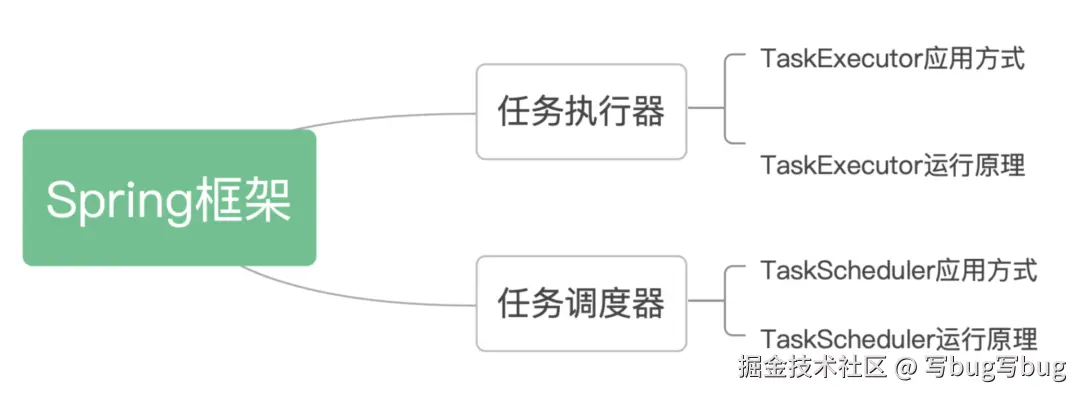
在日常开发过程中,如果想要处理长时间运行的任务,对于任何应用程序开发而言都不是一件容易的事情。有时候,需要异步执行任务或在特定延迟之后执行任务,这可以通过 Spring 的任务执行和任务调度来完成。Spring 框架通过 TaskExecutor 和 TaskScheduler 这两个接口引入了对异步执行和任务调度的抽象。让我们一起来看一下。
Spring 任务执行器
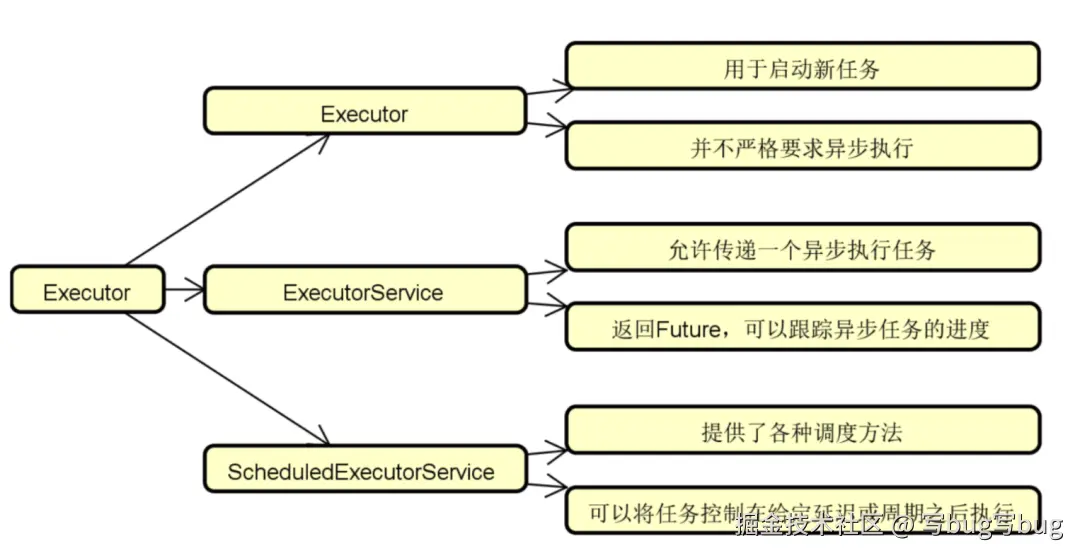
在介绍 Spring 任务执行器之前,要先引出 JDK 中的一个基础并发编程组件,即 Executor 。所谓的 Executor,本质上是在所有内部线程任务执行过程上提供了一个抽象层,并管理线程的整个并发执行流。Executor 是执行任务的入口, JDK 为 Executor 提供了以下三个基本接口,即 Executor、ExecutorService 和 ScheduledExecutorService。
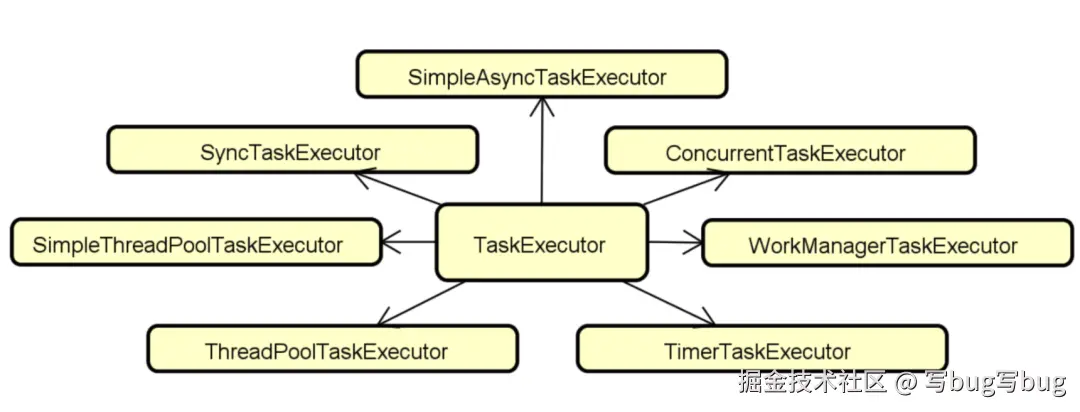
Spring 提供 TaskExecutor 接口作为 Executor 的抽象。TaskExecutor 的实现类有很多,它们提供了针对异步执行过程的各种支持。
接下来,以最基础的 SimpleAsyncTaskExecutor为例,来看看在 Spring 应用程序中执行任务的具体实现过程。
TaskExecutor 应用方式
SimpleAsyncTaskExecutor 为每个任务创建一个新线程,并以异步方式运行,它实现了 AsyncTaskExecutor 接口。可以通过以下方式在 Spring 应用程序中注入一个 SimpleAsyncTaskExecutor。
java
@Bean
AsyncTaskExecutor taskExecutor() {
    SimpleAsyncTaskExecutor taskExecutor = new SimpleAsyncTaskExecutor();
    return taskExecutor;
}
然后,可以构建一个 AsyncTask,并通过 SimpleAsyncTaskExecutor 来异步执行任务。
java
public class AsyncTask {
    @Autowired
    private AsyncTaskExecutor executor;
    public void runTasks() throws Exception {
        for (int i = 1; i <= 5; i++) {
           Runnable task = new SpringTask(" " + i);
           executor.execute(task);
        }
    }
}
这里创建了一个自定义的 SpringTask,这是 JDK 中 Runnable 接口的实现类。
typescript
public class SpringTask implements Runnable {
    privatestaticfinal Logger LOGGER = Logger.getLogger(Task.class);
    private String taskNumber;
    public SpringTask(String taskNumber) {
        this.taskNumber = taskNumber;
    }
    @Override
    public void run() {
        LOGGER.info(Thread.currentThread().getName() + ", Execute Task = " + taskNumber);
        taskProcess();
        LOGGER.info(Thread.currentThread().getName() + ", End");
    }
    private void taskProcess() {
        try {
           Thread.sleep(2000);
        } catch (InterruptedException e) {
           e.printStackTrace();
        }
    }
}
这里通过让执行线程睡眠 2 秒钟的方式来模拟任务的执行时间,并把执行的过程通过日志的方式打印出来。执行这段代码,会在控制台中得到如下输出:
ini
INFO  SpringTask:15 - SimpleAsyncTaskExecutor-3, Execute Task =  3
INFO  SpringTask:15 - SimpleAsyncTaskExecutor-1, Execute Task =  1
INFO  SpringTask:15 - SimpleAsyncTaskExecutor-2, Execute Task =  2
INFO  SpringTask:15 - SimpleAsyncTaskExecutor-5, Execute Task =  5
INFO  SpringTask:15 - SimpleAsyncTaskExecutor-4, Execute Task =  4
INFO  SpringTask:17 - SimpleAsyncTaskExecutor-2, End
INFO  SpringTask:17 - SimpleAsyncTaskExecutor-4, End
INFO  SpringTask:17 - SimpleAsyncTaskExecutor-3, End
INFO  SpringTask:17 - SimpleAsyncTaskExecutor-5, End
INFO  SpringTask:17 - SimpleAsyncTaskExecutor-1, End
显然,基于 SimpleAsyncTaskExecutor,任务与线程之间应该是一对一的执行关系。
TaskExecutor 运行原理
介绍完 Spring 任务执行器的使用方式之后,来进一步分析它的实现原理。同样,还是以前面介绍的 SimpleAsyncTaskExecutor 为例展开讨论。SimpleAsyncTaskExecutor 的类层结构如图所示:

这里的 TaskExecutor 和 AsyncTaskExecutor 都比较好理解,直接看它们的接口定义,如下所示:
java
public interface TaskExecutor extends Executor {
    @Override
    void execute(Runnable task);
}
public interface AsyncTaskExecutor extends TaskExecutor {
    void execute(Runnable task, long startTimeout);
    Future<?> submit(Runnable task);
    <T> Future<T> submit(Callable<T> task);
}
AsyncListenableTaskExecutor 又扩展了 AsyncTaskExecutor,添加了可以返回 ListenableFuture 的方法,ListenableFuture 是 JDK 中 Future 接口的子接口,可用于在任务提交后添加回调。
接下来,来看 AsyncListenableTaskExecutor 中的 execute 方法,如下所示:
java
@Override
public void execute(Runnable task, long startTimeout) {
        Assert.notNull(task, "Runnable must not be null");
        //使用包装器包装任务
        Runnable taskToUse = (this.taskDecorator != null ? this.taskDecorator.decorate(task) : task);
        //启用限流器来执行任务
        if (isThrottleActive() && startTimeout > TIMEOUT_IMMEDIATE) {
           this.concurrencyThrottle.beforeAccess();
           doExecute(new ConcurrencyThrottlingRunnable(taskToUse));
        }
        //不启用限流器来执行任务
        else {
           doExecute(taskToUse);
        }
}
这里引出了限流器的概念,限流器的作用是线程执行的并发度达到阈值则会让后续的线程处于阻塞等待。这是 Spring TaskExecutor 设计上的一个亮点,基本思想如图所示:
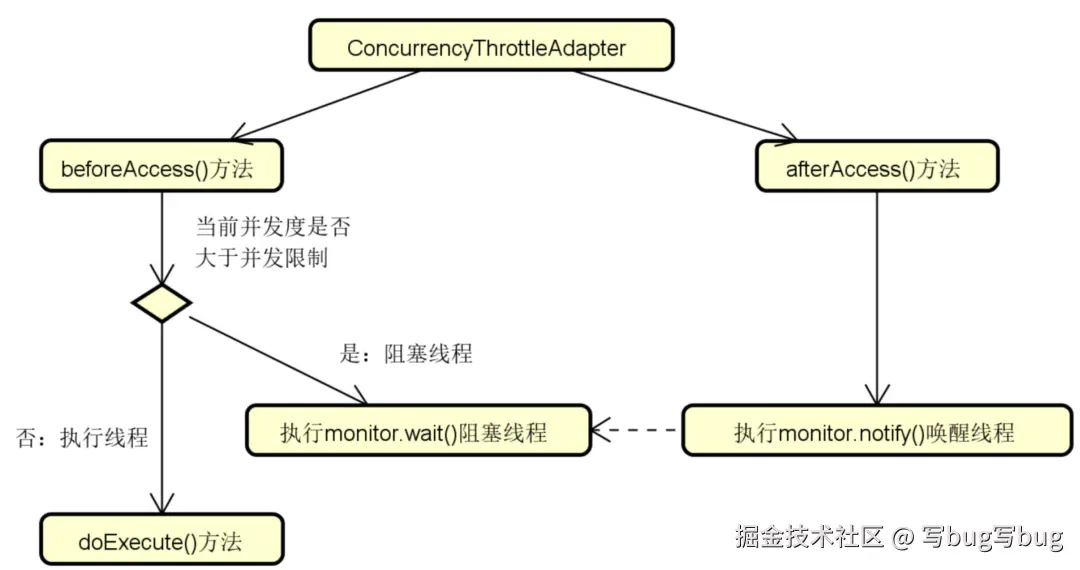
结合图示,不难看出限流器是在线程执行之前进行并发限制的判断,如果需要限流就阻塞线程。而如果任务执行完成后,那就唤醒正在等待的线程继续执行任务。
而真正执行任务的 doExecute() 方法比较简单,单独从线程工厂 ThreadFactory 获取线程,或者直接创建一个新的线程进行执行即可,如下所示:
arduino
protected void doExecute(Runnable task) {
    Thread thread = (this.threadFactory != null ? this.threadFactory.newThread(task) : createThread(task));
    thread.start();
}
Spring 任务调度器
介绍完 Spring 任务执行器,接下来讨论 Spring 任务调度器。有时,我们需要以固定的时间间隔执行任务,就可以通过任务调度器来实现。基于 Spring,将看到如何使用一些注解来对任务进行调度。
TaskScheduler 应用方式
在 Spring 中,可以借助@EnableScheduling 注解来启用任务调度。
less
@Configuration
@EnableScheduling
public class SpringSchedulingExample
一旦启用了任务调度,Spring 将自动注册一个内部 BeanPostProcessor,它将在 Spring 管理的 Bean 上找到添加了@Scheduled 注解的方法。@Scheduled 注解的使用方法如下所示:
typescript
@Scheduled(fixedDelay = 2000)
public void scheduledTask() {
     LOGGER.info("Execute task " + new Date());
}
在这里,使用@Scheduled 注解为 scheduledTask() 设置了调度任务,即通过 fixedDelay 属性每两秒执行一次该方法。执行该方法,可以在控制台上看到如下信息:
sql
INFO  SpringSchedulingExample:17 - Execute task Sat May 01 20:06:11 CST 2021
INFO  SpringSchedulingExample:17 - Execute task Sat May 01 20:06:13 CST 2021
INFO  SpringSchedulingExample:17 - Execute task Sat May 01 20:06:15 CST 2021
INFO  SpringSchedulingExample:17 - Execute task Sat May 01 20:06:17 CST 2021
INFO  SpringSchedulingExample:17 - Execute task Sat May 01 20:06:19 CST 2021
当然,还可以使用其他调度属性,@Scheduled 注解的完整定义如下所示:
less
@Target({ElementType.METHOD, ElementType.ANNOTATION_TYPE})
@Retention(RetentionPolicy.RUNTIME)
@Documented
@Repeatable(Schedules.class)
public @interface Scheduled {
    //cron 表达式
    String cron() default "";
    //由 cron 表达式进行解析的时间区域
    String zone() default "";
    //固定延迟时间
    long fixedDelay() default -1;
    //字符串形式的固定延迟时间
    String fixedDelayString() default "";
    //固定周期
    long fixedRate() default -1;
    //字符串形式的固定周期
    String fixedRateString() default "";
    //初始延迟时间
    long initialDelay() default -1;
    //字符串形式的初始延迟时间
    String initialDelayString() default "";
}
这些属性都很简单,唯一需要说明一下的是 fixedRate。举个例子,如果在某个方法上设置 fiexdRate=3000,而执行该方法所花的时间是一秒,那么两秒后就会再次执行该方法。
TaskScheduler 运行原理
在 Spring 的 TaskScheduler 出现之前,可以使用 JDK 中的 Timer 或第三方的 Quartz 组件类实现调度功能。而 TaskScheduler 的核心优势就是为开发人员提供了一种抽象,使得执行定时任务的代码不需要指定特定的定时框架。TaskScheduler 接口的定义如下所示:
arduino
public interface TaskScheduler {
    ScheduledFuture<?> schedule(Runnable task, Trigger trigger);
    ScheduledFuture<?> schedule(Runnable task, Date startTime);
    ScheduledFuture<?> scheduleAtFixedRate(Runnable task, Date startTime, long period);
    ScheduledFuture<?> scheduleAtFixedRate(Runnable task, long period);
    ScheduledFuture<?> scheduleWithFixedDelay(Runnable task, Date startTime, long delay);
    ScheduledFuture<?> scheduleWithFixedDelay(Runnable task, long delay);
}
TaskScheduler 中各个方法的含义可以结合@Scheduled 注解的说明进行理解,而这些方法都返回了一个 JDK 中的 ScheduledFuture 对象,该对象是对 Future 的扩展。
在 Spring 中,TaskScheduler 接口的代表性实现就是 ThreadPoolTaskScheduler,其类层结构如图所示:
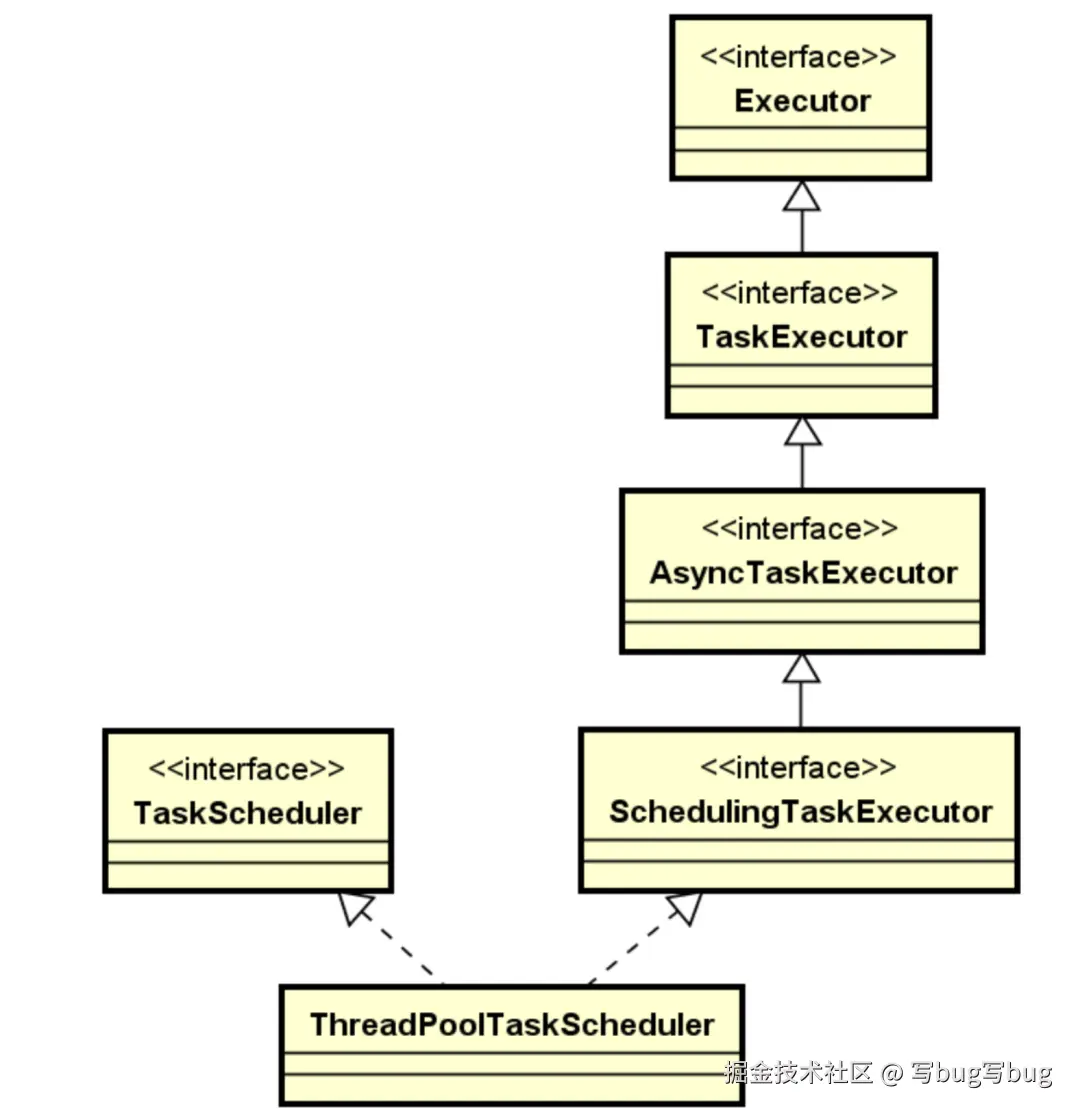
翻阅 ThreadPoolTaskScheduler 类的源代码,发现在该类中存在如下所示的一个变量定义。
arduino
private ScheduledExecutorService scheduledExecutor;在前面介绍 JDK Executor 时,已经引出了 ScheduledExecutorService,它为开发人员提供了各种调度方法。所以,看到这里,不难理解,ThreadPoolTaskScheduler 实际上就是将各种调度操作委托给了这个 ScheduledExecutorService。通过如下所示的 schedule 方法实现过程印证了这一点。
typescript
@Override
public ScheduledFuture<?> schedule(Runnable task, Date startTime) {
        ScheduledExecutorService executor = getScheduledExecutor();
        long initialDelay = startTime.getTime() - System.currentTimeMillis();
        try {
           return executor.schedule(errorHandlingTask(task, false), initialDelay, TimeUnit.MILLISECONDS);
        }
        catch (RejectedExecutionException ex) {
           throw new TaskRejectedException("Executor [" + executor + "] did not accept task: " + task, ex);
        }
}
可以看到,这里首先获取一个 ScheduledExecutorService,然后通过它的 schedule 方法完成调度。而 ScheduledExecutorService 的创建过程也很简单,如下所示:
arduino
protected ScheduledExecutorService createExecutor(
           int poolSize, ThreadFactory threadFactory, RejectedExecutionHandler rejectedExecutionHandler) {
    return new ScheduledThreadPoolExecutor(poolSize, threadFactory, rejectedExecutionHandler);
}
这样,就把 JDK 中的 ScheduledExecutorService 和 Spring 中的 TaskScheduler 关联了起来,从而完成了对任务调度过程的剖析。
总结
针对并发编程,我们可以使用 JDK 所提供的 Thread 类和 Runnable 接口来创建和管理多线程。但由于这些技术组件过于底层,所以在日常开发过程中,我一般不推荐你使用它们来创建多线程应用程序。
而 JDK 并发包中的 Executor 等组件虽然经过高度抽象,为开发人员提供了高层次的 API,但由于并发编程涉及到多线程之间的协作和交互,合理使用这些组件对开发人员的要求也很高。
Spring 框架充分考虑到了这些问题,并结合常见的应用场景提供了任务执行器和任务调度器组件。在今天的内容中,我们从应用方法 和 运行原理这两个维度对这两款技术组件进行了详细地分析,帮助你在开发过程中能够更好地实现各种并发编程需求。