一、Nginx 概述和安装
Nginx是免费的、开源的、高性能的HTTP和反向代理服务器、邮件代理服务器、以及TCP/UDP代理服务器。
Nginx 功能介绍
静态的web资源服务器html,图片,js,css,txt等静态资源
http/https协议的反向代理
结合FastCGI/uWSGI/SCGI等协议反向代理动态资源请求
tcp/udp协议的请求转发(反向代理)
imap4/pop3协议的反向代理
基础特性
模块化设计,较好的扩展性
高可靠性
支持热部署:不停机更新配置文件,升级版本,更换日志文件
低内存消耗:10000个keep-alive连接模式下的非活动连接,仅需2.5M内存
event-driven,aio,mmap,sendfile
Web 服务相关的功能
虚拟主机(server)
支持 keep-alive 和管道连接(利用一个连接做多次请求)
访问日志(支持基于日志缓冲提高其性能)
url rewirte
路径别名
基于IP及用户的访问控制
支持速率限制及并发数限制
重新配置和在线升级而无须中断客户的工作进程
Nginx 安装
官方源码包下载地址:https://nginx.org/en/download.html
编译安装 Nginx
root@Nginx \~# dnf install gcc pcre-devel zlib-devel openssl-devel -y
root@Nginx nginx# tar zxf nginx-1.24.0.tar.gz
root@Nginx nginx-1.24.0# useradd -s /sbin/nologin -M nginx
root@Nginx nginx# cd nginx-1.24.0/
root@Nginx nginx-1.24.0# ./configure --prefix=/usr/local/nginx \
--user=nginx \ # 指定nginx运行用户
--group=nginx \ # 指定nginx运行组
--with-http_ssl_module \ # 支持https://
--with-http_v2_module \ # 支持http版本2
--with-http_realip_module \ # 支持ip透传
--with-http_stub_status_module \ # 支持状态页面
--with-http_gzip_static_module \ # 支持压缩
--with-pcre \ # 支持正则
--with-stream \ # 支持tcp反向代理
--with-stream_ssl_module \ # 支持tcp的ssl加密
--with-stream_realip_module # 支持tcp的透传ip
root@Nginx nginx-1.24.0# make && make install
root@Nginx \~# vim ~/.bash_profile
export PATH=$PATH:/usr/local/nginx/sbin
root@Nginx \~# source ~/.bash_profile
Nginx 启动文件
root@Nginx \~# vim /lib/systemd/system/nginx.service
Unit
Description=The NGINX HTTP and reverse proxy server
After=syslog.target network-online.target remote-fs.target nss-lookup.target
Wants=network-online.target
Service
Type=forking
PIDFile=/usr/local/nginx/logs/nginx.pid
ExecStartPre=/usr/local/nginx/sbin/nginx -t
ExecStart=/usr/local/nginx/sbin/nginx
ExecReload=/usr/local/nginx/sbin/nginx -s reload
ExecStop=/bin/kill -s QUIT $MAINPID
PrivateTmp=true
Install
WantedBy=multi-user.target
root@Nginx \~# systemctl daemon-reload
root@Nginx \~# systemctl start nginx
二、平滑升级和回滚
root@Nginx nginx# tar zxf nginx-1.26.1.tar.gz
root@Nginx nginx# cd nginx-1.26.1/
root@Nginx nginx-1.26.1# ./configure --with-http_ssl_module --withhttp_v2_module
--with-http_realip_module --with-http_stub_status_module --withhttp_gzip_static_module
--with-pcre --with-stream --with-stream_ssl_module --
with-stream_realip_module
root@Nginx nginx-1.26.1# make
root@Nginx nginx-1.26.1# ll objs/nginx /usr/local/nginx/sbin/nginx
-rwxr-xr-x 1 root root 1239416 Jul 18 15:08 objs/nginx
-rwxr-xr-x 1 root root 5671488 Jul 18 11:41 /usr/local/nginx/sbin/nginx
root@Nginx \~# cd /usr/local/nginx/sbin/
root@Nginx sbin# cp nginx nginx.24
root@Nginx sbin# \cp -f /root/nginx/nginx-1.26.1/objs/nginx
/usr/local/nginx/sbin
root@Nginx sbin# nginx -t
nginx: the configuration file /usr/local/nginx/conf/nginx.conf syntax is ok
nginx: configuration file /usr/local/nginx/conf/nginx.conf test is successful
root@Nginx sbin# kill -USR2 39014 #nginx worker ID

root@Nginx sbin# kill -WINCH 48732
root@Nginx sbin# ps aux | grep nginx
root 48732 0.0 0.1 9868 2436 ? Ss 14:17 0:00 nginx: master
process /usr/local/nginx/sbin/nginx
root 52075 0.0 0.3 9876 6528 ? S 15:41 0:00 nginx: master
process /usr/local/nginx/sbin/nginxnobody 52076 0.0 0.2 14208 4868 ? S 15:41 0:00 nginx: worker process

root@Nginx sbin# cp nginx nginx.26
root@Nginx sbin# ls
nginx nginx.24 nginx.26
root@Nginx sbin# mv nginx.24 nginx
root@Nginx sbin# kill -HUP 48732
root@Nginx sbin# ps aux | grep nginx
root 48732 0.0 0.1 9868 2436 ? Ss 14:17 0:00 nginx: master
process /usr/local/nginx/sbin/nginx
root 52075 0.0 0.3 9876 6528 ? S 15:41 0:00 nginx: master
process /usr/local/nginx/sbin/nginx
nobody 52076 0.0 0.2 14208 5124 ? S 15:41 0:00 nginx: worker
process
nobody 52130 0.0 0.2 14200 4868 ? S 16:30 0:00 nginx: worker
process
root@Nginx sbin# kill -WINCH 52075
root 48732 0.0 0.1 9868 2436 ? Ss 14:17 0:00 nginx: master
process /usr/local/nginx/sbin/nginx
root 52075 0.0 0.3 9876 6528 ? S 15:41 0:00 nginx: master
process /usr/local/nginx/sbin/nginx
nobody 52130 0.0 0.2 14200 4868 ? S 16:30 0:00 nginx: worker
process
root 52137 0.0 0.1 221664 2176 pts/0 S+ 16:31 0:00 grep --
color=auto nginx

三、Nginx 核心配置详解
nginx 官方帮助文档: http://nginx.org/en/docs/
Nginx的配置文件的组成部分:
主配置文件:nginx.conf
子配置文件: include conf.d/*.conf
fastcgi, uwsgi,scgi 等协议相关的配置文件
mime.types:支持的mime类型,MIME(Multipurpose Internet Mail Extensions)多用途互联网邮
件扩展类型,MIME消息能包含文本、图像、音频、视频以及其他应用程序专用的数据,是设定某
种扩展名的文件用一种应用程序来打开的方式类型,当该扩展名文件被访问的时候,浏览器会自动
使用指定应用程序来打开。多用于指定一些客户端自定义的文件名,以及一些媒体文件打开方式。
实现 nginx 的高并发配置
root@Nginx \~# ulimit -n 102400
root@Nginx \~# ab -c 5000 -n 10000 http://10.0.0.8/
#默认配置不支持高并发,会出现以下错误日志
root@Nginx \~# tail /apps/nginx/logs/error.log
2020/09/24 21:19:33 crit 41006#0: *1105860 open() "/apps/nginx/html/50x.html"
failed (24: Too many open files), client: 10.0.0.7, server: localhost, request:
"GET / HTTP/1.0", host: "10.0.0.8"
2020/09/24 21:19:33 crit 41006#0: accept4() failed (24: Too many open files)
2020/09/24 21:19:33 crit 41006#0: *1114177 open()
"/apps/nginx/html/index.html" failed (24: Too many open files), client: 10.0.0.7,
server: localhost, request: "GET / HTTP/1.0", host: "10.0.0.8"
#修改配置
root@Nginx \~# vim /etc/security/limits.conf
* - nproc 100000
root@Nginx \~# vim /apps/nginx/conf/nginx.conf
worker_rlimit_nofile 100000;
root@Nginx \~# systemctl restart nginx
root 与 alias
root:指定web的家目录,在定义location的时候,文件的绝对路径等于 root+location
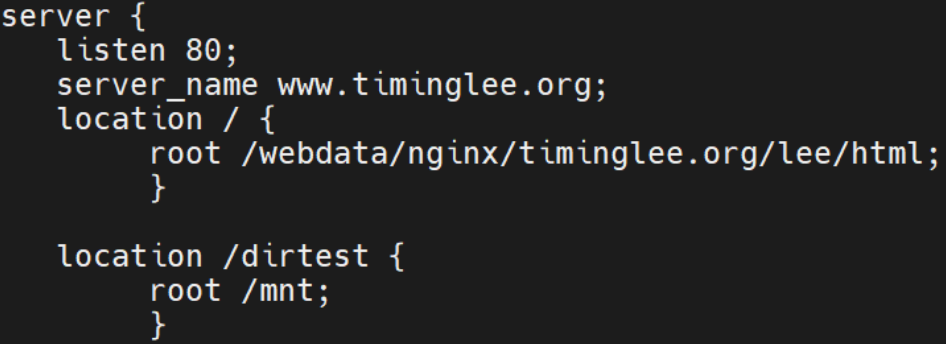
root@Nginx \~# mkdir /mnt/dirtest/
root@Nginx \~# echo dirtest page > /mnt/dirtest/index.html
root@Nginx \~# nginx -s reload
#重启Nginx并访问测试
root@node100 \~# curl lee.timinglee.org/dirtest/dirtest page
alias:定义路径别名,会把访问的路径重新定义到其指定的路径,文档映射的另一种机制;仅能用于
location上下文,此指令使用较少
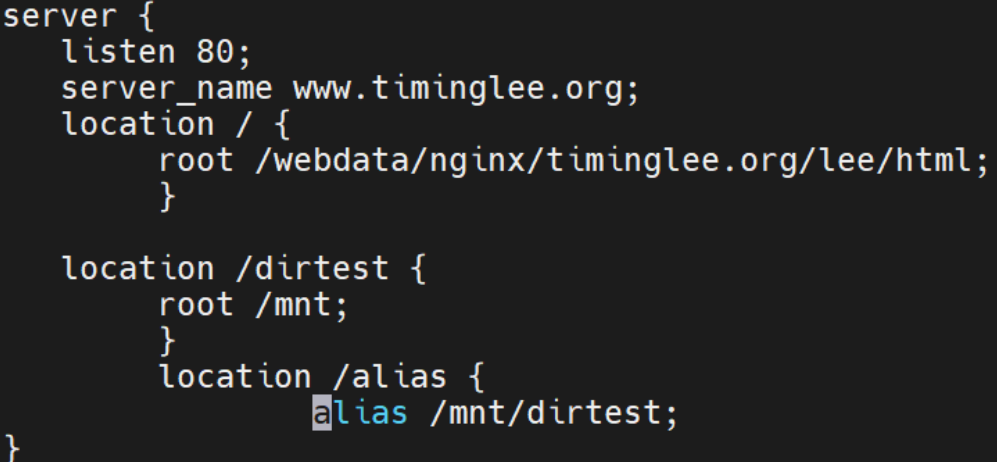
#重启Nginx并访问测试
root@node100 \~# curl lee.timinglee.org/alias/dirtest page
location 的详细使用
匹配案例-精确匹配
root@Nginx \~# mkdir /webdata/nginx/timinglee.org/lee/images -p
root@Nginx \~# ls /webdata/nginx/timinglee.org/lee/images
root@Nginx \~# vim /usr/local/nginx/conf.d/vhosts.conf
server {
listen 80;
server_name lee.timinglee.org;
location / {
root /webdata/nginx/timinglee.org/lee/html;
}
location = /logo.png {
root /webdata/nginx/timinglee.org/lee/images;
}
}
匹配案例-区分大小写
server {
listen 80;
server_name lee.timinglee.org;
location / {
root /webdata/nginx/timinglee.org/lee/html;
}
location ~ /logo.PNG {
root /webdata/nginx/timinglee.org/lee/images;
}
}
匹配案例-不区分大小写
server {
listen 80;
server_name lee.timinglee.org;
location / {
root /webdata/nginx/timinglee.org/lee/html;
}
location ~* /logo.PNG {
root /webdata/nginx/timinglee.org/lee/images;
}
}
匹配案例-URI开始
root@Nginx \~# mkdir /webdata/nginx/timinglee.org/lee/images/images{1,2}
root@Nginx \~# echo image1 >
/webdata/nginx/timinglee.org/lee/images/images1/index.html
root@Nginx \~# echo image1 >
/webdata/nginx/timinglee.org/lee/images/images2/index.html
server {
listen 80;
server_name lee.timinglee.org;
location / {
root /webdata/nginx/timinglee.org/lee/html;
}
location ^~ /images {
root /webdata/nginx/timinglee.org/lee/images;
index index.html;
}
location /images1 {
root /webdata/nginx/timinglee.org/lee/images;
}
}
匹配案例-文件名后缀
root@Nginx \~# mkdir /webdata/nginx/timinglee.org/lee/images
#上传一个图片到/webdata/nginx/timinglee.org/lee/images
server {
listen 80;
server_name lee.timinglee.org;
location / {
root /webdata/nginx/timinglee.org/lee/html;
}
location ~* \.(gif|jpg|jpeg|bmp|png|tiff|tif|ico|wmf|js|css)$ {
root /webdata/nginx/timinglee.org/lee/images;
index index.html;
}
}
匹配案例-优先级
server {
listen 80;
server_name lee.timinglee.org;
location / {
root /webdata/nginx/timinglee.org/lee/html;
}
location ^~ /images {
root /webdata/nginx/timinglee.org/lee/images;
index index.html;
}
location /images1 {
root /webdata/nginx/timinglee.org/lee/images;
}
location ~* \.(gif|jpg|jpeg|bmp|png|tiff|tif|ico|wmf|js)$ {
root /data/nginx/static3;
index index.html;
}
}
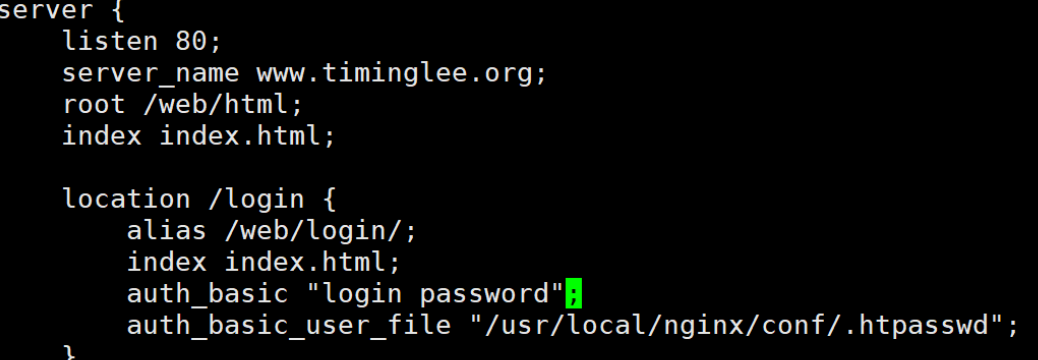
Nginx 账户认证功能
root@Nginx \~# htpasswd -cmb /usr/local/nginx/conf/.htpasswd admin lee #-b 表
示非交互建立用户认证
Adding password for user admin
root@Nginx \~# htpasswd -mb /usr/local/nginx/conf/.htpasswd lee lee
Adding password for user lee
root@Nginx \~# cat /usr/local/nginx/conf/.htpasswd
admin:apr1haGCKgCT$myogggALmqNecTyNupsWQ/
lee:apr1H97AyQPF$kGU.Tc4zn1E4Zkp/M4R6G.
}
root@Nginx \~# mkdir /webdata/nginx/timinglee.org/lee/login
root@Nginx \~# echo login > /webdata/nginx/timinglee.org/lee/login/index.html
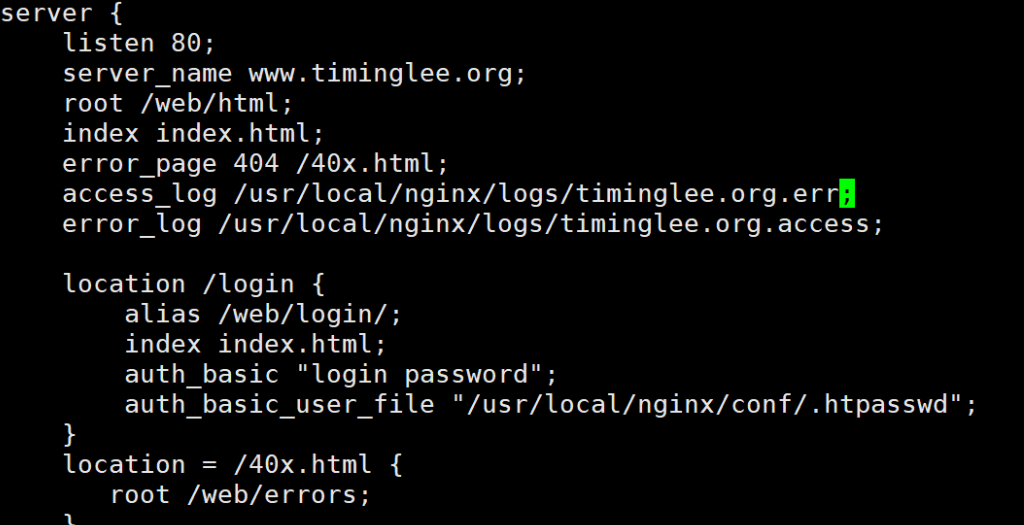
root@Nginx \~# vim /usr/local/nginx/conf.d/vhosts.conf
server {
listen 80;
server_name lee.timinglee.org;
location /login {
root /webdata/nginx/timinglee.org/lee;
index index.html;
auth_basic "login password";
auth_basic_user_file "/usr/local/nginx/conf/.htpasswd";
}
#重启Nginx并访问测试
root@node100 \~# curl lee.timinglee.org/login/ -u lee:lee
login
root@node100 \~# curl lee.timinglee.org/login/ -u admin:lee
login
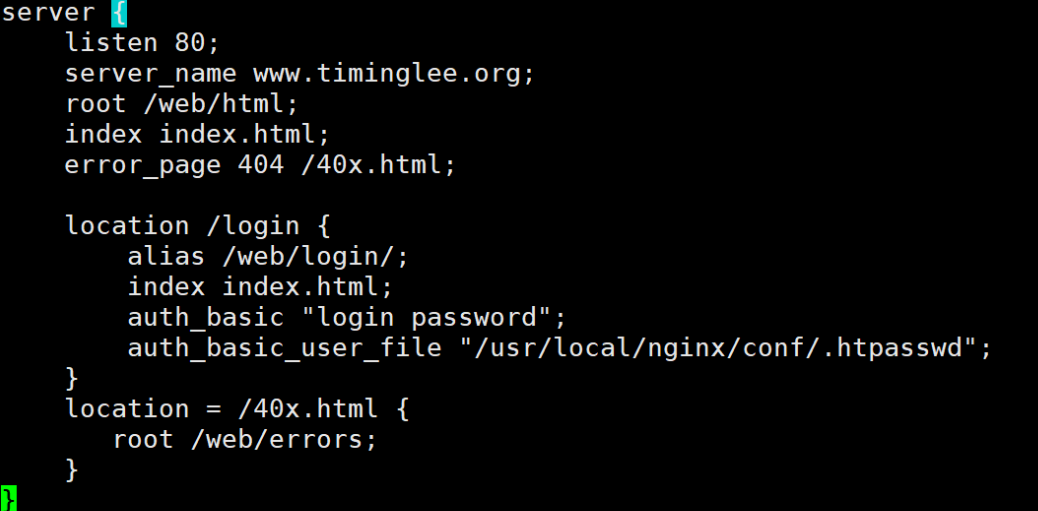
自定义错误页面

#重启Nginx并访问测试
root@node100 \~# curl lee.timinglee.org/login/ -u lee:lee
login
root@node100 \~# curl lee.timinglee.org/login/ -u admin:lee
login
自定义错误页面
root@Nginx \~# mkdir /webdata/nginx/timinglee/lee/errors -p
root@Nginx \~# echo error page > /webdata/nginx/timinglee/lee/errors/40x.html
测试:
root@node100 \~# curl lee.timinglee.org/haha
error page
自定义错误日志
root@Nginx \~# mkdir "/var/log/nginx" -p
root@Nginx \~# vim /usr/local/nginx/conf.d/vhosts.conf
#重启nginx并访问不存在的页面进行测试并验证是在指定目录生成新的日志文件
检测文件是否存在
root@Nginx \~# echo "index.html is not exist" >
/webdata/nginx/timinglee.org/lee/error/default.html
root@Nginx \~# vim /usr/local/nginx/conf.d/vhosts.conf
测试:
curl lee.timinglee.org

四、Nginx 高级配置
Nginx 状态页
#配置示例:
location /nginx_status {
stub_status;
auth_basic "auth login";
auth_basic_user_file /apps/nginx/conf/.htpasswd;
allow 192.168.0.0/16;
allow 127.0.0.1;
deny all;
}
#状态页用于输出nginx的基本状态信息:
#输出信息示例:
Active connections: 291
server accepts handled requests
16630948 16630948 31070465
上面三个数字分别对应accepts,handled,requests三个值
Reading: 6 Writing: 179 Waiting: 106
Active connections: #当前处于活动状态的客户端连接数
#包括连接等待空闲连接数=reading+writing+waiting
accepts: #统计总值,Nginx自启动后已经接受的客户端请求连接的总数。
handled: #统计总值,Nginx自启动后已经处理完成的客户端请求连接总数
#通常等于accepts,除非有因worker_connections限制等被拒绝的
连接
requests: #统计总值,Nginx自启动后客户端发来的总的请求数
Reading: #当前状态,正在读取客户端请求报文首部的连接的连接数
#数值越大,说明排队现象严重,性能不足
Writing: #当前状态,正在向客户端发送响应报文过程中的连接数,数值越大,说明
访问量很大
Waiting: #当前状态,正在等待客户端发出请求的空闲连接数
开启 keep-alive的情况下,这个值等于active --
(reading+writing)
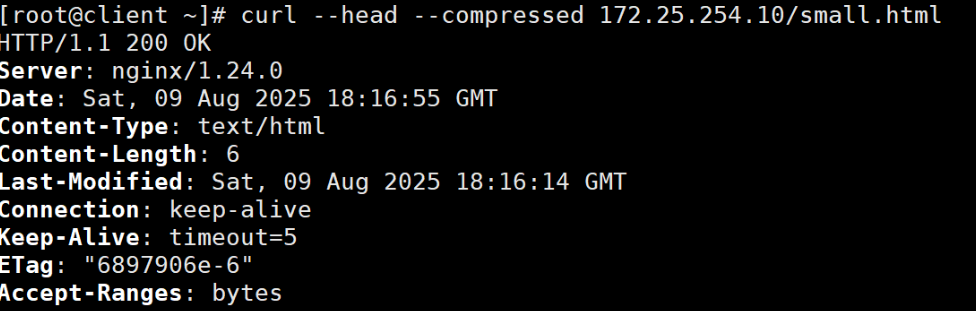
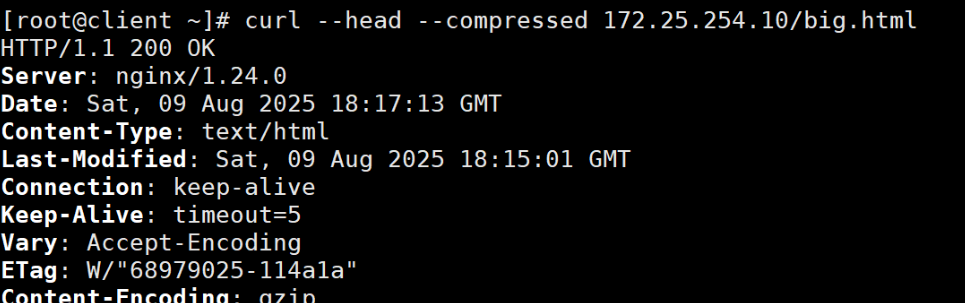
Nginx 压缩功能
root@webservera \~# cp /usr/local/nginx/logs/access.log /web/html/big.html
root@webservera \~# echo hello > /web/html/small.html
root@webservera \~# vim /usr/local/nginx/conf/nginx.conf
gzip on;
gzip_comp_level 5;
gzip_min_length 1k;
gzip_types text/plain text/css application/javascript application/x-javascript
application/xml text/javascript application/x-httpd-php
image/gif image/png;
gzip_vary on;
gzip_proxied any;
Nginx的版本隐藏
root@Nginx nginx-1.26.1# vim src/core/nginx.h
#define nginx_version 1026001
#define NGINX_VERSION "1.0"
#define NGINX_VER "HAHA/" NGINX_VERSION
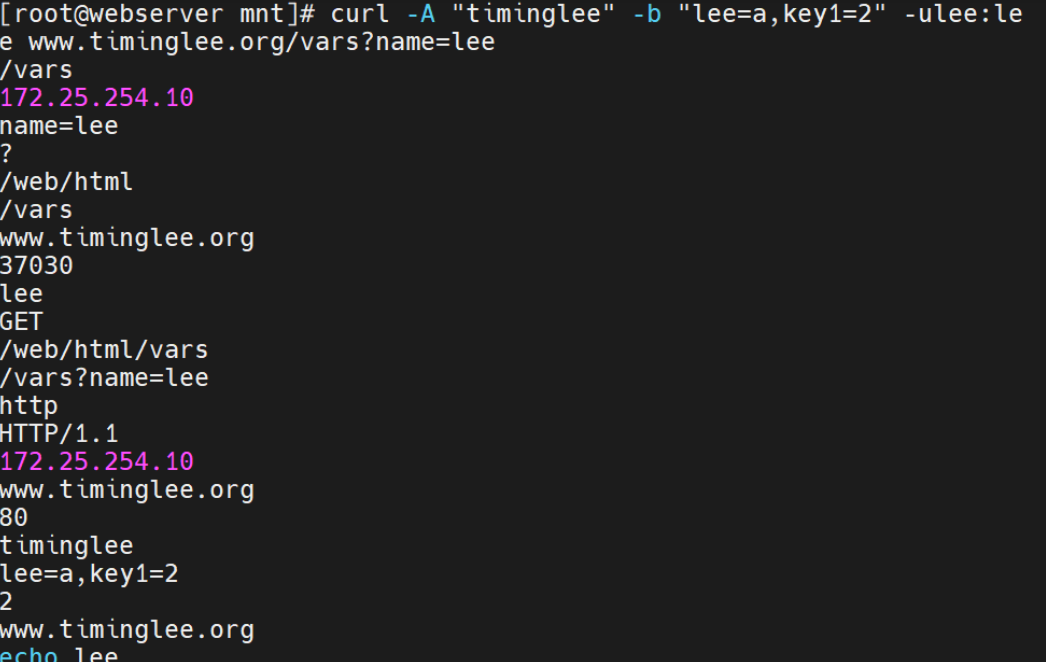
内置变量
官方文档http://nginx.org/en/docs/varindex.html
root@Nginx \~# vim /usr/local/nginx/conf.d/vhosts.conf
server {
listen 80;
server_name lee.timinglee.org;
root /webdata/nginx/timinglee.org/lee;
location /var {
default_type text/html;
echo $remote_addr;
echo $args;
echo $document_root;
echo $document_uri;
echo $host;
echo $http_user_agent;
echo $request_filename;
echo $scheme;
echo scheme://hostdocument_uri?args;
echo $http_cookie;
echo $cookie_key2;
echo $http_Accept;
}
}
五、Nginx Rewrite 相关功能
ngx_http_rewrite_module 模块指令
官方文档: https://nginx.org/en/docs/http/ngx_http_rewrite_module.html
if 指令
官方文档:https://nginx.org/en/docs/http/ngx_http_rewrite_module.html#if
set指令
root@Nginx \~# vim /usr/local/nginx/conf.d/vhosts.conf
server {
listen 80;
server_name lee.timinglee.org;
root /webdata/nginx/timinglee.org/lee;
location /test3{
set $name lee;
echo $name;
}
}
测试:
root@client \~# curl lee.timinglee.org/test3
lee
break 指令
root@Nginx \~# vim /usr/local/nginx/conf.d/vhosts.conf
server {
listen 80;
server_name lee.timinglee.org;
root /webdata/nginx/timinglee.org/lee;
location /break{
default_type text/html;
set $name lee;
echo $name;
break;
set port server_port;
echo $port;
}
}
root@client \~# curl lee.timinglee.org/break #当未添加break时
lee
80
root@client \~# curl lee.timinglee.org/break #添加break后
lee
return 指令
server {
listen 80;
server_name lee.timinglee.org;
root /webdata/nginx/timinglee.org/lee;
location /return {
default_type text/html;
if ( !-e $request_filename){
return 301 http://www.baidu.com;
#return 666 "$request_filename is not exist";
}
echo "$request_filename is exist";
}
}
测试:
root@client \~# curl lee.timinglee.org/return
/webdata/nginx/timinglee.org/lee/return is exist
root@client \~# curl lee.timinglee.org/return1
/webdata/nginx/timinglee.org/lee/return1 is not exist
#测试return 301 http://www.baidu.com;
rewrite 指令
官方文档:https://nginx.org/en/docs/http/ngx_http_rewrite_module.html#rewrite
Nginx 防盗链
实现盗链
#新建一个主机172.25.254.20,盗取另一台主机lee.timinglee.org/images/lee.png的图片
root@client \~# yum install httpd -y
root@client html# vim /var/www/html/index.html
#准备盗链web页面:
<html>
<head>
<meta http-equiv=Content-Type content="text/html;charset=utf-8">
<title>盗链</title>
</head>
<body>
<img src="http://www.timinglee.org/images/lee.png" >
<h1 style="color:red">欢迎大家</h1>
<p><a href=http://www.timinglee.org>狂点老李</a>出门见喜</p>
</body>
</html>
定义防盗链
root@Nginx \~# vim /usr/local/nginx/conf.d/vhosts.conf
server {
listen 80;
server_name www.timinglee.org;
root /data/web/html;
index index.html;
location / {
valid_referers none blocked server_names *.timinglee.org ~/.baidu/.;
if ($invalid_referer){
return 404;
}
}
location /images {
valid_referers none blocked server_names *.timinglee.org ~/.baidu/.;
if ($invalid_referer){
rewrite ^/ http://www.timinglee.org/daolian.png permanent; #注意此图片不能和正常图片放在一个目录中
}
}
}
#重启Nginx并访问测试
六、Nginx 反向代理功能
实现 http 反向代理
官方文档: https://nginx.org/en/docs/http/ngx_http_proxy_module.html
反向代理单台 web 服务器
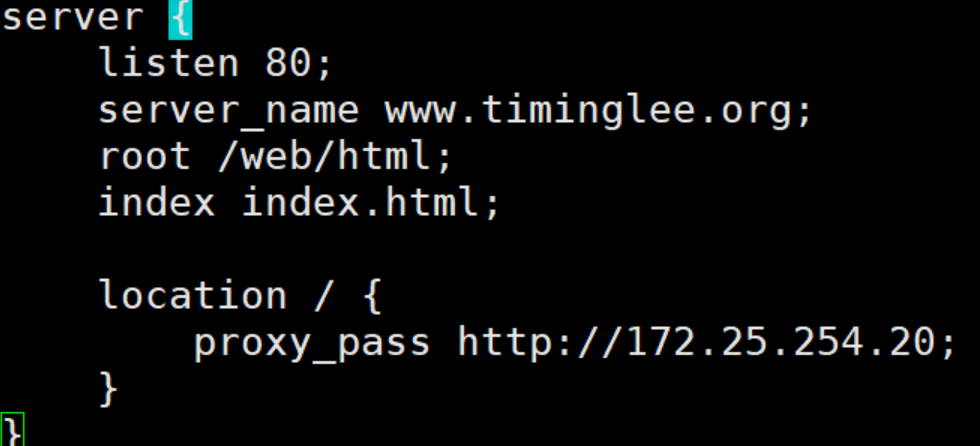
root@webservera \~# vim /usr/local/nginx/conf.d/vhosts.conf
root@webservera \~# nginx -s reload
#测试
root@client \~# curl www.timinglee.org
172.25.254.20
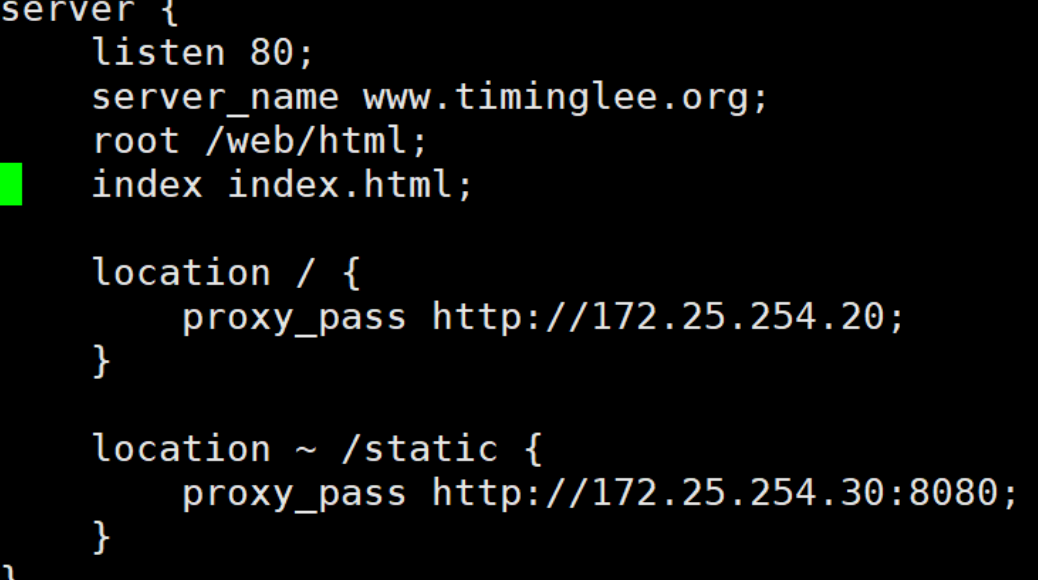
指定 location 实现反向代理
root@webservera \~# vim /usr/local/nginx/conf.d/vhosts.conf
root@webservera \~# nginx -s reload
#后端web服务器必须要有相对于的访问URL
root@RS1 \~# echo 172.25.254.20 > /var/www/html/index.html
root@RS2 \~# vim /etc/httpd/conf/httpd.conf
Listen 8080
root@RS2 \~# systemctl restart httpd
root@RS2 \~# mkdir /var/www/html/static
root@RS2 \~# echo static 172.25.254.30 > /var/www/html/static/index.html
#测试
root@client \~# curl www.timinglee.org/static/
static 172.25.254.30
root@client \~# curl www.timinglee.org
172.25.254.20
http 反向代理负载均衡
官方文档:https://nginx.org/en/docs/http/ngx_http_upstream_module.html
实现 Nginx 四层负载均衡
官方文档:https://nginx.org/en/docs/stream/ngx_stream_proxy_module.html
tcp负载均衡配置参数
stream { #定义stream相关的服务;
Context:main
upstream backend { #定义后端服务器
hash $remote_addr consistent; #定义调度算法
server backend1.example.com:12345 weight=5; #定义具体server
server 127.0.0.1:12345 max_fails=3 fail_timeout=30s;
server unix:/tmp/backend3;
}
upstream dns { #定义后端服务器
server 10.0.0.1:53; #定义具体server
server dns.example.com:53;
}
server { #定义server
listen 12345; #监听IP:PORT
proxy_connect_timeout 1s; #连接超时时间
proxy_timeout 3s; #转发超时时间
proxy_pass backend; #转发到具体服务器组
}
server {
listen 127.0.0.1:53 udp reuseport;
proxy_timeout 20s;
proxy_pass dns;
}
server {
listen ::1:12345;
proxy_pass unix:/tmp/stream.socket;
}
}
负载均衡实例: MySQL
在RS1与RS2上安装mysql
RS1
root@RS1 \~# yum install mariadb-server -y
root@RS1 \~# vim /etc/my.cnf.d/mariadb-server.cnf
mysqld
server-id=20
root@RS1 \~# systemctl start mariadb
root@RS1 \~# mysql -e "grant all on *.* to lee@'%' identified by 'lee';"
RS2
root@RS2 \~# yum install mariadb-server -y
root@RS2 \~# vim /etc/my.cnf.d/mariadb-server.cnf
mysqld
server-id=30
root@RS2 \~# systemctl start mariadb
root@RS2 \~# mysql -e "grant all on *.* to lee@'%' identified by 'lee';"


nginx配置
root@webservera \~# vim /usr/local/nginx/conf/nginx.conf
include /usr/local/nginx/tcp.d/*.conf;
root@webservera \~# mkdir -p /usr/local/nginx/tcp.d
root@webservera \~# vim /usr/local/nginx/tcp.d/mysql.conf
stream {
upstream mysql_server {
server 172.25.254.20:3306 max_fails=3 fail_timeout=30s;
server 172.25.254.30:3306 max_fails=3 fail_timeout=30s;
}
server {
listen 172.25.254.10:3306;
proxy_pass mysql_server;
proxy_connect_timeout 30s;
proxy_timeout 300s;
}
}
#重启nginx并访问测试
root@webservera \~# nginx -s reload
#测试通过nginx负载连接MySQL:
root@RS2 \~# mysql -ulee -plee -h172.25.254.10 -e "select @@server_id"
+-------------+
| @@server_id |
+-------------+
| 20 |
+-------------+
root@RS2 \~# mysql -ulee -plee -h172.25.254.10 -e "select @@server_id"
+-------------+
| @@server_id |
+-------------+
| 30 |
+-------------+
root@RS2 \~#
#在172.25.254.20停止MySQL服务
#再次测试访问,只会看到mysql-server1.timinglee.org进行响应
root@RS2 \~# mysql -ulee -plee -h172.25.254.10 -e "select @@server_id"
+-------------+
| @@server_id |
+-------------+
| 30 |
+-------------+
root@RS2 \~# mysql -ulee -plee -h172.25.254.10 -e "select @@server_id"
+-------------+
| @@server_id |
+-------------+
| 30 |
+-------------+
udp 负载均衡实例: DNS
root@webservera \~# vim /usr/local/nginx/tcp.d/mysql.conf
stream {
upstream dns_server {
server 172.25.254.20:53 max_fails=3 fail_timeout=30s;
server 172.25.254.30:53 max_fails=3 fail_timeout=30s;
}
server {
listen 172.25.254.10:53 udp;
proxy_pass dns_server;
proxy_timeout 1s;
proxy_responses 1;
}
}
root@webservera \~# nginx -s reload
root@webservera \~# systemctl restart nginx.service
在RS1与RS2上下载yum install bind bind-utils
RS1
root@RS1 \~# vi /etc/named.conf
listen-on port 53 { 127.0.0.1;172.25.254.20; };
root@RS1 \~# systemctl restart named
root@RS1 \~# sudo named-checkconf
RS2
root@RS2 \~# vi /etc/named.conf
listen-on port 53 { 127.0.0.1;172.25.254.30; };
root@RS2 \~# systemctl restart named
root@RS2 \~# sudo named-checkconf
#测试
root@RS2 \~#dig www.timinglee.org @172.25.254.10
; <<>> DiG 9.16.23 <<>> www.timinglee.org @172.25.254.10
;; global options: +cmd
;; Got answer:
;; ->>HEADER<<- opcode: QUERY, status: NOERROR, id: 8932
;; flags: qr aa rd ra; QUERY: 1, ANSWER: 1, AUTHORITY: 0, ADDITIONAL: 1
;; OPT PSEUDOSECTION:
; EDNS: version: 0, flags:; udp: 1232
; COOKIE: 8ecb61bbfe2716df0100000066a27b47a3bb0c3d8e537858 (good)
;; QUESTION SECTION:
;www.timinglee.org. IN A
;; ANSWER SECTION:
www.timinglee.org. 86400 IN A 172.25.254.30
;; Query time: 1 msec
;; SERVER: 172.25.254.10#53(172.25.254.10)
;; WHEN: Fri Jul 26 00:20:23 CST 2024
;; MSG SIZE rcvd: 90