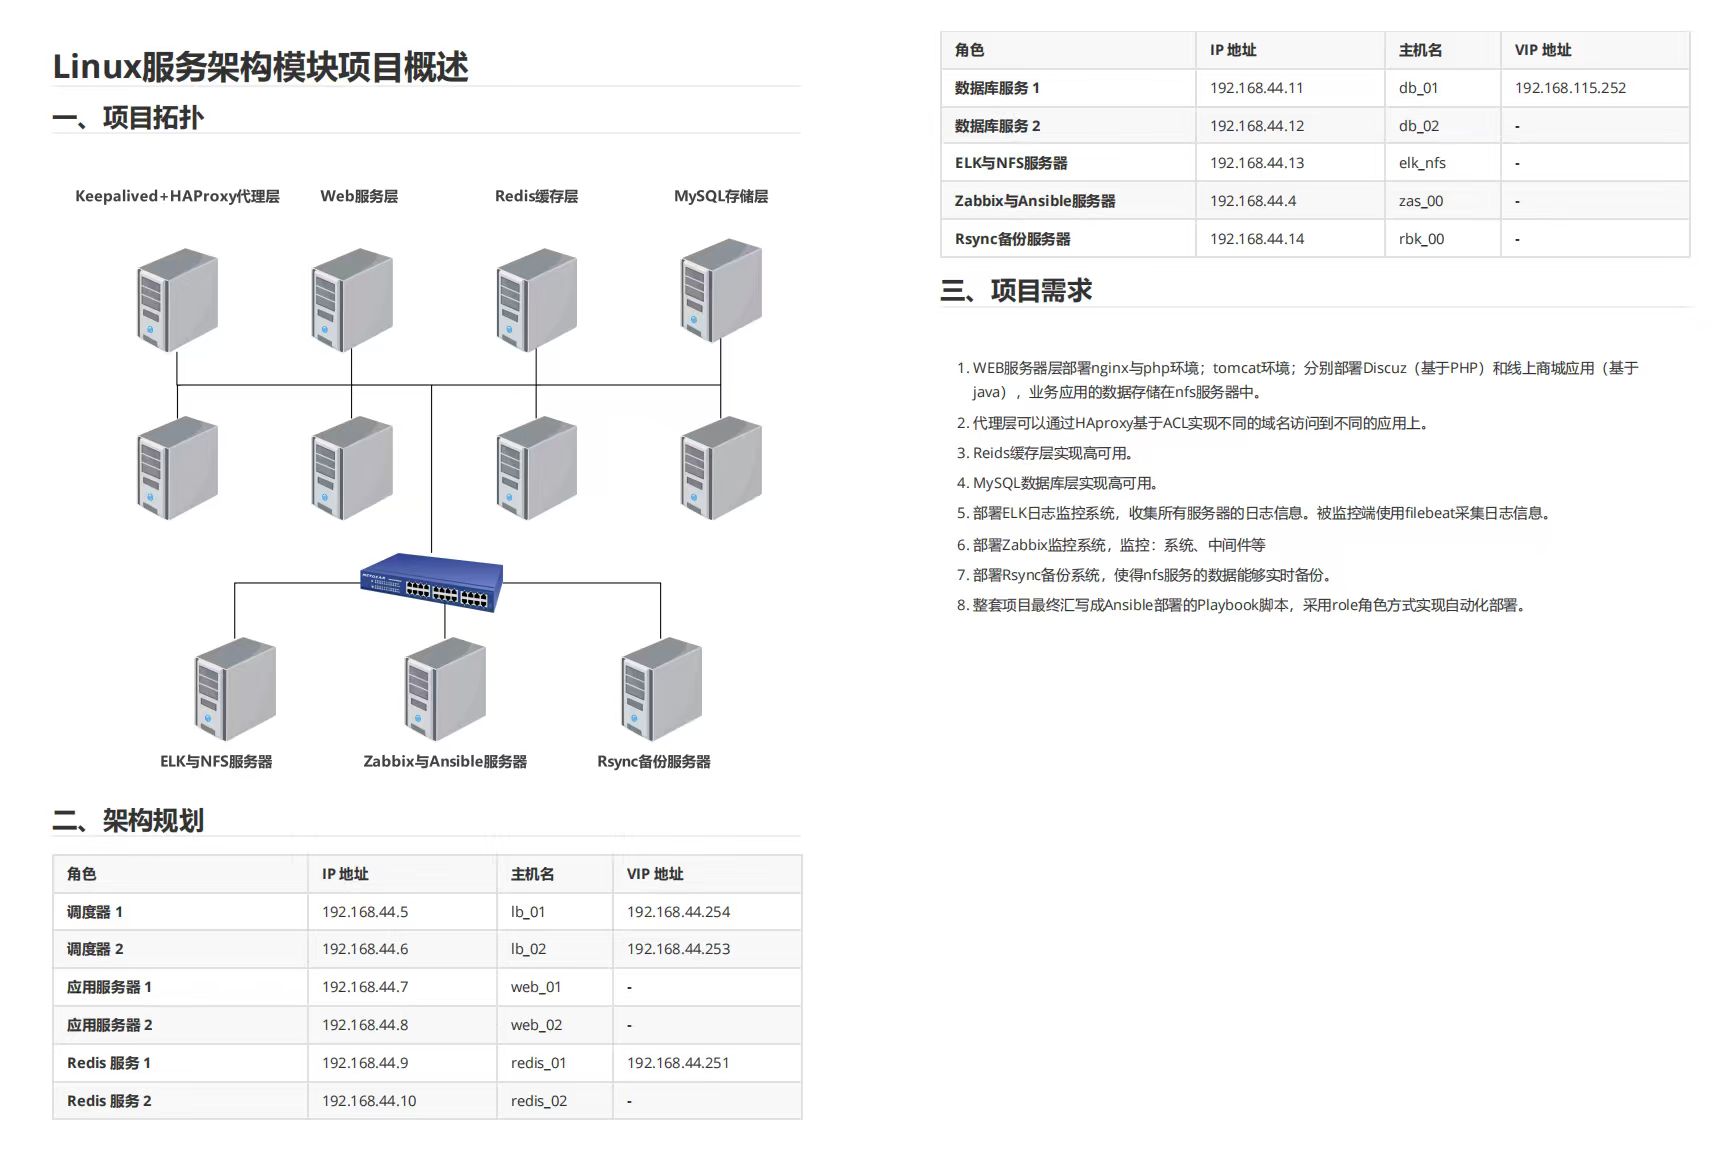
部署discuz论坛以及java应用,实现基于haproxy的acl不同域名访问不同网站,对每个节点实现高可用,使用elk日志监控系统来进行日志的可视化收集,使用zabbix对各个节点机器进行监控。
下面使拓扑图
思路:
将Java应用以及discuz论坛通过nfs服务器挂载到web端,调度器通过haproxy代理访问web端的80端口来访问discuz,通过haproxy代理访问web端的8080端口访问java应用网站,在mysql服务器进行主从复制,使用redis收集discuz的缓存,通过sersycn将nfs服务器挂载的目录备份到rsync服务器,对各个节点使用keepalived分配虚拟ip实现各节点的高可用。可以通过ansible批量进行主机的环境部署,比如keepalived、zabbix-agent等。
主机配置
以下是实验步骤以及各个主机配置信息
将各个主机的主机名对应的IP写入/etc/hosts文件并拷贝到所有主机
[root@zab01 opt]# cat /etc/hosts
127.0.0.1   localhost localhost.localdomain localhost4 localhost4.localdomain4
::1         localhost localhost.localdomain localhost6 localhost6.localdomain6
192.168.44.4 zab01
192.168.44.5 lb01
192.168.44.6 lb02
192.168.44.7 web01
192.168.44.8 web02
192.168.44.9 redis01
192.168.44.10 redis02
192.168.44.11 db01
192.168.44.12 db02
192.168.44.13 elk
192.168.44.14 rsync
192.168.44.254 discuz.example.com
192.168.44.253 java.example.com
[root@zab01 opt]# cat copyfile.yml
- name: 拷贝压缩包到目标主机组
  hosts: all  # 指定目标主机组(替换为实际组名)
  tasks:
    - name: 拷贝压缩包到远程主机
      ansible.builtin.copy:
        src: /etc/hosts  # 控制节点上压缩包的绝对路径
        dest: /etc/  # 远程主机的目标路径(含文件名)
ansible进行各个主机环境的部署:
ansible主机分组:
[all]
192.168.44.5
192.168.44.6
192.168.44.7
192.168.44.8
192.168.44.11
192.168.44.12
192.168.44.13
192.168.44.14
192.168.44.9
192.168.44.10

[agent]
192.168.44.5
192.168.44.6
192.168.44.7
192.168.44.8
192.168.44.11
192.168.44.12
192.168.44.13
192.168.44.14

[agent2]
192.168.44.9
192.168.44.10

[keepalived]
192.168.44.5
192.168.44.6
192.168.44.9
192.168.44.10
192.168.44.11
192.168.44.12
进行主机批量部署的playbook:
[root@zab01 opt]# cat zdbs.yml
---
- name: 配置所有主机的免密登录
  hosts: all
  gather_facts: no
  tasks:
    - name: 确保.ssh目录存在并设置正确权限
      ansible.builtin.file:
        path: ~/.ssh
        state: directory
        mode: '0700'

    - name: 分发公钥文件到所有主机
      ansible.builtin.copy:
        src: ~/.ssh/id_rsa.pub
        dest: ~/.ssh/authorized_keys
        mode: '0600'

- name: 拷贝filebeat.rpm到所有主机
  hosts: all
  gather_facts: yes
  tasks:
    - name: 复制filebeat.rpm到目标主机
      ansible.builtin.copy:
        src: /opt/filebeat-7.17.29-x86_64.rpm
        dest: /opt/filebeat.rpm
        mode: '0644'
    - name: 安装filebeat.rpm包
      ansible.builtin.yum:
        name: /opt/filebeat.rpm
        state: present
        become: yes


- name: 配置agent组的zabbix-agent
  hosts: agent
  gather_facts: yes
  tasks:
    - name: 安装zabbix-agent7.0源
      ansible.builtin.yum:
        name: https://repo.zabbix.com/zabbix/7.0/rhel/{{ ansible_distribution_major_version }}/{{ ansible_architecture }}/zabbix-release-7.0-2.el{{ ansible_distribution_major_version }}.noarch.rpm
        state: present
        disable_gpg_check: yes

    - name: 安装zabbix-agent
      ansible.builtin.yum:
        name: zabbix-agent
        state: present

    - name: 配置zabbix-agent指向服务器192.168.44.4并设置主机名
      ansible.builtin.lineinfile:
        path: /etc/zabbix/zabbix_agentd.conf
        regexp: "{{ item.regexp }}"
        line: "{{ item.line }}"
      loop:
        - { regexp: '^Server=.*', line: 'Server=192.168.44.4' }
        - { regexp: '^Hostname=.*', line: "Hostname={{ inventory_hostname }}" }

- name: 配置agent2组的zabbix-agent2
  hosts: agent2
  gather_facts: yes
  tasks:
    - name: 安装zabbix-agent7.0源
      ansible.builtin.yum:
        name: https://repo.zabbix.com/zabbix/7.0/rhel/{{ ansible_distribution_major_version }}/{{ ansible_architecture }}/zabbix-release-7.0-2.el{{ ansible_distribution_major_version }}.noarch.rpm
        state: present
        disable_gpg_check: yes

    - name: 安装zabbix-agent2
      ansible.builtin.yum:
        name: zabbix-agent2
        state: present

    - name: 配置zabbix-agent2指向服务器192.168.44.4并设置主机名
      ansible.builtin.lineinfile:
        path: /etc/zabbix/zabbix_agent2.conf
        regexp: "{{ item.regexp }}"
        line: "{{ item.line }}"
      loop:
        - { regexp: '^Server=.*', line: 'Server=192.168.44.4' }
        - { regexp: '^Hostname=.*', line: "Hostname={{ inventory_hostname }}" }

- name: 在keepalived组安装keepalived
  hosts: keepalived
  gather_facts: yes
  tasks:
    - name: 安装keepalived
      ansible.builtin.yum:
        name: keepalived
        state: present
mysql服务器
在批量部署成功之后,首先配置mysql服务器的主从复制以及实现其高可用
主从复制状态:
mysql> SHOW SLAVE STATUS\G
*************************** 1. row ***************************
               Slave_IO_State: Waiting for source to send event
                  Master_Host: 192.168.44.11
                  Master_User: slave
                  Master_Port: 3306
                Connect_Retry: 60
              Master_Log_File: mysql-bin.000007
          Read_Master_Log_Pos: 54408230
               Relay_Log_File: relay-log.000002
                Relay_Log_Pos: 326
        Relay_Master_Log_File: mysql-bin.000007
             Slave_IO_Running: Yes
            Slave_SQL_Running: Yes
              Replicate_Do_DB:
          Replicate_Ignore_DB:
           Replicate_Do_Table:
       Replicate_Ignore_Table:
      Replicate_Wild_Do_Table:
  Replicate_Wild_Ignore_Table:
                   Last_Errno: 0
                   Last_Error:
                 Skip_Counter: 0
          Exec_Master_Log_Pos: 54408230
              Relay_Log_Space: 530
              Until_Condition: None
               Until_Log_File:
                Until_Log_Pos: 0
           Master_SSL_Allowed: No
           Master_SSL_CA_File:
           Master_SSL_CA_Path:
              Master_SSL_Cert:
            Master_SSL_Cipher:
               Master_SSL_Key:
        Seconds_Behind_Master: 0
Master_SSL_Verify_Server_Cert: No
                Last_IO_Errno: 0
                Last_IO_Error:
               Last_SQL_Errno: 0
               Last_SQL_Error:
  Replicate_Ignore_Server_Ids:
             Master_Server_Id: 1
                  Master_UUID: d340fe2b-6c1e-11f0-a747-000c29e79690
             Master_Info_File: mysql.slave_master_info
                    SQL_Delay: 0
          SQL_Remaining_Delay: NULL
      Slave_SQL_Running_State: Replica has read all relay log; waiting for more updates
           Master_Retry_Count: 86400
                  Master_Bind:
      Last_IO_Error_Timestamp:
     Last_SQL_Error_Timestamp:
               Master_SSL_Crl:
           Master_SSL_Crlpath:
           Retrieved_Gtid_Set:
            Executed_Gtid_Set:
                Auto_Position: 0
         Replicate_Rewrite_DB:
                 Channel_Name:
           Master_TLS_Version:
       Master_public_key_path:
        Get_master_public_key: 0
            Network_Namespace:
1 row in set, 1 warning (0.00 sec)
keepalived实现高可用:
! Configuration File for keepalived

global_defs {
   router_id MySQL_LB01
}

vrrp_script check_mysql {
    script "/etc/keepalived/check_mysql.sh"
    interval 2
    weight 2
    fall 3
    rise 2
}

vrrp_instance VI_1 {
    state MASTER
    interface ens33
    virtual_router_id 52
    priority 100
    advert_int 1
    authentication {
        auth_type PASS
        auth_pass 1111
    }
    virtual_ipaddress {
        192.168.44.252
    }
 track_script {
        check_haproxy  # 关联上面定义的vrrp_script
    }
}
mysql的check:
[root@db02 ~]# cat /etc/keepalived/check_mysql.sh
#!/bin/bash
zt=$(systemctl status mysqld | grep "Active:" | awk '{print $3}')
if [ "$zt" = "(running)" ];
then
        exit 0
else
        systemctl stop keepalived.service
fi
从机keeplived配置:
! Configuration File for keepalived

global_defs {
   router_id LVS_DEVEL
}

vrrp_script check_mysql {
    script "/etc/keepalived/check_mysql.sh"
    interval 2
    weight 2
    fall 3
    rise 2
}

vrrp_instance VI_1 {
    state BACKUP
    interface ens33
    virtual_router_id 52
    priority 90
    advert_int 1
    authentication {
        auth_type PASS
        auth_pass 1111
    }
    virtual_ipaddress {
        192.168.44.252
    }
 track_script {
        check_haproxy  # 关联上面定义的vrrp_script
    }
}
在数据库创建用户
mysql> SELECT user, host FROM mysql.user;
+------------------+--------------+
| user             | host         |
+------------------+--------------+
| discuz           | 192.168.44.% |
| repl             | 192.168.44.% |
| root             | 192.168.44.% |
| slave            | 192.168.44.% |
| zabbix           | 192.168.44.% |
| mysql.infoschema | localhost    |
| mysql.session    | localhost    |
| mysql.sys        | localhost    |
| root             | localhost    |
+------------------+--------------+
将各应用所需的数据库表结构导入数据库(在zabbix服务器和nfs服务器将他们的表结构文件拷贝到MySQL主机):
[root@db01 ~]# zcat /usr/share/zabbix-sql-scripts/mysql/server.sql.gz | mysql --default-character-set=utf8mb4 -h192.168.44.252 -uzabbix -p zabbix  # zabbix的表结构注入
[root@db01 ~]# mysql -uroot -p'123456' biyesheji < /tmp/biyesheji.sql  # java应用的表结构注入
nfs服务器部署
nfs服务器解压discuz:
[root@elk ~]# cd /var/www/discuz/
[root@elk discuz]# ls
upload
[root@elk discuz]# cd upload/
[root@elk upload]# ls -l
总用量 76
-rwxrwxrwx  1 nginx nginx 2869  7月 27  2023 admin.php
drwxrwxrwx 10 nginx nginx  149  7月 27  2023 api
-rwxrwxrwx  1 nginx nginx  727  7月 27  2023 api.php
drwxrwxrwx  2 nginx nginx   23  7月 27  2023 archiver
drwxrwxrwx  2 nginx nginx  141  7月 31 10:43 config
-rwxrwxrwx  1 nginx nginx 1040  7月 27  2023 connect.php
-rwxrwxrwx  1 nginx nginx  106  7月 27  2023 crossdomain.xml
drwxrwxrwx 15 nginx nginx 4096  7月 31 10:46 data
-rwxrwxrwx  1 nginx nginx 5558  7月 26  2023 favicon.ico
-rwxrwxrwx  1 nginx nginx 2357  7月 27  2023 forum.php
-rwxrwxrwx  1 nginx nginx  906  7月 27  2023 group.php
-rwxrwxrwx  1 nginx nginx 1325  7月 27  2023 home.php
-rwxrwxrwx  1 nginx nginx 6920  7月 27  2023 index.php
drwxrwxrwx  5 nginx nginx   64  7月 27  2023 install
-rwxrwxrwx  1 nginx nginx  998  7月 27  2023 member.php
-rwxrwxrwx  1 nginx nginx 2410  7月 27  2023 misc.php
-rwxrwxrwx  1 nginx nginx 1790  7月 27  2023 plugin.php
-rwxrwxrwx  1 nginx nginx 1086  7月 27  2023 portal.php
-rwxrwxrwx  1 nginx nginx  639  7月 27  2023 robots.txt
-rwxrwxrwx  1 nginx nginx 1755  7月 27  2023 search.php
drwxrwxrwx 10 nginx nginx  168  7月 27  2023 source
drwxrwxrwx  7 nginx nginx   86  7月 27  2023 static
drwxrwxrwx  3 nginx nginx   38  7月 27  2023 template
drwxrwxrwx  8 nginx nginx  146  7月 27  2023 uc_client
drwxrwxrwx 13 nginx nginx 4096  7月 27  2023 uc_server
nfs服务器配置java应用(将原ROOT文件删除,java应用软件重命名为ROOT.war 运行tomcat之后自动生成ROOT文件,实现访问8080端口直接访问java应用界面)
[root@elk ROOT]# ls
注意事项  assets  biyesheji.sql  css  favicon.ico  images  images.zip  index.jsp  js  lib  META-INF  static  WEB-INF
[root@elk ROOT]# pwd
/opt/tomcat/webapps/ROOT
在web服务器配置nginx,将目录指向挂载目录
[root@web01 ~]# df -Th
文件系统                             类型      容量  已用  可用 已用% 挂载点
devtmpfs                             devtmpfs  4.0M     0  4.0M    0% /dev
tmpfs                                tmpfs     1.8G     0  1.8G    0% /dev/shm
tmpfs                                tmpfs     726M  9.6M  716M    2% /run
/dev/mapper/rl-root                  xfs        70G  6.9G   64G   10% /
/dev/mapper/rl-home                  xfs       126G  925M  125G    1% /home
/dev/sda1                            xfs       960M  304M  657M   32% /boot
tmpfs                                tmpfs     363M   52K  363M    1% /run/user/42
tmpfs                                tmpfs     363M   36K  363M    1% /run/user/0
192.168.44.13:/var/www/discuz/upload nfs4       70G  8.6G   62G   13% /var/www/discuz
192.168.44.13:/opt/tomcat/webapps    nfs4       70G  8.6G   62G   13% /opt/apache-tomcat-8.5.40/webapps
[root@web01 ~]# cat /etc/nginx/conf.d/discuz.conf
server {
    listen 80;
    server_name discuz.example.com;
    root /var/www/discuz;
    index index.php index.html;

    location ~ \.php$ {
        fastcgi_pass unix:/run/php-fpm/www.sock;
        fastcgi_index index.php;
        fastcgi_param SCRIPT_FILENAME $document_root$fastcgi_script_name;
        include fastcgi_params;
    }
}
在web服务器配置tomcat,将webapps目录内容全部删除,并将nfs的java应用的webapps改在至webapps目录
[root@web01 ~]# cd /opt/apache-tomcat-8.5.40/webapps/
[root@web01 webapps]# ls
docs  examples  host-manager  manager  ROOT  ROOT.war
[root@web01 webapps]# df -Th
文件系统                             类型      容量  已用  可用 已用% 挂载点
devtmpfs                             devtmpfs  4.0M     0  4.0M    0% /dev
tmpfs                                tmpfs     1.8G     0  1.8G    0% /dev/shm
tmpfs                                tmpfs     726M  9.6M  716M    2% /run
/dev/mapper/rl-root                  xfs        70G  6.9G   64G   10% /
/dev/mapper/rl-home                  xfs       126G  925M  125G    1% /home
/dev/sda1                            xfs       960M  304M  657M   32% /boot
tmpfs                                tmpfs     363M   52K  363M    1% /run/user/42
tmpfs                                tmpfs     363M   36K  363M    1% /run/user/0
192.168.44.13:/var/www/discuz/upload nfs4       70G  8.6G   62G   13% /var/www/discuz
192.168.44.13:/opt/tomcat/webapps    nfs4       70G  8.6G   62G   13% /opt/apache-tomcat-8.5.40/webapps
keepalived、haproxy服务器的部署
配置keepalived和haproxy实现通过acl访问不同域名访问不同网站,并实现高可用
keepalived的配置(从节点只需要更改router_id、state信息以及优先级):
[root@lb01 ~]# cat /etc/keepalived/keepalived.conf
! Configuration File for keepalived

global_defs {
   router_id LVS_MASTER
}

vrrp_script check_haproxy {
    script "/etc/keepalived/check_haproxy.sh"
    interval 2
    weight 2
    fall 3
    rise 2
}
vrrp_instance VI_254 {
    state MASTER
    interface ens33
    virtual_router_id 54
    priority 100
    advert_int 1
    authentication {
        auth_type PASS
        auth_pass 1111
    }
    virtual_ipaddress {
        192.168.44.254/24
    }
 track_script {
        check_haproxy
    }
}


vrrp_instance VI_253 {
    state MASTER
    interface ens33
    virtual_router_id 53
    priority 100
    advert_int 1
    authentication {
        auth_type PASS
        auth_pass 1111
    }
    virtual_ipaddress {
        192.168.44.253/24
    }
 track_script {
        check_haproxy
    }
}
haproxy的配置(主从节点配置完全相同):
[root@lb01 ~]# cat /etc/haproxy/haproxy.cfg
global
    log 127.0.0.1 local0 info
    maxconn 4096
    daemon

defaults
    log global
    mode http
    option httplog
    option dontlognull
    retries 3
    timeout connect 5000
    timeout client 50000
    timeout server 50000

# 监听VIP 192.168.44.254:80(对应discuz.example.com)
frontend discuz_front
    bind 192.168.44.254:80 transparent #(这个单词代表主机没有绑定的IP254也能启动haproxy)
    mode http
    acl is_discuz hdr(host) -i discuz.example.com 192.168.44.254
    use_backend discuz_back if is_discuz

# 后端服务器(80端口)
backend discuz_back
    mode http
    balance roundrobin  # 轮询算法
    server web1 192.168.44.7:80 check inter 2000 rise 2 fall 3
    server web2 192.168.44.8:80 check inter 2000 rise 2 fall 3

# 监听VIP 192.168.44.253:80(对应java.example.com)
frontend java_front
    bind 192.168.44.253:80 transparent
    mode http
    # 匹配域名java.example.com,转发到后端8080端口集群
    acl is_java hdr(host) -i java.example.com 192.168.44.253
    use_backend java_back if is_java

# 后端服务器(8080端口)
backend java_back
    mode http
    balance roundrobin
    server app1 192.168.44.7:8080 check inter 2000 rise 2 fall 3
    server app2 192.168.44.8:8080 check inter 2000 rise 2 fall 3
haproxy的检查脚本
[root@lb01 ~]# cat /etc/keepalived/check_haproxy.sh
#!/bin/bash
if ! ps -C haproxy > /dev/null; then
# 若 HAProxy 进程不存在,停止 Keepalived 让 VIP 切换
systemctl stop keepalived
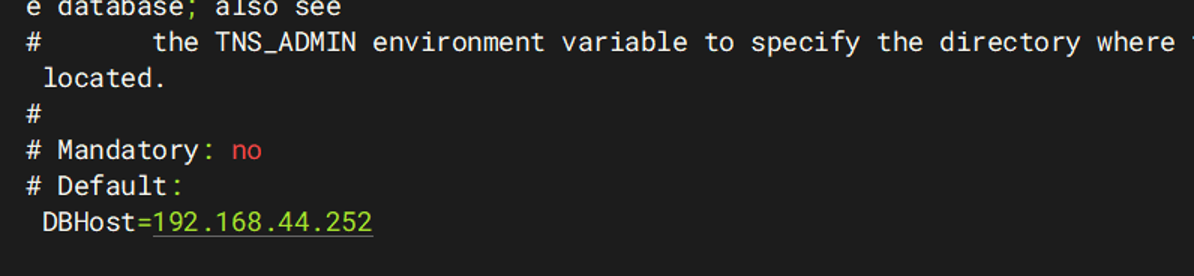
fi在配置dicuz论坛时绑定IP到mysql 数据库的虚拟ip252(忘记截图了)
java应用的配置文件
(可以看得出java应用绑定的mysqlip也是虚拟ip252):
[root@elk opt]# cd /opt/tomcat/webapps/ROOT/WEB-INF/classes/
[root@elk classes]# ls
com  generatorConfig.xml  jdbc.properties  log4j.properties  mapper  mybatis  spring
[root@elk classes]# cat jdbc.properties
jdbc.driver=com.mysql.cj.jdbc.Driver
jdbc.jdbcUrl=jdbc:mysql://192.168.44.252:3306/biyesheji?useUnicode=true&characterEncoding=utf-8&allowMultiQueries=true&useSSL=false&serverTimezone=GMT%2b8&allowPublicKeyRetrieval=true
jdbc.user=root
jdbc.password=123456
由于没有做dns服务,所以在web网页进行访问测试时需要在windows主机的hosts文件写入域名和对应ip
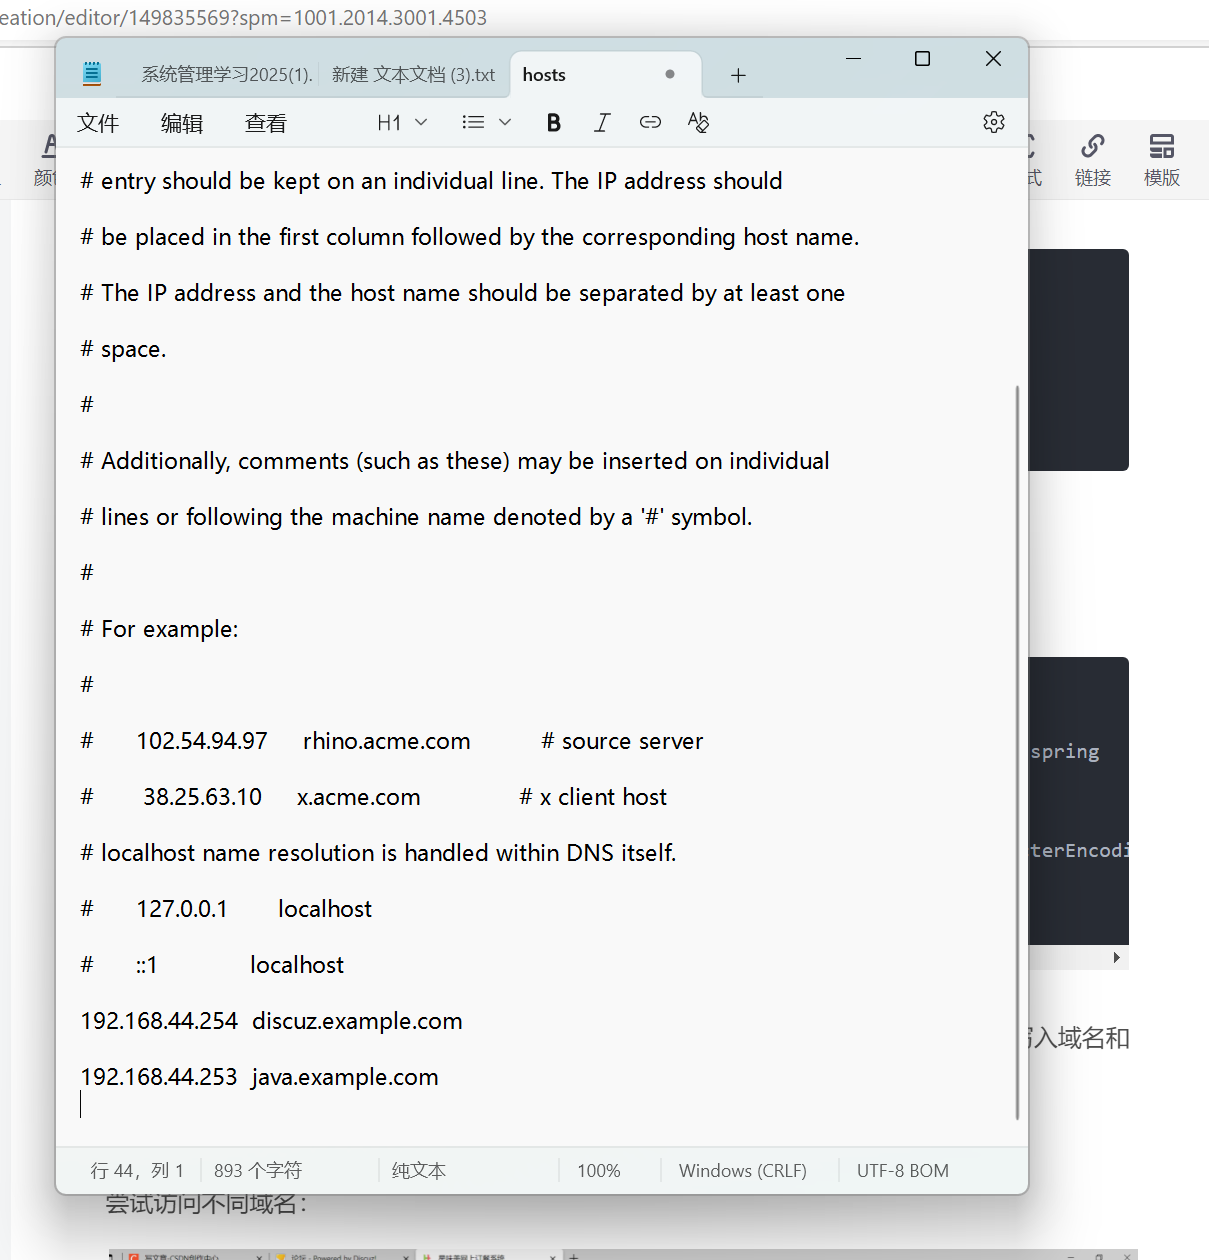
尝试访问不同域名:

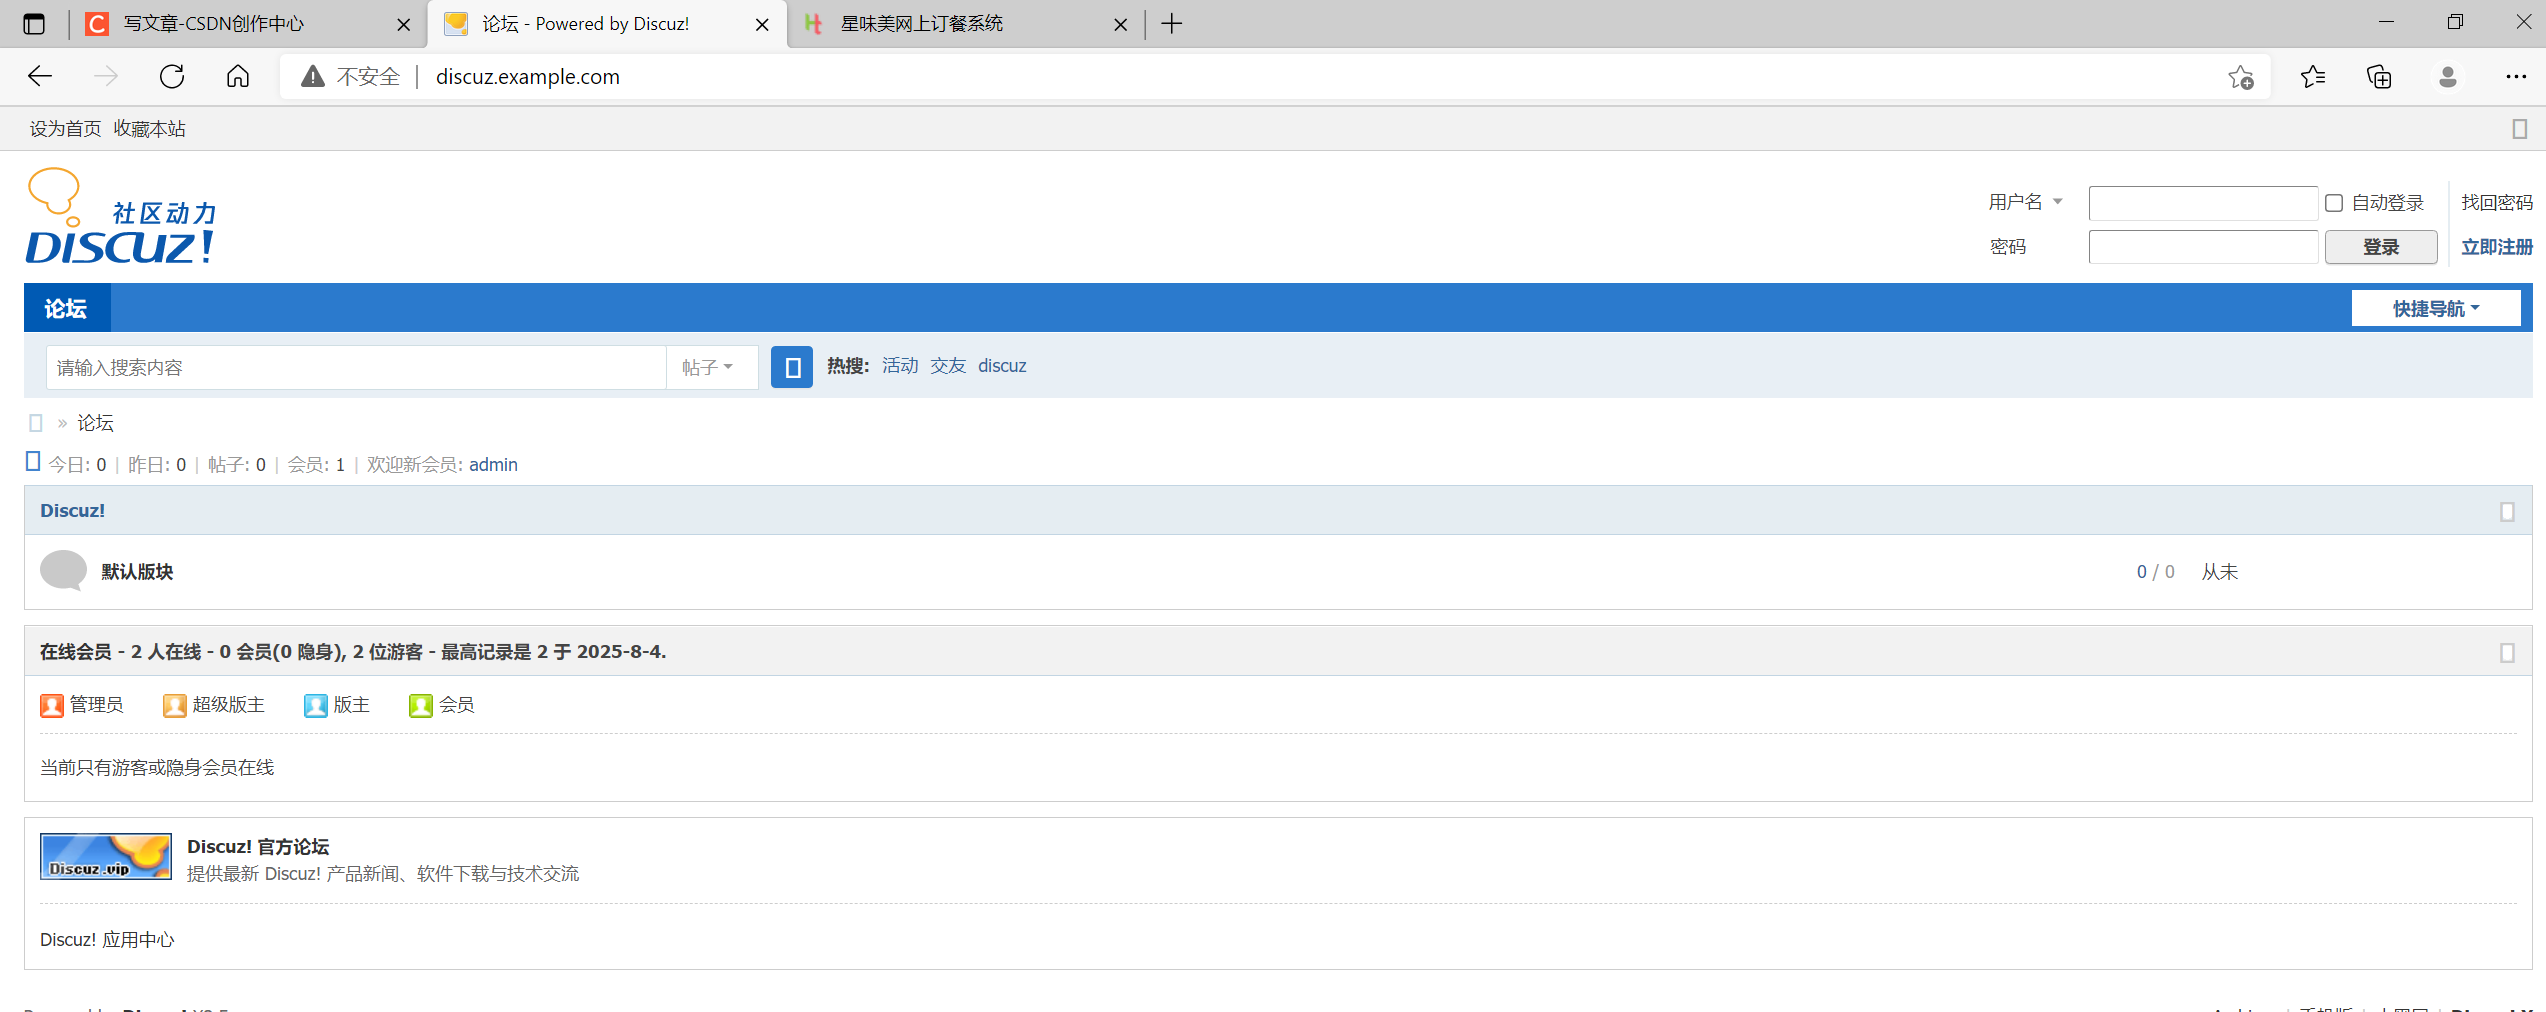
同理,尝试访问虚拟IP是否成功
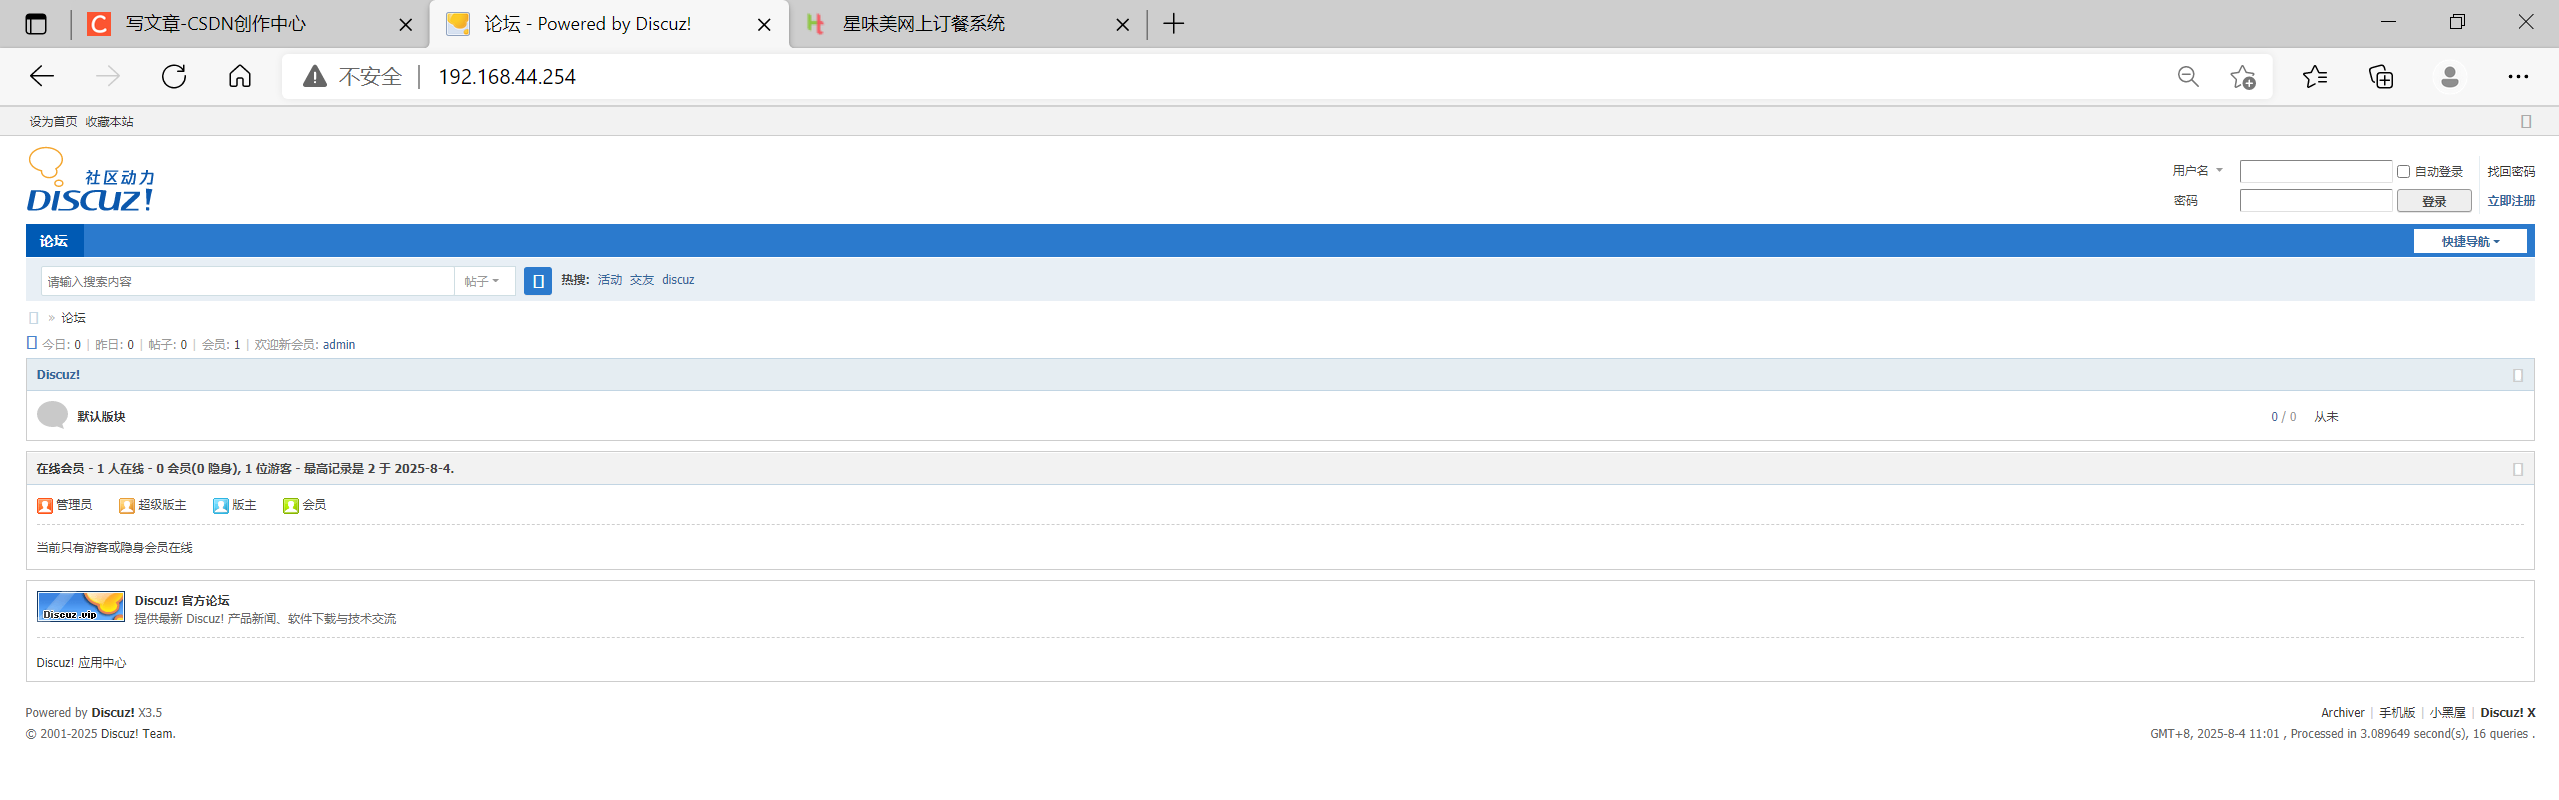

在发现访问成功之后可以确定web端和代理端是没问题的,接下来进行其余部分的部署
redis服务配置
使用redis备份discuz的数据备份
首先在两台web端下载插件 php-redis,如果直接安装没有,先安装epel源。
在discuz的配置页面进行数据备份的配置
[root@elk classes]# cd /var/www/discuz/upload/config/
[root@elk config]# ls
config_global_default.php  config_global.php  config_ucenter_default.php  config_ucenter.php  index.htm
[root@elk config]# cat config_global.php
<?php


$_config = array();

// ----------------------------  CONFIG DB  ----------------------------- //
$_config['db'][1]['dbhost'] = '192.168.44.252';
$_config['db'][1]['dbuser'] = 'discuz';
$_config['db'][1]['dbpw'] = 'discuz';
$_config['db'][1]['dbcharset'] = 'utf8mb4';
$_config['db'][1]['pconnect'] = 0;
$_config['db'][1]['dbname'] = 'discuz';
$_config['db'][1]['tablepre'] = 'pre_';
$_config['db']['slave'] = '';
$_config['db']['common']['slave_except_table'] = '';
$_config['db']['common']['engine'] = 'innodb';

// --------------------------  CONFIG MEMORY  --------------------------- //
$_config['memory']['prefix'] = 'discuz_';    # 自定义前缀名
$_config['memory']['redis']['server'] = '192.168.44.251';    #绑定redis的虚拟ip
$_config['memory']['redis']['port'] = 6379;
$_config['memory']['redis']['pconnect'] = 1;
$_config['memory']['redis']['timeout'] = 0;
$_config['memory']['redis']['requirepass'] = '';
$_config['memory']['redis']['db'] = 0;
$_config['memory']['memcache']['server'] = '';
$_config['memory']['memcache']['port'] = 11211;
$_config['memory']['memcache']['pconnect'] = 1;
$_config['memory']['memcache']['timeout'] = 1;
$_config['memory']['memcached']['server'] = '';
$_config['memory']['memcached']['port'] = 11211;
$_config['memory']['apc'] = 0;
$_config['memory']['apcu'] = 0;
$_config['memory']['xcache'] = 0;
$_config['memory']['eaccelerator'] = 0;
$_config['memory']['wincache'] = 0;
$_config['memory']['yac'] = 0;
$_config['memory']['file']['server'] = '';

// --------------------------  CONFIG SERVER  --------------------------- //
$_config['server']['id'] = 1;

// -------------------------  CONFIG DOWNLOAD  -------------------------- //
$_config['download']['readmod'] = 2;
$_config['download']['xsendfile']['type'] = 0;
$_config['download']['xsendfile']['dir'] = '/down/';

// --------------------------  CONFIG OUTPUT  --------------------------- //
$_config['output']['charset'] = 'utf-8';
$_config['output']['forceheader'] = 1;
$_config['output']['gzip'] = 0;
$_config['output']['tplrefresh'] = 1;
$_config['output']['language'] = 'zh_cn';
$_config['output']['staticurl'] = 'static/';
$_config['output']['ajaxvalidate'] = 0;
$_config['output']['upgradeinsecure'] = 0;
$_config['output']['css4legacyie'] = 1;

// --------------------------  CONFIG COOKIE  --------------------------- //
$_config['cookie']['cookiepre'] = 'npJ6_';
$_config['cookie']['cookiedomain'] = '';
$_config['cookie']['cookiepath'] = '/';

// -------------------------  CONFIG SECURITY  -------------------------- //
$_config['security']['authkey'] = '76eb99bd5fcb2b0c24bad5c8f490319ekE1SaC1XDbeJgd1ywKUuiTVCUDCdSPHI';
$_config['security']['urlxssdefend'] = 1;
$_config['security']['attackevasive'] = 0;
$_config['security']['onlyremoteaddr'] = 1;
$_config['security']['useipban'] = 1;
$_config['security']['querysafe']['status'] = 1;
$_config['security']['querysafe']['dfunction'][0] = 'load_file';
$_config['security']['querysafe']['dfunction'][1] = 'hex';
$_config['security']['querysafe']['dfunction'][2] = 'substring';
$_config['security']['querysafe']['dfunction'][3] = 'if';
$_config['security']['querysafe']['dfunction'][4] = 'ord';
$_config['security']['querysafe']['dfunction'][5] = 'char';
$_config['security']['querysafe']['daction'][0] = '@';
$_config['security']['querysafe']['daction'][1] = 'intooutfile';
$_config['security']['querysafe']['daction'][2] = 'intodumpfile';
$_config['security']['querysafe']['daction'][3] = 'unionselect';
$_config['security']['querysafe']['daction'][4] = '(select';
$_config['security']['querysafe']['daction'][5] = 'unionall';
$_config['security']['querysafe']['daction'][6] = 'uniondistinct';
$_config['security']['querysafe']['dnote'][0] = '/*';
$_config['security']['querysafe']['dnote'][1] = '*/';
$_config['security']['querysafe']['dnote'][2] = '#';
$_config['security']['querysafe']['dnote'][3] = '--';
$_config['security']['querysafe']['dnote'][4] = '"';
$_config['security']['querysafe']['dlikehex'] = 1;
$_config['security']['querysafe']['afullnote'] = 0;
$_config['security']['creditsafe']['second'] = 0;
$_config['security']['creditsafe']['times'] = 10;
$_config['security']['fsockopensafe']['port'][0] = 80;
$_config['security']['fsockopensafe']['port'][1] = 443;
$_config['security']['fsockopensafe']['ipversion'][0] = 'ipv6';
$_config['security']['fsockopensafe']['ipversion'][1] = 'ipv4';
$_config['security']['fsockopensafe']['verifypeer'] = '';
$_config['security']['error']['showerror'] = '1';
$_config['security']['error']['guessplugin'] = '1';

// --------------------------  CONFIG ADMINCP  -------------------------- //
// -------- Founders: $_config['admincp']['founder'] = '1,2,3'; --------- //
$_config['admincp']['founder'] = '1';
$_config['admincp']['forcesecques'] = 0;
$_config['admincp']['checkip'] = 1;
$_config['admincp']['runquery'] = 0;
$_config['admincp']['dbimport'] = 1;
$_config['admincp']['mustlogin'] = 1;

// --------------------------  CONFIG REMOTE  --------------------------- //
$_config['remote']['on'] = 0;
$_config['remote']['dir'] = 'remote';
$_config['remote']['appkey'] = '62cf0b3c3e6a4c9468e7216839721d8e';
$_config['remote']['cron'] = 0;

// ---------------------------  CONFIG INPUT  --------------------------- //
$_config['input']['compatible'] = 0;

// ---------------------------  CONFIG IPDB  ---------------------------- //
$_config['ipdb']['setting']['fullstack'] = '';
$_config['ipdb']['setting']['default'] = '';
$_config['ipdb']['setting']['ipv4'] = 'tiny';
$_config['ipdb']['setting']['ipv6'] = 'v6wry';

// -------------------------  CONFIG IPGETTER  -------------------------- //
$_config['ipgetter']['setting'] = 'header';
$_config['ipgetter']['header']['header'] = 'HTTP_X_FORWARDED_FOR';
$_config['ipgetter']['iplist']['header'] = 'HTTP_X_FORWARDED_FOR';
$_config['ipgetter']['iplist']['list'][0] = '127.0.0.1';
$_config['ipgetter']['dnslist']['header'] = 'HTTP_X_FORWARDED_FOR';
$_config['ipgetter']['dnslist']['list'][0] = 'comsenz.com';


// -------------------  THE END  -------------------- //
redis的验证:
[root@redis01 ~]# redis-cli -h 192.168.44.251
192.168.44.251:6379> keys discuz_*
1) "discuz_posttable_info"
2) "discuz_fields_register"
3) "discuz_common_member_count_1"
4) "discuz_common_session_idx_uid_0"
5) "discuz_usergroup_1"
6) "discuz_diytemplatename"
7) "discuz_censor"
8) "discuz_membersplitdata"
9) "discuz_common_session_idx_uid_group_0"
10) "discuz_pluginlanguage_system"
11) "discuz_bbcodes_display"
12) "discuz_onlinelist"
13) "discuz_bbcodes"
14) "discuz_setting_forumdisplay_fields_eval_sha"
15) "discuz_modreasons"
16) "discuz_diytemplatenameforum"
17) "discuz_smilies"
18) "discuz_diytemplatenamehome"
19) "discuz_common_session_YNW1og"
20) "discuz_usergroups"
21) "discuz_forums"
22) "discuz_fields_optional"
23) "discuz_forumrecommend"
24) "discuz_setting_viewthread_fields_eval_sha"
25) "discuz_setting_common_fields_eval_sha"
26) "discuz_common_seccheck_pk"
27) "discuz_stamptypeid"
28) "discuz_common_session_idx_invisible_0"
29) "discuz_ipctrl"
30) "discuz_magic"
31) "discuz_common_session_fetch_member_3rd_eval_sha"
32) "discuz_setting"
33) "discuz_forumlinks"
34) "discuz_common_session_delete_by_session_eval_sha"
35) "discuz_common_banned_index"
36) "discuz_announcements"
37) "discuz_cronnextrun"
38) "discuz_adminmenu"
39) "discuz_fields_required"
40) "discuz_heats"
41) "discuz_addoncheck_template"
42) "discuz_onlinerecord"
43) "discuz_common_session_idx_lastactivity"
44) "discuz_common_session_F4Qvhf"
45) "discuz_historyposts"
46) "discuz_common_member_status_1"
47) "discuz_creditrule"
48) "discuz_userstats"
49) "discuz_smileytypes"
50) "discuz_common_member_field_home_1"
51) "discuz_style_default"
52) "discuz_common_session_idx_fid_0"
53) "discuz_seccodedata"
54) "discuz_common_session_idx_ip_192.168.44.5"
55) "discuz_usergroup_7"
56) "discuz_plugin"
57) "discuz_addoncheck_plugin"
58) "discuz_cronpublish"
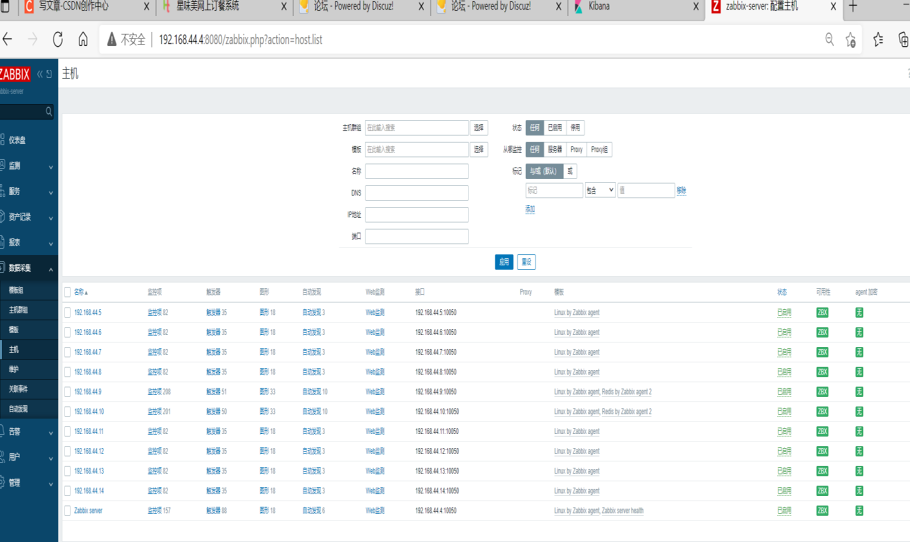
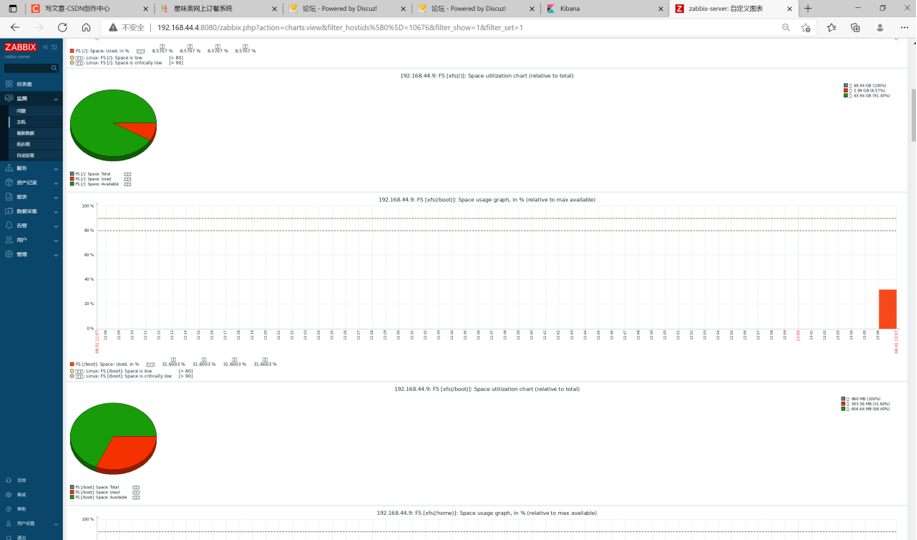
59) "discuz_common_member_1"redis配置完成之后,部署zabbix监控主机状态
zabbix服务器给到虚拟mysql数据库的ip
/usr/share/zabbix-sql-scripts/mysql 将此目录下的server.sql.gz拷贝到mysql主机,并且导入创建的zabbix数据库 即执行 zcat /usr/share/zabbix-sql-scripts/mysql/server.sql.gz | mysql --default-character-set=utf8mb4 -uzabbix -p zabbix
之后手动配置web网页端的自动发现及触发器等
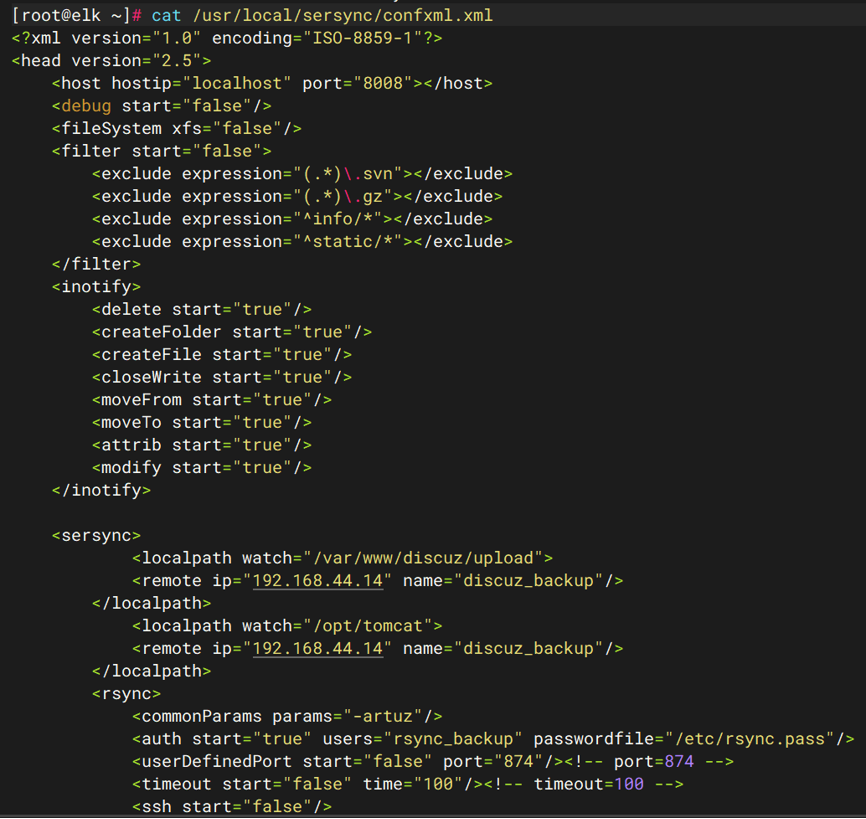
配置rsync服务
nfs端下载sersync:
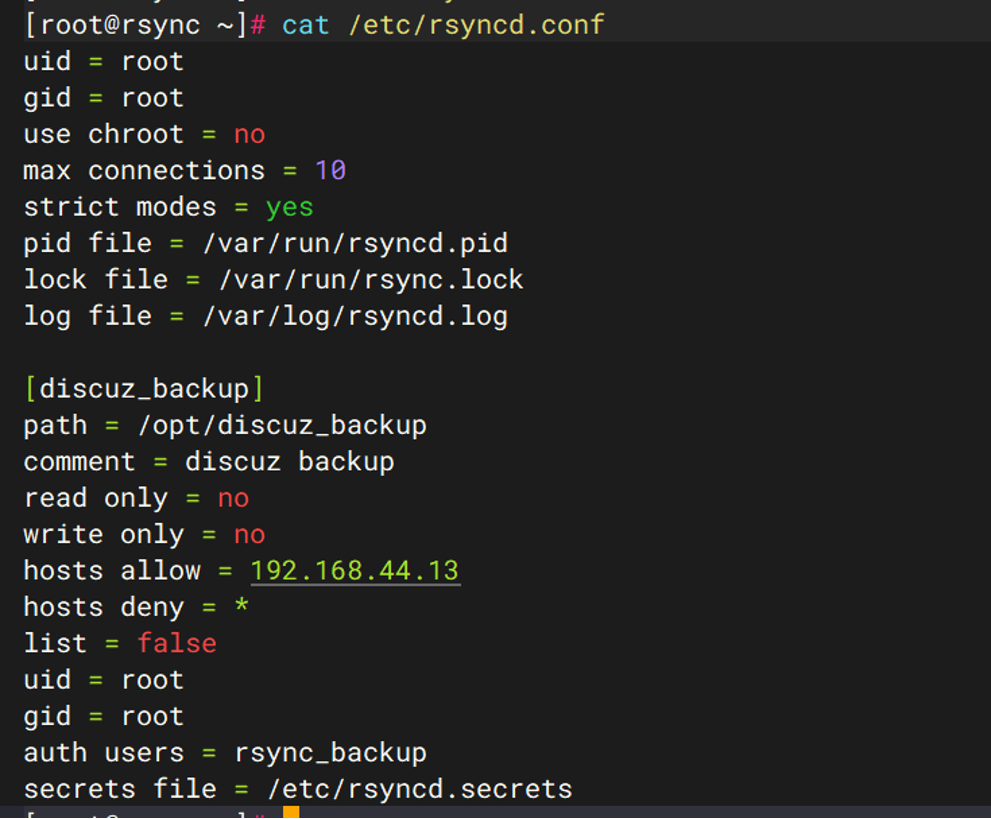
rsync服务器端:
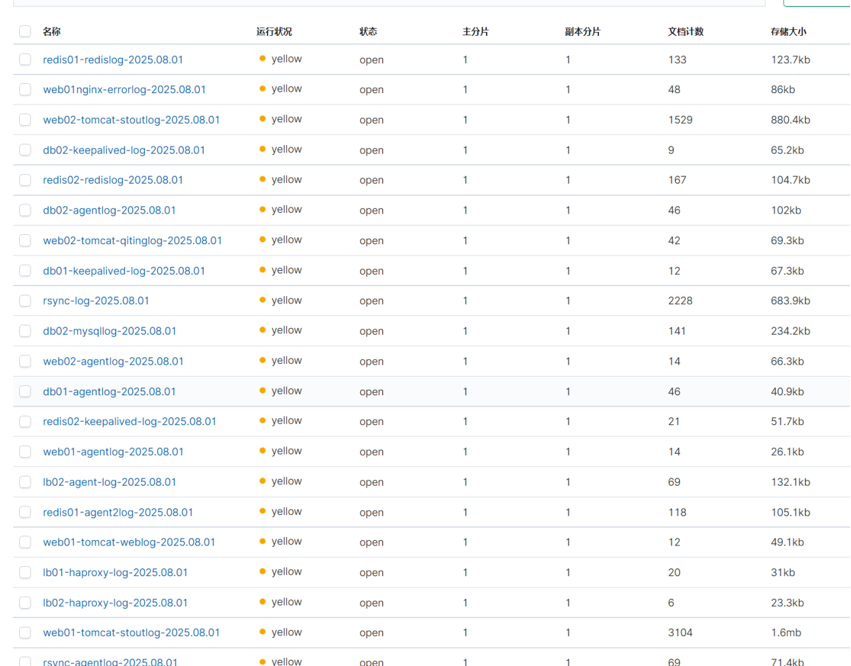
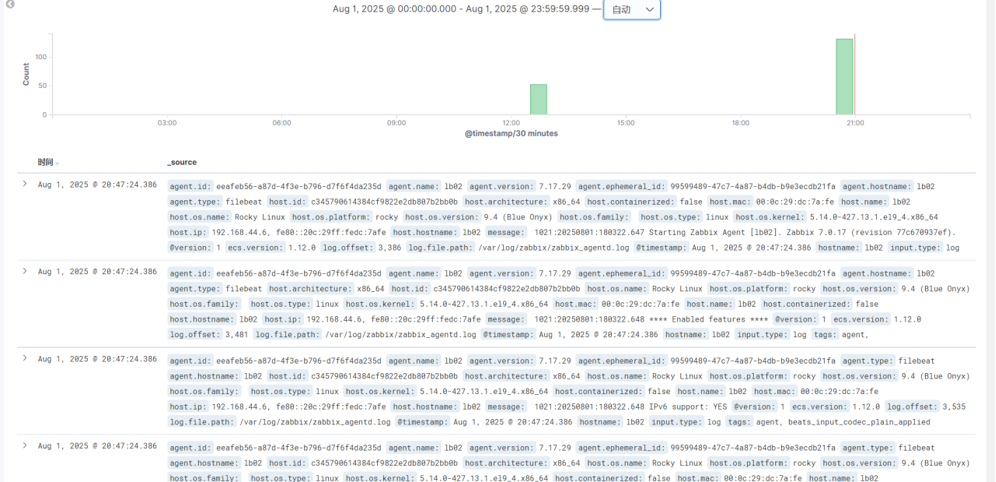
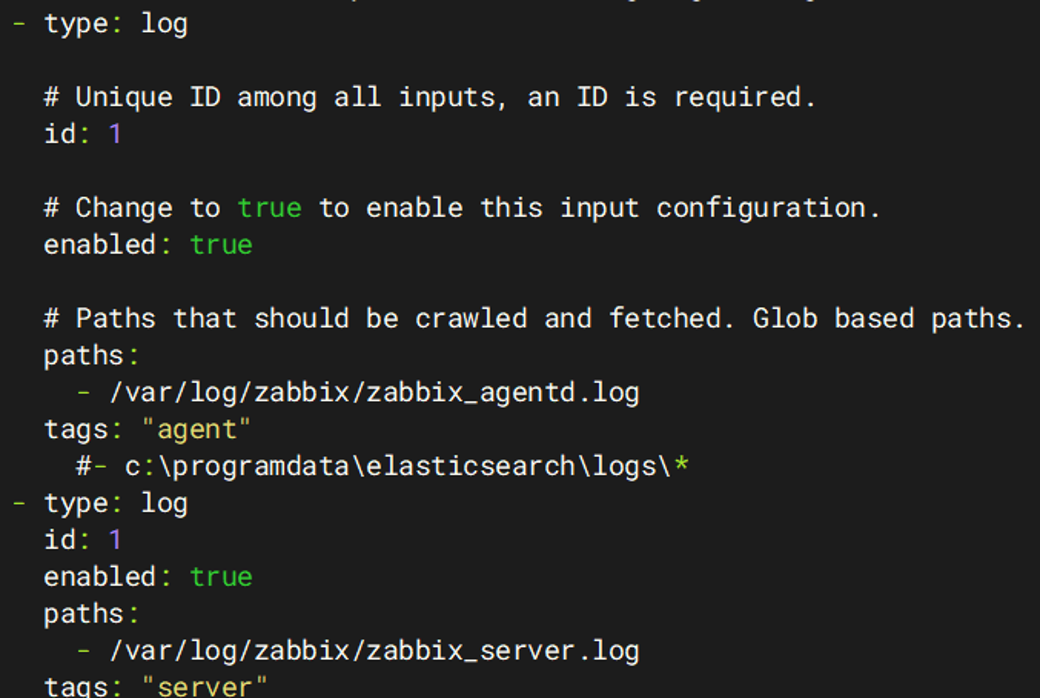
elk部署
注意rocky9与filebeat7.1.1版本不兼容,推荐下载filebeat7.17版本,和7.1.1版本配置基本相同,但是多了个ID选项
监控界面: