介绍
spring是分层的java SE/EE应用full-stack轻量级开源框架,以IOC(Inverse Of Control:控制反转)和AOP(Aspect Oriented Programming:面向切面编程)为内核,提供了展现层Spring MVC和持久层Spring JDBC以及业务层事务管理等众多的企业级应用技术,还能整合开源世界众多著名的第三方框架和类库,逐渐成为使用最多的Java EE企业级应用开源框架。
优势
- 开源免费的轻量级框架
- 低侵入式设计,代码污染极低
- 支持事务的处理,对框架整合的支持
- 以控制反转(IOC),面向切面编程(AOP)为内核
- 方便解耦,简化开发:将对象的创建交给spring 无需new
- 提供了展现层SpringMVC和持久层Spring JDBCTemplate以及业务层事务管理等众多企业级应用技术
- 能整合开源世界众多第三方框架和类库
接下来,我们用一个简单示例进一步理解spring框架。
创建项目
创建一个maven项目
引入依赖
xml
<!-- https://mvnrepository.com/artifact/org.springframework/spring-context -->
<dependency>
    <groupId>org.springframework</groupId>
    <artifactId>spring-context</artifactId>
    <version>7.0.0-M7</version>
</dependency>
xml
<!-- https://mvnrepository.com/artifact/org.aspectj/aspectjweaver -->
<dependency>
    <groupId>org.aspectj</groupId>
    <artifactId>aspectjweaver</artifactId>
    <version>1.9.24</version>
    <scope>runtime</scope>
</dependency>
基本使用
方式一:配置文件
创建xml文件
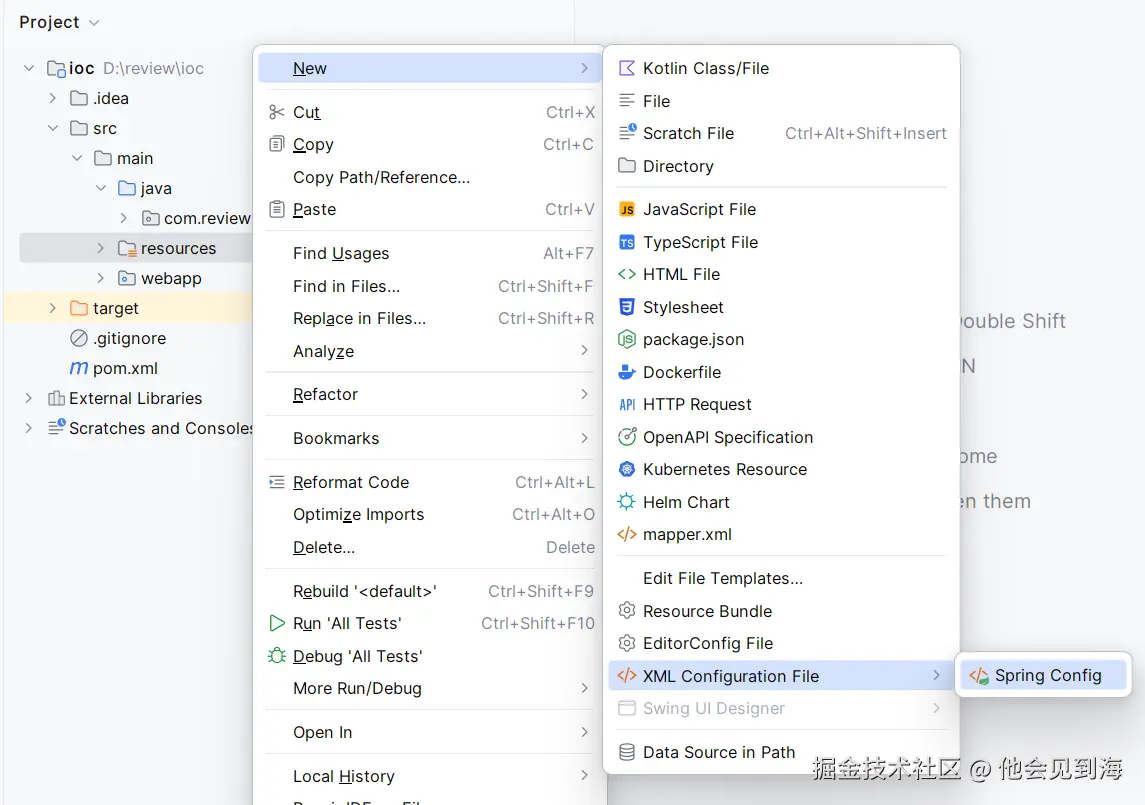 在
在resources文件夹下选择Spring Config创建配置文件 -> 文件名.xml,我这里就用spring.xml
创建类
java
public class Student {

    private String name = "张三";

    public Student () {
        System.out.println("创建完成");
    }

    public String getName() {
        return name;
    }

    public void setName(String name) {
        this.name = name;
    }

}
spring.xml文件
xml
<?xml version="1.0" encoding="UTF-8"?>
<beans xmlns="http://www.springframework.org/schema/beans"
       xmlns:xsi="http://www.w3.org/2001/XMLSchema-instance"
       xsi:schemaLocation="http://www.springframework.org/schema/beans http://www.springframework.org/schema/beans/spring-beans.xsd">

    <!--  id:spring生成对象的时候,放到容器里面,会给每一个对象生成一个id,用于区分对象  -->
    <!--  class:告诉它使用哪个类  -->
    <bean id="student" class="com.review.test4.Student"></bean>

</beans>
使用bean标签
-
id:spring生成对象的时候,放到容器里面,会给每一个对象生成一个id,用于区分对象。相当于给对象起的名称,一般用类名的小写;
-
class:告诉它是哪个类
获取对象
- 通过id获取
context.getBean("student") - 通过类获取
context.getBean(Student.class)
java
public class Test4 {

    public static void main(String[] args) {

        // 生成spring容器
        // 读取spring的xml文件,根据内容生成对应的对象,放到容器里面
        ApplicationContext context = new ClassPathXmlApplicationContext("spring.xml");

        // 1、根据id获取对象
        Student student1 = (Student) context.getBean("student");

        // 2、通过类获取对象
        Student student2 = context.getBean(Student.class);

        System.out.println(student1);
        System.out.println(student2);
        // -----------------------------------
        // com.review.test4.Student@3c0a50da
        // com.review.test4.Student@3c0a50da

    }

}
方式二:注解
创建xml文件
同样是在resources文件夹下选择Spring Config创建配置文件 -> 文件名.xml,我这里就用spring1.xml
创建类
java
@Component("s")
public class Student {

    private String name = "张三";

    public Student () {
        System.out.println("创建完成");
    }

    public String getName() {
        return name;
    }

    public void setName(String name) {
        this.name = name;
    }

}添加@Component注解,spring扫描到这个注解的时候,会自动生成对象。
spring.xml文件
xml
<?xml version="1.0" encoding="UTF-8"?>
<beans xmlns="http://www.springframework.org/schema/beans"
       xmlns:xsi="http://www.w3.org/2001/XMLSchema-instance"
       xmlns:context="http://www.springframework.org/schema/context"
       xsi:schemaLocation="http://www.springframework.org/schema/beans http://www.springframework.org/schema/beans/spring-beans.xsd http://www.springframework.org/schema/context https://www.springframework.org/schema/context/spring-context.xsd">

    <!-- 扫描包,会去扫描注解,有对应注解的会自动生成对象 -->
    <context:component-scan base-package="com.review.test4"></context:component-scan>

</beans>
<context:component-scan base-package="com.review.test4"></context:component-scan> 扫描包,会去扫描注解,有对应注解的会自动生成对象
获取对象
java
public class Test6 {

    public static void main(String[] args) {

        ApplicationContext context = new ClassPathXmlApplicationContext("spring1.xml");

        // 如果使用注解,默认是类名(首字母小写)
        // 也可在注解里加上
//        Student student = (Student) context.getBean("student");
        Student student = (Student) context.getBean("s");

        System.out.println(student);

    }

}@Component("s")里面的s是对象名,不写默认是类名小写
Bean的生命周期
spring默认的是单例对象可以通过xml文件里bean标签的scope修改
xml
<!-- singleton是单例对象,不写默认也是单例对象 -->
<bean id="student" class="com.review.test4.Student" scope="singleton"></bean>
<!-- prototype是多例对象 -->
<bean id="student" class="com.review.test4.Student" scope="prototype"></bean>
单例对象和多例对象的生命周期不同
单例对象
java
public class Test4 {

    public static void main(String[] args) {

        // 创建spring容器
        // 创建容器的时候,对象已经生成
        ApplicationContext ctx = new ClassPathXmlApplicationContext("spring.xml");

        // 获取对象只是从容器里面拿出来
        Student student1 = (Student) ctx.getBean("student");
        Student student2 = (Student) ctx.getBean("student");

        System.out.println(student1 == student2);
        // 结果 true

    }

}通过上述代码可以看到,student1和student2是同一个对象。
生命周期
- 对象出生:当应用加载,创建容器时,对象就被创建
我们可以在构造器里添加一行输出语句,我们不拿对象出来,看看会不会输出
java
public class Student {

    public Student () {
        System.out.println("创建完成");
    }

}
java
public class Test7 {

    public static void main(String[] args) {

        ApplicationContext context = new ClassPathXmlApplicationContext("spring.xml");

    }

}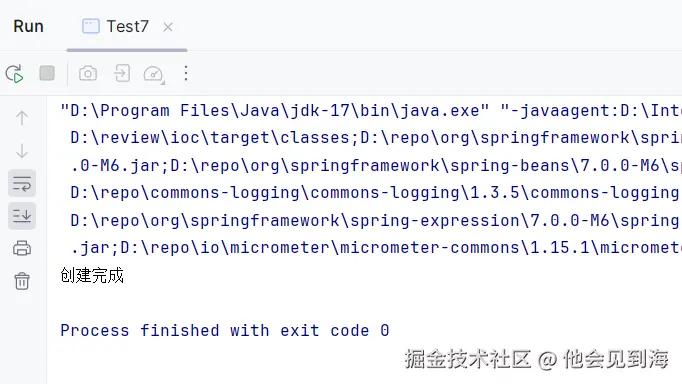
可以看到我们即使没有拿到对象,依然执行了构造函数,说明对象被创建出来了
-
对象活着:只要容器在,对象一直活着
-
对象死亡:当应用卸载,销毁容器时,对象就被销毁了
多例对象
在spring.xml文件里的bean标签添加scope="prototype"
xml
<bean id="student" class="com.review.test4.Student" scope="prototype"></bean>此时我们再比较student1和student2
java
public class Test4 {

    public static void main(String[] args) {

        // 创建spring容器
        // 创建容器的时候,对象已经生成
        ApplicationContext ctx = new ClassPathXmlApplicationContext("spring.xml");

        // 获取对象只是从容器里面拿出来
        Student student1 = (Student) ctx.getBean("student");
        Student student2 = (Student) ctx.getBean("student");

        System.out.println(student1 == student2);
        // 结果 false

    }

}发现student1和student2是两个不同的对象
生命周期
- 对象出生:当使用对象时,创建新的对象实例 我们还是可以通过之前的例子,来看看对象什么时候被创建
java
public class Test7 {
public static void main(String[] args) {
ApplicationContext context = new ClassPathXmlApplicationContext("spring.xml");
}
}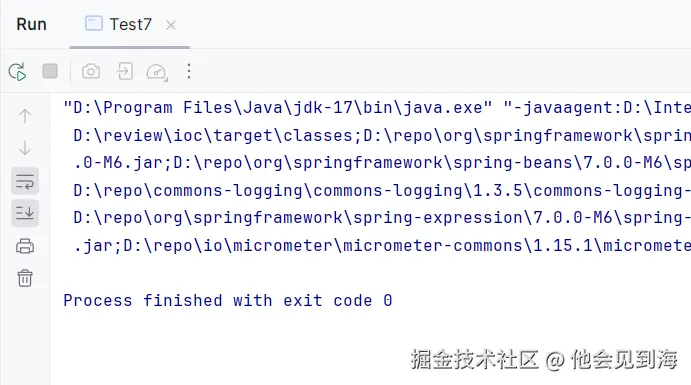 这个时候我们会发现并没有输出,也就是没有调用构造函数,即对象没有被创建,我们没有去拿对象,对象就没有创建
java
public class Test7 {

    public static void main(String[] args) {

        ApplicationContext context = new ClassPathXmlApplicationContext("spring.xml");

        Student student1 = (Student) context.getBean("student");
        Student student2 = (Student) context.getBean("student");

        System.out.println(student1 == student2);

    }

}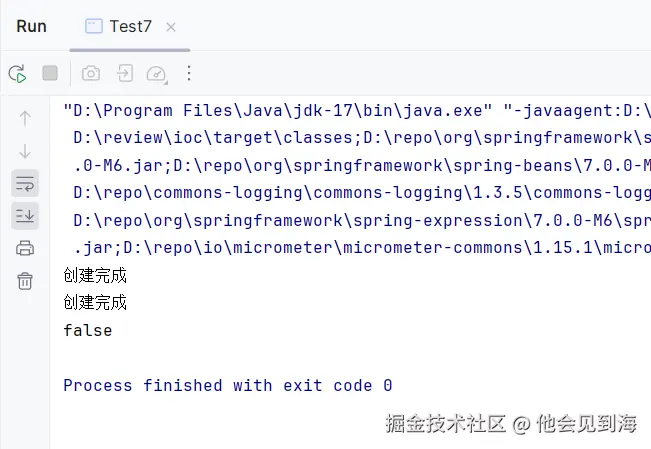
当我们从容器中拿出student1对象和student2对象时,才调用构造函数,才创建出来
-
对象活着:对象在使用中,对象就一直活着
-
对象死亡:当对象长时间不用,被java垃圾回收机制回收
依赖注入
依赖注入(Dependency Injection,简称 DI)是 Spring 框架的核心特性之一,它是控制反转(Inversion of Control,IoC)思想的具体实现。其核心思想是:对象不自行创建依赖的对象,而是由外部容器(如 Spring 容器)负责创建并注入这些依赖,从而降低代码间的耦合度。
如果我想在创建下面的teacher对象时,给里面的一些属性赋予初值,该怎么办?
java
public class Teacher {

    private String name;

    private String sex;

    private Integer age;

    private Student student;

    public Teacher() {
    }

    public Teacher(String name, String sex, Integer age, Student student) {
        this.name = name;
        this.sex = sex;
        this.age = age;
        this.student = student;
    }

    public Teacher(String name, String sex, Integer age) {
        this.name = name;
        this.sex = sex;
        this.age = age;
    }

    public String getName() {
        return name;
    }

    public void setName(String name) {
        this.name = name;
    }

    public String getSex() {
        return sex;
    }

    public void setSex(String sex) {
        this.sex = sex;
    }

    public Integer getAge() {
        return age;
    }

    public void setAge(Integer age) {
        this.age = age;
    }

    public Student getStudent() {
        return student;
    }

    public void setStudent(Student student) {
        this.student = student;
    }

    @Override
    public String toString() {
        return "Teacher{" +
                "name='" + name + ''' +
                ", sex='" + sex + ''' +
                ", age=" + age +
                ", student=" + student +
                '}';
    }

}
使用构造函数
!使用构造函数赋值的前提是:类中需要提供一个对应参数列表的构造函数!
有了该构造函数之后,我们便可在xml文件中使用constructor-arg标签来进行赋值
标签:constructor-arg
标签属性:
index:指定参数在构造函数参数列表中的索引位置type:指定参数在构造函数中的数据类型name:指定参数在构造函数中的名称,用这个找给谁赋值value:它能赋的值是基本数据类型和String类型ref:它能赋的值是其他bean类型,也就是说,必须得是在配置文件中配置过的bean
基本数据类型
基本数据类型直接用value赋值
xml
<!-- 1、使用类的构造器 -->
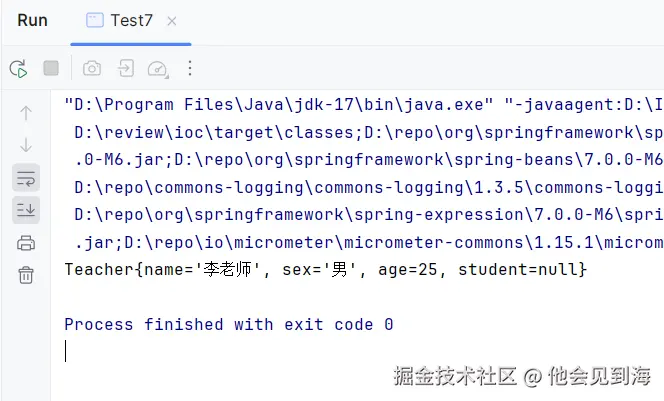
<bean id="teacher" class="com.review.test4.Teacher">
<constructor-arg name="name" value="李老师"></constructor-arg>
<constructor-arg name="sex" value="男"></constructor-arg>
<constructor-arg name="age" value="25"></constructor-arg>
</bean>
java
public class Test7 {

    public static void main(String[] args) {

        ApplicationContext context = new ClassPathXmlApplicationContext("spring.xml");

        Teacher teacher = (Teacher) context.getBean("teacher");

        System.out.println(teacher);

    }

}
引用数据类型
引用数据类型使用ref赋值
xml
<bean id="student" class="com.review.test4.Student" scope="prototype"></bean>
<bean id="teacher" class="com.review.test4.Teacher">
<constructor-arg name="name" value="李老师"></constructor-arg>
<constructor-arg name="sex" value="男"></constructor-arg>
<constructor-arg name="age" value="25"></constructor-arg>
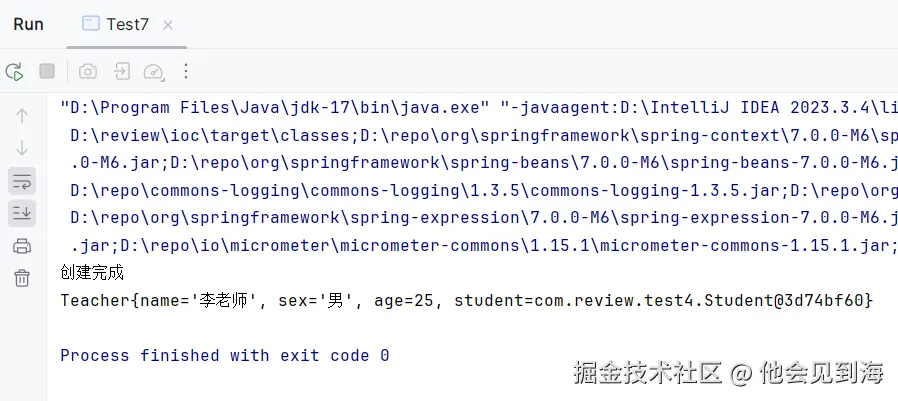
<constructor-arg name="student" ref="student"></constructor-arg>
</bean>
java
public class Test7 {

    public static void main(String[] args) {

        ApplicationContext context = new ClassPathXmlApplicationContext("spring.xml");

        Teacher teacher = (Teacher) context.getBean("teacher");

        System.out.println(teacher);

    }

}
使用set方法
在xml文件中使用property标签来进行赋值
标签:property
标签属性:
name:找的是类中set方法后面的部分value:给属性赋值的是基本数据类型和String类型ref:给属性赋值是其他bean类型的
基本数据类型
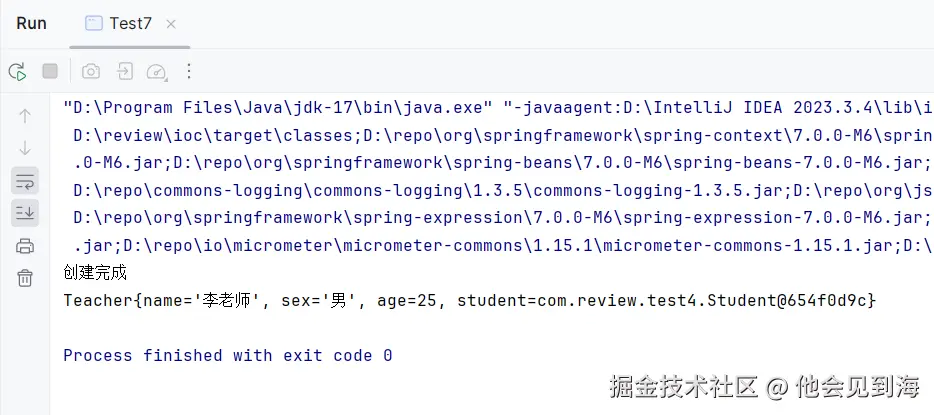
xml
<bean id="teacher" class="com.review.test4.Teacher">
    <property name="name" value="李老师"></property>
    <property name="age" value="25"></property>
    <property name="sex" value="男"></property>
</bean>
输出代码同上
引用数据类型
xml
<bean id="teacher" class="com.review.test4.Teacher">
    <property name="name" value="李老师"></property>
    <property name="age" value="25"></property>
    <property name="sex" value="男"></property>
    <property name="student" ref="student"></property>
</bean>
输出代码同上
总结
知道了什么是Spring,Spring的优势是什么,Spring的基本使用。了解了Bean的生命周期,同时对Spring的一个核心功能IOC(控制反转)有了更深的理解,同时理解了什么是依赖注入,学会了通过XML文件配置IOC和不同方式的依赖注入。