以 IntStream 为例,浅析 Java 中 Stream 的实现
我们在使用 Stream 时,典型的步骤是
- 创建
Stream - 执行若干(可以是
0个)中间操作 - 执行终止操作
下面举一个具体的例子。 假设现在需要计算小于 10 的所有正偶数的立方和,即
23+43+63+83
可以用如下的代码来计算。⬇️
java
import java.util.stream.IntStream;

public class SimpleIntStream {
    public static void main(String[] args) {
        // Suppose that we need to calculate the cubic sum of positive even numbers that are less than 10
        int result = IntStream.range(1, 10) // Step 1
                .filter(n -> (n & 1) == 0) // Step 2
                .map(n -> n * n * n) // Step 3
                .sum(); // Step 4
        System.out.println("The result of 2**3 + 4**3 + 6**3 + 8**3 is: " + result);
    }
}
上面的代码中和 Stream 有直接关系的代码共有 4 步,我在注释中标出来了。
Step 1: 创建IntStreamStep 2: 调用IntStream.filter(...)方法,生成一个新的IntStreamStep 3: 调用IntStream.map(...)方法,生成一个新的IntStreamStep 4: 调用IntStream.sum()方法,得到结果。
其中 Step 2 和 Step 3 都是中间操作。 Step 4 是终止操作。
我们来看看这 4 个 step 的背后发生了什么。
Step 1: 创建 IntStream
分析
Step 1 就是 IntStream.range(1, 10)。 它创建了 IntStream 的一个实例。 为便于叙述,我们把这个实例称为 stage1。
因为 IntStream 是接口,所以其背后必定有某个实现类。
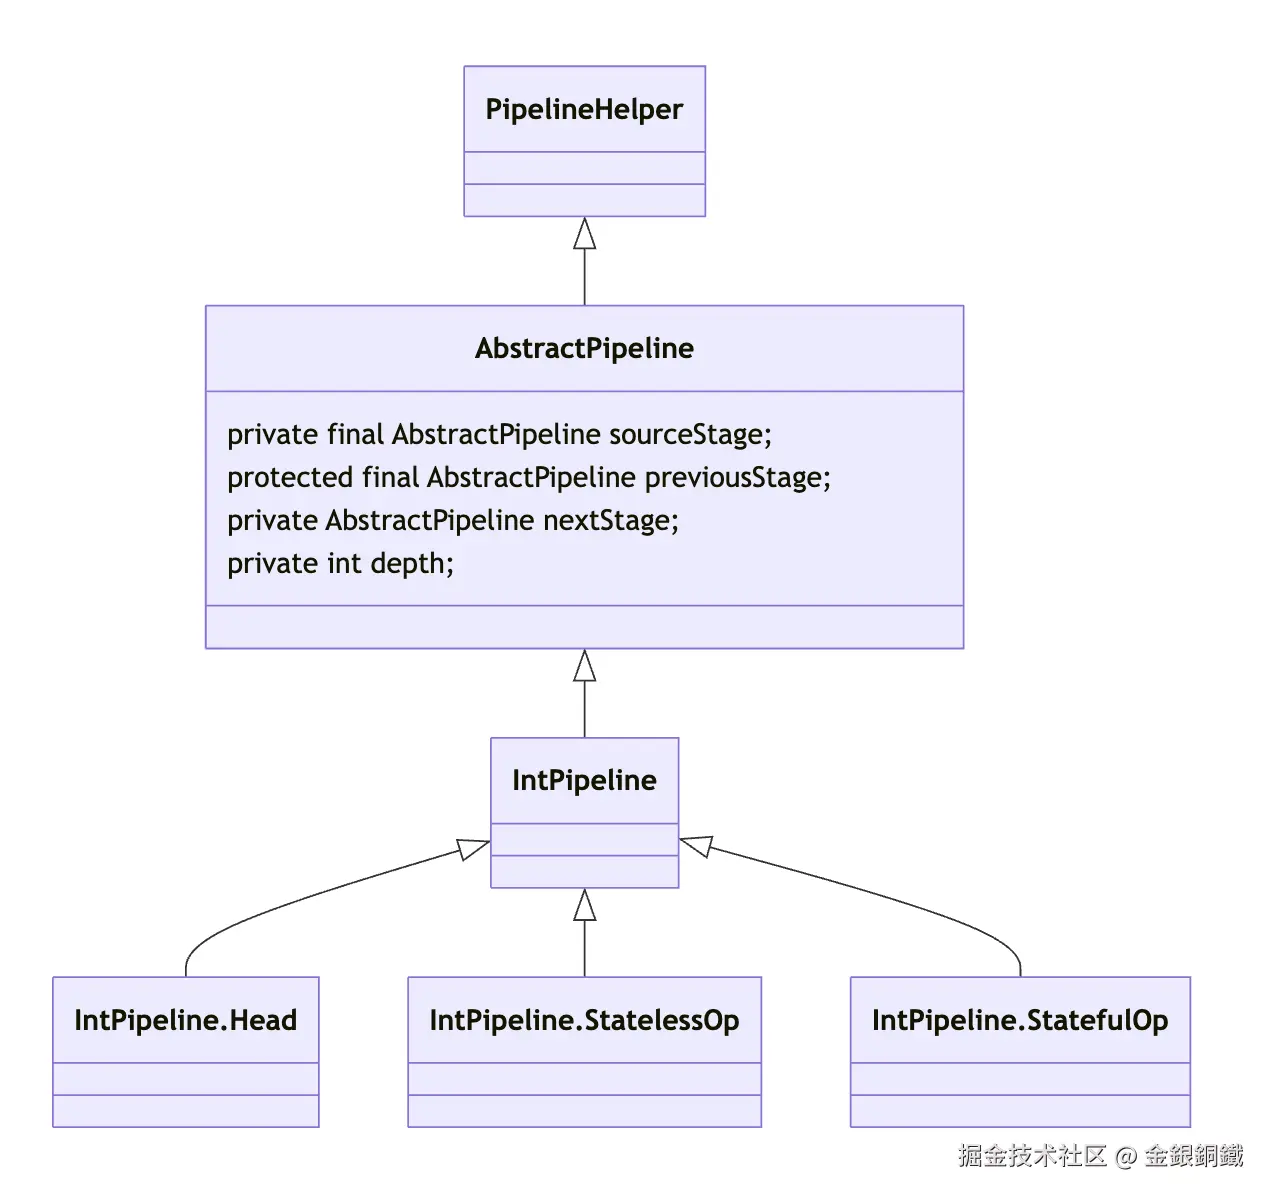
借助 Intellij IDEA,可以看到对应的实现类是 IntPipeline.Head (全限定类名是 java.util.stream.IntPipeline.Head)⬇️

我画了一张图来表示 Step 1 背后的逻辑 ⬇️

这张图中,灰色背景的节点表示 Step 1 的代码, 蓝色背景的节点表示 IntPipeline.Head 的实例,即 stage1(完整的类名太长了,在图中就简称为 Head 了)。
图中有一条名为 sourceStage 的绿色边,这个 sourceStage 字段来自 AbstractPipeline 类。 Head 类和 AbstractPipeline 和之间的关系如下图所示 ⬇️
总结
Step 1 创建了 IntPipeline.Head 类的实例 stage1。
Step 2: 执行 filter 操作得到新的 IntStream
分析
Step 1 创建了 IntStream 的一个实例 stage1, Step 2 通过 stage1 调用 IntStream.filter(...) 方法,并生成 IntStream 的又一个实例。我们称这个新实例为 stage2。
借助 Intellij IDEA,可以看到 stage2 是 java.util.stream.IntPipeline.StatelessOp 的一个 子类 的实例 ⬇️  注意: stage2 的精确类型是
 java.util.stream.IntPipeline$10,由于这是一个匿名内部类,我们不必关心这个类的具体名称。
我画了一张图来表示 Step 2 背后的逻辑 ⬇️

灰色背景的节点表示 Step 2 的代码, 蓝色背景的两个节点表示 IntStream 的两个实例,即 stage1 和 stage2。
- 图中有名为
previousStage的黄色边,这个previousStage字段来自AbstractPipeline类。 - 图中有名为
nextStage的蓝色边,这个nextStage字段来自AbstractPipeline类。
总结
Step 2 创建了 IntPipeline.StatelessOp 类的(子类的)实例 stage2,而 stage1, stage2 通过 previousStage 字段和 nextStage 字段组成了一个双向链表。
Step 3: 执行 map 操作得到新的 IntStream
分析
Step 2 创建了 IntStream 的实例 stage2, Step 3 通过 stage2 调用 IntStream.map(...) 方法,生成 IntStream 的一个实例。我们称这个新实例为 stage3。
借助 Intellij IDEA,可以看到 stage3 是 java.util.stream.IntPipeline.StatelessOp 的一个 子类 的实例 ⬇️

注意: stage3 的精确类型是 java.util.stream.IntPipeline$4,由于这是一个匿名内部类,我们不必关心这个类的具体名称。
下图展示了 Step 3 背后的逻辑 ⬇️

灰色背景的节点表示 Step 3 的代码, 蓝色背景的三个节点表示 IntStream 的三个实例,即 stage1, stage2, stage3。
总结
Step 3 创建了 IntPipeline.StatelessOp 类的(子类的)实例 stage3,而 stage1, stage2, stage3 组成了一个双向链表。
nextStage用于指向链表中的下一个节点。如果用 → 来表示nextStage的话,那么这三个节点的关系可以表示为 stage1 → stage2 → stage3previousStage用于指向链表中的上一个节点。如果用 ← 来表示previousStage的话,那么这三个节点的关系可以表示为 stage1 ← stage2 ← stage3
我把 stage1, stage2, stage3 中几个重要字段的值列在下方的表格中(其中 depth 字段上文没有提到,不过它的含义比较直观)。
| sourceStage | nextStage | previousStage | depth | |
|---|---|---|---|---|
| stage1 | stage1 | stage2 | null | 0 |
| stage2 | stage1 | stage3 | stage1 | 1 |
| stage3 | stage1 | null | stage2 | 2 |
现在我们只关心 nextStage 和 previousStage 这两个字段,我把 Step 3 的图简化一下,得到如下的结果 ⬇️

Step 4: 调用 sum() 方法
Step 1 到 Step 3 都是在创建 IntStream 的实例,而真正的计算逻辑是在 Step 4 完成的。
借助 Intellij IDEA,可以看到 sum() 方法的逻辑如下
java
@Override
public final int sum() {
    return reduce(0, Integer::sum);
}
我们再去查看 reduce(...) 方法 ⬇️
java
@Override
public final int reduce(int identity, IntBinaryOperator op) {
    return evaluate(ReduceOps.makeInt(identity, op));
}
evaluate(...) 方法的代码如下 ⬇️

通过打断点可以确认,我们的代码对应的 isParallel() 值为 false。
所以会运行到下面这一行。
java
terminalOp.evaluateSequential(this, sourceSpliterator(terminalOp.getOpFlags()))这个 evaluateSequential(...) 方法定义在 java.util.Spliterator.TerminalOp 接口中。
我们需要去 TerminalOp 接口的实现类中查看实际运行的逻辑。
TerminalOp 接口中的 evaluateSequential(...) 方法
TerminalOp 接口的实现类是在下图红框位置生成的 ⬇️ 
我们再去看 ReduceOps 类中的 makeInt(...) 方法的逻辑 ⬇️
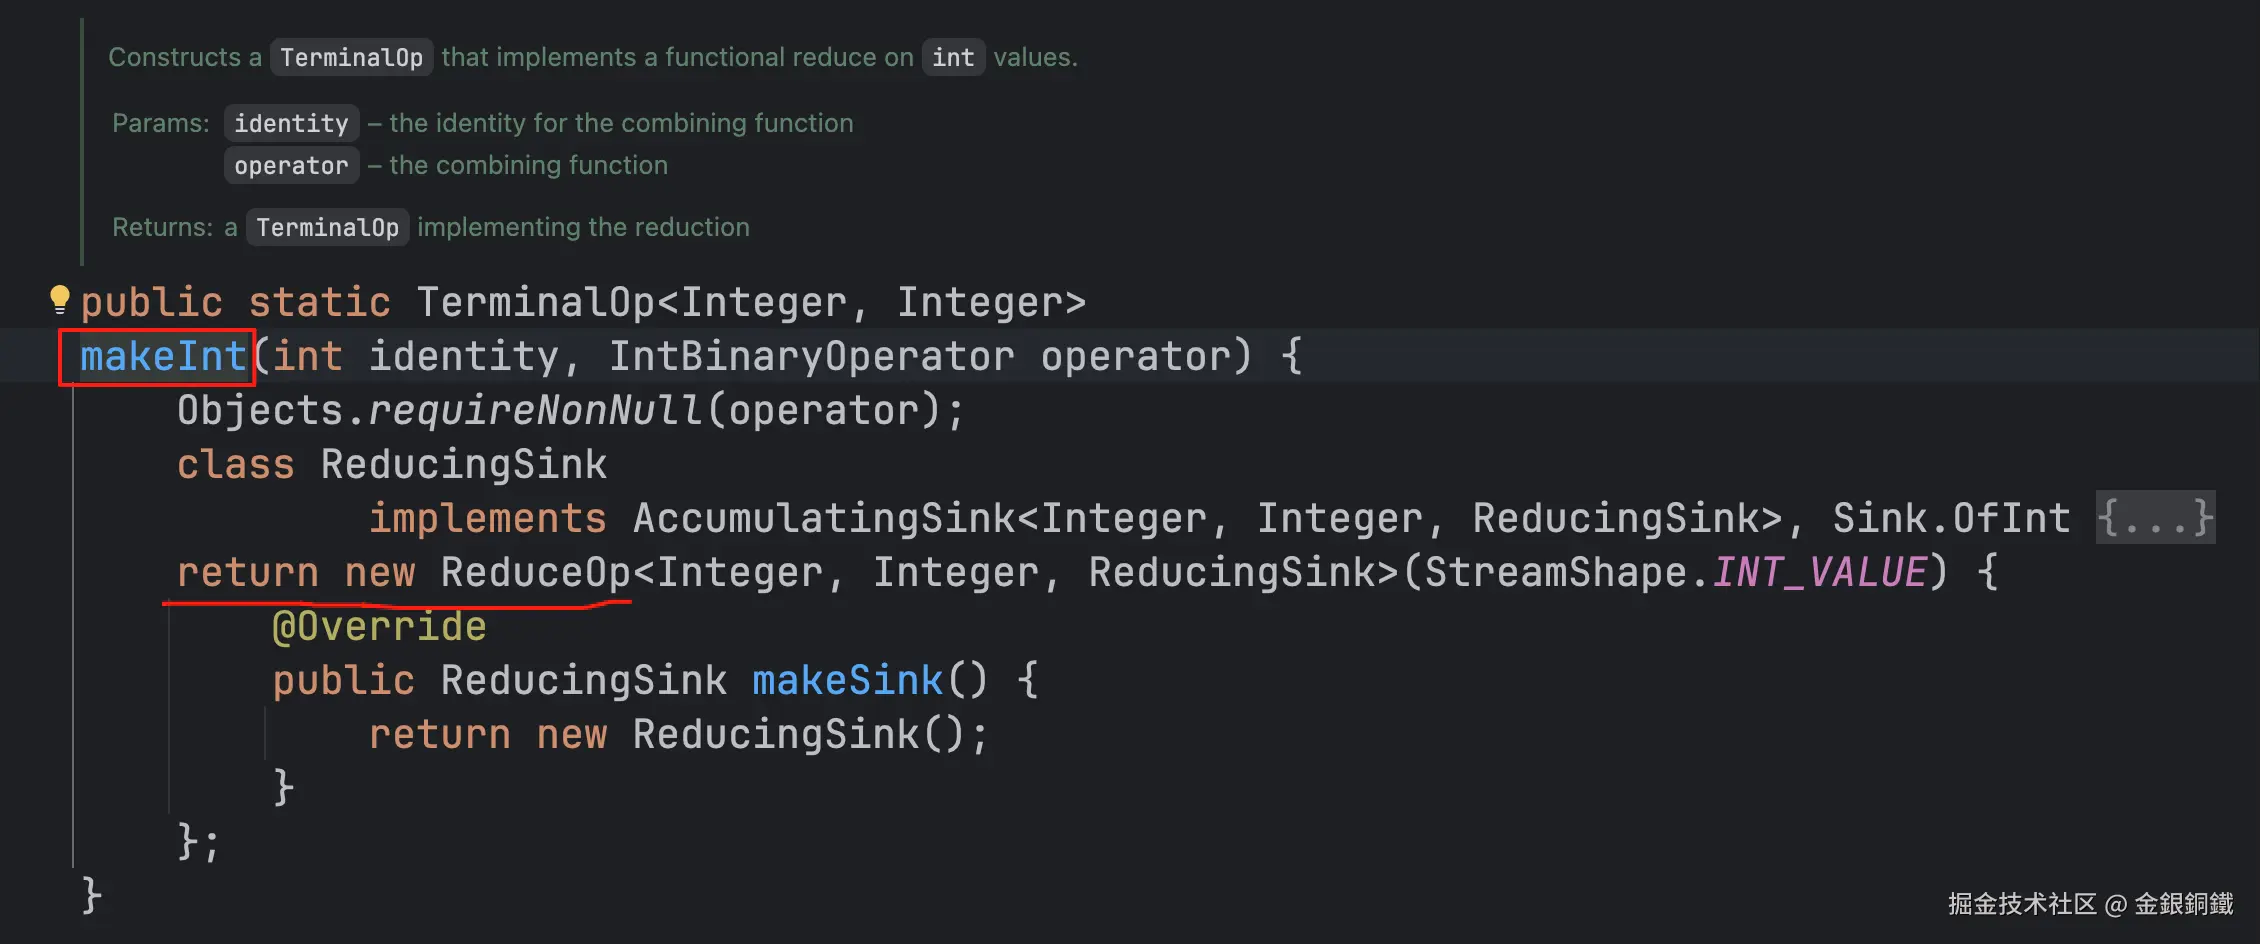
看来 ReduceOps 类中的 makeInt(...) 方法会返回一个匿名内部类,且这个匿名内部类是 ReduceOp 类的子类。
这里啰嗦一句,在打断点时,可以看到这个匿名内部类的全限定类名是 java.util.stream.ReduceOps$6,不过既然是匿名内部类,那么它的名称也就不重要了。这有点像做了好事而不愿留名的人,对这样的人来说,只要好事做完了就可以了,别人不必知道自己的名字。
我画了类图来表示这几个类的继承关系 ⬇️

由于匿名内部类(即 ReduceOps$6)中没有 override evaluateSequential(...) 方法, 所以最终调用的是 ReduceOp 类里的 evaluateSequential(...) 方法。
ReduceOp 类里的 evaluateSequential(...) 方法是这样的 ⬇️
java
@Override
public <P_IN> R evaluateSequential(PipelineHelper<T> helper,
                                   Spliterator<P_IN> spliterator) {
    return helper.wrapAndCopyInto(makeSink(), spliterator).get();
}
所以要看以下两处逻辑
-
makeSink() -
helper.wrapAndCopyInto(...)
先看 makeSink()。
makeSink() 方法
makeSink() 的字面意思是制作 sink。怎么理解呢?
从 Step 1 到 Step 3,我们生成了 3 个 IntStream 的实例。我们可以把这些实例想象成水流, 那么水流要流到哪里去呢?要流到 sink 去。我去 Google 了一下 ⬇️

看来厨房和卫生间的水槽都可以称为 sink。水从 sink 流走, stream 也从 sink 流走。

通过打断点可以看到 makeSink() 中只有以下一句代码
java
return new ReducingSink();这句代码返回了 ReducingSink 类的实例,我们称这个实例为 sink1。 注意:ReducingSink 类是局部内部类,它的全限定类名是 java.util.stream.ReduceOps$5ReducingSink(我们不用关心它的具体名称)。
makeSink() 我们已经看完了,更新一下任务列表 ⬇️
-
makeSink() -
helper.wrapAndCopyInto(...)
然后再看 helper.wrapAndCopyInto(...)。
helper.wrapAndCopyInto(...) 方法
wrapAndCopyInto(...) 方法定义在 PipelineHelper 这个抽象类中 ⬇️

AbstractPipeline 类中 override 了这个方法 ⬇️
java
// 以下代码是从 AbstractPipeline.java 里 copy 过来的
@Override
final <P_IN, S extends Sink<E_OUT>> S wrapAndCopyInto(S sink, Spliterator<P_IN> spliterator) {
    copyInto(wrapSink(Objects.requireNonNull(sink)), spliterator);
    return sink;
}
其中的主要逻辑是 wrapSink(...) 和 copyInto(...),我们将任务列表更新如下 ⬇️
-
makeSink() -
helper.wrapAndCopyInto(...)-
wrapSink(...) -
copyInto(...)
-
先看 wrapSink(...),从名字来看,似乎是要对 Sink 做一些包装的工作。 它的 javadoc 如下 ⬇️ 看来确实如此 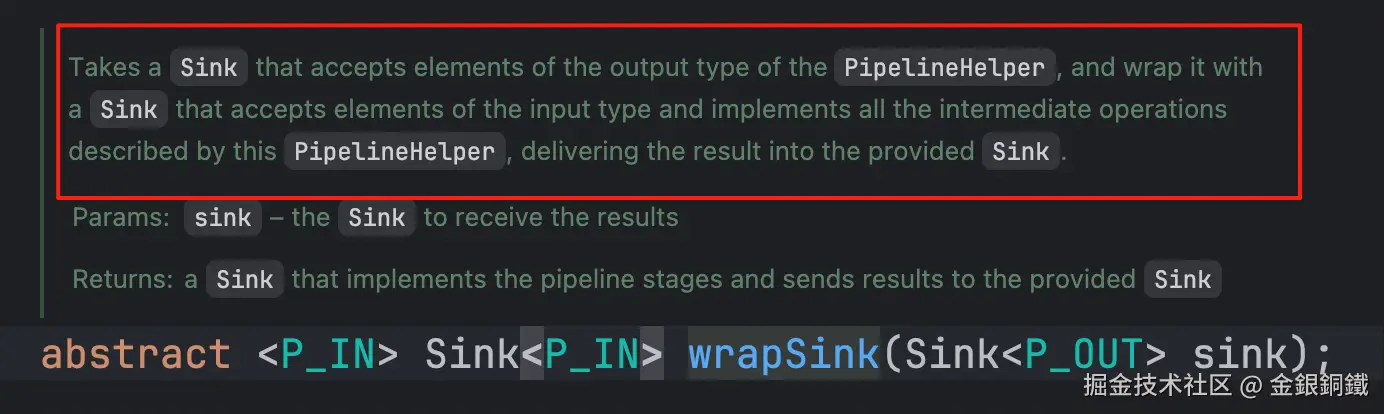
其代码如下
java
// 以下代码是从 AbstractPipeline.java 里 copy 过来的
@Override
@SuppressWarnings("unchecked")
final <P_IN> Sink<P_IN> wrapSink(Sink<E_OUT> sink) {
    Objects.requireNonNull(sink);

    for ( @SuppressWarnings("rawtypes") AbstractPipeline p=AbstractPipeline.this; p.depth > 0; p=p.previousStage) {
        sink = p.opWrapSink(p.previousStage.combinedFlags, sink);
    }
    return (Sink<P_IN>) sink;
}
通过阅读代码和打断点,会发现这段代码的作用是将所有的非 Head 节点包装成 sink。 从 Step 1 到 Step 3,我们得到了 stage1, stage2, stage3。其中只有 stage1 是 Head 节点。 包装后会变成这样 ⬇️

请注意
3个stage节点是从Head的实例算起的,所以 从上到下 依次是 stage1, stage2, stage3 (Head实例是 stage1)3个sink节点是从ReducingSink的实例算起的,所以 从下到上 依次是 sink1, sink2, sink3(ReducingSink实例是 sink1),这3个sink节点通过downstream字段构成了一个单链表 sink3 → sink2 → sink1
wrapSink(...) 方法的返回值就是上图的 sink3
wrapSink(...) 方法看完了,更新后的任务列表如下 ⬇️
-
makeSink() -
helper.wrapAndCopyInto(...)-
wrapSink(...) -
copyInto(...)
-
然后我们再去看 copyInto(...) 方法。从名称来看,这个方法的作用应该是把 stream 中的元素 copy 到 sink 里去。
这个方法的 javadoc 如下 ⬇️

打断点后,会看到我们的代码将运行到 copyInto(...) 方法里的 if 分支 ⬇️

上图中的 wrappedSink 就是上文刚刚提到的 sink3
java
wrappedSink.begin(spliterator.getExactSizeIfKnown());
spliterator.forEachRemaining(wrappedSink);
wrappedSink.end();
看来又有新的代码要看了,更新后的任务列表如下 ⬇️
-
makeSink() -
helper.wrapAndCopyInto(...)-
wrapSink(...) -
copyInto(...)-
begin(long)method inSinkinterface -
forEachRemaining(Consumer)method inSpliteratorinterface -
end()method inSinkinterface
-
-
先猜测一下 ⬇️
begin(long)听起来像是在真正的处理前,做准备工作的步骤forEachRemaining(Consumer)听起来像是真正干活的步骤end()听起来像是干完活后,处理善后事宜的步骤
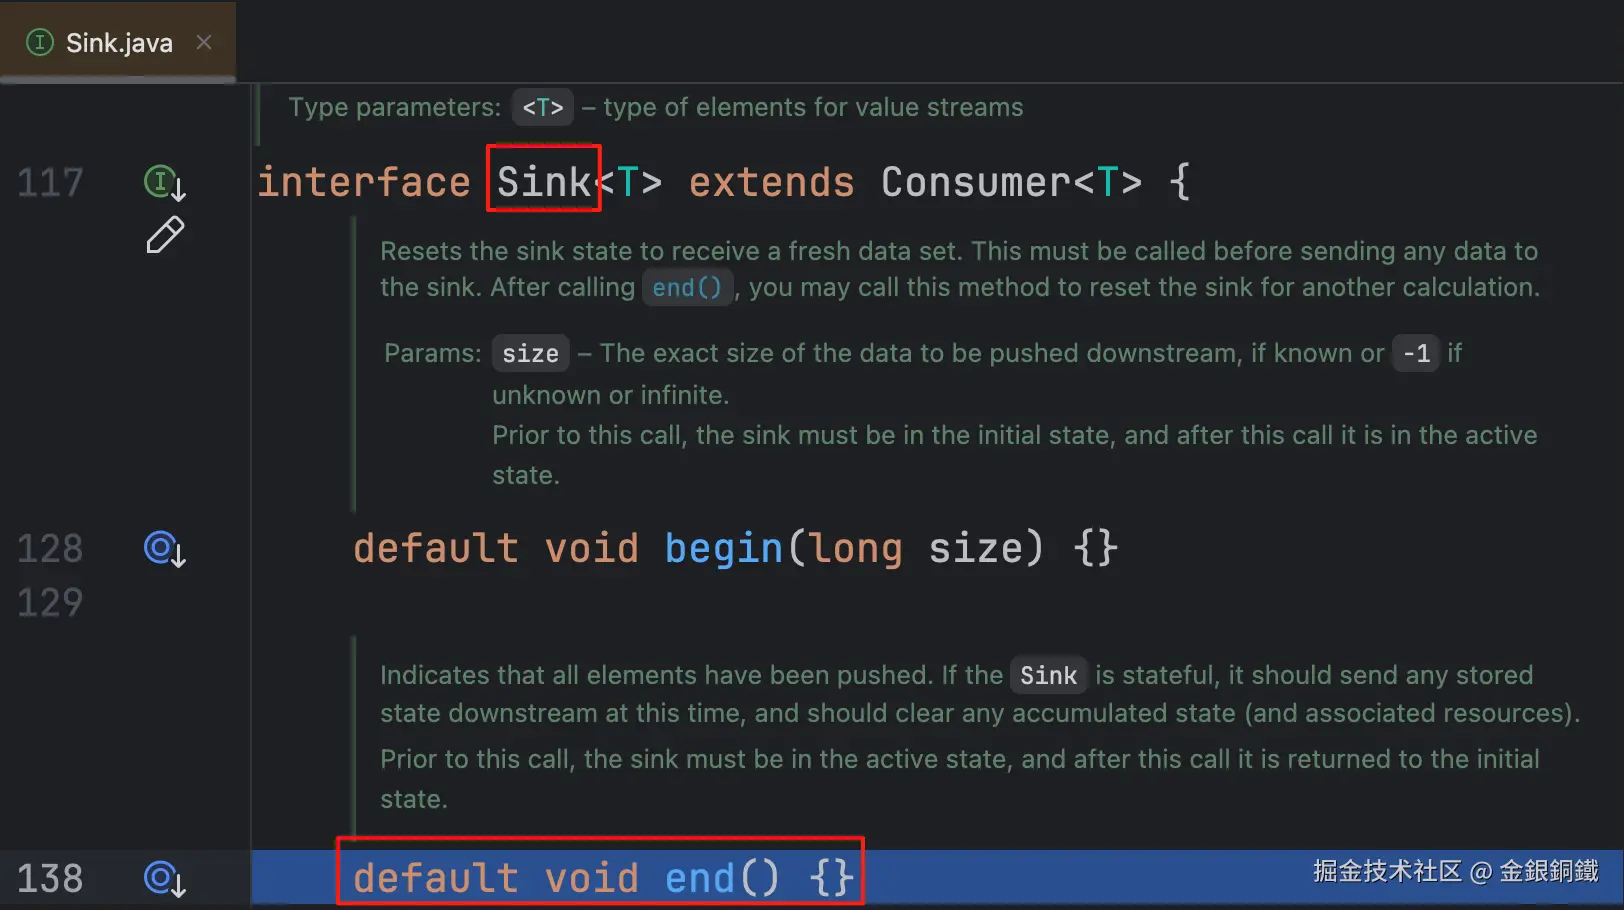
begin(long) 和 end() 都是 Sink 接口中定义的方法,我把这两个方法的 javadoc 复制到下方 ⬇️
java
// 下方的代码是从 Sink.java 中 copy 的
/**
 * Resets the sink state to receive a fresh data set.  This must be called
 * before sending any data to the sink.  After calling {@link #end()},
 * you may call this method to reset the sink for another calculation.
 * @param size The exact size of the data to be pushed downstream, if
 * known or {@code -1} if unknown or infinite.
 *
 * <p>Prior to this call, the sink must be in the initial state, and after
 * this call it is in the active state.
 */
default void begin(long size) {}

/**
 * Indicates that all elements have been pushed.  If the {@code Sink} is
 * stateful, it should send any stored state downstream at this time, and
 * should clear any accumulated state (and associated resources).
 *
 * <p>Prior to this call, the sink must be in the active state, and after
 * this call it is returned to the initial state.
 */
default void end() {}
forEachRemaining(Consumer) 来自 Spliterator 接口,它的 javadoc 如下 ⬇️
java
// 下方的代码是从 Spliterator.java 中 copy 的
/**
 * Performs the given action for each remaining element, sequentially in
 * the current thread, until all elements have been processed or the action
 * throws an exception.  If this Spliterator is {@link #ORDERED}, actions
 * are performed in encounter order.  Exceptions thrown by the action
 * are relayed to the caller.
 * <p>
 * Subsequent behavior of a spliterator is unspecified if the action throws
 * an exception.
 *
 * @implSpec
 * The default implementation repeatedly invokes {@link #tryAdvance} until
 * it returns {@code false}.  It should be overridden whenever possible.
 *
 * @param action The action
 * @throws NullPointerException if the specified action is null
 */
default void forEachRemaining(Consumer<? super T> action) {
    do { } while (tryAdvance(action));
}但通过打断点,可以看到,我们的代码实际上执行的并不是上面这个方法,Spliterator.OfInt 这个嵌套类(其实它是个接口,但是如果叫"嵌套接口"的话,感觉有点拗口)中 override 了 forEachRemaining(Consumer) 方法。我们的代码会执行这个 override 的方法 ⬇️

通过打断点,我们会发现,上图的 if 分支成立。 这个 if 分支里只有下面一行代码
java
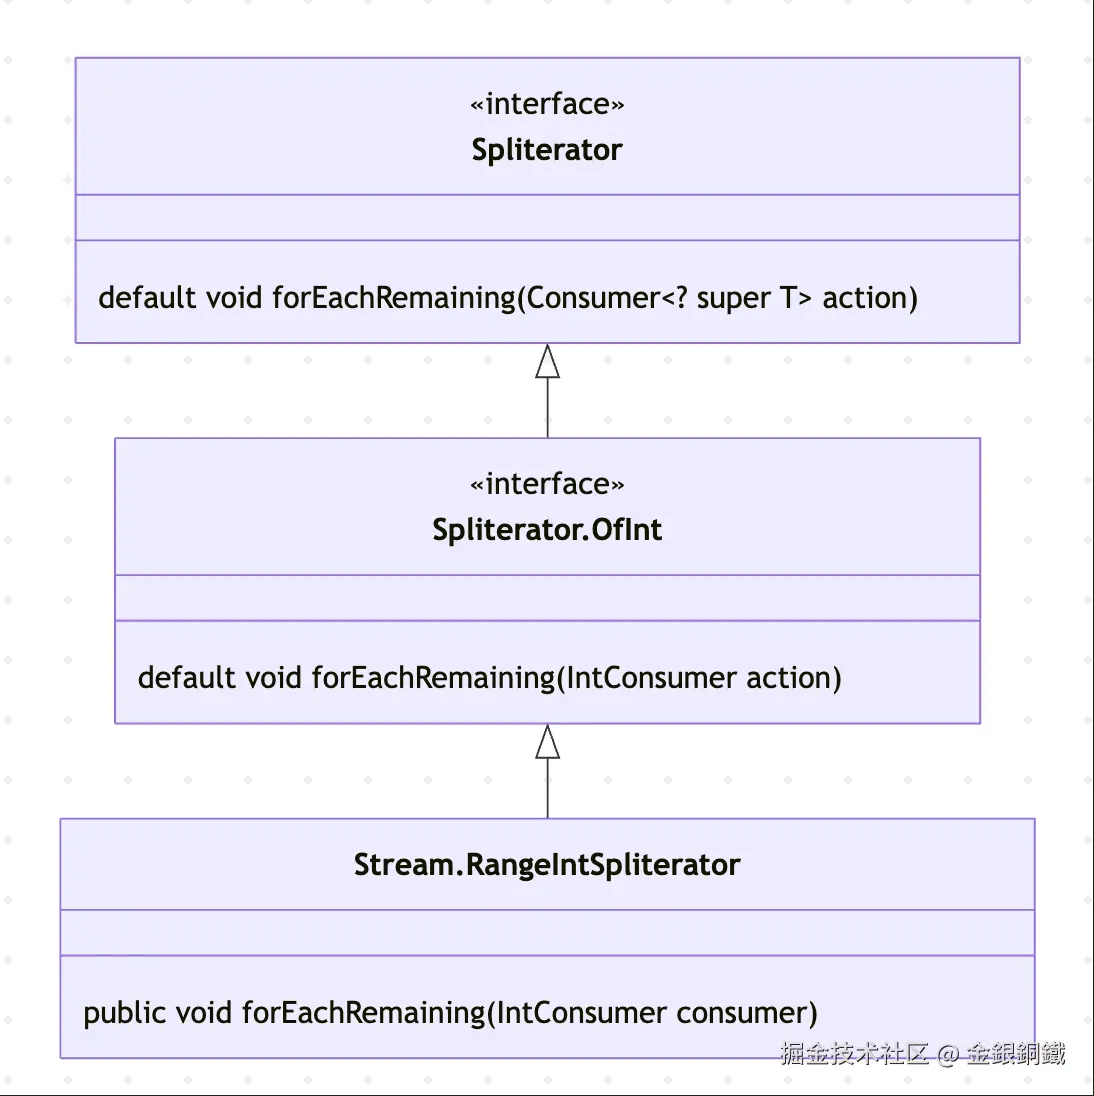
forEachRemaining((IntConsumer) action);上面的这个 forEachRemaining(IntConsumer) 方法在 Spliterator.OfInt 类中。 打断点后,会发现 java.util.stream.Streams.RangeIntSpliterator 类中 override 了 forEachRemaining(IntConsumer) 方法。
这里有一点绕,我们可以参考下方的类图来辅助理解。
打断点后,可以看到 i 会从 1 遍历到 10 (不包含 10)⬇️

图中的 consumer 就是上文提到的 sink3。 sink3 和 sink2 都是 Sink.ChainedInt 的子类的实例。
下方的表格展示了 sink3, sink2, sink1 是如何通过 downstream 字段连接起来的 ⬇️
| class | downstream | code | |
|---|---|---|---|
| sink3 | Sink.ChainedInt 的一个匿名子类 |
sink2 |  |
| sink2 | Sink.ChainedInt 的一个匿名子类 |
sink1 | 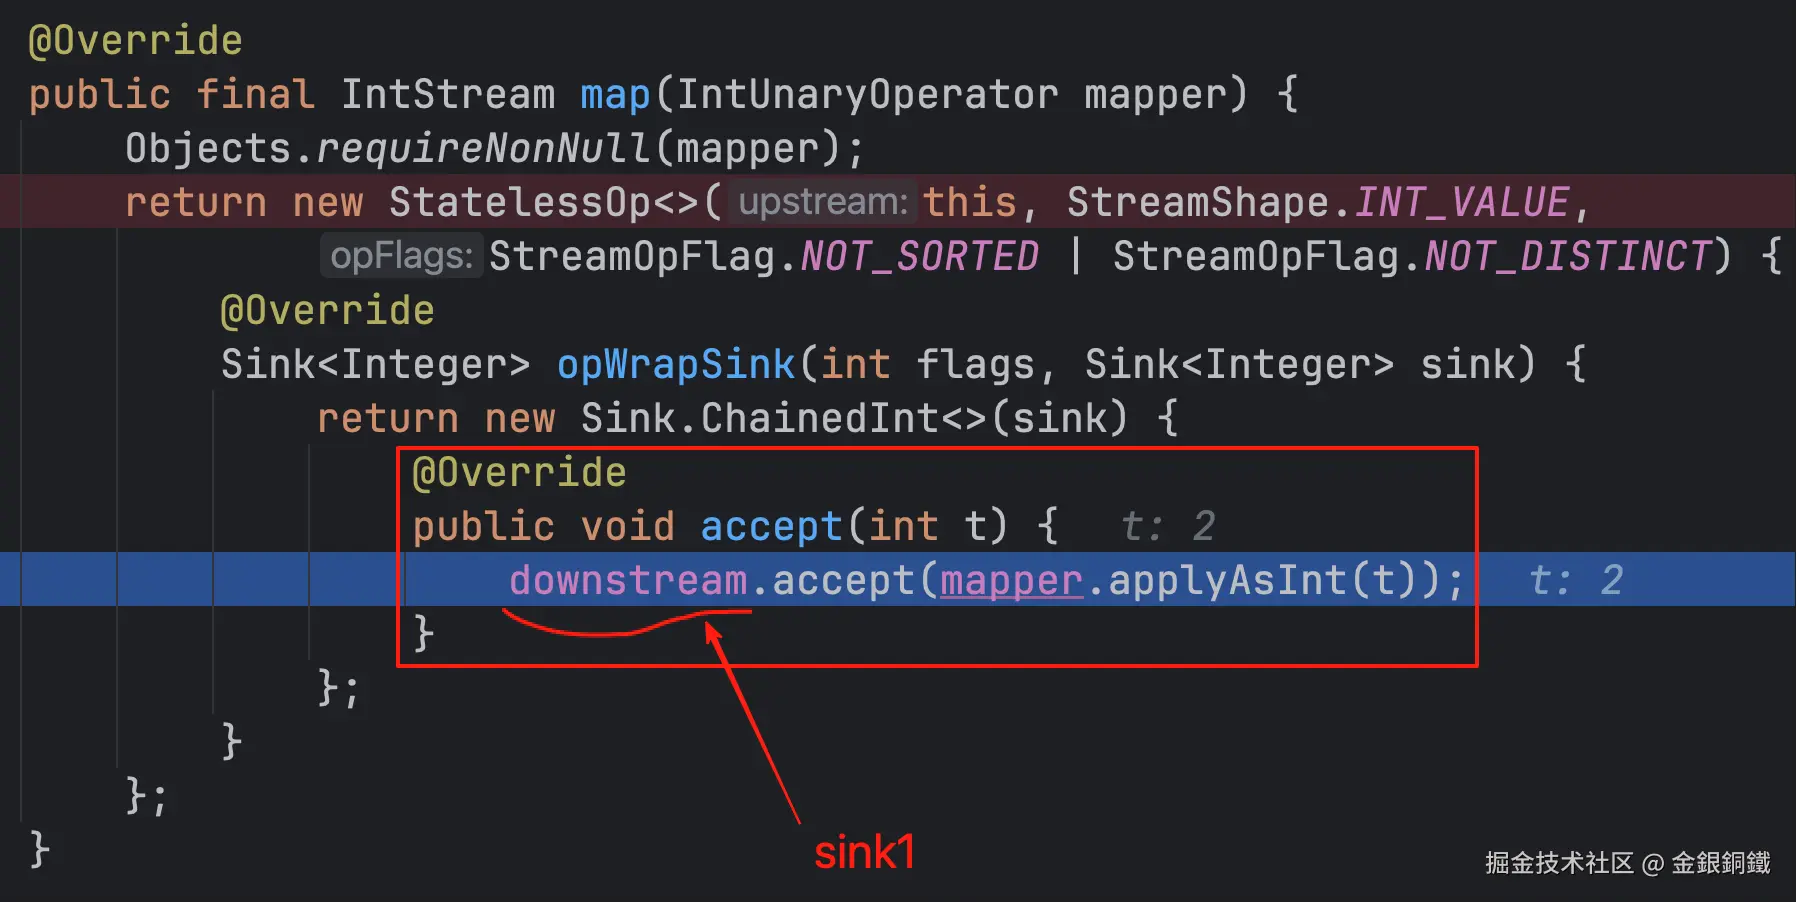 |
| sink1 | ReducingSink ⬅️ 它是一个局部内部类 |
没有 downstream 字段 | 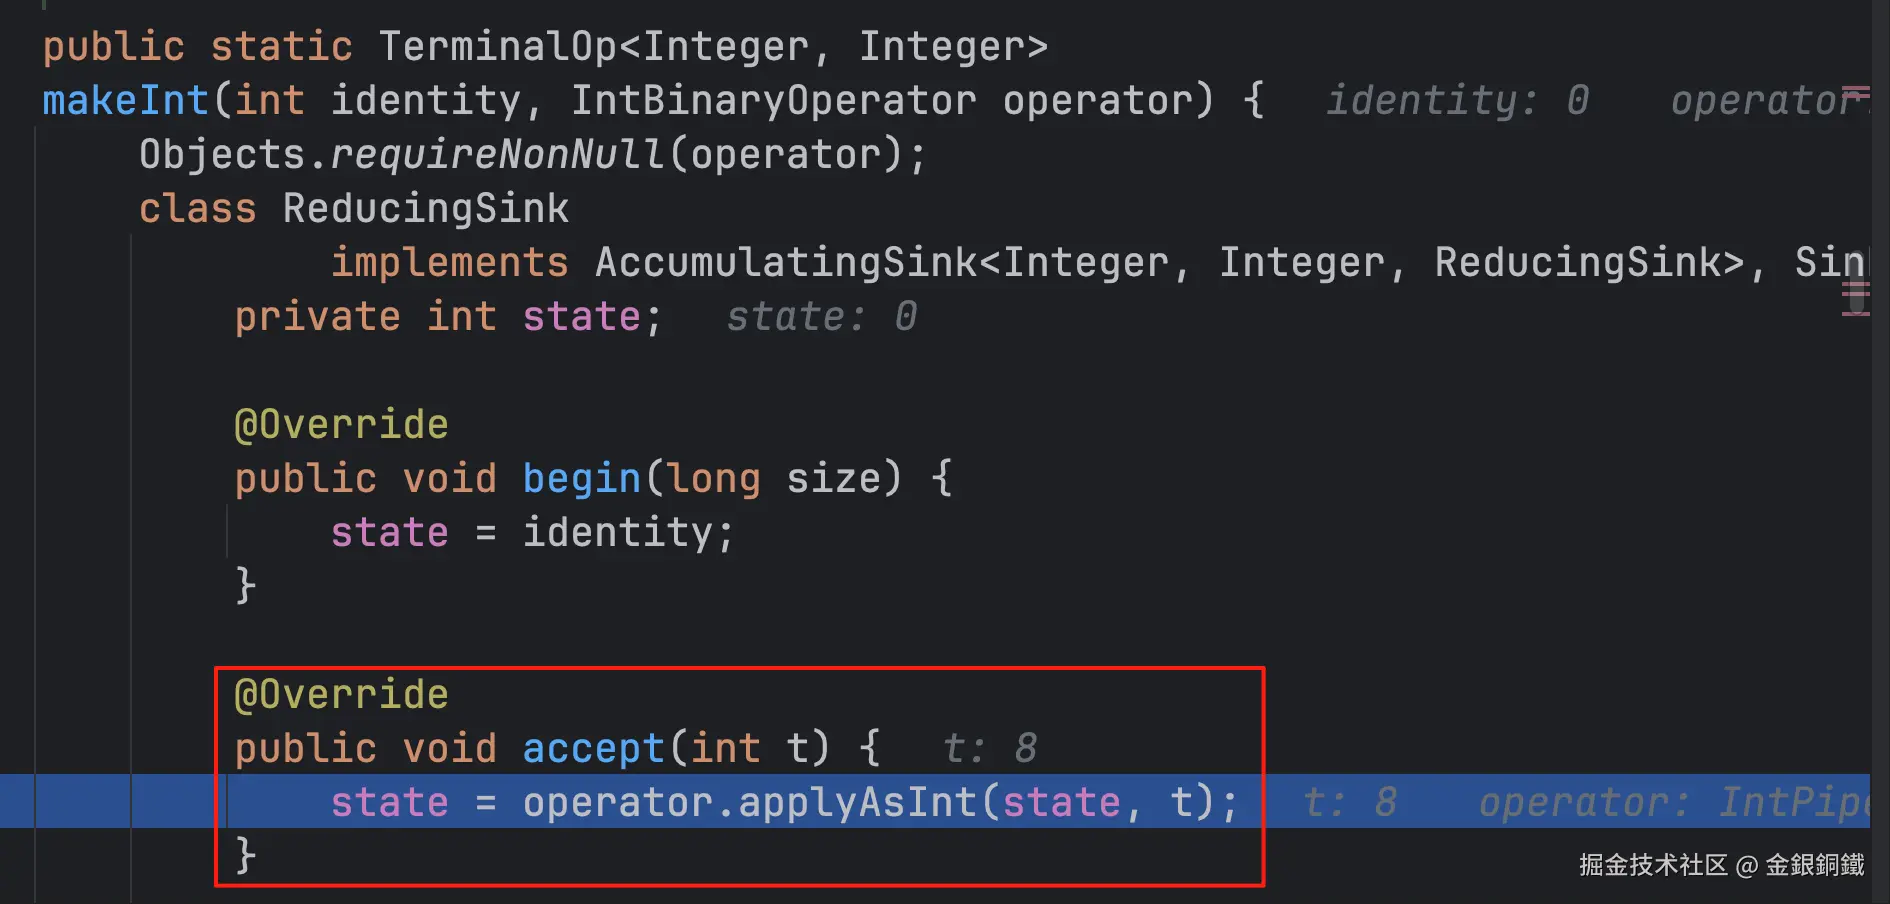 |
至于 begin(long) 和 end(),它们也是沿着 sink3→sink2→sink1 的方向来处理的。
为了方便理解,我画了对应的表格 ⬇️
| class | downstream | code for begin(long) | code for end() | |
|---|---|---|---|---|
| sink3 | Sink.ChainedInt 的一个匿名子类 |
sink2 | 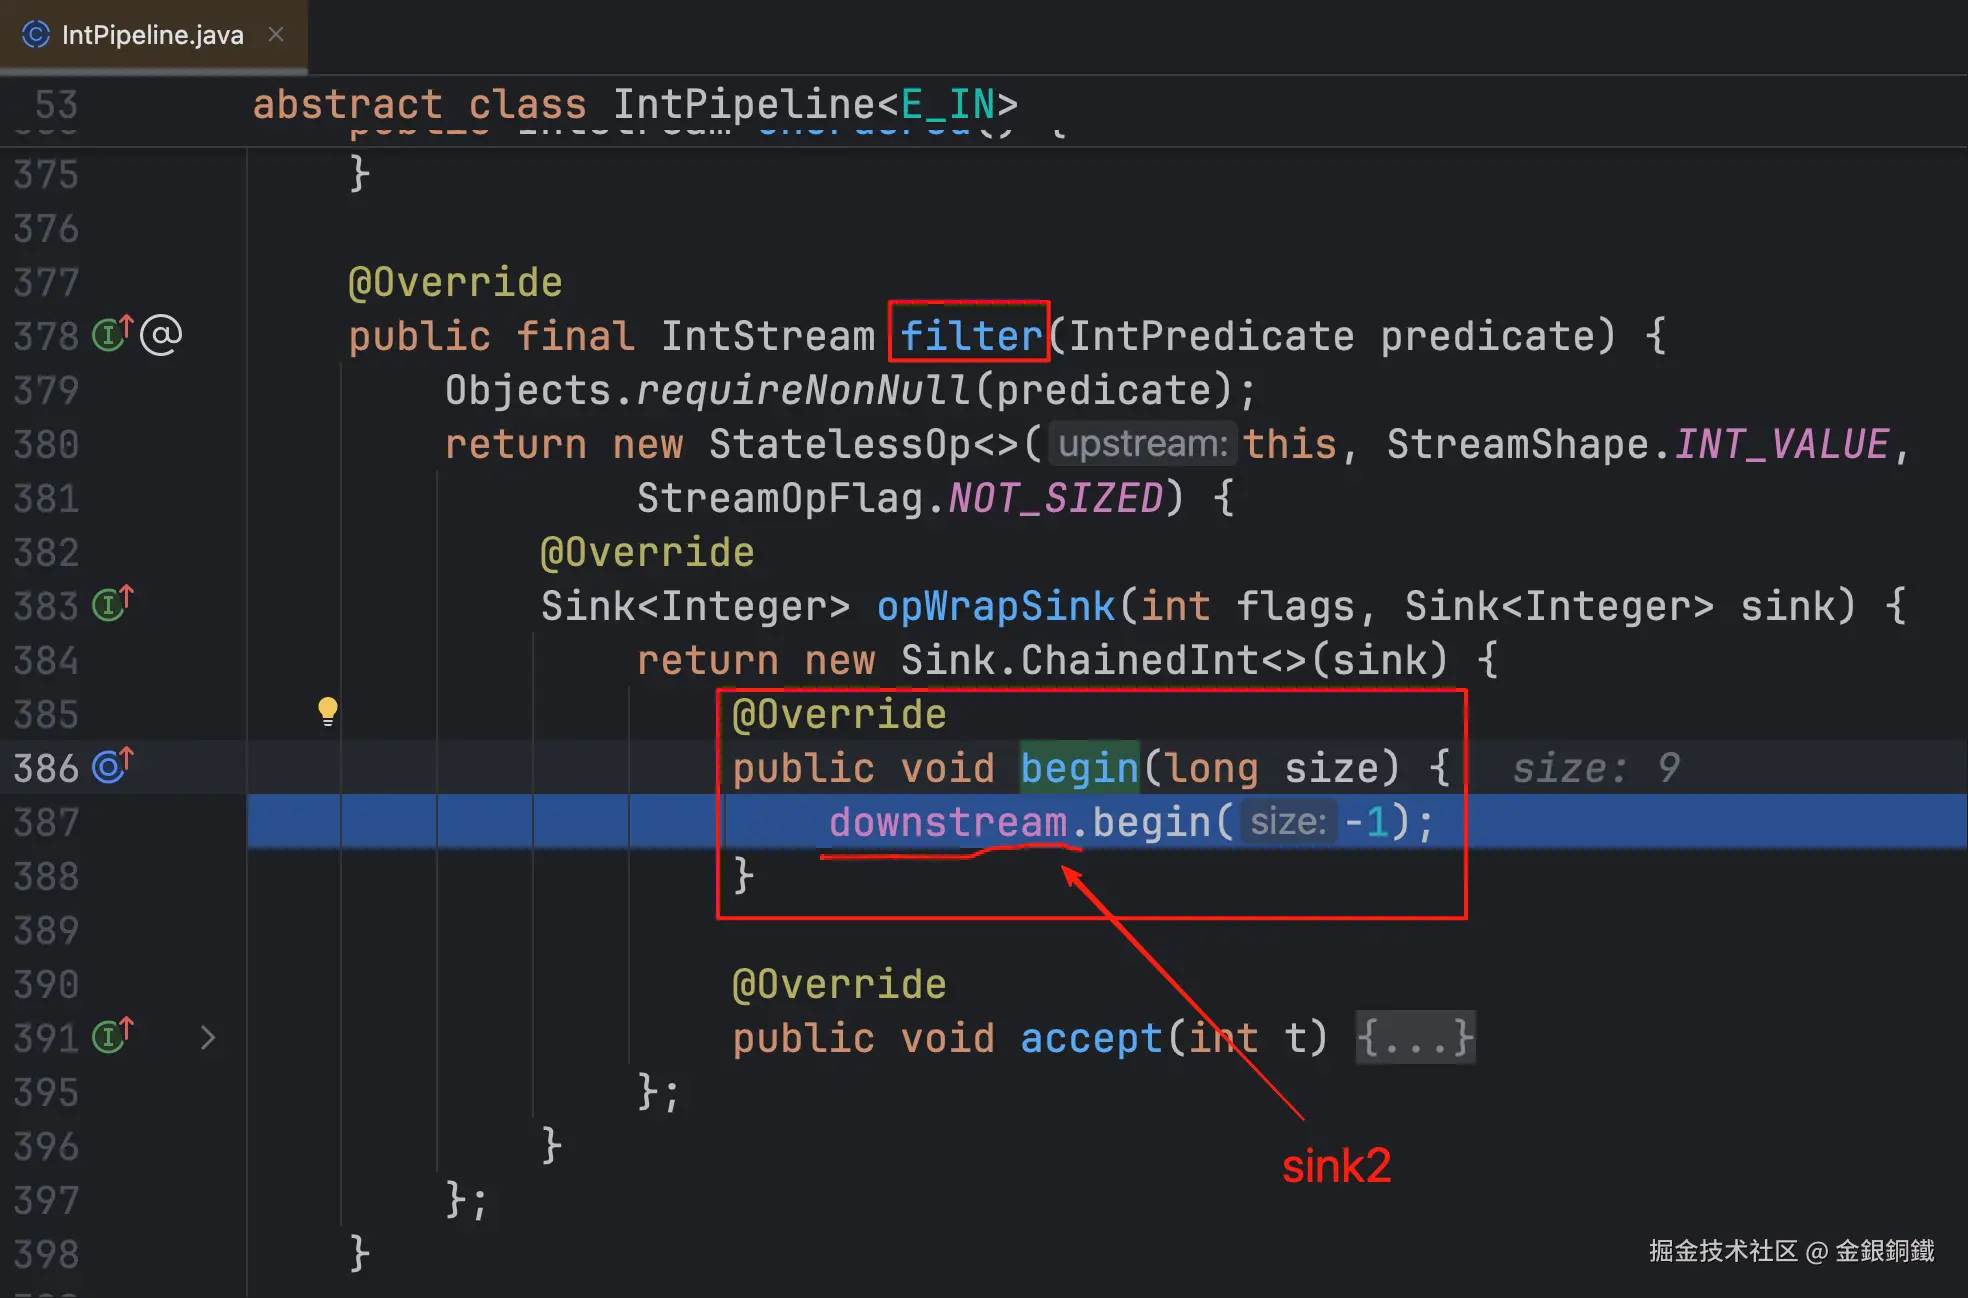 |
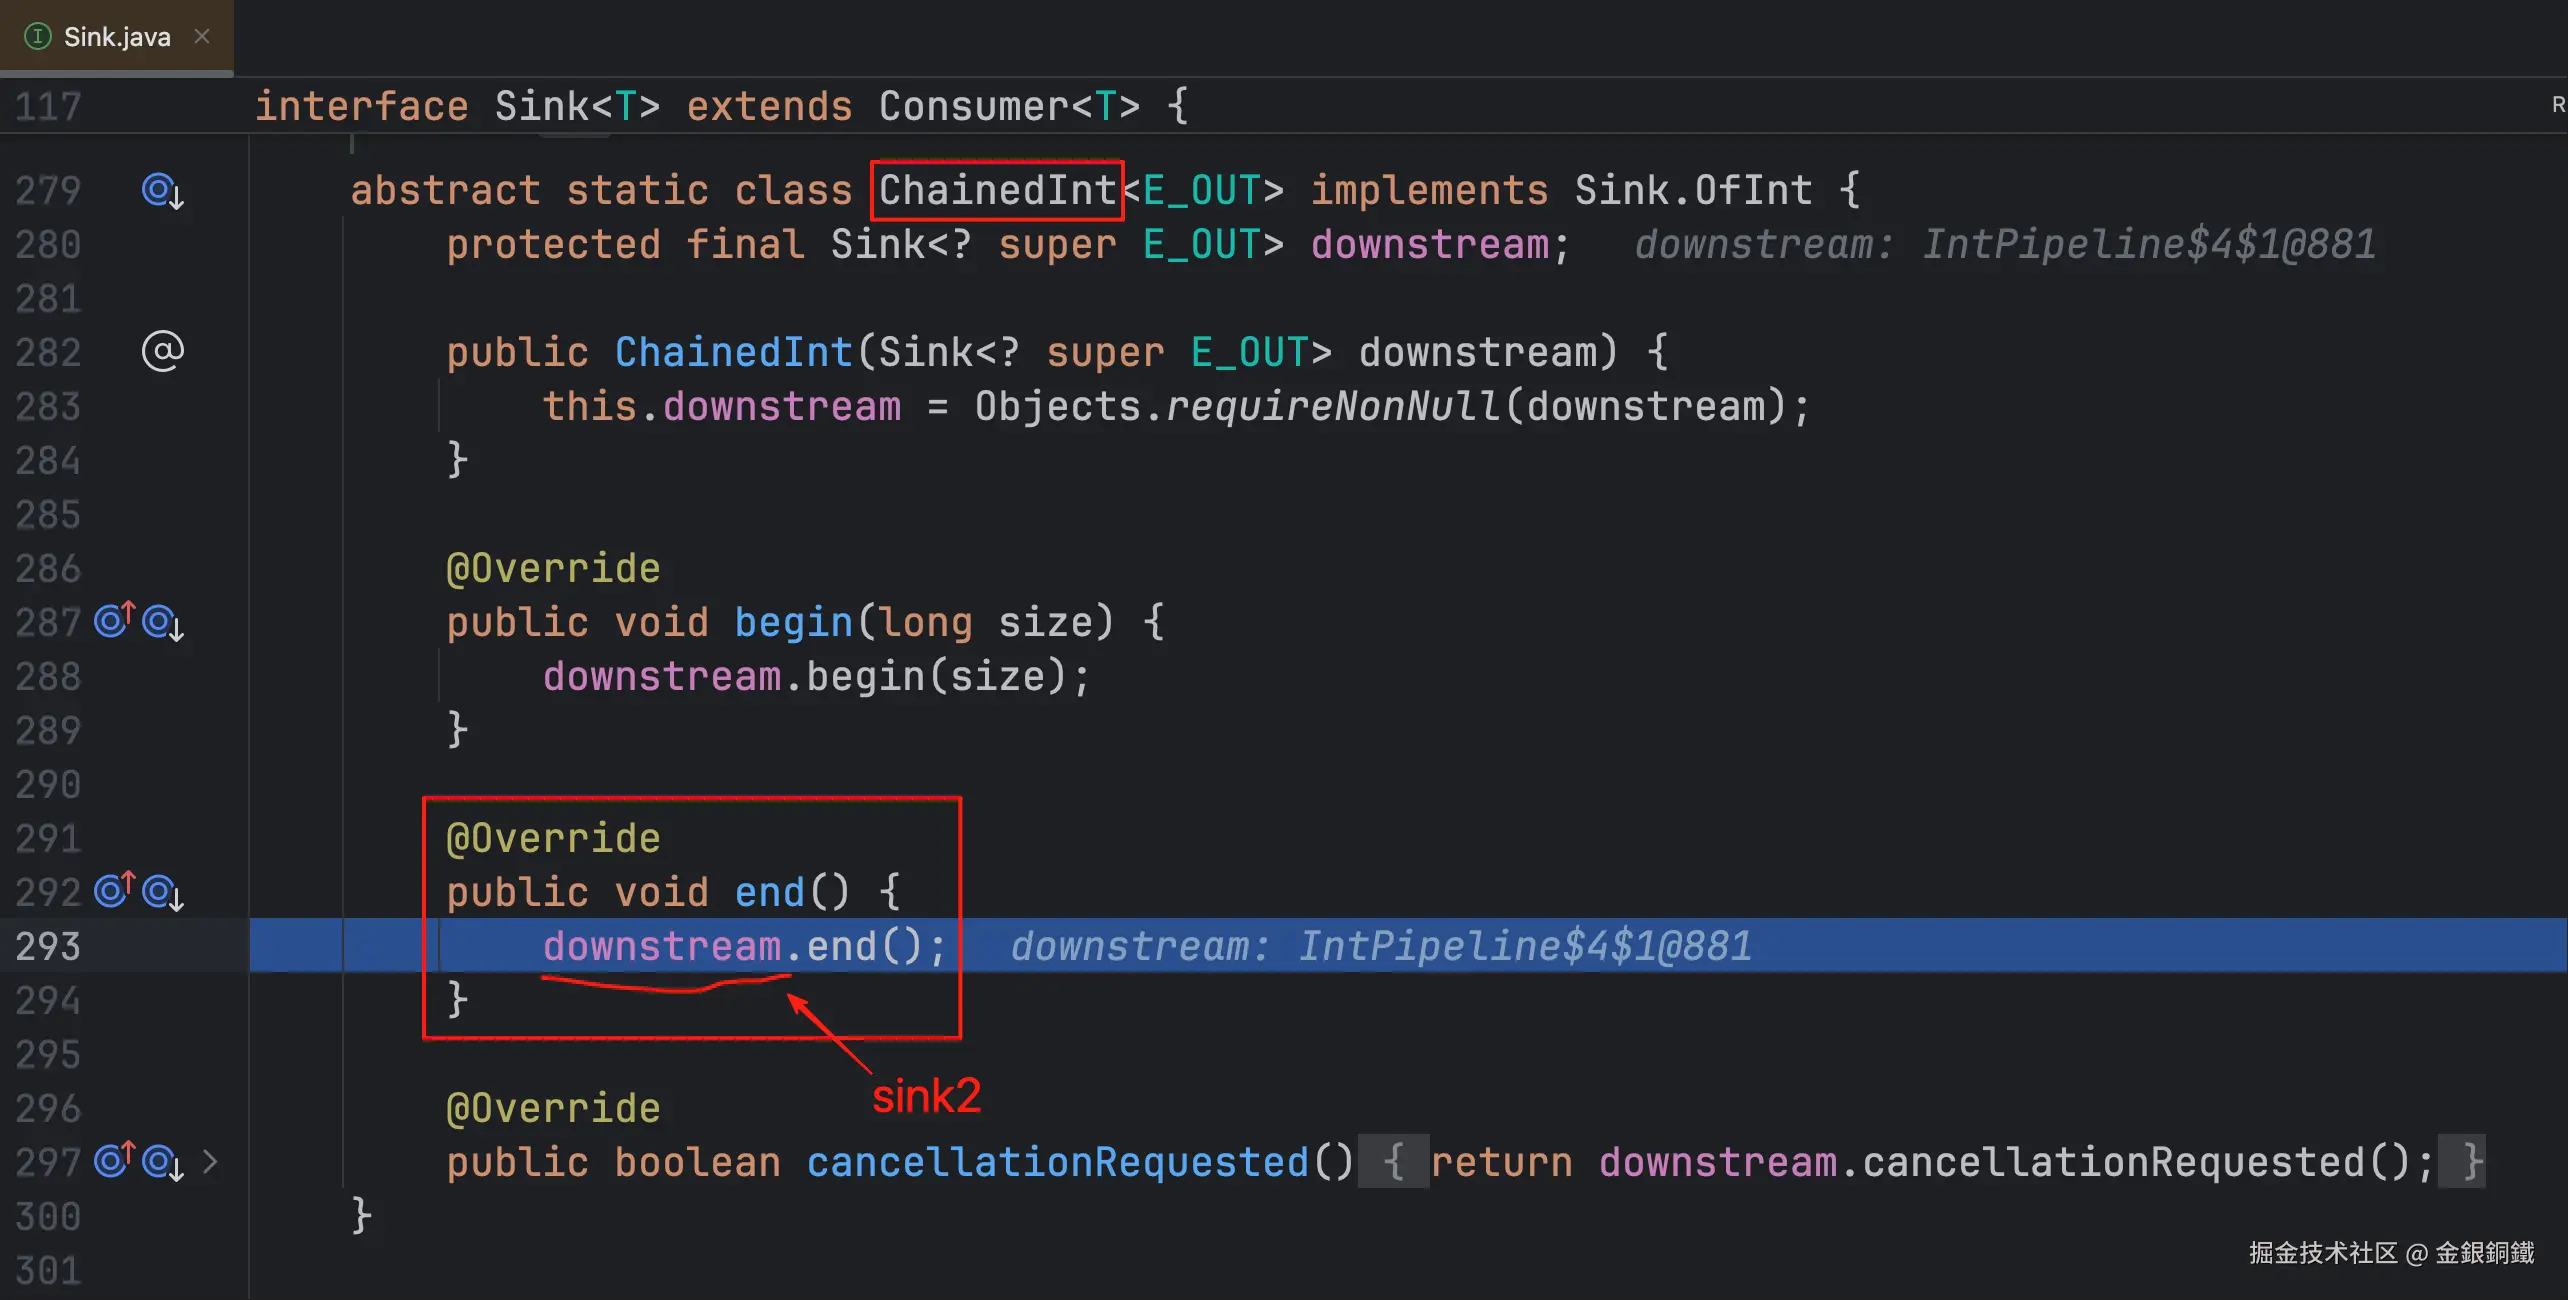 |
| sink2 | Sink.ChainedInt 的一个匿名子类 |
sink1 | 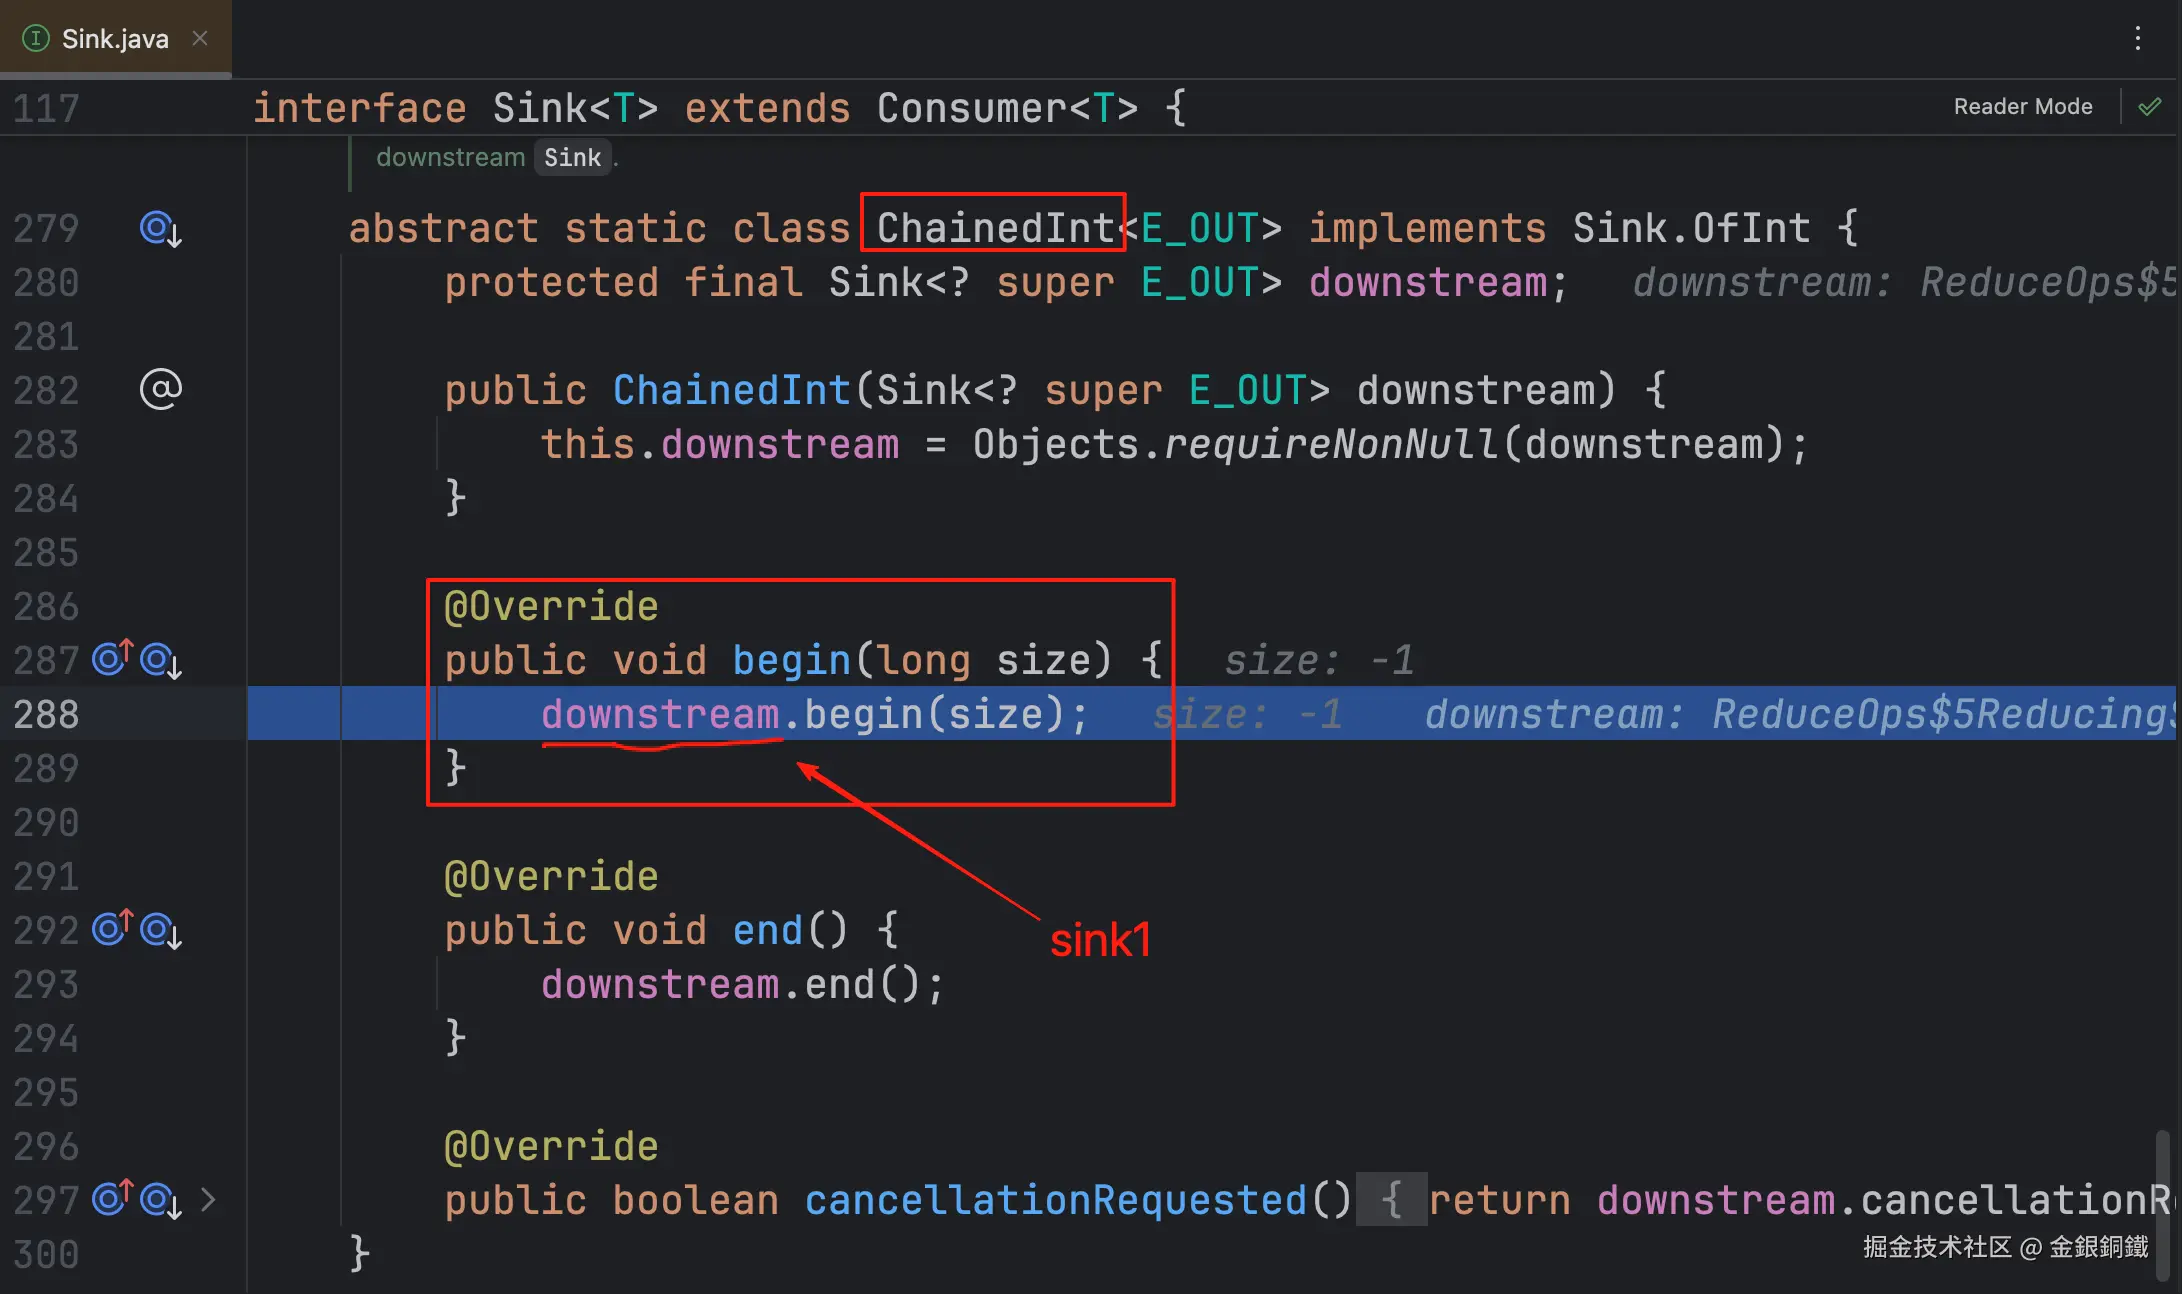 注意:由于匿名子类没有 注意:由于匿名子类没有 override begin(long) 方法,所以这里的 begin(long) 方法来自 Sink.ChainedInt |
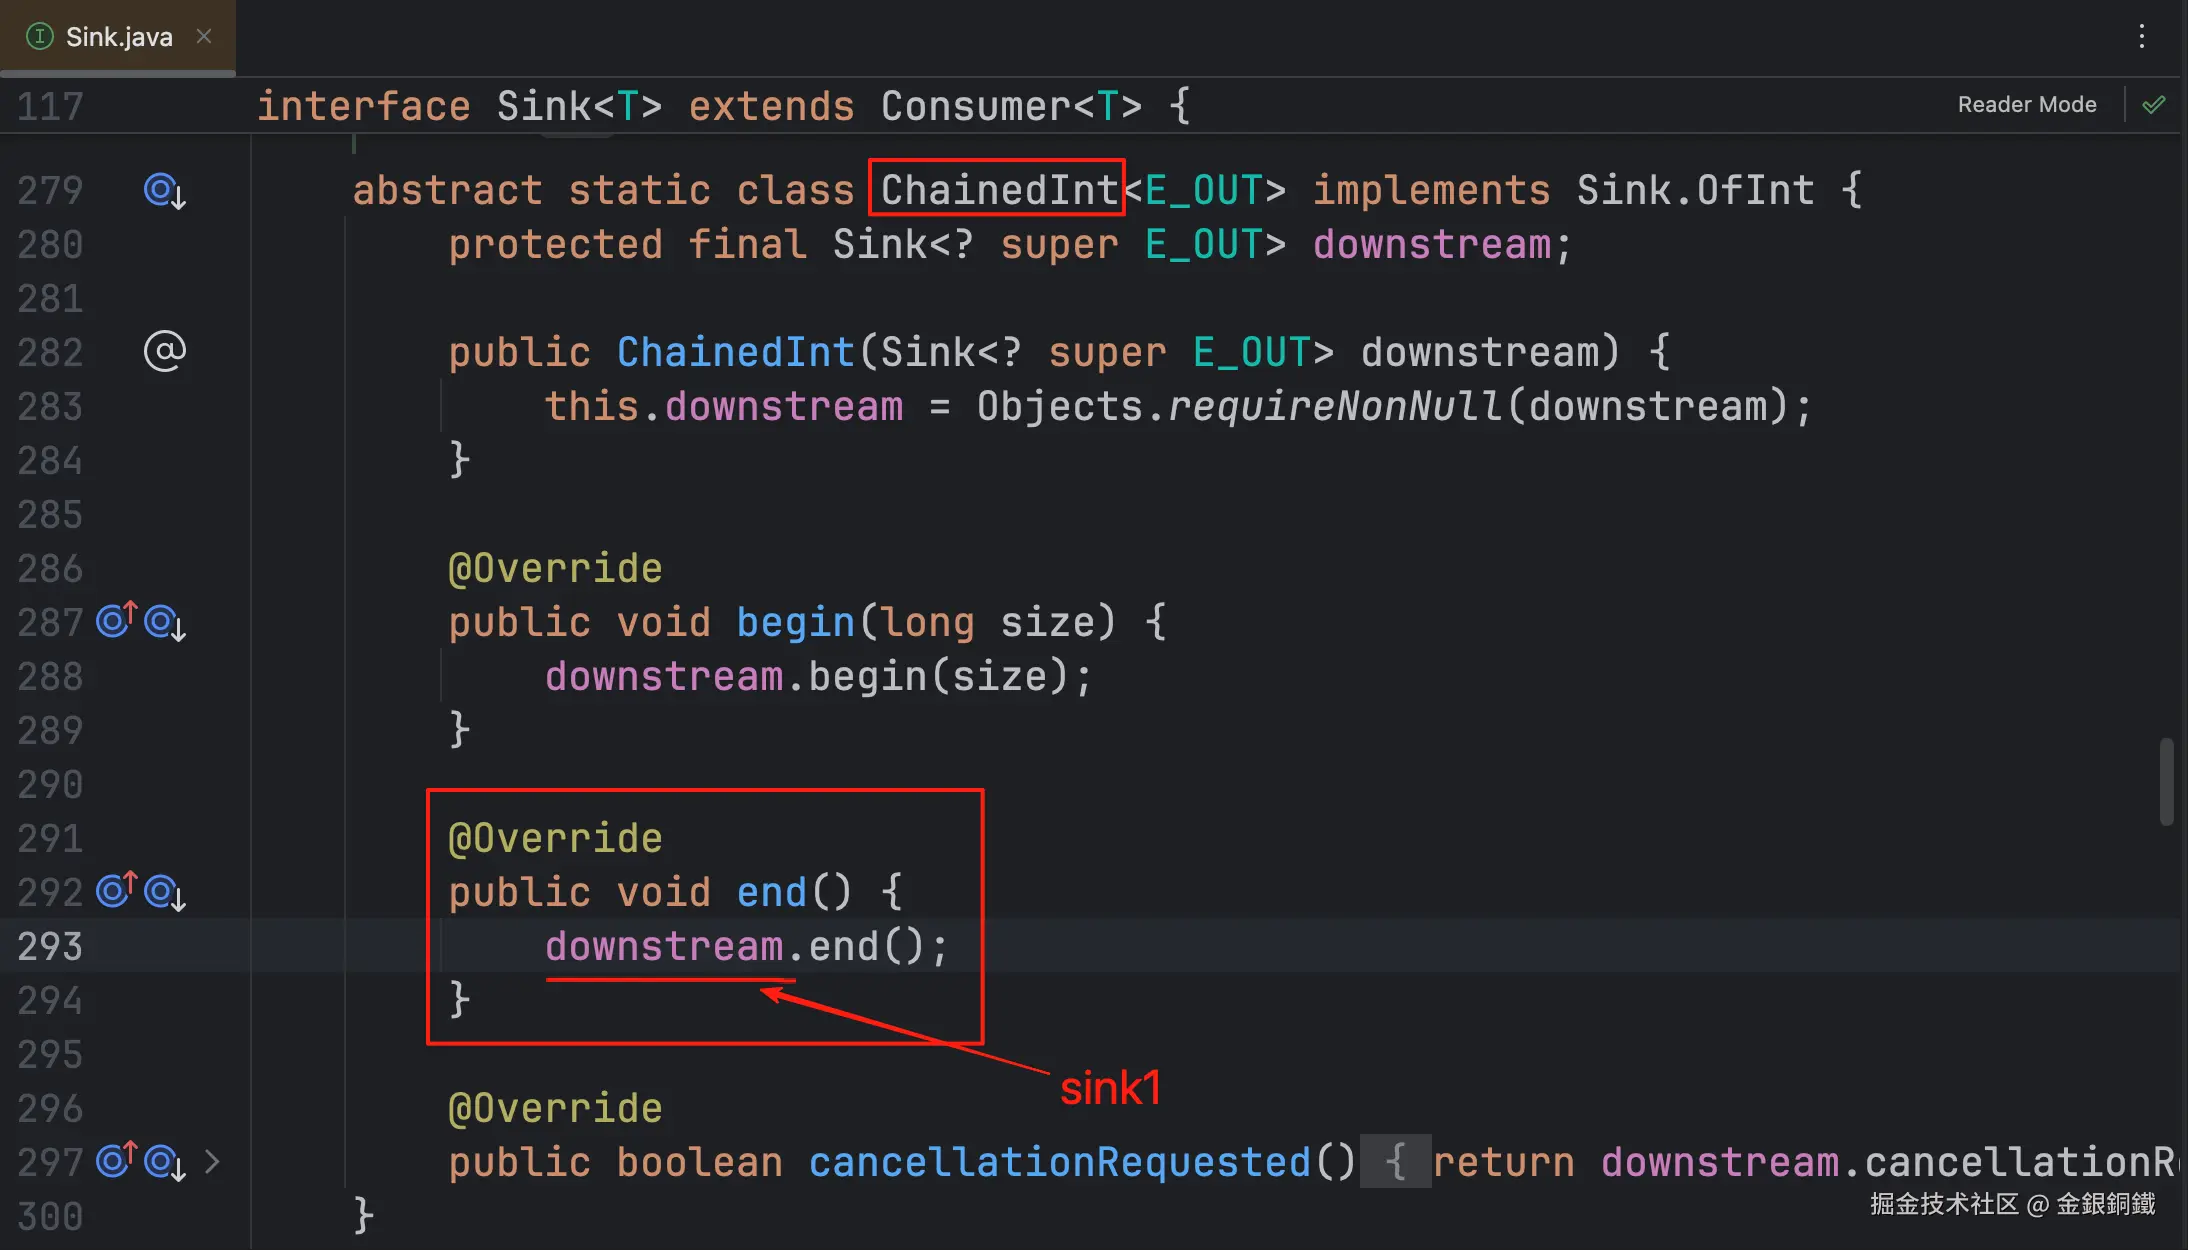 注意:其实本图和上一行的图对应的代码在同一个位置 注意:其实本图和上一行的图对应的代码在同一个位置 |
| sink1 | ReducingSink ⬅️ 它是一个局部内部类 |
没有 downstream 字段 | 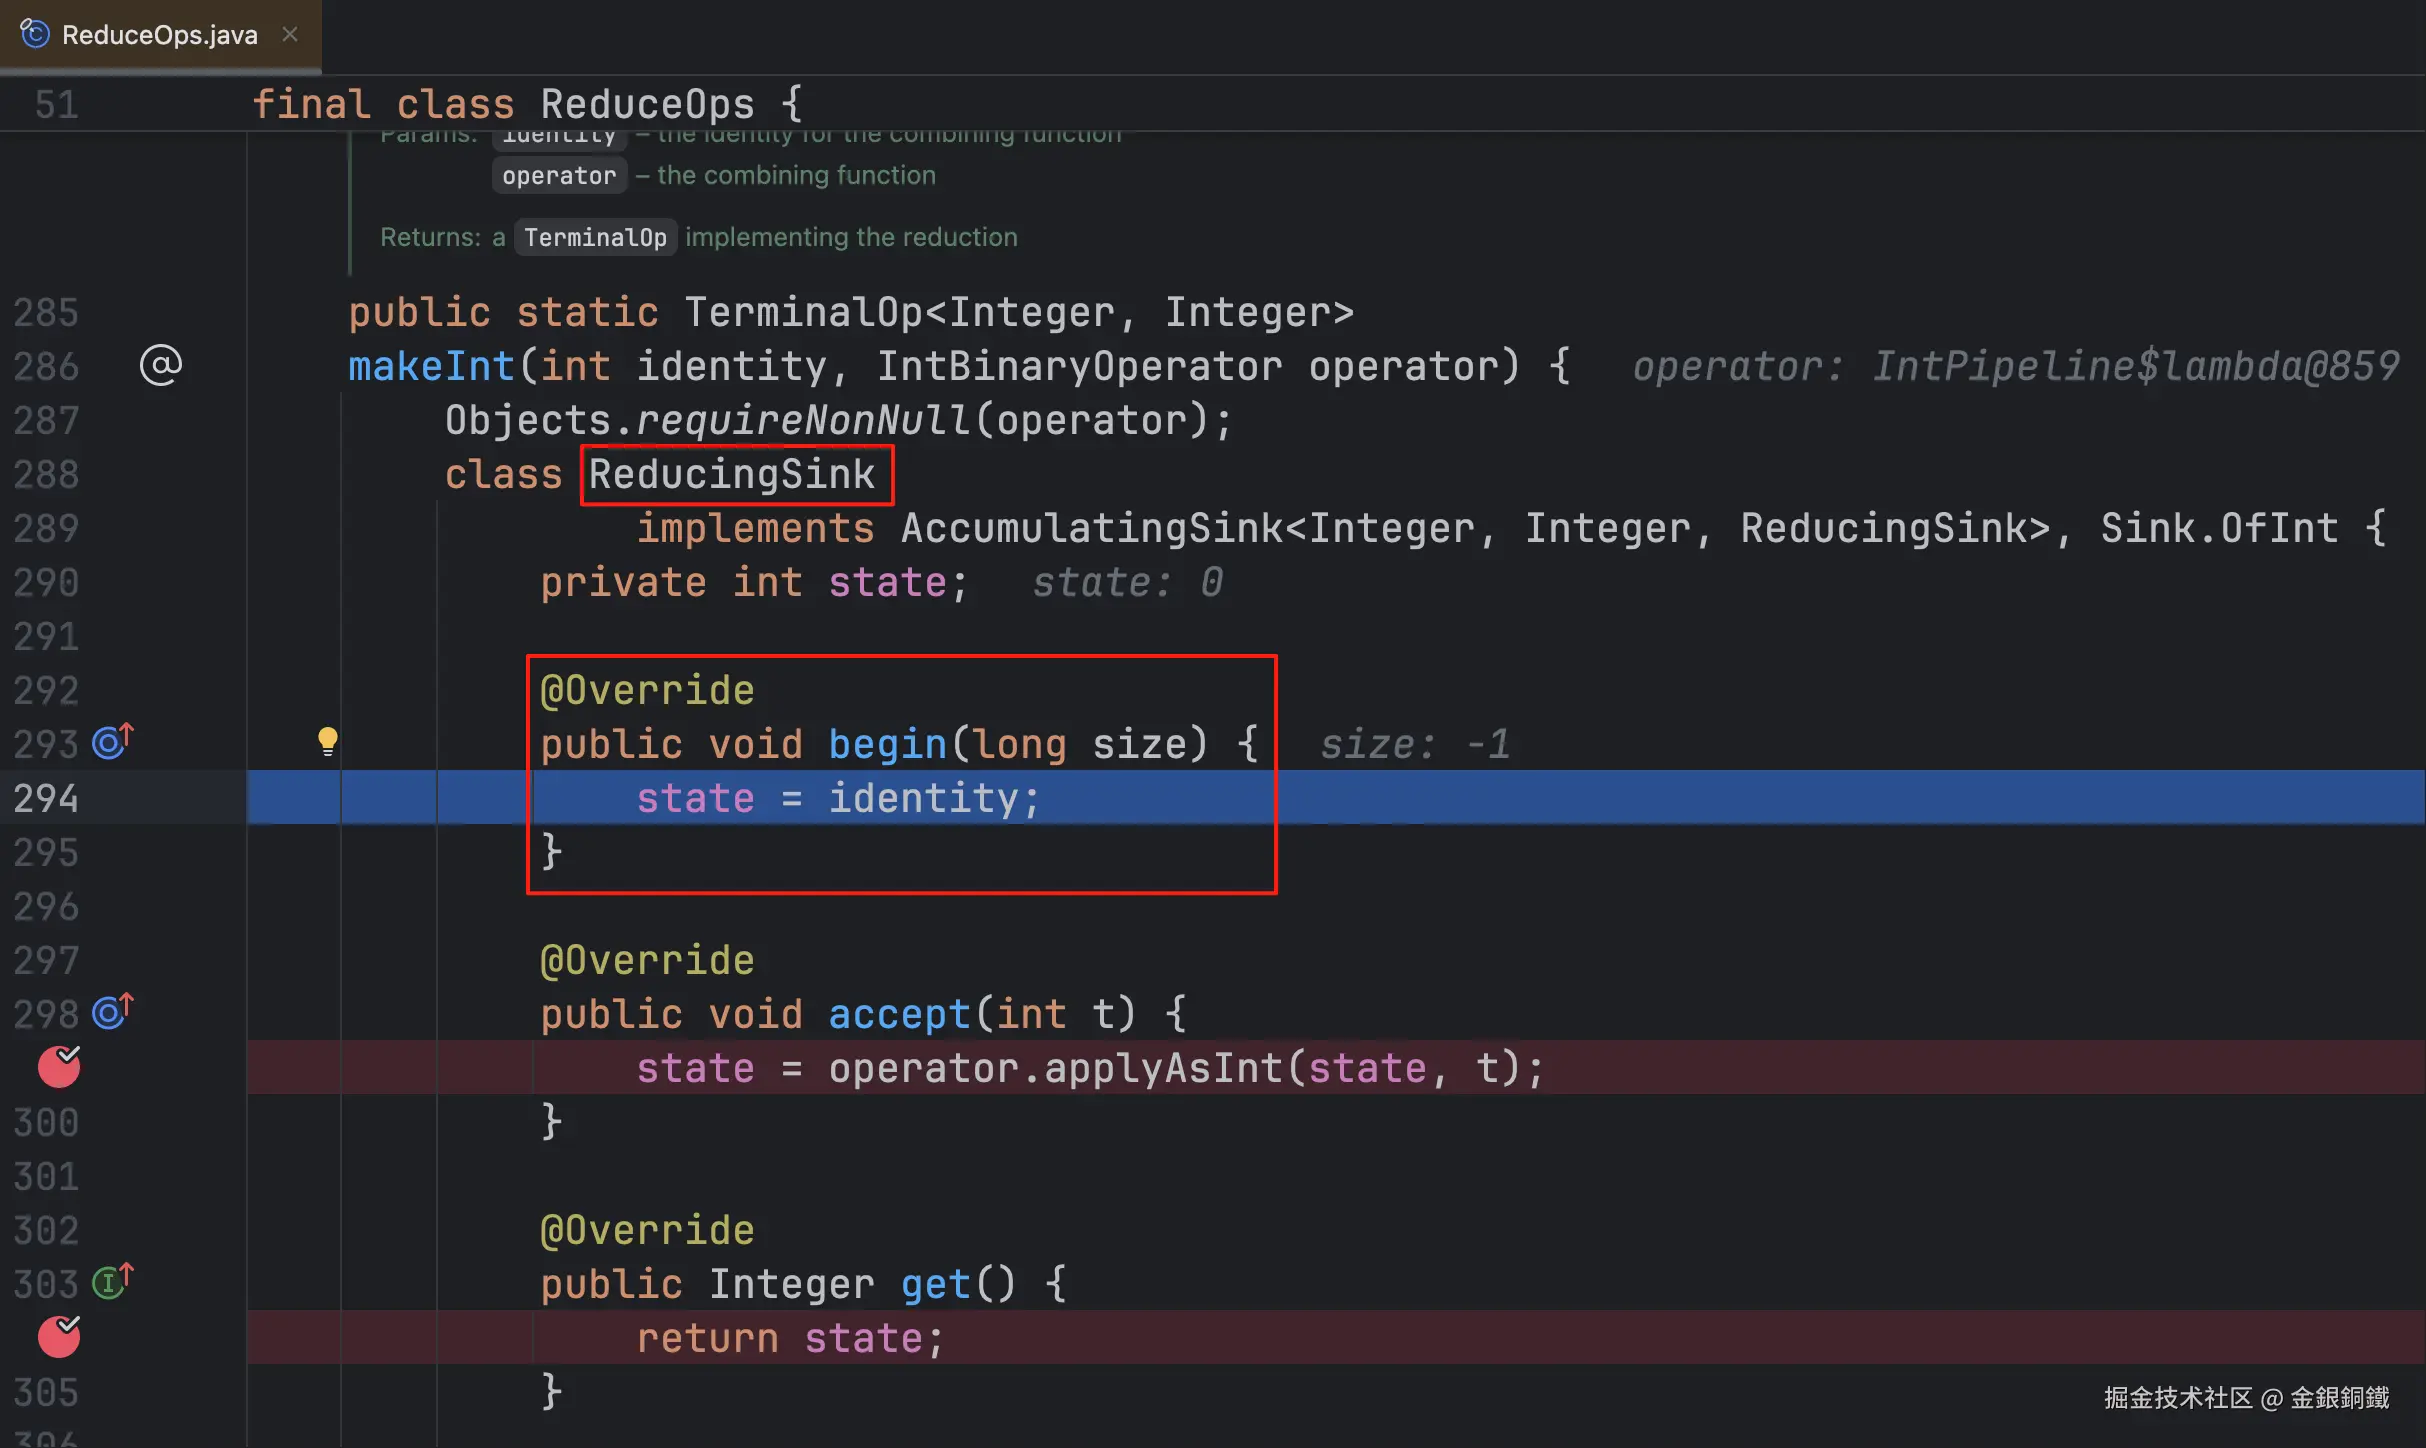 |
 |
再更新一下任务列表,Step 4 我们也看完了。
-
makeSink() -
helper.wrapAndCopyInto(...)-
wrapSink(...) -
copyInto(...)-
begin(long)method inSinkinterface -
forEachRemaining(Consumer)method inSpliteratorinterface -
end()method inSinkinterface
-
-