一. 前言
最近在维护一个老项目,发现项目中用了很多的自定义指令。突然发现,自己已经很久没有封装过指令了,特别是vue3.0时代以来,这个功能我好像用的越来越少了。其实以前在2.0时代的时候,封装指令是很常见的写法(勾起了当年的回忆)。那现在既然遇到了,就封装一些很常见的指令在日常开发中可以用到的。

二. 使用流程
2.1. 介绍
其实关于指令的使用,vue3.0的官网写的已经很仔细了,对新手很友好这里是地址。写法主要还是在提供在不同钩子函数中,执行不同操作。
下面 这些是官网给出的钩子函数的执行时机
js
const myDirective = {
  // 在绑定元素的 attribute 前
  // 或事件监听器应用前调用
  created(el, binding, vnode) {
    // 这个created可以拿到dom、但是binding不会检测到响应式数据的改变
  },
  // 在元素被插入到 DOM 前调用
  beforeMount(el, binding, vnode) {},
  // 在绑定元素的父组件
  // 及他自己的所有子节点都挂载完成后调用
  mounted(el, binding, vnode) {},
  // 绑定元素的父组件更新前调用
  beforeUpdate(el, binding, vnode, prevVnode) {},
  // 在绑定元素的父组件
  // 及他自己的所有子节点都更新后调用
  updated(el, binding, vnode, prevVnode) {},
  // 绑定元素的父组件卸载前调用
  beforeUnmount(el, binding, vnode) {},
  // 绑定元素的父组件卸载后调用
  unmounted(el, binding, vnode) {}
}这里要注意几个参数:
el: 绑定到指令的dom元素。binding: 一个对象,包含以下属性。value: 传递给指令的值。(v-directive="1,2,3",这里的[1,2,3]就是值)oldValue:之前的值。仅在beforeUpdate和updated中可用arg: 传递给指令的参数。(v-directive:arg="", 这个arg就是参数)modifiers: 指令修饰符。(v-directive.foo="" 这里的foo就是修饰符)
这里就是要区分一下arg和modifiers的区别。举个例子:
js
v-directive:arg.foo="1"这里的话,value就是1、 foo就是指令修饰符, arg就是指令参数。
这里要注意点,指令的参数也可以是动态的:
js
v-directive:[arg].foo="1"这时候指令的参数会基于组件的 arg 数据属性响应式地更新。
2.2. 简单实用
这里简单实现一个v-if,顺便把directive的结构搭建了。
新建一个directives文件夹,里面新建一个myShow.ts:
js
import type { Directive, DirectiveBinding } from 'vue'

const myShow: Directive = {
  updated(el: HTMLElement, binding: DirectiveBinding) {
    const { value } = binding
    if (value) {
      el.style.display = 'block'
    }
    else el.style.display = 'none'
  }
}

export default myShow根据外部传来的binding.value,来控制当前元素的显示与隐藏。要注意一下,这里放在update中执行,因为在mounted中,不会检测到binding.value值的改变。
然后在同级目录下,新建一个index.ts
js
import type { App, Directive } from "vue"
import myShow from "./myShow"

interface IdirectiveList<T> {
  [key: string]: T
}
const directiveList: IdirectiveList<Directive> = {
  myShow
}

const installDirectives = {
  install(app: App<Element>) {
    for(let key in directiveList) {
      app.directive(key, directiveList[key])   // 通过app.directive注册
    }
  }
}

export default installDirectives最后在main.ts中把directives导入:
js
import installDirectives from './directives'
app.use(installDirectives)
三. 常见指令实现
实现之前要提一句话,组件是主要的构建模块,而组合式函数则侧重于有状态的逻辑。自定义指令主要是为了重用涉及普通元素的底层 DOM 访问的逻辑。 真不愧是官网的原话,讲的很有深意!我们使用指令的目的是为了复用dom元素的一些操作方式。所以我们的注意点是 dom元素!!!
3.1 图片懒加载
图片懒加载的实现流程:
判断元素是否进入可视区域使用IntersectionObserver观察进入可视区后加载图片预定url最后移除图片观察器
我们简单实现一下:新建一个lazyImage.ts:
js
import loadingImage from '../assets/loading.gif'
import errorImage from '../assets/error.jpeg'


import type { Directive, DirectiveBinding } from "vue";

const lazyImage: Directive = {
  mounted(el, binding: DirectiveBinding) {
    const {src, loading = loadingImage, error = errorImage } = binding.value
    el.src = loading   // 先个一个默认的占位图片
    const observer = new IntersectionObserver((entries: IntersectionObserverEntry[]) => {
      entries.forEach((entry: IntersectionObserverEntry) => {
        if (entry.isIntersecting) {
          imageLoading(src).then(() => {
            el.src = src
            observer.unobserve(el)   // 去除观察
          }).catch(() => {
            el.src = error
          })
        }
      })
    }, {
      rootMargin: '50px'    //图片 距离50px的时候开始加载
    })

    observer.observe(el)
    el.dataset.observer = observer
  },

  unmounted(el) {
    if (el.dataset.observer) {
      el.dataset.observer.unobserve(el)
    }
  }
}

const imageLoading = (src: string) => {
  return new Promise((resolve, reject) => {
    const img = new Image()
    img.src = src
    img.onload = resolve
    img.onerror = reject
  })
}

export default lazyImage
代码简单讲解一下:
el.src = loading刚进入的时候给个默认值loading。- 用
IntersectionObserver来监控每个img图片。当图片进入可视区域(entry.isIntersecting)的时候,加载data里面的src。 observer.observe(el)对当前元素开启观察。el.dataset.observer = observer的意思是,把当前的观察者observer,放到dataset属性中。这步操作的意思是,当图片加载正确的url后,移除对当前图片的观察。在unmounted中卸载,放在一直观察泄漏内存。
然后我们更新一下index.ts文件。最后在页面上使用一下:
js
<div class="text">
    <img
      width="600" height="400"
      v-for="(image, index) in arr"
      v-lazyImage="{src: image}"
      :key="index"
    />
</div>

<script setup lang="ts">
import test from './assets/test.jpeg'

const arr = [test, test, test, test, test, test, test, test]
</script>看一下最终的效果:
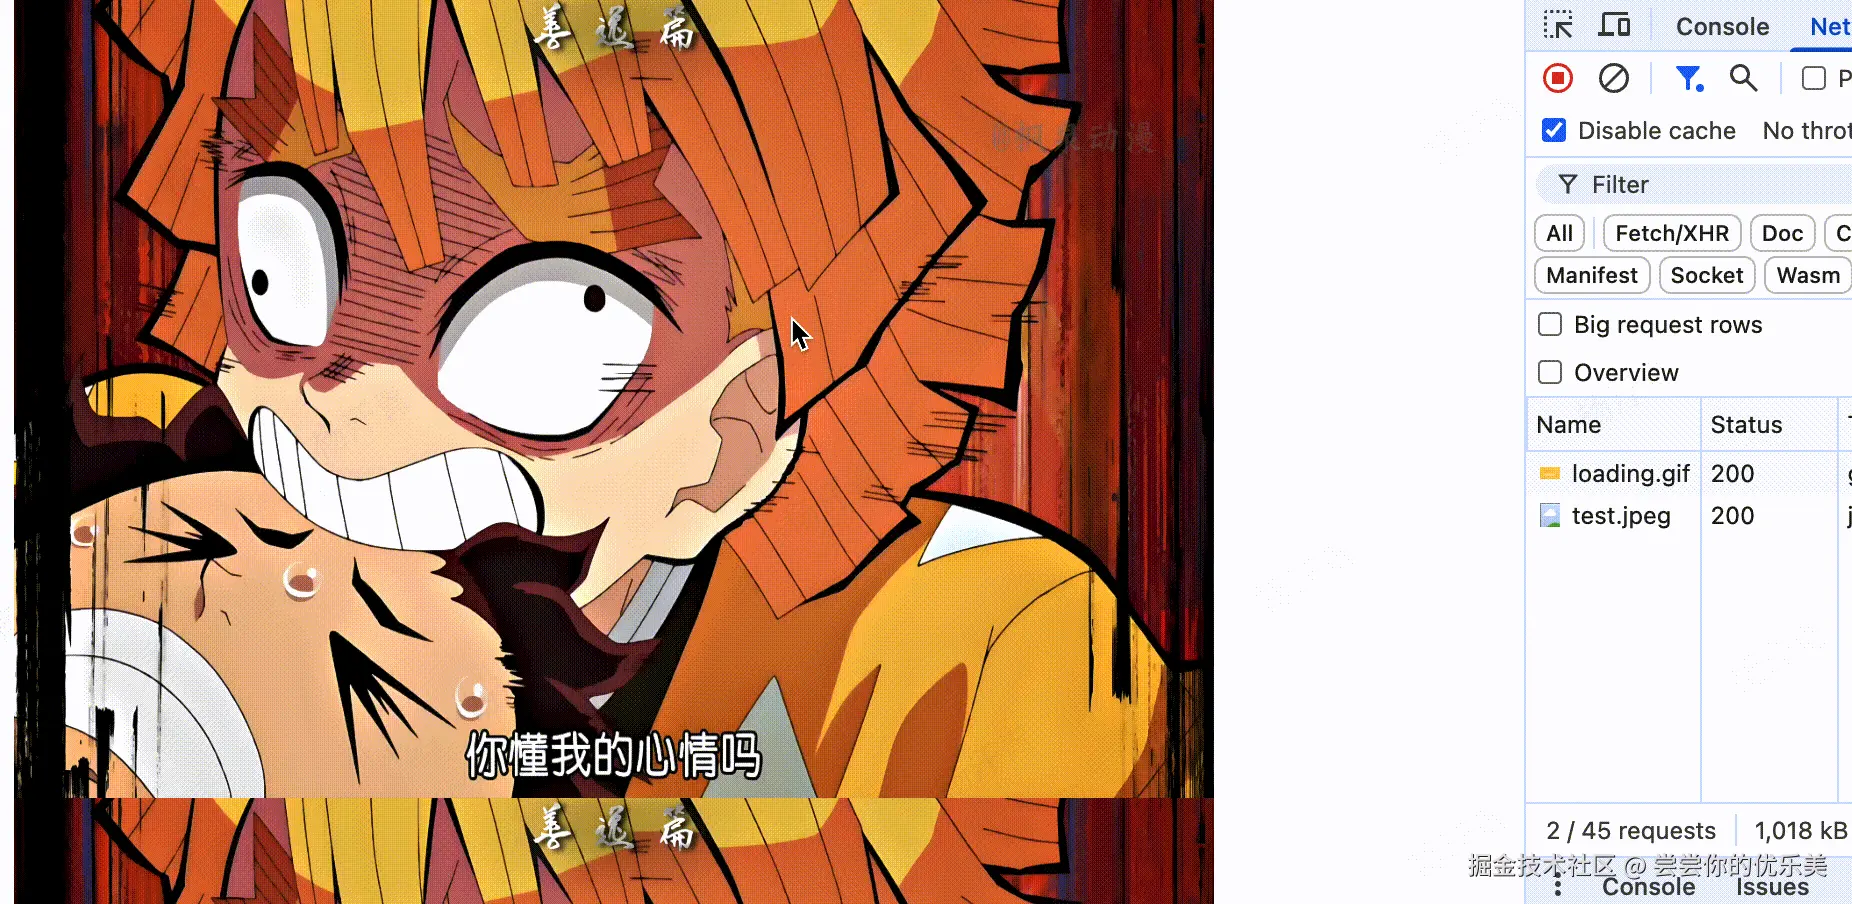
3.2 按钮权限
这个在一些后台管理的项目里面用到的很多。其实原理很简单,就是根据接口返回、自定义的白名单中,来判断你当前按钮的权限标识在不在里面,如果在显示,否则隐藏。
新建一个permission.ts文件:
js
import { type Directive, type DirectiveBinding } from "vue";

// 这里可以自定义或者从接口拿
const whiteBlock = ["per:page:1", "per:page:2", "per:page:3", "per:page:4"]

const permission: Directive = {
  mounted(el: HTMLElement, binding: DirectiveBinding) {
    if (!binding.value) return;
    else {
      console.log(binding.value)
      // 如果在白名单内,不做处理,不在直接隐藏。
      !whiteBlock.includes(binding.value) ? el.style.display = 'none' :  el.style.display = 'auto'
    }
  }
}

export default permission
没什么好说的,很简单。就是通过传入的值来判断在不在白名单之内就可以。在页面上使用一下:
js
    <el-button v-permission="'per:page:1'">per:page:1</el-button>
    <el-button v-permission="'per:page:2'">per:page:2</el-button>
    <el-button v-permission="'per:page:10'">per:page:10</el-button>
    <el-button v-permission="'per:page:3'">per:page:3</el-button>
js
let whiteBlock: string[] = [];

setTimeout(() => {
  whiteBlock = ["per:page:1", "per:page:2", "per:page:3", "per:page:4"]
}, 3000)
没什么问题,per:page:10不在白名单内,就不会显示。
但是这里有个优化点,需要提一下。如果你的白名单数据是从接口拿的,那不能在mounted阶段处理逻辑问题。因为异步的问题,会出现el加载完成,但是whiteBlock还没有获取到。
比如我们把whiteBlock的赋值变成异步的。
js
let whiteBlock: string[] = [];

setTimeout(() => {
  whiteBlock = ["per:page:1", "per:page:2", "per:page:3", "per:page:4"]
}, 500)
这时候页面就会变成空白。

所以,这里需要对逻辑改造一下,把whiteBlock变为响应式数据,然后通过watchEffect监听一下whiteBlock。代码如下:
js
import { type Directive, type DirectiveBinding } from "vue";
import { ref, watchEffect } from "vue"

// 这里可以自定义或者从接口拿
let whiteBlock = ref<string[]>([]);

setTimeout(() => {
  whiteBlock.value = ["per:page:1", "per:page:2", "per:page:3", "per:page:4"]
}, 500)


const permission: Directive = {
  mounted(el: HTMLElement, binding: DirectiveBinding) {
    watchEffect(() => {
      if (whiteBlock.value.length === 0 || !binding.value) return
      !whiteBlock.value.includes(binding.value) ? el.style.display = 'none' :  el.style.display = 'auto'
    })
  }
}

export default permission
ok! 最后要注意一下,whiteBlock的获取一般都放在登陆的时候和用户信息一起返回,不然的话会出现,按钮闪烁消失的问题。
3.3 元素的拖拽
这个其实已经有很好用的库了,但是不妨碍我们在实现一下。新建一个drag.ts文件:
js
import type { Directive } from "vue";

const drag: Directive = {
  mounted(el: HTMLElement) {
    el.style.cursor = 'move'
    el.onmousedown = (e: MouseEvent) => {
      const disX: number = e.clientX - el.offsetLeft;
      const disY: number = e.clientY - el.offsetTop;
      document.onmousemove = (e: MouseEvent) => {
        el.style.left = `${e.clientX - disX}px`;
        el.style.top = `${e.clientY - disY}px`;
      };
      document.onmouseup = () => {
        document.onmousemove = null;
      };
    }
  },
}

export default dra
然后在项目中使用一下:
js
<el-button v-drag style="position: absolute;">拖拽</el-button>这里注意一下,我这种写法是需要当前文件定位为absolute的。
3.4 无限滚动
这个的实现原理,主要是判断scrollHeight和scrollTop、clientHeight的关系。从网上找了一张图:
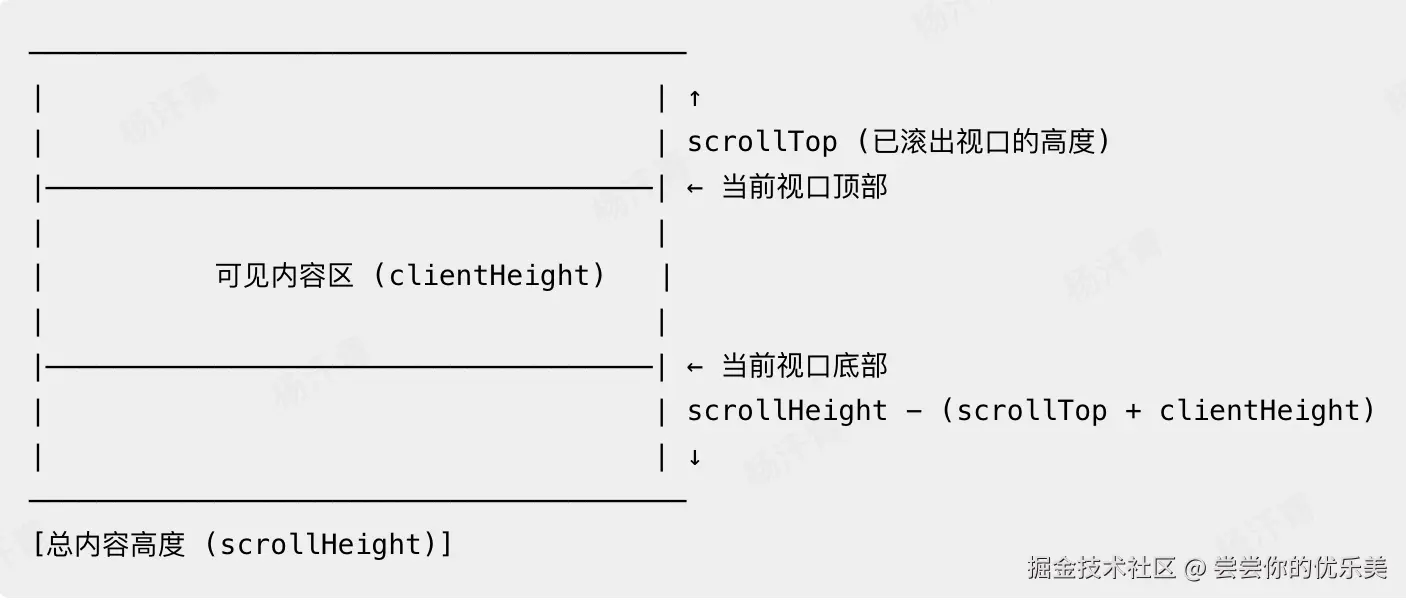
如果滚动轴到达 视口底部 则执行callback函数。所以要判断一下: scrollHeight - scrollTop <= clientHeight
新建一个infiniteScroll.ts文件:
js
import type { Directive, DirectiveBinding } from "vue";

const infiniteScroll: Directive = {
  mounted(el: HTMLElement, binding: DirectiveBinding) {
    const { arg = 0, value } = binding
    const bottomDistance: number = el.clientHeight - Number(arg)
    if (el.scrollHeight - el.scrollTop <= bottomDistance) {
      value()   // 执行回调
    }
  },
}

export default infiniteScroll
在项目中使用一下:
js
<div v-infiniteScroll:[distance]="callBack"> </div>四. 总结
好用的一些指令还有很多,比如防抖、节流等。这里就不多说了。这里主要是提供一些好用的指令实现的方法。