文章目录
一、组合模式的介绍
组合模式是一种结构型设计模式, 它将对象组合成树形结构以表示"整体-部分"的层次结构。组合模式使得用户对单个对象和组合对象的使用具有一致性。
换句话说:
- 可以把"一个对象"和"多个对象的组合"统一对待。
- 客户端代码不需要区分处理的是"叶子节点"还是"容器节点"。
二、组合模式的结构
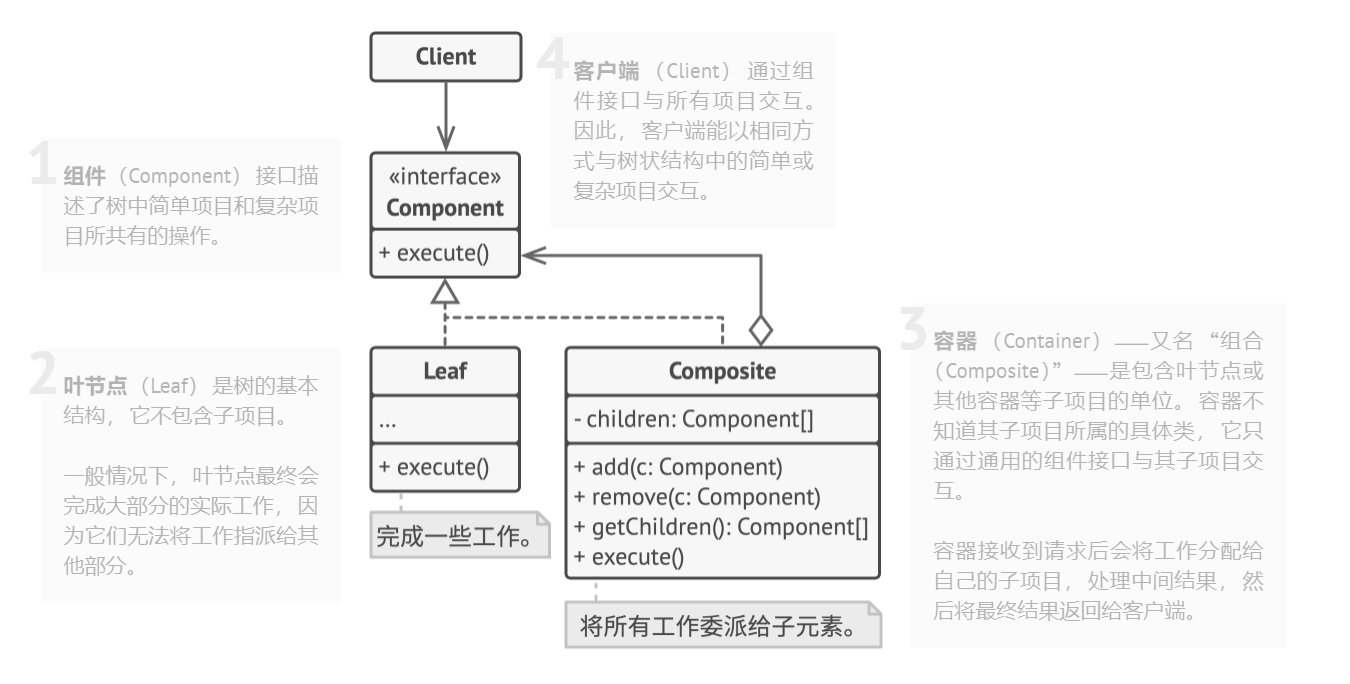
组合模式一般包含以下角色:
- 抽象组件(Component):定义了对象的通用接口,比如 add、remove、display 等。
- 叶子节点(Leaf):表示最小的个体对象,没有子节点。
- 组合节点(Composite):作为容器,可以包含叶子节点和其他组合节点,实现了 add、remove 等方法。
- 客户端(Client):通过组件接口与对象交互,不关心是叶子还是组合。

优点:
- 统一了叶子节点和组合节点的接口,客户端使用简单。
- 可以方便地扩展树结构(新增叶子或组合类)。
- 符合"开闭原则"。
缺点:
- 设计更复杂,需要抽象类/接口。
- 在层次较深时,可能影响性能。
使用场景:
- 文件系统(文件夹和文件)。
- GUI 界面(窗口中包含按钮、文本框等)。
- 公司组织架构(部门、员工)。
- 游戏中的场景树(节点包含子节点)。
三、示例代码
假设我们要表示一个文件夹-文件系统:
cpp
#include <iostream>
#include <vector>
#include <memory>
using namespace std;

// 抽象组件
class FileSystemNode {
public:
    virtual void show(int depth = 0) const = 0;
    virtual ~FileSystemNode() = default;
};

// 叶子节点:文件
class File : public FileSystemNode {
    string name;
public:
    File(const string& n) : name(n) {}
    void show(int depth = 0) const override {
        cout << string(depth, '-') << "File: " << name << endl;
    }
};

// 组合节点:文件夹
class Folder : public FileSystemNode {
    string name;
    vector<shared_ptr<FileSystemNode>> children;
public:
    Folder(const string& n) : name(n) {}

    void add(shared_ptr<FileSystemNode> node) {
        children.push_back(node);
    }

    void show(int depth = 0) const override {
        cout << string(depth, '-') << "Folder: " << name << endl;
        for (auto& child : children) {
            child->show(depth + 2);
        }
    }
};

// 客户端
int main() {
    auto root = make_shared<Folder>("root");
    auto folder1 = make_shared<Folder>("docs");
    auto folder2 = make_shared<Folder>("images");

    auto file1 = make_shared<File>("a.txt");
    auto file2 = make_shared<File>("b.txt");
    auto file3 = make_shared<File>("photo.jpg");

    folder1->add(file1);
    folder1->add(file2);
    folder2->add(file3);

    root->add(folder1);
    root->add(folder2);

    root->show();
    return 0;
}
Qt 组合模式示例:自定义 UI 组件树:
我们要实现一个抽象组件 UIComponent,它可以是 控件(叶子节点) 或 容器(组合节点,包含子控件),最终在 Qt 界面上展示。
cpp
#include <QApplication>
#include <QWidget>
#include <QPushButton>
#include <QVBoxLayout>
#include <QString>
#include <QDebug>

// 抽象组件
class UIComponent {
public:
    virtual QWidget* widget() = 0; // 返回 Qt 控件
    virtual void add(UIComponent* comp) { Q_UNUSED(comp); } // 默认不实现
    virtual ~UIComponent() = default;
};

// 叶子节点:具体控件(比如按钮)
class UIButton : public UIComponent {
    QPushButton* m_button;
public:
    UIButton(const QString& text) {
        m_button = new QPushButton(text);
    }

    QWidget* widget() override {
        return m_button;
    }
};

// 组合节点:容器(比如垂直布局的 QWidget)
class UIContainer : public UIComponent {
    QWidget* m_widget;
    QVBoxLayout* m_layout;
public:
    UIContainer(const QString& title = "") {
        m_widget = new QWidget;
        m_layout = new QVBoxLayout(m_widget);
        if (!title.isEmpty()) {
            m_widget->setWindowTitle(title);
        }
    }

    void add(UIComponent* comp) override {
        m_layout->addWidget(comp->widget());
    }

    QWidget* widget() override {
        return m_widget;
    }
};

// 客户端
int main(int argc, char *argv[]) {
    QApplication app(argc, argv);

    // 根容器
    UIContainer root("组合模式示例");

    // 子容器
    UIContainer* subContainer = new UIContainer;

    // 按钮(叶子节点)
    UIButton* btn1 = new UIButton("按钮 A");
    UIButton* btn2 = new UIButton("按钮 B");
    UIButton* btn3 = new UIButton("按钮 C");

    // 组合结构
    root.add(btn1);
    subContainer->add(btn2);
    subContainer->add(btn3);
    root.add(subContainer);

    // 显示
    root.widget()->show();

    return app.exec();
}
运行效果:
- 主窗口标题为 组合模式示例。
- 窗口中有一个按钮 A,以及一个子容器(里面放了按钮 B 和 C)。
- 客户端代码完全不区分"按钮"还是"容器",都通过 UIComponent* 统一管理。
思路说明:
- UIComponent:抽象接口,类似 Component。
- UIButton:叶子节点(单个控件)。
- UIContainer:组合节点(内部有 QVBoxLayout,可以添加子节点)。
- 客户端 main:只调用 add,不关心是按钮还是容器。