拜托可不可以先点个赞证明你看过
每篇文章都是我学习的过程,可能有些思路看起来乱乱的,但这都是我珍贵的思绪留下的痕迹,随手帮我点个赞,加个关注吧 如果有用的话。要不然就找不到我啦。或者有什么需要讨论的,给我评论留言,让我觉得不孤独。谢谢大家。
啥是授权请求(Authorization Request):
一个由客户端发起的、用于请求用户授权的 HTTP 请求,发送到授权服务器的 授权端点 (通常为 /oauth2/authorize。 总结起来就是:客户端请求用户授权,OAuth 流程的起点
客户端引导用户浏览器向 /oauth2/authorize 发起的请求,目的是获取用户授权
说人话:客户端想要访问用户的资源,请用户同意给我授权
🔍 OAuth2AuthorizationEndpointFilter 是干什么的?
✅ 它的作用:
拦截所有发往
/oauth2/authorize的请求,处理"授权请求"(Authorization Request)
🔧 它做了什么?
-
解析请求参数 (
client_id,response_type,scope等) -
验证请求合法性:
client_id是否存在?redirect_uri是否注册过?response_type是否支持?scope是否允许?
-
触发用户认证流程:
- 如果用户未登录 → 跳转到登录页(如
/login) - 如果已登录 → 检查是否需要用户同意(Consent)
- 如果用户未登录 → 跳转到登录页(如
-
生成授权码(Authorization Code) (在后续流程中)
-
重定向回客户端 (带上
code和state)
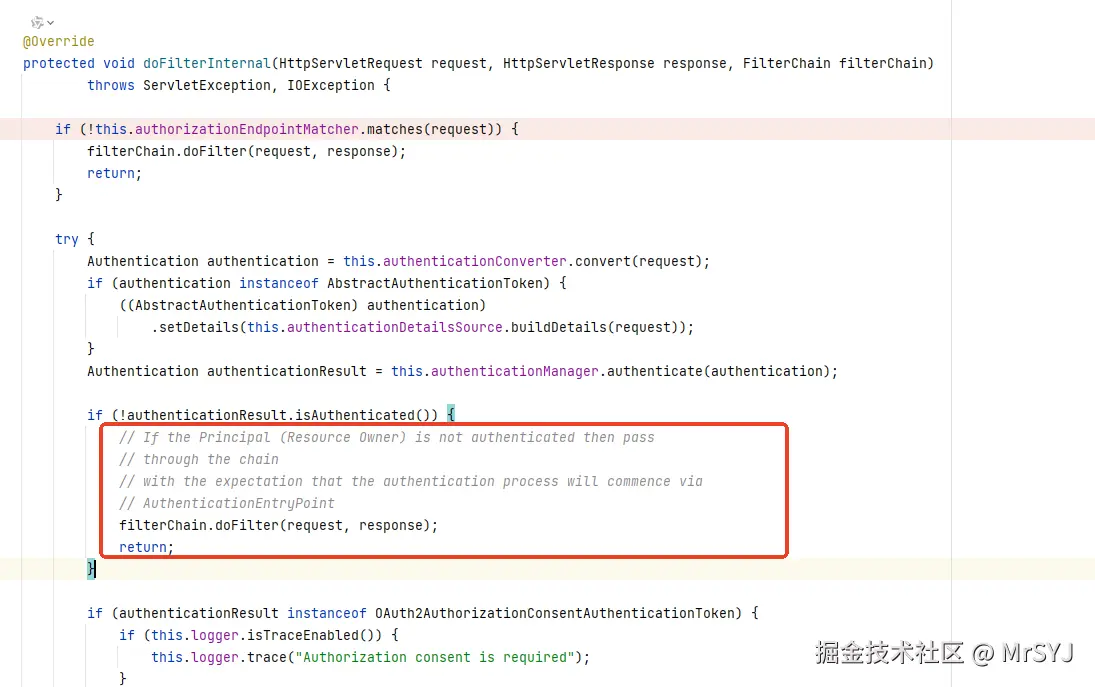
OAuth2AuthorizationEndpointFilter 源码解读
OAuth2AuthorizationEndpointFilter处理授权请求的整个逻辑如下:
kotlin
@Override
protected void doFilterInternal(HttpServletRequest request, HttpServletResponse response, FilterChain filterChain)
      throws ServletException, IOException {

   // 第一步匹配请求
   if (!this.authorizationEndpointMatcher.matches(request)) {
      filterChain.doFilter(request, response);
      return;
   }

   try {
      // 第二步请求转换
      Authentication authentication = this.authenticationConverter.convert(request);
      if (authentication instanceof AbstractAuthenticationToken) {
         ((AbstractAuthenticationToken) authentication)
            .setDetails(this.authenticationDetailsSource.buildDetails(request));
      }
      // 第三步 授权请求的认证
      Authentication authenticationResult = this.authenticationManager.authenticate(authentication);

      if (!authenticationResult.isAuthenticated()) {
         // If the Principal (Resource Owner) is not authenticated then pass
         // through the chain
         // with the expectation that the authentication process will commence via
         // AuthenticationEntryPoint
         filterChain.doFilter(request, response);
         return;
      }

      if (authenticationResult instanceof OAuth2AuthorizationConsentAuthenticationToken) {
         if (this.logger.isTraceEnabled()) {
            this.logger.trace("Authorization consent is required");
         }
         sendAuthorizationConsent(request, response,
               (OAuth2AuthorizationCodeRequestAuthenticationToken) authentication,
               (OAuth2AuthorizationConsentAuthenticationToken) authenticationResult);
         return;
      }

      this.sessionAuthenticationStrategy.onAuthentication(authenticationResult, request, response);

      this.authenticationSuccessHandler.onAuthenticationSuccess(request, response, authenticationResult);

   }
   catch (OAuth2AuthenticationException ex) {
      if (this.logger.isTraceEnabled()) {
         this.logger.trace(LogMessage.format("Authorization request failed: %s", ex.getError()), ex);
      }
      this.authenticationFailureHandler.onAuthenticationFailure(request, response, ex);
   }
}
第一步:authorizationEndpointMatcher
vbscript
if (!this.authorizationEndpointMatcher.matches(request)) {
   filterChain.doFilter(request, response);
   return;
}过滤器的第一段代码就是只处理authorizationEndpointMatcher匹配的请求,authorizationEndpointMatcher是RequestMatcher,用来匹配请求的,见名之意:叫授权端点匹配器,也就是说是用来匹配授权请求的。那么authorizationEndpointMatcher是怎么创建的,授权请求的路径又是什么呢?下面的代码展示了创建过程
ini
private static final String DEFAULT_AUTHORIZATION_ENDPOINT_URI = "/oauth2/authorize";

this.authorizationEndpointMatcher = createDefaultRequestMatcher(authorizationEndpointUri);

private static RequestMatcher createDefaultRequestMatcher(String authorizationEndpointUri) {
  RequestMatcher authorizationRequestGetMatcher = new AntPathRequestMatcher(authorizationEndpointUri,
        HttpMethod.GET.name());
  RequestMatcher authorizationRequestPostMatcher = new AntPathRequestMatcher(authorizationEndpointUri,
        HttpMethod.POST.name());
  RequestMatcher openidScopeMatcher = (request) -> {
     String scope = request.getParameter(OAuth2ParameterNames.SCOPE);
     return StringUtils.hasText(scope) && scope.contains(OidcScopes.OPENID);
  };
  RequestMatcher responseTypeParameterMatcher = (
        request) -> request.getParameter(OAuth2ParameterNames.RESPONSE_TYPE) != null;

  RequestMatcher authorizationRequestMatcher = new OrRequestMatcher(authorizationRequestGetMatcher,
        new AndRequestMatcher(authorizationRequestPostMatcher, responseTypeParameterMatcher,
              openidScopeMatcher));
  RequestMatcher authorizationConsentMatcher = new AndRequestMatcher(authorizationRequestPostMatcher,
        new NegatedRequestMatcher(responseTypeParameterMatcher));

  return new OrRequestMatcher(authorizationRequestMatcher, authorizationConsentMatcher);
}createDefaultRequestMatcher方法是用来创建authorizationEndpointMatcher的,乍一看这个方法很复杂呢,但是实际在做的事情是 精准识别两种类型的请求 ,并交给 OAuth2AuthorizationEndpointFilter 处理
-
授权请求(Authorization Request)
GET /authorize?response_type=code&...- 或
POST /authorize(带response_type参数)
-
同意请求(Consent Request)
POST /authorize(不带response_type,但可能是用户提交了"同意"表单)
它通过组合 OR 和 AND 条件,精确区分这几种情况,确保只有合法的授权流程请求被拦截处理。
🧩 背景:OAuth 2.0 授权端点的两种请求
在 OAuth 2.0 流程中,用户访问 /oauth2/authorize 可能触发两种请求:
1. 授权请求(Authorization Request)
客户端(如 Vue)发起,目的是获取授权码。
http
GET /oauth2/authorize?
  response_type=code
  &client_id=my-client
  &scope=user
  &redirect_uri=...
或(某些实现支持 POST):
http
POST /oauth2/authorize
Content-Type: application/x-www-form-urlencoded

response_type=code&client_id=my-client&scope=user&...
👉 这种请求必须包含 response_type 参数。
2. 同意请求(Consent Request)
用户在授权服务器页面点击"同意"按钮后,浏览器提交的表单请求。
http
POST /oauth2/authorize
Content-Type: application/x-www-form-urlencoded

user_oauth_approval=true
👉 这种请求不包含 response_type,但它是授权流程的一部分(用户同意授权)。
🔍 代码逐行解析
我们先看返回值 是个OrRequestMatcher
return new OrRequestMatcher(authorizationRequestMatcher, authorizationConsentMatcher);
也就是说只要authorizationRequestMatcher/authorizationConsentMatcher两者有一个匹配就可以进入当前过滤器。
authorizationRequestMatcher授权匹配器
java
RequestMatcher authorizationRequestMatcher = new OrRequestMatcher(
    authorizationRequestGetMatcher,  // GET 请求(无参数要求)
    new AndRequestMatcher(
        authorizationRequestPostMatcher,        // POST
        responseTypeParameterMatcher,           // 有 response_type
        openidScopeMatcher                      // 有 scope=openid
    )
);
所以 authorizationRequestMatcher匹配两种
- 所有
GET /oauth2/authorize(授权请求) - 所有
POST /oauth2/authorize带response_type(授权请求),带scope=openid也就是post要求oidc
authorizationConsentMatcher授权同意匹配器
java
RequestMatcher authorizationConsentMatcher = new AndRequestMatcher(
    authorizationRequestPostMatcher,                    // POST 请求
    new NegatedRequestMatcher(responseTypeParameterMatcher)  // 但没有 response_type
);
👉 匹配:
POST /oauth2/authorize- 但 不包含
response_type参数
这通常就是用户点击"同意"后提交的表单。
第二步:authenticationConverter
arduino
this.authenticationConverter = new DelegatingAuthenticationConverter(
      Arrays.asList(
            new OAuth2AuthorizationCodeRequestAuthenticationConverter(),
            new OAuth2AuthorizationConsentAuthenticationConverter()));
我们知道authenticationConverter是用来将请求转化成认证对象的,在 Spring Security 的认证流程中,AuthenticationManager 只认识 Authentication 类型的对象
OAuth2AuthorizationCodeRequestAuthenticationConverter生成待认证的令牌
OAuth2AuthorizationCodeRequestAuthenticationConverter 就是一个"请求转换器",它的作用是:
🔧 将原始的 HTTP 请求(如 /oauth2/authorize?response_type=code&client_id=...)解析并转换成一个 Spring Security 能处理的认证令牌对象 ------ OAuth2AuthorizationCodeRequestAuthenticationToken。
java
@Override
public Authentication convert(HttpServletRequest request) {

   MultiValueMap<String, String> parameters = "GET".equals(request.getMethod())
         ? OAuth2EndpointUtils.getQueryParameters(request) : OAuth2EndpointUtils.getFormParameters(request);

   // response_type (REQUIRED)
   String responseType = parameters.getFirst(OAuth2ParameterNames.RESPONSE_TYPE);

   String authorizationUri = request.getRequestURL().toString();

   // client_id (REQUIRED)
   String clientId = parameters.getFirst(OAuth2ParameterNames.CLIENT_ID);


   Authentication principal = SecurityContextHolder.getContext().getAuthentication();
   if (principal == null) {
      // 如果未登录就暂时用一个匿名的,后续我们知道,没登录这块会被拦截
      principal = ANONYMOUS_AUTHENTICATION;
   }
   // redirect_uri (OPTIONAL)
   String redirectUri = parameters.getFirst(OAuth2ParameterNames.REDIRECT_URI);

   // scope (OPTIONAL)
   Set<String> scopes = null;
   String scope = parameters.getFirst(OAuth2ParameterNames.SCOPE);
   if (StringUtils.hasText(scope)) {
      scopes = new HashSet<>(Arrays.asList(StringUtils.delimitedListToStringArray(scope, " ")));
   }

   // state (RECOMMENDED)
   String state = parameters.getFirst(OAuth2ParameterNames.STATE);


   // code_challenge (REQUIRED for public clients) - RFC 7636 (PKCE)
   String codeChallenge = parameters.getFirst(PkceParameterNames.CODE_CHALLENGE);


   // code_challenge_method (OPTIONAL for public clients) - RFC 7636 (PKCE)
   String codeChallengeMethod = parameters.getFirst(PkceParameterNames.CODE_CHALLENGE_METHOD);


   Map<String, Object> additionalParameters = new HashMap<>();
   parameters.forEach((key, value) -> {
      if (!key.equals(OAuth2ParameterNames.RESPONSE_TYPE) && !key.equals(OAuth2ParameterNames.CLIENT_ID)
            && !key.equals(OAuth2ParameterNames.REDIRECT_URI) && !key.equals(OAuth2ParameterNames.SCOPE)
            && !key.equals(OAuth2ParameterNames.STATE)) {
         additionalParameters.put(key, (value.size() == 1) ? value.get(0) : value.toArray(new String[0]));
      }
   });

   return new OAuth2AuthorizationCodeRequestAuthenticationToken(authorizationUri, clientId, principal, redirectUri,
         state, scopes, additionalParameters);
}上面就是把原始的 HTTP 授权请求 转换成OAuth2AuthorizationCodeRequestAuthenticationToken 的过程。 可能有人觉得为啥一定要转成authenticationToken呢?可以这样去思考:OAuth2AuthorizationCodeRequestAuthenticationToken是一种自定义的认证令牌,表示"用户正在请求一个授权码"。 OAuth2 授权请求本身也需要"认证":验证它是不是一个合法请求。
OAuth2AuthorizationCodeRequestAuthenticationProvider 认证令牌
显然和OAuth2AuthorizationCodeRequestAuthenticationToken 配合的就应该是OAuth2AuthorizationCodeRequestAuthenticationProvider,专门用来认证这个令牌的,
🔐 验证由 OAuth2AuthorizationCodeRequestAuthenticationConverter 创建的 OAuth2AuthorizationCodeRequestAuthenticationToken 是否合法,并决定是否允许该客户端发起授权请求
验证流程:
java
RegisteredClient registeredClient = this.registeredClientRepository
   .findByClientId(authorizationCodeRequestAuthentication.getClientId());
if (registeredClient == null) {
   throwError(OAuth2ErrorCodes.INVALID_REQUEST, OAuth2ParameterNames.CLIENT_ID,
         authorizationCodeRequestAuthentication, null);
}
通过registeredClientRepository校验是否是合法客户端
ini
OAuth2AuthorizationCodeRequestAuthenticationContext.Builder authenticationContextBuilder = OAuth2AuthorizationCodeRequestAuthenticationContext
   .with(authorizationCodeRequestAuthentication)
   .registeredClient(registeredClient);
this.authenticationValidator.accept(authenticationContextBuilder.build());
这块默认好像校验redirectUri 我们可以扩展authenticationValidator来自定义逻辑 这块没太细看
java
if (!registeredClient.getAuthorizationGrantTypes().contains(AuthorizationGrantType.AUTHORIZATION_CODE)) {
   if (this.logger.isDebugEnabled()) {
      this.logger.debug(LogMessage.format(
            "Invalid request: requested grant_type is not allowed" + " for registered client '%s'",
            registeredClient.getId()));
   }
   throwError(OAuth2ErrorCodes.UNAUTHORIZED_CLIENT, OAuth2ParameterNames.CLIENT_ID,
         authorizationCodeRequestAuthentication, registeredClient);
}
检查客户端注册时声明的"授权类型"中,是否包含 authorization_code。
scss
// code_challenge (REQUIRED for public clients) - RFC 7636 (PKCE)
String codeChallenge = (String) authorizationCodeRequestAuthentication.getAdditionalParameters()
   .get(PkceParameterNames.CODE_CHALLENGE);
if (StringUtils.hasText(codeChallenge)) {
   String codeChallengeMethod = (String) authorizationCodeRequestAuthentication.getAdditionalParameters()
      .get(PkceParameterNames.CODE_CHALLENGE_METHOD);
   if (!StringUtils.hasText(codeChallengeMethod) || !"S256".equals(codeChallengeMethod)) {
      throwError(OAuth2ErrorCodes.INVALID_REQUEST, PkceParameterNames.CODE_CHALLENGE_METHOD, PKCE_ERROR_URI,
            authorizationCodeRequestAuthentication, registeredClient, null);
   }
}
else if (registeredClient.getClientSettings().isRequireProofKey()) {
   throwError(OAuth2ErrorCodes.INVALID_REQUEST, PkceParameterNames.CODE_CHALLENGE, PKCE_ERROR_URI,
         authorizationCodeRequestAuthentication, registeredClient, null);
}
这段和PKCE 相关,我还没有研究太明白,这块做个记号。要是哪个有缘人看到了,帮我解解惑。
kotlin
// ---------------
// The request is valid - ensure the resource owner is authenticated
// ---------------

Authentication principal = (Authentication) authorizationCodeRequestAuthentication.getPrincipal();
if (!isPrincipalAuthenticated(principal)) {
   if (this.logger.isTraceEnabled()) {
      this.logger.trace("Did not authenticate authorization code request since principal not authenticated");
   }
   // Return the authorization request as-is where isAuthenticated() is false
   return authorizationCodeRequestAuthentication;
}
typescript
private static boolean isPrincipalAuthenticated(Authentication principal) {
   return principal != null && !AnonymousAuthenticationToken.class.isAssignableFrom(principal.getClass())
         && principal.isAuthenticated();
}这块就是要求用户必须是已经认证通过的,但是上面我们在创建token的时候传递进入principal恰好是AnonymousAuthenticationToken,是个匿名的用户,所以这里校验不通过,直接返回了代码结束了,返回的authorizationCodeRequestAuthentication是没有经过认证的,isAuthenticated()=false
我们把代码跟回到OAuth2AuthorizationEndpointFilter
发现如果在访问/oauth2/authorize进行授权请求的时候,如果发现用户没有登录,OAuth2AuthorizationEndpointFilter直接将这个请求放行了,这么做的目的是:请求放了之后回来到AuthorizationFilter,它会校验当前请求需要用户进行认证,就会开启认证流程,引导用户进行认证了。
总结一下吧
我们这篇文章就讨论了在用户未登录的情况下,进行授权请求/oauth2/authorize,底层发生了。简单来讲就是客户端进行授权请求,OAuth2AuthorizationEndpointFilter利authenticationConverter将授权请求封装成OAuth2AuthorizationCodeRequestAuthenticationToken令牌,由OAuth2AuthorizationCodeRequestAuthenticationProvider对令牌进行认证,验证过程中发现用户(资源拥有者)并没有进行认证isAuthenticationed=false ,那么就直接放行了,由authorizationFilter处理/oauth2/authorize,发现未认证,引导用户开启认证。
由于篇幅有限,下篇文章我将继续讨论在用户已经认证的情况下,进行/oauth2/authorize授权请求,将会发生什么?
请大家多多包涵,多多点赞,多多关注。谢谢大家啦!