谷歌近期发布了Gemini 2.5 Flash Image,这是一款功能强大的全新图像生成和编辑模型,其代号为 Nano Banana。该模型引入了最先进的图像创建和处理功能,解锁了一系列全新应用。
本指南为希望使用Gemini Developer API将 Gemini 2.5 Flash Image 又名 Nano Banana 集成到其应用程序中的开发人员提供了全面的指导。
本指南将涵盖:
- 在 AI Studio 中使用 Nano Banana
- 项目设置
- 图像创建
- 图像编辑
- 照片修复
- 多幅输入图像
- 对话式图像编辑
- 最佳实践和有效提示
- 社区示例和灵感
- 资源
以下是您将在本教程中构建的示例:
ini
prompt = "Restore and colorize this image from 1932"

response = client.models.generate_content(
    model="gemini-2.5-flash-image-preview",
    contents=[prompt, image],
)
让我们开始吧!
1)在 Google AI Studio 中使用 Nano Banana
虽然最终用户可以在Gemini 应用程序中访问 Nano Banana ,但对于开发人员来说,制作原型和测试提示的最佳环境是Google AI Studio。AI Studio 是在编写任何代码之前试验所有可用 AI 模型的游乐场,也是使用 Gemini API 进行构建的入口点。
您可以在 AI Studio 中免费使用 Nano Banana。首先,请访问aistudio.google.com,使用您的 Google 帐户登录,然后从模型选择器中选择Nano Banana 。
对于直接访问,请使用此链接开始与模型的新会话:

提示 :您还可以直接在 AI Studio (ai.studio/apps)中为 Nano Banana 网络应用程序编写代码,或者探索代码并重新混合现有应用程序之一。
2)项目设置
要遵循本指南,您需要以下内容:
- 来自Google AI Studio 的API 密钥。
- 为您的项目设置计费。
- 适用于Python或JavaScript/TypeScript 的Google Gen AI SDK 。
步骤A:生成API密钥
请按照以下步骤操作:
- 在 Google AI Studio 中,点击左侧导航面板中的获取 API 密钥。
- 在下一页上,单击创建 API 密钥。
- 选择现有的 Google Cloud 项目或创建一个新项目。此项目用于管理 API 使用计费。
该过程完成后,将显示您的 API 密钥。请复制并安全存储。
步骤 B:启用计费
虽然在 AI Studio 中进行原型设计是免费的,但通过 API 使用模型则需要付费。您必须在 Google Cloud 项目中启用结算功能。
在 API 密钥管理屏幕中,单击项目旁边的 "设置计费" 并按照屏幕上的说明进行操作。

纳米香蕉多少钱?
使用 Nano Banana 生成图像的成本为每张图片 0.039 美元*。只需 1 美元,您就可以生成大约 25 张图片。
- 官方定价为每 100 万个输入代币 0.30 美元,每 100 万个输出代币 30 美元。一张标准的 1024x1024 像素输出图像需要 1290 个代币,相当于每张图片 0.039 美元。详情请参阅Gemini 2.5 Flash 图像定价表。
步骤C:安装SDK
选择适合您首选语言的 SDK。
Python:
bash
pip install -U google-genai
# Install the Pillow library for image manipulation
pip install Pillow
JavaScript / TypeScript:
bash
npm install @google/genai以下示例使用 Python SDK 进行演示。在GitHub Gist中提供了在 JavaScript 中使用 Nano Banana 的 等效代码片段。
3)从文本生成图像
gemini-2.5-flash-image-preview使用 Nano Banana 根据描述性文本提示生成一张或多张图片。所有 API 请求均使用模型 ID 。
ini
from google import genai
from PIL import Image
from io import BytesIO

# Configure the client with your API key
client = genai.Client(api_key="YOUR_API_KEY")

prompt = """Create a photorealistic image of an orange cat
with a green eyes, sitting on a couch."""

# Call the API to generate content
response = client.models.generate_content(
    model="gemini-2.5-flash-image-preview",
    contents=prompt,
)

# The response can contain both text and image data.
# Iterate through the parts to find and save the image.
for part in response.candidates[0].content.parts:
    if part.text is not None:
        print(part.text)
    elif part.inline_data is not None:
        image = Image.open(BytesIO(part.inline_data.data))
        image.save("cat.png")
输出:

该模型是多模态的,因此响应结构为一个 列表,parts其中可以包含交错的文本和图像数据(inline_data)。上面的代码遍历这些部分以提取并保存生成的图像。
4)使用文本和图像输入进行图像编辑
提供现有图像以及用于执行编辑的文本提示。该模型擅长保持输入图像的字符和内容一致性。
ini
from google import genai
from PIL import Image
from io import BytesIO

client = genai.Client(api_key="YOUR_API_KEY")

prompt = """Using the image of the cat, create a photorealistic,
street-level view of the cat walking along a sidewalk in a
New York City neighborhood, with the blurred legs of pedestrians
and yellow cabs passing by in the background."""

image = Image.open("cat.png")

# Pass both the text prompt and the image in the 'contents' list
response = client.models.generate_content(
    model="gemini-2.5-flash-image-preview",
    contents=[prompt, image],
)

for part in response.candidates[0].content.parts:
    if part.text is not None:
        print(part.text)
    elif part.inline_data is not None:
        image = Image.open(BytesIO(part.inline_data.data))
        image.save("cat2.png")
输入和输出:

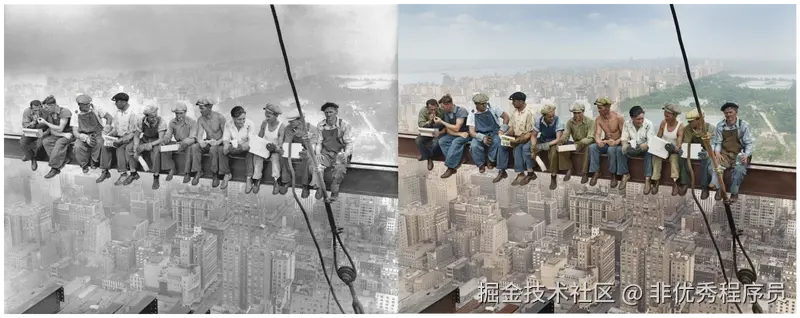
5)使用 Nano Banana 修复照片
该模型的强大应用之一是照片修复。只需简单的提示,它就能修复和着色老照片,效果令人印象深刻。
ini
from google import genai
from PIL import Image
from io import BytesIO

client = genai.Client(api_key="YOUR_API_KEY")

prompt = "Restore and colorize this image from 1932"

image = Image.open("lunch.jpg")  # "Lunch atop a Skyscraper, 1932"

response = client.models.generate_content(
    model="gemini-2.5-flash-image-preview",
    contents=[prompt, image],
)

for part in response.candidates[0].content.parts:
    if part.text is not None:
        print(part.text)
    elif part.inline_data is not None:
        image = Image.open(BytesIO(part.inline_data.data))
        image.save("lunch-restored.png")
原件和输出:

6)处理多个输入图像
您可以提供多幅图像作为更复杂的编辑任务的输入。
ini
from google import genai
from PIL import Image
from io import BytesIO

client = genai.Client(api_key="YOUR_API_KEY")

prompt = "Make the girl wear this t-shirt. Leave the background unchanged."

image1 = Image.open("girl.png")
image2 = Image.open("tshirt.png")

response = client.models.generate_content(
    model="gemini-2.5-flash-image-preview",
    contents=[prompt, image1, image2],
)

for part in response.candidates[0].content.parts:
    if part.text is not None:
        print(part.text)
    elif part.inline_data is not None:
        image = Image.open(BytesIO(part.inline_data.data))
        image.save("girl-with-tshirt.png")
输入 1 和 2 以及输出:

7)对话式图像编辑
为了进行迭代优化,您可以使用chats会话来维护跨多个请求的上下文。这允许您以对话的方式编辑图像。
ini
from google import genai
from PIL import Image
from io import BytesIO

client = genai.Client(api_key="YOUR_API_KEY")

# Create a chat
chat = client.chats.create(
    model="gemini-2.5-flash-image-preview"
)

# Make the first image edit
response1 = chat.send_message(
    [
        "Change the cat to a bengal cat, leave everything else the same",
        Image.open("cat.png"),
    ]
)
# display / save image...

# Continue chatting and editing
response2 = chat.send_message("The cat should wear a funny party hat")
# display / save image...
输入和输出 1 和 2:

提示:如果您注意到经过多次对话编辑后图像特征开始退化或"漂移",最好使用最新图像和更详细、更整合的提示开始新的会话,以保持高保真度。
8)Nano Banana 的最佳实践和提示
为了使 Nano Banana 获得最佳效果,请遵循以下提示指南:
- 高度具体: 您提供的有关主题、颜色、灯光和构图的细节越多,您对输出的控制就越强。
- 提供背景和意图: 解释图像的目的或想要表达的情绪。模特对背景的理解会影响其创作选择。
- 迭代和完善: 不要期望第一次就完美。利用模型的对话能力进行渐进式修改,不断完善您的图像。
- 使用分步说明: 对于复杂的场景,将提示分解为一系列清晰、连续的说明。
- 使用积极的框架: 不要使用"没有汽车"这样的消极提示,而是积极地描述所需的场景:"空旷、荒凉的街道,没有交通迹象。"
- 控制相机: 使用摄影和电影术语来指导构图,例如"广角拍摄"、"微距拍摄"或"低角度透视"。
要深入了解最佳实践,请查看有关提示最佳实践的官方博客文章和文档中的提示指南。
9)社区范例与启发
探索社区使用 Nano Banana 构建的内容:
- @henrydaubrez 的转换镜头视角:X post
- @multimodalart 通过小样本学习实现一致的角色设计:X 帖子
- "红色箭头看到的是什么"谷歌地图由 @tokumin 改造:X 帖子
- 由@yachimat_manga 的火柴人注释生成图像:X post
- @deedydas 从静态图像创建 3D 模型:X 帖子
- @bilawalsidhu 生成基于位置的 AR 体验:X 帖子
- 将 2D 地图转换为 3D 图形,作者: @demishassabis :X post
10)资源和后续步骤
本指南涵盖了使用 Nano Banana(又名 Gemini 2.5 Flash 镜像)进行构建的基础知识。您已经学习了如何设置环境、生成和编辑镜像,以及如何应用高级技术。现在,您可以开始将这些强大的功能融入到您自己的项目中。