文章目录
说明
为了方便演示,前后端代码一起写了
关于对象存储请看我另一篇博客阿里云对象存储OSS的使用
SSM使用
引入依赖
xml
<!--阿里云OSS依赖-->
    <dependency>
      <groupId>com.aliyun.oss</groupId>
      <artifactId>aliyun-sdk-oss</artifactId>
      <version>3.17.4</version>
    </dependency>

    <dependency>
      <groupId>javax.xml.bind</groupId>
      <artifactId>jaxb-api</artifactId>
      <version>2.3.1</version>
    </dependency>
    <dependency>
      <groupId>javax.activation</groupId>
      <artifactId>activation</artifactId>
      <version>1.1.1</version>
    </dependency>
    <!-- no more than 2.3.3-->
    <dependency>
      <groupId>org.glassfish.jaxb</groupId>
      <artifactId>jaxb-runtime</artifactId>
      <version>2.3.3</version>
    </dependency>

    <dependency>
      <groupId>commons-fileupload</groupId>
      <artifactId>commons-fileupload</artifactId>
      <version>1.4</version>
    </dependency>

    <dependency>
      <groupId>commons-io</groupId>
      <artifactId>commons-io</artifactId>
      <version>2.11.0</version>
    </dependency>
在spring-mvc.xml中加入配置
xml
<!-- 配置 MultipartResolver 用于文件上传 -->
    <bean id="multipartResolver" class="org.springframework.web.multipart.commons.CommonsMultipartResolver">
        <!-- 设置最大上传文件大小 -->
        <property name="maxUploadSize" value="10485760"/> <!-- 10MB -->
        <property name="maxInMemorySize" value="4096"/>
        <property name="defaultEncoding" value="UTF-8"/>
    </bean>
创建上传工具类AliOssUtil
java
package com.Teenage_education_network.utils;

import com.aliyun.oss.ClientException;
import com.aliyun.oss.OSS;
import com.aliyun.oss.OSSClientBuilder;
import com.aliyun.oss.OSSException;

import java.io.InputStream;

public class AliOssUtil {
    private static final String ENDPOINT = "https://oss-cn-beijing.aliyuncs.com";
    private static final String ACCESS_KEY_ID = "你的id";
    private static final String SECRET_ACCESS_KEY = "你的秘钥";
    private static final String BUCKET_NAME = "项目名";

    /*
    * uploadFile方法
    * objectName:文件名称比如 "YEjdihp893bif1.jpg"
    * inputStream:文件流,用于读取文件比如,D:\Users\Administrator\Desktop\YEjdihp893bif1.jpg
    * */
    //上传文件,返回文件的公网访问地址
    public static String uploadFile(String objectName, InputStream inputStream){
        // 创建OSSClient实例。
        OSS ossClient = new OSSClientBuilder().build(ENDPOINT,ACCESS_KEY_ID,SECRET_ACCESS_KEY);
        //公文访问地址
        String url = "";
        try {
            // 创建存储空间。
            ossClient.createBucket(BUCKET_NAME);
            ossClient.putObject(BUCKET_NAME, objectName, inputStream);

            // 这里是返回阿里云的url地址
            url = "https://"+BUCKET_NAME+"."+ENDPOINT.substring(ENDPOINT.lastIndexOf("/")+1)+"/"+objectName;
        } catch (OSSException oe) {
            System.out.println("Caught an OSSException, which means your request made it to OSS, "
                    + "but was rejected with an error response for some reason.");
            System.out.println("Error Message:" + oe.getErrorMessage());
            System.out.println("Error Code:" + oe.getErrorCode());
            System.out.println("Request ID:" + oe.getRequestId());
            System.out.println("Host ID:" + oe.getHostId());
        } catch (ClientException ce) {
            System.out.println("Caught an ClientException, which means the client encountered "
                    + "a serious internal problem while trying to communicate with OSS, "
                    + "such as not being able to access the network.");
            System.out.println("Error Message:" + ce.getMessage());
        } finally {
            if (ossClient != null) {
                ossClient.shutdown();
            }
        }
        return url;
    }
}
响应工具类ResultJSON
java
package com.hsh.pojo.tdo;

import java.io.Serializable;

/**
 * @Author: wzy
 * @Date: 2024/11/13 11:03
 * @Description: 返回结果类
 */
public class ResultJSON<T> implements Serializable {
    private Integer code;
    private String msg;
    private T data;
    public ResultJSON(Integer code, String msg, T data) {
        this.code = code;
        this.msg = msg;
        this.data = data;

    }

    /**
     * 操作成功或者失败
     * @param c 受影响行数
     * @return 当前传入的受影响行数>0则返回成功,否则返回失败
     */
    public static  ResultJSON successORerror(int c){
        return c>0?new ResultJSON(200,"操作成功",c)
                :new ResultJSON(400,"操作失败",c);
    }

    public static ResultJSON success(){
        return new ResultJSON(200,"操作成功",null);
    }
    public static ResultJSON success(String msg){
        return new ResultJSON(200,msg,null);
    }
    public static <T> ResultJSON success(T data){
        return new ResultJSON(200,"操作成功",data);
    }
    public static ResultJSON success(Integer code,String msg){
        return new ResultJSON(code,msg,null);
    }
    public static <T> ResultJSON success(String msg,T data){
        return new ResultJSON(200,msg,data);
    }
    public static <T> ResultJSON success(Integer code,String msg,T data){
        return new ResultJSON(code,msg,data);
    }

    public static ResultJSON error(){
        return new ResultJSON(500,"操作失败",null);
    }
    public static ResultJSON error(String msg){
        return new ResultJSON(500,msg,null);
    }
    public static ResultJSON error(Integer code,String msg){
        return new ResultJSON(code,msg,null);
    }

    public T getData() {
        return data;
    }

    public void setData(T data) {
        this.data = data;
    }

    public Integer getCode() {
        return code;
    }

    public void setCode(Integer code) {
        this.code = code;
    }

    public String getMsg() {
        return msg;
    }

    public void setMsg(String msg) {
        this.msg = msg;
    }
}
编写controller
java
package com.hsh.controller;

import com.hsh.pojo.tdo.ResultJSON;
import com.hsh.utils.AliOssUtil;
import org.springframework.web.bind.annotation.PostMapping;
import org.springframework.web.bind.annotation.RequestMapping;
import org.springframework.web.bind.annotation.RequestParam;
import org.springframework.web.bind.annotation.RestController;
import org.springframework.web.multipart.MultipartFile;

import java.io.IOException;
import java.util.UUID;

/**
 * @author xrkhy
 * @date 2025/9/6 19:05
 * @description
 */

@RestController
@RequestMapping("/upload")
public class UploadController {
    // 本次请求通过elementPlus的el-upload组件上传图片,通过el-upload组件的属性发起请求
    // 前端上传路径action="/api/upload/imgUpload" 要和后端一致 这里的/api是前端的反向代理的标识
    // 前端的name="img" 是这里的形参名
    // 前端的请求头添加token  :headers="{'Authorization':tokenStore.token}"
    @PostMapping("/imgUpload")
    public ResultJSON<String> imgUpload(@RequestParam("img") MultipartFile img) throws IOException {
        System.out.println(img);
        if (img == null || img.isEmpty()) {
            // 处理文件为空的情况
            return ResultJSON.error("文件不能为空");
        }
        String originalFilename = img.getOriginalFilename();
        // 生成新的唯一的文件名
        String fileNmae = UUID.randomUUID().toString() + originalFilename.substring(originalFilename.lastIndexOf("."));
        String url = AliOssUtil.uploadFile(fileNmae, img.getInputStream());
        System.out.println(url);
        return ResultJSON.success("添加成功",url);
    }
}
自动上传
代码编写
html
<template>
  <el-form
      :model="productForm"
      label-width="120px"
      label-position="right"
    >
      <!-- 用户基础信息 -->
      <el-form-item label="商品名称" prop="productName">
        <el-input v-model="productForm.productName"></el-input>
      </el-form-item>

      <el-form-item label="封面图片">
        <!-- :auto-upload 设置是否自动上传 true自动上传 -->
        <!-- action为你的请求路径:你要替换为你的上传API地址 -->
        <!--
              name: 上传的文件字段名 (也就是后端的参数 我这里是img)
              后端的接收参数如下就是我上面写的UploadController
              public ResultJSON<String>
              imgUpload(@RequestParam("img") MultipartFile img){}
         -->
        <!-- :on-success="handleAvatarSuccess" 上传成功回调 -->
        <!-- :before-upload="beforeAvatarUpload"上传前校验 -->
        <!--
          list-type="picture-card" 文件列表的类型 这里不需要
          因为已经有<i class="el-icon-plus" v-if="!productForm.imageUrl"></i>代替了
        -->
        <!-- :show-file-list="false" 是否显示已上传文件列表 -->

        <!--
              除了上面还可以设置响应头,配置如下
              :headers="{'Authorization':tokenStore.token}"
        -->

        <el-upload
          :auto-upload="true"
          action="http://localhost:8080/upload/imgUpload"
          name="img"
          :on-success="handleAvatarSuccess"
          :before-upload="beforeAvatarUpload"
          :show-file-list="false"
        >
          <!--
              v-if="!productForm.imageUrl" 是如果上传成功这个
              +图标(<i class="el-icon-plus"></i>)上传的提示就不显示了
          -->
          <i
            style="font-size: 20px; border: 1px solid #ccc; padding: 20px"
            class="el-icon-plus"
            v-if="!productForm.imageUrl"
          ></i>
          <img style="width: 100px" v-else :src="productForm.imageUrl" />
        </el-upload>
      </el-form-item>

      <el-form-item label="商品价格" prop="productPrice">
        <el-input-number
          v-model="productForm.productPrice"
          :precision="2"
          :step="0.01"
        ></el-input-number>
      </el-form-item>

      <el-form-item label="商品库存" prop="productStock">
        <el-input-number
          v-model="productForm.productStock"
          label="描述文字"
        ></el-input-number>
      </el-form-item>

      <!-- 操作按钮 -->
      <el-form-item>
        <el-button type="primary" @click="submitForm">提交</el-button>
        <el-button @click="resetForm">重置</el-button>
      </el-form-item>
    </el-form>
</template>


<script>
export default {
  data() {
    return {
      productForm: {
        productId: null,
        productName: "",
        imageUrl: "",
        productPrice: "",
        productStock: ""
      },
    }
  }
  methods: {
  	// 上传成功后的回调
    handleAvatarSuccess(res, file) {
      this.productForm.imageUrl = res.data;
    },
    // 上传前的校验
    beforeAvatarUpload(file) {
      const isJPG = file.type === "image/jpeg" || file.type === "image/png";
      const isLt2M = file.size / 1024 / 1024 < 2;
      if (!isJPG) {
        this.$message.error("上传头像图片只能是 JPG 或 PNG 格式!");
      }
      if (!isLt2M) {
        this.$message.error("上传头像图片大小不能超过 2MB!");
      }
      return isJPG && isLt2M;
    },
    submitForm() {
      console.log("提交的数据:", this.formData);
      // 这里在发起请求
    },
  }
}
</script>
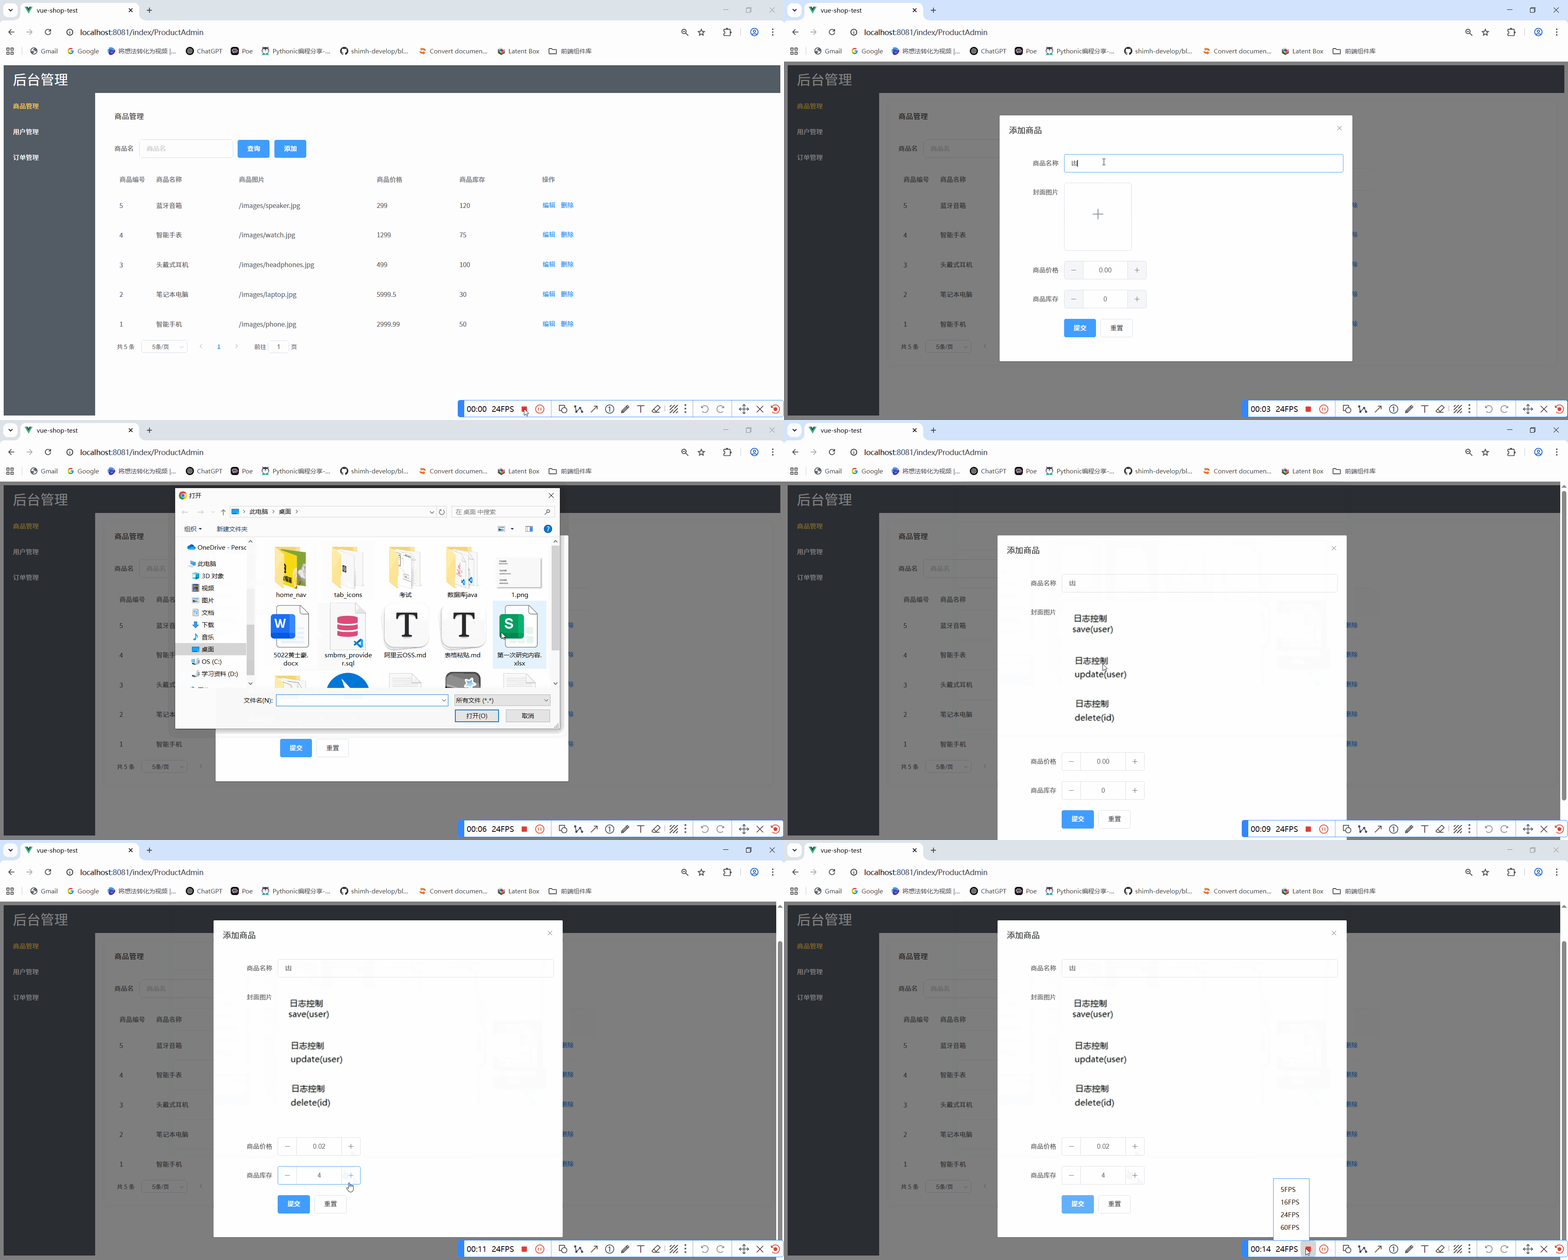
结果如下演示

上面数据确实是拿到了,此时在点击提交发送。

手动上传
前端代码编写
html
<template>
  <div>
    <h1>图片手动提交</h1>
    <el-form
      :model="productForm"
      style="width: 500px"
      label-width="120px"
      label-position="right"
    >
      <!-- 用户基础信息 -->
      <el-form-item label="商品名称" prop="productName">
        <el-input v-model="productForm.productName"></el-input>
      </el-form-item>

      <el-form-item label="封面图片">
        <!-- :auto-upload 设置是否自动上传 true自动上传 -->
        <!-- action为你的请求路径:你要替换为你的上传API地址 -->
        <!--
              list-type="picture-card" 文件列表的类型 这里不需要
              因为已经有<i class="el-icon-plus" v-if="!productForm.imageUrl"></i>代替了
         -->
        <!-- :show-file-list="false" 是否显示已上传文件列表 这里关闭 -->
        <!--
                  v-if="!productForm.imageUrl" 是如果上传成功这个
                  +图标(<i class="el-icon-plus"></i>)上传的提示就不显示了
        -->
        <el-upload
          :auto-upload="false"
          action="#"
          :show-file-list="false"
          :on-change="handleImgChange"
        >
          <i
            style="font-size: 20px; border: 1px solid #ccc; padding: 20px"
            class="el-icon-plus"
            v-if="!productForm.imageUrl"
          ></i>
          <img style="width: 100px" v-else :src="productForm.imageUrl" />
        </el-upload>
        <!-- v-if="productForm.imageUrl" 如果图片不存在 img不显示 -->
        <!-- <img v-if="imgURL" :src="imgURL" /> -->
      </el-form-item>

      <el-form-item label="商品价格" prop="productPrice">
        <el-input-number
          v-model="productForm.productPrice"
          :precision="2"
          :step="0.01"
        ></el-input-number>
      </el-form-item>

      <el-form-item label="商品库存" prop="productStock">
        <el-input-number
          v-model="productForm.productStock"
          label="描述文字"
        ></el-input-number>
      </el-form-item>

      <!-- 操作按钮 -->
      <el-form-item>
        <el-button type="primary" @click="submitForm">提交</el-button>
      </el-form-item>
    </el-form>
  </div>
</template>

<script>
import axios from "axios";

export default {
  name: "ImageUpload",
  data() {
    return {
      // 表单数据
      // 注意这里表单不能有字段为null,否则会报错
      // 比如productId: null, 发送给后端报错
      productForm: {
        productId: "",
        productName: "",
        imageUrl: "",
        productPrice: "",
        productStock: "",
        imgUrlFile: ""
      }
    };
  },
  methods: {
    // handleFileChange(file, fileList) {
    //   this.fileList = fileList;
    // },
    // 提交前实现封面图片预览
    handleImgChange(uploadFile) {
      // 预览图片
      // this.imgUrl = URL.createObjectURL(uploadFile.raw);
      this.productForm.imageUrl = URL.createObjectURL(uploadFile.raw);
      console.log(this.productForm.imageUrl);
      this.productForm.imgUrlFile = uploadFile.raw;
      // this.productForm.imageUrl = uploadFile.raw;
    },
    async submitForm() {
      const formData = new FormData();
      // 追加其他表单字段
      // 遍历 productForm 对象的属性
      for (const key in this.productForm) {
        // 将每个属性和值添加到 FormData 中
        formData.append(key, this.productForm[key]);
      }

      // 追加文件字段
      formData.append("file", this.imgUrlFile);

      this.clgFromData(formData);

      const res = await axios.post(
        "http://localhost:8080/product/addProductWithImg",
        formData
        // 下面的headers可以不,会自动识别是json还是formdata
        // {
        //   headers: {
        //     "Content-Type": "multipart/form-data"
        //   }
        // }
      );
      console.log(res);
    },
    clgFromData(formData) {
      for (let pair of formData.entries()) {
        console.log(pair[0] + ", " + pair[1]);
      }
    }
  }
};
</script>

<style scoped></style>
后端代码编写
java
package com.hsh.controller;

import com.hsh.pojo.Product;
import com.hsh.pojo.tdo.ResultJSON;
import com.hsh.service.ProductService;
import com.hsh.utils.AliOssUtil;
import org.springframework.beans.factory.annotation.Autowired;
import org.springframework.web.bind.annotation.*;
import org.springframework.web.multipart.MultipartFile;

import java.io.IOException;
import java.util.List;
import java.util.UUID;

@RestController
@RequestMapping("/product")
@CrossOrigin(origins = "http://localhost:8081")
public class ProductController {
    @Autowired
    ProductService productService;

    @PostMapping("/addProduct")
    public ResultJSON addProduct(@RequestBody Product product){
        System.out.println("product = " + product);
        return productService.addProduct(product);
    }

    // 注意 传入的product对象的属性不能是 null 也不能是 MultipartFile,否则报400的错误
    // 注意:java的product对象中,没有imgUrlFile属性。
    // 前端传入的product对象中,imgUrlFile属性是MultipartFile类型。
    @PostMapping("/addProductWithImg")
    public ResultJSON<Product> findProductById(@ModelAttribute Product product,
                                               @RequestParam(value = "imgUrlFile",required = false) MultipartFile imgUrlFile) throws IOException {
        System.out.println("product = " + product);
        System.out.println("imgFile = " + imgUrlFile);
        if (imgUrlFile == null || imgUrlFile.isEmpty()) {
            // 处理文件为空的情况
            return ResultJSON.error("文件不能为空");
        }
        String originalFilename = imgUrlFile.getOriginalFilename();
        // 生成新的唯一的文件名
        String fileNmae = UUID.randomUUID().toString() + originalFilename.substring(originalFilename.lastIndexOf("."));
        String url = AliOssUtil.uploadFile(fileNmae, imgUrlFile.getInputStream());
        System.out.println(url);
        product.setImageUrl(url);
        return productService.addProduct(product);
    }

}
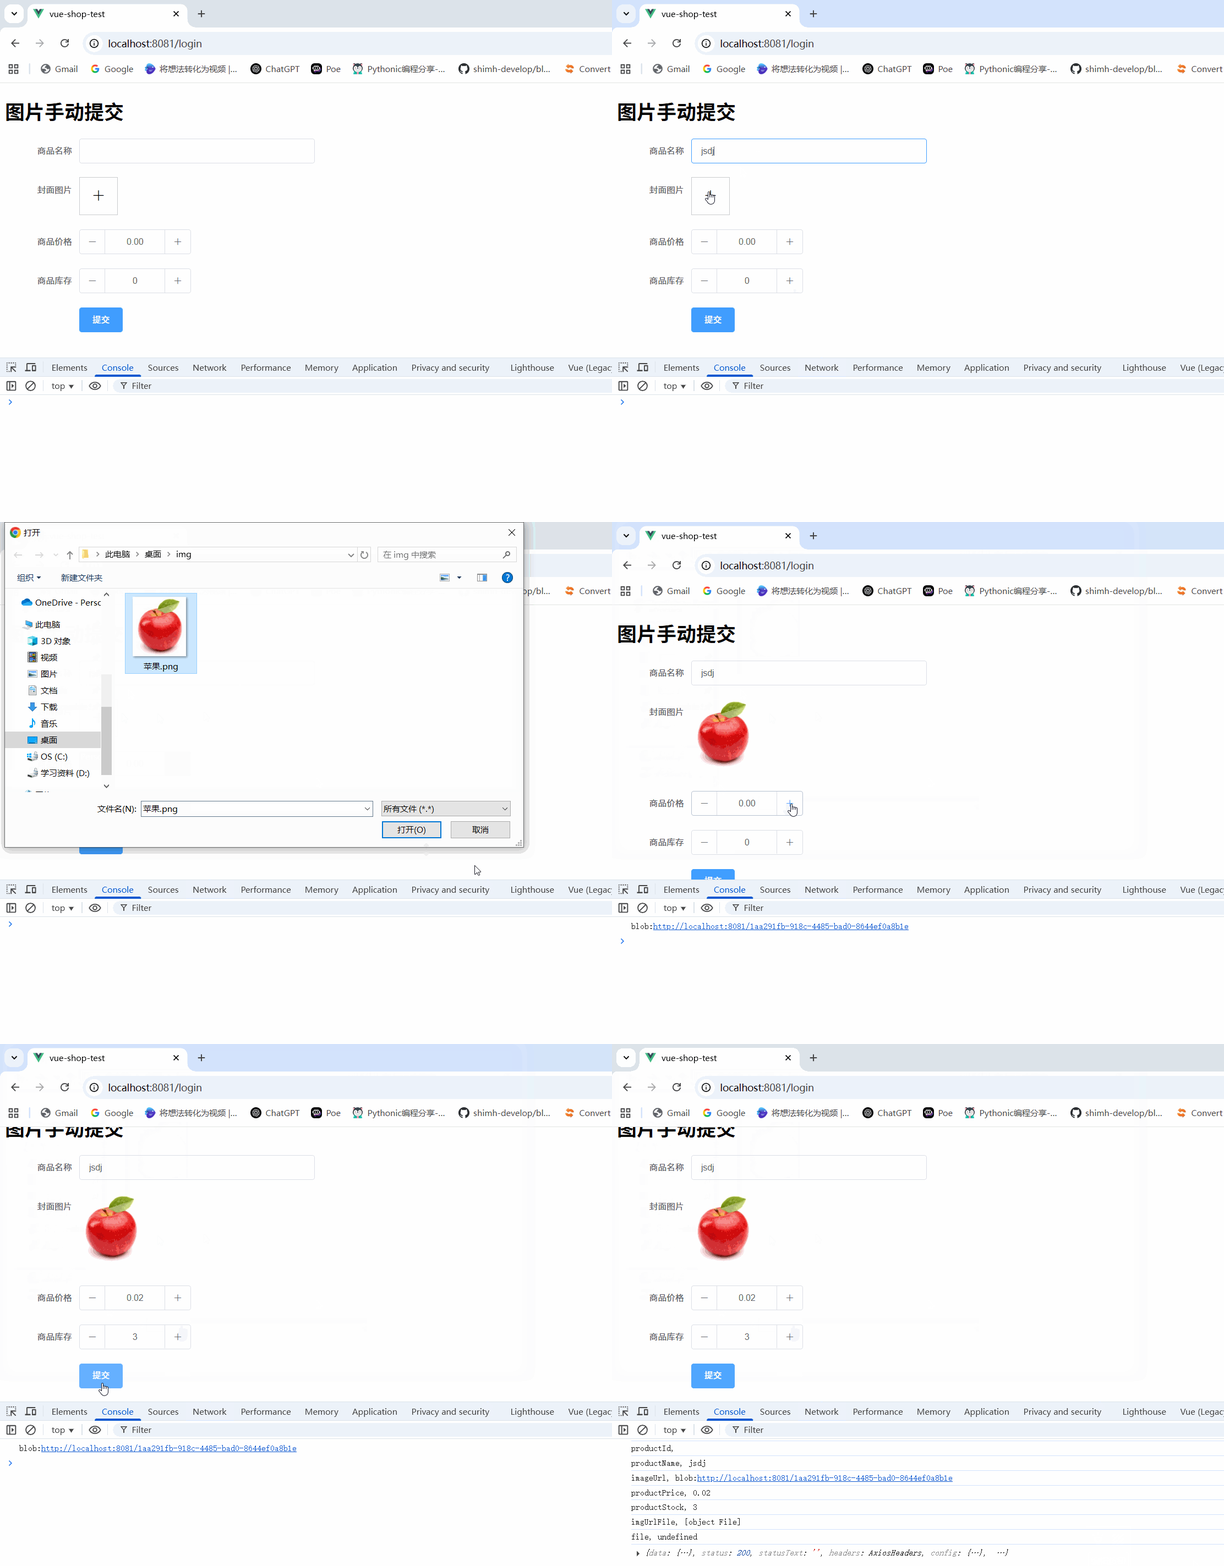
结果演示如下
