AWS EKS 自动扩缩EC2计算资源的3种方式
在AWS EKS集群自动扩缩的最佳实践中提到了3种主要的计算资源自动扩缩方法
其中Cluster Autoscaler和Karpenter都是Kubernetes Autoscaler的具体实现,Cluster Autoscaler最经典,Karpenter最早由AWS开源并后续适配了多家云计算平台,Karpenter性能表现更好。
鉴于大量的用户习惯使用经典的Cluster Autoscaler,本文也以Cluster Autoscaler为例实现EC2计算资源的自动扩缩。
安装 Cluster Autoscaler
本次安装luster Autoscaler的参考链接
IAM OIDC provider设置
为了让Cluster Autoscaler有权限操作nodegroup,我们需要设置安全策略
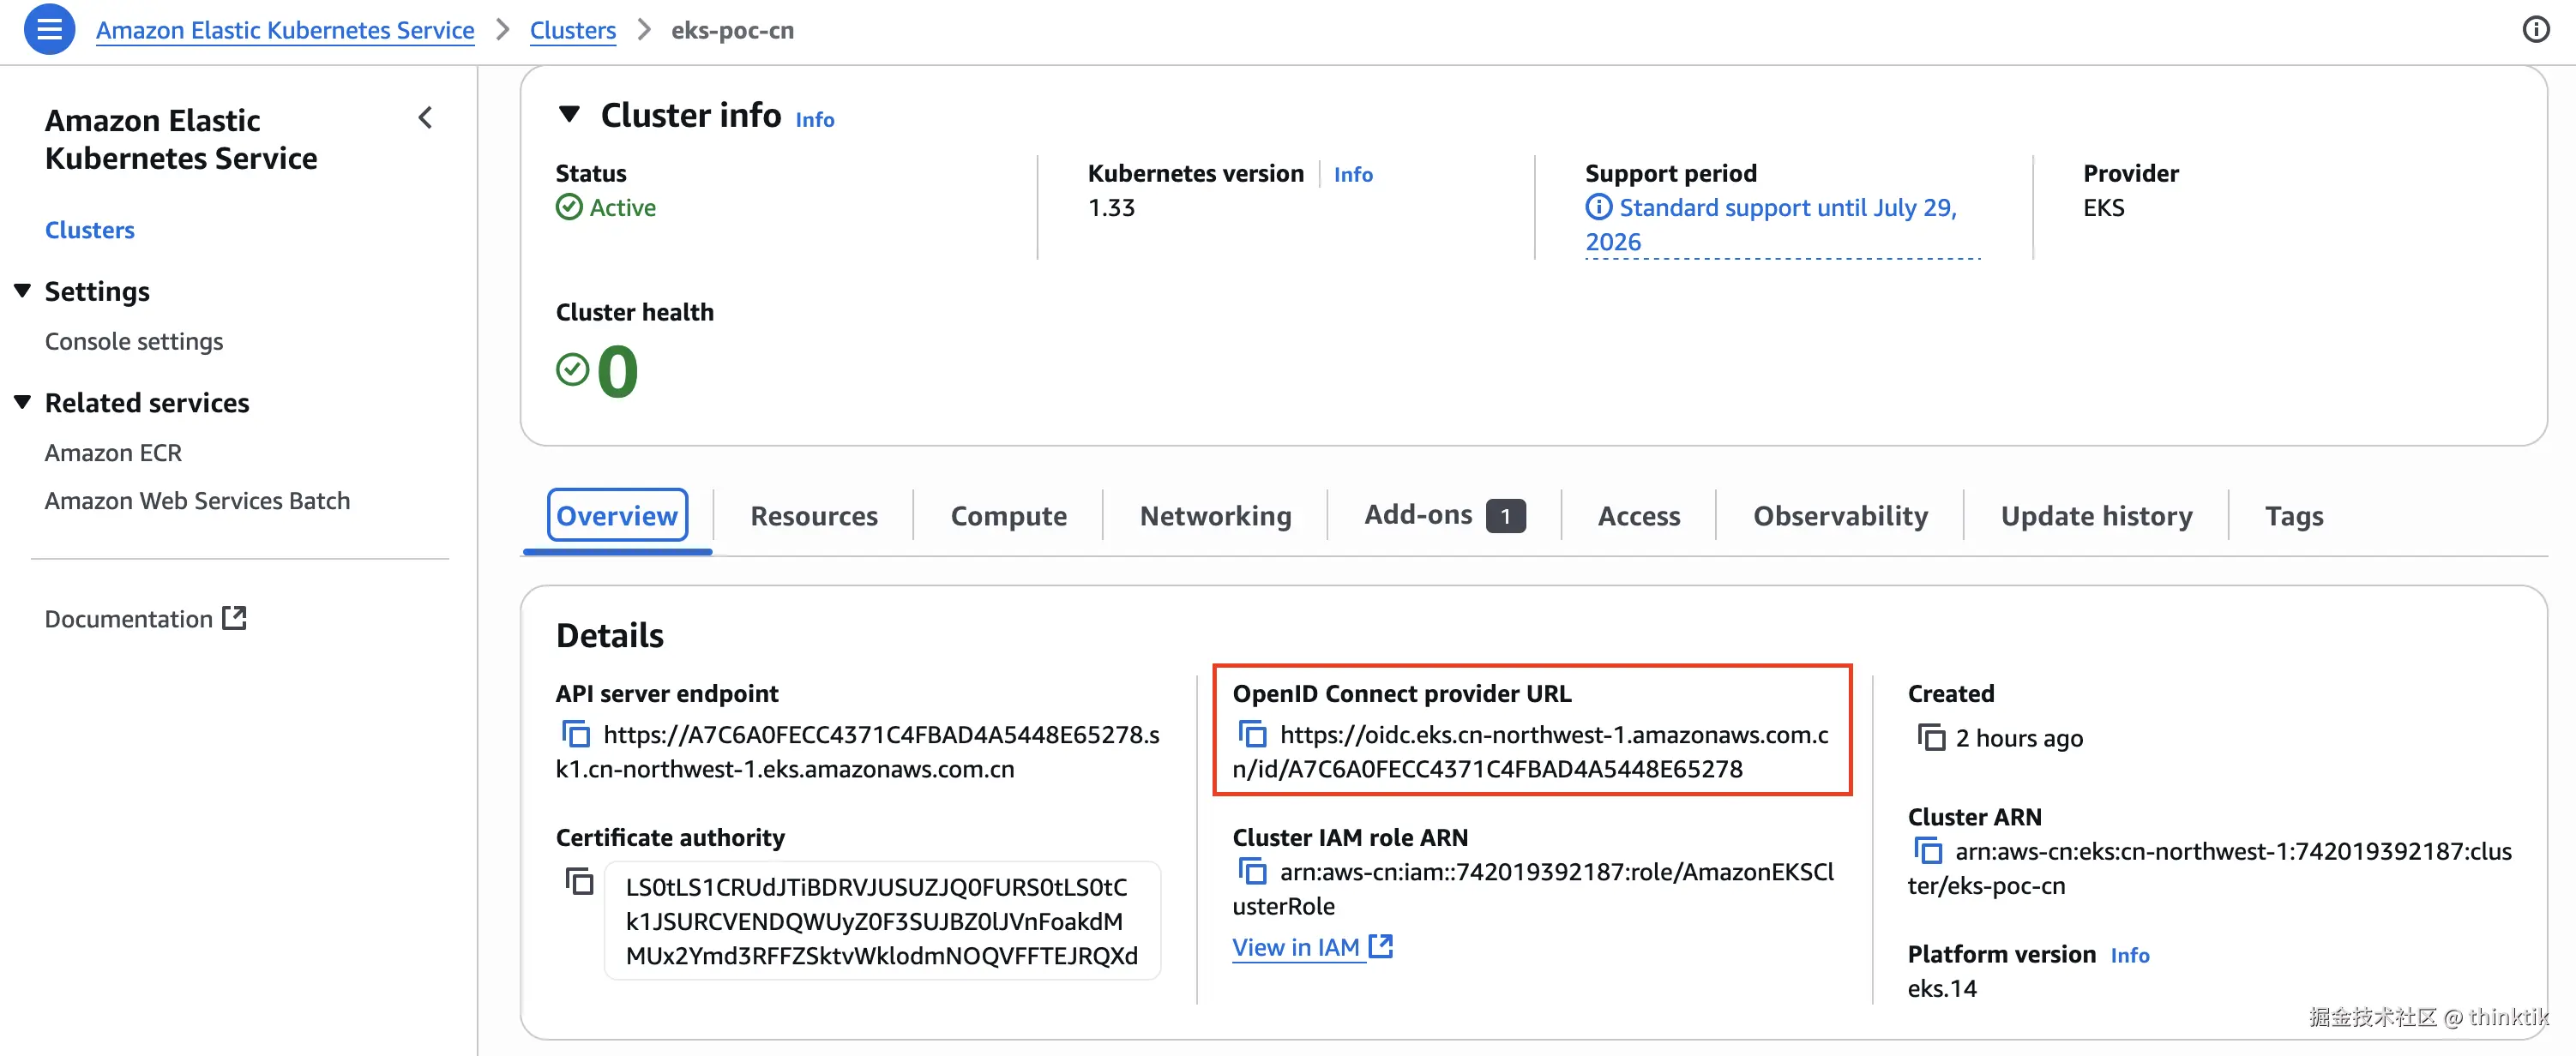
在AWS EKS中复制集群的OpenID Connect provider URL
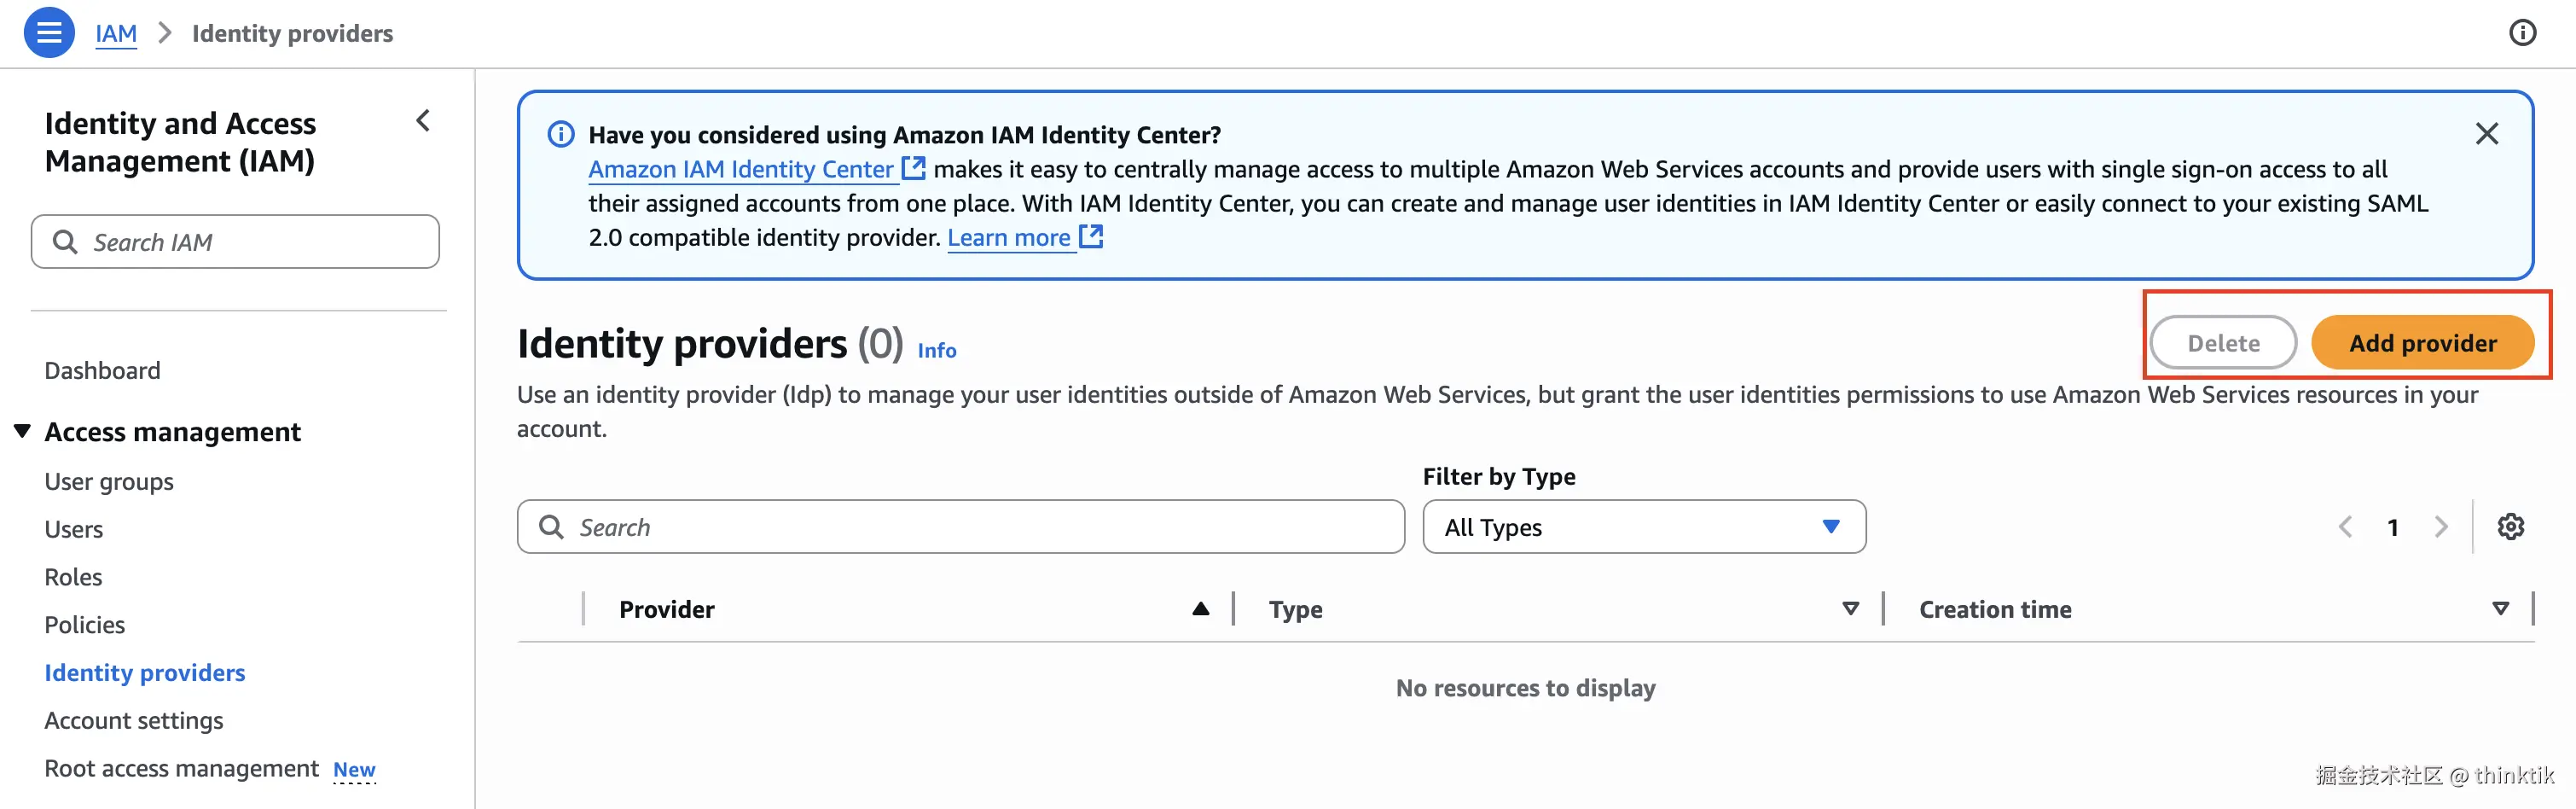
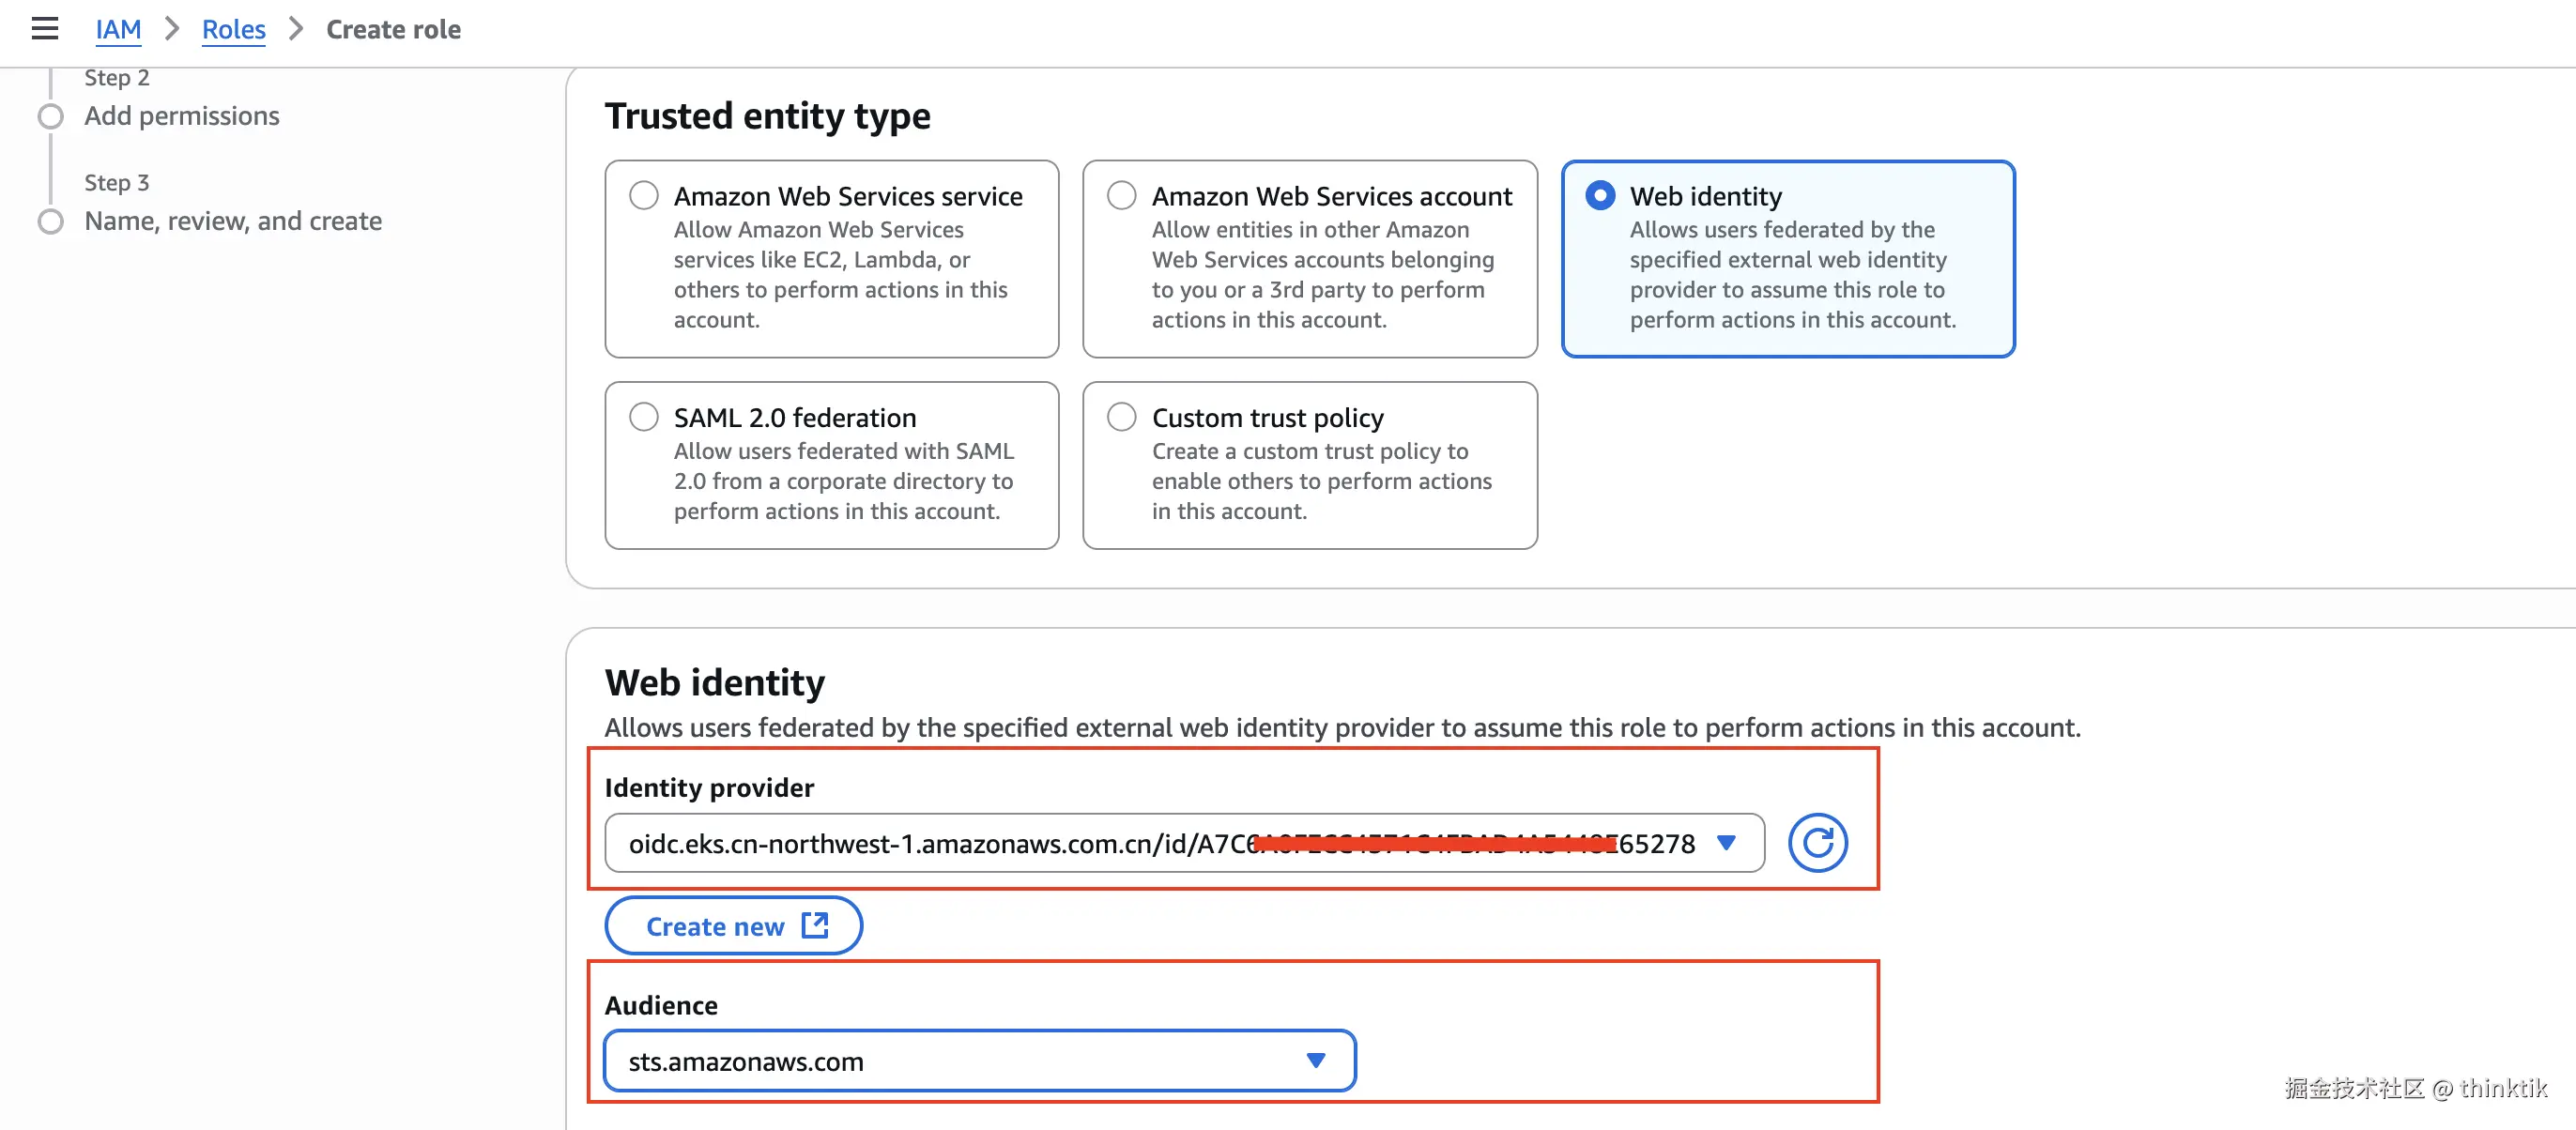
在AWS IAM补充OIDC,我们先创建Identity providers
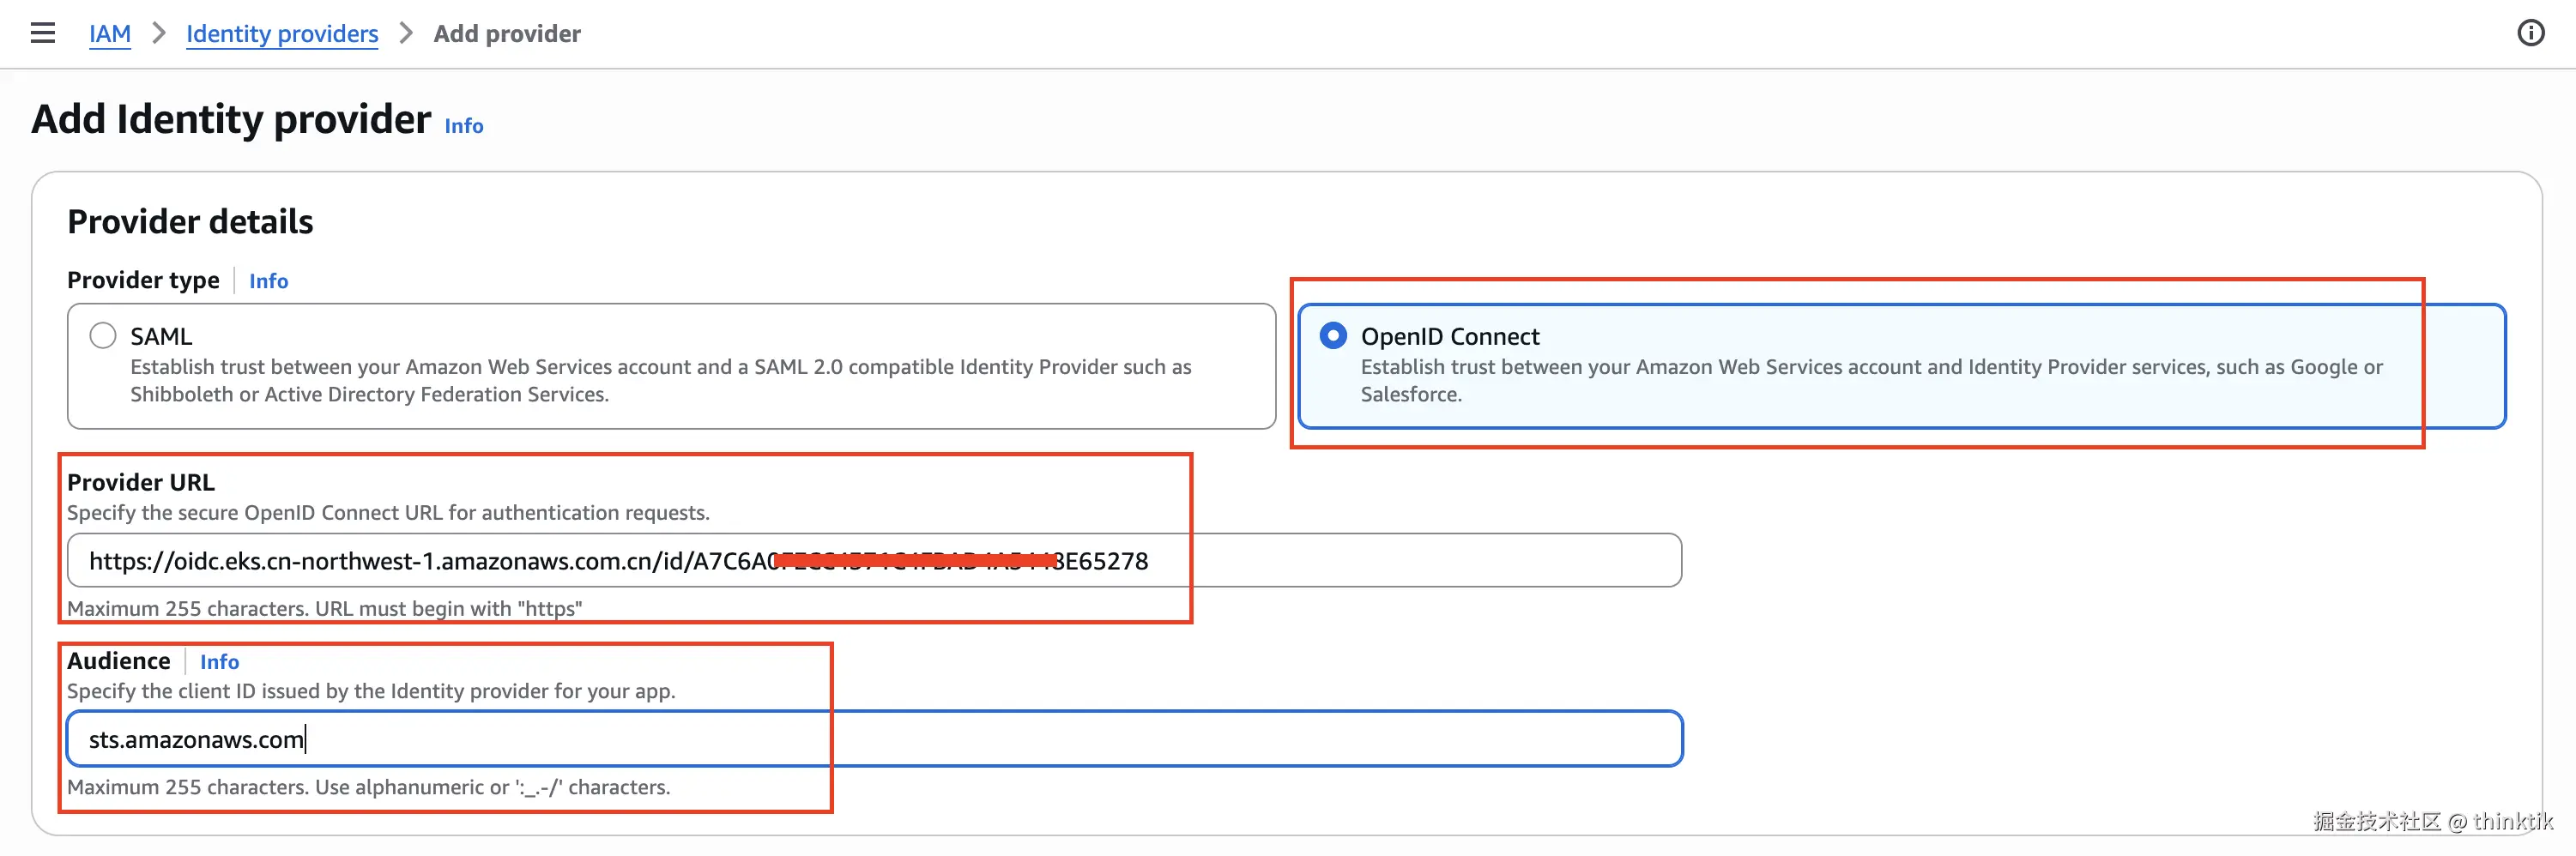
填入前面复制的OpenID Connect provider URL,并将Audience设置为sts.amazonaws.com
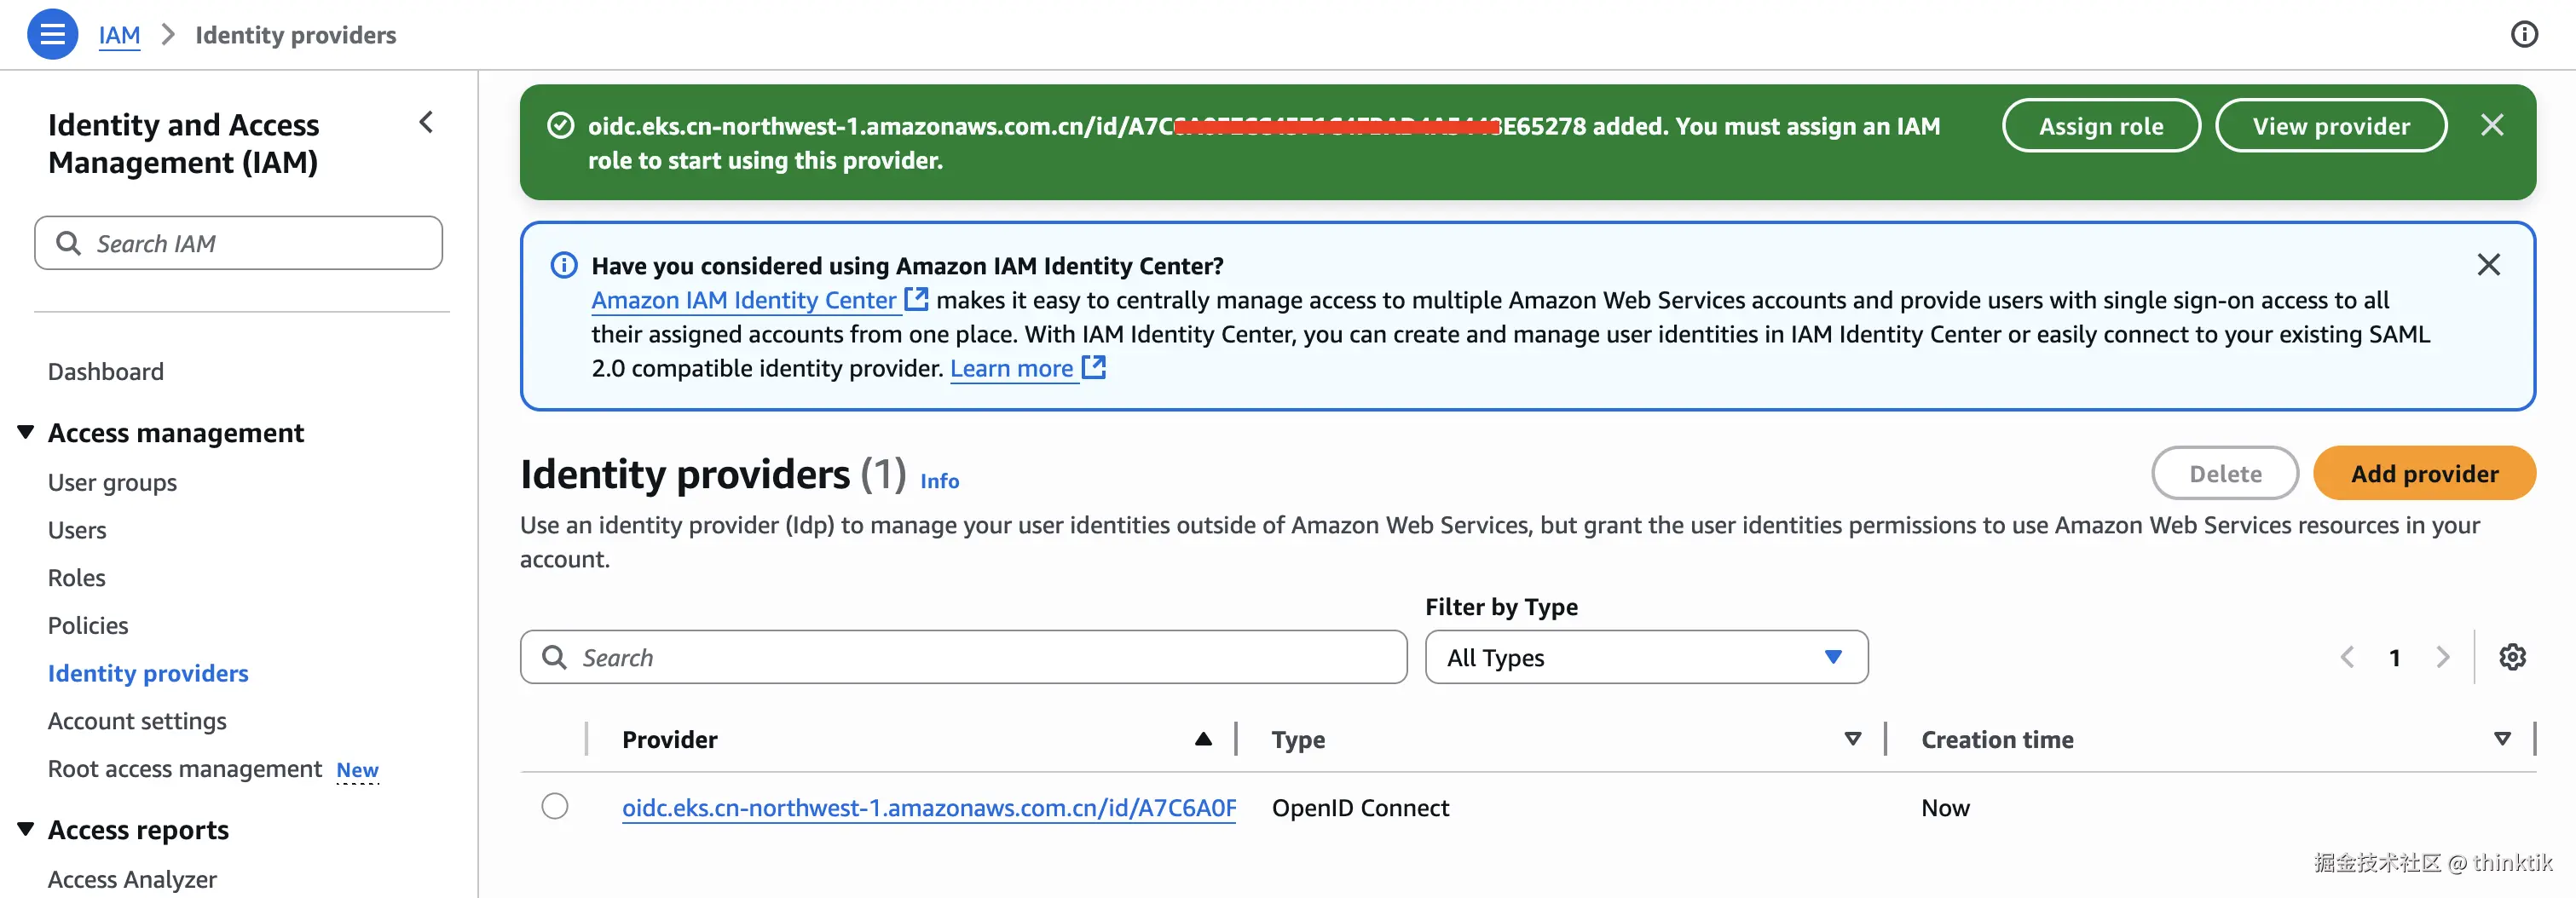
创建完成
EKS Nodegroup tags管理
为了让Cluster Autoscaler能够准确知道我们允许它扩缩哪些node group,我们最好 是显式给node group设置tag
为需要被Cluster Autoscaler管理的node group设置tag
tag有2个:
| 名称 | 值 |
|---|---|
| k8s.io/cluster-autoscaler/enabled | true |
k8s.io/cluster-autoscaler/<cluster-name> |
owned |
将<cluster-name>换为你实际的集群名称
例如我的:

为Cluster Autoscaler创建IAM Policy
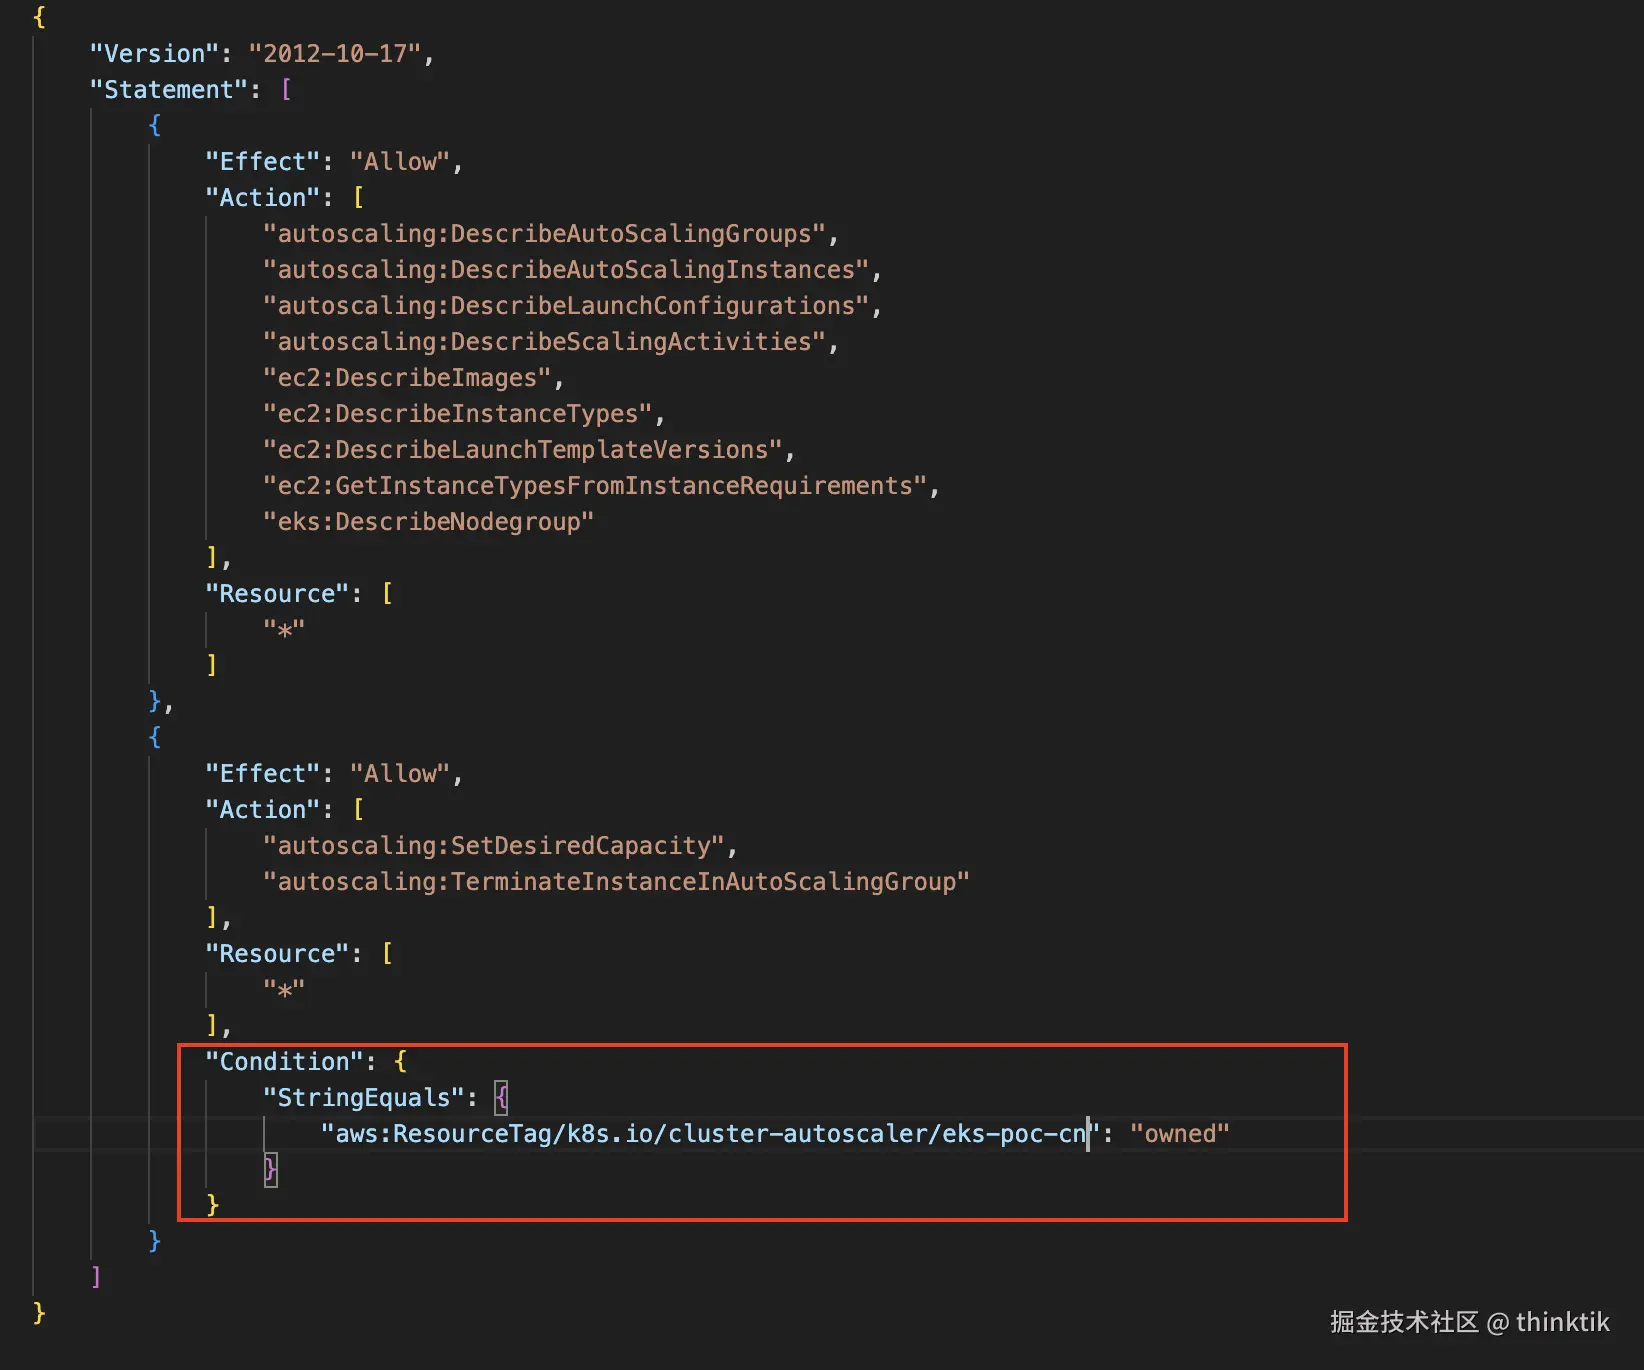
这是为Cluster Autoscaler设计的AWS IAM polocy,其中请把<cluster-name>替换为你自己实际的EKS集群名称
json
{
    "Version": "2012-10-17",
    "Statement": [
        {
            "Effect": "Allow",
            "Action": [
                "autoscaling:DescribeAutoScalingGroups",
                "autoscaling:DescribeAutoScalingInstances",
                "autoscaling:DescribeLaunchConfigurations",
                "autoscaling:DescribeScalingActivities",
                "ec2:DescribeImages",
                "ec2:DescribeInstanceTypes",
                "ec2:DescribeLaunchTemplateVersions",
                "ec2:GetInstanceTypesFromInstanceRequirements",
                "eks:DescribeNodegroup"
            ],
            "Resource": [
                "*"
            ]
        },
        {
            "Effect": "Allow",
            "Action": [
                "autoscaling:SetDesiredCapacity",
                "autoscaling:TerminateInstanceInAutoScalingGroup"
            ],
            "Resource": [
                "*"
            ],
            "Condition": {
                "StringEquals": {
                    "aws:ResourceTag/k8s.io/cluster-autoscaler/<cluster-name>": "owned"
                }
            }
        }
    ]
}
比如我的
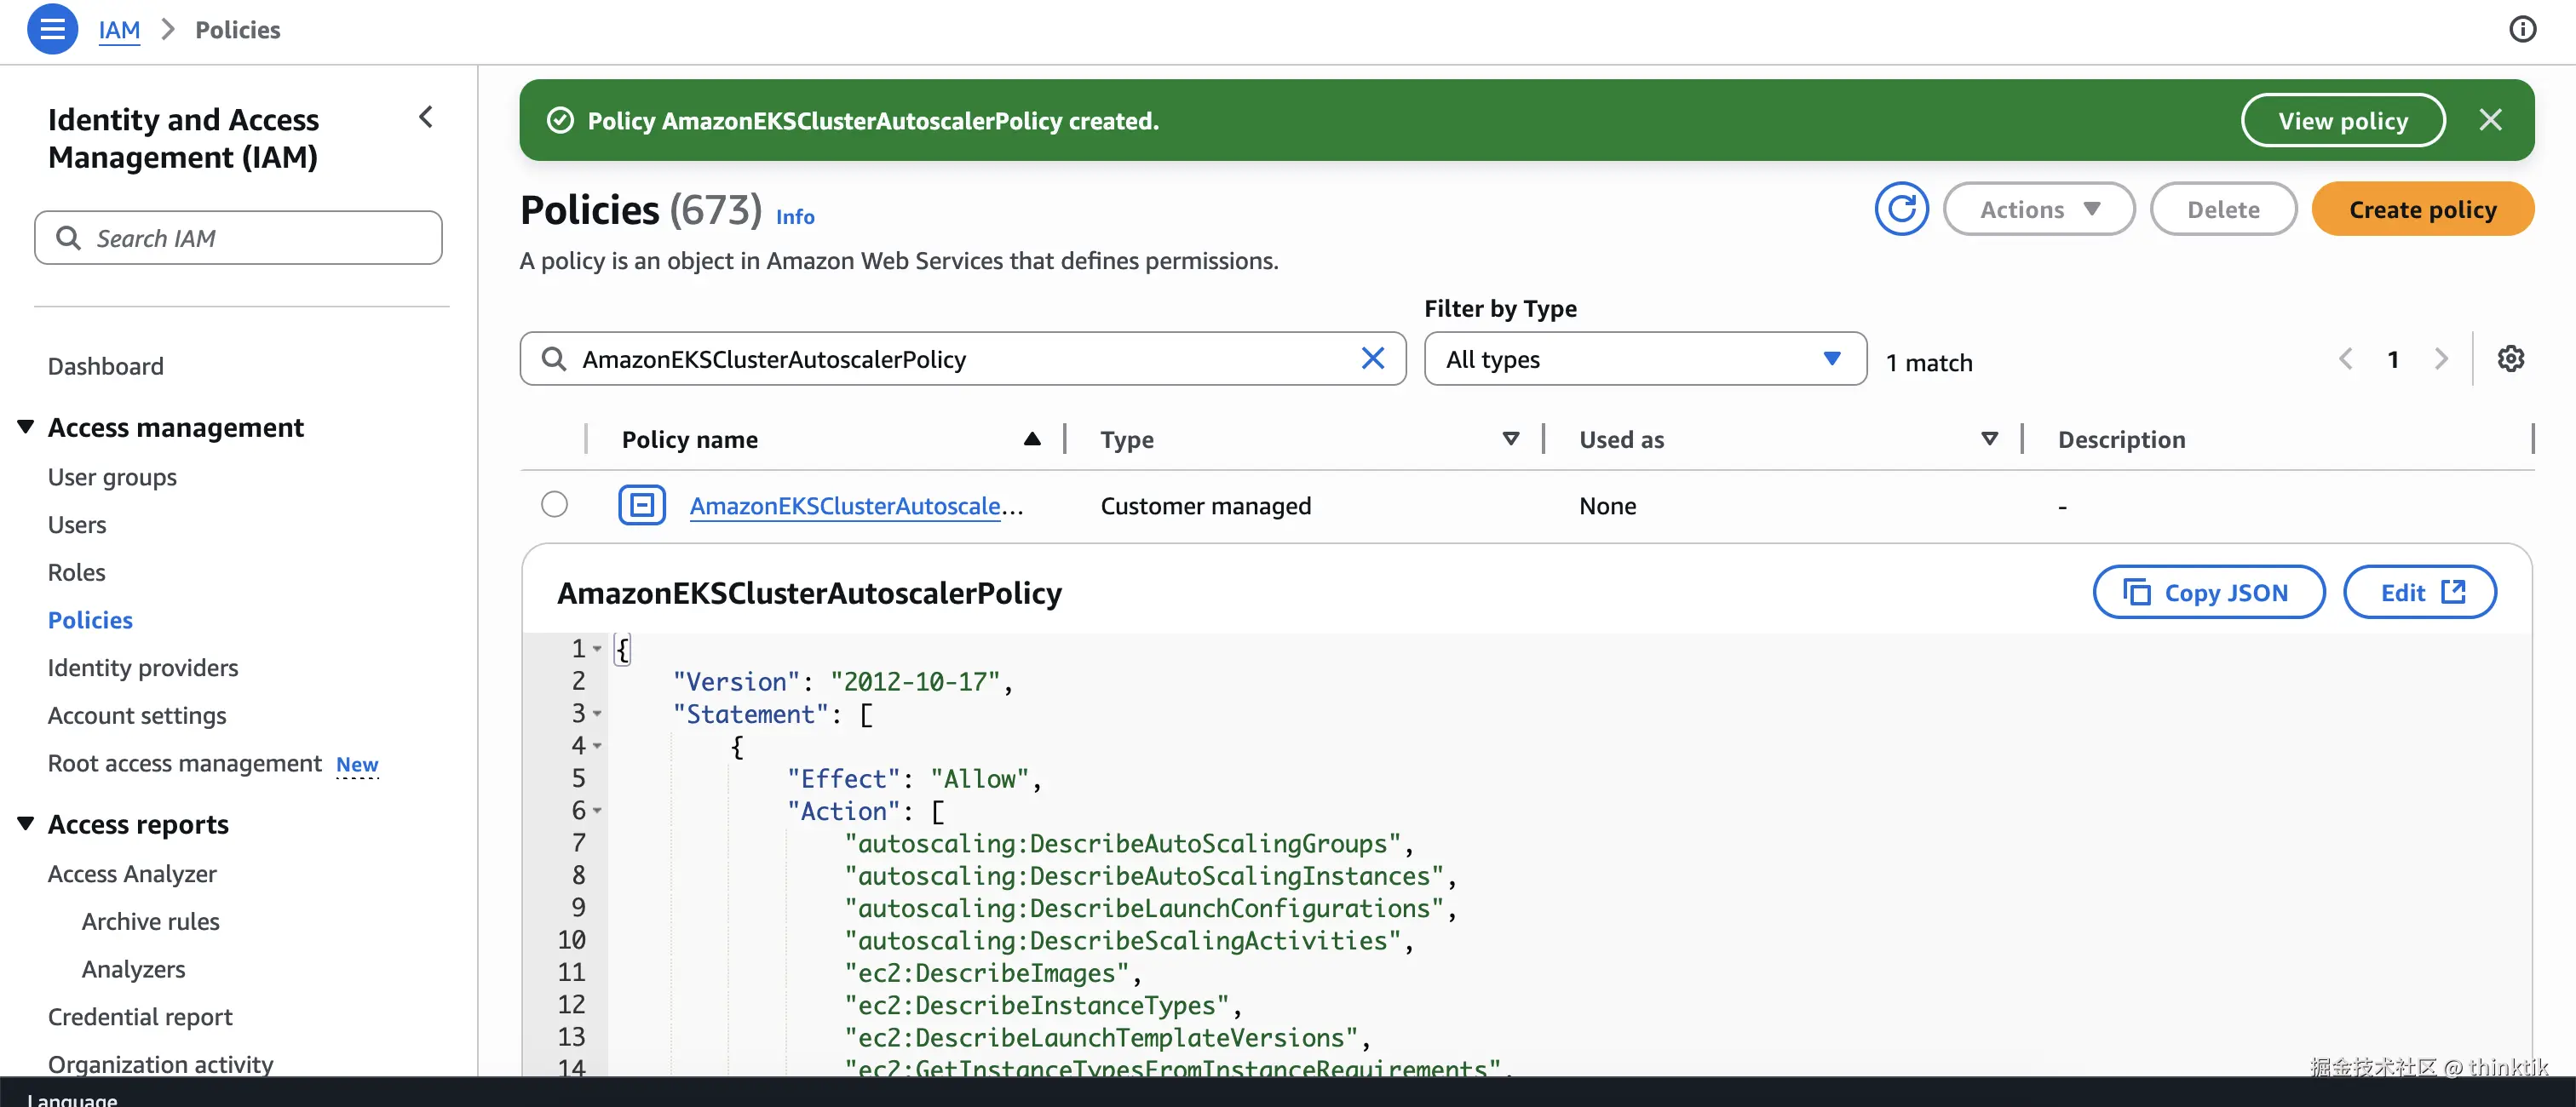
然后可以在AWS IAM页面控制台创建policy,名称为AmazonEKSClusterAutoscalerPolicy
为Cluster Autoscaler创建IAM Role
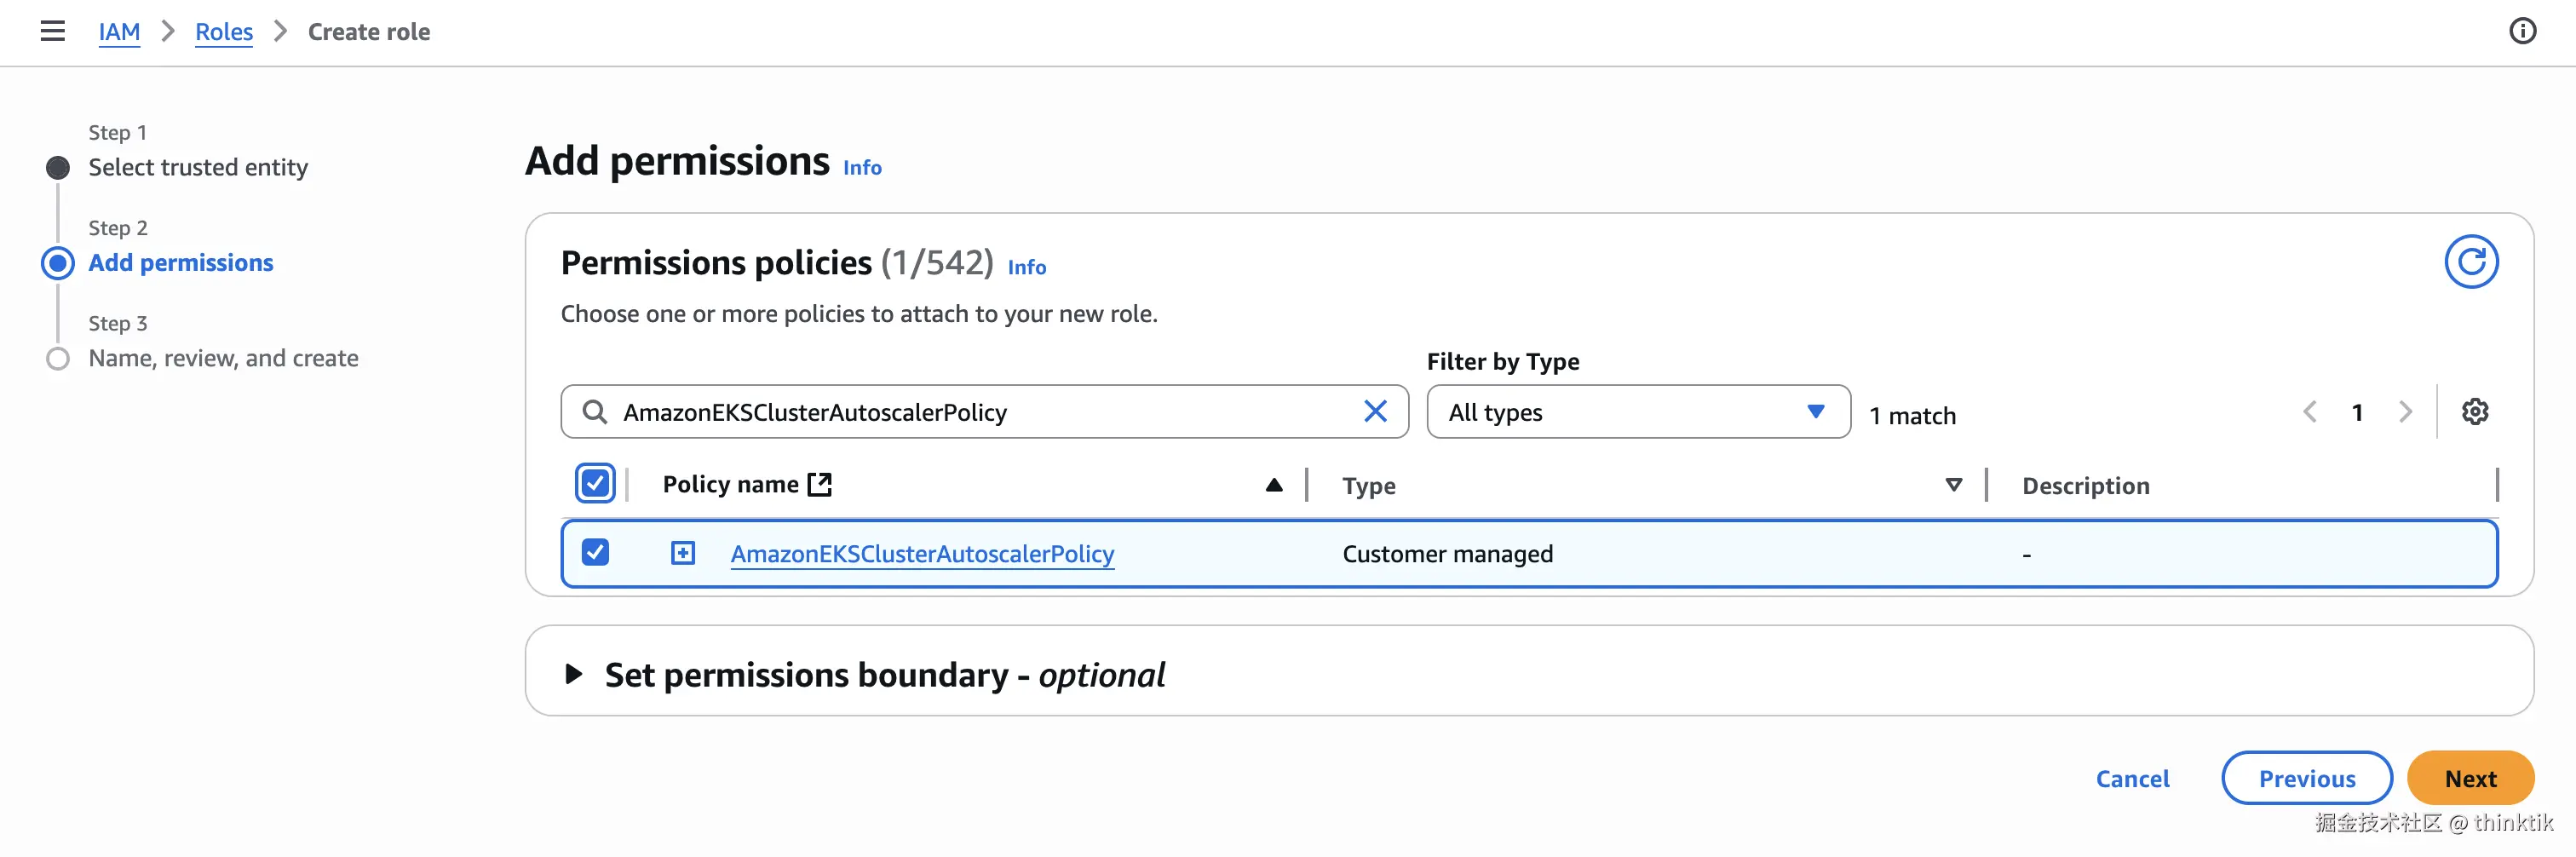
在AWS IAM控制台创建role,其中Identity provider选择你自己EKS集群的OIDC即可
policy选择上面新创的AmazonEKSClusterAutoscalerPolicy
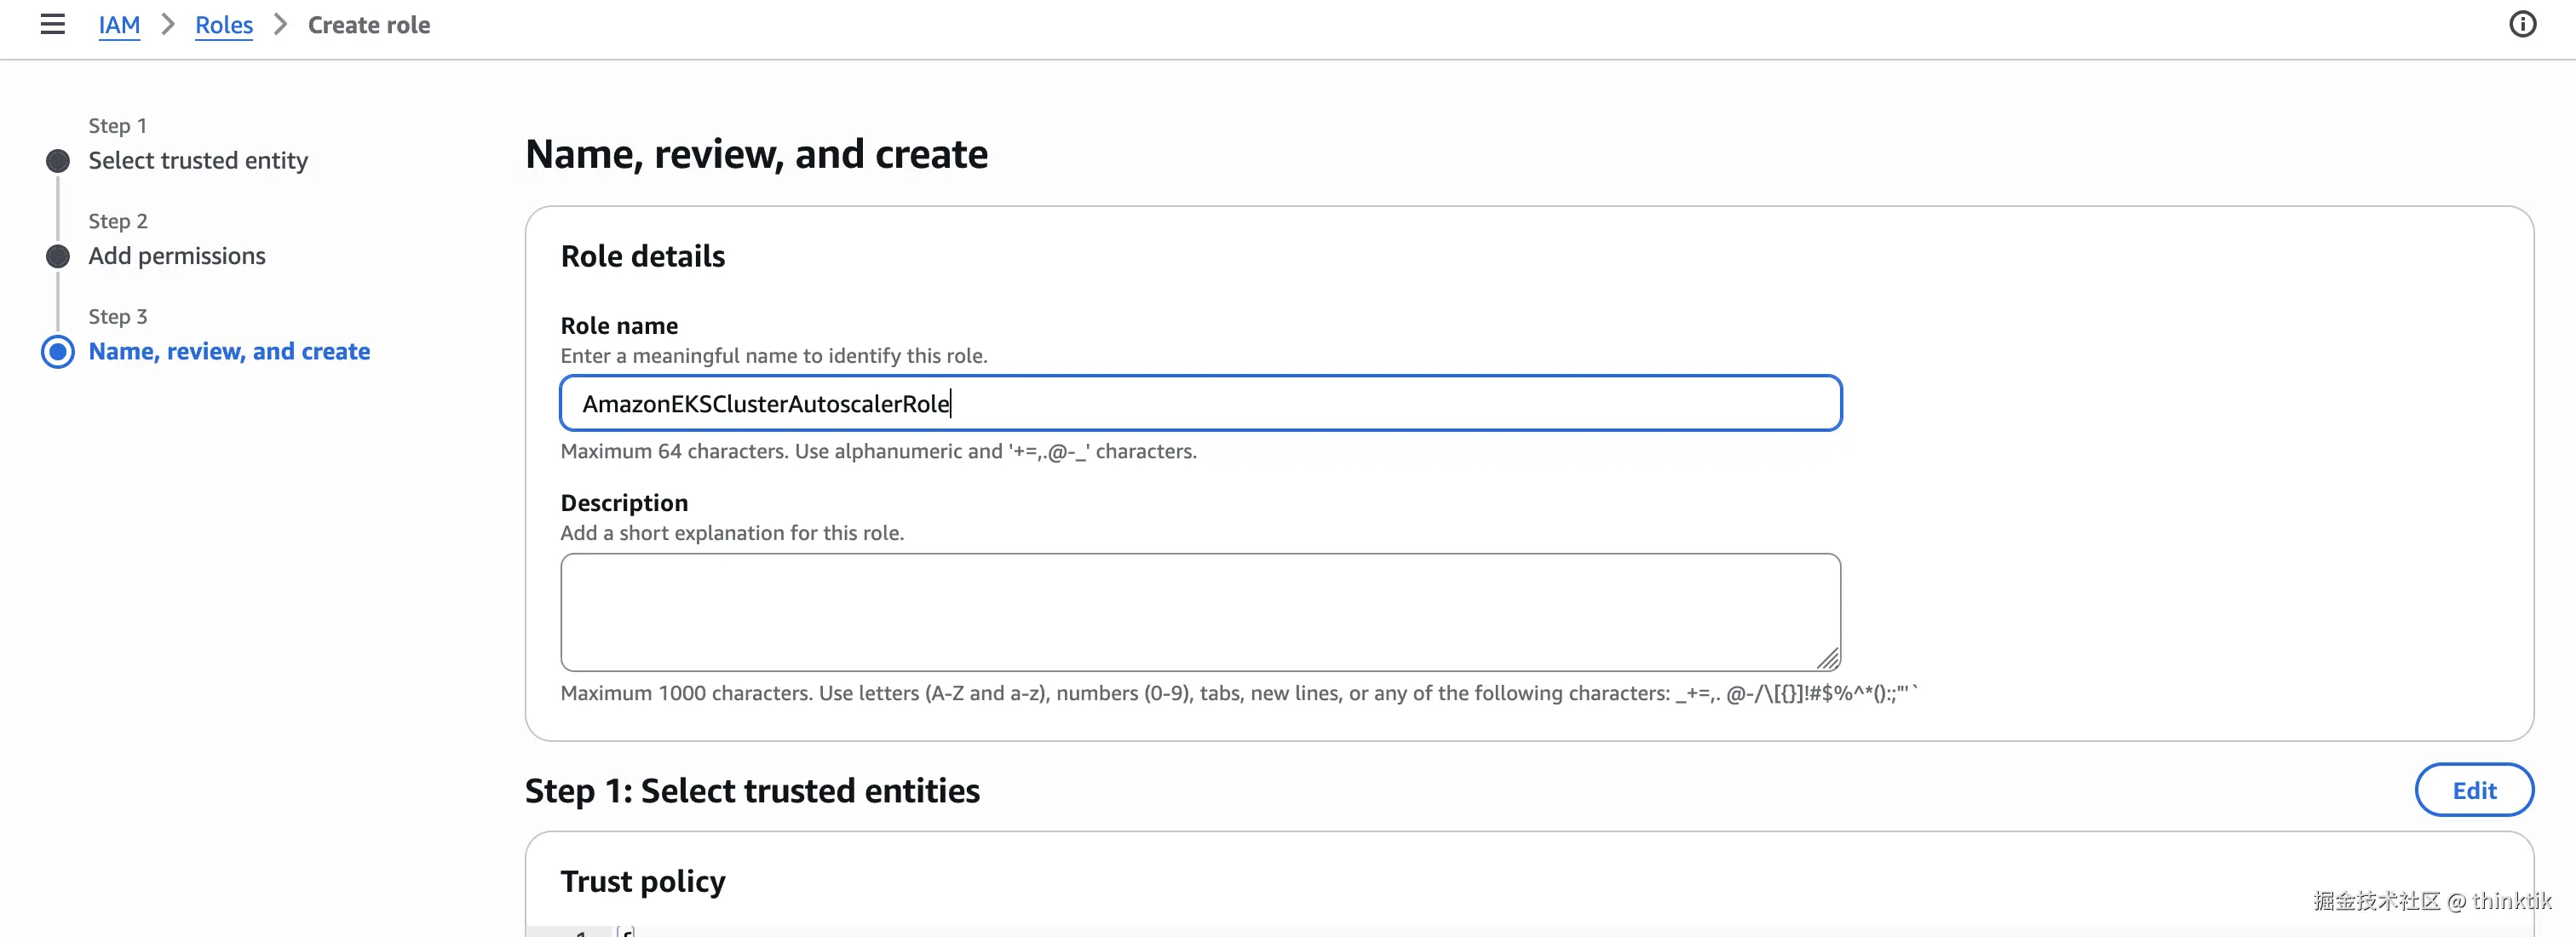
检查设置并创建,名称填为AmazonEKSClusterAutoscalerRole
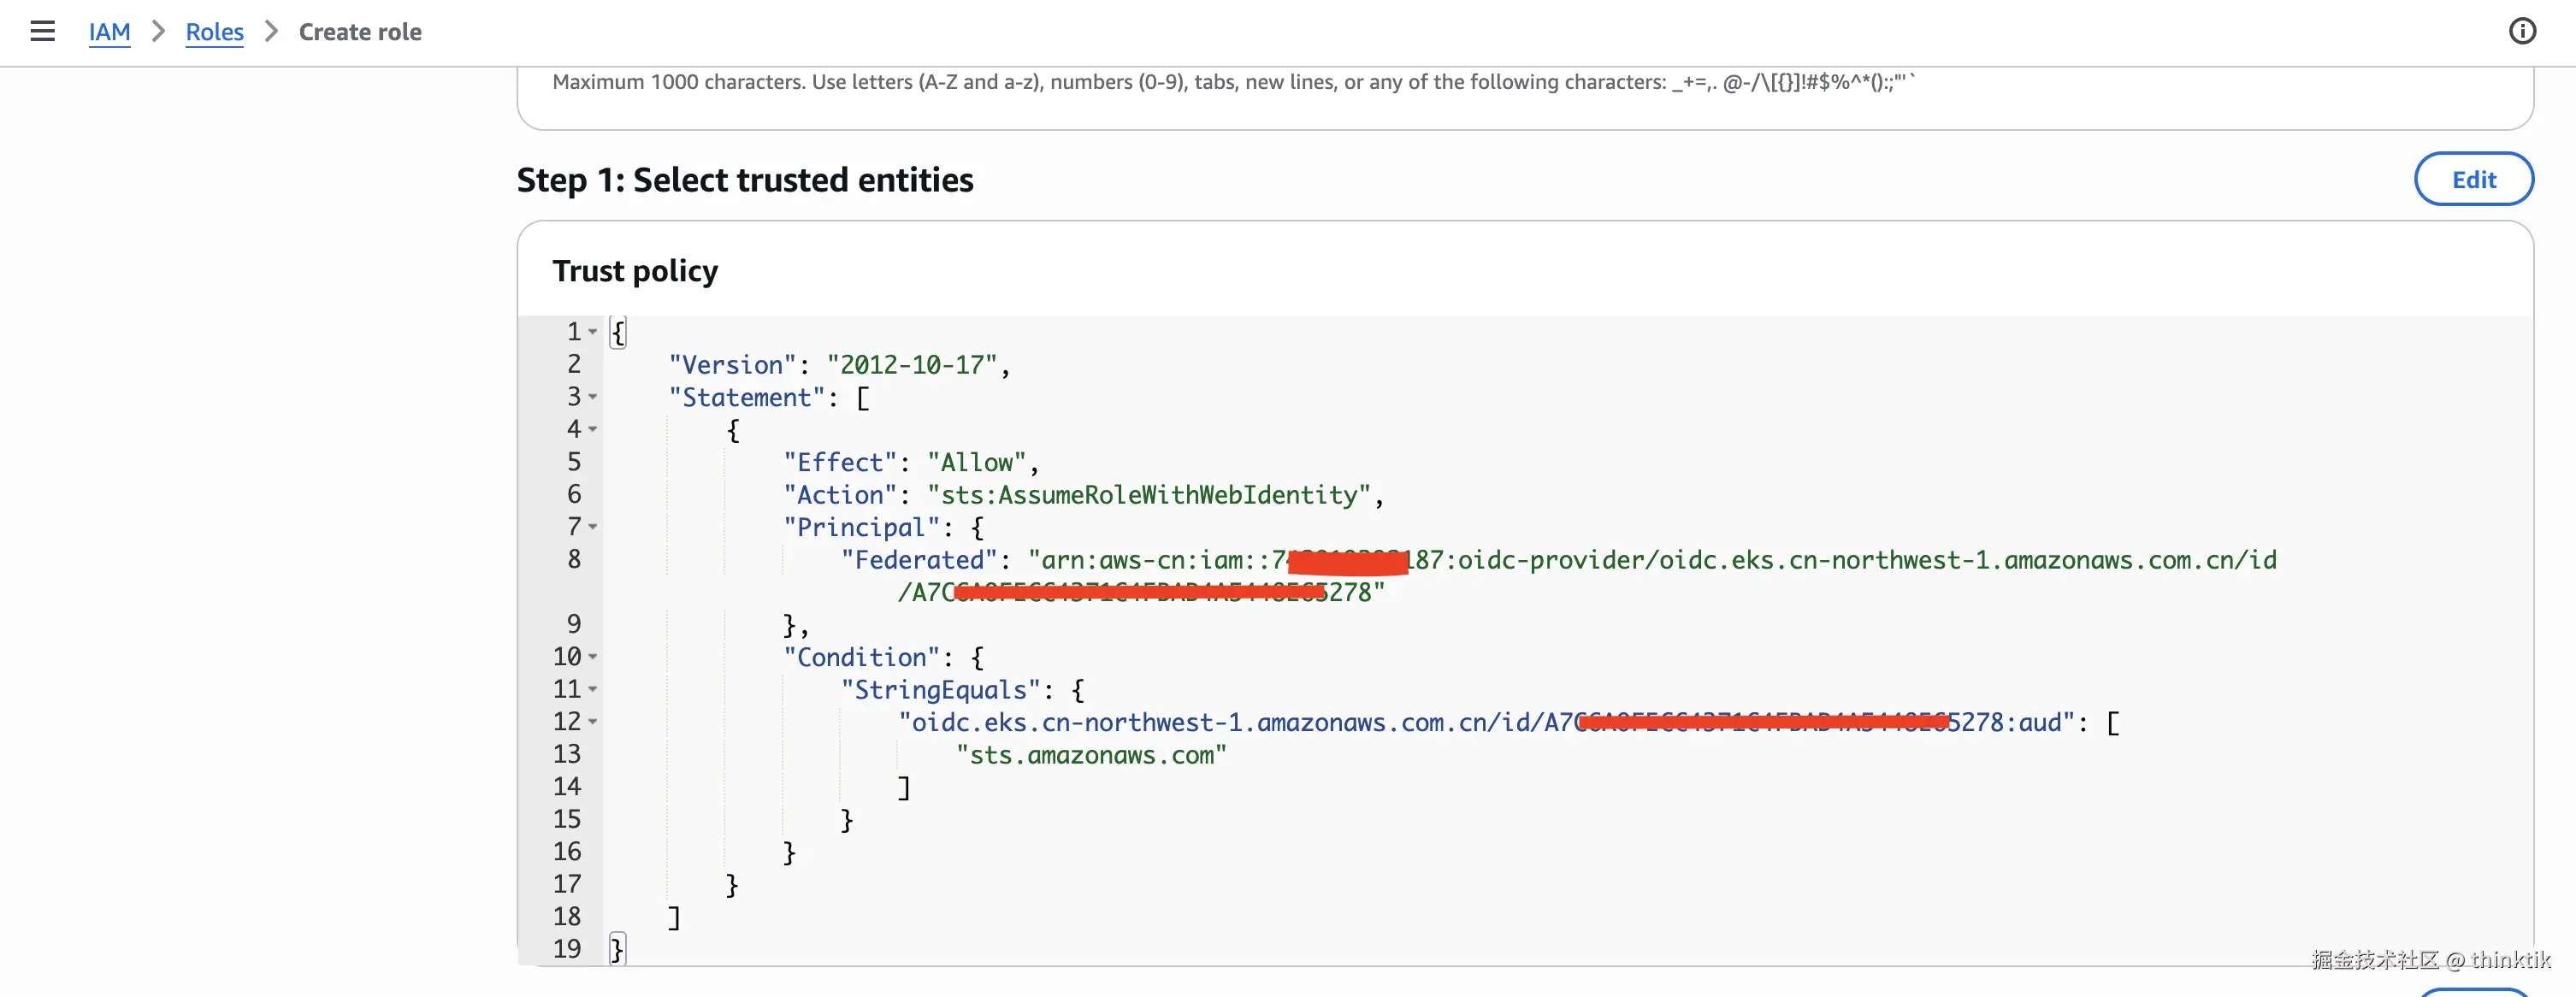
保险起见,创建完成后检查AmazonEKSClusterAutoscalerRole是否和前面的OIDC签名一致
正式安装autoscaler
下载cluster-autoscaler-autodiscover.yaml
bash
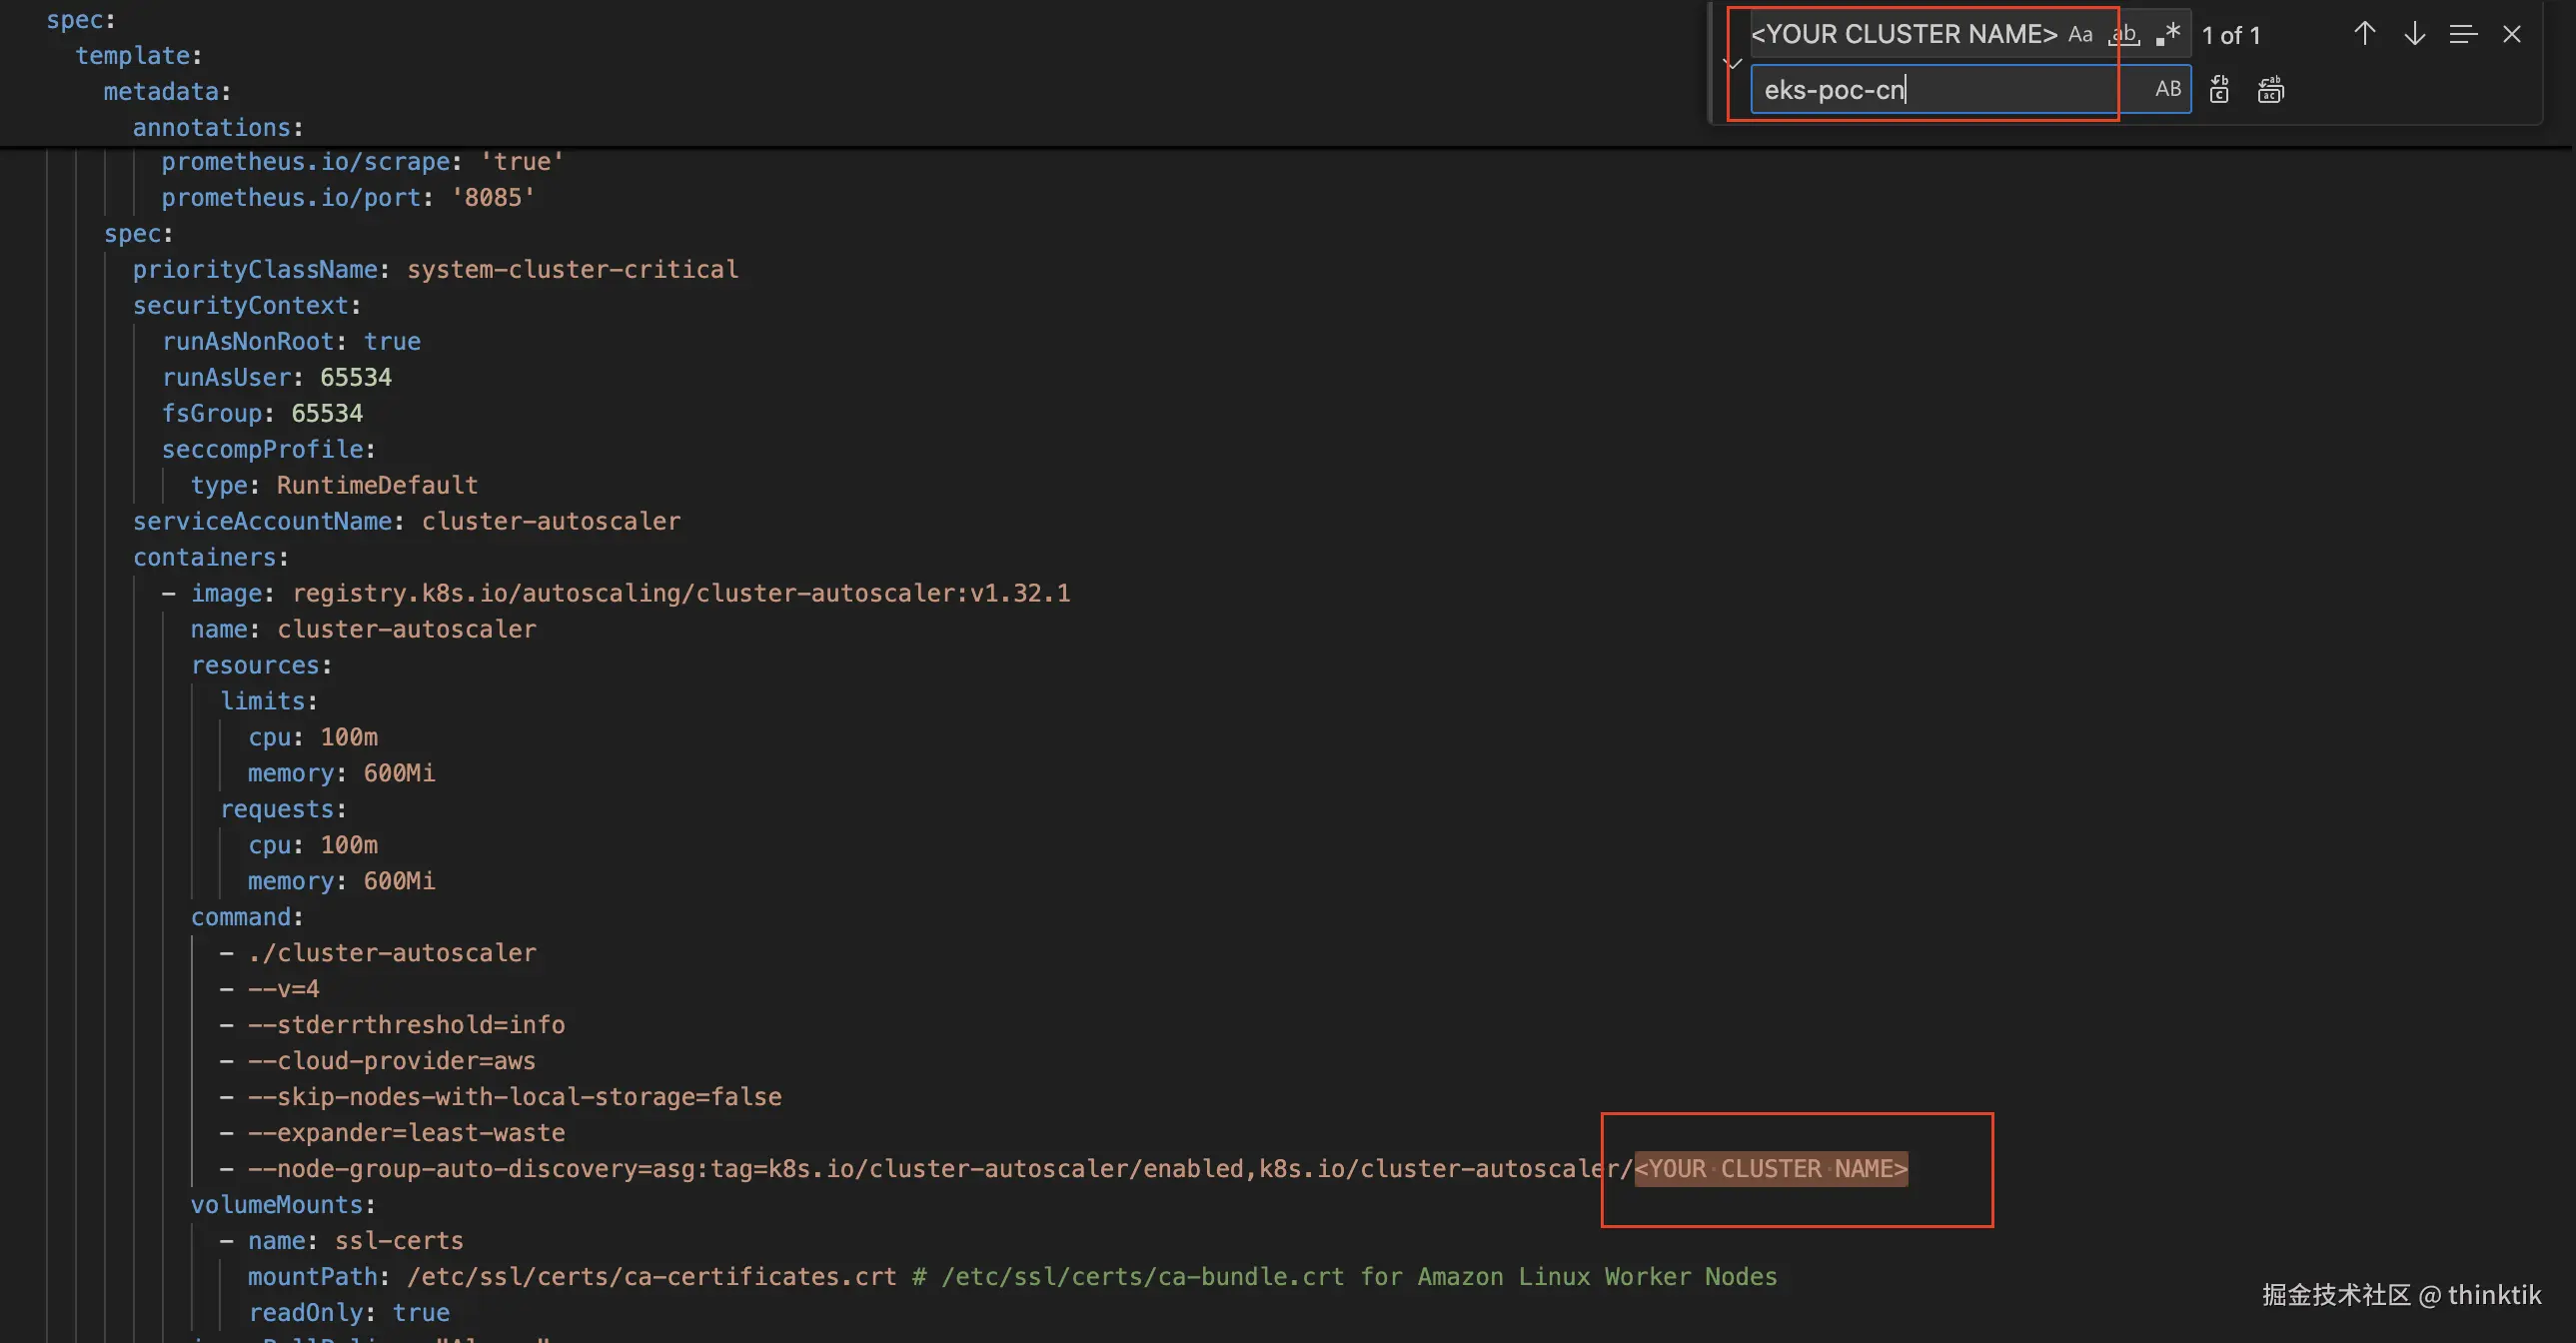
curl -O https://raw.githubusercontent.com/kubernetes/autoscaler/master/cluster-autoscaler/cloudprovider/aws/examples/cluster-autoscaler-autodiscover.yaml将下载的文件进行修改,调整<YOUR CLUSTER NAME>为你的集群名称
然后部署
bash
kubectl apply -f cluster-autoscaler-autodiscover.yaml为集群的cluster-autoscaler加上有关role的注解,将arn:aws:iam::ACCOUNT_ID:role/AmazonEKSClusterAutoscalerRole替换为前面创建的名为AmazonEKSClusterAutoscalerRole的role的实际的arn
bash
kubectl annotate serviceaccount cluster-autoscaler -n kube-system eks.amazonaws.com/role-arn=arn:aws:iam::ACCOUNT_ID:role/AmazonEKSClusterAutoscalerRole为cluster-autoscaler deployment打patch,补充注解
bash
kubectl patch deployment cluster-autoscaler -n kube-system -p '{"spec":{"template":{"metadata":{"annotations":{"cluster-autoscaler.kubernetes.io/safe-to-evict": "false"}}}}}'修改cluster-autoscaler
bash
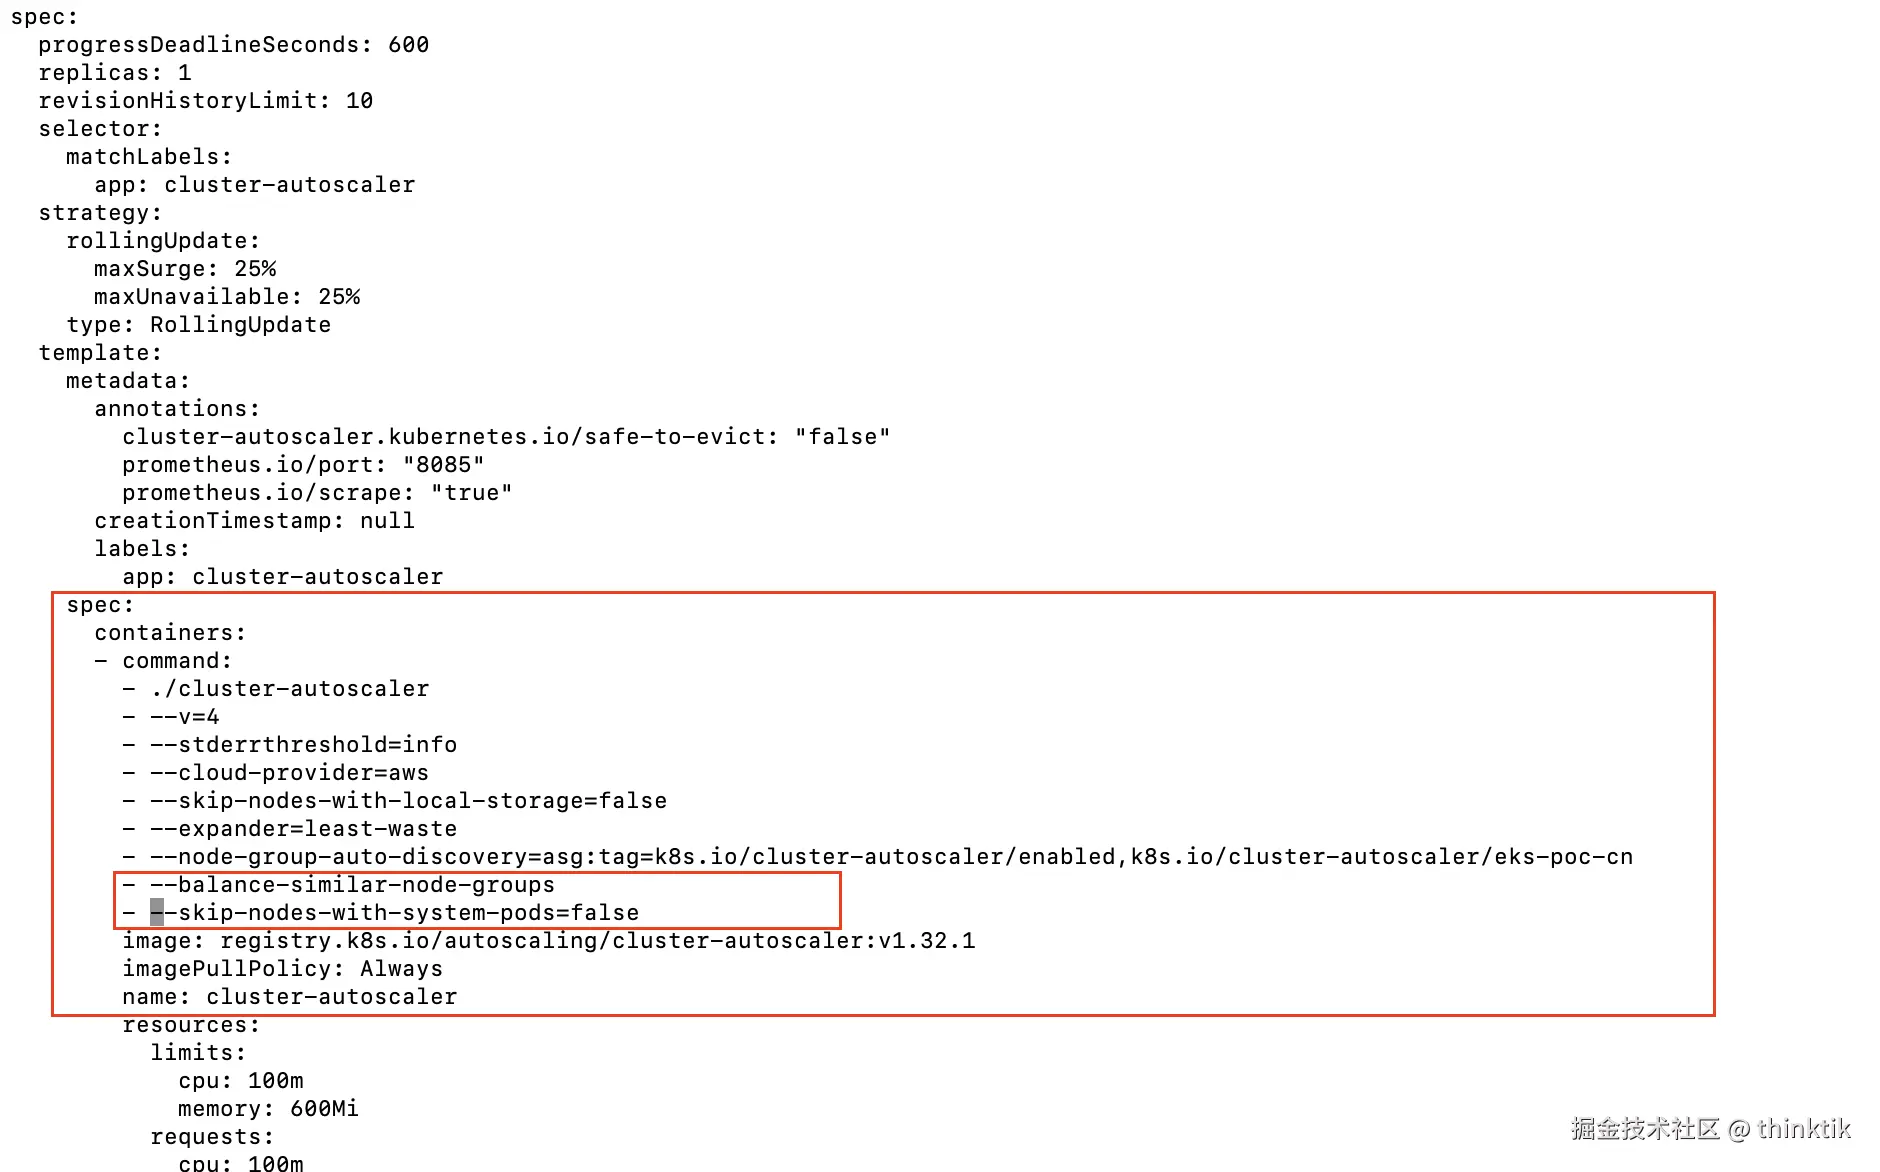
kubectl -n kube-system edit deployment.apps/cluster-autoscaler加上如下的内容,加的使用缩进请用空格,不要用tab缩进
yaml
--balance-similar-node-groups
--skip-nodes-with-system-pods=false
如下图,位置在
到这里部署就完成了~~~~~~
检查安装效果
通过下面的命令查看pod
bash
kubectl -n kube-system get deployments 如果看到cluster-autoscaler运行正常,说明部署成功
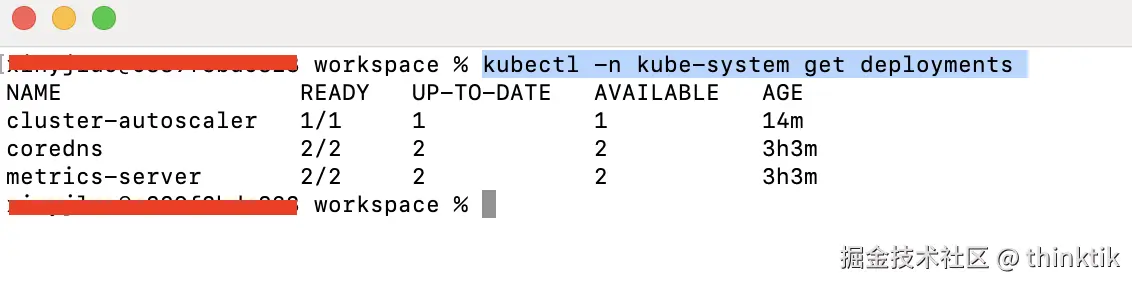
通过下面的命令查看log
bash
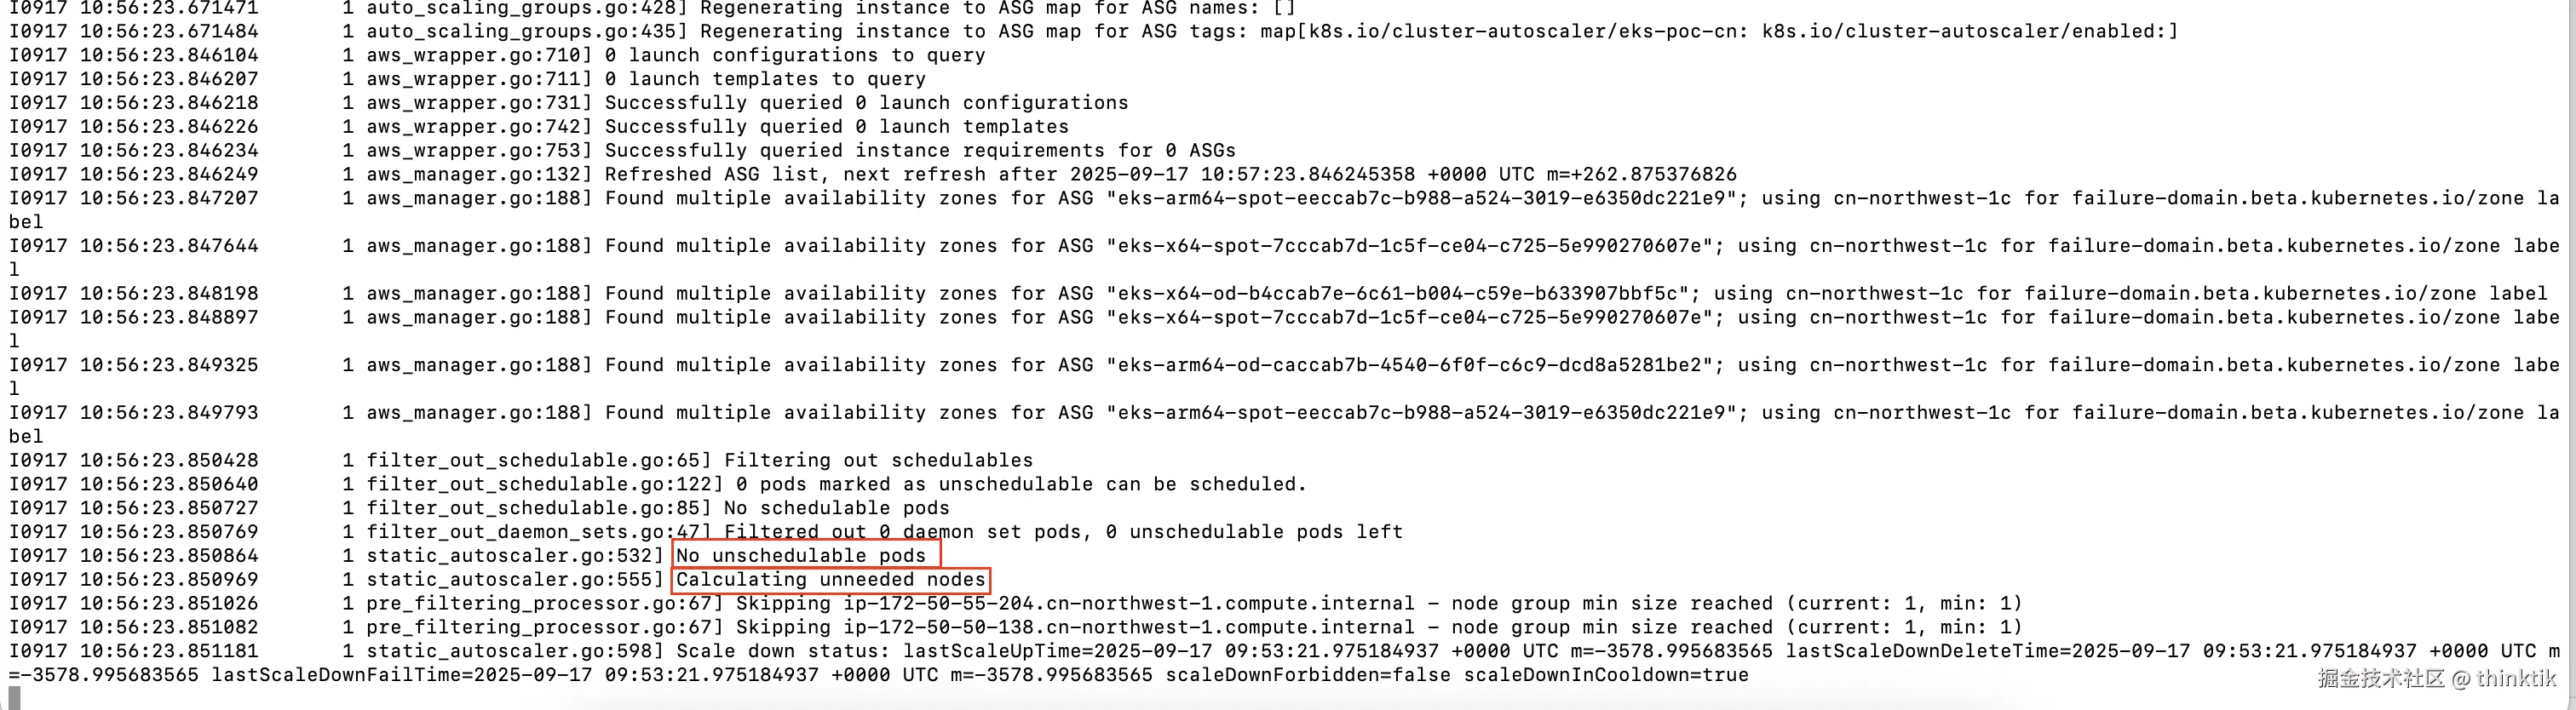
kubectl -n kube-system logs -f deployment.apps/cluster-autoscaler出现No unschedulable pods,Calculating unneeded nodes类的字样,说明工作正常,正在尝试进行扩缩容评估
Horizontal Pod Autoscaler设置
首先安装Metrics Server,参考Installing the Kubernetes Metrics Server
arduino
kubectl apply -f https://github.com/kubernetes-sigs/metrics-server/releases/latest/download/components.yaml这里建议先下载文件然后用registryk8s.azk8s.cn替换registry.k8s.io,避免网络问题
继续参考Horizontal Pod Autoscaler进行测试
以一个PHP样例为测试对象
bash
kubectl apply -f https://k8s.io/examples/application/php-apache.yaml这里建议先下载文件然后用registryk8s.azk8s.cn替换registry.k8s.io,避免网络问题
设置一个HPA,规定CPU压力超过50%后扩展
css
kubectl autoscale deployment php-apache --cpu-percent=50 --min=1 --max=10查看HPA信息
arduino
kubectl get hpa进行压力测试,通过压力让CPU指标上升
css
kubectl run -i --tty load-generator --rm --image=busybox --restart=Never -- /bin/sh -c "while sleep 0.01; do wget -q -O- http://php-apache; done"当施加压力后,我们看到pod数量随着CPU指标的上升而变多了,这时HPA工作正常 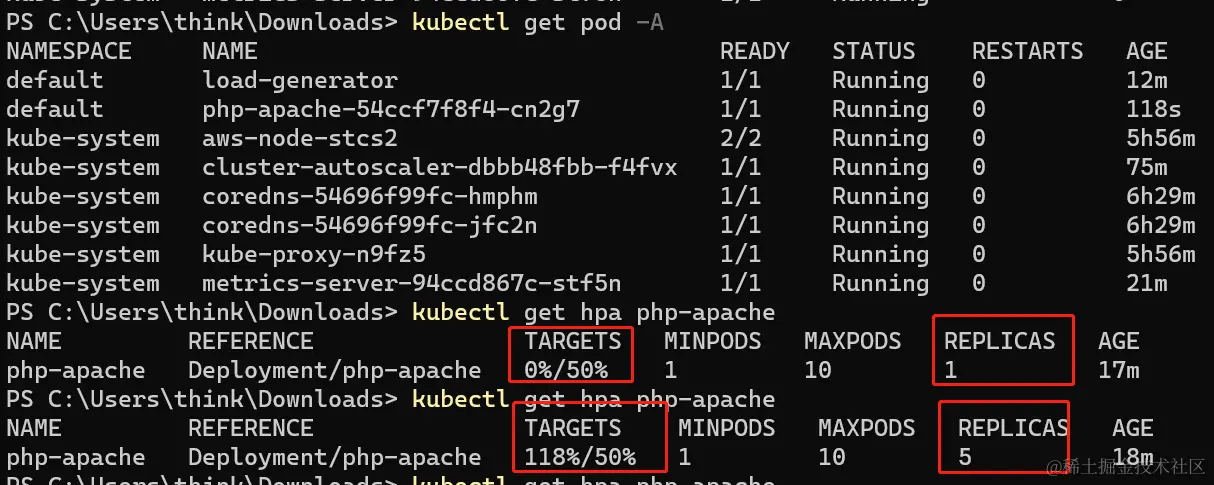 更多的pod需要更多的EC2承载,我们看到cluster-autoscaler自动为我们扩展了一个EC2
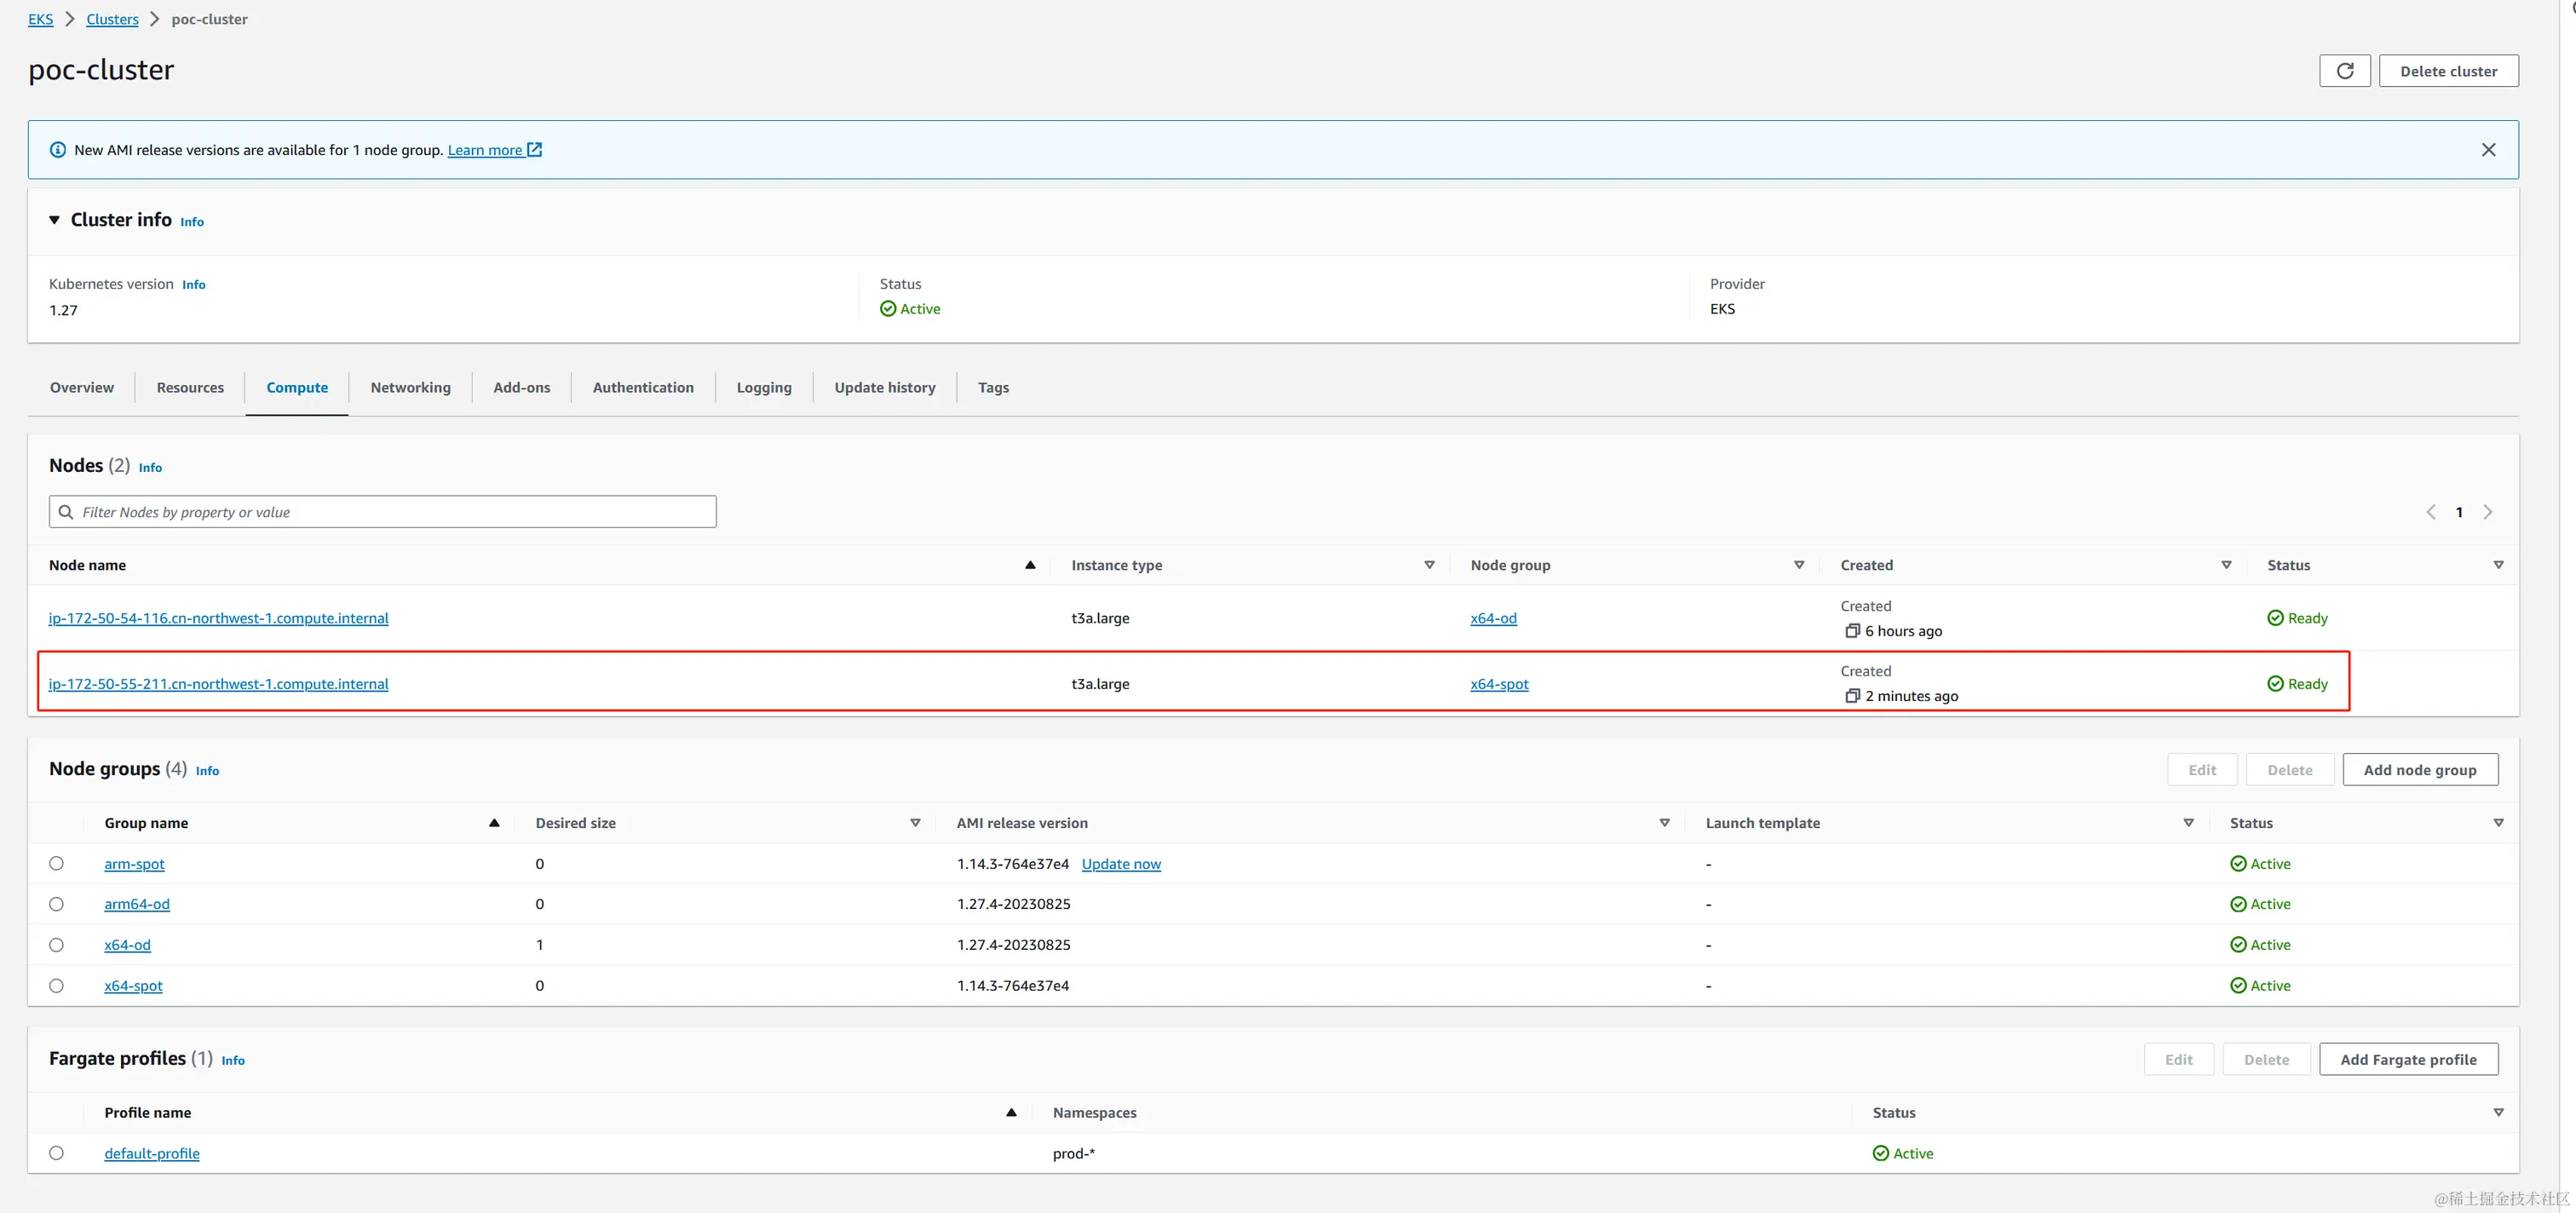
当我们停止压力测试,过一段时间cluster-autoscaler会自动为我们回收EC2。
清理测试,删除相关的资源
bash
kubectl delete deployment.apps/php-apache service/php-apache horizontalpodautoscaler.autoscaling/php-apache**到这里我们完成一个高可用,资源自动扩展的EKS部署,这样我们真正的实现了云上按需计算、高性价比、高可靠性的容器化服务搭建。 **
设置Fargate
创建Amazon EKS Pod execution IAM role
fargate正常运行需要有Amazon EKS Pod execution IAM role,详情可以参考Amazon EKS Pod execution IAM role
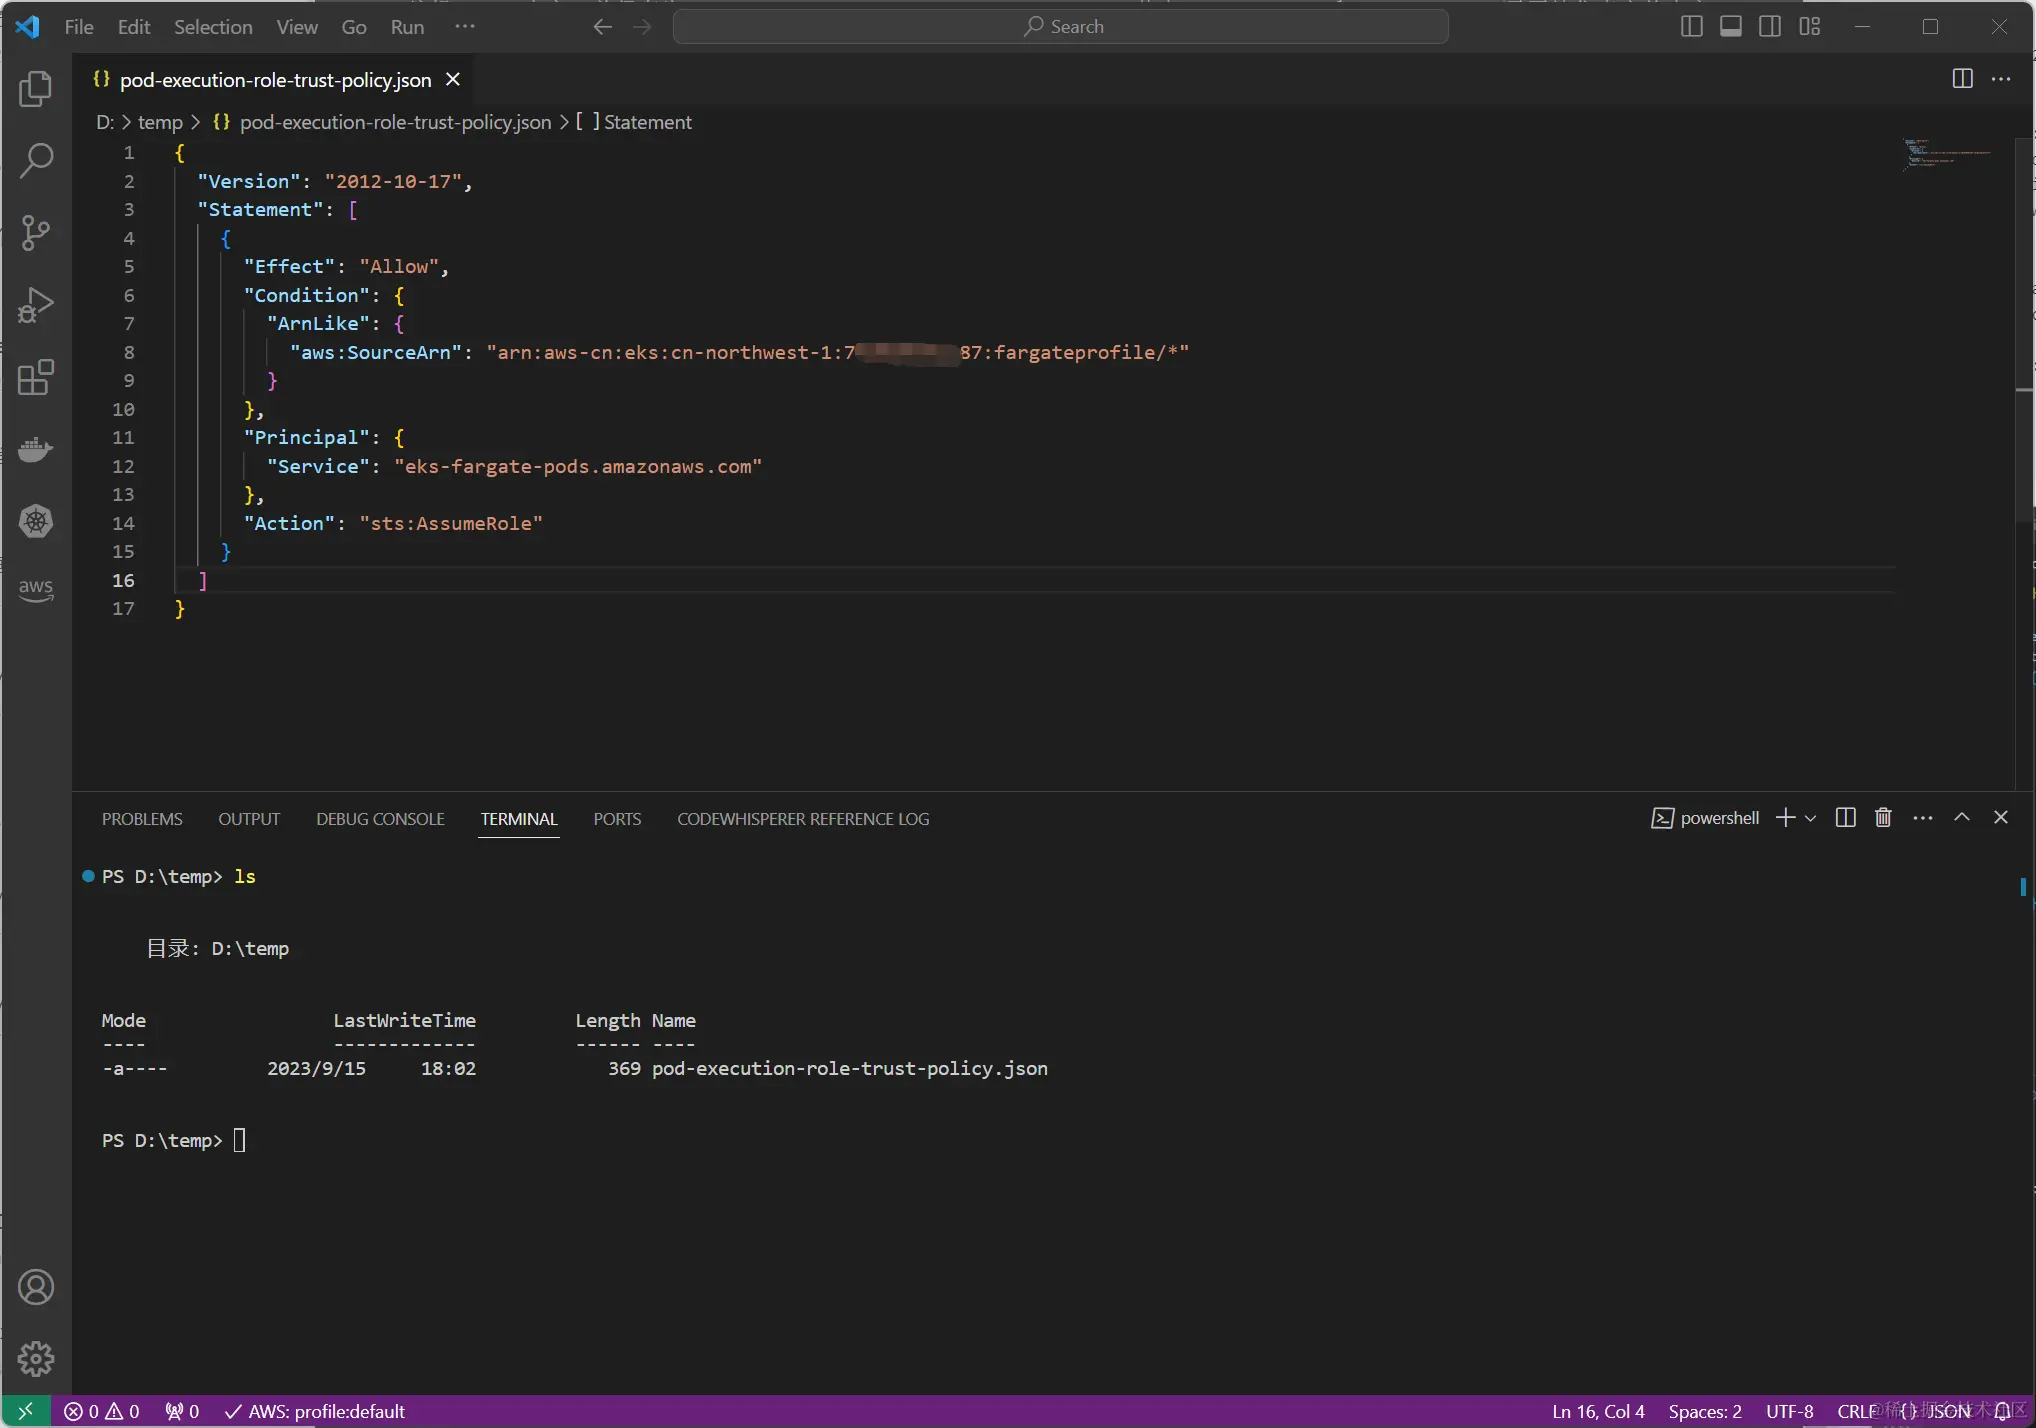
编辑policy内容,并保存为pod-execution-role-trust-policy.json,其中region-code和aws-account需要填你真实的内容
json
{
  "Version": "2012-10-17",
  "Statement": [
    {
      "Effect": "Allow",
      "Condition": {
         "ArnLike": {
            "aws:SourceArn": "arn:aws-cn:eks:<region-code>:<aws-account>:fargateprofile/*"
         }
      },
      "Principal": {
        "Service": "eks-fargate-pods.amazonaws.com"
      },
      "Action": "sts:AssumeRole"
    }
  ]
}
创建role,名称可以自定义,我设置为AmazonEKSFargatePodExecutionRole
css
aws iam create-role --role-name AmazonEKSFargatePodExecutionRole --assume-role-policy-document file://"pod-execution-role-trust-policy.json"将AmazonEKSFargatePodExecutionRole和AmazonEKSFargatePodExecutionRolePolicy关联
arduino
aws iam attach-role-policy --policy-arn arn:aws-cn:iam::aws:policy/AmazonEKSFargatePodExecutionRolePolicy --role-name AmazonEKSFargatePodExecutionRole创建fargate profile
 填写自己的fargate-profile名称,并选定刚才创建的
AmazonEKSFargatePodExecutionRole 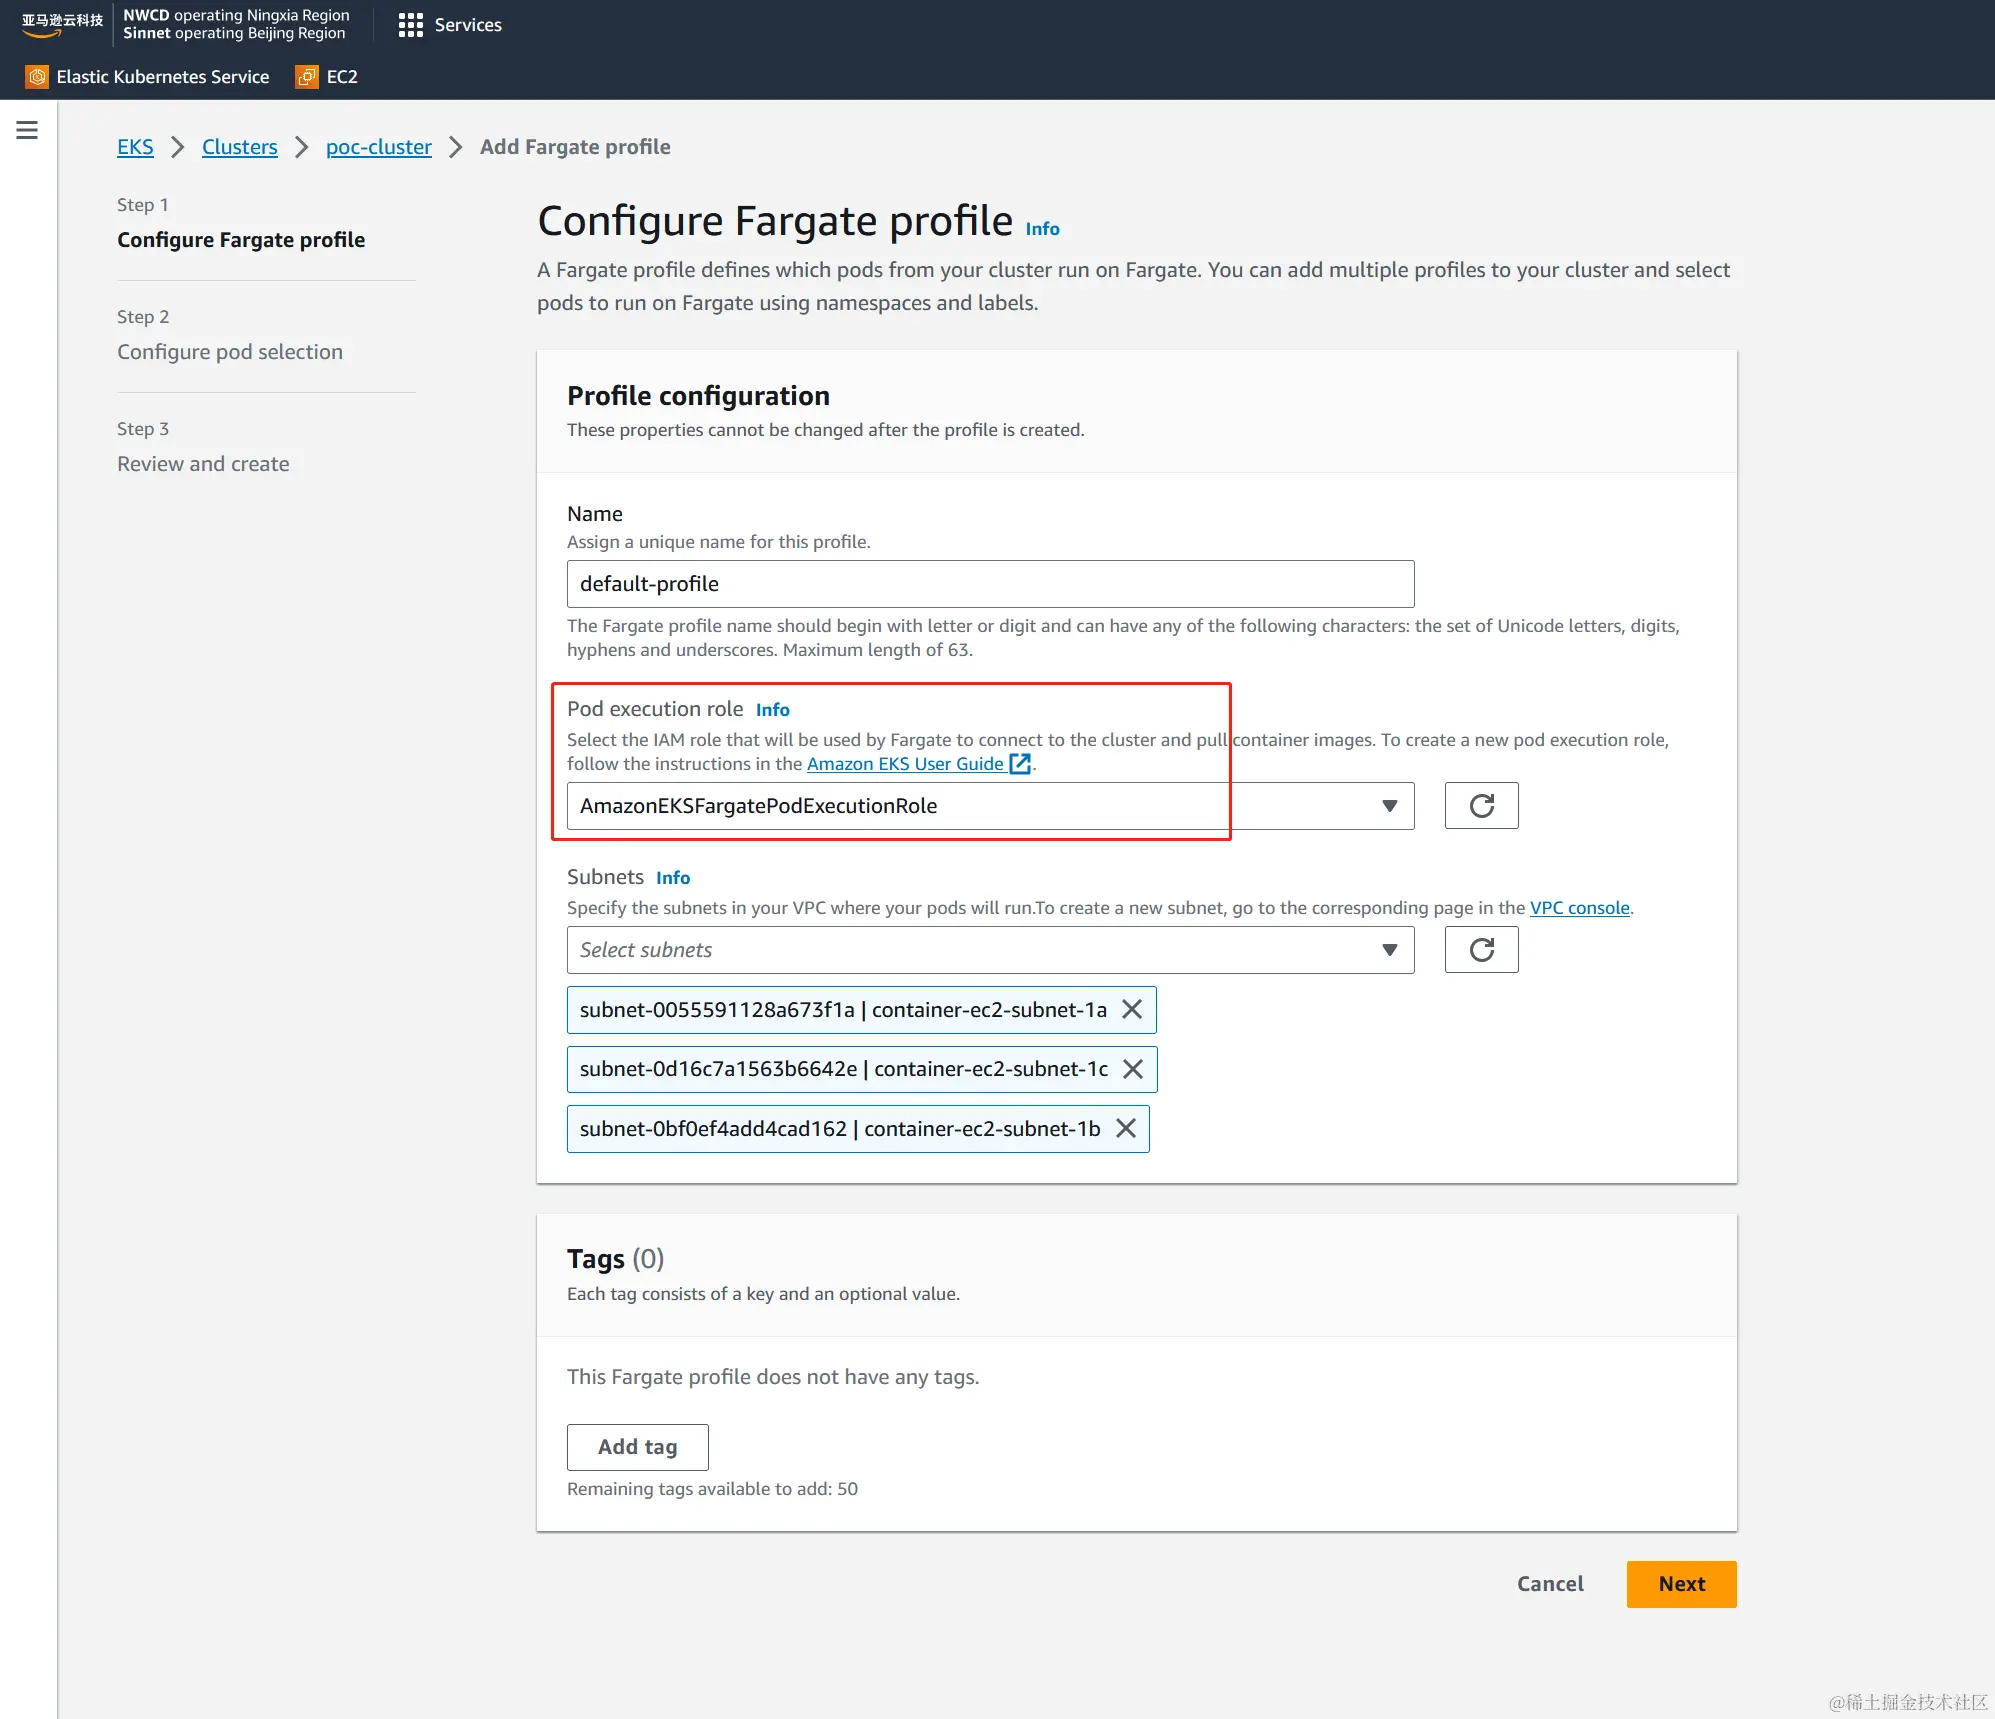 为这个profie填入合适的namespace设置,详情见AWS Fargate profile
 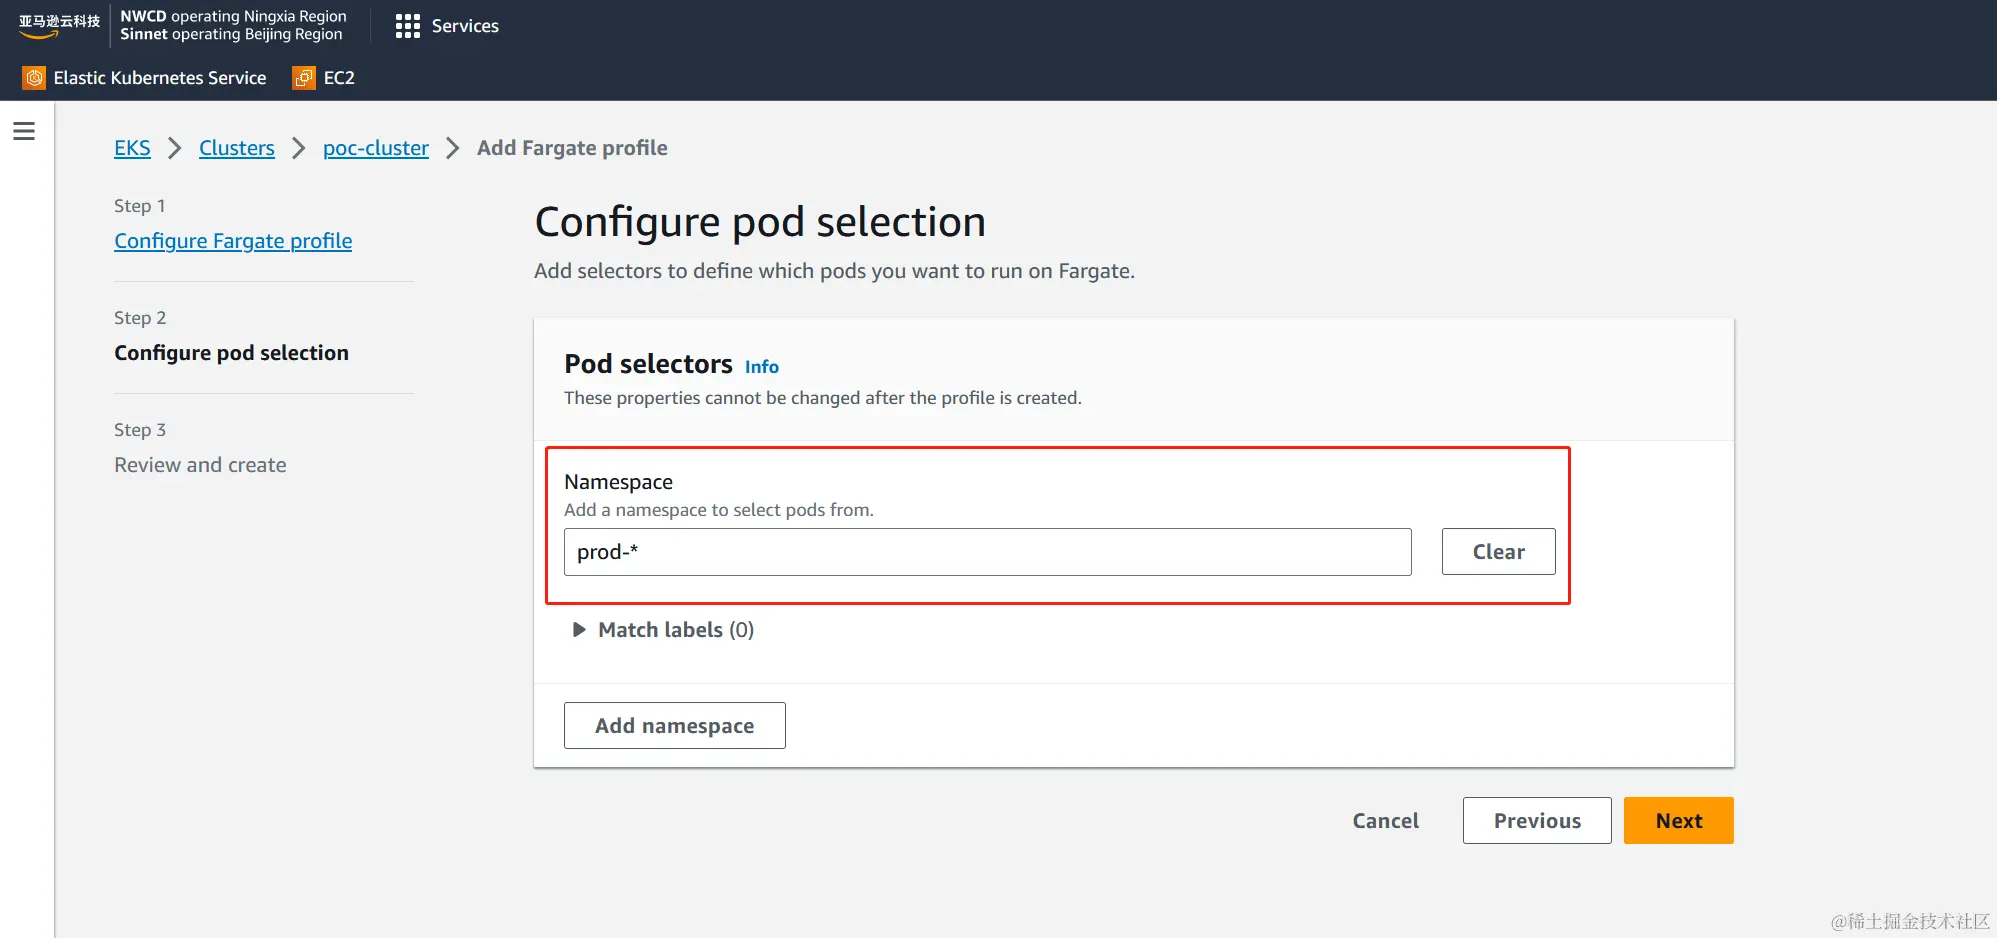 检查并创建
检查并创建 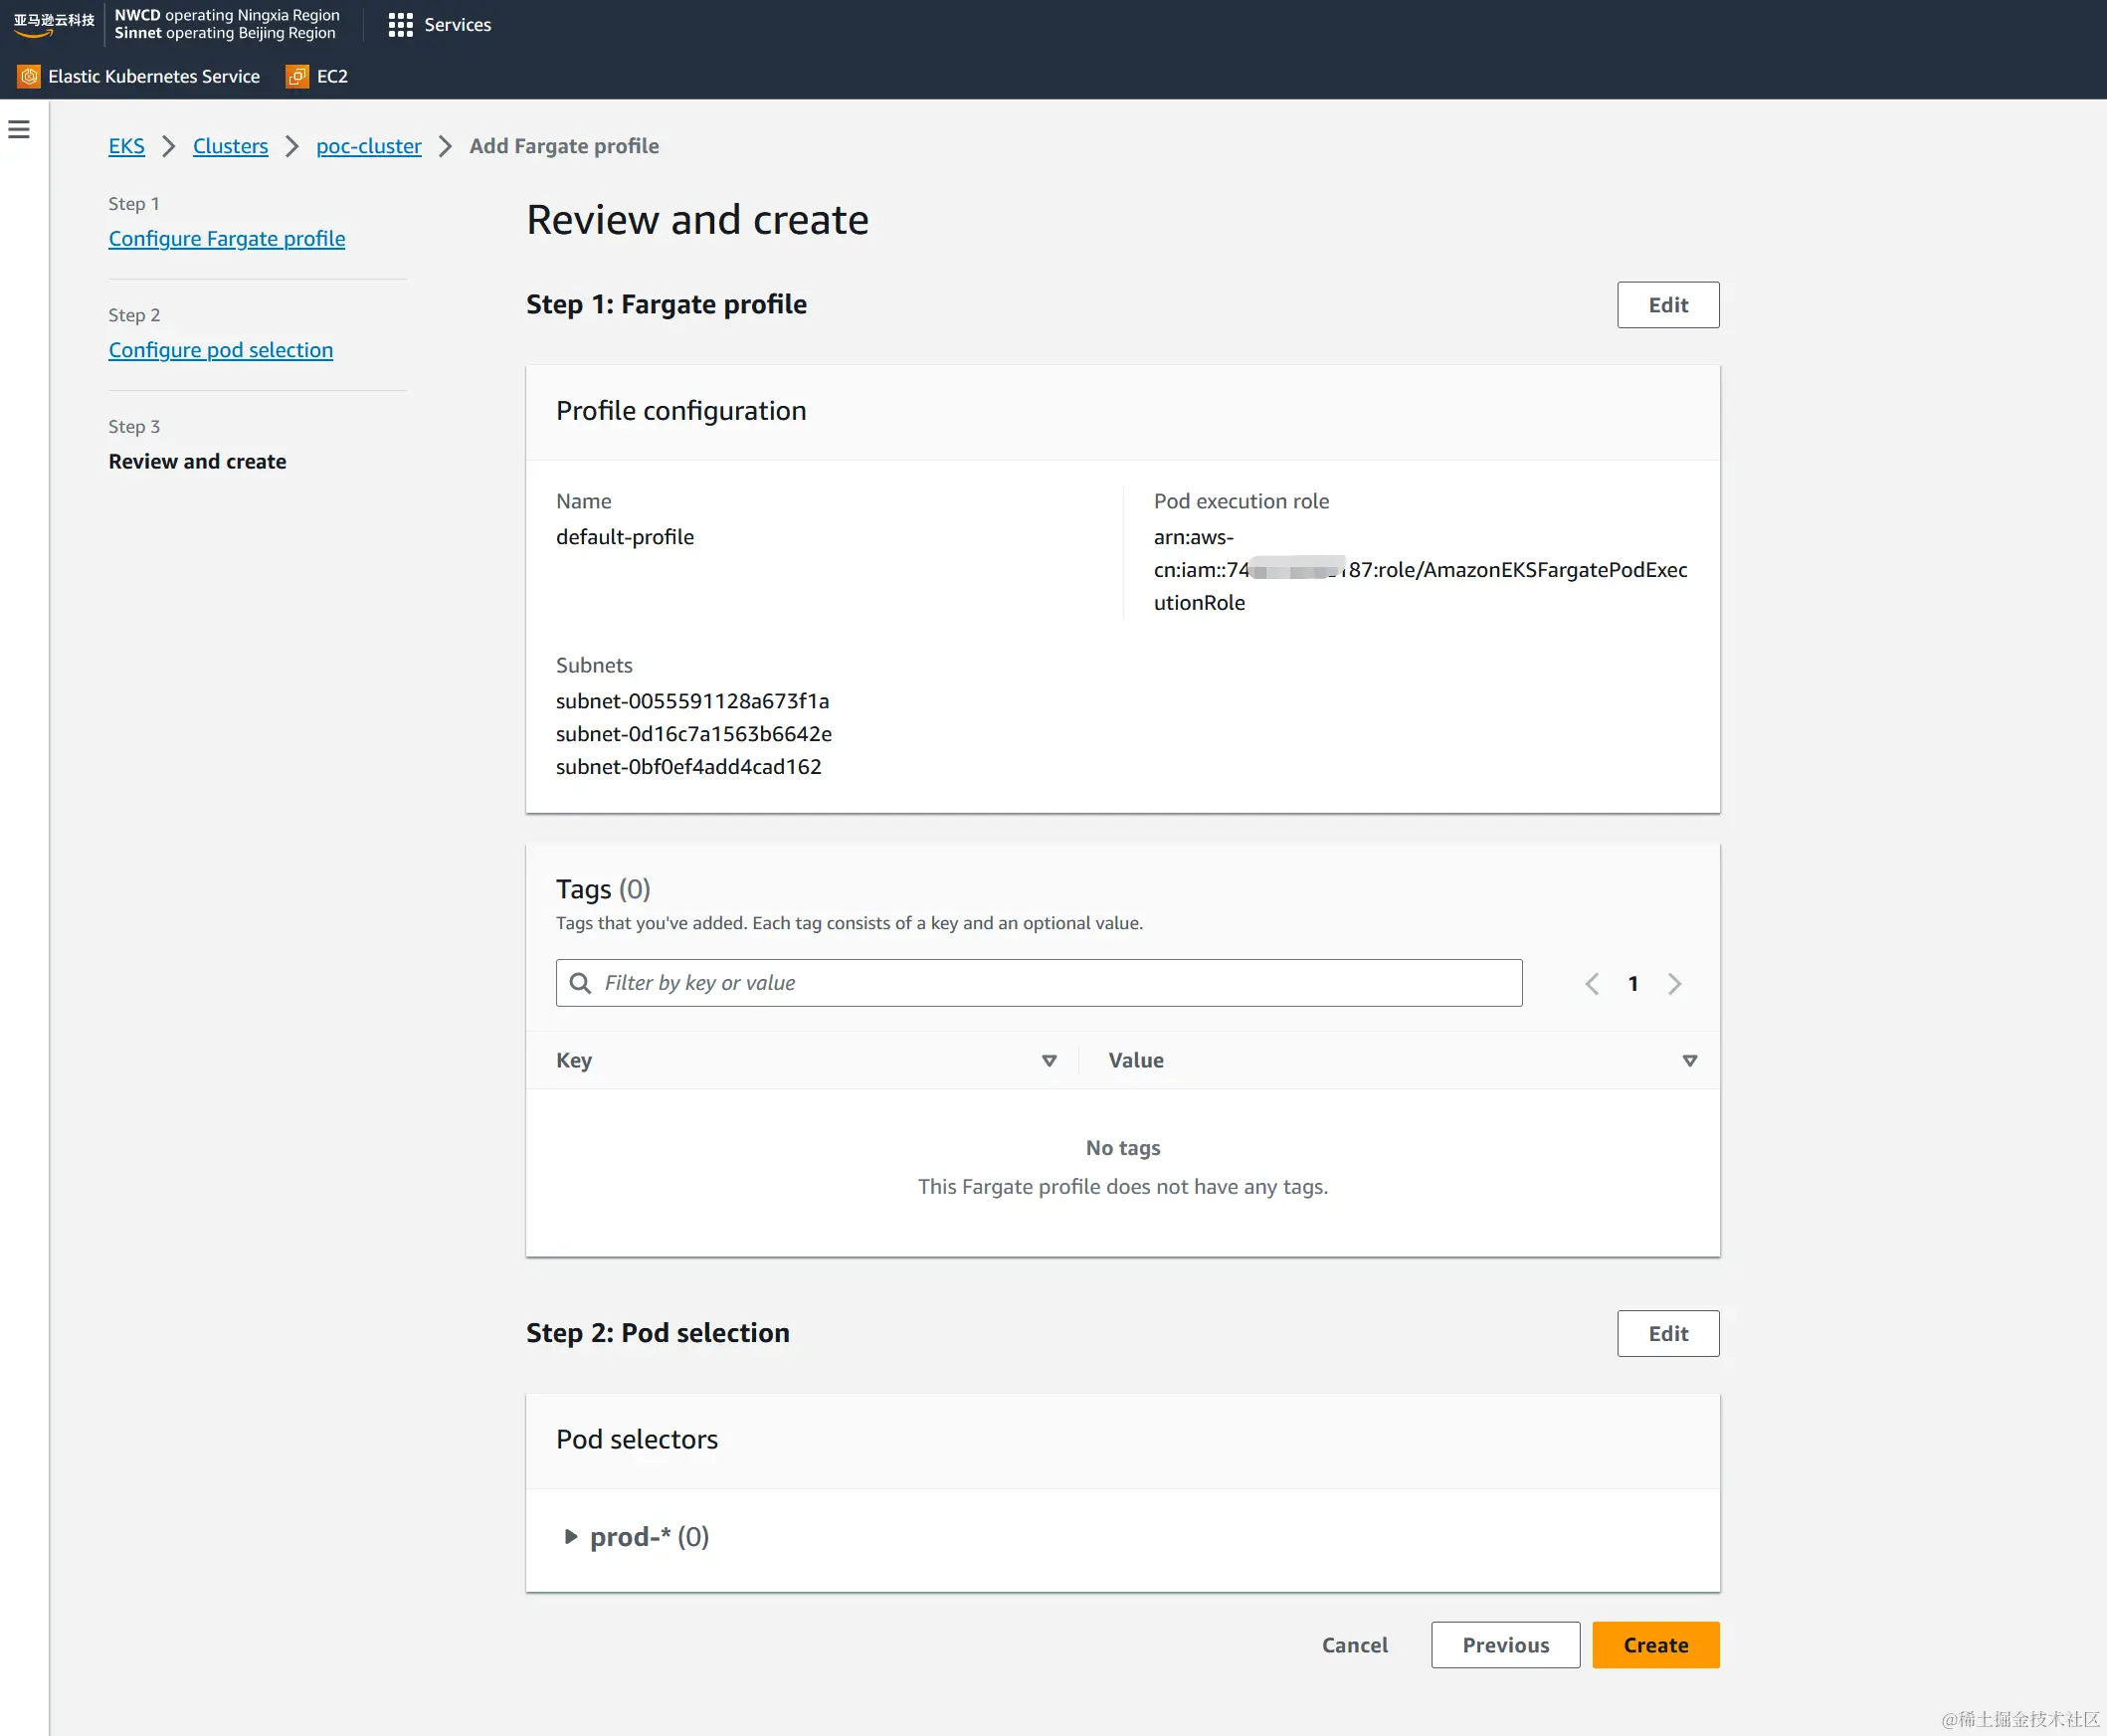 创建需要几分钟
 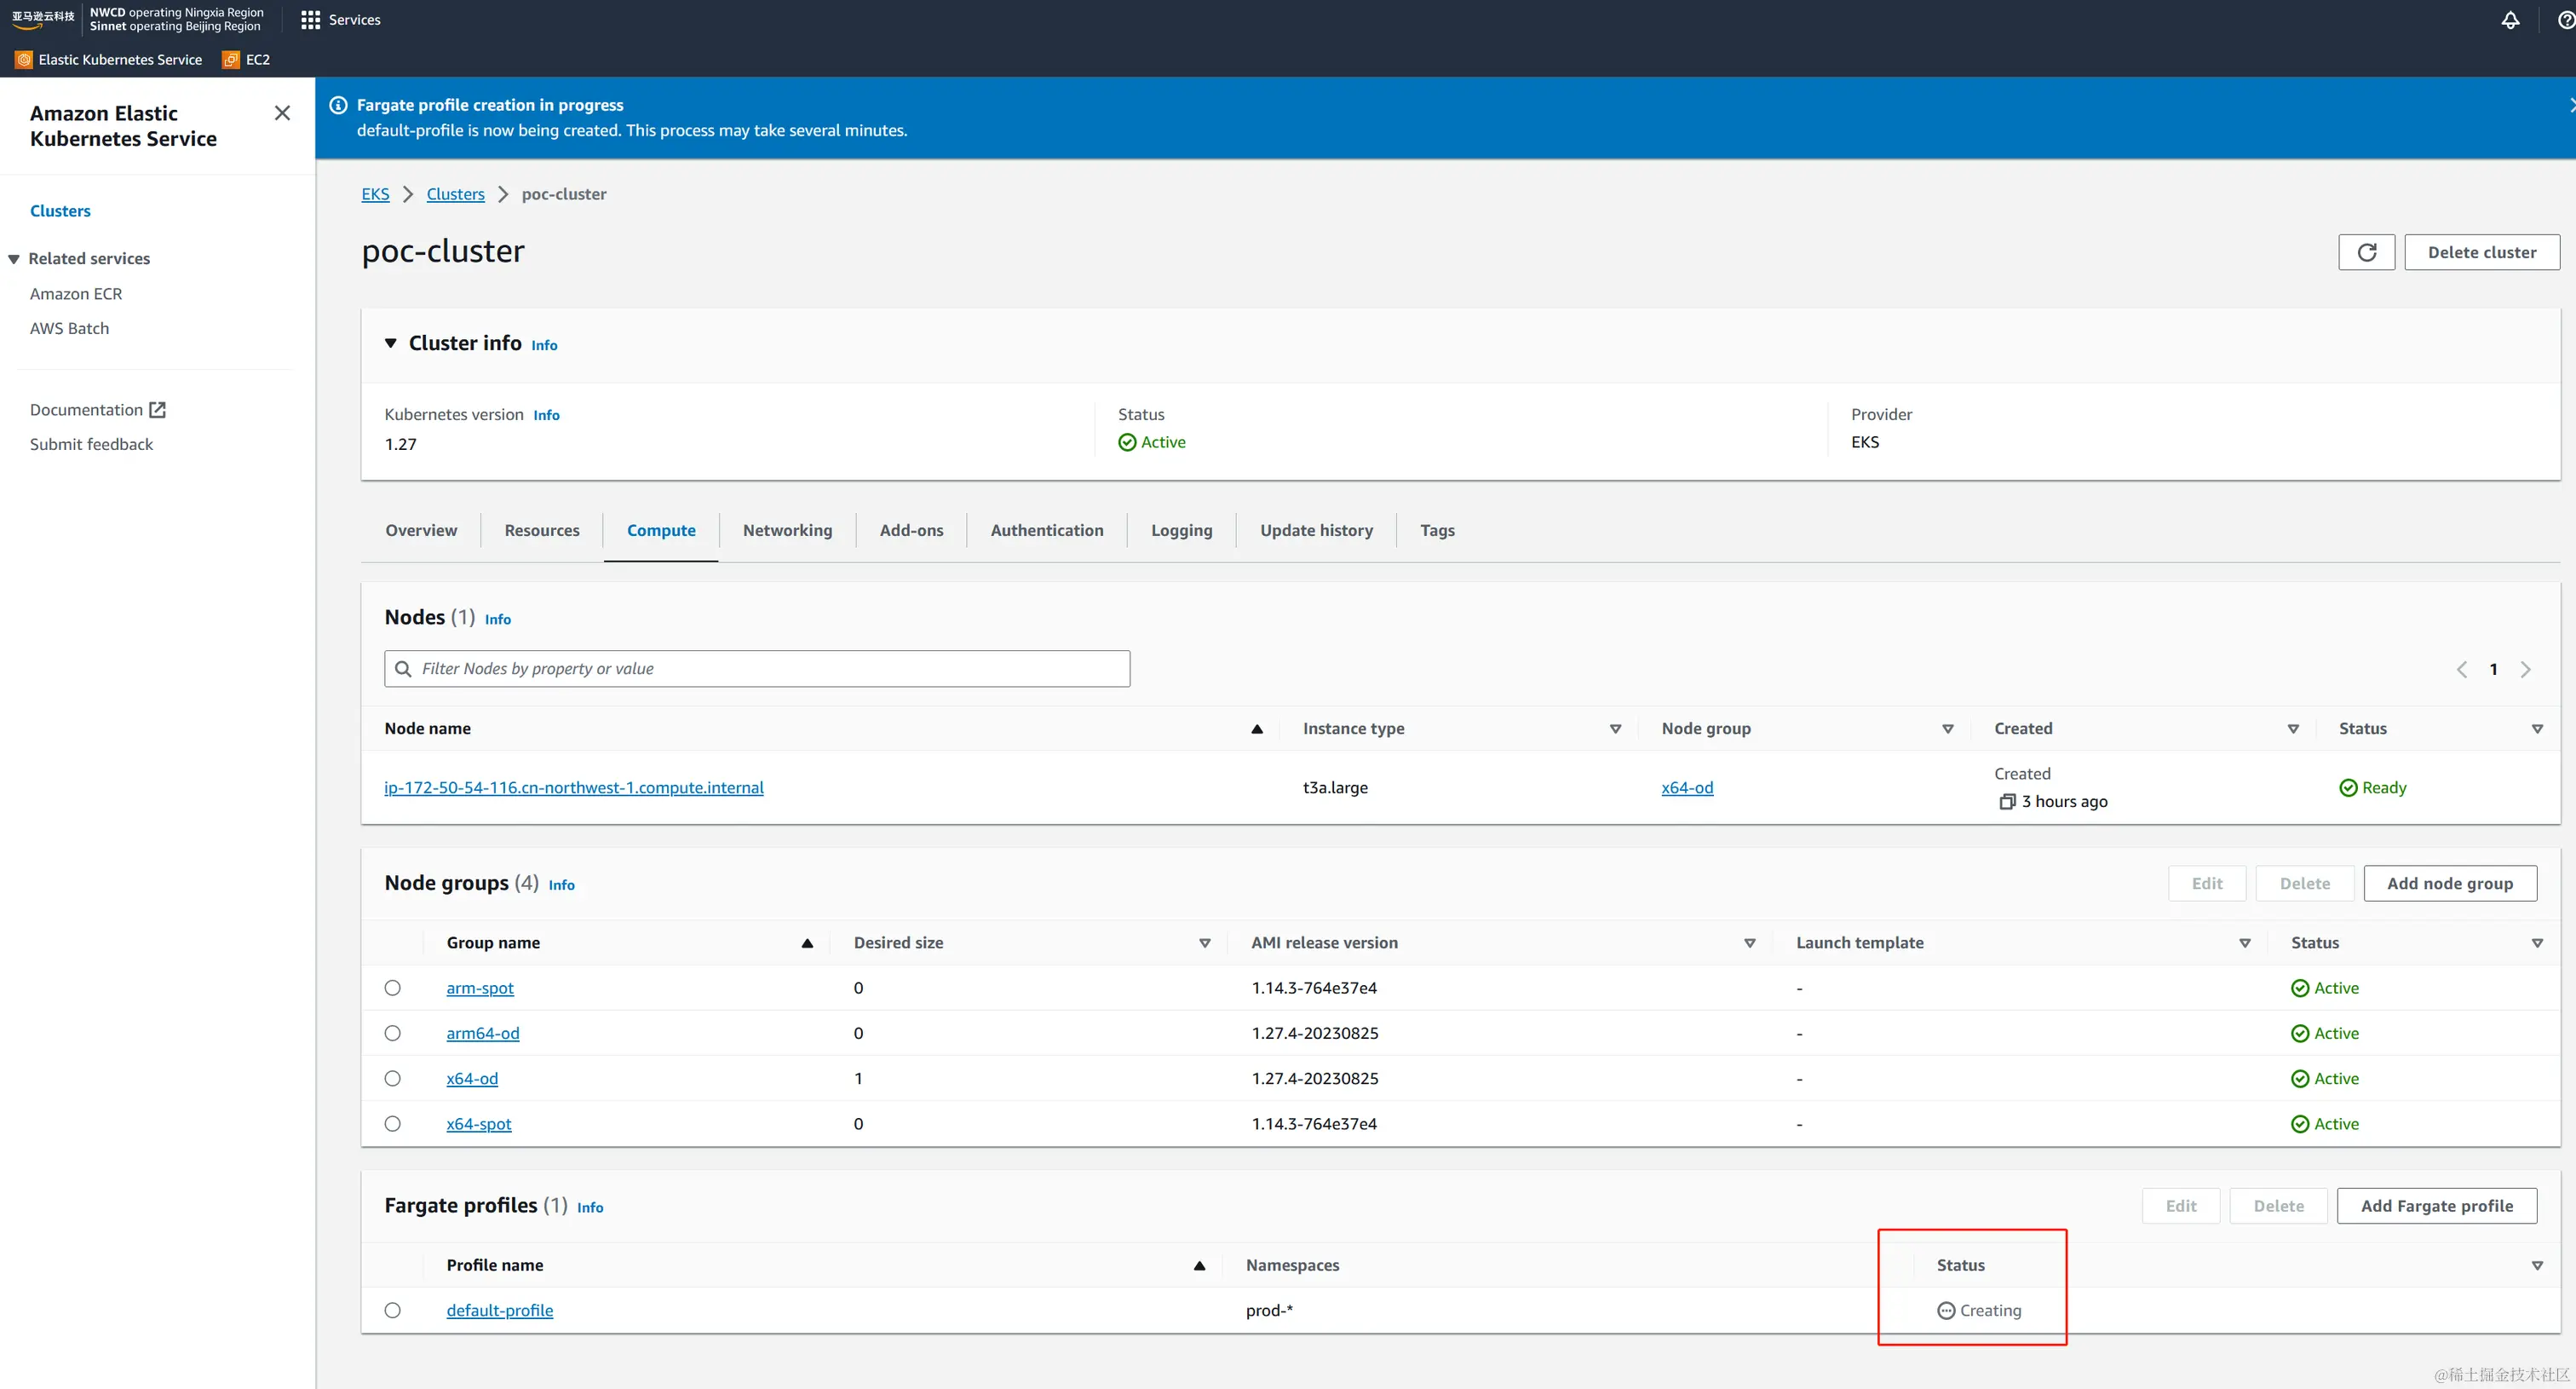 创建完成
创建完成 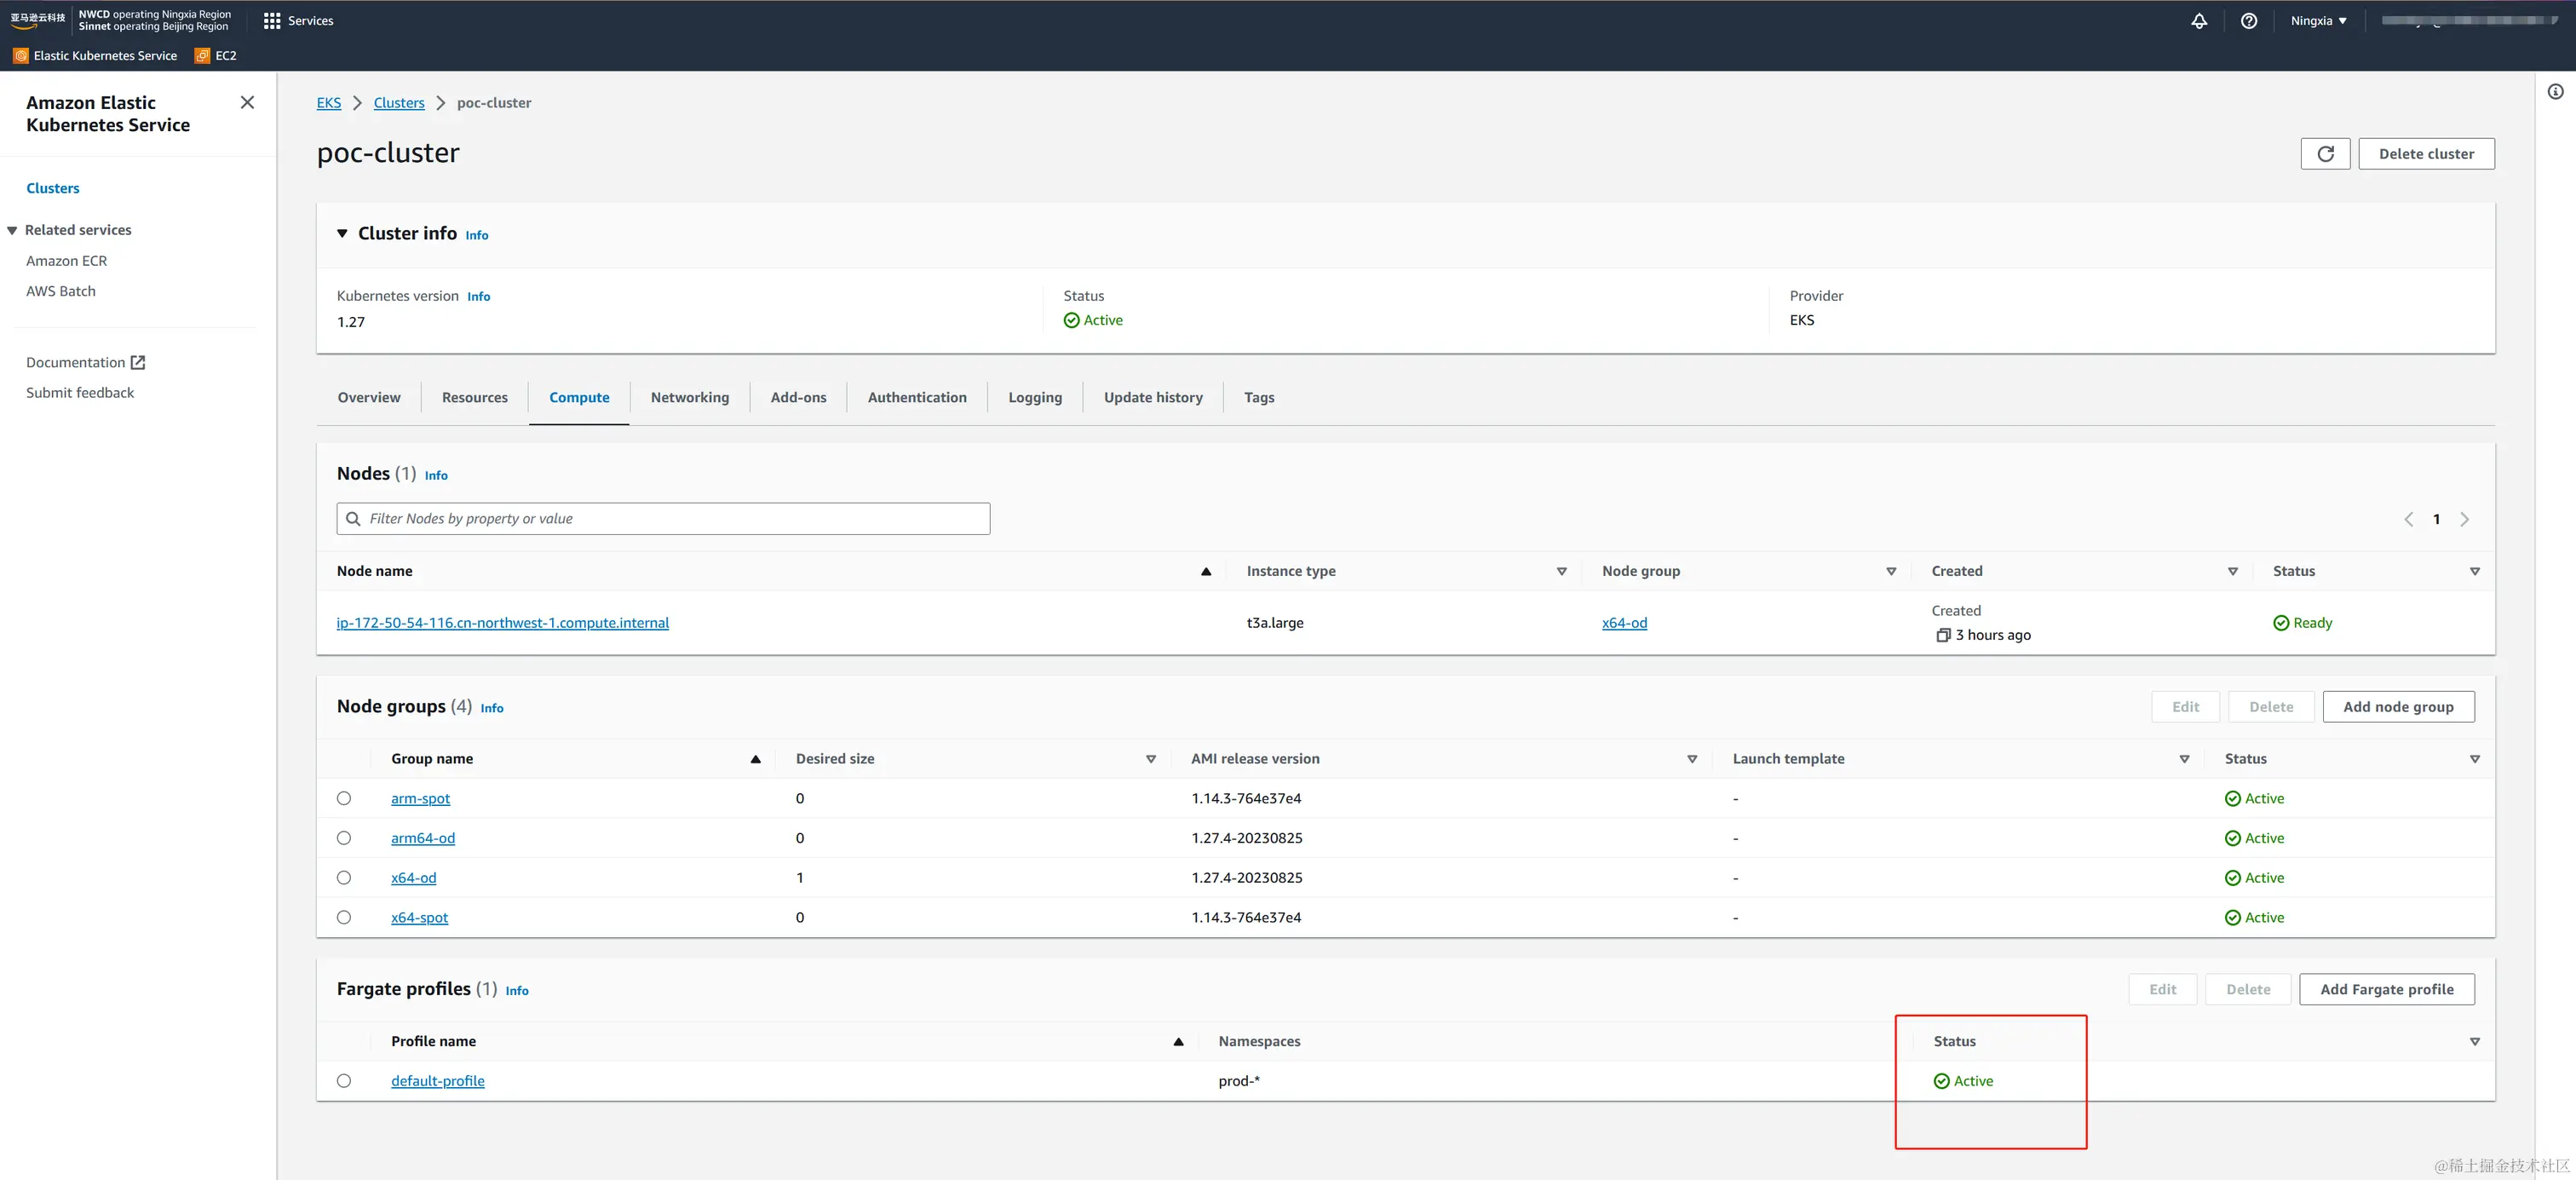
测试fargate的使用
这里是一个简单的nginx deployment样例,请注意它的namesapce必须要和fargate proflie中的namespace设置相匹配 ,匹配规则为AWS Fargate profile
yaml
apiVersion: apps/v1
kind: Deployment
metadata:
name: eks-sample-linux-deployment
# 必须和fargate proflie中的namespace设置相匹配,https://docs.aws.amazon.com/eks/latest/userguide/fargate-profile.html
namespace: prod-fargate
labels:
app: eks-sample-linux-app
spec:
replicas: 3
selector:
matchLabels:
app: eks-sample-linux-app
template:
metadata:
labels:
app: eks-sample-linux-app
spec:
affinity:
nodeAffinity:
requiredDuringSchedulingIgnoredDuringExecution:
nodeSelectorTerms:
- matchExpressions:
- key: kubernetes.io/arch
operator: In
values:
- amd64
- arm64
containers:
- name: nginx
image: public.ecr.aws/nginx/nginx:1.23
ports:
- name: http
containerPort: 80
imagePullPolicy: IfNotPresent
nodeSelector:
kubernetes.io/os: linux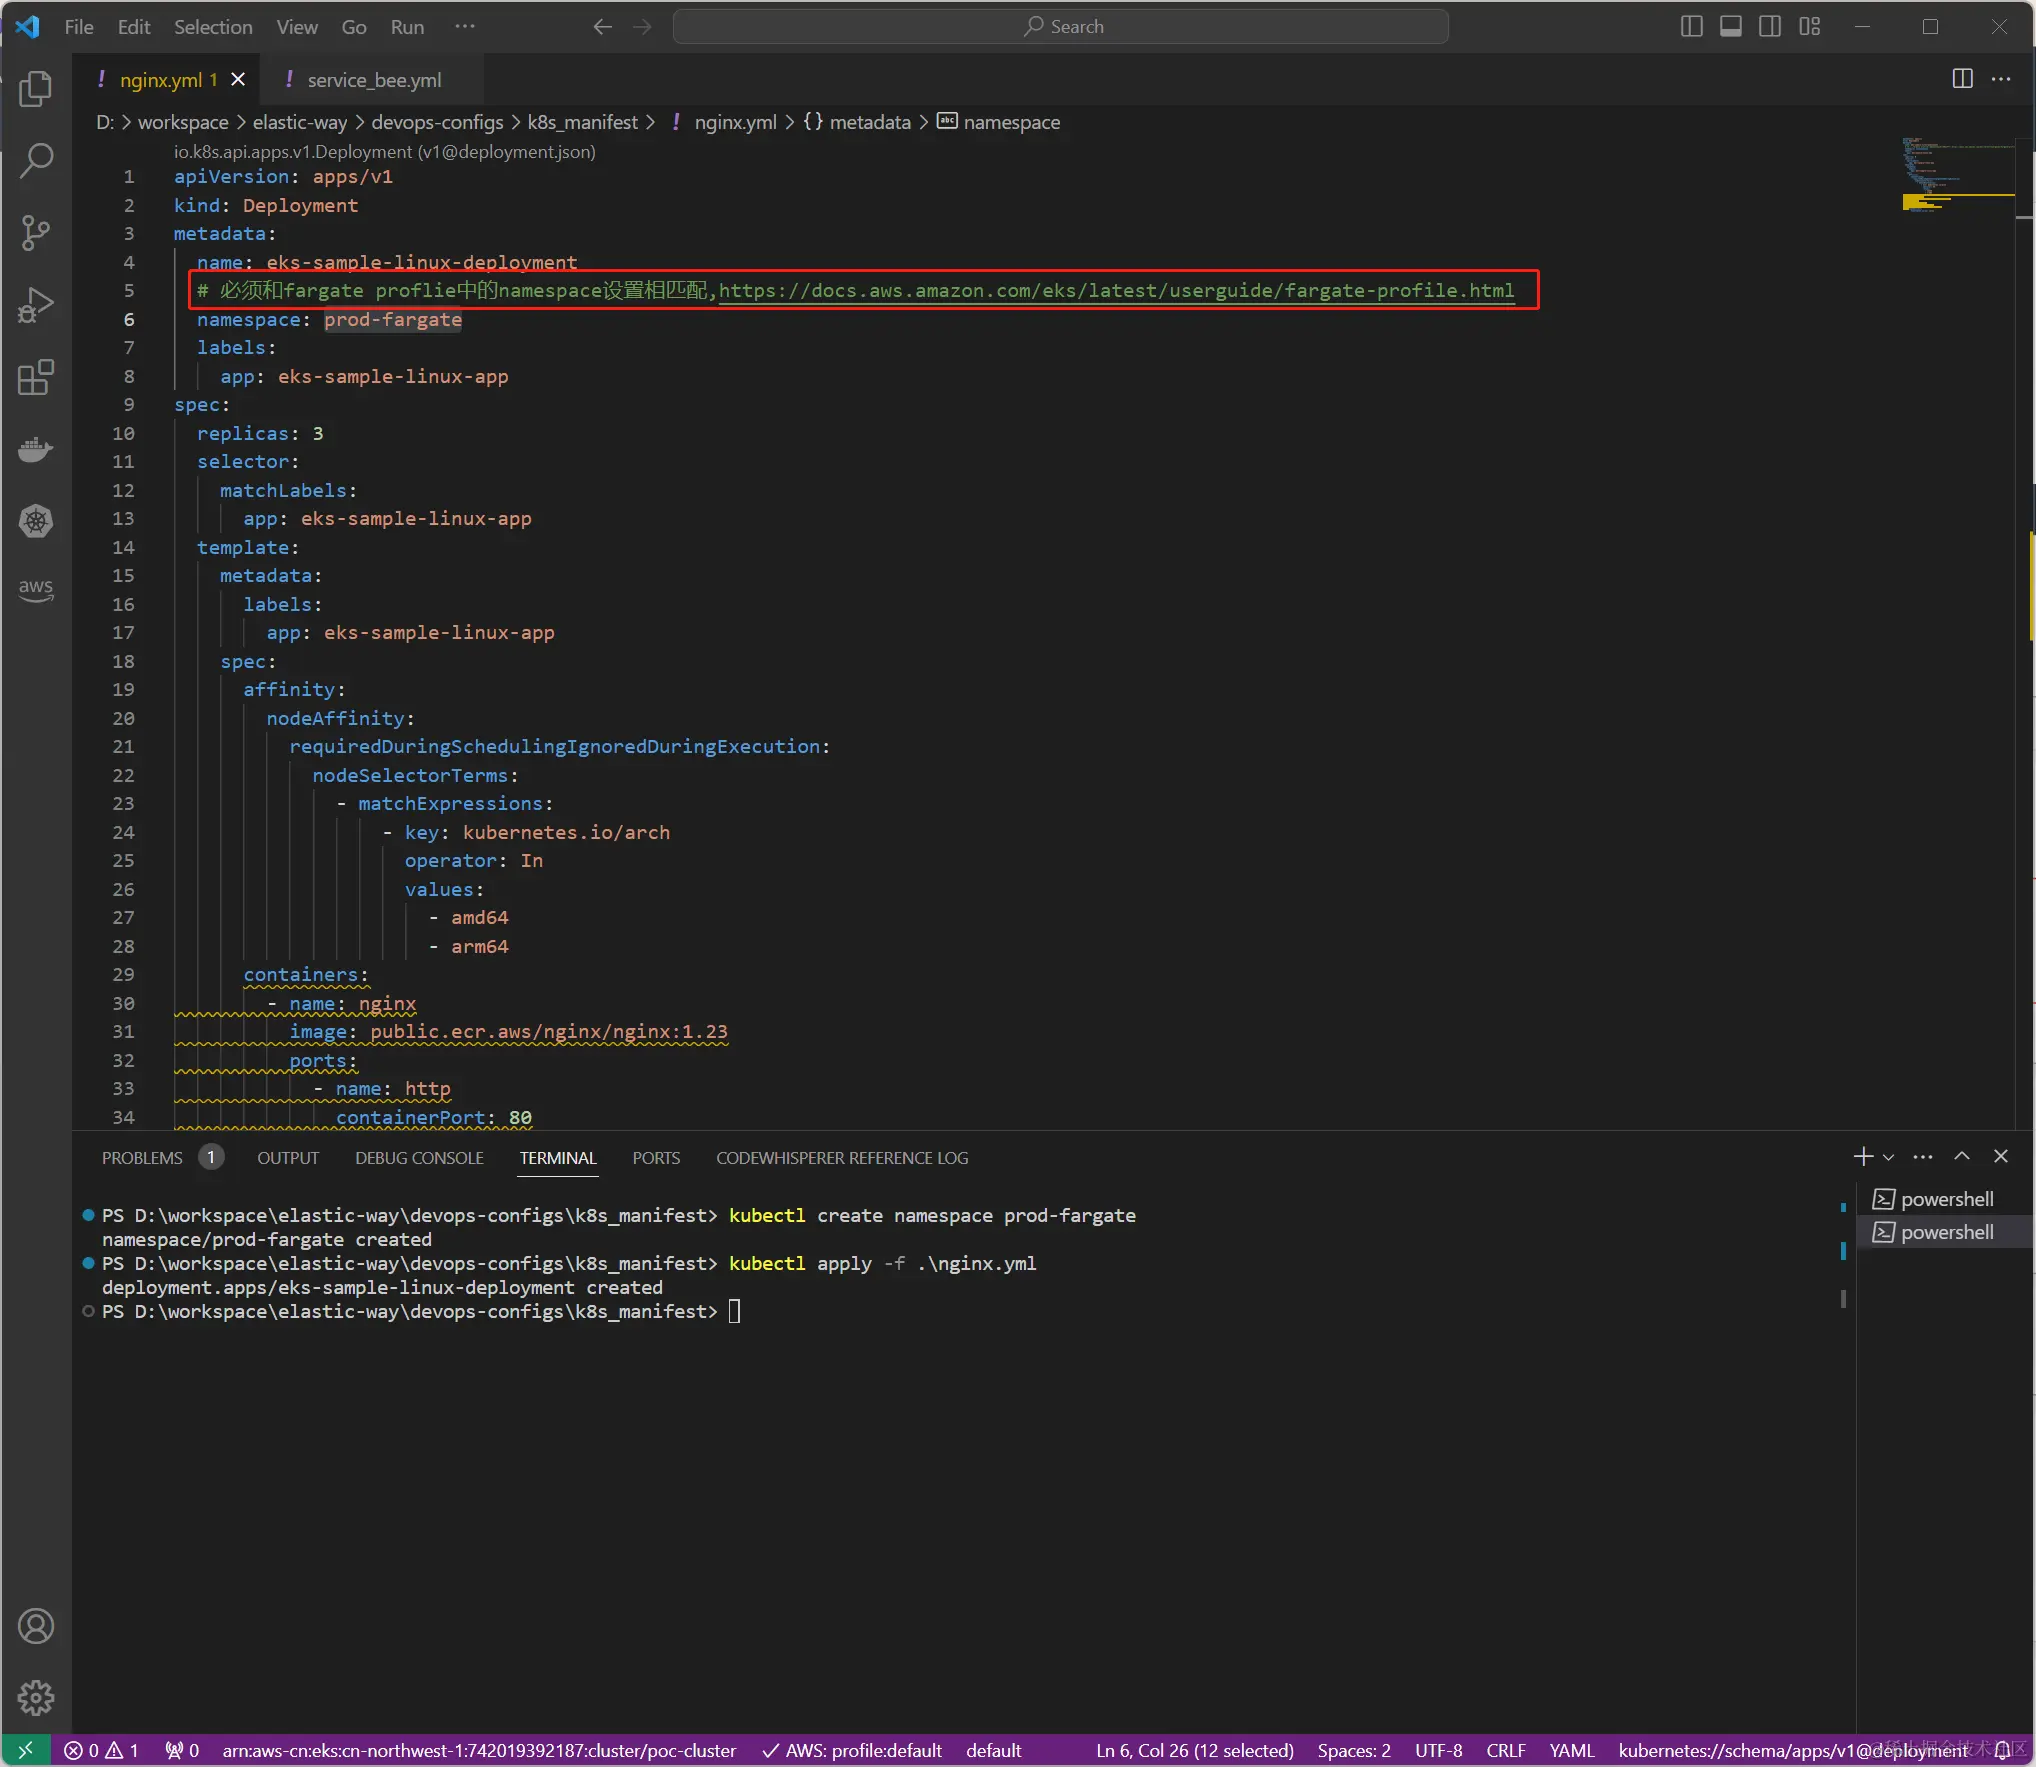 等待片刻我们发现fargate作为底层计算资源已经运行了正确的nginx
fargate和ec2 node group不一样,只需要你设置好pod的HPA后,pod就可以自动的水平扩展并及时获取对应的fargate计算资源,不再需要autosacler等插件。
关于fargate详情请看: