Torna 是一个企业级的接口文档管理系统,专注于 API 文档的生成、管理和协作。它支持多种编程语言的接口文档自动生成,无代码侵入,并提供可视化的管理界面,适合开发团队使用。
本文将介绍Torna的安装及在项目中如何使用。
一、安装
下载地址
https://gitee.com/durcframework/torna/releases![]() https://gitee.com/durcframework/torna/releases本文下载的是torna-1.33.7版本安装包
https://gitee.com/durcframework/torna/releases本文下载的是torna-1.33.7版本安装包
下载完成后上传到ubantu服务中
然后解压
sudo unzip torna-1.33.7.zip
进入解压目录下,编辑application.properties,配置数据库连接和端口
Server port
server.port=7700
MySQL host
mysql.host=localhost:3306
Schema name
mysql.schema=torna
Make sure the account can run CREATE/ALTER SQL
mysql.username=root
mysql.password=root
记得初始化数据库,sql文件,根据自己的版本去下载

https://gitee.com/durcframework/torna/tree/v1.33.7/
然后运行命令启动
sudo sh startup.sh
放开端口,云服务的话还得去云服务商的控制台添加安全策略
sudo ufw allow 7700/tcp
然后访问:http://192.168.110.35:7700/#/dashboard

创建一个自己的项目,然后在项目下面创建应用
二、在spring boot项目中使用
pom.xml添加插件依赖
XML
<!-- smart-doc插件 -->
            <plugin>
                <groupId>com.ly.smart-doc</groupId>
                <artifactId>smart-doc-maven-plugin</artifactId>
                <version>3.0.2</version>
                <configuration>
                    <!--指定生成文档的使用的配置文件-->
                    <configFile>${basedir}/src/main/resources/smart-doc.json</configFile>
                    <!--指定项目名称-->
                    <projectName>xx</projectName>
                </configuration>
                <executions>
                    <execution>
                        <phase>package</phase>
                    </execution>
                </executions>
            </plugin>
            <plugin>
                <groupId>org.apache.maven.plugins</groupId>
                <artifactId>maven-source-plugin</artifactId>
                <version>3.2.1</version>
                <executions>
                    <execution>
                        <phase>package</phase>
                        <goals>
                            <goal>jar-no-fork</goal>
                        </goals>
                    </execution>
                </executions>
            </plugin>
然后在项目resource目录下新建smart-doc.json文件
XML
{
"outPath": "target/doc",
"projectName": "管理后台",//项目名称
"packageFilters": "xxx.xxx.xxx.controller.*", // 扫描的包,即存放controller的包
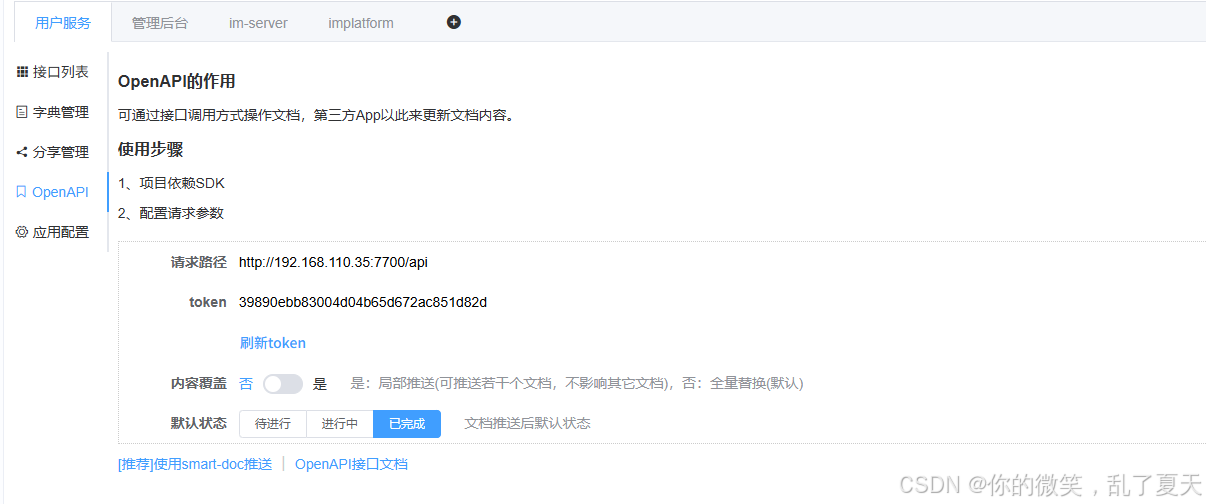
"openUrl": "http://192.168.110.35:7700/api", // 对应torna所创建的应用下OpenAPI的请求路径
"appToken": "39890ebb83004d04b65d672ac851d82d",// 对应torna所创建的应用下OpenAPI的token
"debugEnvName":"本地环境",
"debugEnvUrl":"http://127.0.0.1:8080/api-users",
"tornaDebug": true,
"replace": true
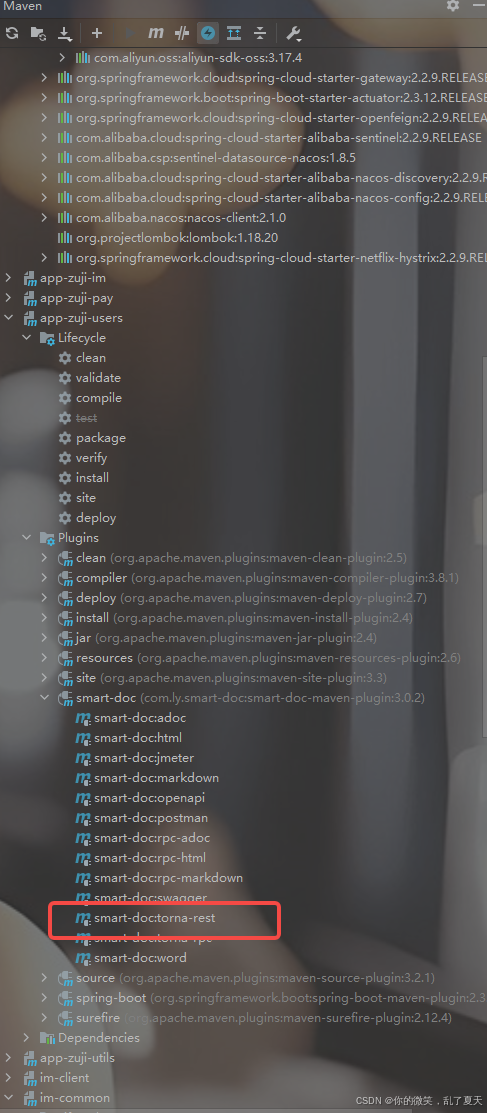
}然后在找到smart-doc插件,然后双击运行torna-rest
然后进入torna查看接口文档是否更新
