需要安装插件Nexus Artifact Uploader,然后再Jenkins密钥管理处添加好Nexus账号密码
1.代码片段
1.1 上传单个文件
bash
//......此处省略
        stage('Upload to Nexus') {
            steps {
                script {
                    // 使用之前生成的 version 变量
                    nexusArtifactUploader artifacts: [
                        [
                            artifactId: 'basejar', // 替换为您的 artifactId
                            classifier: '',
                            file: 'target/spring-boot-3-hello-world-1.0.0-SNAPSHOT.jar', // 替换为您的文件路径
                            type: 'jar' // 根据您的文件类型进行修改
                        ],
                				[
                    		artifactId: 'basejar', // 同样的 artifactId,或根据需要修改
                    		classifier: 'pom',
                    		file: 'pom.xml', // 指向您的 pom.xml 文件
                    		type: 'pom' // 文件类型为 pom
                				]
                    ],
                    //文件file类型有jar,pom,war,zip,tar.gz
                    credentialsId: 'Nexus3-DevOps',
                    groupId: 'top.xxx',
                    nexusUrl: 'registryv.xxxx.top',
                    nexusVersion: 'nexus3',
                    protocol: 'https',
                    repository: 'DevopsArtifact',
                    version: "${_tag}"
                }
            }
        }
//....此处省略
1.2 上传zip文件
有时候你的代码是会做一个分离的 比如你的依赖jar放在了lib里面,resource放了配置文件
bash
        stage('Build') {
            when {
                expression {
                    // 检查 BRANCH_TAG 是否不以 'rel-' 开头
                    return !params.BRANCH_TAG.startsWith('rel-')
                }
            }
            steps {
                ansiColor('xterm') { // 启用 AnsiColor
                    echo "${GREEN}项目开始构建${RESET}"
                    echo "Building"
                }
                sh 'mvn clean package -Dmaven.test.skip=true'
								sh 'tar zcvf spring-boot-3-hello-world-1.0.0-SNAPSHOT.tar.gz target/spring-boot-3-hello-world-1.0.0-SNAPSHOT.jar pom.xml target/lib target/resource'
            }
        }
        stage('Upload to Nexus') {
            steps {
                script {
                    // 使用之前生成的 version 变量
                    nexusArtifactUploader artifacts: [
                        [
                            artifactId: 'basejar', // 替换为您的 artifactId
                            classifier: '',
                            file: 'spring-boot-3-hello-world-1.0.0-SNAPSHOT.tar.gz', // 替换为您的文件路径
                            type: 'tar.gz' // 根据您的文件类型进行修改
                        ],
                				[
                    		artifactId: 'basejar', // 同样的 artifactId,或根据需要修改
                    		classifier: 'pom',
                    		file: 'pom.xml', // 指向您的 pom.xml 文件
                    		type: 'pom' // 文件类型为 pom
                				]
                    ],
                    //文件file类型有jar,pom,war,zip,tar.gz
                    credentialsId: 'Nexus3-DevOps',
                    groupId: 'top.xxx',
                    nexusUrl: 'registryv.xxx.top',
                    nexusVersion: 'nexus3',
                    protocol: 'https',
                    repository: 'DevopsArtifact',
                    version: "${_tag}"
                }
            }
        }
2.查看上传结果
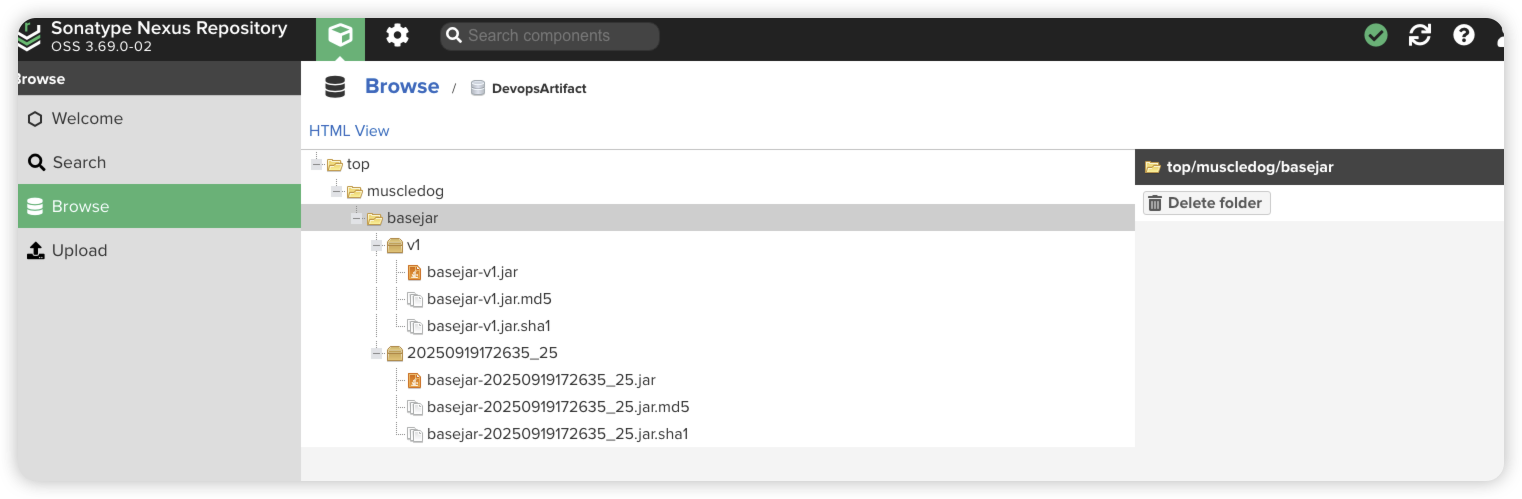
image-20250919173150571
3.制品下载
3.1 参数化构建设置
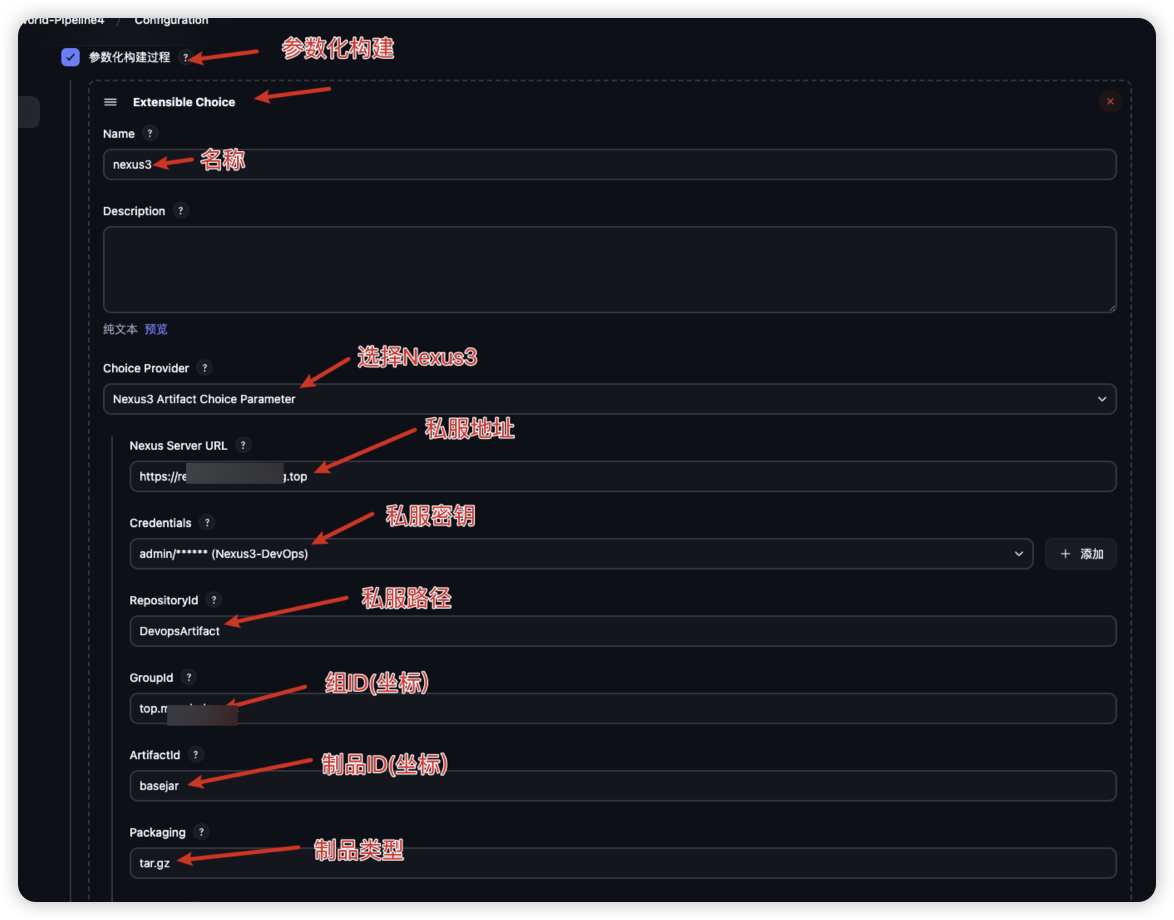
image-20250922174427350

image-20250922174523253
bash
//上面定义的nexus3能够将你拉取到的列表存入到变量当中,这里在建立一个私服变量将上面定义参数拉取到的内容转换成字符串
String artifactUrl = "${env.artifactUrl}"
sh " wget ${artifactUrl} && ls " // Nexus3制品库无认证
//sh " wget --user=admin --password=Qwer@123 ${artifactUrl} && ls "   // Nexus3制品库有认证