引子
在前两篇文章中,我们已经成功地将 LLM 集成进了Spring Boot,并实现了流畅的流式对话体验。但我们很快会发现一个核心问题:通用大模型虽然知识渊博,但它对我们的私域知识(比如公司内部的产品文档、技术手册、个人笔记等)一无所知。它无法回答"我们最新的XX产品有哪些特性?"这类具体问题。
要解决这个问题,就轮到今天的主角登场了------RAG(Retrieval-Augmented Generation,检索增强生成)。
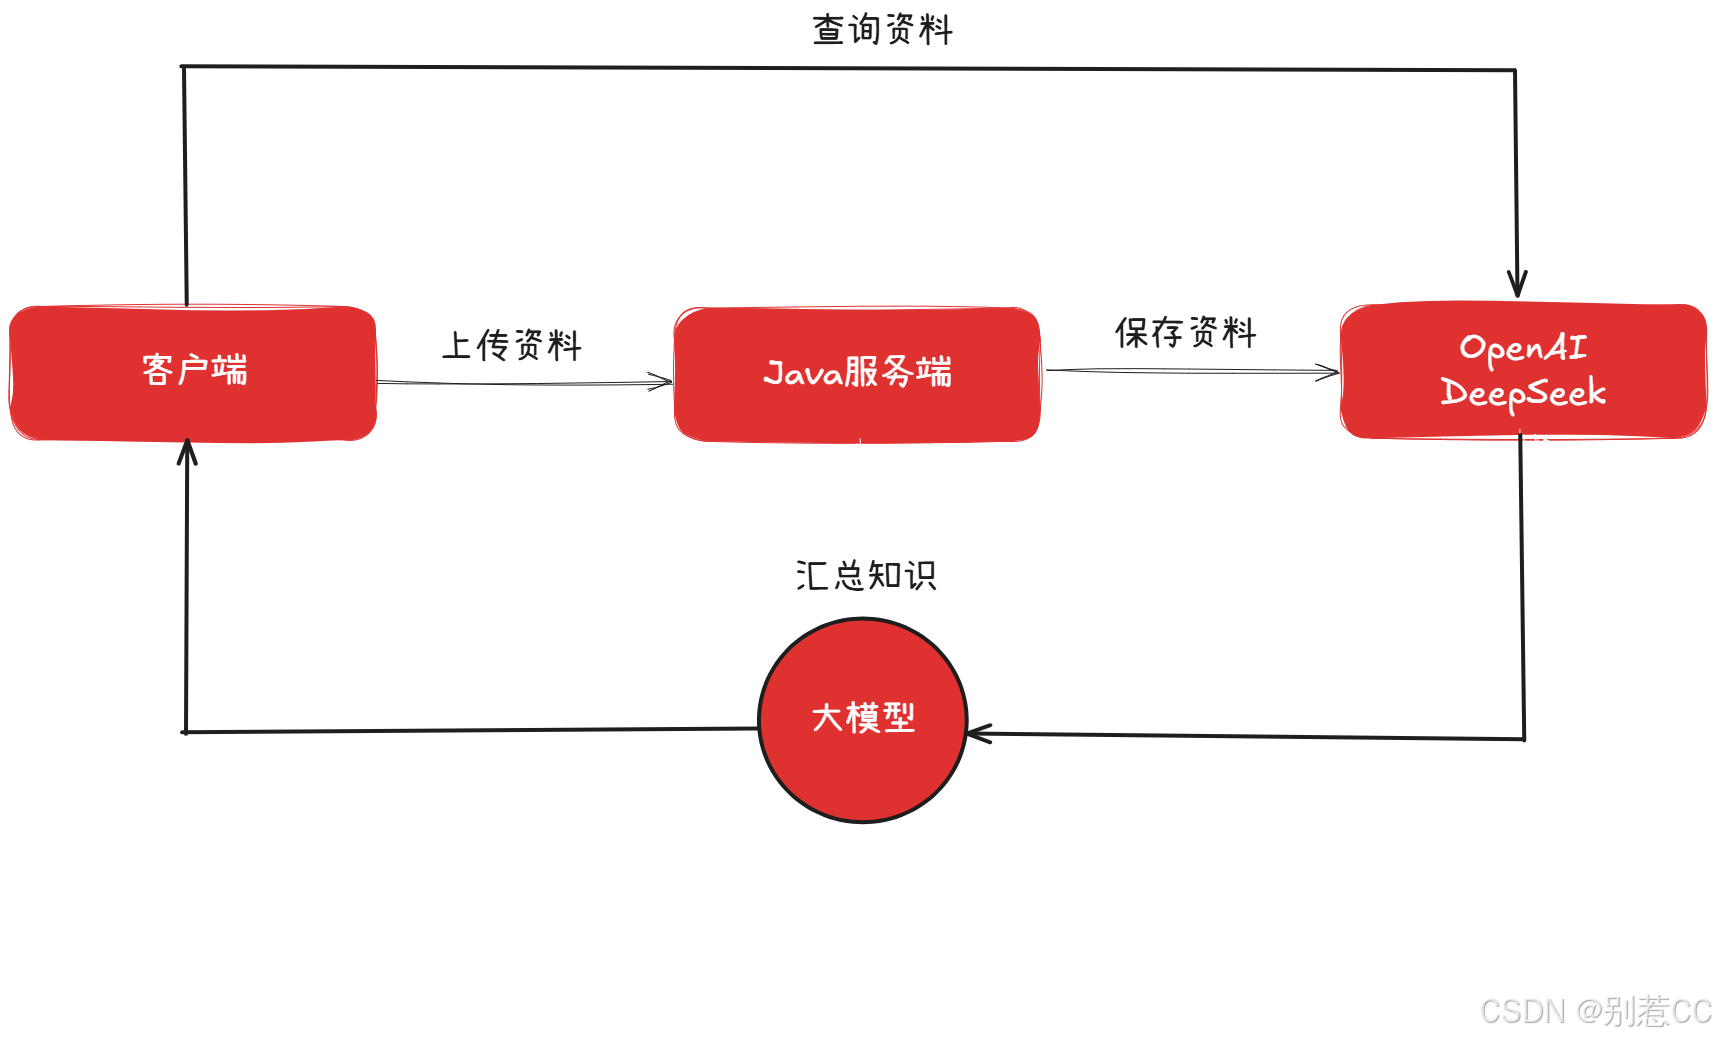
简单来说,RAG技术就像是为大模型外挂了一个"知识U盘"。它允许我们在对话时,先从我们自己的知识库(向量数据库)中检索出与问题最相关的信息,然后将这些信息连同原始问题一起"喂"给大模型,让它基于这些"参考资料"来生成精准的回答。
本文将手把手带你走完整个流程:从搭建向量数据库,到将私有文档"喂"给AI,最终实现一个可以随时在"通用模式"和"知识库模式"间切换的智能聊天机器人。
环境准备
要实现RAG,我们首先需要一个能够存储"知识"的地方,这个地方就是向量数据库。它专门用于存储文本转换后的向量(一堆数字),并能高效地进行相似度检索。
市面上有多种选择,如 Chroma、Milvus 等。本次我们选用 Redis Stack ,因为它不仅是我们熟悉的 Redis,其集成的 RediSearch 模块还提供了强大的向量存储和检索能力,对于Java开发者来说非常友好。
我们使用 Docker 来快速启动它,整个过程分为两步:
1.拉取最新镜像
shell
docker pull redis/redis-stack:latest2.运行容器
shell
docker run -d --name redis-stack -p 9379:6379 -e REDIS_ARGS="--requirepass 123456" redis/redis-stack:latest说明 :我们通过
-p 9379:6379将容器的6379端口映射到宿主机的9379,避免与本地其他Redis实例冲突。同时,通过-e设置了访问密码为123456。
运行成功后,向量数据库就已经准备就绪了!

项目整合
1.添加 Maven 依赖
接下来,我们需要在 Spring Boot 项目中引入相关依赖并进行配置。
xml
<!-- Spring AI 内嵌式 Embedding 模型 Starter -->
<dependency>
    <groupId>org.springframework.ai</groupId>
    <artifactId>spring-ai-starter-vector-store-redis</artifactId>
</dependency>

<!-- Spring AI 内嵌式 Embedding 模型 Starter -->
<dependency>
    <groupId>org.springframework.ai</groupId>
    <artifactId>spring-ai-starter-model-transformers</artifactId>
</dependency>


<!-- Spring AI 文档读取器,用于解析多种格式的文档 -->
<dependency>
    <groupId>org.springframework.ai</groupId>
    <artifactId>spring-ai-tika-document-reader</artifactId>
</dependency>
依赖说明:
spring-ai-starter-vector-store-redis:核心依赖,提供了与 Redis 向量数据库交互的所有能力。spring-ai-starter-model-transformers:这个依赖非常关键,它会自动下载并运行一个本地的 Embedding 模型。这个模型负责将我们的文本(如"什么是RAG?")转换成数学向量。这意味着我们无需再调用外部 API 来进行向量化,实现了本地处理。spring-ai-tika-document-reader:一个强大的文档解析工具,让我们的应用能直接读取.txt,.pdf,.docx等多种格式的文件。
2.增加 application.yml 配置
在 application.yml 中,添加与 Redis 向量数据库相关的配置:
yaml
spring:
  data:
    redis:
      host: 127.0.0.1
      port: 9379
      password: 123456
  ai:
    vectorstore:
      redis:
        initialize-schema: true # 是否初始化所需的模式
        index-name: lee-vectorstore # 用于存储向量的索引名称
        prefix: 'lee:' # redis 键的前缀
配置完成后,Spring AI 会在应用启动时自动连接到 Redis,并根据配置创建好用于存储向量的索引。
构建知识库上传与处理流程
万事俱备,让我们开始编写代码,实现文档的上传、解析、切分和向量化存储。
1.前端改造:提供上传入口和模式开关
首先,我们需要改造前端页面,增加两个核心功能:一个文件上传按钮,用于提交我们的知识库文档;一个**"知识库"开关**,用于在普通对话和RAG对话之间自由切换。
html
<!DOCTYPE html>
<html lang="zh-CN">
<head>
    <meta charset="UTF-8">
    <meta name="viewport" content="width=device-width, initial-scale=1.0">
    <title>RAG 增强流式对话</title>
    <style>
        body {
            font-family: -apple-system, BlinkMacSystemFont, "Segoe UI", Roboto, "Helvetica Neue", Arial, sans-serif;
            background-color: #f4f7f9;
            margin: 0;
            display: flex;
            justify-content: center;
            align-items: center;
            height: 100vh;
        }
        .chat-container {
            width: 90%;
            max-width: 800px;
            height: 90vh;
            background-color: #fff;
            border-radius: 12px;
            box-shadow: 0 4px 20px rgba(0, 0, 0, 0.1);
            display: flex;
            flex-direction: column;
            overflow: hidden;
            position: relative;
        }
        .chat-header {
            background-color: #4a90e2;
            color: white;
            padding: 16px;
            font-size: 1.2em;
            text-align: center;
            font-weight: bold;
        }
        .chat-messages {
            flex-grow: 1;
            padding: 20px;
            overflow-y: auto;
            display: flex;
            flex-direction: column;
            gap: 15px;
        }
        .message {
            padding: 12px 18px;
            border-radius: 18px;
            max-width: 75%;
            line-height: 1.5;
            word-wrap: break-word;
        }
        .user-message {
            background-color: #dcf8c6;
            align-self: flex-end;
            border-bottom-right-radius: 4px;
        }
        .bot-message {
            background-color: #e9e9eb;
            align-self: flex-start;
            border-bottom-left-radius: 4px;
        }
        .chat-input-area {
            display: flex;
            padding: 15px;
            border-top: 1px solid #e0e0e0;
            background-color: #f9f9f9;
            align-items: center;
        }
        #message-input {
            flex-grow: 1;
            padding: 12px;
            border: 1px solid #ccc;
            border-radius: 20px;
            resize: none;
            font-size: 1em;
            margin-right: 10px;
        }
        #send-button {
            padding: 12px 25px;
            border: none;
            background-color: #4a90e2;
            color: white;
            border-radius: 20px;
            cursor: pointer;
            font-size: 1em;
            transition: background-color 0.3s;
            flex-shrink: 0;
        }
        #send-button:disabled {
            background-color: #a0c7ff;
            cursor: not-allowed;
        }
        #upload-button {
            width: 44px;
            height: 44px;
            border: 1px solid #ccc;
            border-radius: 50%;
            display: flex;
            justify-content: center;
            align-items: center;
            cursor: pointer;
            margin-right: 10px;
            background-color: #fff;
            transition: background-color 0.3s;
            flex-shrink: 0;
        }
        #upload-button:hover {
            background-color: #f0f0f0;
        }
        #upload-button svg {
            width: 20px;
            height: 20px;
            fill: #555;
        }
        #upload-button.loading {
            cursor: not-allowed;
            animation: spin 1s linear infinite;
        }
        @keyframes spin {
            0% { transform: rotate(0deg); }
            100% { transform: rotate(360deg); }
        }
        #file-input {
            display: none;
        }
        #toast-notification {
            position: absolute;
            top: 80px;
            left: 50%;
            transform: translateX(-50%);
            padding: 12px 25px;
            border-radius: 8px;
            color: white;
            font-weight: bold;
            opacity: 0;
            visibility: hidden;
            transition: opacity 0.5s, visibility 0.5s;
            z-index: 1000;
        }
        #toast-notification.show {
            opacity: 1;
            visibility: visible;
        }
        #toast-notification.success {
            background-color: #28a745;
        }
        #toast-notification.error {
            background-color: #dc3545;
        }

        /* --- 新增:知识库开关样式 --- */
        .knowledge-switch-container {
            display: flex;
            align-items: center;
            margin-right: 10px;
            cursor: pointer;
        }
        .knowledge-switch-container .switch-label {
            margin-right: 8px;
            font-size: 0.9em;
            color: #555;
            user-select: none; /* 防止文本被选中 */
        }
        .switch {
            position: relative;
            display: inline-block;
            width: 40px;
            height: 22px;
        }
        .switch input {
            opacity: 0;
            width: 0;
            height: 0;
        }
        .slider {
            position: absolute;
            cursor: pointer;
            top: 0;
            left: 0;
            right: 0;
            bottom: 0;
            background-color: #ccc;
            transition: .4s;
            border-radius: 22px;
        }
        .slider:before {
            position: absolute;
            content: "";
            height: 16px;
            width: 16px;
            left: 3px;
            bottom: 3px;
            background-color: white;
            transition: .4s;
            border-radius: 50%;
        }
        input:checked + .slider {
            background-color: #4a90e2;
        }
        input:checked + .slider:before {
            transform: translateX(18px);
        }
    </style>
</head>
<body>

<div class="chat-container">
    <div class="chat-header">RAG 增强流式对话</div>
    <div class="chat-messages" id="chat-messages">
        <!-- 聊天消息会在这里动态添加 -->
    </div>

    <div id="toast-notification"></div>

    <div class="chat-input-area">
        <label for="file-input" id="upload-button" title="上传知识文档">
            <svg viewBox="0 0 1024 1024" xmlns="http://www.w3.org/2000/svg"><path d="M761.6 364.8c-12.8-12.8-32-12.8-44.8 0l-160 160c-12.8 12.8-12.8 32 0 44.8 12.8 12.8 32 12.8 44.8 0l102.4-102.4v300.8c0 19.2 12.8 32 32 32s32-12.8 32-32V467.2l102.4 102.4c12.8 12.8 32 12.8 44.8 0 12.8-12.8 12.8-32 0-44.8L761.6 364.8zM896 896H128V128h448c19.2 0 32-12.8 32-32s-12.8-32-32-32H128C64 64 0 128 0 192v704c0 64 64 128 128 128h768c64 0 128-64 128-128V448c0-19.2-12.8-32-32-32s-32 12.8-32 32v448z"></path></svg>
        </label>
        <input type="file" id="file-input" accept=".txt,.pdf,.md,.docx">

        <!-- 新增:知识库开关 -->
        <div class="knowledge-switch-container" title="开启后将基于上传的文档进行回答">
            <span class="switch-label">知识库</span>
            <label class="switch">
                <input type="checkbox" id="knowledge-toggle">
                <span class="slider"></span>
            </label>
        </div>

        <textarea id="message-input" placeholder="输入您的问题..." rows="1"></textarea>
        <button id="send-button">发送</button>
    </div>
</div>

<script>
    // --- DOM 元素获取 ---
    const chatMessages = document.getElementById('chat-messages');
    const messageInput = document.getElementById('message-input');
    const sendButton = document.getElementById('send-button');
    const fileInput = document.getElementById('file-input');
    const uploadButton = document.getElementById('upload-button');
    const toast = document.getElementById('toast-notification');
    // 新增:知识库开关元素
    const knowledgeToggle = document.getElementById('knowledge-toggle');

    // --- 核心变量 ---
    const userId = 'user-' + Date.now() + '-' + Math.random().toString(36).substr(2, 9);
    let eventSource = null;
    let currentBotMessageElement = null;

    // --- 文件上传逻辑 (无变化) ---
    async function handleFileUpload(event) {
        const file = event.target.files[0];
        if (!file) return;

        uploadButton.classList.add('loading');
        uploadButton.style.pointerEvents = 'none';

        const formData = new FormData();
        formData.append('file', file);

        try {
            // 假设您的上传接口在 RagController 中,路径为 /rag/upload
            const response = await fetch('/rag/upload', { // 请确保此路径与您的后端匹配
                method: 'POST',
                body: formData,
            });

            // 假设您的后端成功时返回 { status: 200, msg: "成功" } 格式
            const result = await response.json();

            if (response.ok && result.status === 200) {
                showToast(`文档 "${file.name}" 上传成功!`, 'success');
            } else {
                showToast(`上传失败: ${result.msg || '未知错误'}`, 'error');
            }
        } catch (error) {
            console.error('Upload failed:', error);
            showToast('上传失败,请检查网络或联系管理员。', 'error');
        } finally {
            uploadButton.classList.remove('loading');
            uploadButton.style.pointerEvents = 'auto';
            fileInput.value = '';
        }
    }

    // --- Toast 通知 (无变化) ---
    function showToast(message, type = 'success') {
        toast.textContent = message;
        toast.className = 'show';
        toast.classList.add(type);
        setTimeout(() => {
            toast.className = toast.className.replace('show', '');
        }, 3000);
    }

    // --- SSE 连接 (无变化) ---
    function connectSSE() {
        if (eventSource) {
            eventSource.close();
        }
        eventSource = new EventSource(`/sse/connect?userId=${userId}`);

        eventSource.addEventListener('add', (event) => {
            if (!currentBotMessageElement) {
                currentBotMessageElement = createMessageElement('bot-message');
                chatMessages.appendChild(currentBotMessageElement);
            }
            if (event.data && event.data.toLowerCase() !== 'null') {
                // 使用 innerHTML 以便未来支持 Markdown -> HTML 的渲染
                currentBotMessageElement.innerHTML += event.data.replace(/\n/g, '<br>');
            }
            scrollToBottom();
        });

        eventSource.addEventListener('finish', (event) => {
            console.log('Stream finished:', event.data);
            currentBotMessageElement = null;
            sendButton.disabled = false;
            messageInput.disabled = false;
            eventSource.close();
        });

        eventSource.onerror = (error) => {
            console.error('SSE Error:', error);
            if (currentBotMessageElement) {
                currentBotMessageElement.innerHTML += '<br><strong style="color: red;">连接中断,请重试。</strong>';
            }
            sendButton.disabled = false;
            messageInput.disabled = false;
            eventSource.close();
        };
    }

    // --- 发送消息 (核心修改) ---
    async function sendMessage() {
        const message = messageInput.value.trim();
        if (!message) return;

        displayUserMessage(message);
        messageInput.value = '';
        messageInput.focus();

        sendButton.disabled = true;
        messageInput.disabled = true;

        // 确保SSE连接已准备好接收消息
        connectSSE();

        // 判断知识库开关的状态
        const useKnowledgeBase = knowledgeToggle.checked;

        // 更新输入框的 placeholder 提示
        updatePlaceholder();

        try {
            // 调用统一的后端API
            await fetch('/chat/send', {
                method: 'POST',
                headers: {
                    'Content-Type': 'application/json',
                },
                body: JSON.stringify({
                    currentUserName: userId,
                    message: message,
                    useKnowledgeBase: useKnowledgeBase // 发送开关状态
                }),
            });
        } catch (error) {
            console.error('Failed to send message:', error);
            displayBotMessage('抱歉,发送消息失败。');
            sendButton.disabled = false;
            messageInput.disabled = false;
        }
    }

    // --- UI 辅助函数 ---
    function createMessageElement(className, htmlContent = '') {
        const div = document.createElement('div');
        div.className = `message ${className}`;
        div.innerHTML = htmlContent;
        return div;
    }

    function displayUserMessage(message) {
        const userMessageElement = createMessageElement('user-message', message);
        chatMessages.appendChild(userMessageElement);
        scrollToBottom();
    }

    function displayBotMessage(message) {
        const botMessageElement = createMessageElement('bot-message', message);
        chatMessages.appendChild(botMessageElement);
        scrollToBottom();
    }

    function scrollToBottom() {
        chatMessages.scrollTop = chatMessages.scrollHeight;
    }

    // 新增:根据开关状态更新输入框提示
    function updatePlaceholder() {
        if (knowledgeToggle.checked) {
            messageInput.placeholder = '基于已上传的知识库进行提问...';
        } else {
            messageInput.placeholder = '直接与我对话...';
        }
    }

    // --- 事件绑定 ---
    sendButton.addEventListener('click', sendMessage);
    messageInput.addEventListener('keydown', (event) => {
        if (event.key === 'Enter' && !event.shiftKey) {
            event.preventDefault();
            sendMessage();
        }
    });
    fileInput.addEventListener('change', handleFileUpload);
    // 新增:为开关绑定change事件,以更新placeholder
    knowledgeToggle.addEventListener('change', updatePlaceholder);

    // 初始化placeholder
    updatePlaceholder();

</script>
</body>
</html>
最终效果如下:
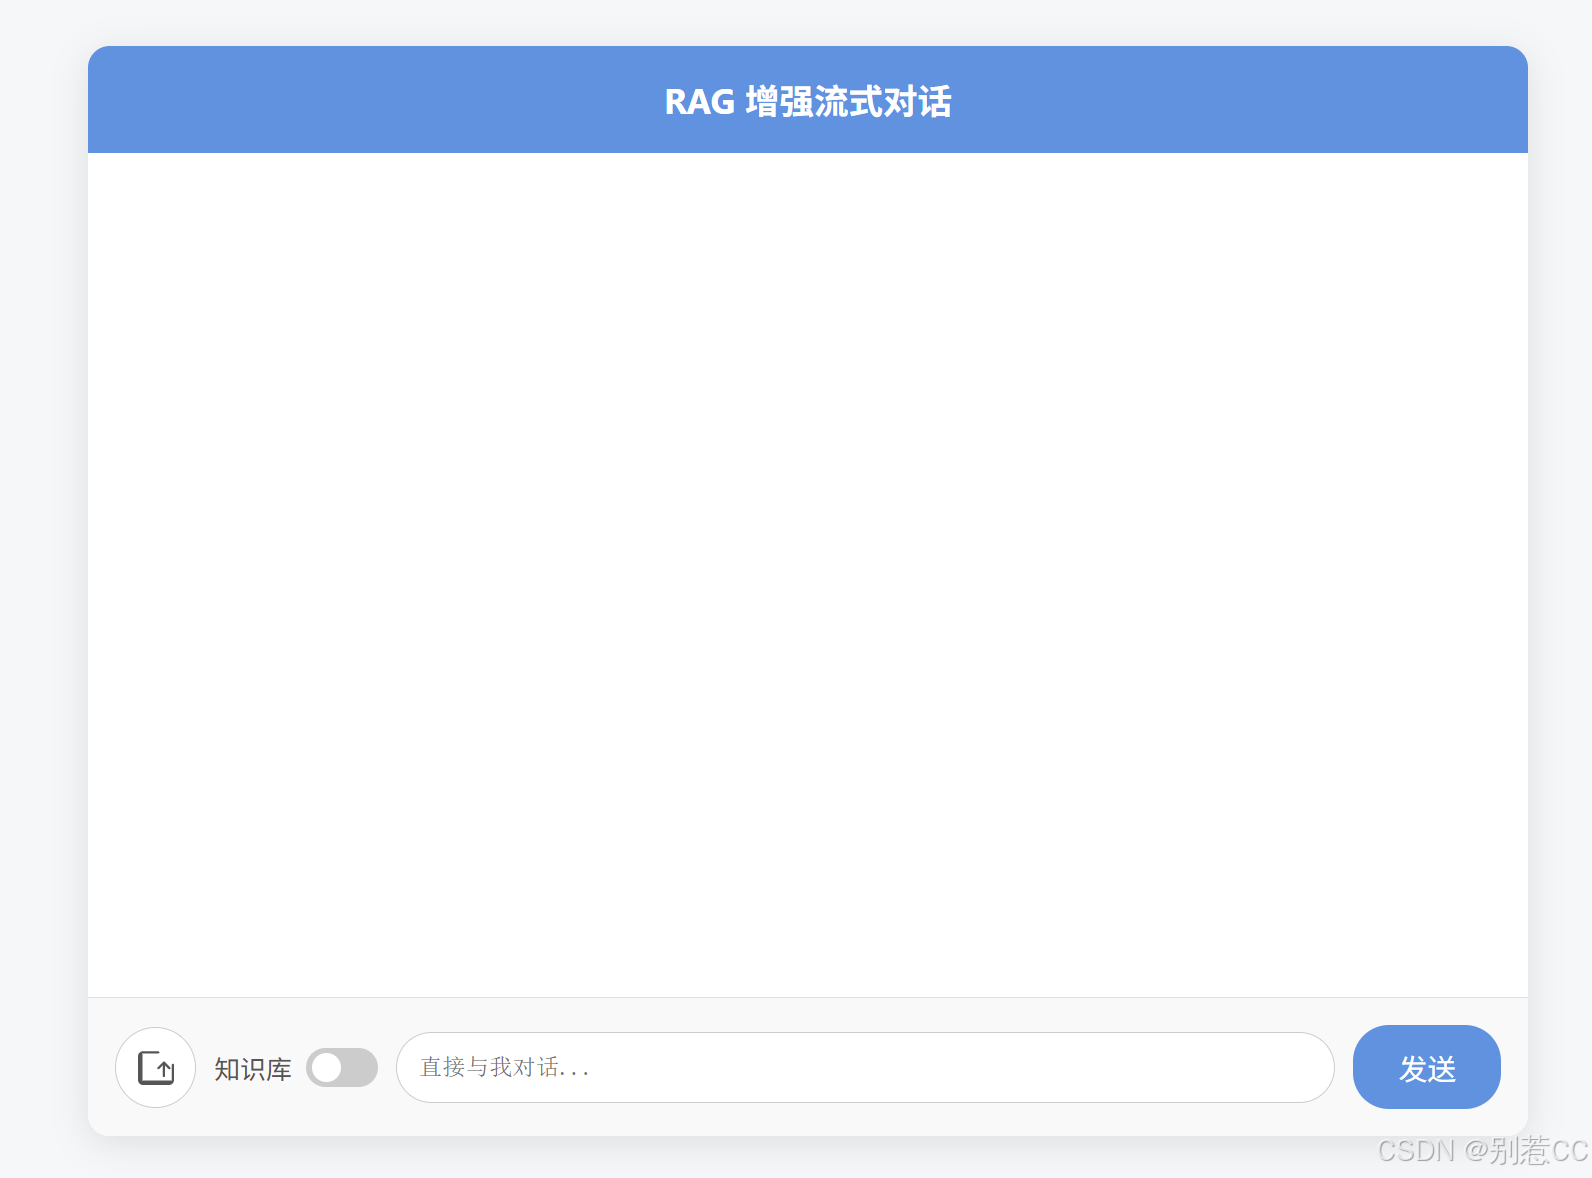
2.后端实现:文档的接收与入库
我们创建一个 RagController 来处理前端的文件上传请求。
java
import com.cc.service.DocumentService;
import com.cc.utils.LeeResult;
import jakarta.annotation.Resource;
import org.springframework.web.bind.annotation.*;
import org.springframework.web.multipart.MultipartFile;


@RestController
@RequestMapping("/rag")
public class RagController {

    @Resource
    private DocumentService documentService;

    @PostMapping("/upload")
    public LeeResult upload(@RequestParam("file") MultipartFile file) {
        documentService.loadText(file.getResource(),file.getOriginalFilename());
        return LeeResult.ok();
    }

}
DocumentServiceImpl 是整个处理流程的核心,它负责将上传的文档进行读取 -> 切分 -> 向量化 -> 存储。
java
import com.cc.service.DocumentService;
import com.cc.utils.CustomTextSplitter;
import lombok.RequiredArgsConstructor;
import org.springframework.ai.document.Document;
import org.springframework.ai.reader.TextReader;
import org.springframework.ai.vectorstore.redis.RedisVectorStore;
import org.springframework.core.io.Resource;
import org.springframework.stereotype.Service;

import java.util.List;

@Service
@RequiredArgsConstructor
public class DocumentServiceImpl implements DocumentService {

    private final RedisVectorStore redisVectorStore;

    @Override
    public void loadText(Resource resource, String fileName) {
        // 加载读取文档
        TextReader textReader = new TextReader(resource);
        textReader.getCustomMetadata().put("fileName", fileName);
        List<Document> documents = textReader.get();
        // 切割文档
        CustomTextSplitter customTextSplitter = new CustomTextSplitter();
        List<Document> list = customTextSplitter.apply(documents);
        // 向量存储
        redisVectorStore.add(list);
    }
为什么需要切割文档?
大模型处理的上下文长度是有限的,我们不能把一篇几万字的文档整个扔给它。正确的做法是把长文档切分成一个个逻辑完整的、有意义的小段落(Chunk)。这样在检索时,我们只需要找到与问题最相关的几个段落即可。
虽然 Spring AI 提供了默认的切割策略,但对于结构化的知识库(如QA对、API文档等),自定义切割规则能极大地提升检索精度。这里我们创建一个 CustomTextSplitter,它会根据连续的空行来切分文档,这对于我们后面提供的产品手册非常有效。
java
import org.springframework.ai.transformer.splitter.TextSplitter;
import java.util.List;

public class CustomTextSplitter extends TextSplitter {
    @Override
    protected List<String> splitText(String text) {
        return List.of(split(text));
    }


    public String[] split(String text) {
         // 这里可以实现你自己的复杂切分逻辑
        // 为简化示例,我们按连续的换行符进行分割
        return text.split("\\s*\\R\\s*\\R\\S*");
    }
}
值得注意的是,我们只需继承
TextSplitter并重写splitText方法,Spring AI 的apply方法在内部就会调用我们的实现,非常方便。
3.准备知识库文档
这里我利用大模型生成了一个产品手册作为我们的知识库文件,内容涵盖产品介绍、安装、功能和FAQ等。
markdown
产品名称:Aura Hub 智能家居中心
产品型号:AH-2500
固件版本:2.5.1
发布日期:2025年3月15日

--- 产品简介 ---
Aura Hub 是下一代智能家居的中枢设备,旨在无缝连接和管理您家中所有的智能设备。它通过先进的本地处理和云端协作,为您提供快速、稳定且安全的智能家居体验。Aura Hub 支持 Wi-Fi 和 Zigbee 3.0 两种主流无线通信协议,确保了与市面上绝大多数智能设备的兼容性。

--- 安装与设置指南 ---

1.  连接电源:将附带的电源适配器连接到 Aura Hub 的电源端口,并插入电源插座。
2.  连接网络:在首次设置时,请使用包装盒内的以太网线将 Aura Hub 连接到您的家庭路由器。这能确保最稳定的初始配置过程。设置完成后,您可以选择继续使用有线连接或切换到Wi-Fi连接。
3.  下载应用:在您的手机上,从应用商店搜索并下载"Aura Connect"应用程序。
4.  添加设备:打开"Aura Connect"应用,注册并登录您的账户。点击"添加设备",应用会自动扫描并发现局域网内的 Aura Hub,请按照屏幕上的指引完成绑定。

--- 核心功能详解 ---

1.  语音控制:Aura Hub 内置了高性能麦克风阵列,其原生唤醒词是"你好,Aura"。同时,它也完全兼容主流的第三方语音平台,如"Echo Assistant"和"Google Home",您可以将它们关联到Aura Hub。
2.  场景自动化:通过"Aura Connect"应用,您可以创建个性化的自动化场景。例如,您可以设置一个"回家模式",当您到家时,自动打开客厅的灯、将空调调节到24摄氏度并播放您喜欢的音乐。
3.  能耗监控:Aura Hub 能够追踪并分析所有已连接的智能插座和部分智能电器的实时及历史功耗。这些能耗数据会在云端为您保存长达90天,帮助您更好地了解家庭用电情况。
4.  远程访问:无论您身在何处,只要手机有网络,就可以通过"Aura Connect"应用实时查看和控制家中的设备状态。

--- 常见问题与故障排查 (FAQ) ---
问:为什么我的 Aura Hub 无法连接到网络?
答:请首先检查以太网线是否牢固插入。然后,尝试重启您的路由器和 Aura Hub。最后,请确保您路由器的DHCP服务已开启,以便为Aura Hub自动分配IP地址。

问:语音助手没有响应,我该怎么办?
答:请检查 Aura Hub 设备顶部的状态指示灯。如果指示灯显示为红色常亮,表示麦克风已被手动静音。请轻触设备顶部的静音按钮解除静音。如果问题依旧,请尝试在距离设备1-3米范围内,用正常的音量清晰地说出唤醒词"你好,Aura"。

问:如何将 Aura Hub 重置为出厂设置?
答:这是一个不可逆操作,会清除所有数据。请使用一根回形针或SIM卡针,长按设备背部的"Reset"小孔10秒钟,直到正面的环形指示灯变为蓝色闪烁状态,然后松开即可。

--- 技术支持 ---
如果您遇到无法解决的问题,请通过以下方式联系我们:

- 官方网站:www.aurahome-tech.com
- 技术支持邮箱:support@aurahome-tech.com
4.网络问题小贴士
由于 spring-ai-starter-model-transformers 依赖需要从 Hugging Face Hub 下载模型文件,国内用户可能会遇到网络问题。

如果下载失败,可以配置一个全局的JVM代理来解决。创建一个 ProxyConfig 配置类即可:
java
import jakarta.annotation.PostConstruct;
import org.springframework.context.annotation.Configuration;


@Configuration
public class ProxyConfig {

    // 这里的端口号换成你自己梯子的
    private final String PROXY_HOST = "127.0.0.1";
    private final int PROXY_PORT = 10080;

    @PostConstruct
    public void setSystemProxy() {
        // 设置系统代理属性,这会影响Spring Boot自动配置的HTTP客户端
        System.setProperty("http.proxyHost", PROXY_HOST);
        System.setProperty("http.proxyPort", String.valueOf(PROXY_PORT));
        System.setProperty("https.proxyHost", PROXY_HOST);
        System.setProperty("https.proxyPort", String.valueOf(PROXY_PORT));

        System.out.println("System proxy configured: http://" + PROXY_HOST + ":" + PROXY_PORT);
    }
}
5.验证入库结果
上传我们准备好的《Aura Hub 产品手册》后,可以在 Redis 客户端中看到,文档已经被成功切分并存储为带有向量数据的条目。
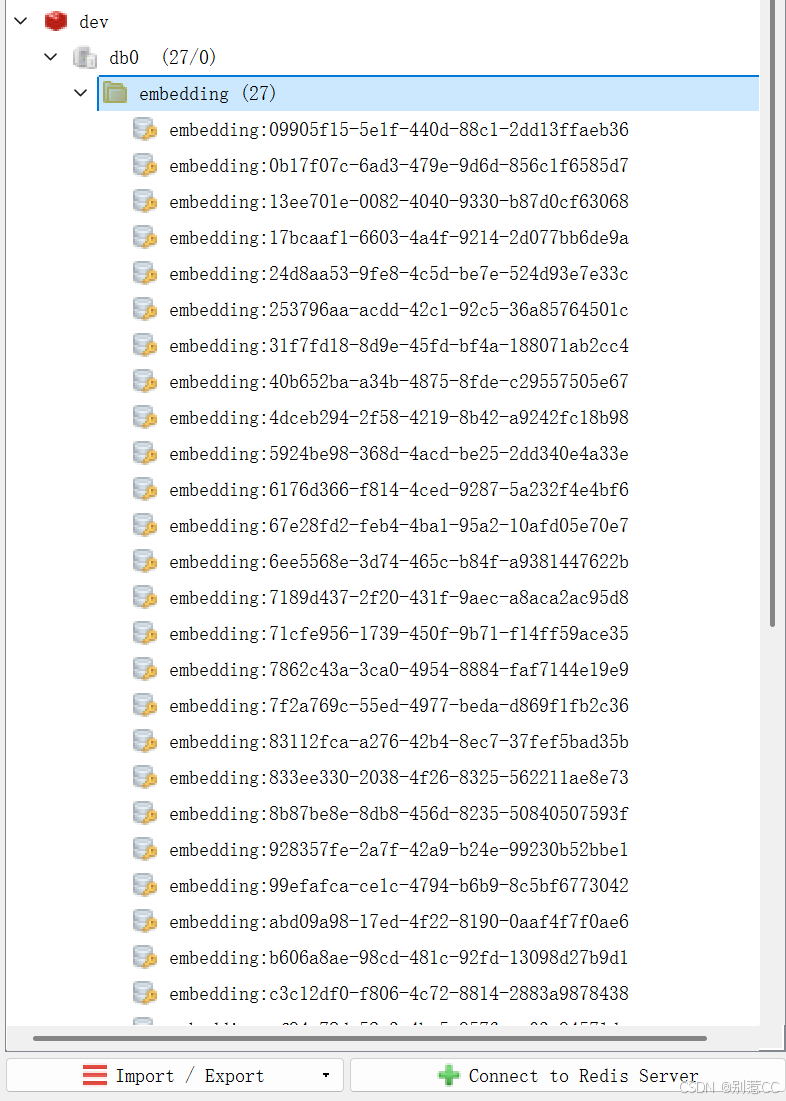
至此,我们的知识库已经成功"喂"给了AI的大脑!
实现RAG增强对话
知识入库后,最关键的一步就是如何在对话中"用"上它。
1. 统一聊天接口
为了代码的优雅,我们不再使用两个独立的接口来处理两种对话模式,而是设计一个统一的聊天接口。通过在请求体中增加一个 useKnowledgeBase 布尔值来动态切换。
java
import lombok.Data;

@Data
public class ChatEntity {

    private String currentUserName;

    private String message;

    private String botMsgId;

    // 用于前端传递是否使用知识库
    private boolean useKnowledgeBase;

}
统一的 ChatController.java
java
import com.cc.bean.ChatEntity;
import com.cc.service.ChatService;

import jakarta.annotation.Resource;
import org.springframework.web.bind.annotation.*;

@RestController
@RequestMapping("/chat")
public class ChatController {

    @Resource
    private ChatService chatService;

    /**
     * 统一的聊天接口
     * @param chatEntity 包含消息和是否使用知识库的标志
     */
    @PostMapping("/send")
    public void chat(@RequestBody ChatEntity chatEntity) {
        // 直接将包含所有信息的实体传递给服务层
        chatService.streamChat(chatEntity);
    }

}
2.改造核心聊天服务
在ChatServiceImpl 中的方法会根据 useKnowledgeBase 的值,决定是直接调用AI,还是先去向量数据库检索再调用AI。
java
import com.cc.bean.ChatEntity;
import com.cc.enums.SSEMsgType;
import com.cc.service.ChatService;
import com.cc.service.DocumentService;
import com.cc.utils.SSEServer;
import jakarta.annotation.Resource;
import lombok.extern.slf4j.Slf4j;
import org.springframework.ai.chat.client.ChatClient;
import org.springframework.ai.chat.prompt.Prompt;
import org.springframework.ai.document.Document;
import org.springframework.stereotype.Service;
import reactor.core.publisher.Flux;

import java.util.List;
import java.util.stream.Collectors;

@Service
@Slf4j
public class ChatServiceImpl implements ChatService {

    private final ChatClient chatClient;

    @Resource
    private DocumentService documentService;

    private static final String RAG_PROMPT_TEMPLATE = """
            请根据下面提供的上下文知识库内容来回答用户的问题。
            规则:
            1. 回答时,要充分利用上下文信息,但不要在回答中直接提及"根据上下文"或"根据知识库"等词语。
            2. 如果上下文中没有足够的信息来回答问题,请明确告知:"根据现有的知识,我无法回答这个问题。"
            3. 你的回答应该是直接、清晰且相关的。

            【上下文】
            {context}

            【问题】
            {question}
            """;

    public ChatServiceImpl(ChatClient.Builder chatClientBuilder) {
        this.chatClient = chatClientBuilder.build();
    }


    @Override
    public void streamChat(ChatEntity chatEntity) {

        String userId = chatEntity.getCurrentUserName();
        String question = chatEntity.getMessage();

        // 根据前端传递的标志决定是否启用RAG
        Prompt prompt;
        if (chatEntity.isUseKnowledgeBase()) {
            log.info("【用户: {}】正在使用知识库模式进行提问。", userId);
            // 1. 从向量数据库中搜索相关文档
            List<Document> relatedDocs = documentService.doSearch(question);

            // 2. 构建上下文
            String context = "没有找到相关的知识库信息。"; // 默认值
            if (relatedDocs != null && !relatedDocs.isEmpty()) {
                context = relatedDocs.stream()
                        .map(Document::getText)
                        .collect(Collectors.joining("\n---\n"));
            }

            // 3. 创建RAG提示词
            String promptContent = RAG_PROMPT_TEMPLATE
                    .replace("{context}", context)
                    .replace("{question}", question);
            prompt = new Prompt(promptContent);

        } else {
            log.info("【用户: {}】正在使用普通模式进行提问。", userId);
            // 普通模式,直接使用用户的问题作为提示词
            prompt = new Prompt(question);
        }

        // 统一的流式处理逻辑
        Flux<String> stream = chatClient.prompt(prompt).stream().content();

        // 订阅并处理流
        stream
                .doOnError(throwable -> {
                    log.error("【用户: {}】的AI流处理发生错误: {}", userId, throwable.getMessage(), throwable);
                    SSEServer.sendMsg(userId, "抱歉,服务出现了一点问题,请稍后再试。", SSEMsgType.FINISH);
                    SSEServer.close(userId);
                })
                .subscribe(
                        // onNext: 每当收到新的数据块时,通过SSE发送给前端
                        content -> SSEServer.sendMsg(userId, content, SSEMsgType.ADD),

                        // onError: 最终的错误处理(虽然doOnError已经处理,但这是规范写法)
                        error -> log.error("【用户: {}】的流订阅最终失败: {}", userId, error.getMessage()),

                        // onComplete: 当流正常结束时,发送结束信号
                        () -> {
                            log.info("【用户: {}】的流已成功结束。", userId);
                            SSEServer.sendMsg(userId, "done", SSEMsgType.FINISH);
                            SSEServer.close(userId);
                        }
                );
    }


}
注意 :读者们可以观察下
RAG_PROMPT_TEMPLATE中的规则,我们需要明确地指导模型:如何使用上下文、找不到答案时该如何回应。这种精细的指令是保证RAG效果的关键。
测试
完成了编码后,让我们进行测试,看看AI开启"知识库"前后有什么不同。
1.测试一:关闭知识库开关
我们问一个关于产品的问题:"Aura Hub 是什么?"
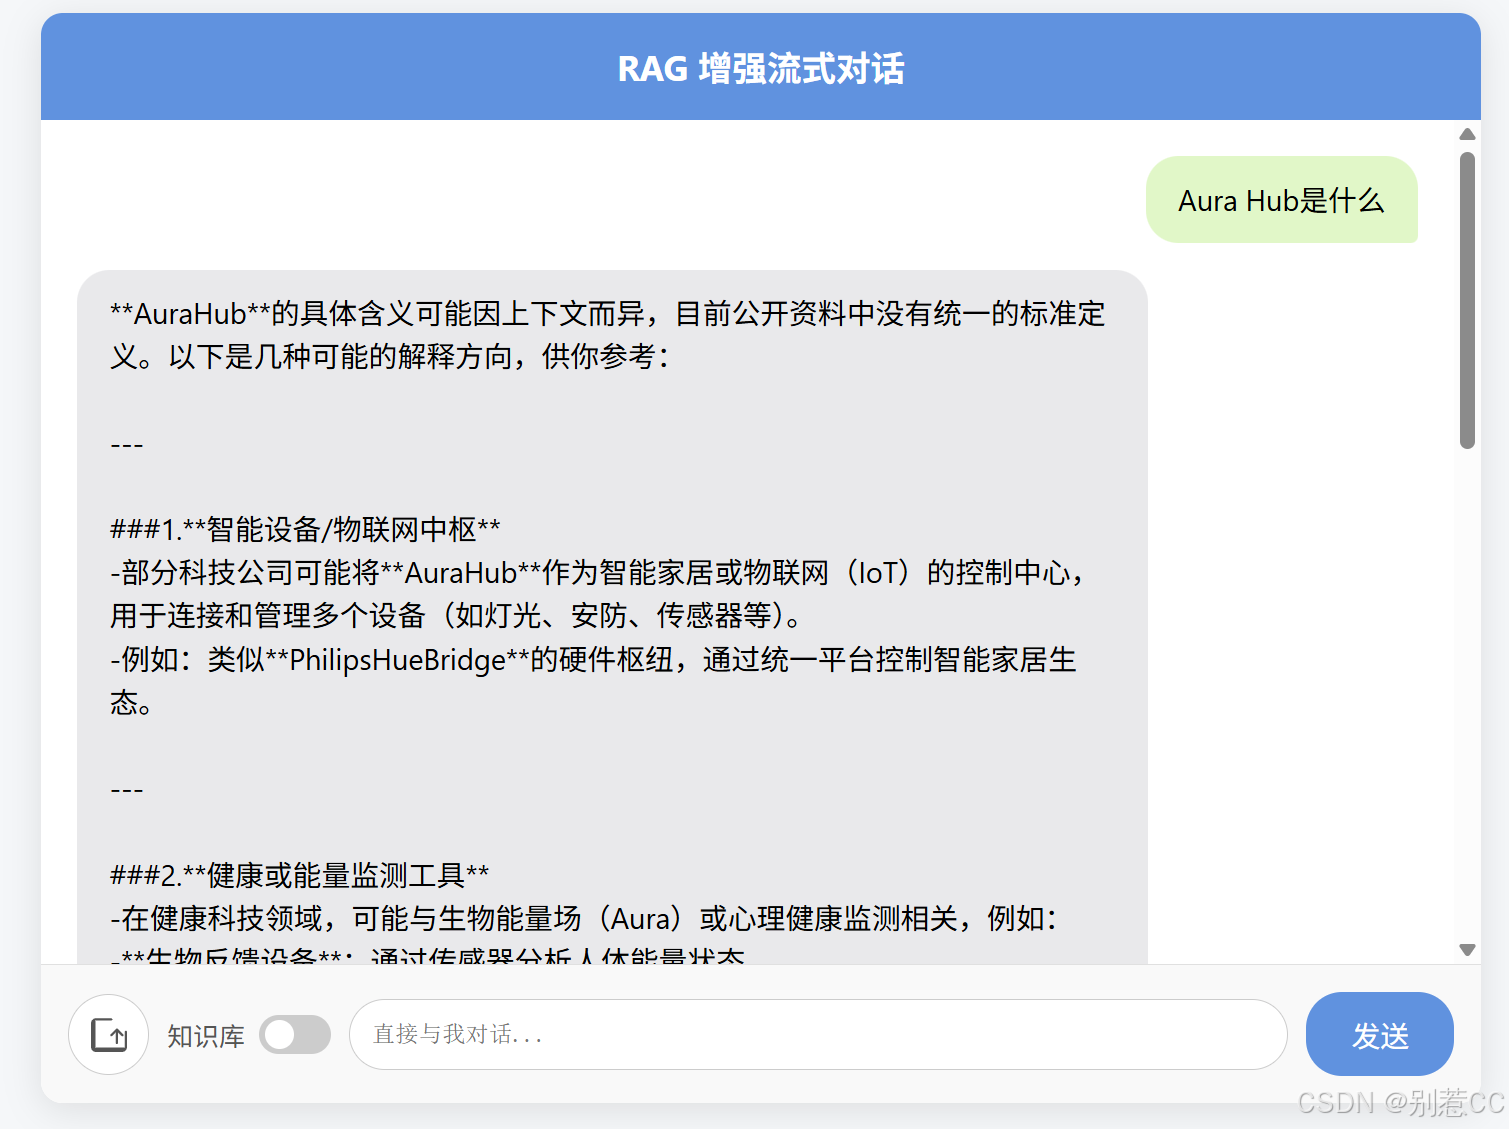
可以看到,大模型完全不知道这个虚构的Aura Hub是什么。
2.测试二:开启知识库开关
现在,我们打开"知识库"开关,再问一遍同样的问题。
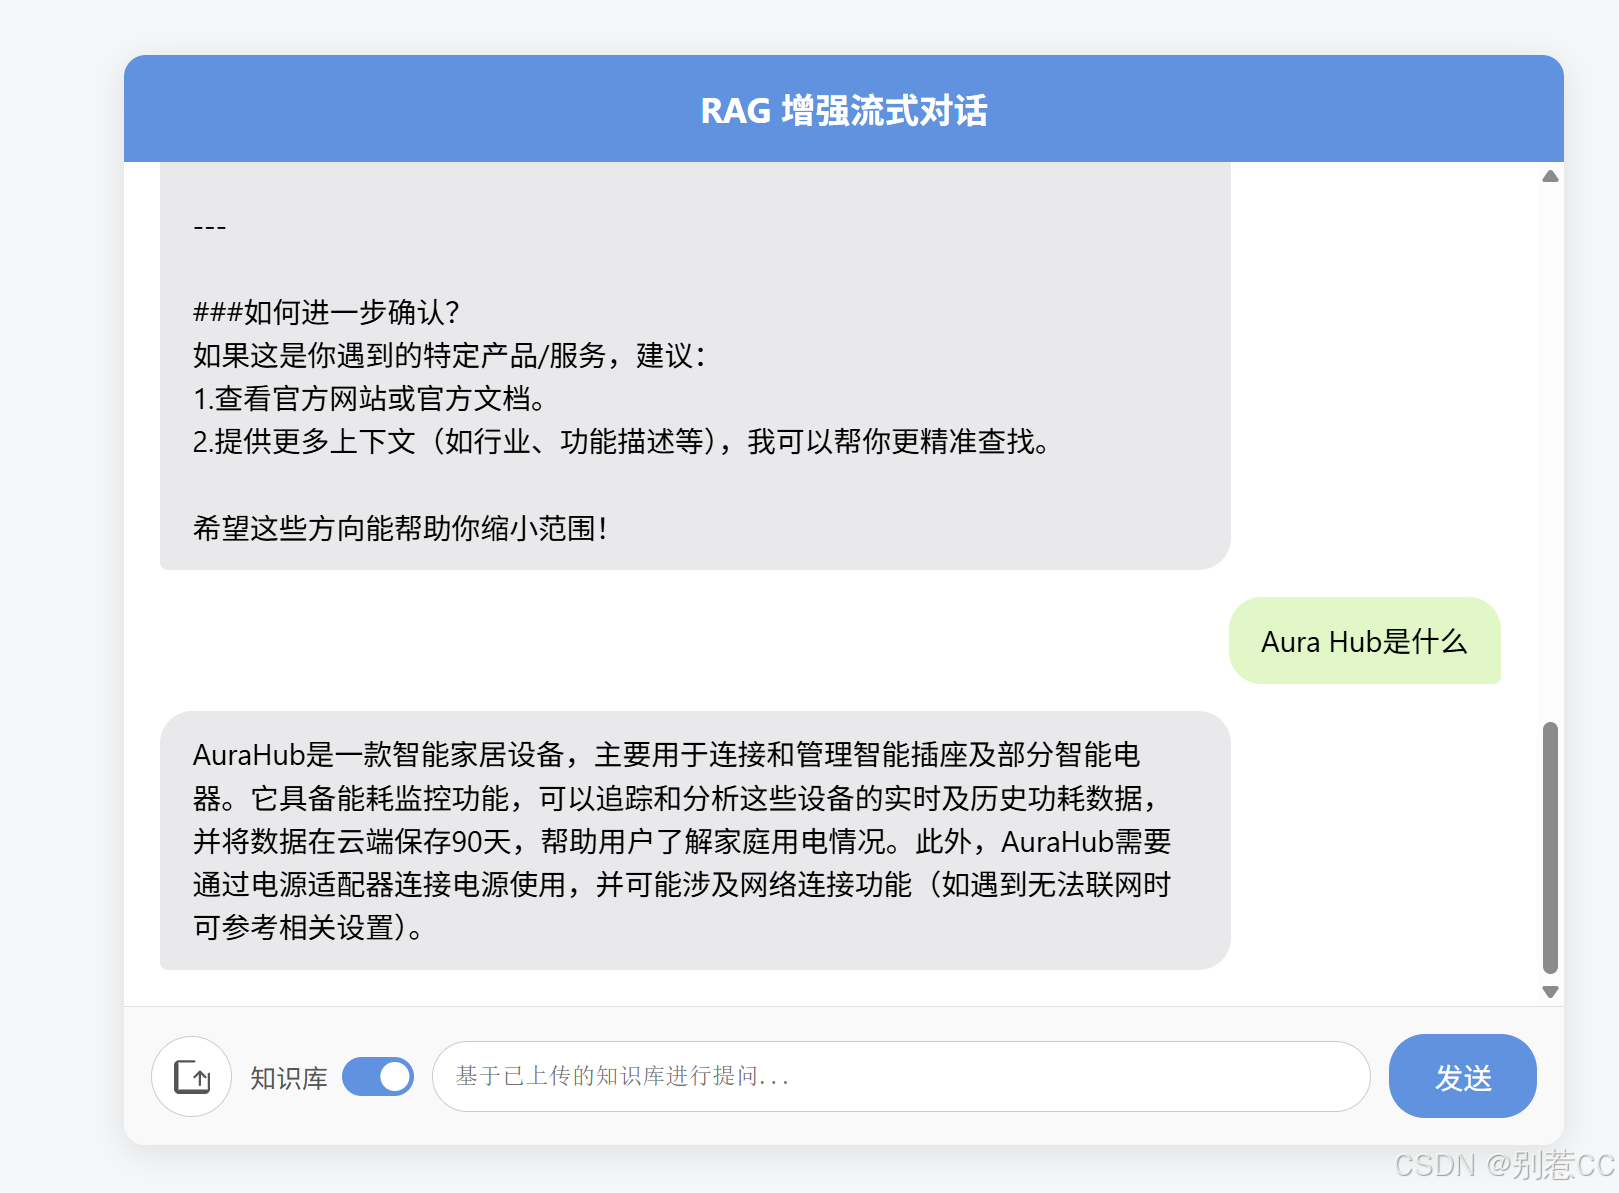
成功了! AI精准地从我们上传的文档中找到了答案,并以自然语言的形式呈现出来。
小结
在本篇文章中,我们完成了一次激动人心的进阶之旅。通过整合 Redis 向量数据库和 Spring AI,我们成功地为 AI 应用构建了一个外部知识库,实现了完整的 RAG 流程。这不仅是一个技术演示,更为我们打开了通往构建企业级智能客服、智能文档问答、个人知识助手等无限可能的大门。
然而,知识库的内容终究依赖人工维护,难以保证实时更新。当用户询问最新的行业报告或实时资讯时,AI 仍然力不从心。那么,有没有办法让 AI 实时联网搜索,获取网络上的最新信息呢?答案是肯定的,这正是我们下一篇文章要探索的内容------通过集成 SearXNG 实现联网搜索功能。
如果你对本文有任何疑问或建议,欢迎在评论区交流。下篇见!