缘由
看过上篇文章《OpenCvSharp基于颜色反差规避FBA面单贴标(2)》的都应该有印象这么一行代码:
// 面单颜色列表(十六进制格式)
privatestaticreadonly List<string> LabelColors = new List<string>
{
 "#7C7C7C", "#707070", "#5E5E5E", "#8F8F8D", "#5F5F5F", "#CBCBC9","#FFFFFF","#FEFEFE","#FCFCFC" ,"#7B7B7B","#828282","#7D7D7D","#787878","#D7D7D5","#777777","#7F7F7F"
};
每次有不同颜色或者无法定位的面单,都需要人工补录面单的背景色HEX,那么能不能集成一个工具,自动吸取图片色号保存后,这里能立即生效呢?答案是肯定的!先看看动态效果图:

-
点击取色,跟随鼠标实时显示背景色便于定位
-
快捷键Alt+C,抓取当前鼠标所在背景色存储到列表并存储到根目录colorHistory.json文件,便于其他地方读取
-
列表支持右键删除错误颜色(如下图)
-
其他地方读取抓取的颜色列表
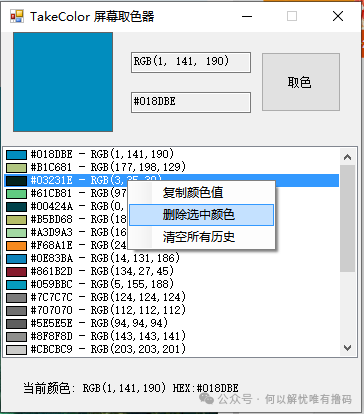
保存的json文件格式如下:
[
  "#018DBE",
"#B1C681",
"#03231E",
"#61CB81",
"#00424A",
"#B5BD68",
"#A3D9A3",
"#F68A1E",
"#0E83BA",
"#861B2D",
"#059BBC"
]
每次抓取都会往json存储当前最新色号,然后其他地方实时读取json即可:
//// 面单颜色列表(十六进制格式)
  //private static readonly List<string> LabelColors = new List<string>
//{
//    "#7C7C7C", "#707070", "#5E5E5E", "#8F8F8D", "#5F5F5F", "#CBCBC9","#FFFFFF","#FEFEFE","#FCFCFC" ,"#7B7B7B","#828282","#7D7D7D","#787878","#D7D7D5","#777777","#7F7F7F"
//};
static List<string> LabelColors = new List<string>();
privatestatic List<string> LoadColorList()
  {
      try
      {
          string historyFilePath = System.Windows.Forms.Application.StartupPath + @"\colorHistory.json";
          if (File.Exists(historyFilePath))
          {
              string json = File.ReadAllText(historyFilePath);
              var hexList = JsonSerializer.Deserialize<List<string>>(json);

              foreach (var hex in hexList)
              {
                  if (!string.IsNullOrEmpty(hex))
                  {
                      LabelColors.Add(hex);
                  }
              }
              return LabelColors;
          }
      }
      catch (Exception ex)
      {
          MessageBox.Show($"加载历史记录失败: {ex.Message}", "错误",
              MessageBoxButtons.OK, MessageBoxIcon.Error);
      }
      returnnull;
} 
private List<Color> colorHistory = new List<Color>();
  private MagnifierForm magnifierForm;
  privatestring historyFilePath = "colorHistory.json";
  private ContextMenuStrip historyContextMenu;
// 初始化右键菜单
   privatevoidInitializeContextMenu()
   {
       historyContextMenu = new ContextMenuStrip();

       ToolStripMenuItem deleteItem = new ToolStripMenuItem("删除选中颜色");
       deleteItem.Click += DeleteItem_Click;

       ToolStripMenuItem clearAllItem = new ToolStripMenuItem("清空所有历史");
       clearAllItem.Click += ClearAllItem_Click;

       ToolStripMenuItem copyItem = new ToolStripMenuItem("复制颜色值");
       copyItem.Click += CopyItem_Click;

       historyContextMenu.Items.AddRange(new ToolStripItem[] {
       copyItem, deleteItem, clearAllItem
          });

       lstHistory.ContextMenuStrip = historyContextMenu;
       LoadColorHistory();
       // 设置ListBox为自绘模式
       lstHistory.DrawMode = DrawMode.OwnerDrawFixed;
       lstHistory.DrawItem += LstHistory_DrawItem;
   }
ListBox实时显示当前吸取的背景色,重绘代码如下:
// 绘制ListBox项
privatevoidLstHistory_DrawItem(object sender, DrawItemEventArgs e)
 {
     if (e.Index < 0 || e.Index >= colorHistory.Count) return;

     e.DrawBackground();

     Color color = colorHistory[e.Index];
     string text = $"{ColorToHex(color)} - RGB({color.R},{color.G},{color.B})";

     // 绘制颜色块
     Rectangle colorRect = new Rectangle(e.Bounds.Left + 2, e.Bounds.Top + 2, 20, e.Bounds.Height - 4);
     using (SolidBrush brush = new SolidBrush(color))
     {
         e.Graphics.FillRectangle(brush, colorRect);
     }
     e.Graphics.DrawRectangle(Pens.Black, colorRect);

     // 绘制文本
     Rectangle textRect = new Rectangle(e.Bounds.Left + 25, e.Bounds.Top, e.Bounds.Width - 25, e.Bounds.Height);
     using (SolidBrush textBrush = new SolidBrush(e.ForeColor))
     {
         e.Graphics.DrawString(text, e.Font, textBrush, textRect);
     }

     e.DrawFocusRectangle();
 }
RGB和HEX 相互转换
// HEX字符串转Color
  private Color HexToColor(string hex)
  {
      try
      {
          // 移除#号
          hex = hex.Replace("#", "");

          // 处理3位HEX
          if (hex.Length == 3)
          {
              hex = $"{hex[0]}{hex[0]}{hex[1]}{hex[1]}{hex[2]}{hex[2]}";
          }

          // 处理6位HEX
          if (hex.Length == 6)
          {
              byte r = Convert.ToByte(hex.Substring(0, 2), 16);
              byte g = Convert.ToByte(hex.Substring(2, 2), 16);
              byte b = Convert.ToByte(hex.Substring(4, 2), 16);
              return Color.FromArgb(r, g, b);
          }

          return Color.Empty;
      }
      catch
      {
          return Color.Empty;
      }
  }

// 颜色转HEX
privatestringColorToHex(Color color)
  {
      return$"#{color.R:X2}{color.G:X2}{color.B:X2}";
  }
结束语
感谢各位耐心查阅! 如果您有更好的想法欢迎一起交流,有不懂的也可以微信公众号联系博主,作者公众号会经常发一些实用的小工具和demo源码,需要的可以去看看!另外,如果觉得本篇博文对您或者身边朋友有帮助的,麻烦点个关注!赠人玫瑰,手留余香,您的支持就是我写作最大的动力,感谢您的关注,期待和您一起探讨!再会!(公众号回复"takecolor"获取完整代码)