
目录
[精美时钟 - Winform](#精美时钟 - Winform)
[精美时钟 - WPF](#精美时钟 - WPF)
[精美时钟 - Electron](#精美时钟 - Electron)
[精美时钟 - WinUI3](#精美时钟 - WinUI3)
前言
当我们看见一只漂亮的蝴蝶,或者是看见一个精美的时钟时,很难把它与一个"窗口"关联,脑海里默认会把古板的、方方正正的窗口作为程序的一种刻板印象,但实际上它们可以是任意形状,任意透明度的,可以很精美,很具有观赏性。本文对 Winform、WPF、 WinUI3 和 Electron 4 种不同的方式来实现 异形透明窗口,看看它们的实现区别以及效果区别。
开发环境
Visual Studio 2026, .Net 10.0,Claude Sonnet 4.5
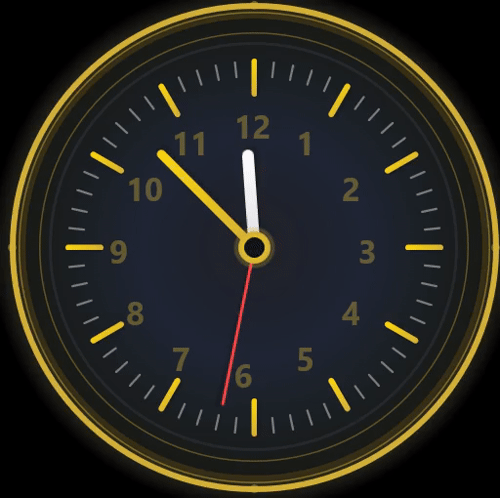
精美时钟 - Winform
Winform 一般非常适合做工具类软件,上手极快,错误率极低,速写,速成,很少来用它做一些好看的页面效果,它在实现透明窗口的时候,用 "分层窗口" 技术来进行实现: WS_EX_LAYERED + UpdateLayeredWindow。
关键步骤 1 - 启用分层窗口样式:
cs
Size = new Size(700, 680);
FormBorderStyle = FormBorderStyle.None;
StartPosition = FormStartPosition.CenterScreen;

int exStyle = GetWindowLong(Handle, GWL_EXSTYLE);
SetWindowLong(Handle, GWL_EXSTYLE, exStyle | WS_EX_LAYERED);
关键步骤 2 - 绘制位图并更新到分层窗口:
cs
private void UpdateContent()
{
    using (var bitmap = new Bitmap(Width, Height, System.Drawing.Imaging.PixelFormat.Format32bppArgb))
    using (var g = Graphics.FromImage(bitmap))
    {
        g.SmoothingMode = System.Drawing.Drawing2D.SmoothingMode.HighQuality;
        g.TextRenderingHint = System.Drawing.Text.TextRenderingHint.AntiAliasGridFit;
        g.Clear(Color.Transparent);

        // 绘制背景
        using (var path = GetRoundedRect(new Rectangle(0, 0, Width, Height), 20))
        using (var brush = new System.Drawing.Drawing2D.LinearGradientBrush(
            new Rectangle(0, 0, Width, Height),
            Color.FromArgb(240, 20, 30, 50), Color.FromArgb(240, 40, 60, 90), 45f))
            g.FillPath(brush, path);

        // 标题
        using (var font = new Font("微软雅黑", 20, FontStyle.Bold))
        using (var brush = new SolidBrush(Color.White))
            g.DrawString("UpdateLayeredWindow 高级功能演示", font, brush, new PointF(Width / 2 - 250, 30));

        // 绘制按钮
        foreach (var btn in buttons)
        {
            using (var path = GetRoundedRect(btn.Bounds, 10))
            using (var brush = new System.Drawing.Drawing2D.LinearGradientBrush(btn.Bounds,
                Color.FromArgb(200, 70, 130, 180), Color.FromArgb(200, 30, 90, 150), 90f))
                g.FillPath(brush, path);

            using (var pen = new Pen(Color.FromArgb(180, 255, 255, 255), 2))
            using (var path = GetRoundedRect(btn.Bounds, 10))
                g.DrawPath(pen, path);

            using (var font = new Font("微软雅黑", 11, FontStyle.Bold))
            using (var brush = new SolidBrush(Color.White))
                g.DrawString(btn.Text, font, brush, btn.Bounds,
                    new StringFormat { Alignment = StringAlignment.Center, LineAlignment = StringAlignment.Center });
        }

        UpdateLayeredWindowBitmap(bitmap);
    }
}
关键步骤 3 - 平滑角度插值算法:
cs
private void Timer_Tick(object sender, EventArgs e)
{
var now = DateTime.Now;
targetSecondAngle = (now.Second + now.Millisecond / 1000f) * 6f - 90f;
targetMinuteAngle = (now.Minute + now.Second / 60f) * 6f - 90f;
targetHourAngle = (now.Hour % 12 + now.Minute / 60f) * 30f - 90f;
// 平滑插值
secondAngle = LerpAngle(secondAngle, targetSecondAngle, 0.3f);
minuteAngle = LerpAngle(minuteAngle, targetMinuteAngle, 0.1f);
hourAngle = LerpAngle(hourAngle, targetHourAngle, 0.1f);
UpdateContent();
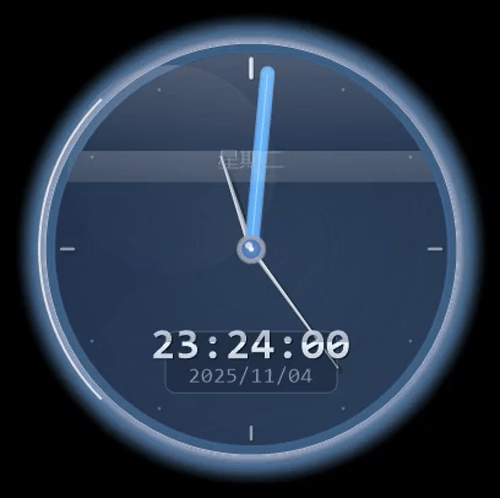
}运行时: CPU:2%~3%,内存 :55M 左右
这精美的外观,很难让我把它与Winform进行关联,能看到这样透明灵动、具有光感的时钟,真的很惊艳,但是他的cpu占用过高,性能比较差,对于更深入的开发会造成很大压力,不适合常态化使用。
精美时钟 - WPF
用 WPF 来实现一个精美的时钟,简直是极其简单、又快速,可以任意自由地发挥,它的实现技术原理是:通过设置 WindowStyle="None"、AllowsTransparency="True" 和Background="Transparent" 三个关键属性实现透明窗口。
关键步骤 1 - 窗口透明配置:
cs
WindowStyle="None" AllowsTransparency="True" Background="Transparent"
ResizeMode="NoResize"
关键步骤 2 - 指针旋转动画:
cs
private void UpdateTime()
{
    var now = DateTime.Now;

    // 计算指针角度
    double seconds = now.Second + now.Millisecond / 1000.0;
    double minutes = now.Minute + seconds / 60.0;
    double hours = (now.Hour % 12) + minutes / 60.0;

    SecondRotate.Angle = seconds * 6; // 每秒6度
    MinuteRotate.Angle = minutes * 6; // 每分钟6度
    HourRotate.Angle = hours * 30; // 每小时30度

    // 更新日期
    DateText.Text = now.ToString("yyyy年MM月dd日");
    WeekText.Text = GetChineseWeekDay(now.DayOfWeek);
}
关键步骤 3 - 刻度动态生成:
cs
private void CreateClockMarks()
{
double centerX = 220;
double centerY = 220;
// 创建阿拉伯数字刻度
string[] numbers = { "12", "1", "2", "3", "4", "5", "6", "7", "8", "9", "10", "11" };
for (int i = 0; i < 12; i++)
{
double angle = i * 30; // 每30度一个数字
double radians = angle * Math.PI / 180;
double distance = 130; // 数字到中心的距离
double x = centerX + distance * Math.Sin(radians);
double y = centerY - distance * Math.Cos(radians);
var textBlock = new TextBlock
{
Text = numbers[i],
FontSize = 28,
FontWeight = FontWeights.Normal,
Foreground = new SolidColorBrush(Color.FromRgb(230, 216, 138)), // 金色
RenderTransform = new TranslateTransform(-15, -15) // 居中调整
};
Canvas.SetLeft(textBlock, x);
Canvas.SetTop(textBlock, y);
NumberMarks.Children.Add(textBlock);
}
// 创建60个分钟刻度
for (int i = 0; i < 60; i++)
{
if (i % 5 == 0) continue; // 跳过数字位置
double angle = i * 6; // 每6度一个刻度
double radians = angle * Math.PI / 180;
double x1 = centerX + 155 * Math.Sin(radians);
double y1 = centerY - 155 * Math.Cos(radians);
double x2 = centerX + 165 * Math.Sin(radians);
double y2 = centerY - 165 * Math.Cos(radians);
var line = new Line
{
X1 = x1,
Y1 = y1,
X2 = x2,
Y2 = y2,
Stroke = new SolidColorBrush(Color.FromArgb(100, 230, 216, 138)), // 半透明金色
StrokeThickness = 1.5
};
MinuteMarks.Children.Add(line);
}
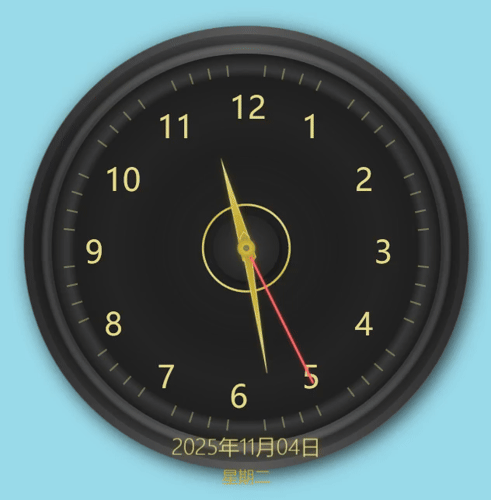
}运行时: CPU:0%~1%,内存 :105M 左右
它的效果好像看不出来什么缺点,漂亮的3D阴影,轻松打造立体感,边缘抗锯齿,矢量图形构造的时钟零部件既简单又精美,代码量也非常少。cpu占用较低,内存也整体比较均衡。它在功能的丰富性、扩展性上完全靠谱,一个字:稳。
精美时钟 - Electron
接下来是用 Electron 内部嵌入的web网页,这种方式我一开始甚至都不敢想,我一直以为web页面只能在浏览器里面来显示,从来没有想过用这种方式来做一个独立的窗口,而且竟然是异形的透明的,而且搭配上 web 丰富的样式,它的效果真的是很惊艳、绚丽,实现原理是:Electron 的透明窗口能力 + CSS 圆形裁剪技术 + backdrop-filter 背景模糊+ -webkit-app-region 窗口拖拽 。
关键步骤 1 - 透明窗口创建:
javascript
function createWindow() {
  mainWindow = new BrowserWindow({
    width: 500,
    height: 500,
    transparent: true,
    frame: false,
    backgroundColor: '#00000000',
    hasShadow: false,
    resizable: false,
    webPreferences: {
      nodeIntegration: true,
      contextIsolation: false
    }
  })

  mainWindow.loadFile('clock.html')
}
关键步骤 2 - CSS 圆形裁剪与毛玻璃效果:
html
.clock-container {
            /* 圆形时钟容器 */
            width: 400px;
            height: 400px;
            border-radius: 50%;

            /* 渐变背景 */
            background: linear-gradient(135deg,
                rgba(255, 255, 255, 0.95) 0%,
                rgba(240, 240, 255, 0.9) 100%);

            /* 毛玻璃效果 */
            backdrop-filter: blur(30px);
            -webkit-backdrop-filter: blur(30px);

            /* 精美的边框 */
            border: 3px solid rgba(255, 255, 255, 0.8);

            /* 多层阴影增加立体感 */
            box-shadow:
                0 8px 32px rgba(0, 0, 0, 0.1),
                0 2px 8px rgba(0, 0, 0, 0.05),
                inset 0 0 60px rgba(255, 255, 255, 0.5);

            /* 布局 */
            display: flex;
            flex-direction: column;
            justify-content: center;
            align-items: center;
            position: relative;

            /* 可拖拽 */
            -webkit-app-region: drag;

            /* 动画 */
            animation: fadeIn 0.8s ease-out;
        }
关键步骤 3 - 时间更新与刻度生成:
javascript
function createTicks() {
const tickMarks = document.getElementById('tickMarks');
for (let i = 0; i < 60; i++) {
const tick = document.createElement('div');
tick.className = i % 5 === 0 ? 'tick major' : 'tick';
tick.style.transform = `rotate(${i * 6}deg)`;
tickMarks.appendChild(tick);
}
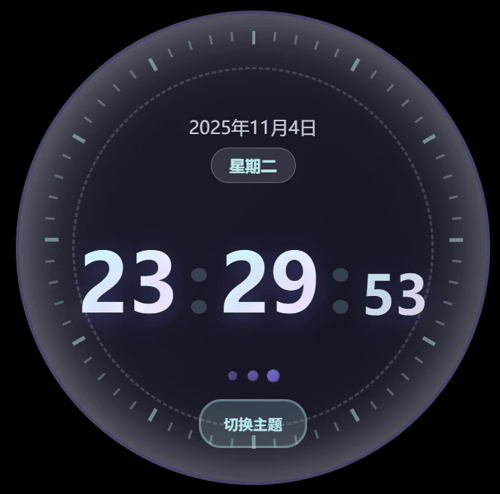
}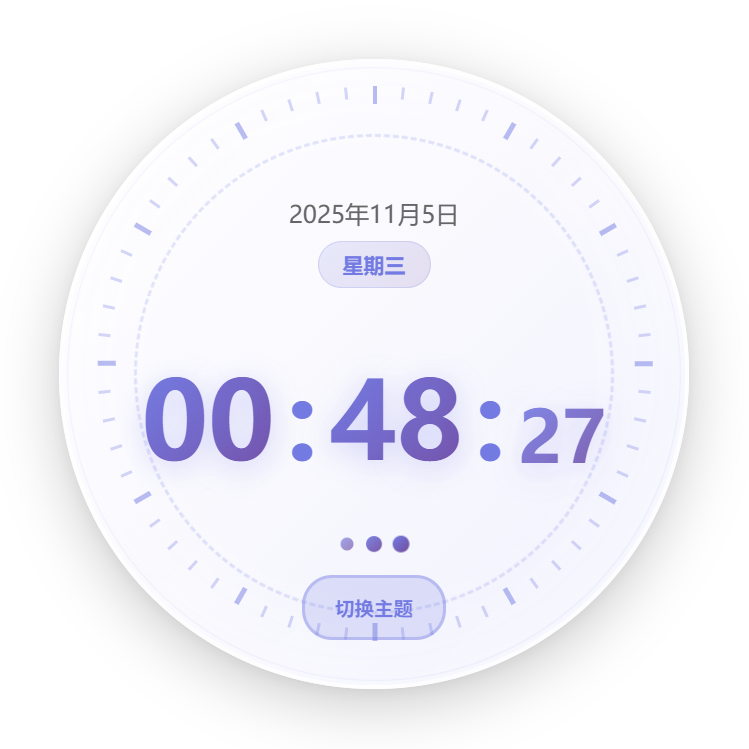 运行时: CPU:0%~0.5%,内存 :150M 左右
它的3D阴影处理的非常棒,跟WPF不相上下,但是内存占用偏高,与Winform的50M相比,资源占用偏高;页面风格有很明显的web感,扁平化,空灵的感觉;它内置的丰富动画系统,表现非常流畅,很对得起内存占用率。
精美时钟 - WinUI3
最后一种是用 WinUI3 来实现,用这个技术来做一个透明的窗口,对于我来说真的非常的复杂,又是费了九牛二虎之力,到处搜罗资料,实现它的原理是:分层窗口 SetLayeredWindowAttributes API + SwapChainPanel :
关键步骤 1 - 分层窗口透明设置:
cs
long nExStyle = GetWindowLong(hWndMain, GWL_EXSTYLE);
if ((nExStyle & WS_EX_LAYERED) == 0)
{
    SetWindowLong(hWndMain, GWL_EXSTYLE, (IntPtr)(nExStyle | WS_EX_LAYERED));
    bool bReturn = SetLayeredWindowAttributes(hWndMain, nColorBackground, 255, LWA_COLORKEY );
}
关键步骤 2 - SwapChain 创建与绑定:
cs
HRESULT CreateSwapChain(IntPtr hWnd)
{
    HRESULT hr = HRESULT.S_OK;
    DXGI_SWAP_CHAIN_DESC1 swapChainDesc = new DXGI_SWAP_CHAIN_DESC1();
    swapChainDesc.Width = 550;
    swapChainDesc.Height = 550;
    swapChainDesc.Format = DXGI_FORMAT.DXGI_FORMAT_B8G8R8A8_UNORM; // this is the most common swapchain format
    swapChainDesc.Stereo = false;
    swapChainDesc.SampleDesc.Count = 1;                // don't use multi-sampling
    swapChainDesc.SampleDesc.Quality = 0;
    swapChainDesc.BufferUsage = D2DTools.DXGI_USAGE_RENDER_TARGET_OUTPUT;
    swapChainDesc.BufferCount = 2;                     // use double buffering to enable flip
    swapChainDesc.Scaling = (hWnd != IntPtr.Zero) ? DXGI_SCALING.DXGI_SCALING_NONE : DXGI_SCALING.DXGI_SCALING_STRETCH;
    swapChainDesc.SwapEffect = DXGI_SWAP_EFFECT.DXGI_SWAP_EFFECT_FLIP_SEQUENTIAL; // all apps must use this SwapEffect
    swapChainDesc.Flags = 0;

    IDXGIAdapter pDXGIAdapter;
    hr = m_pDXGIDevice.GetAdapter(out pDXGIAdapter);
    if (hr == HRESULT.S_OK)
    {
        IntPtr pDXGIFactory2Ptr;
        hr = pDXGIAdapter.GetParent(typeof(IDXGIFactory2).GUID, out pDXGIFactory2Ptr);
        if (hr == HRESULT.S_OK)
        {
            IDXGIFactory2 pDXGIFactory2 = Marshal.GetObjectForIUnknown(pDXGIFactory2Ptr) as IDXGIFactory2;
            if (hWnd != IntPtr.Zero)
                hr = pDXGIFactory2.CreateSwapChainForHwnd(m_pD3D11DevicePtr, hWnd, ref swapChainDesc, IntPtr.Zero, null, out m_pDXGISwapChain1);
            else
                hr = pDXGIFactory2.CreateSwapChainForComposition(m_pD3D11DevicePtr, ref swapChainDesc, null, out m_pDXGISwapChain1);

            hr = m_pDXGIDevice.SetMaximumFrameLatency(1);
            GlobalTools.SafeRelease(ref pDXGIFactory2);
            Marshal.Release(pDXGIFactory2Ptr);
        }
        GlobalTools.SafeRelease(ref pDXGIAdapter);
    }
    return hr;
}
关键步骤 3 - XAML中绘制时钟UI:
cs
<!-- 发光外圈效果 -->
<Ellipse Width="360" Height="360"
         Opacity="0.3">
    <Ellipse.Fill>
        <RadialGradientBrush>
            <GradientStop Color="#FFD4AF37" Offset="0.85"/>
            <GradientStop Color="Transparent" Offset="1"/>
        </RadialGradientBrush>
    </Ellipse.Fill>
</Ellipse>

<!-- 外圈装饰边框 - 双层效果 -->
<Ellipse Width="334" Height="334"
         Stroke="#FFD4AF37" StrokeThickness="4"
         Fill="Transparent"/>
<Ellipse Width="322" Height="322"
         Stroke="#80D4AF37" StrokeThickness="1"
         Fill="Transparent"/>

<!-- WinUI3 特色:Acrylic 亚克力背景效果 -->
<Ellipse Width="312" Height="312" HorizontalAlignment="Center" VerticalAlignment="Center">
    <Ellipse.Fill>
        <RadialGradientBrush>
            <GradientStop Color="#CC1A1A2E" Offset="0"/>
            <GradientStop Color="#CC16213E" Offset="0.5"/>
            <GradientStop Color="#CC0F1419" Offset="1"/>
        </RadialGradientBrush>
    </Ellipse.Fill>
</Ellipse>

<!-- 多层装饰圆环 - 增强视觉层次 -->
<Ellipse Width="293" Height="293"
         Stroke="#60D4AF37" StrokeThickness="1"
         Fill="Transparent" HorizontalAlignment="Center" VerticalAlignment="Center"/>
<Ellipse Width="279" Height="279"
         Stroke="#404A4A5E" StrokeThickness="2"
         Fill="Transparent" HorizontalAlignment="Center" VerticalAlignment="Center"/>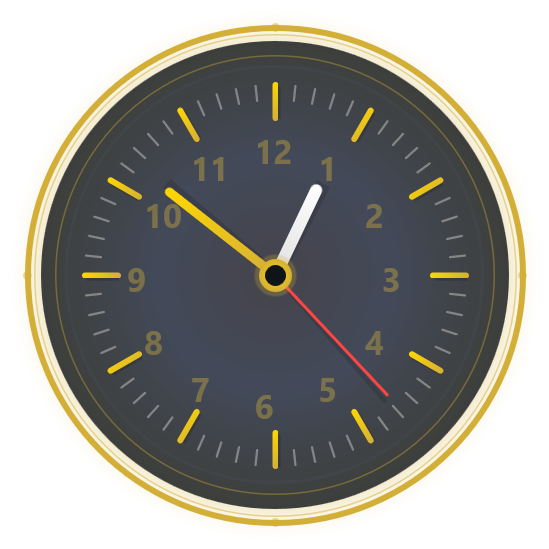
运行时: CPU:0%~0.1%,内存 :100M 左右
整个实现过程,非常艰难,上下搜罗,但是效果很棒,帧率极高,尤其秒针转动的时候,就好像看到真实时钟转动的感觉,完全不丢帧,极致的丝滑,体验真的很棒。可以看出来,WinUI3非常擅长高性能的UI渲染。资源管理器中显示cpu一直是0的状态,占用率极低。
总结
每一种我都很喜欢 ~