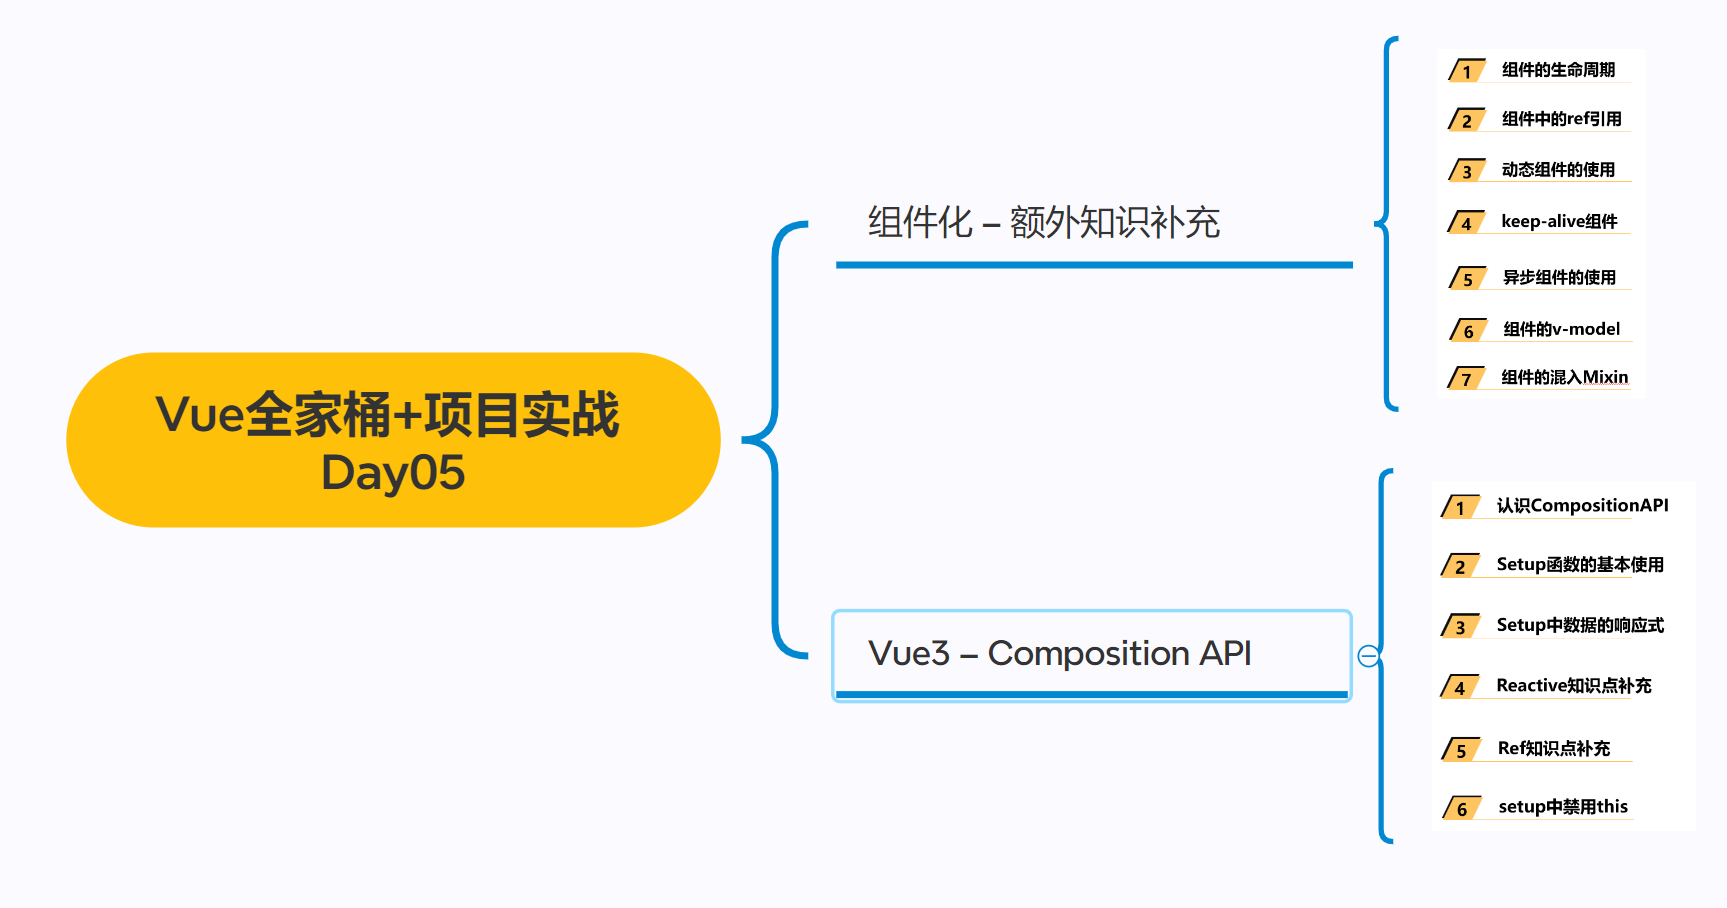
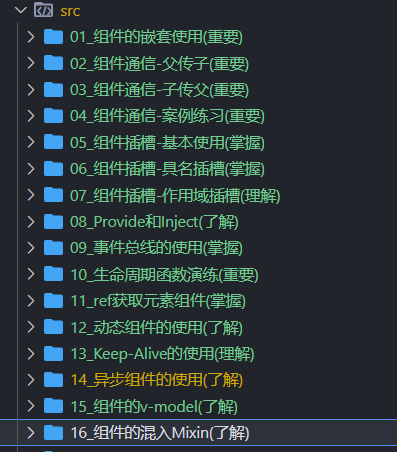
组件化 -- 额外知识补充
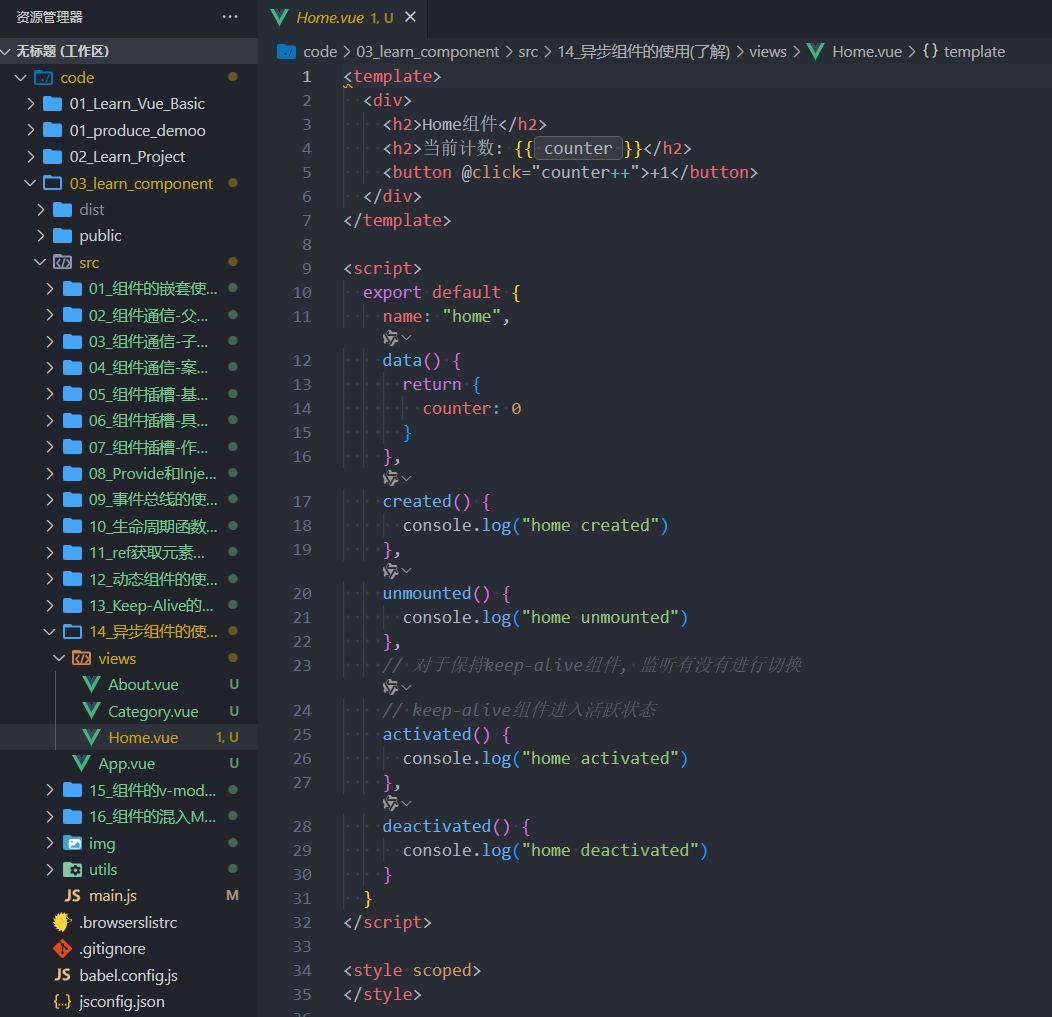
1 组件的生命周期
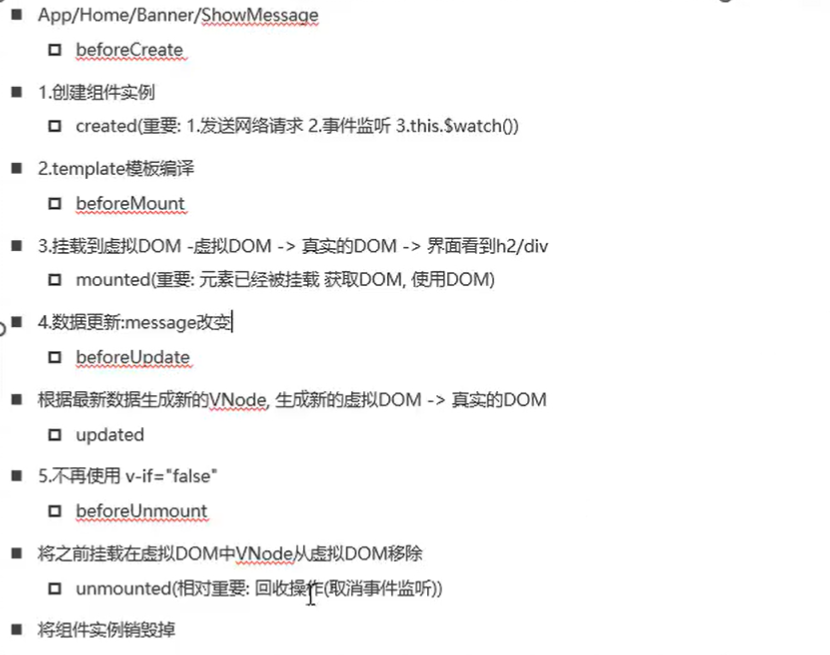
认识生命周期
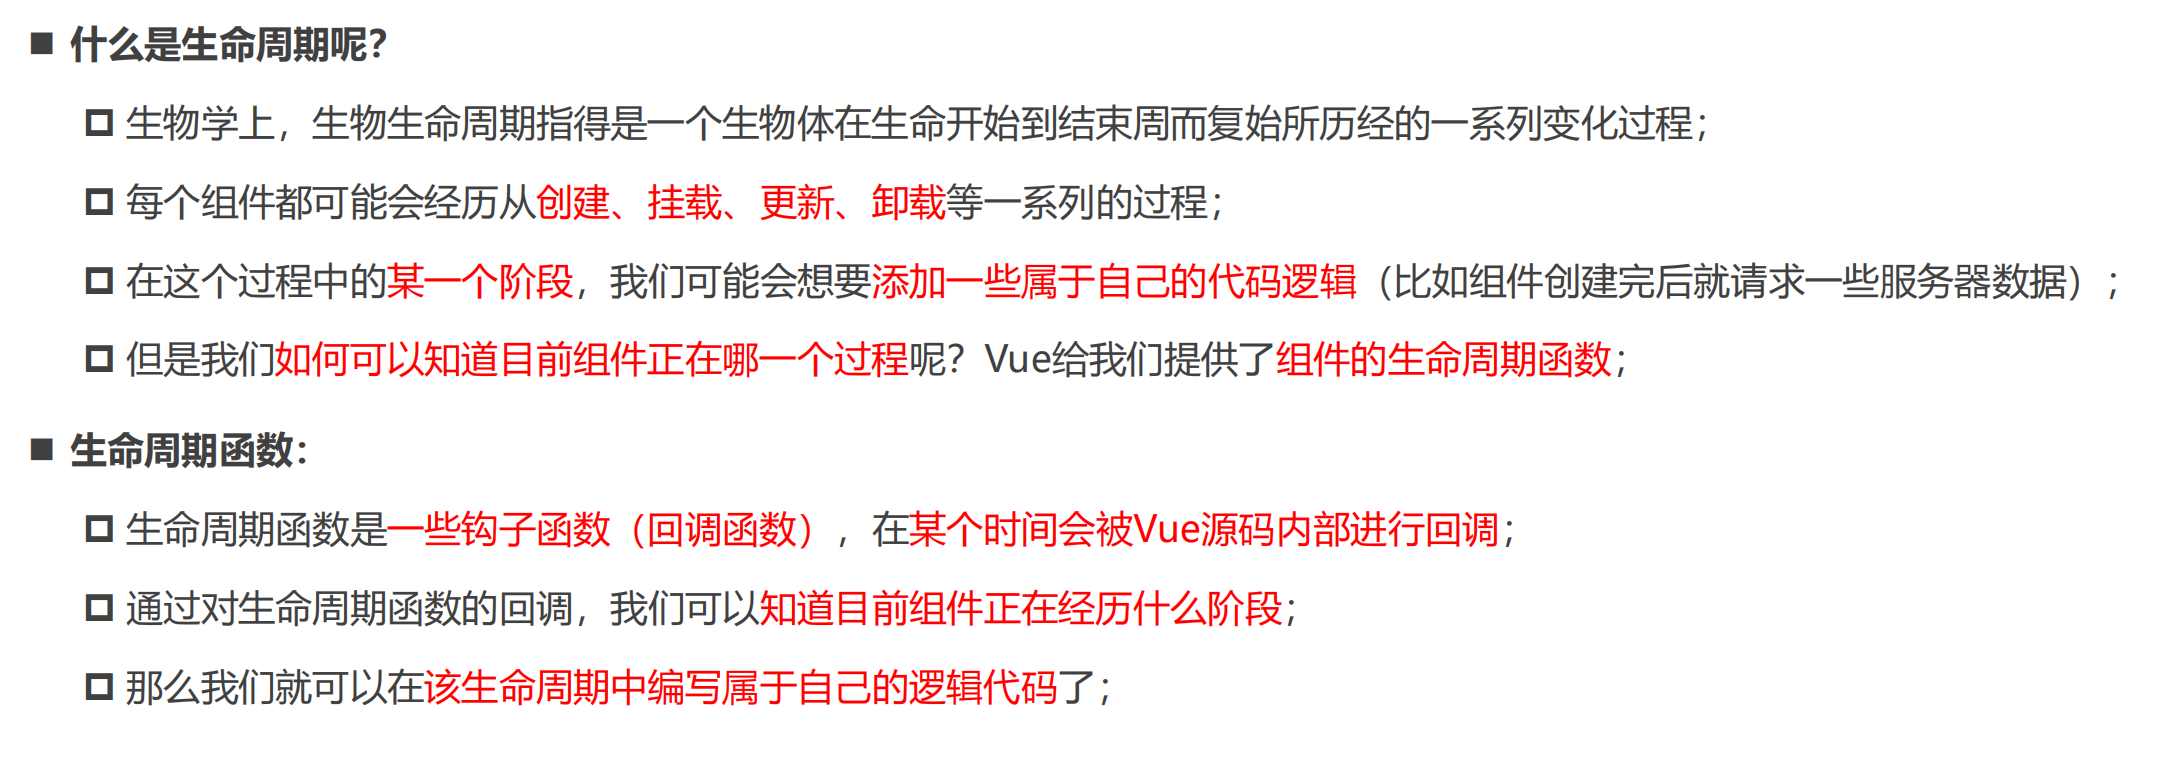
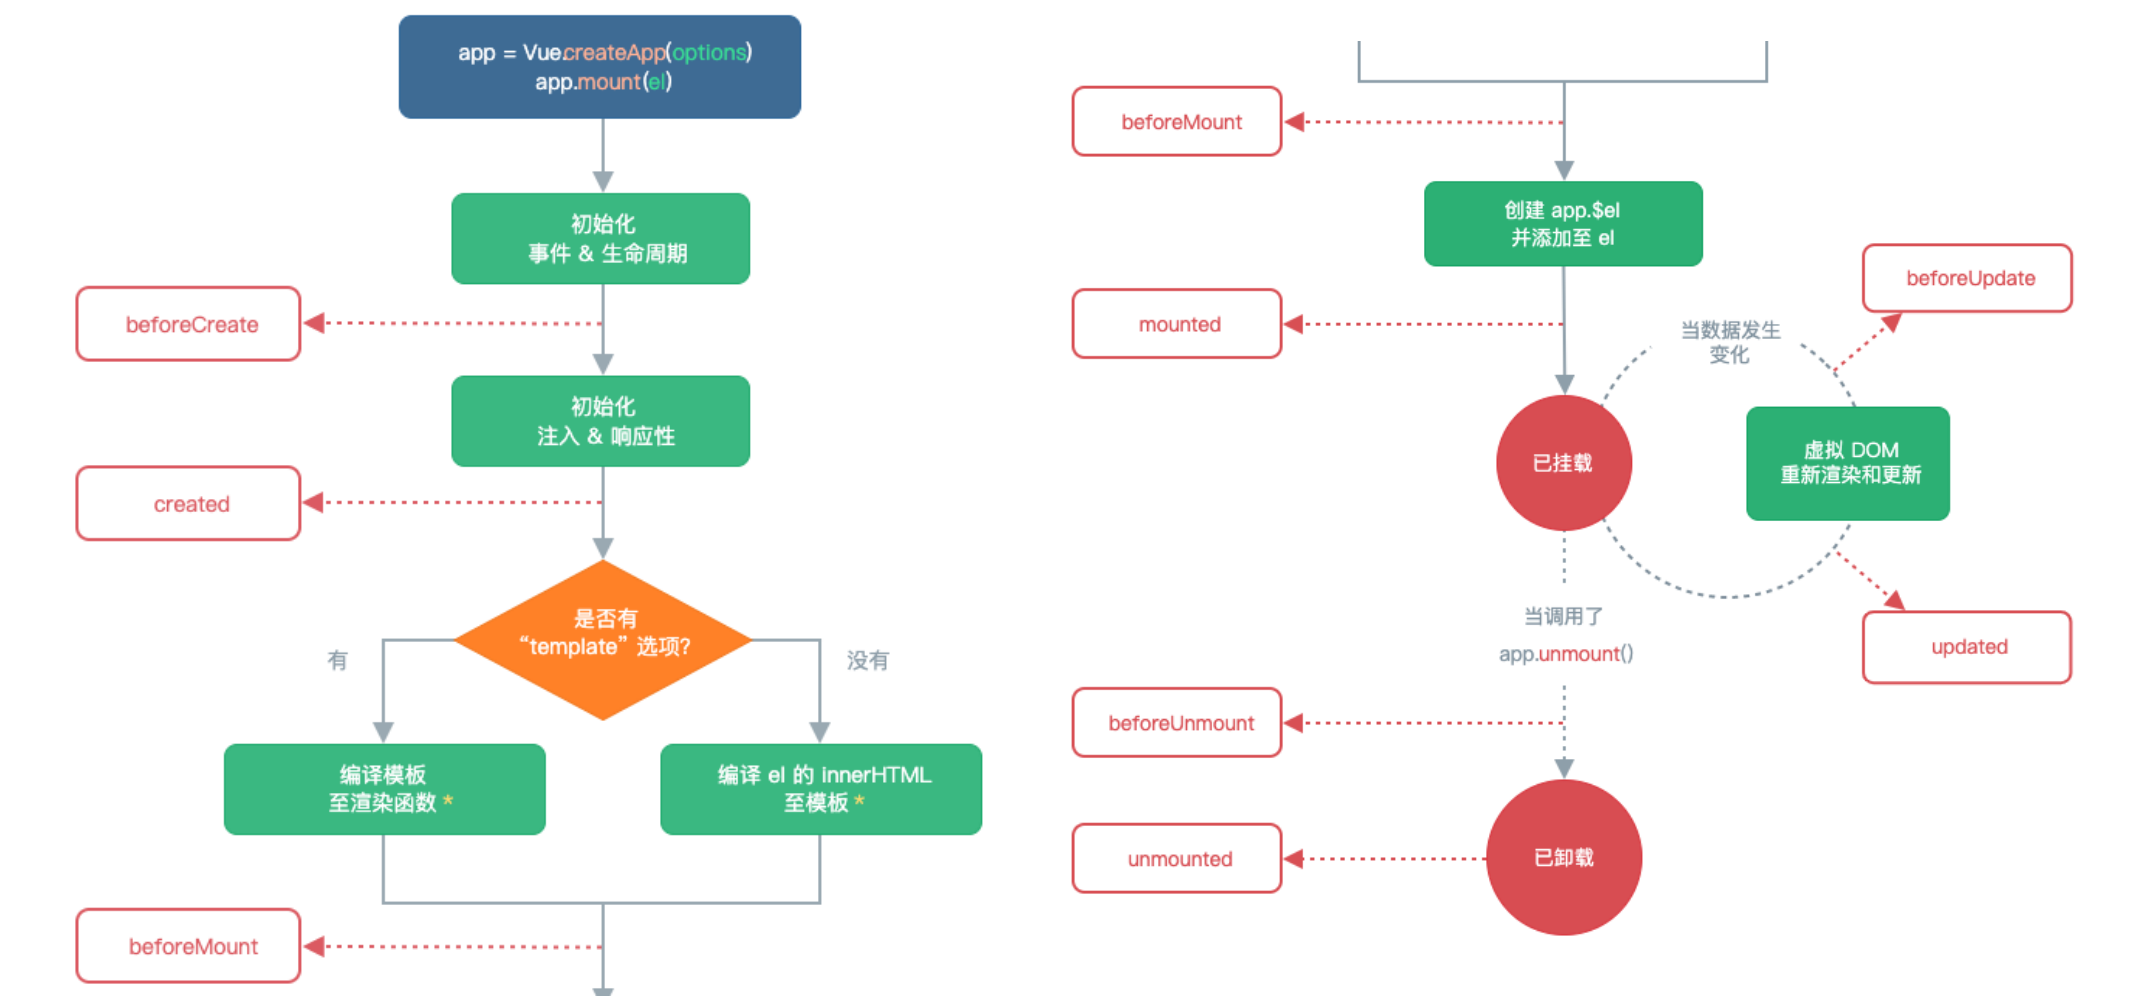
生命周期的流程
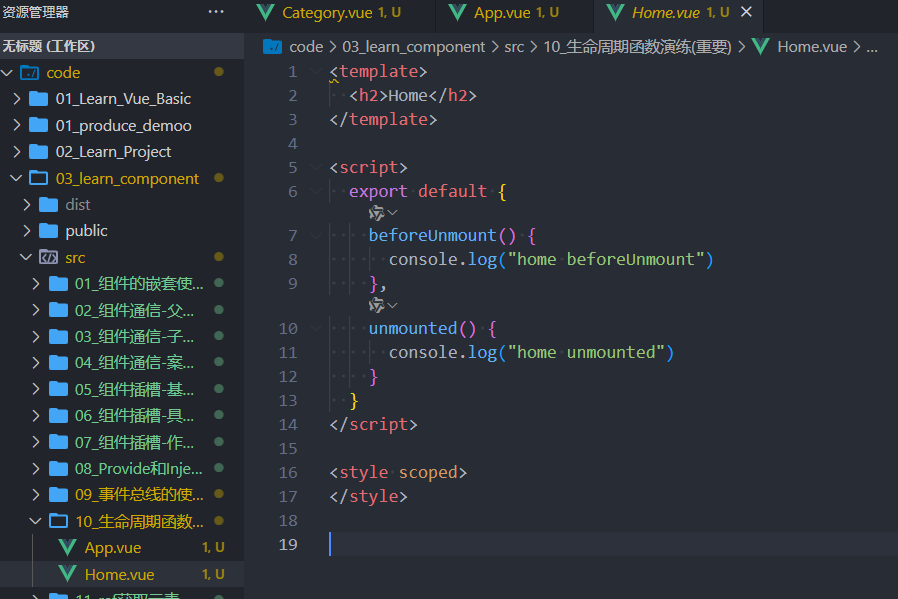
<template>
  <h2>message: {{message}}-{{counter}}</h2>
  <button @click="message = 'Hello World'">修改message</button>
  <button @click="counter++">+1</button>

  <div>
    <button @click="isShowHome = !isShowHome">显示Home</button>
    <home v-if="isShowHome"></home>
  </div>
</template>

<script>
  import Home from "./Home.vue"

  export default {
    components: {
      Home
    },
    data() {
      return {
        message: "Hello App",
        counter: 0,
        isShowHome: true
      }
    },
    // 1.组件被创建之前
    beforeCreate() {
      console.log("beforeCreate")
    },
    // 2.组件被创建完成
    created() {
      console.log("created")
      console.log("1.发送网络请求, 请求数据")
      console.log("2.监听eventbus事件")
      console.log("3.监听watch数据")
    },
    // 3.组件template准备被挂载
    beforeMount() {
      console.log("beforeMount")
    },
    // 4.组件template被挂载: 虚拟DOM -> 真实DOM
    mounted() {
      console.log("mounted")
      console.log("1.获取DOM")
      console.log("2.使用DOM")
    },
    // 5.数据发生改变
    // 5.1. 准备更新DOM
    beforeUpdate() {
      console.log("beforeUpdate")
    },
    // 5.2. 更新DOM
    updated() {
      console.log("updated")
    },

    // 6.卸载VNode -> DOM元素
    // 6.1.卸载之前
    beforeUnmount() {
      console.log("beforeUnmount")
    },
    // 6.2.DOM元素被卸载完成
    unmounted() {
      console.log("unmounted")
    }
  }
</script>

<style scoped>
</style>
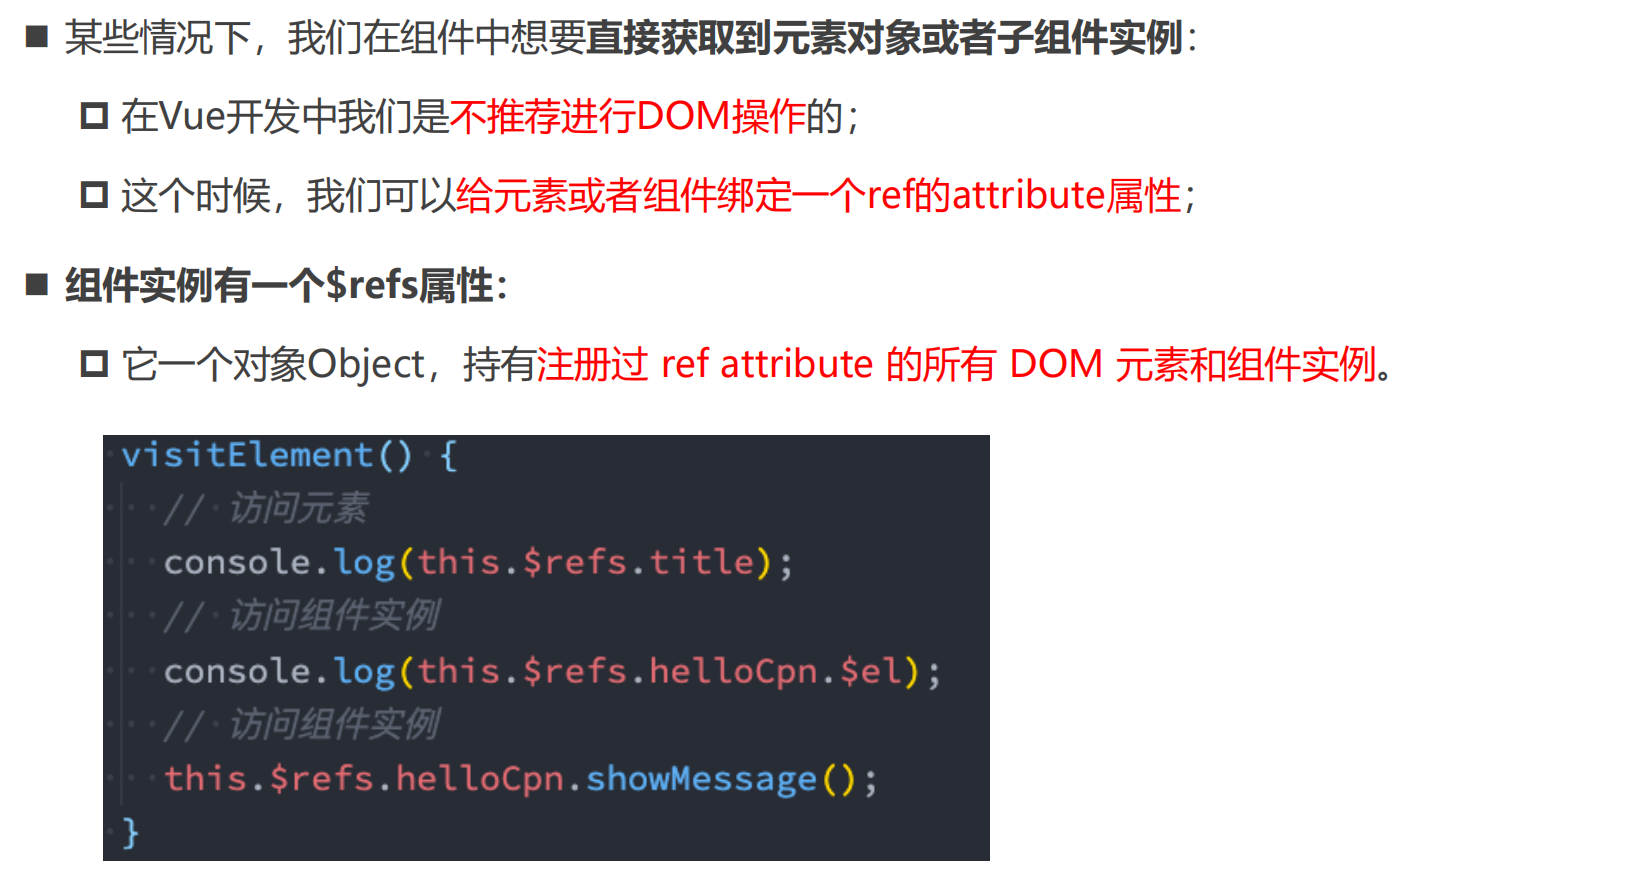
2 组件中的ref引用
$refs的使用
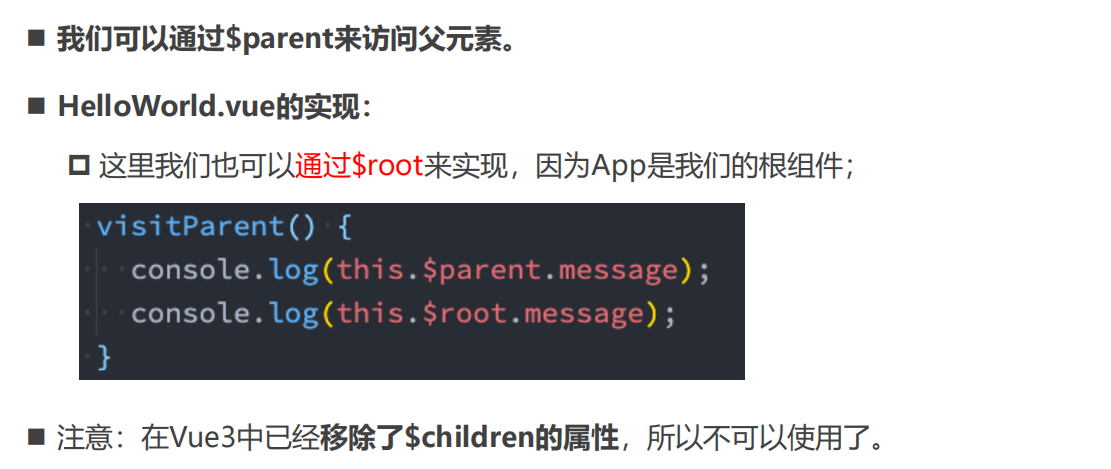
parent和root
切换组件案例
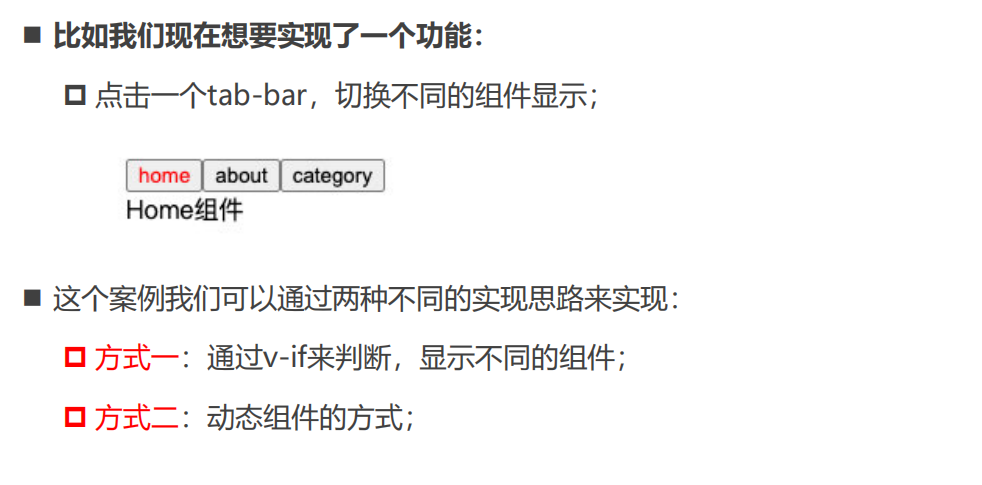
v-if显示不同的组件

<template>
  <div class="app">
    <h2 ref="title" class="title" :style="{ color: titleColor }">{{ message }}</h2>
    <button ref="btn" @click="changeTitle">修改title</button>

    <banner ref="banner"/>
  </div>
</template>

<script>
  import Banner from "./Banner.vue"

  export default {
    components: {
      Banner
    },
    data() {
      return {
        message: "Hello World",
        titleColor: "red"
      }
    },
    methods: {
      changeTitle() {
        // 1.不要主动的去获取DOM, 并且修改DOM内容
        // this.message = "你好啊, 李银河!"
        // this.titleColor = "blue"

        // 2.获取h2/button元素
        console.log(this.$refs.title)
        console.log(this.$refs.btn)

        // 3.获取banner组件: 组件实例
        console.log(this.$refs.banner)

        // 3.1.在父组件中可以主动的调用子组件的对象方法
        this.$refs.banner.bannerClick()

        // 3.2.获取banner组件实例, 获取banner中的元素
        console.log(this.$refs.banner.$el)

        // 3.3.如果banner template是多个根, 拿到的是第一个node节点
        // 注意: 开发中不推荐一个组件的template中有多个根元素
        // console.log(this.$refs.banner.$el.nextElementSibling)

        // 4.组件实例还有两个属性(了解):
        console.log(this.$parent) // 获取父组件
        console.log(this.$root) // 获取根组件
      }
    }
  }
</script>

<style scoped>
</style>
<template>
  <div class="banner">
    <h2>Banner</h2>
  </div>
</template>

<script>
  export default {
    created() {

    },
    methods: {
      bannerClick() {
        console.log("bannerClick")
      }
    }
  }
</script>

<style scoped>
</style>
3 动态组件的使用
动态组件的实现
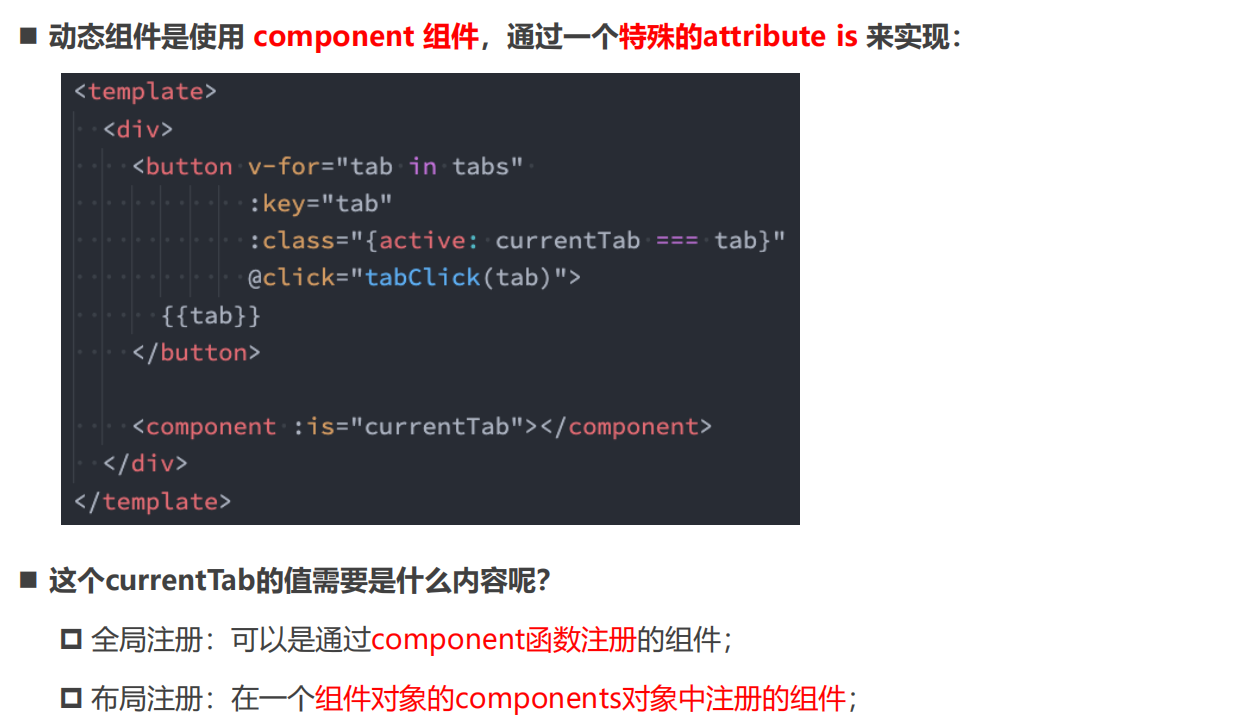
<template>
<div class="app">
<div class="tabs">
<template v-for="(item, index) in tabs" :key="item">
<button :class="{ active: currentTab === item }"
@click="itemClick(item)">
{{ item }}
</button>
</template>
</div>
<div class="view">
<!-- 1.第一种做法: v-if进行判断逻辑, 决定要显示哪一个组件 -->
<!-- <template v-if="currentIndex === 0">
<home></home>
</template>
<template v-else-if="currentIndex === 1">
<about></about>
</template>
<template v-else-if="currentIndex === 2">
<category></category>
</template> -->
<!-- 2.第二种做法: 动态组件 component -->
<!-- is中的组件需要来自两个地方: 1.全局注册的组件 2.局部注册的组件 -->
<!-- <component :is="tabs[currentIndex]"></component> -->
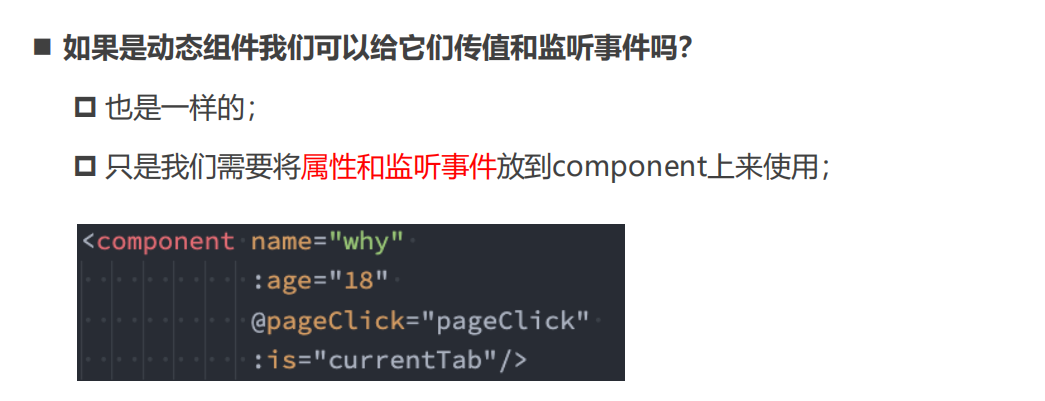
<component name="why"
:age="18"
@homeClick="homeClick"
:is="currentTab">
</component>
</div>
</div>
</template>
<script>
import Home from './views/Home.vue'
import About from './views/About.vue'
import Category from './views/Category.vue'
export default {
components: {
Home,
About,
Category
},
data() {
return {
tabs: ["home", "about", "category"],
// currentIndex: 0
currentTab: "home"
}
},
methods: {
itemClick(tab) {
this.currentTab = tab
},
homeClick(payload) {
console.log("homeClick:", payload)
}
}
}
</script>
<style scoped>
.active {
color: red;
}
</style>
动态组件的传值
<template>
  <div class="app">
    <div class="tabs">
      <template v-for="(item, index) in tabs" :key="item">
        <button :class="{ active: currentTab === item }"
                @click="itemClick(item)">
          {{ item }}
        </button>
      </template>
    </div>
    <div class="view">
      <!-- 1.第一种做法: v-if进行判断逻辑, 决定要显示哪一个组件 -->
      <!-- <template v-if="currentIndex === 0">
        <home></home>
      </template>
      <template v-else-if="currentIndex === 1">
        <about></about>
      </template>
      <template v-else-if="currentIndex === 2">
        <category></category>
      </template> -->

      <!-- 2.第二种做法: 动态组件 component -->
      <!-- is中的组件需要来自两个地方: 1.全局注册的组件 2.局部注册的组件 -->
      <!-- <component :is="tabs[currentIndex]"></component> -->
      <component name="why"
                 :age="18"
                 @homeClick="homeClick"
                 :is="currentTab">
      </component>
    </div>
  </div>
</template>

<script>
  import Home from './views/Home.vue'
  import About from './views/About.vue'
  import Category from './views/Category.vue'

  export default {
    components: {
      Home,
      About,
      Category
    },
    data() {
      return {
        tabs: ["home", "about", "category"],
        // currentIndex: 0
        currentTab: "home"
      }
    },
    methods: {
      itemClick(tab) {
        this.currentTab = tab
      },
      homeClick(payload) {
        console.log("homeClick:", payload)
      }
    }
  }
</script>

<style scoped>
  .active {
    color: red;
  }
</style>

4 keep-alive组件
认识keep-alive
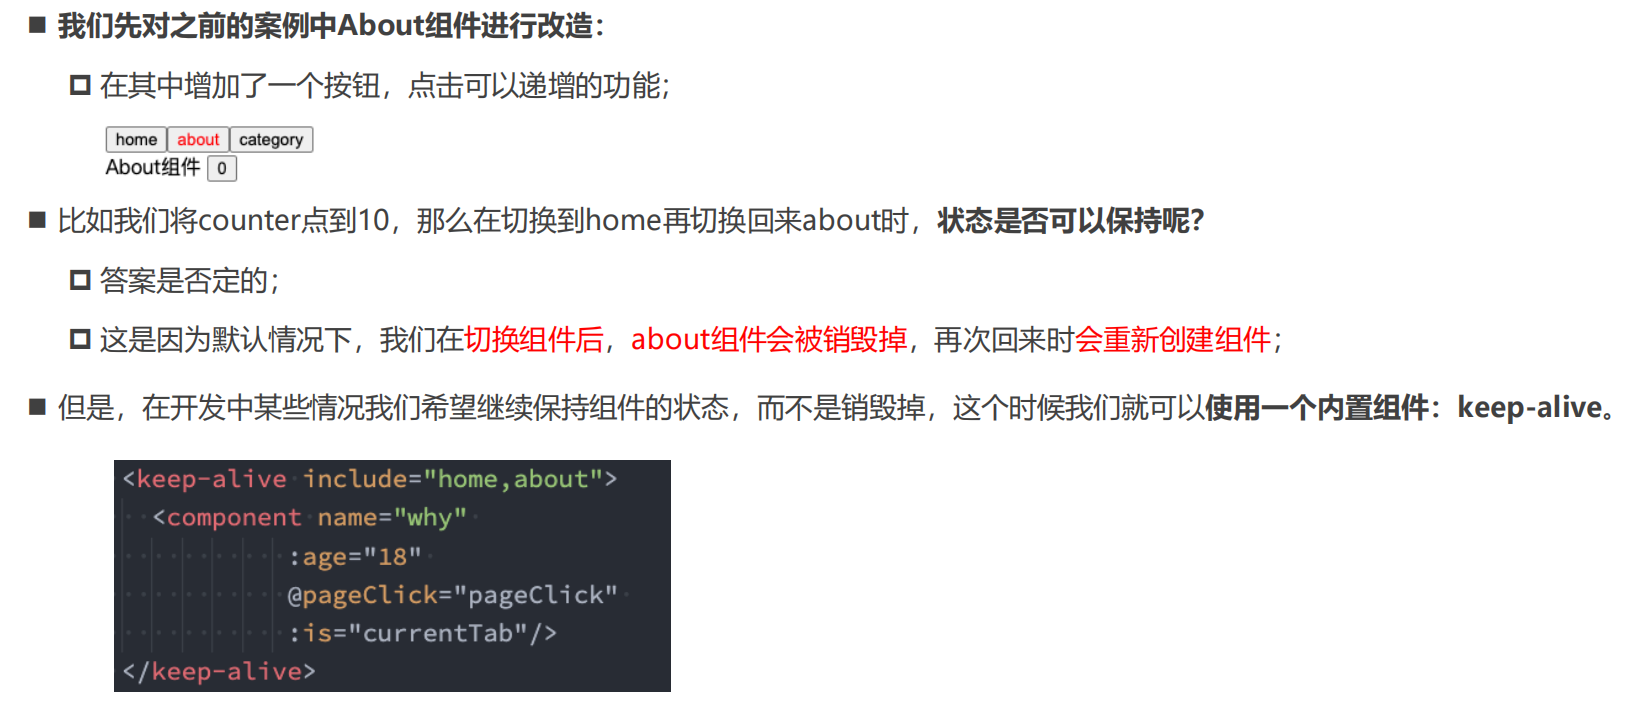
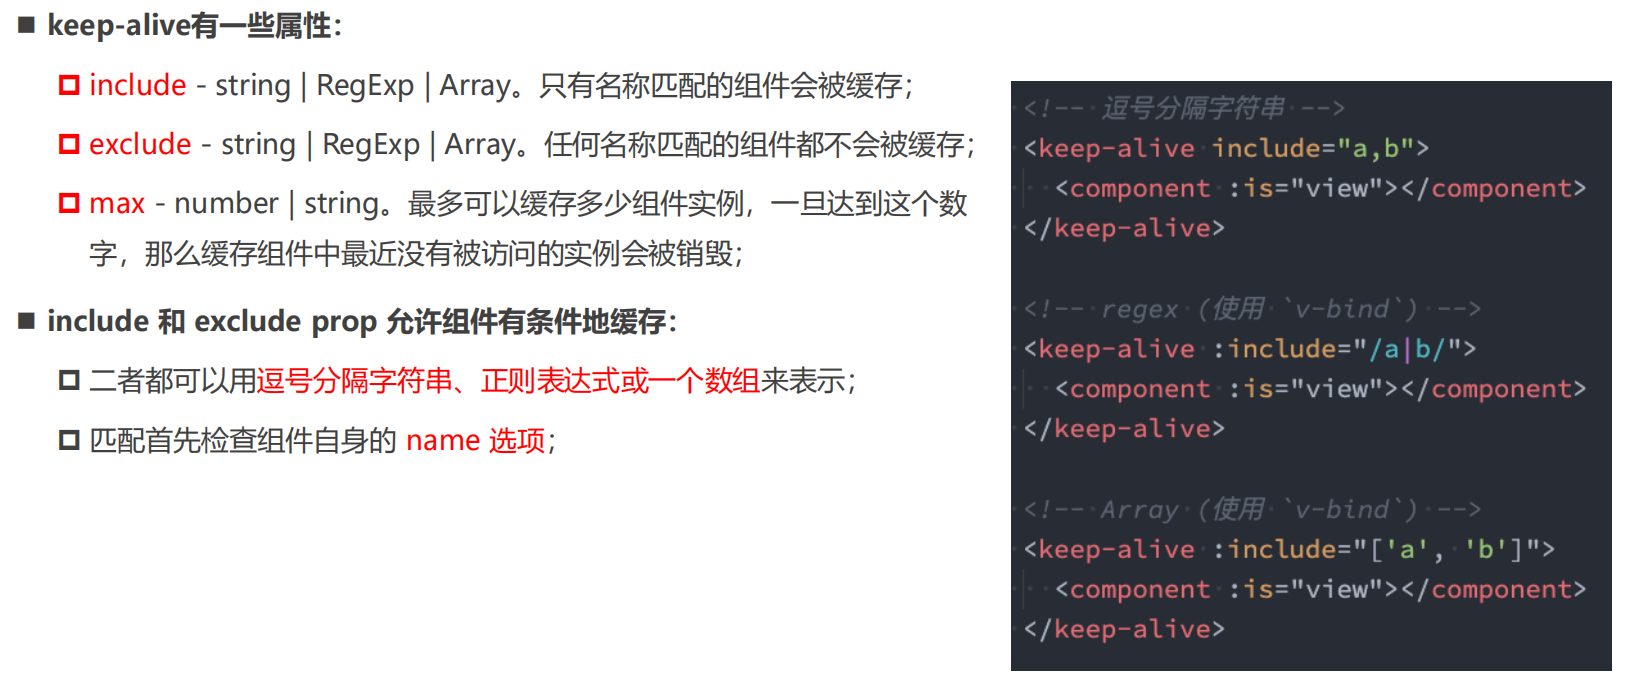
keep-alive属性
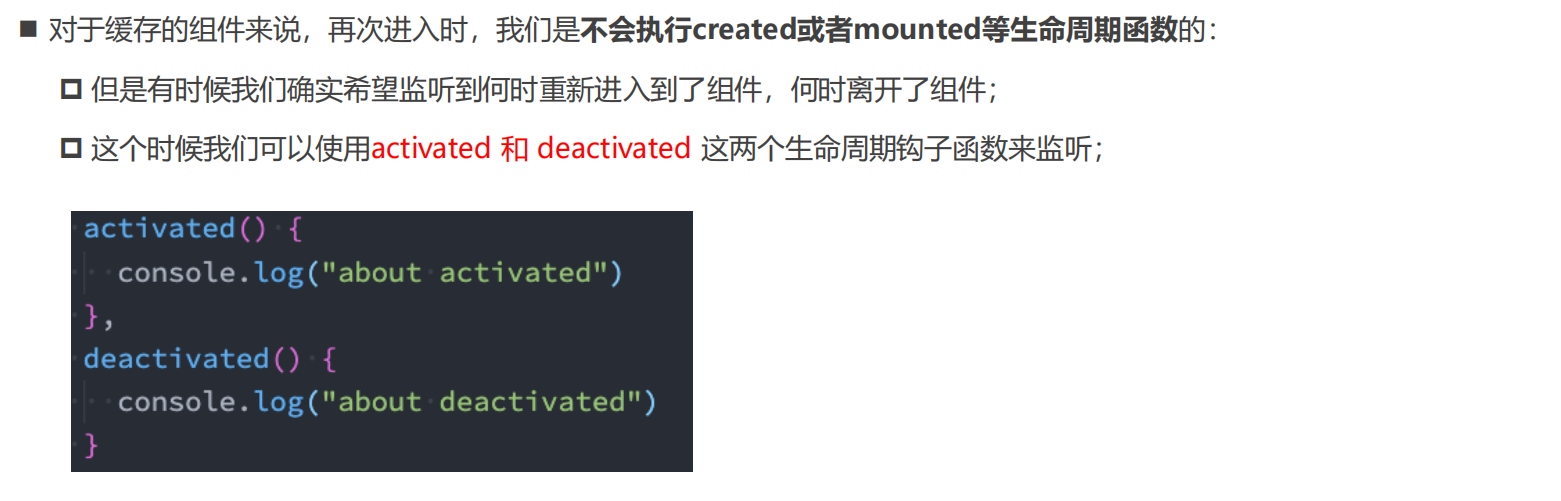
缓存组件的生命周期
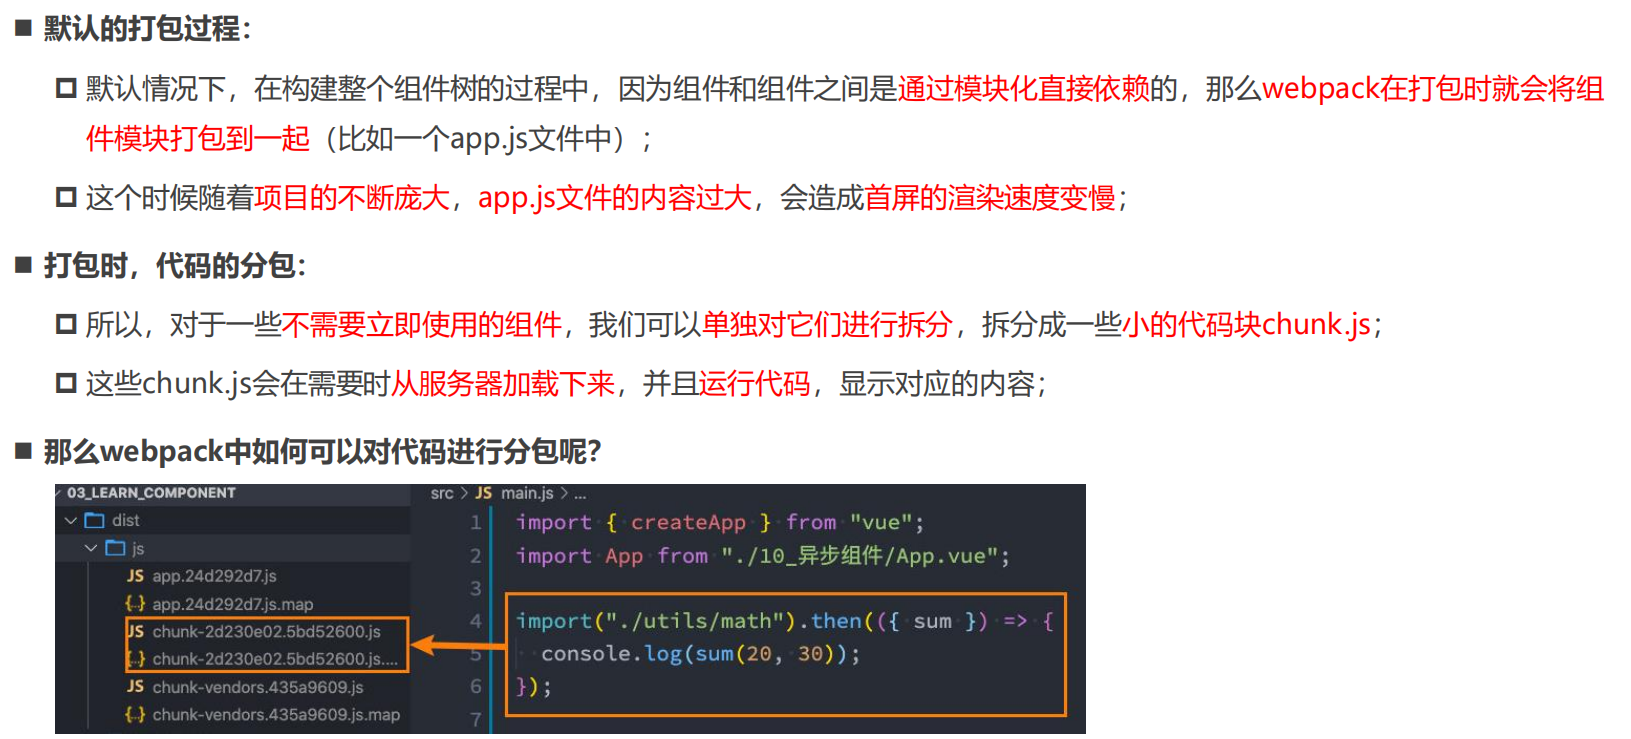
Webpack的代码分包
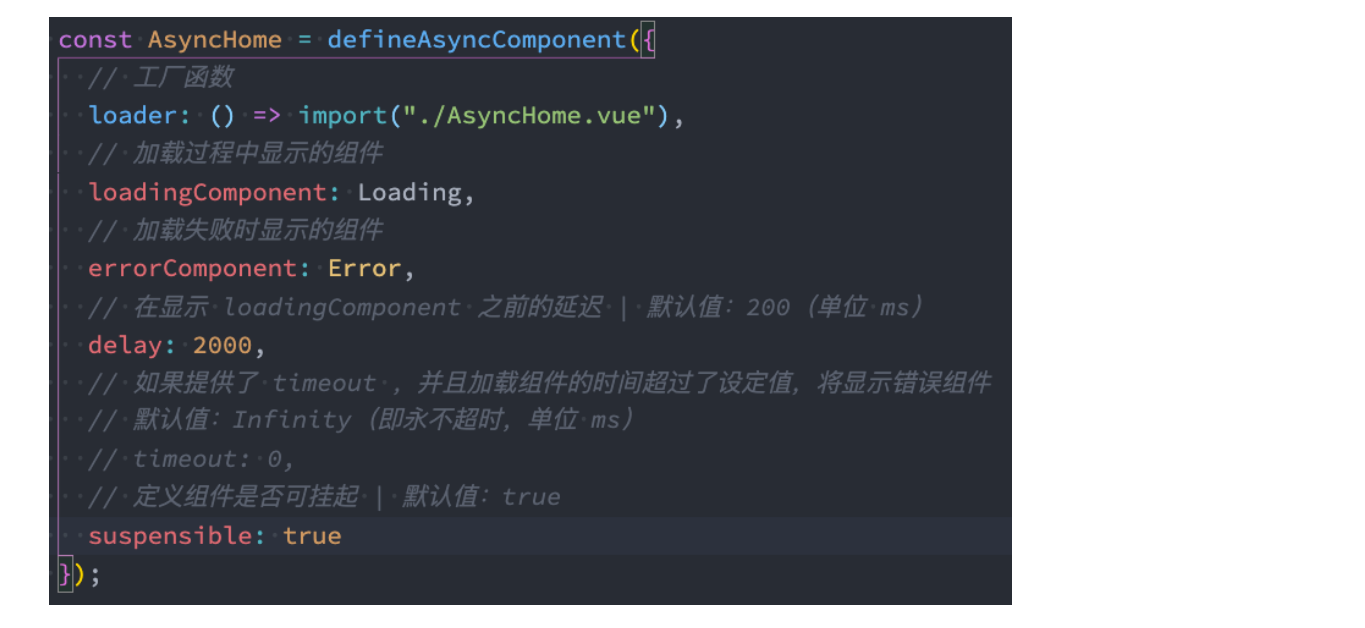
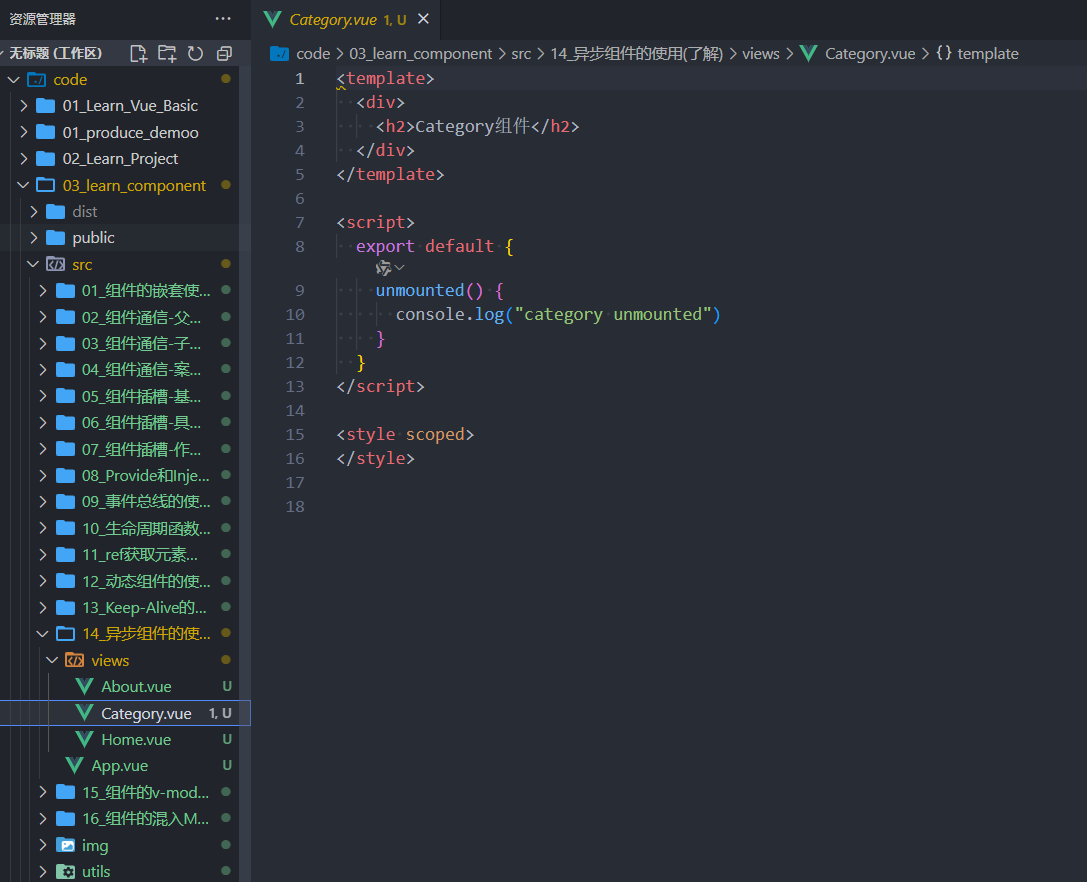
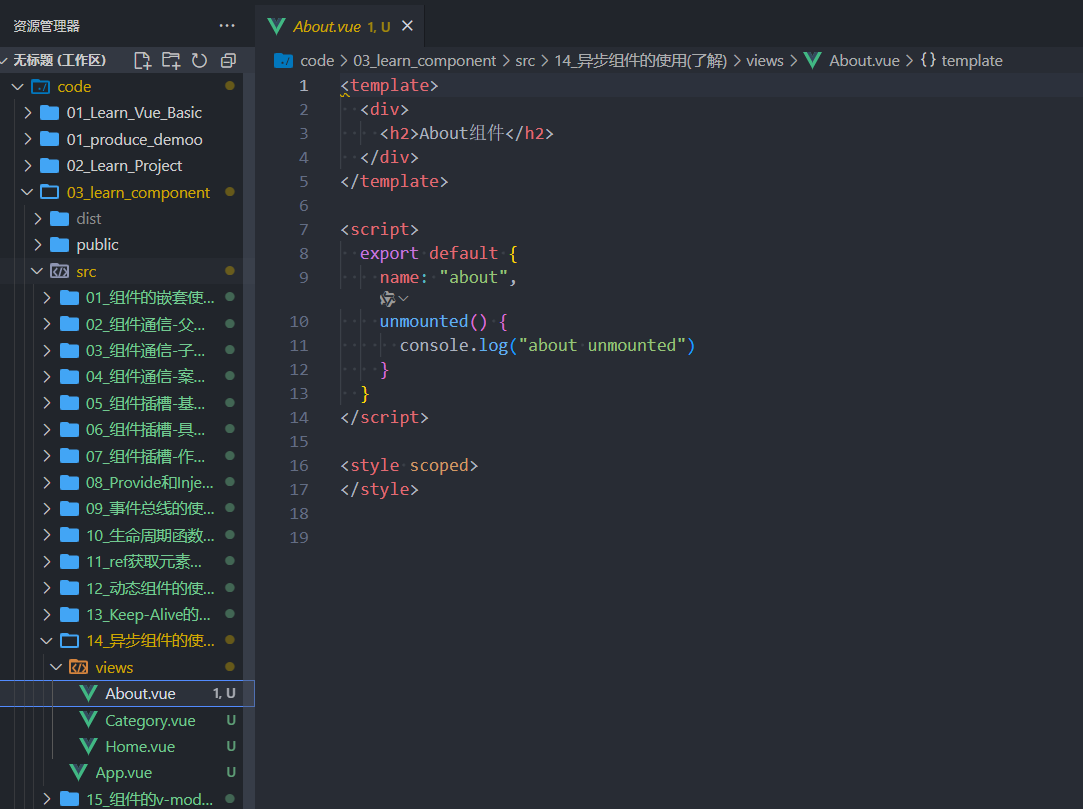
5 异步组件的使用
Vue中实现异步组件
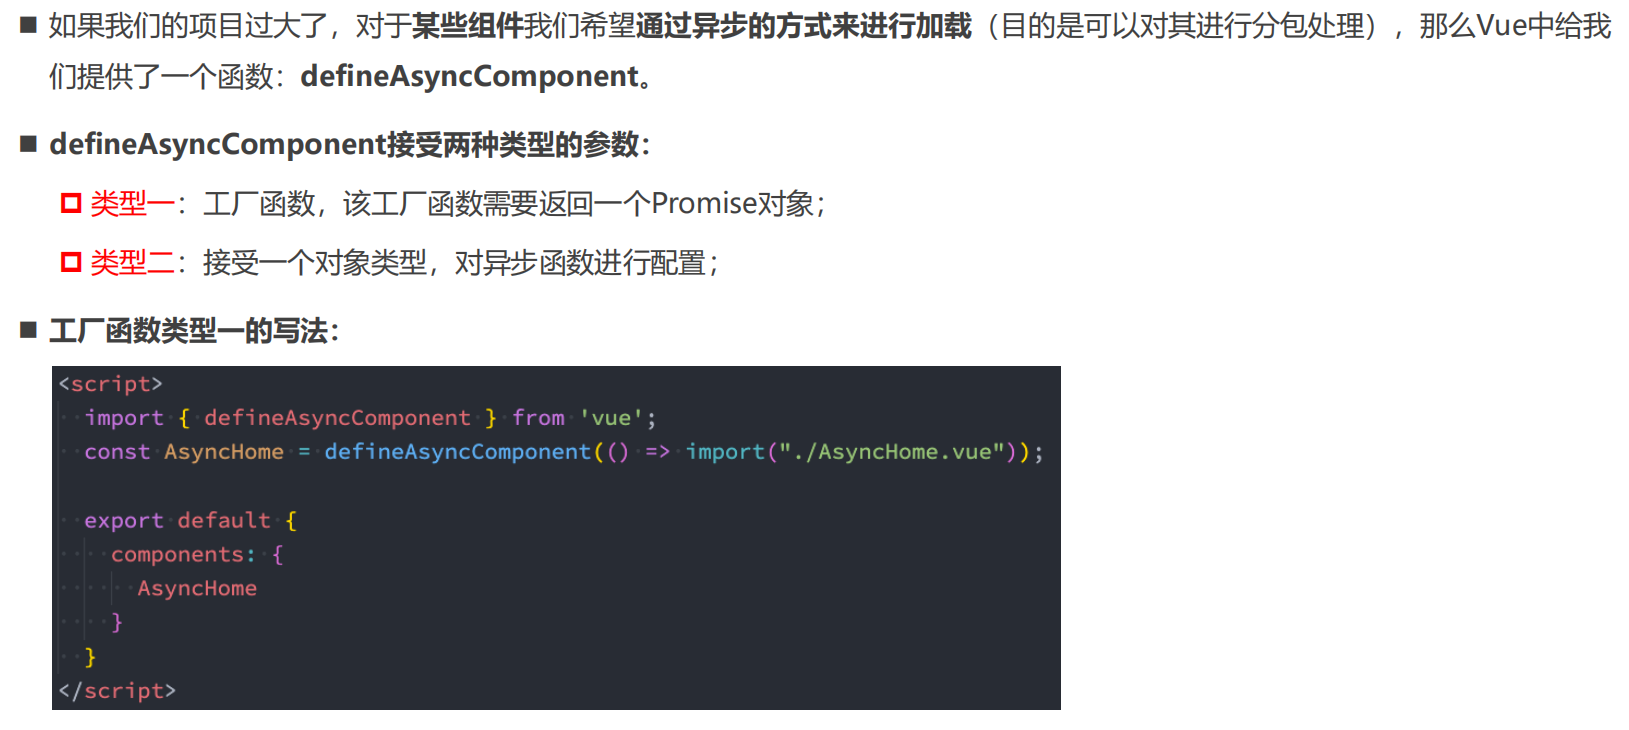
异步组件的写法二(了解)
<template>
  <div class="app">
    <div class="tabs">
      <template v-for="(item, index) in tabs" :key="item">
        <button :class="{ active: currentTab === item }"
                @click="itemClick(item)">
          {{ item }}
        </button>
      </template>
    </div>
    <div class="view">
      <!-- include: 组件的名称来自于组件定义时name选项  -->
      <keep-alive include="home,about">
        <component :is="currentTab"></component>
      </keep-alive>
    </div>
  </div>
</template>

<script>
  import { defineAsyncComponent } from 'vue'

  import Home from './views/Home.vue'
  import About from './views/About.vue'
  // import Category from './views/Category.vue'
  // const Category = import("./views/Category.vue")
  const AsyncCategory = defineAsyncComponent(() => import("./views/Category.vue"))

  export default {
    components: {
      Home,
      About,
      Category: AsyncCategory
    },
    data() {
      return {
        tabs: ["home", "about", "category"],
        // currentIndex: 0
        currentTab: "home"
      }
    },
    methods: {
      itemClick(tab) {
        this.currentTab = tab
      },
      homeClick(payload) {
        console.log("homeClick:", payload)
      }
    }
  }
</script>

<style scoped>
  .active {
    color: red;
  }
</style>
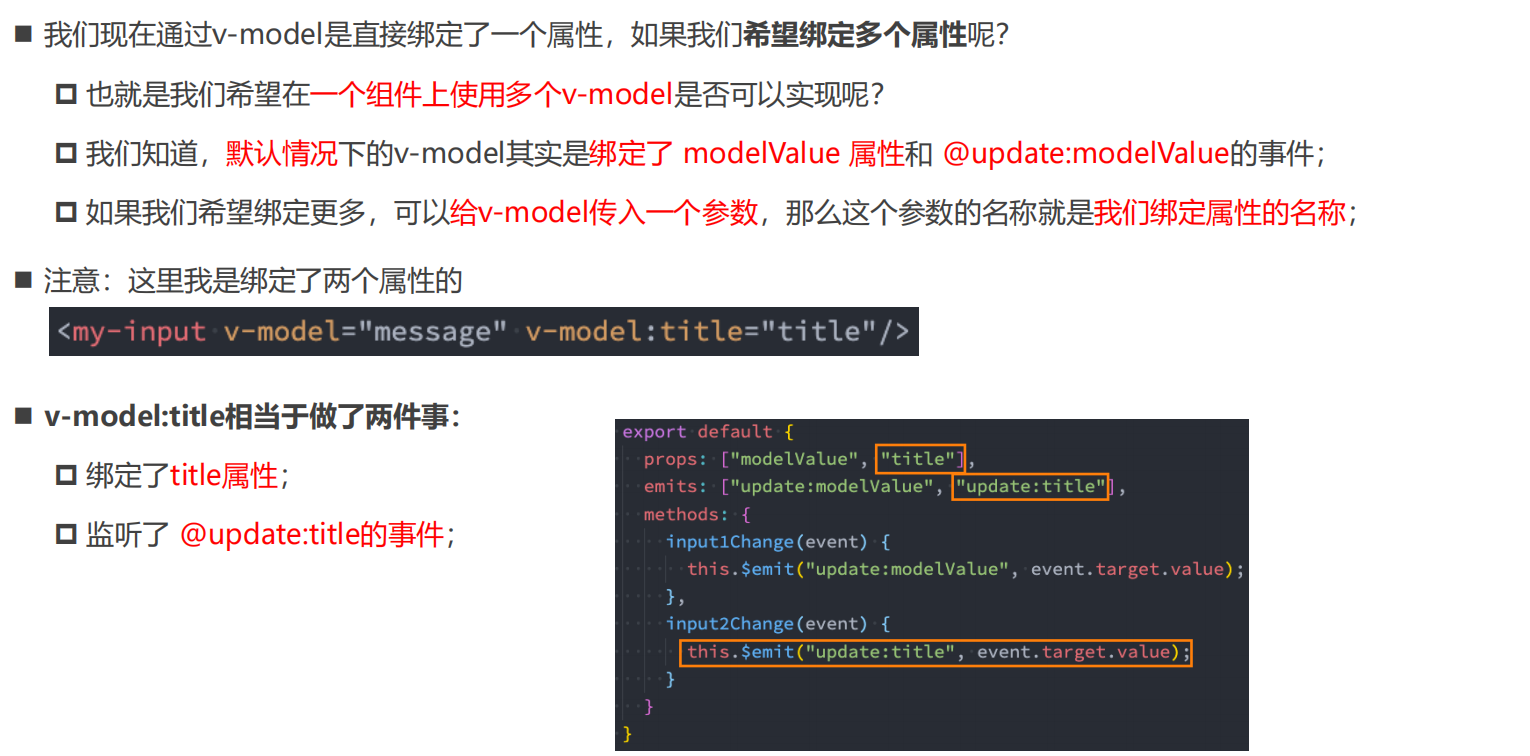
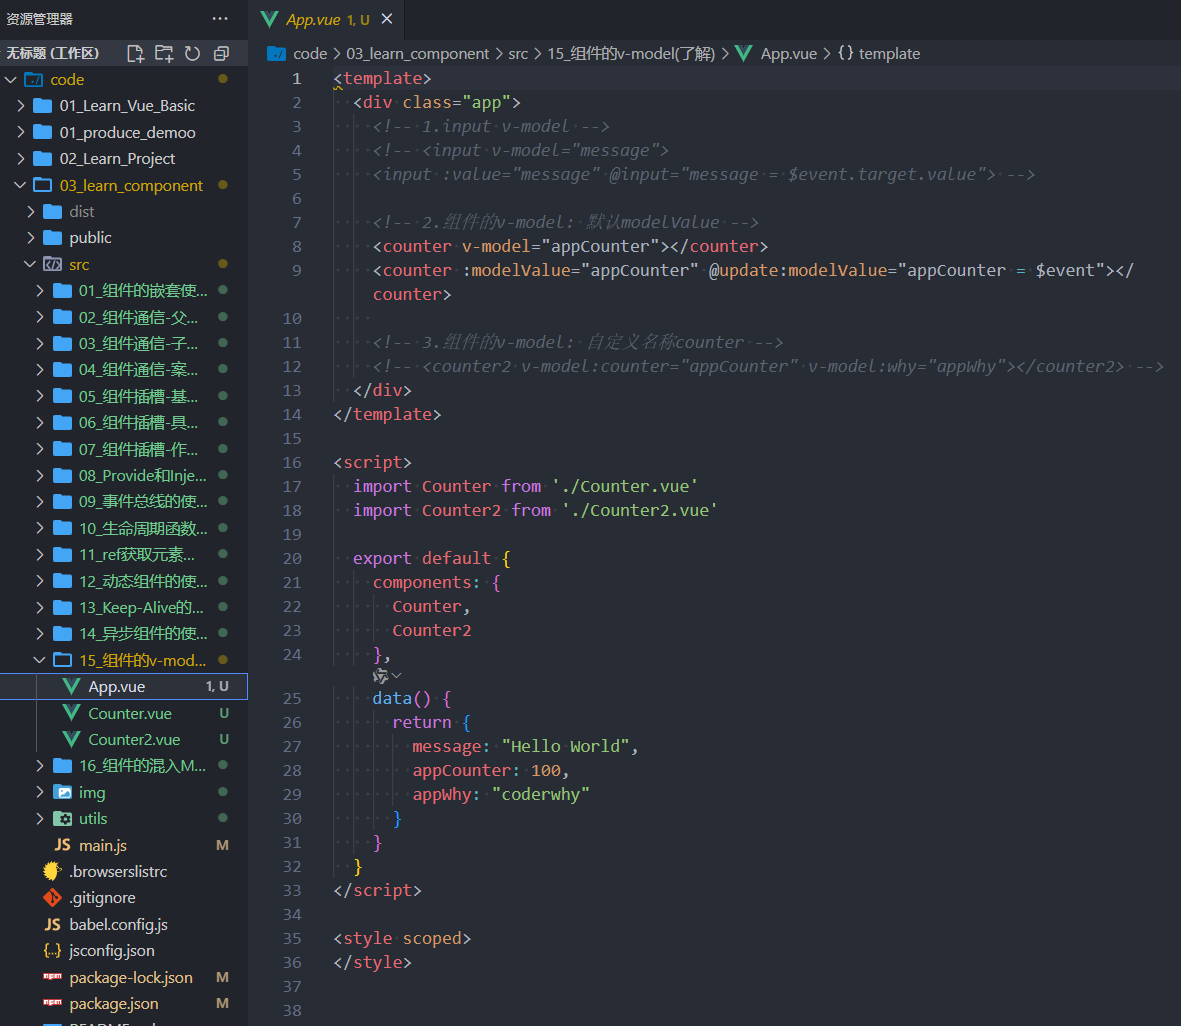
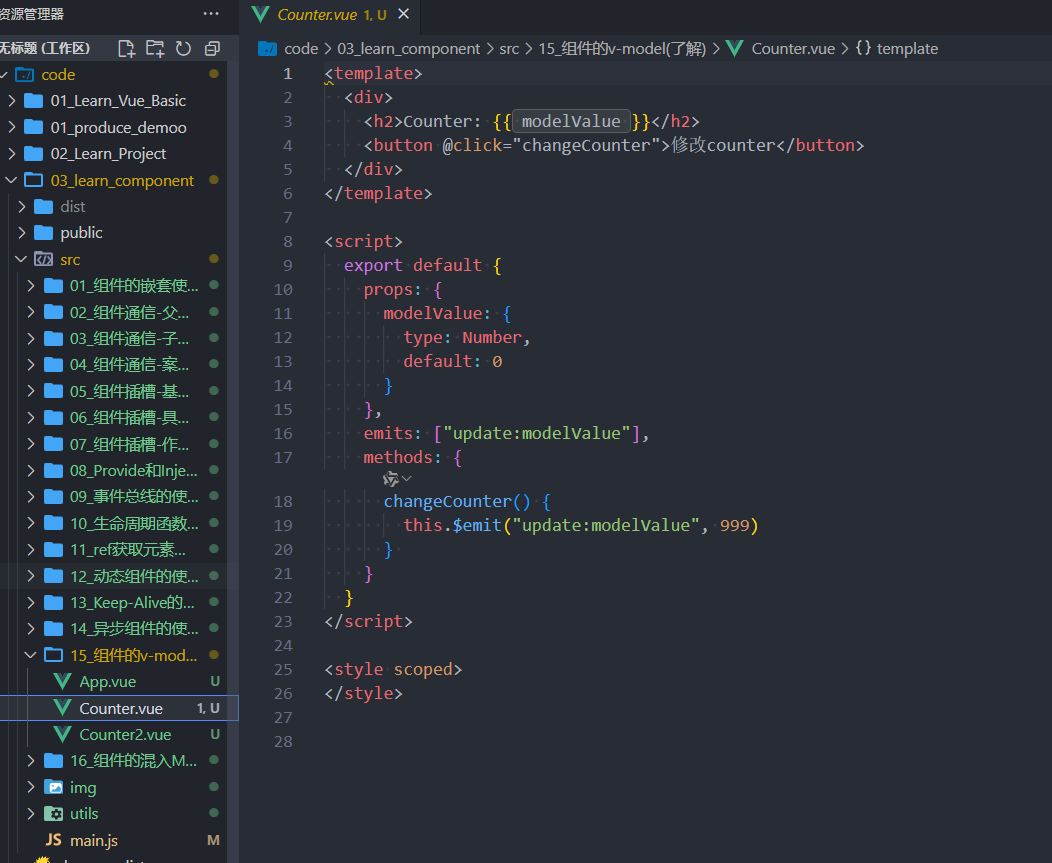
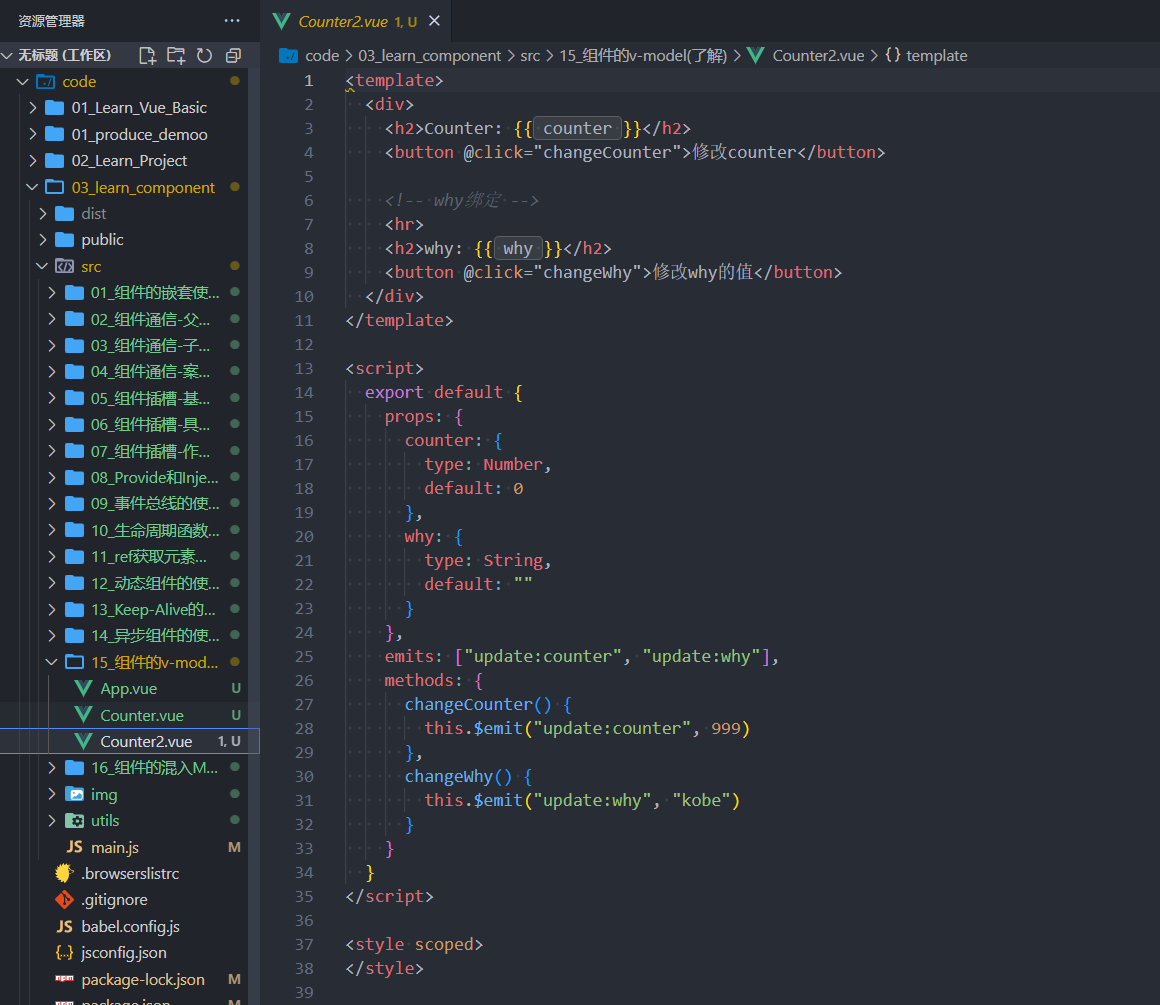
6 组件的v-model
组件的v-model
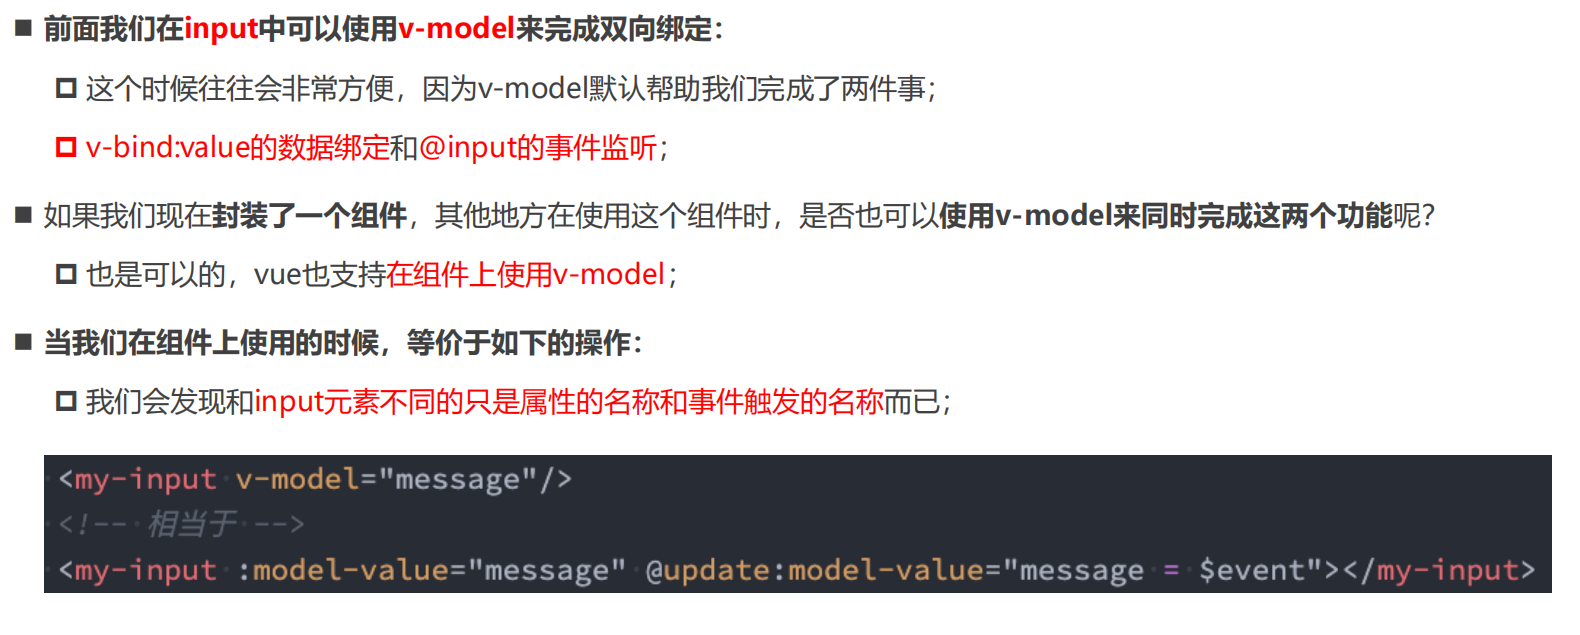
组件v-model的实现
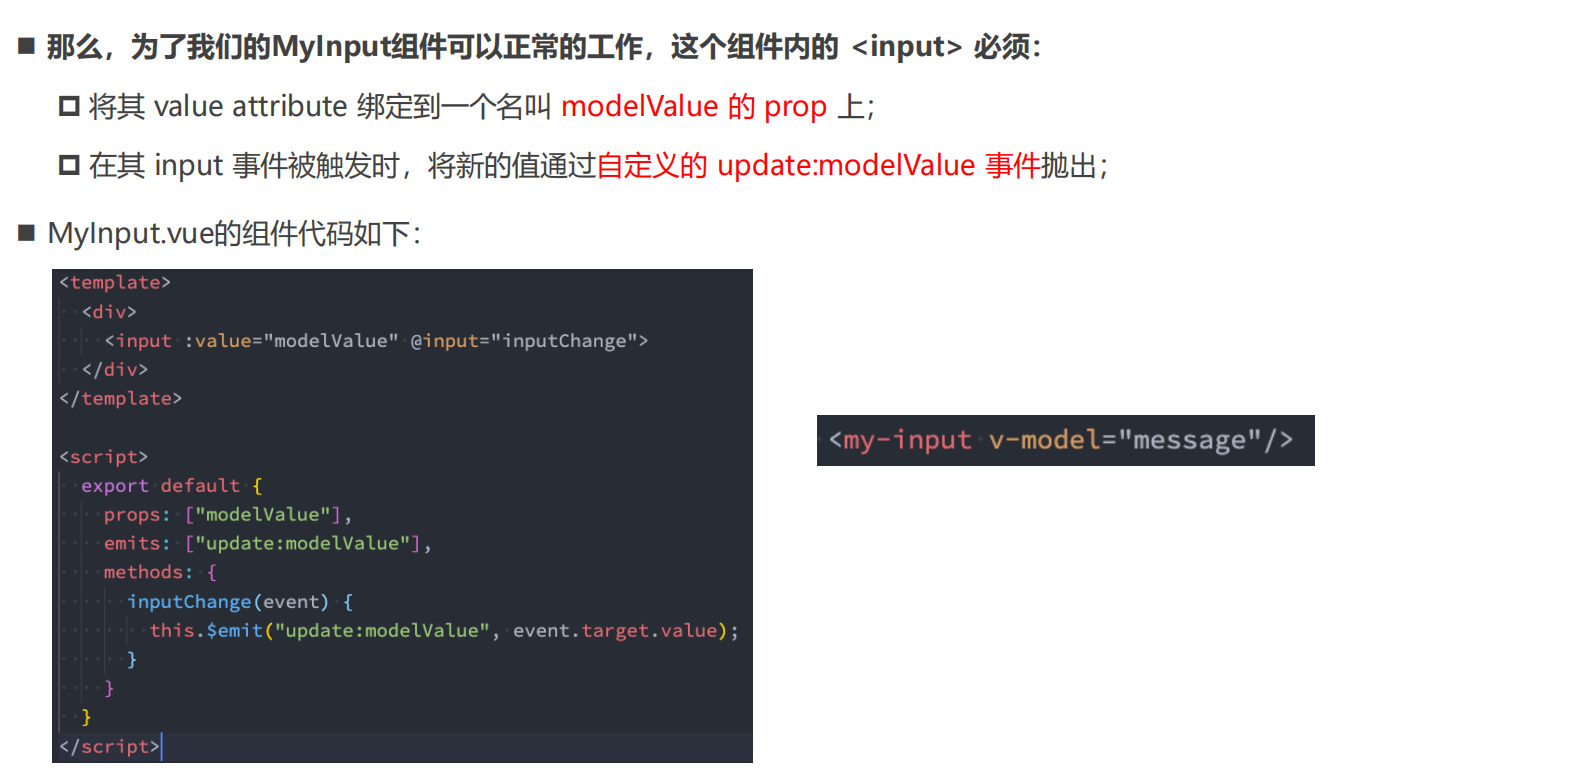
绑定多个属性
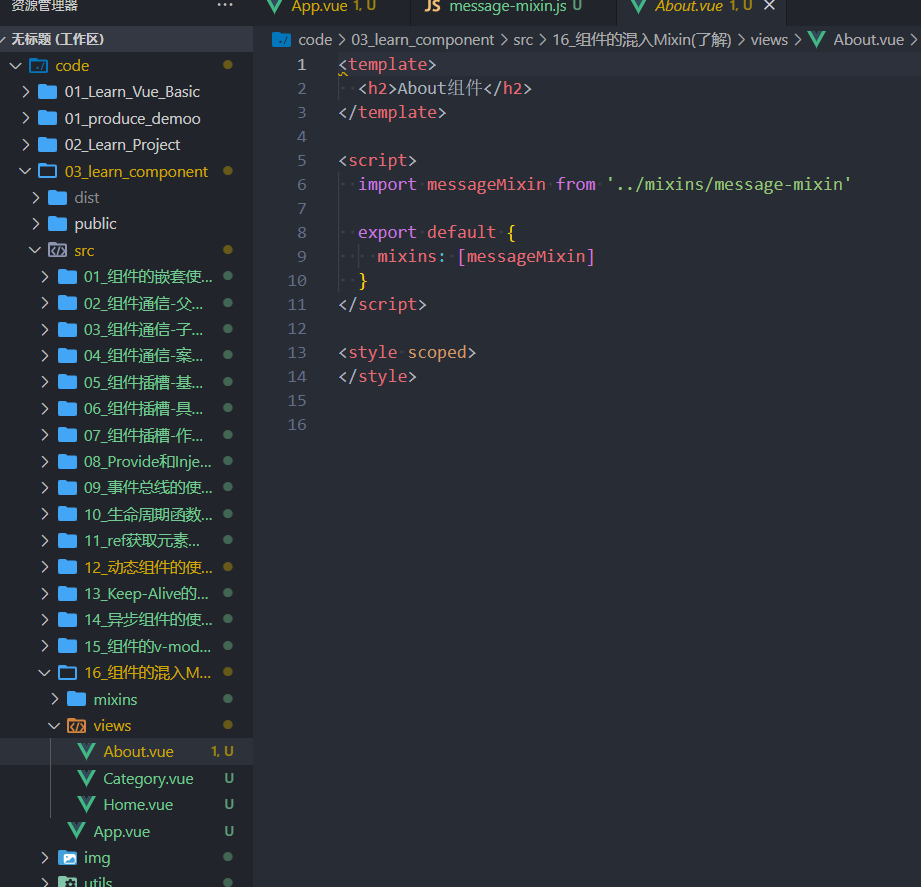
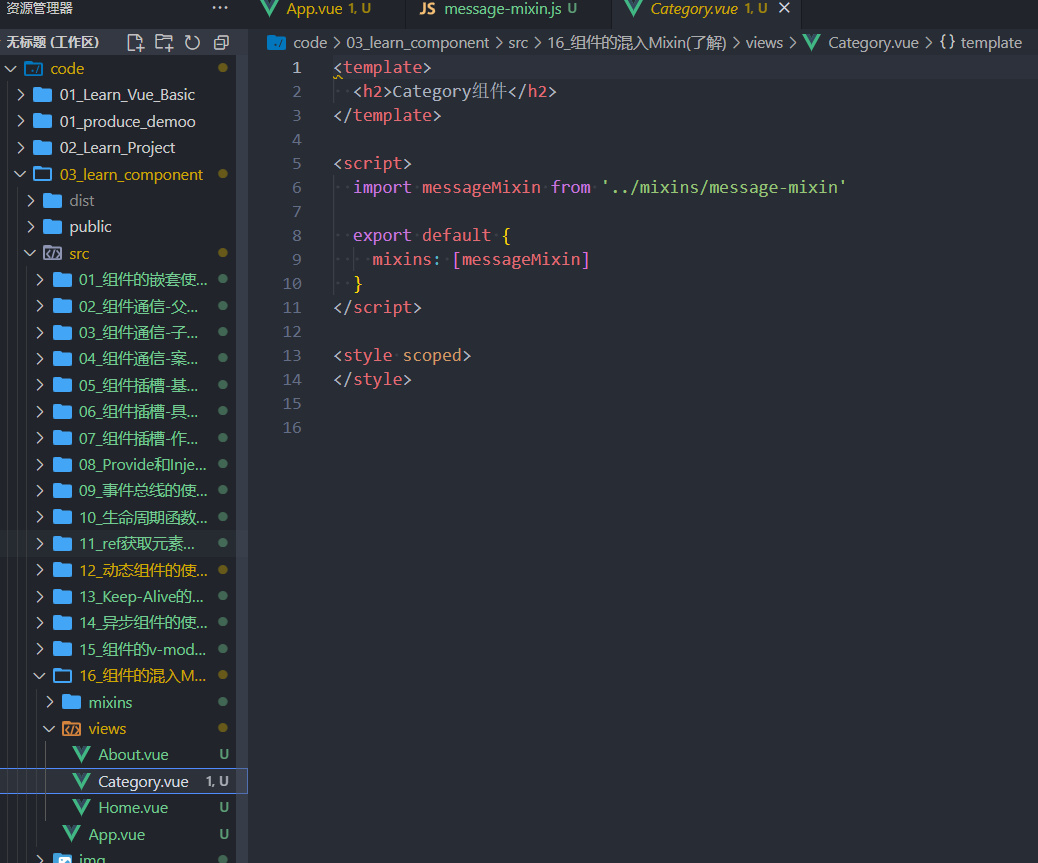
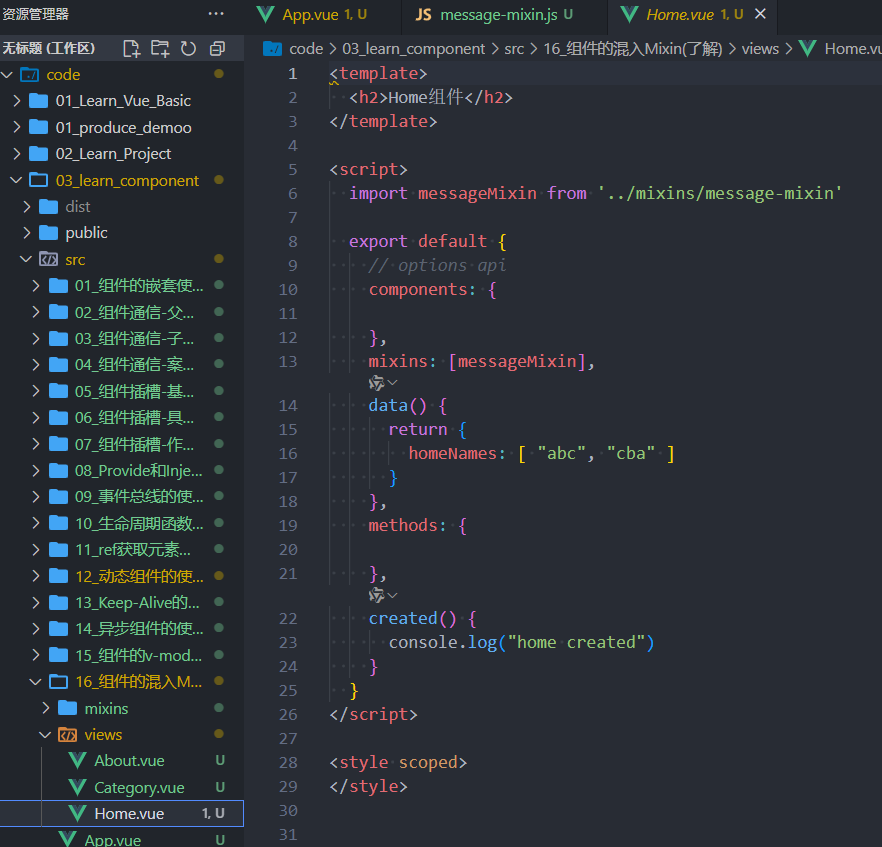
7 组件的混入Mixin
认识Mixin
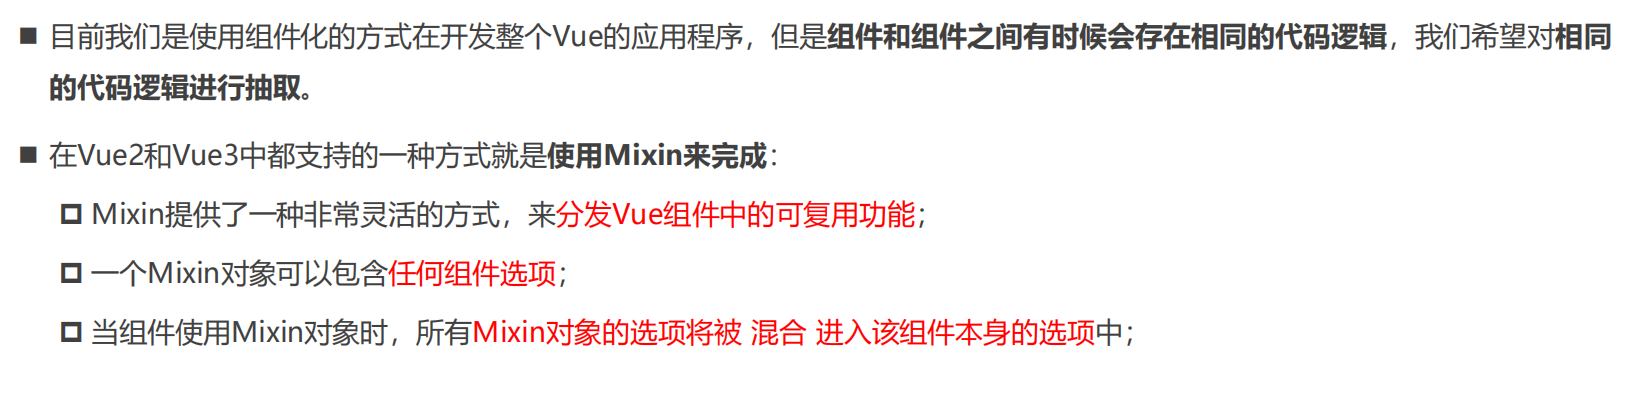
Mixin的基本使用
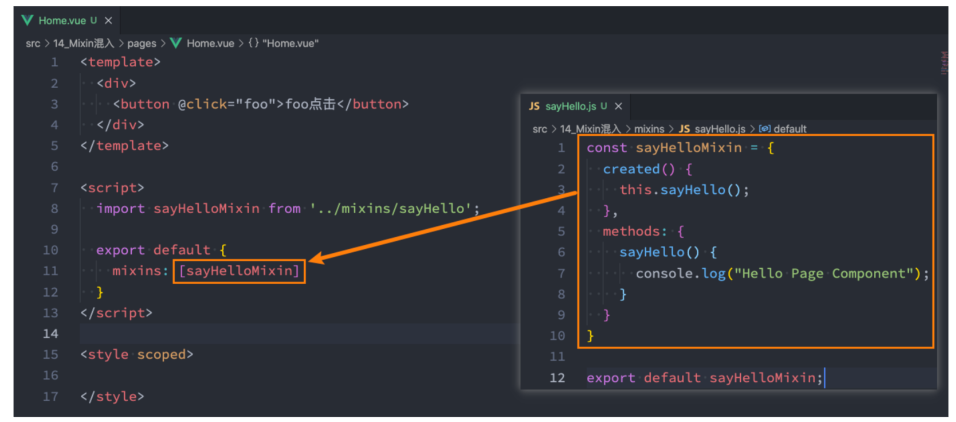
Mixin的合并规则

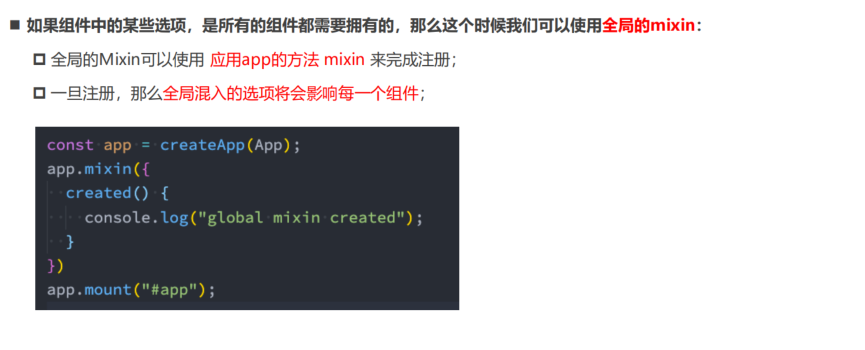
全局混入Mixin
Vue3 -- Composition API
1 认识CompositionAPl
Options API的弊端
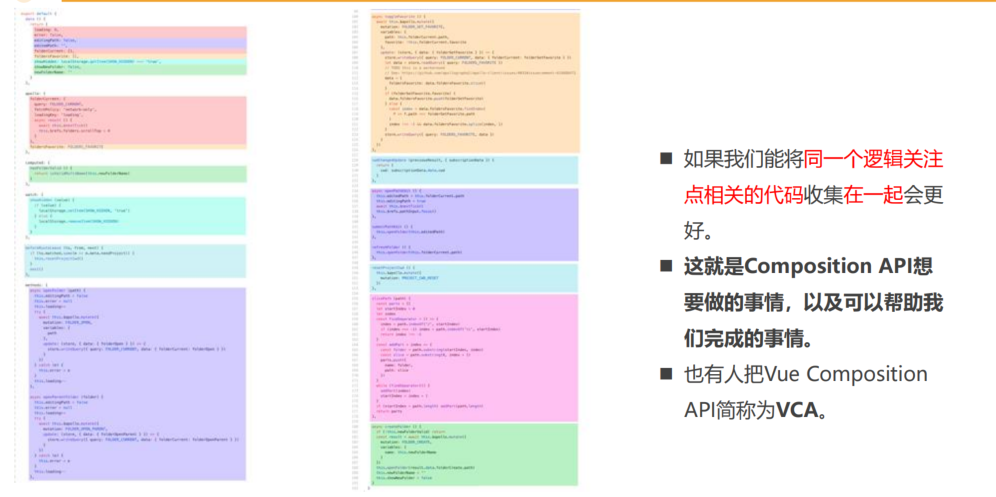
大组件的逻辑分散
认识Composition API

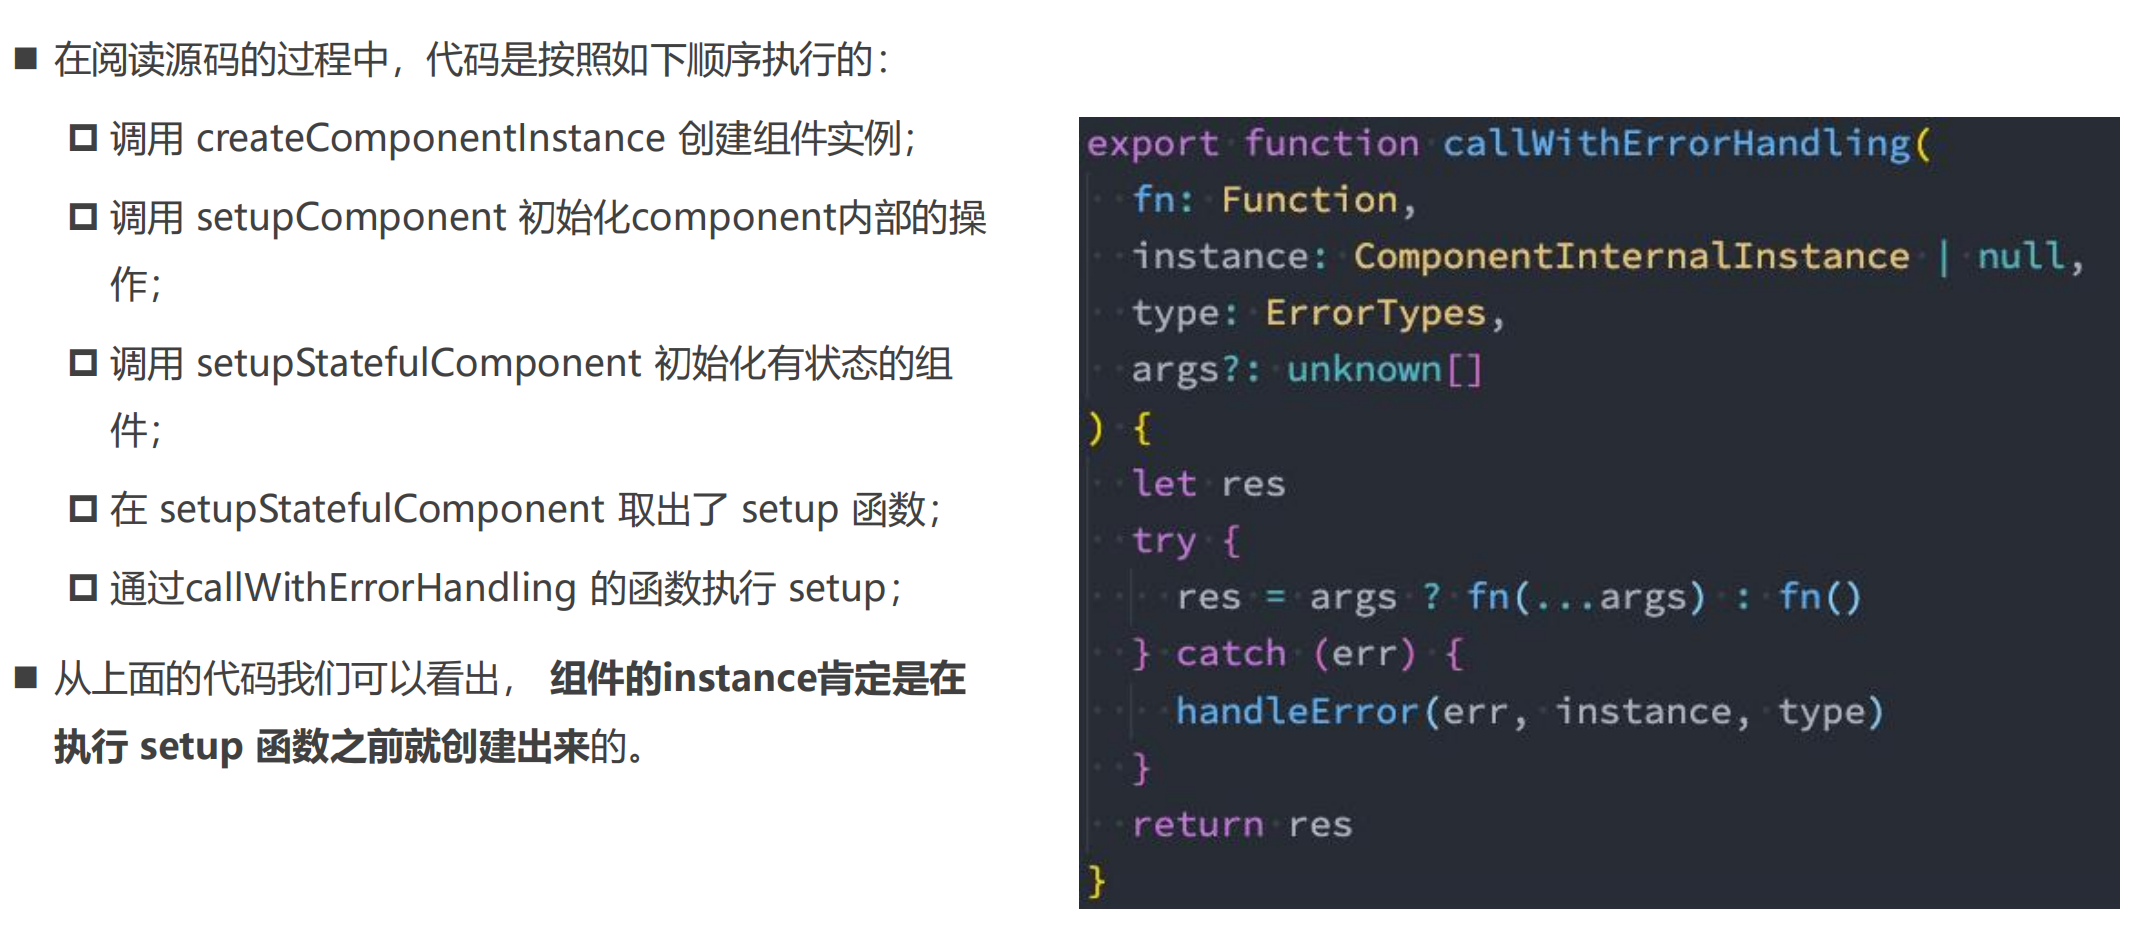
2 Setup函数的基本使用
setup函数的参数
<template>
<div class="app">
<!-- template中ref对象自动解包 -->
<h2>当前计数: {{ counter }}</h2>
<button @click="increment">+1</button>
<button @click="decrement">-1</button>
</div>
</template>
<script>
import { ref } from 'vue'
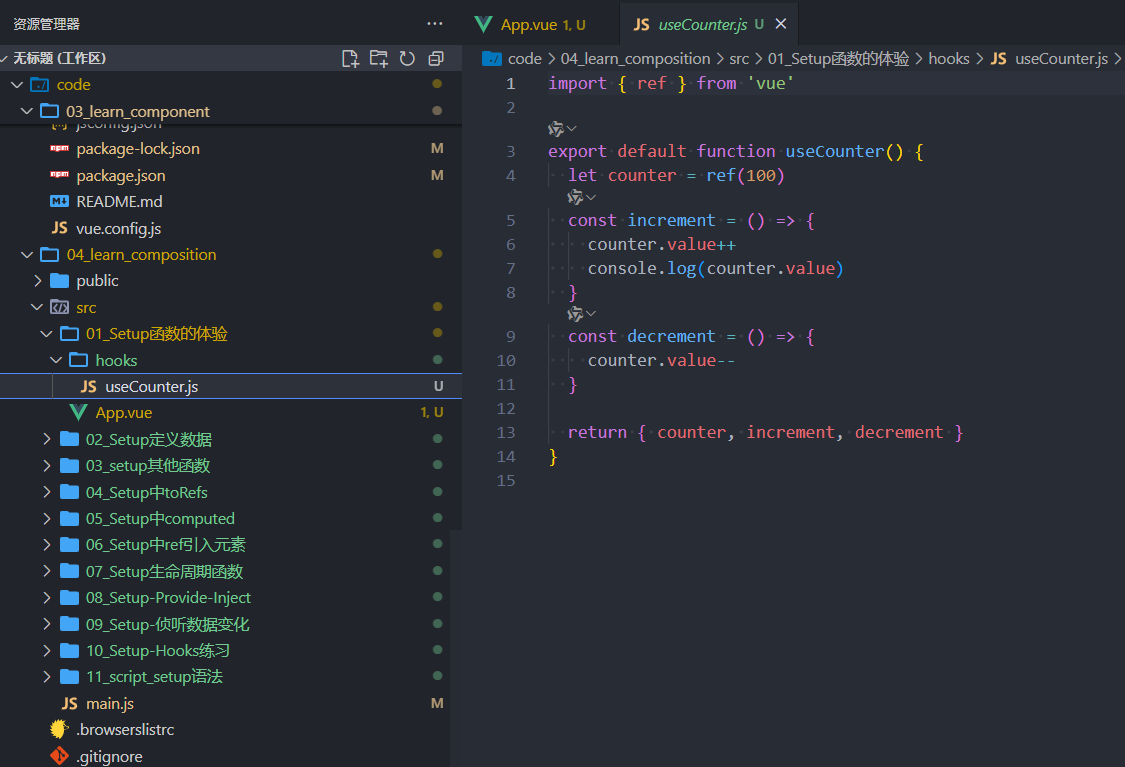
import useCounter from './hooks/useCounter'
export default {
setup() {
// 1.定义counter的内容
// 默认定义的数据都不是响应式数据
// let counter = ref(100)
// const increment = () => {
// counter.value++
// console.log(counter.value)
// }
// const decrement = () => {
// counter.value--
// }
// const { counter, increment, decrement } = useCounter()
return {
...useCounter()
}
}
}
</script>
<style>
</style>
3 Setup中数据的响应式
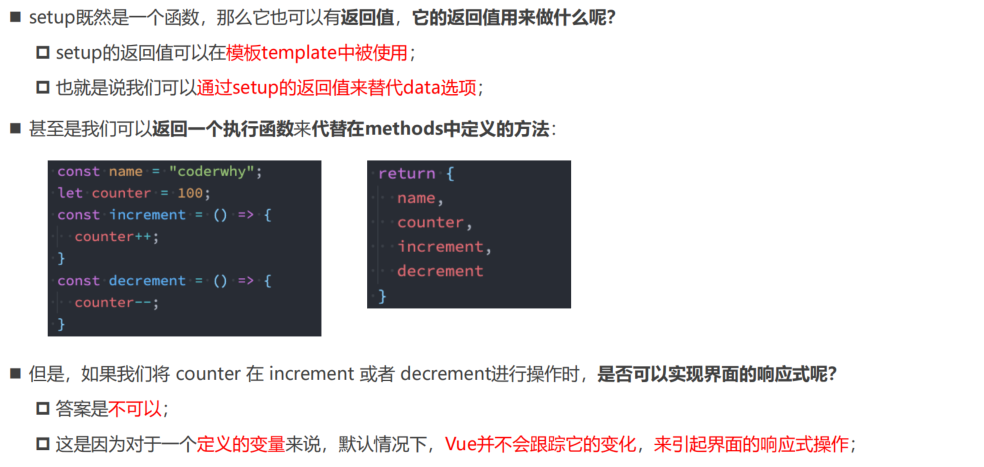
setup函数的返回值
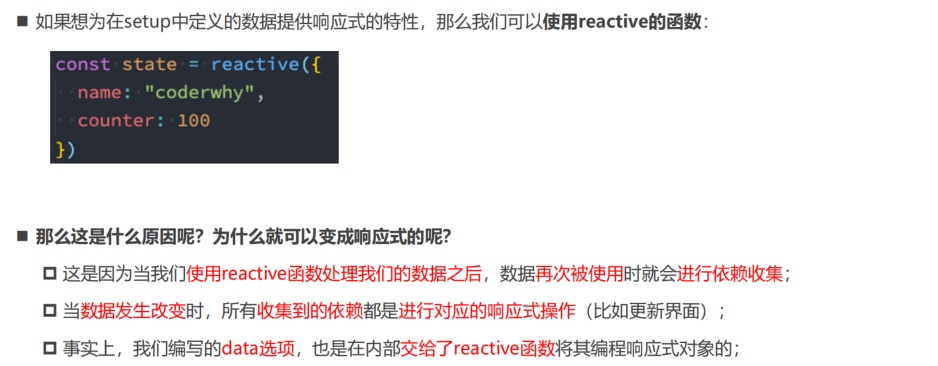
4 Reactive知识点补充
Reactive API
5 Ref知识点补充
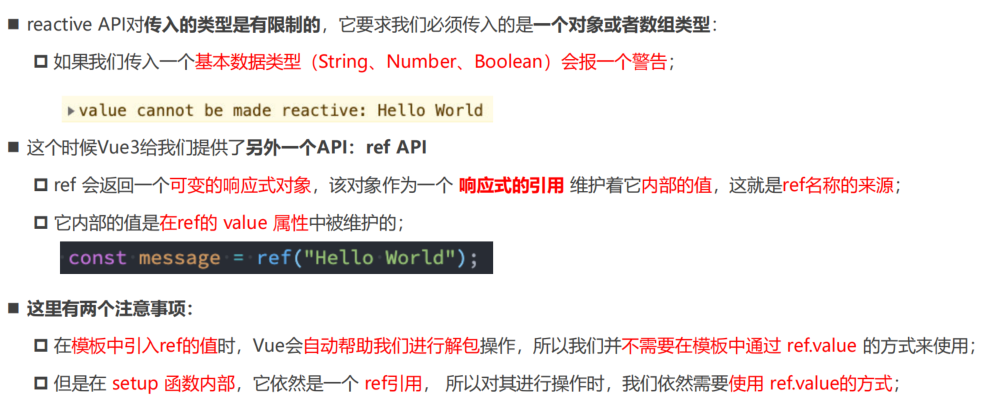
Ref API
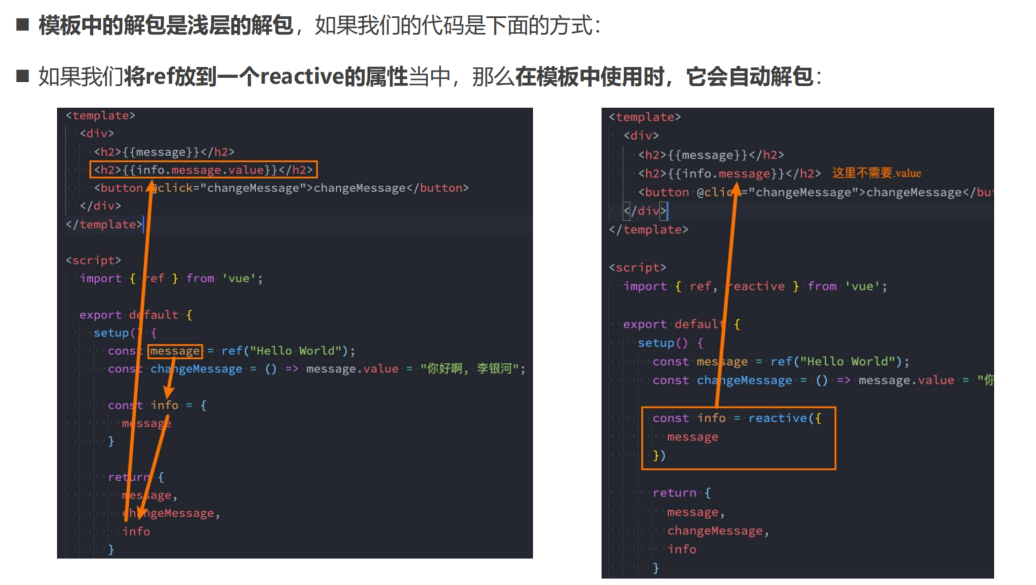
Ref自动解包(测试已经修改)
认识readonly
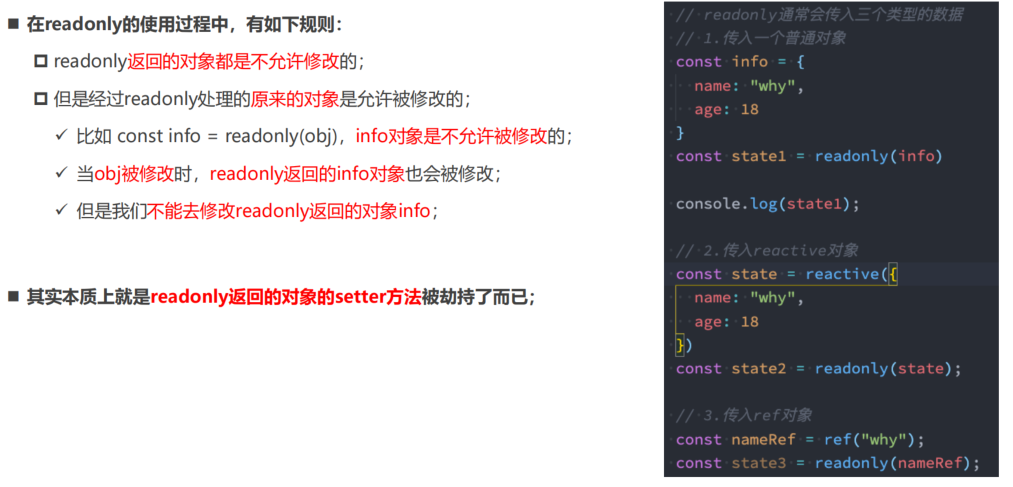
readonly的使用
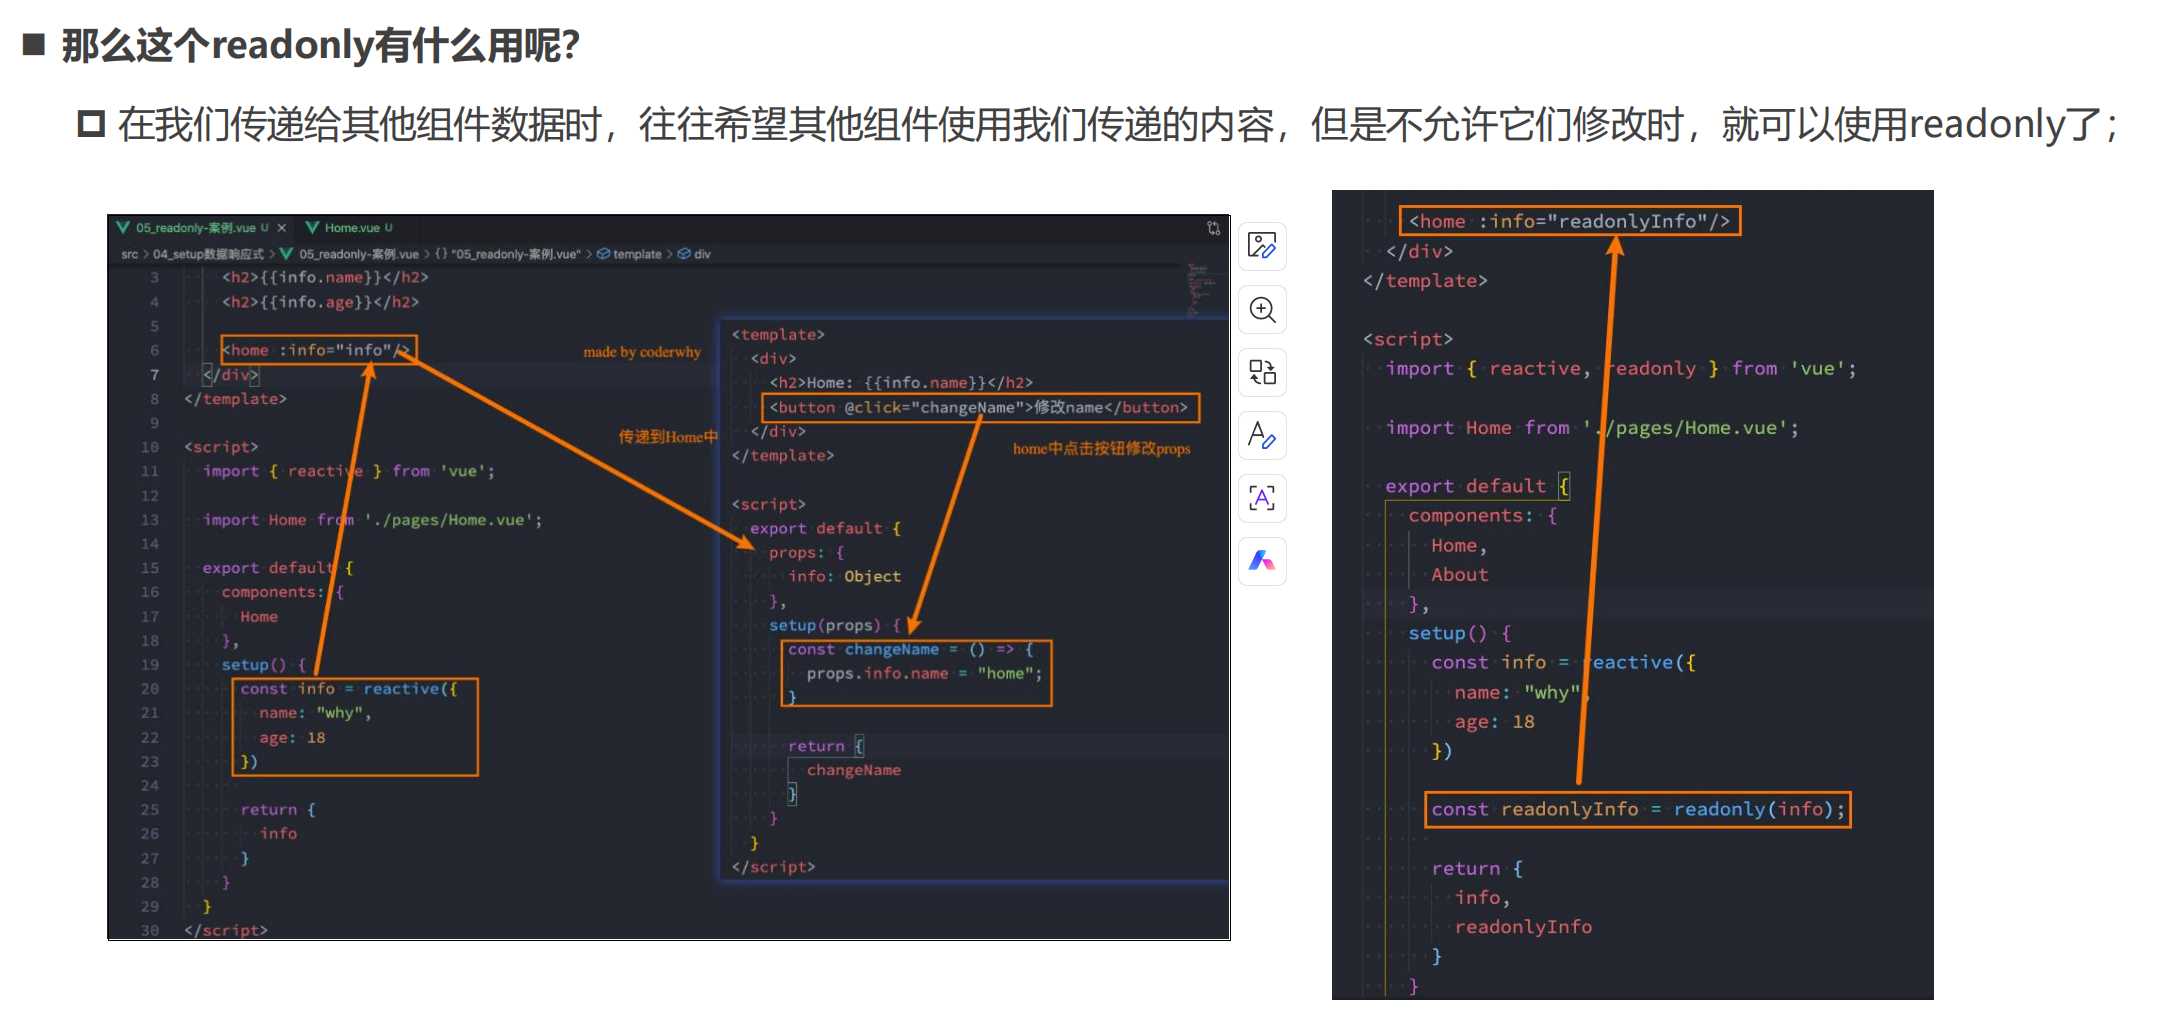
readonly的应用
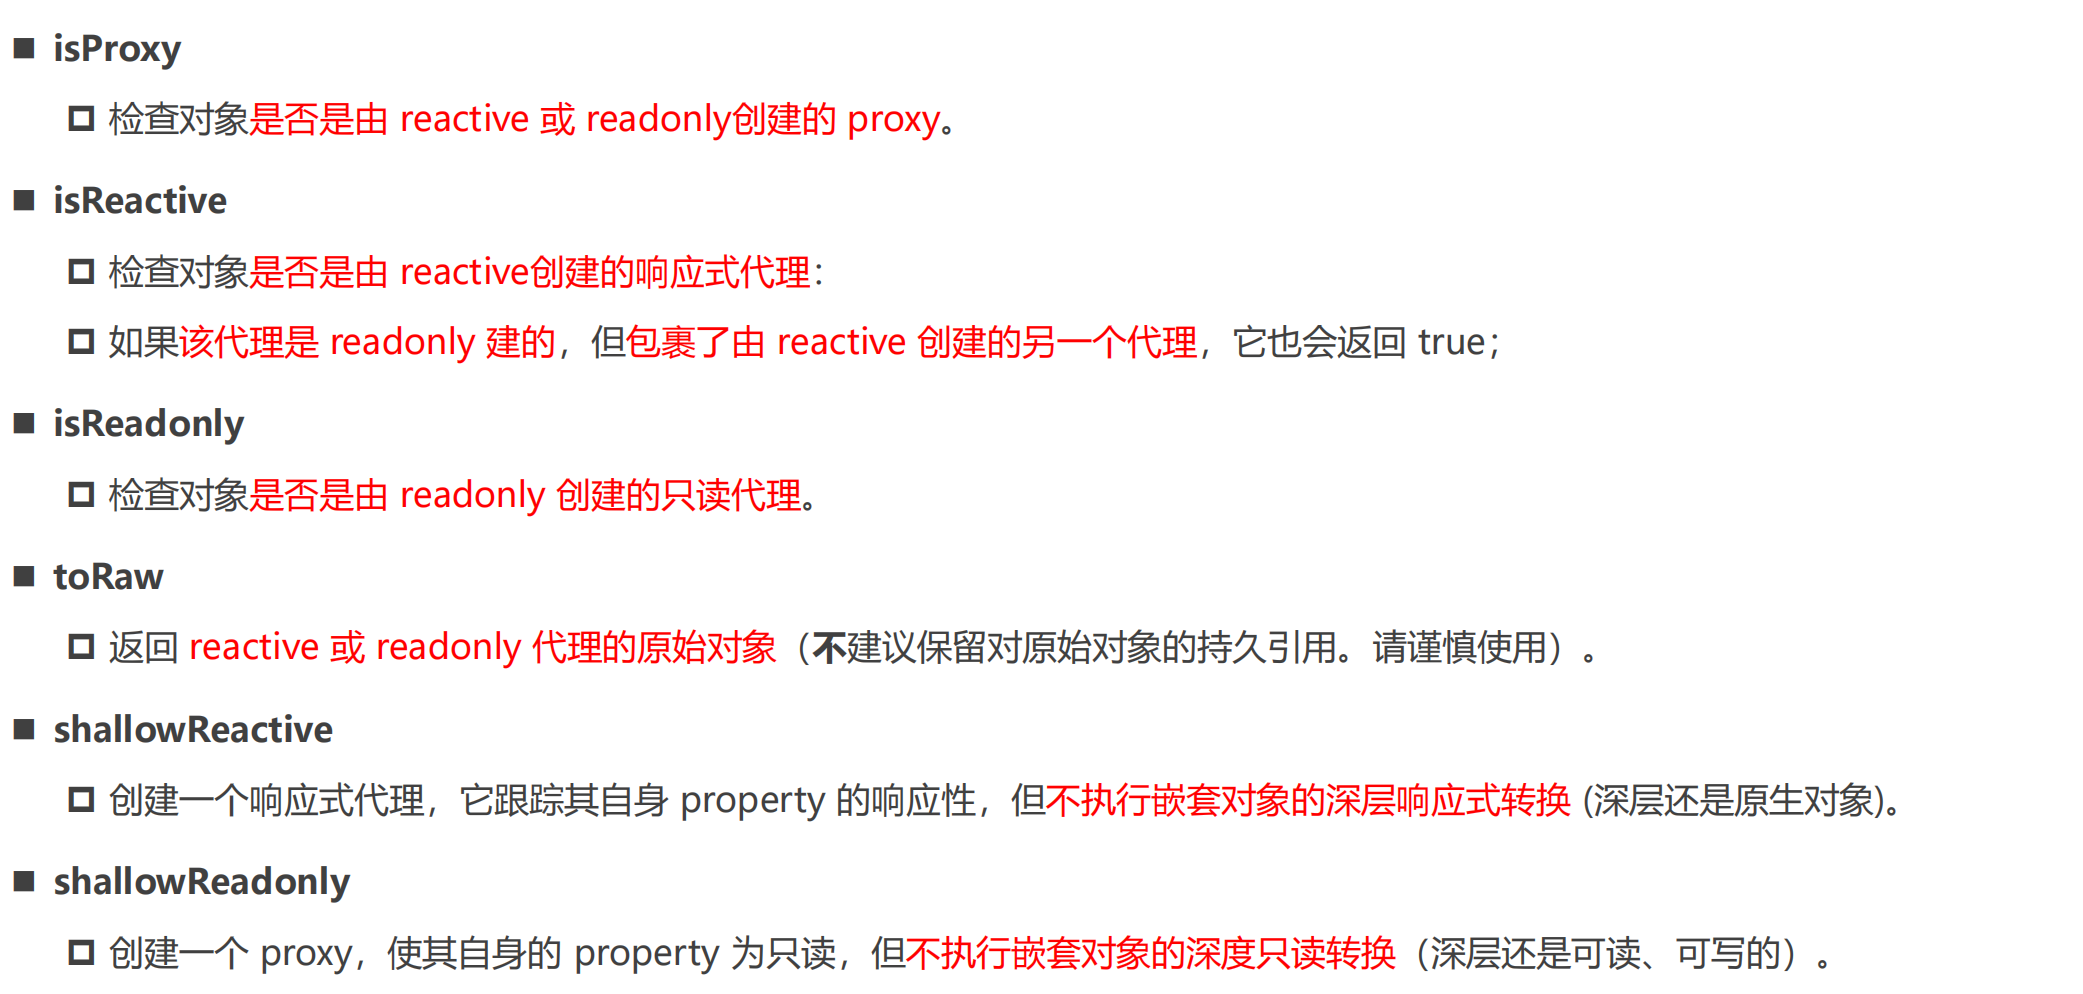
Reactive判断的API
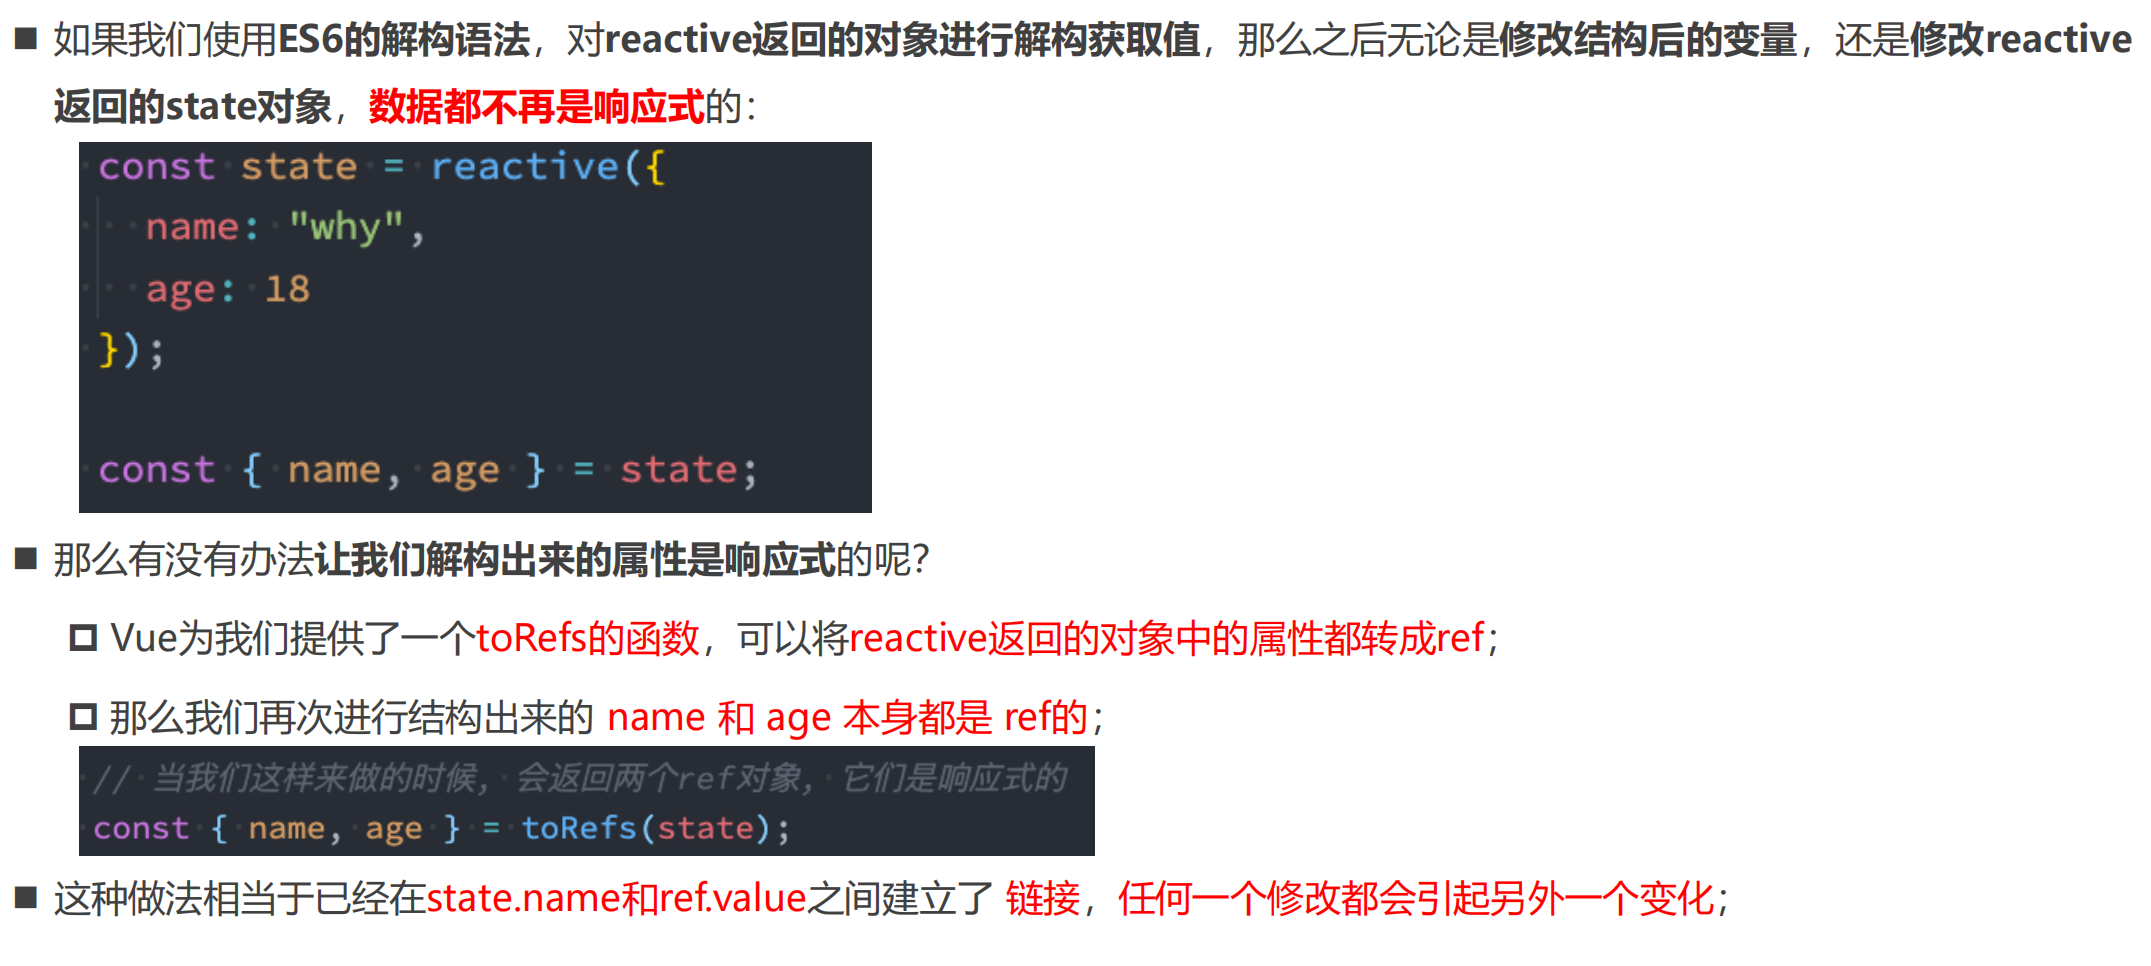
toRefs
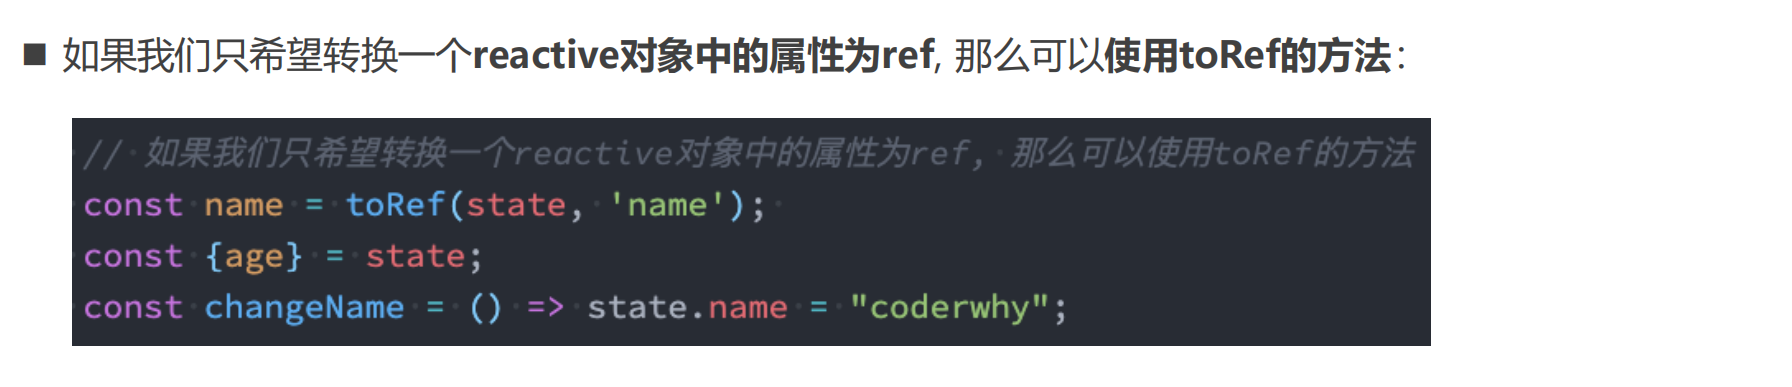
toRef
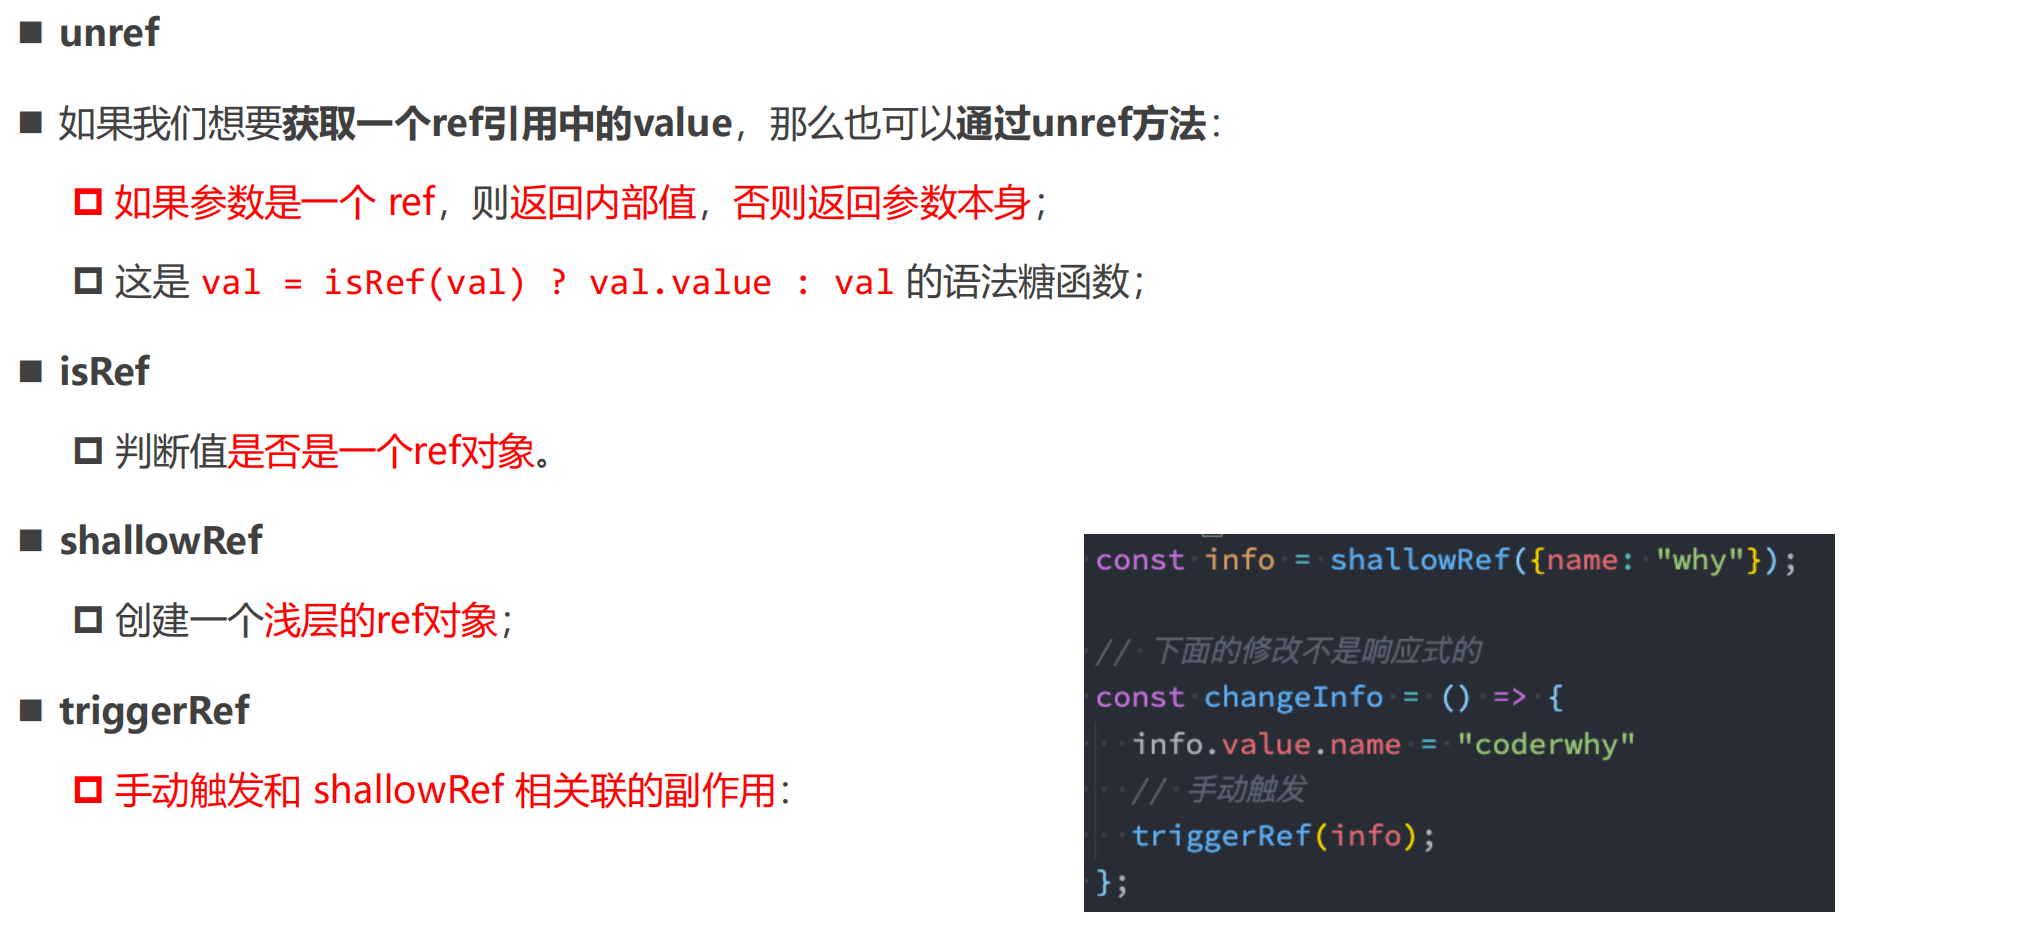
ref其他的API
6 setup中禁用this
setup不可以使用this
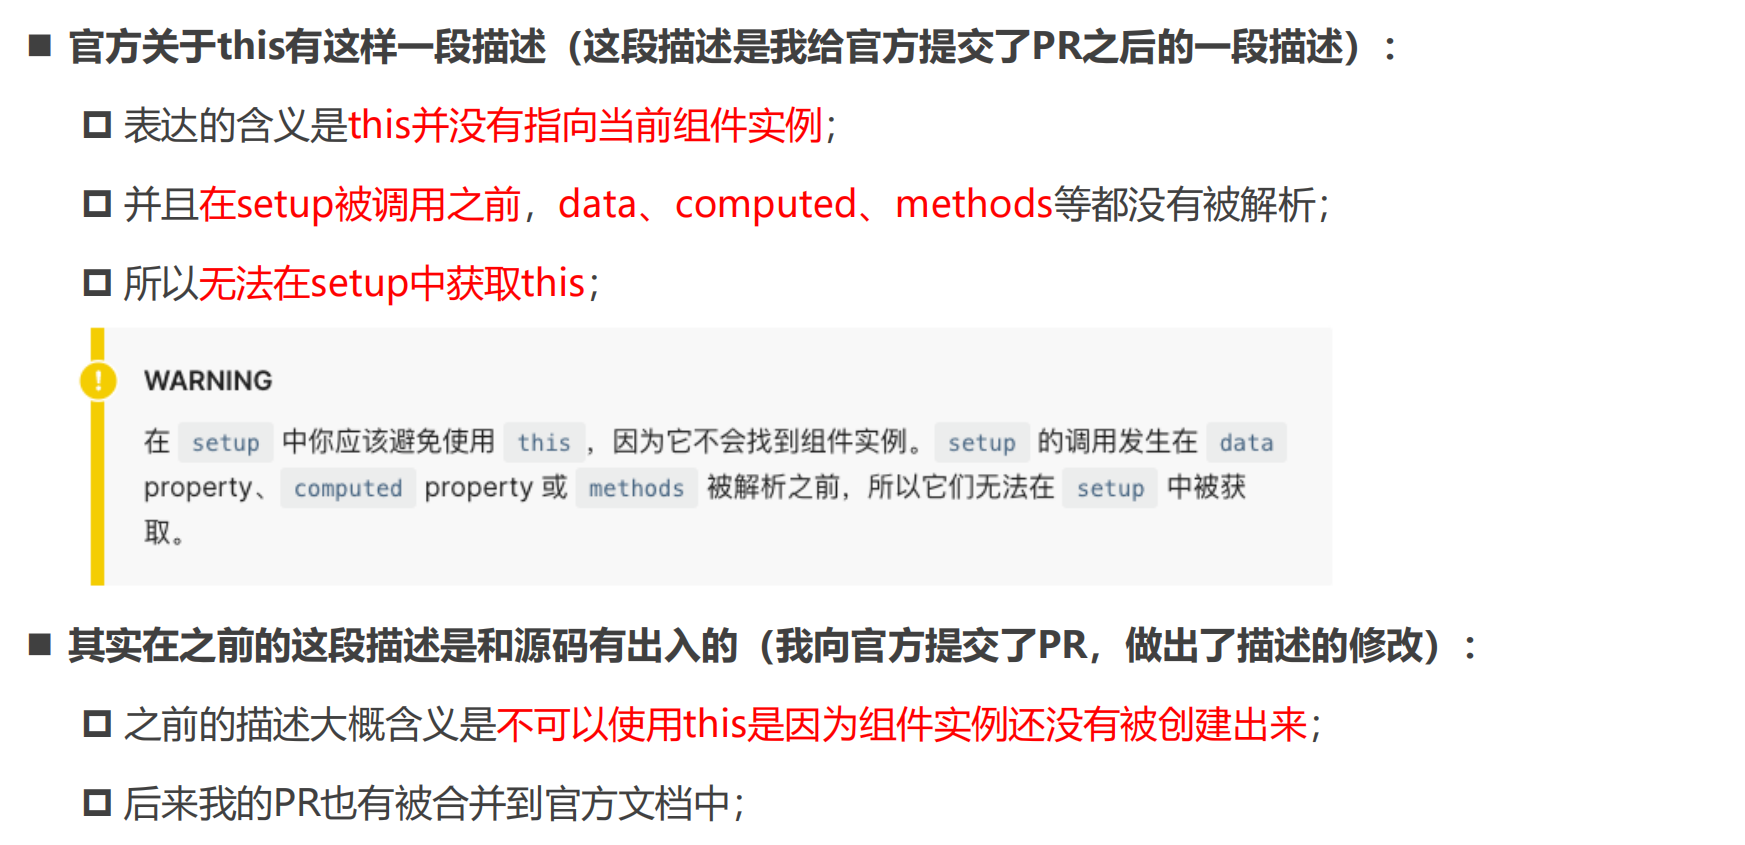
之前关于this的描述问题
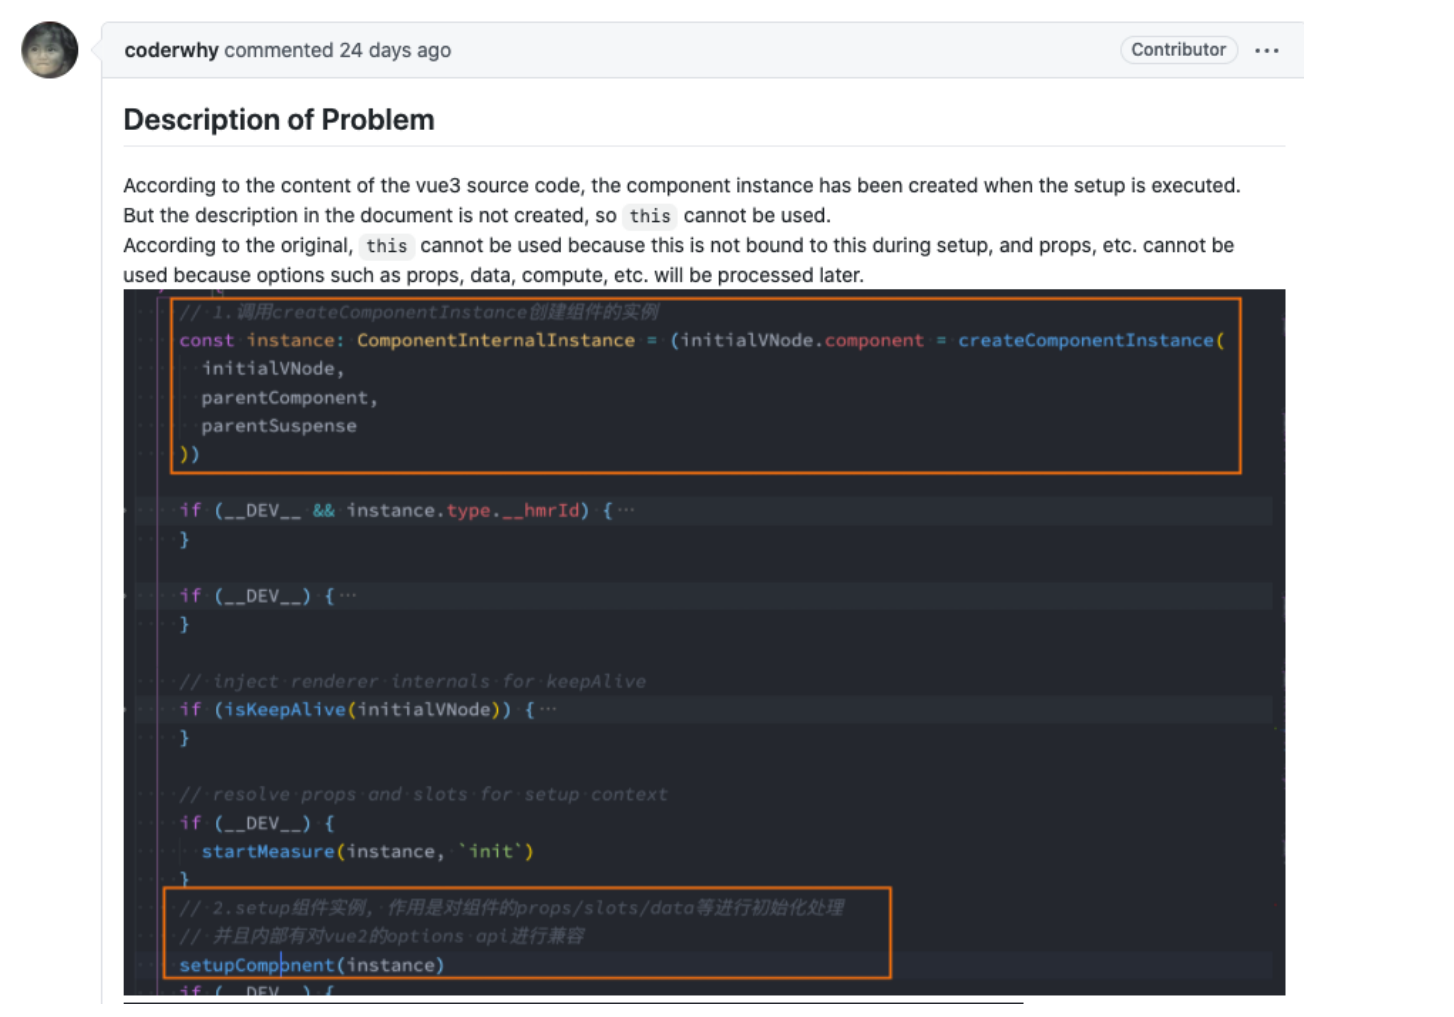
我是如何发现官方文档的错误的呢?