Postman 学习笔记 III:CLI 自动化测试与 Jenkins CI/CD 实践
这一篇的内容比较多,涉及到了 test runner,cli 自动化和一点 Jenkins 的东西,所以会稍微复杂一些
已经写好的笔记在:
这一篇主要会涉及一些自动化和 CI/CD 的部分,repo 地址依旧在:
https://github.com/GoldenaArcher/postman-api-study
repo 之后不会再更新了,其中已经包含笔记中所有的内容
collection 信息
这个是在 collection 中的 ℹ 中的信息,主要是需要这个 collection id:
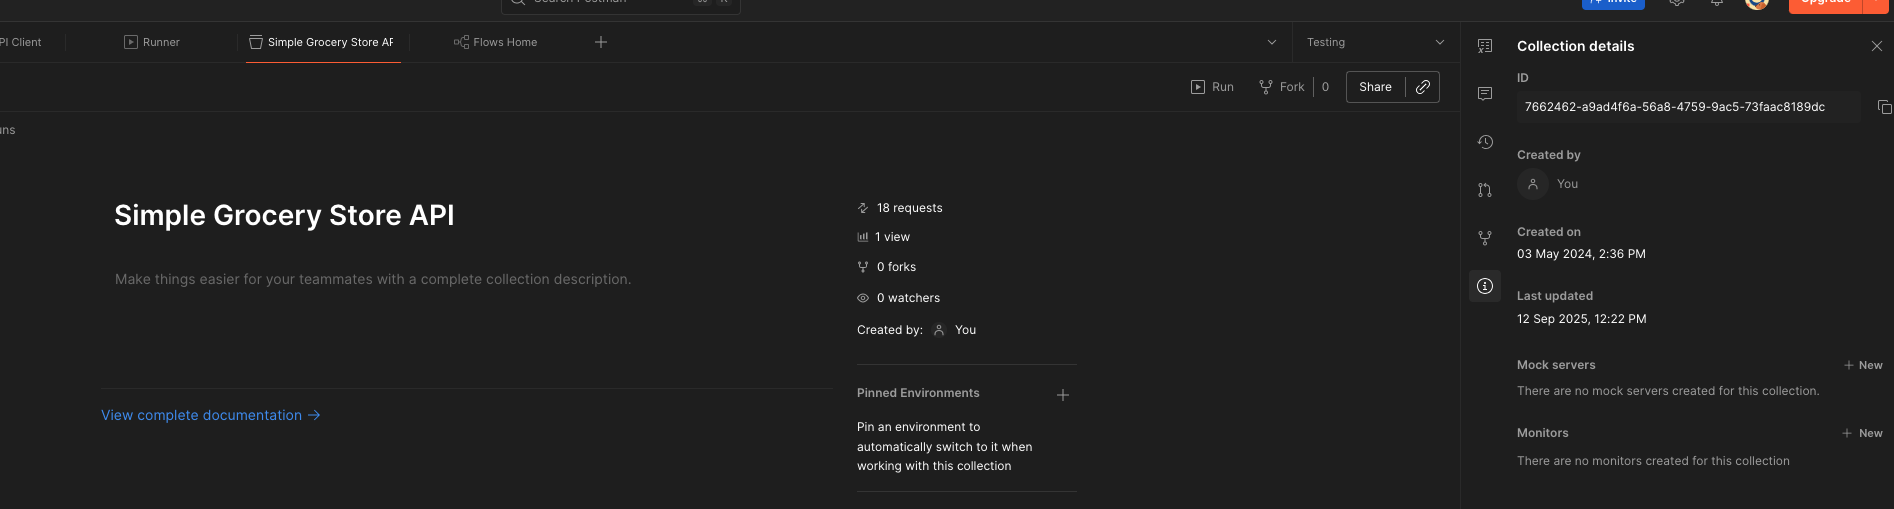
这个 id 在之后使用 cli 运行 collection runner 的时候需要用
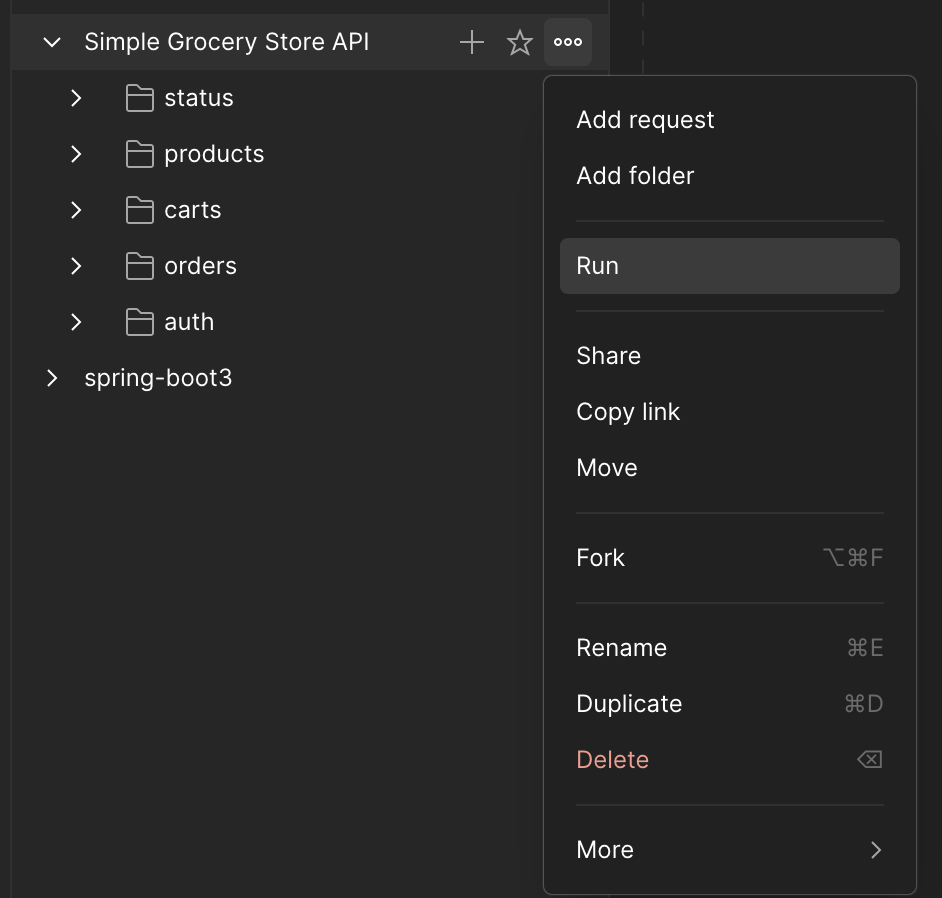
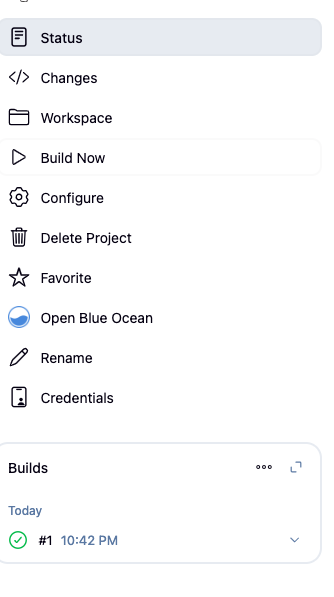
手动运行 collection runner
collection runner 就是一键运行 collection 中所有测试的地方,有 2 两种方式可以打开
-
UI 下方的 status bar,或者快捷键
这个打开的是所有 collection 的 runner,需要手动选择对应的 collection 去运行
-
collection 的 ... 中
这个打开的 runner 是当前 collection 的
截图我没放下来,不过 UI 界面是一样的,在 UI 中选择 Run manually 执行即可:
运行后的结果如下:

🚨:collection runner 是有运行 limit 的,官方文档 **Changes to Postman's packaging in v11: plans, add-ons, and more** 中提到:
Beginning May 1, 2024, Postman users across all plan types will receive 25 collection runs per month with their base license. Previously, Enterprise Essentials and Professional teams were limited to 250 collection runs per team/month.
Current customers on the Enterprise Essentials and Professional plans will maintain the previous limit of 250 runs per team/month. If you wish to switch to the new model with a user-based run limit, submit a support request. We are happy to honor this adjustment to your plan.
个人使用,现在每个月手动操作 runner 的上限在 25------这个是手动操作,脚本执行的并不在这个 quota 中
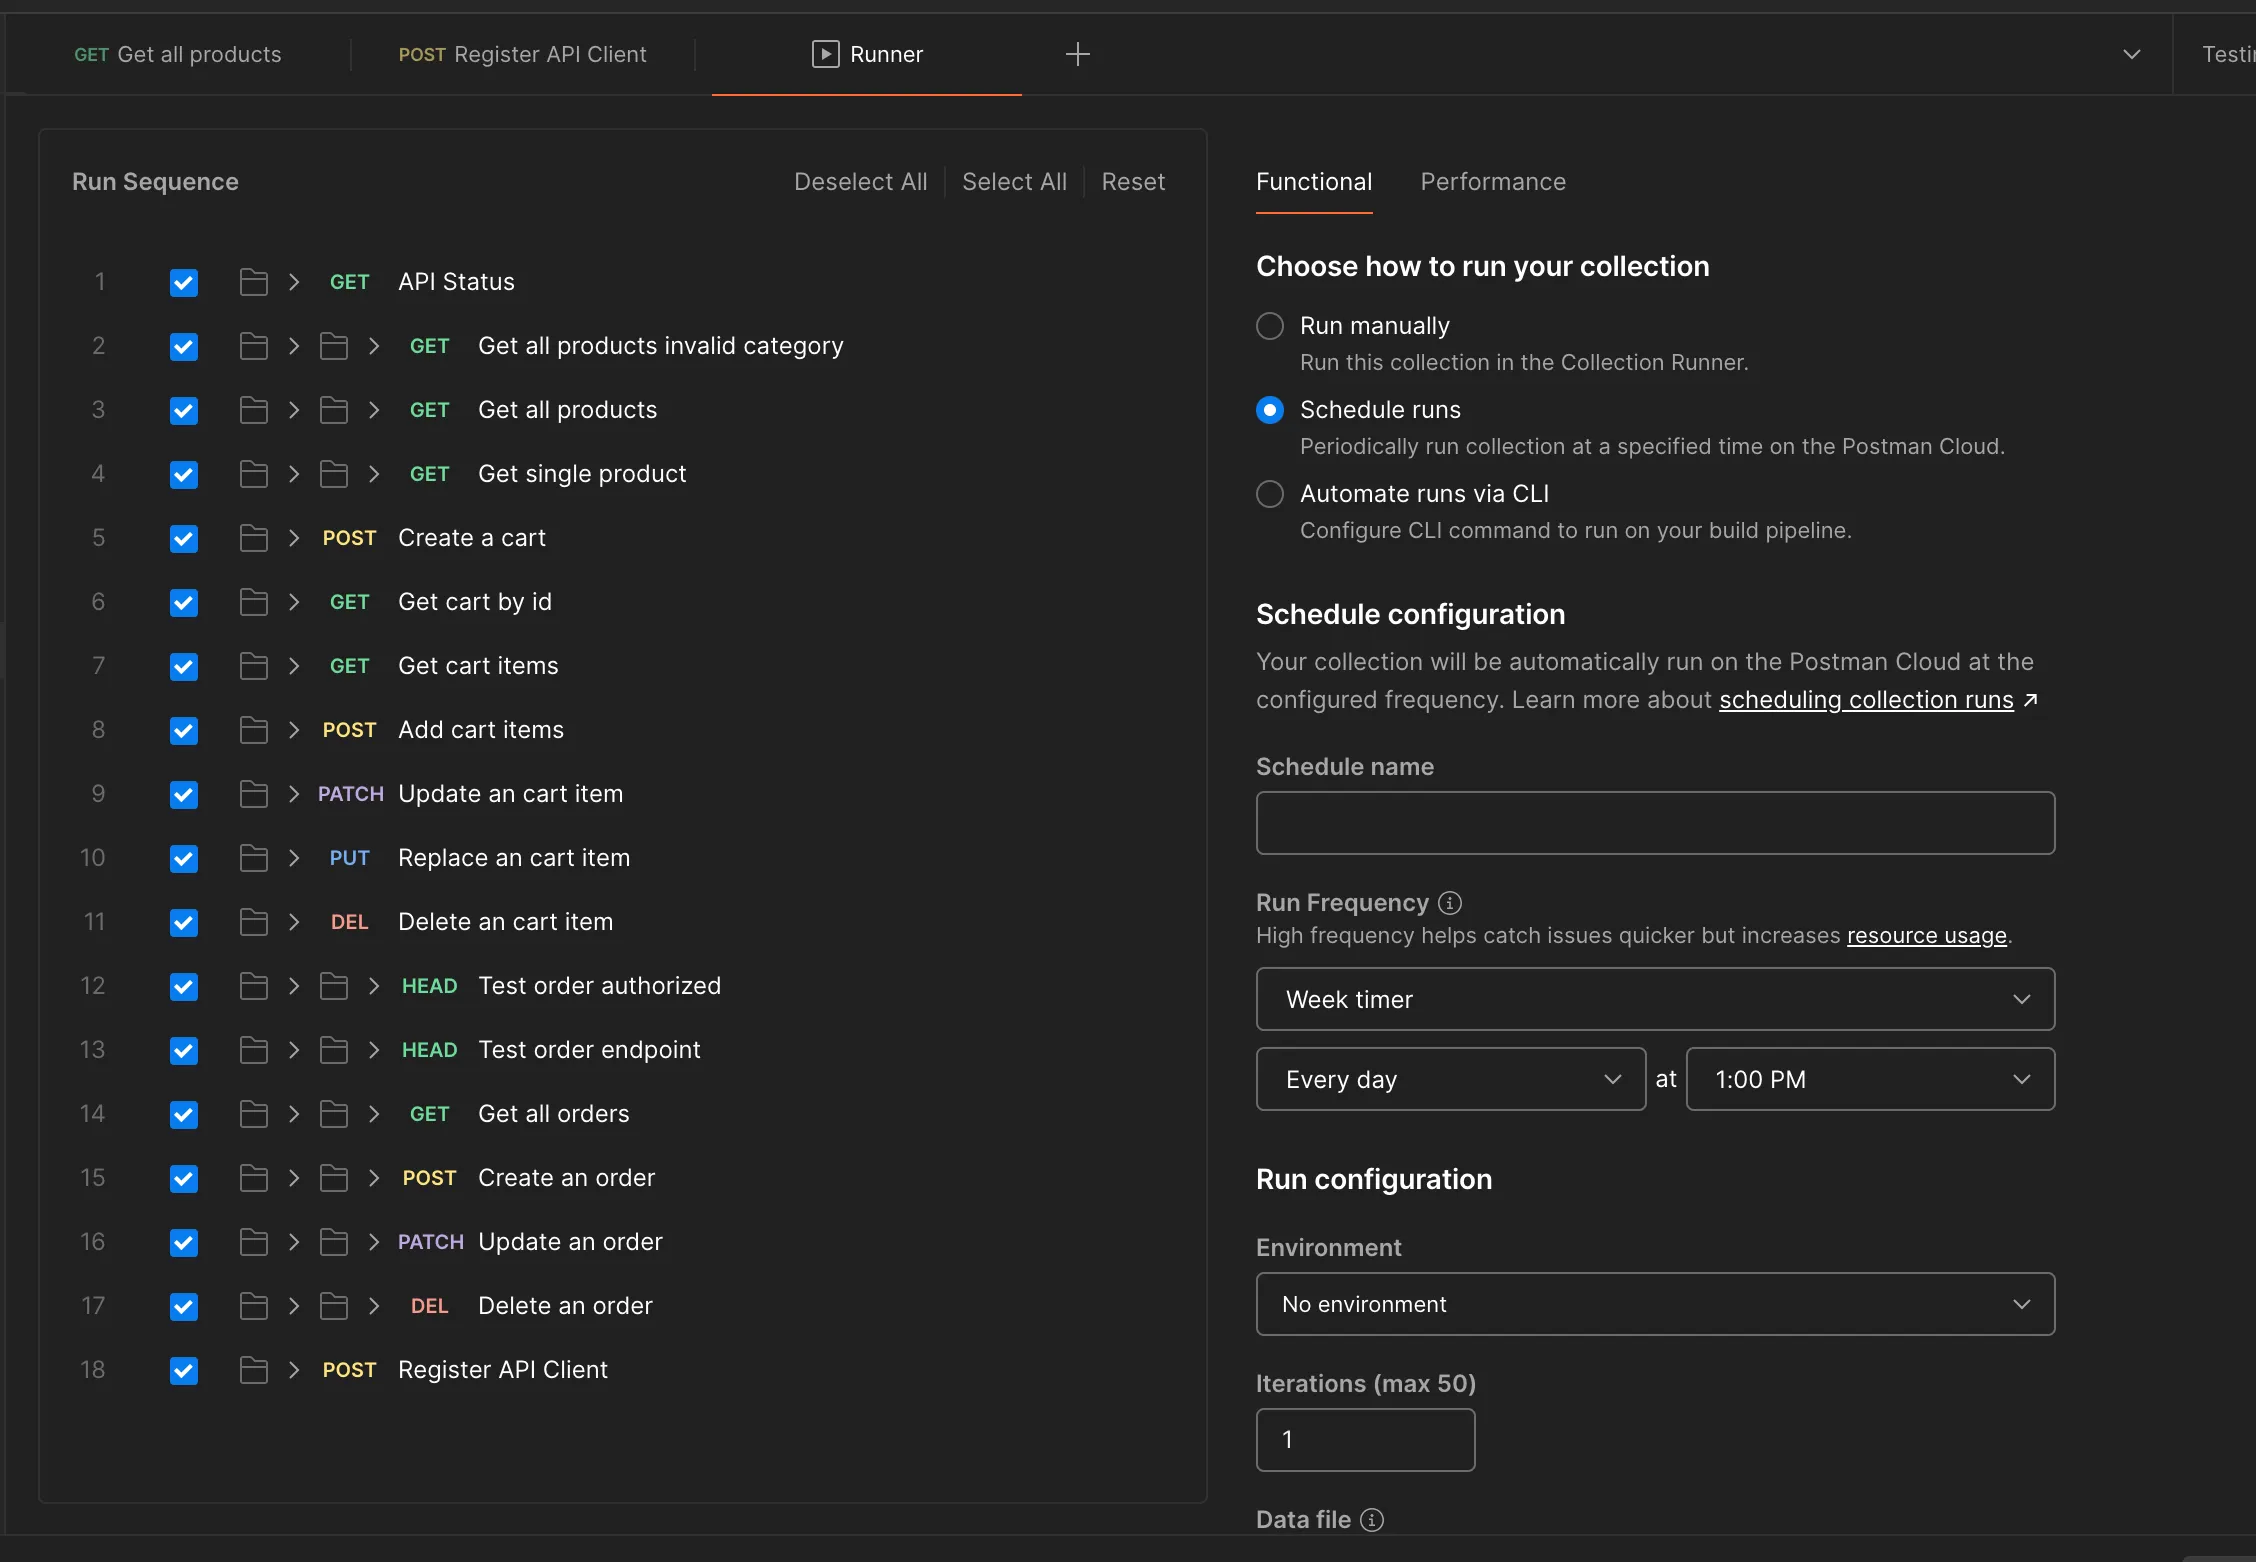
schedule 执行
这个依旧在 UI 中操作,不过选的是 Schedule runs:

postman 的 schedule jobs 是在自己的云端操作的,因此在 schedule 的时间里,用户并不需要在本地打开 postman 的 client
scheduled run 有个问题,就是它无法访问 collection variable,这一点在具体操作的时候也是需要注意一下的
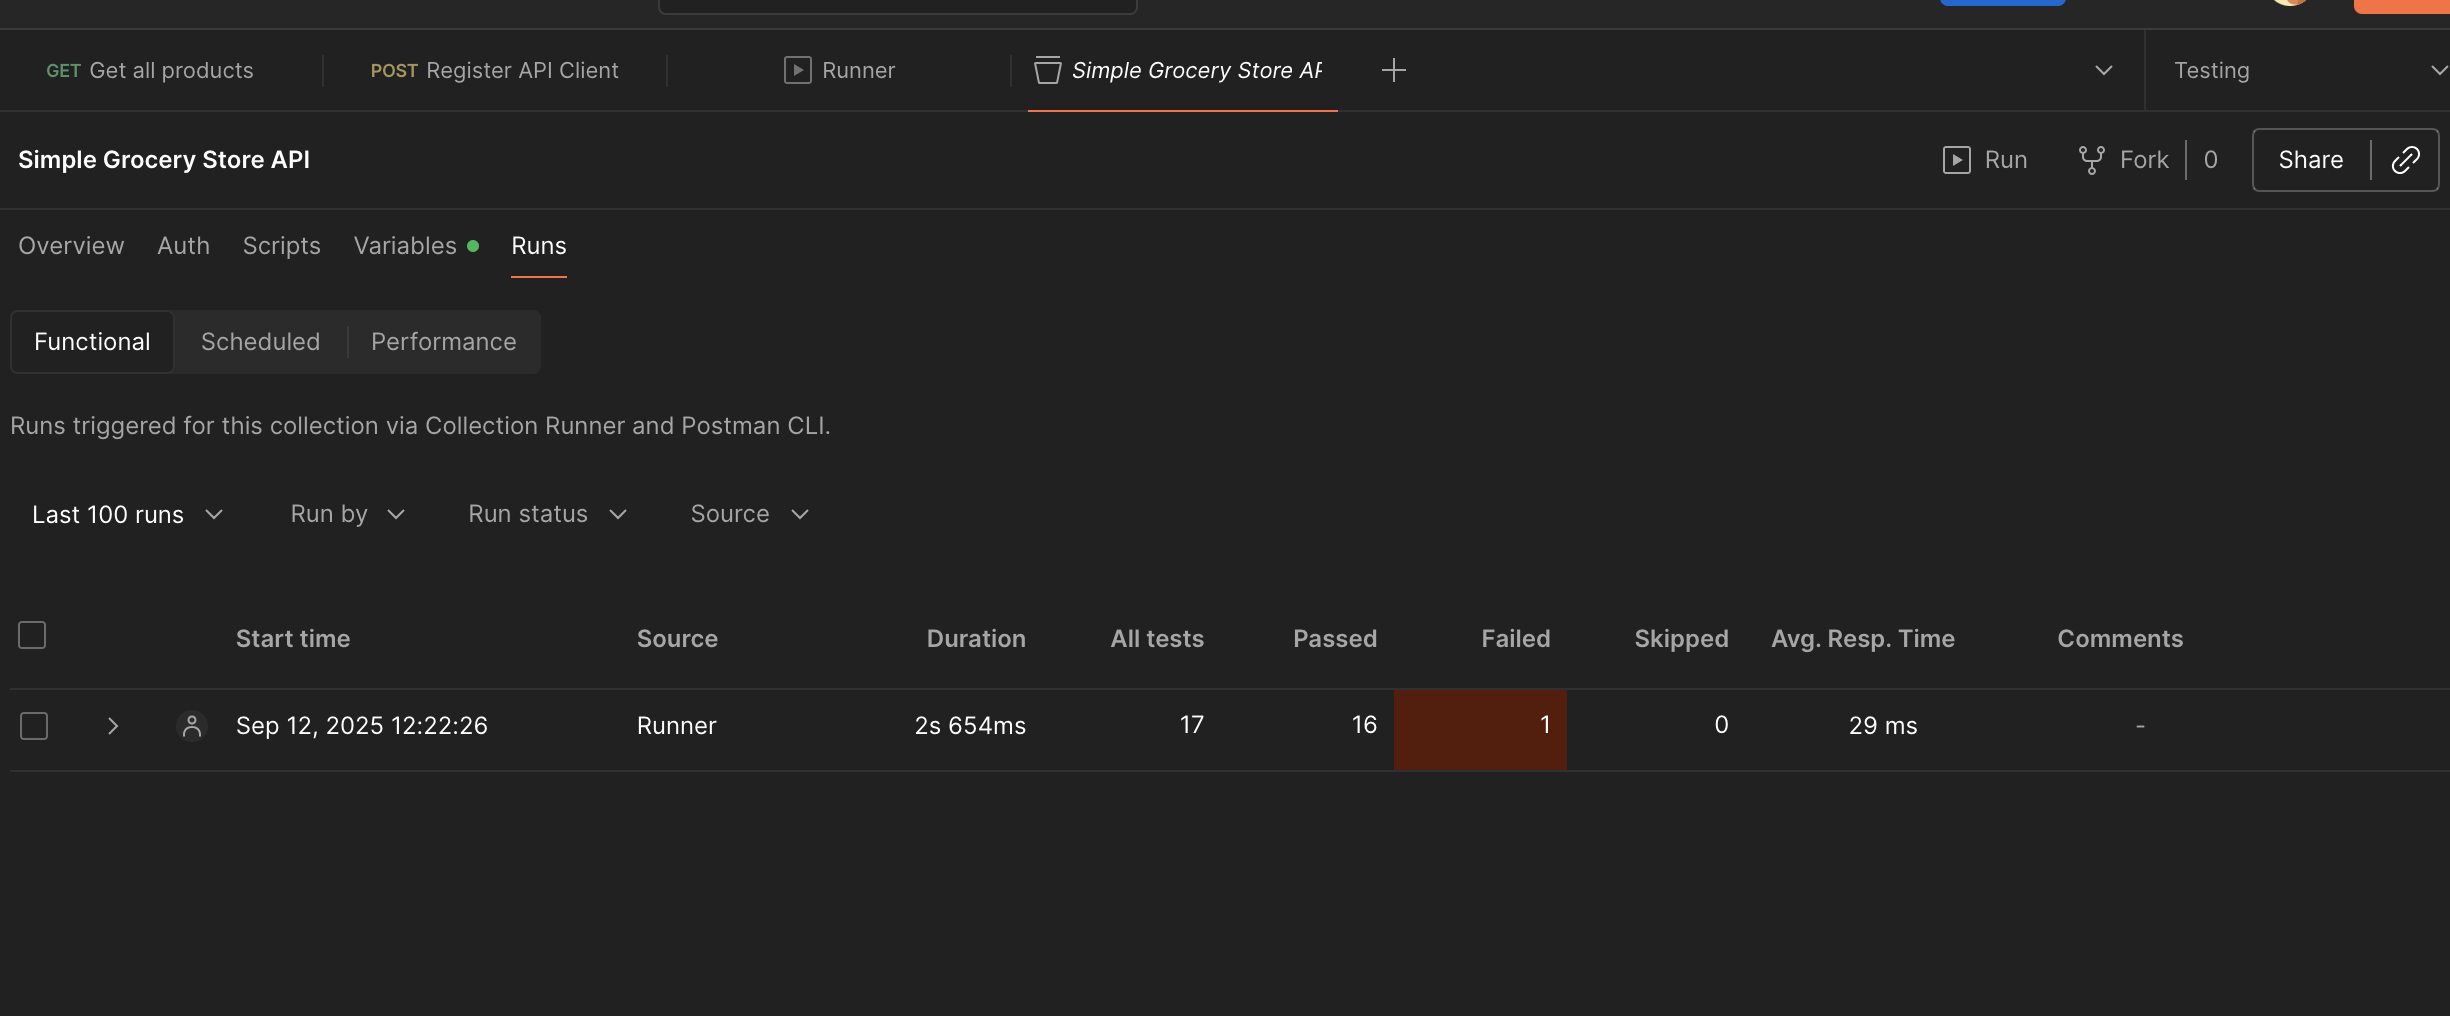
查看运行结果
这个查看运行结果有点反直觉,需要在 collection 中查看:
postman cli
postman cli 是官方推出的第二代工具,与 postman 的结合做的算是比较好的,从未来的趋势来看,postman 应该是会主推这个工具
它的优点在于提供从 cli 登录的功能,并且可以缓存登录信息,这样对 API key 的需求会少一点------当然,配置好脚本的话,登录功能并不是刚需
安装
下载我用的是 curl指令,通过官方文档下载即可: Install the Postman CLI
bash
❯ curl -o- "https://dl-cli.pstmn.io/install/osx_64.sh" | sh

  % Total    % Received % Xferd  Average Speed   Time    Time     Time  Current
                                 Dload  Upload   Total   Spent    Left  Speed
100  1801  100  1801    0     0   5388      0 --:--:-- --:--:-- --:--:--  5408
  % Total    % Received % Xferd  Average Speed   Time    Time     Time  Current
                                 Dload  Upload   Total   Spent    Left  Speed
100 29.8M  100 29.8M    0     0  54.7M      0 --:--:-- --:--:-- --:--:-- 54.7M
The Postman CLI has been installed

# after installation
❯ postman
Usage: postman [options] [command]

Options:
  -v, --version     output the version number
  --silent          Silences all terminal output
  -h, --help        display help for command

Commands:
  collection        Run and test your Postman collections directly from the command line.
  api               Publish and test your APIs directly from the command line
  login [options]   Authenticate with Postman to access your resources.
  logout [options]  Delete the stored Postman API key.
  spec              Lint and validate Specifications from the command line
  monitor           Invoke a monitor run and display results

To get available options for a command:
  postman <command> -h
跑 runner
这里就要用到之前提到的 collection id 和/或 environment id 了,不过 runner 会提供明文 id 可以直接 cv,UI 如下:
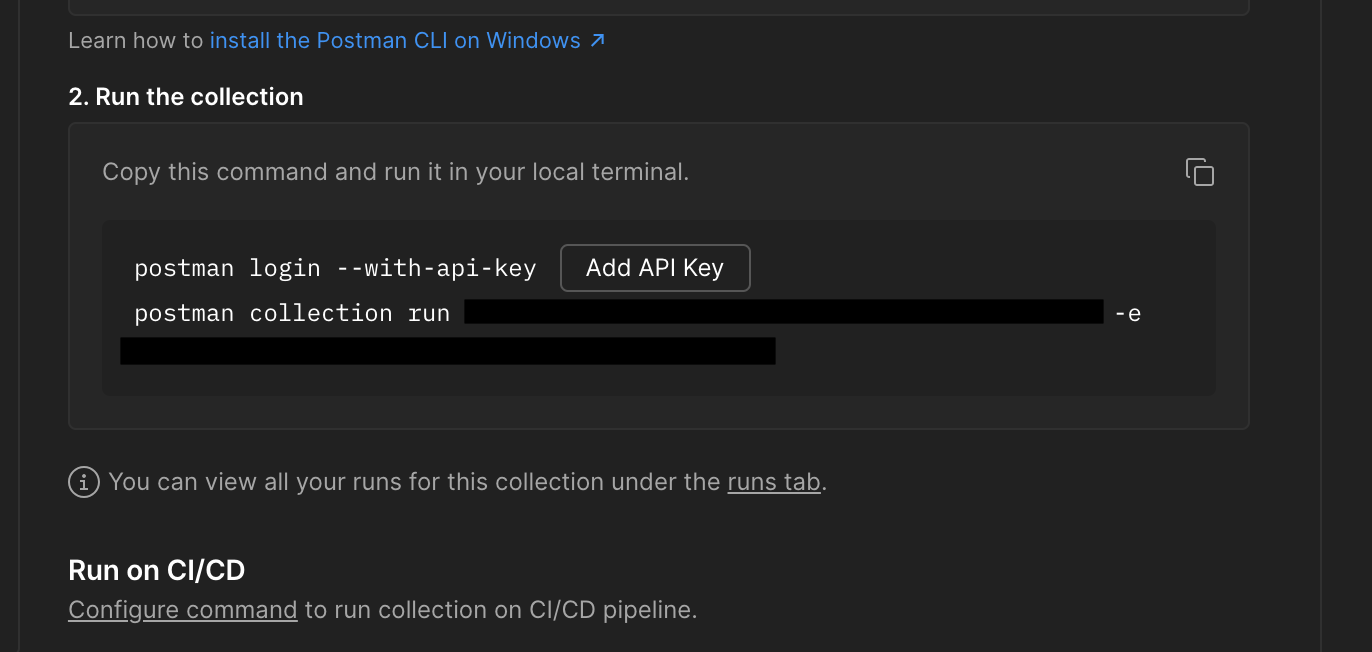
👀:如果没有生成过 API key,记得点击 Add API Key 这个 🔘 去生成一个。默认情况下,如果 60 天内没有用过这个 API key,那么 postman 就会自动删除这个 key。过期日期是可以在账户进行修改的
大体操作如下:
bash
❯ postman login --with-api-key POSTMAN_GENERATED_API_KEY
postman collection run collection_id -e environment_id
Logged in using api key of user:
Logged in successfully.
Running your collection...
postman
Simple Grocery Store API
❏ status
↳ API Status
┌
│
└
GET http://localhost:8080/status [200 OK, 309 B, 77 ms]
✓ Status code is 200
✓ Status is OK
❏ products / error cases
↳ Get all products invalid category
GET http://localhost:8080/products?= [400 Bad Request, 433 B, 7 ms]
✓ Status code is 400
✓ Error message
❏ products / success cases
↳ Get all products
GET http://localhost:8080/products?available=true [200 OK, 596 B, 17 ms]
✓ At least one available product exists
✓ Return a valid product object and is in stock
↳ Get single product
GET http://localhost:8080/products/4643 [200 OK, 408 B, 6 ms]
✓ Status code is 200
✓ Response is an object
✓ Correct product was retrieved
✓ Product name
✓ Product in stock
✓ Product price
❏ carts
↳ Create a cart
POST http://localhost:8080/carts [201 Created, 348 B, 7 ms]
1. Status code is 201
✓ Response returns a cartId
↳ Get cart by id
GET http://localhost:8080/carts/bx0-ycNjqIm5IvufuuZ09 [200 OK, 343 B, 6 ms]
↳ Get cart items
GET http://localhost:8080/carts/bx0-ycNjqIm5IvufuuZ09/items [200 OK, 295 B, 6 ms]
↳ Add cart items
POST http://localhost:8080/carts/bx0-ycNjqIm5IvufuuZ09/items [201 Created, 330 B, 6 ms]
✓ Status code is 201
✓ Response returns a valid itemId
↳ Update an cart item
PATCH http://localhost:8080/carts/bx0-ycNjqIm5IvufuuZ09/items/12345 [204 No Content, 250 B, 6 ms]
↳ Replace an cart item
PUT http://localhost:8080/carts/bx0-ycNjqIm5IvufuuZ09/items/938550560 [204 No Content, 250 B, 5 ms]
↳ Delete an cart item
DELETE http://localhost:8080/carts/bx0-ycNjqIm5IvufuuZ09/items/938550560 [204 No Content, 250 B, 4 ms]
❏ orders / error cases
↳ Test order authorized
HEAD http://localhost:8080/orders [401 Unauthorized, 252 B, 4 ms]
✓ Status code is 401
❏ orders / success cases
↳ Test order endpoint
HEAD http://localhost:8080/orders [200 OK, 242 B, 4 ms]
↳ Get all orders
GET http://localhost:8080/orders [422 Unprocessable Entity, 707 B, 43 ms]
↳ Create an order
POST http://localhost:8080/orders [400 Bad Request, 430 B, 14 ms]
2⠄ JSONError in test-script
↳ Update an order
PATCH http://localhost:8080/orders/ord_123456789 [400 Bad Request, 430 B, 5 ms]
↳ Delete an order
DELETE http://localhost:8080/orders/7F3jI7FjBY1G7cPb6fIUc [422 Unprocessable Entity, 707 B, 4 ms]
❏ auth
↳ Register API Client
POST http://localhost:8080/api-clients [201 Created, 326 B, 6 ms]
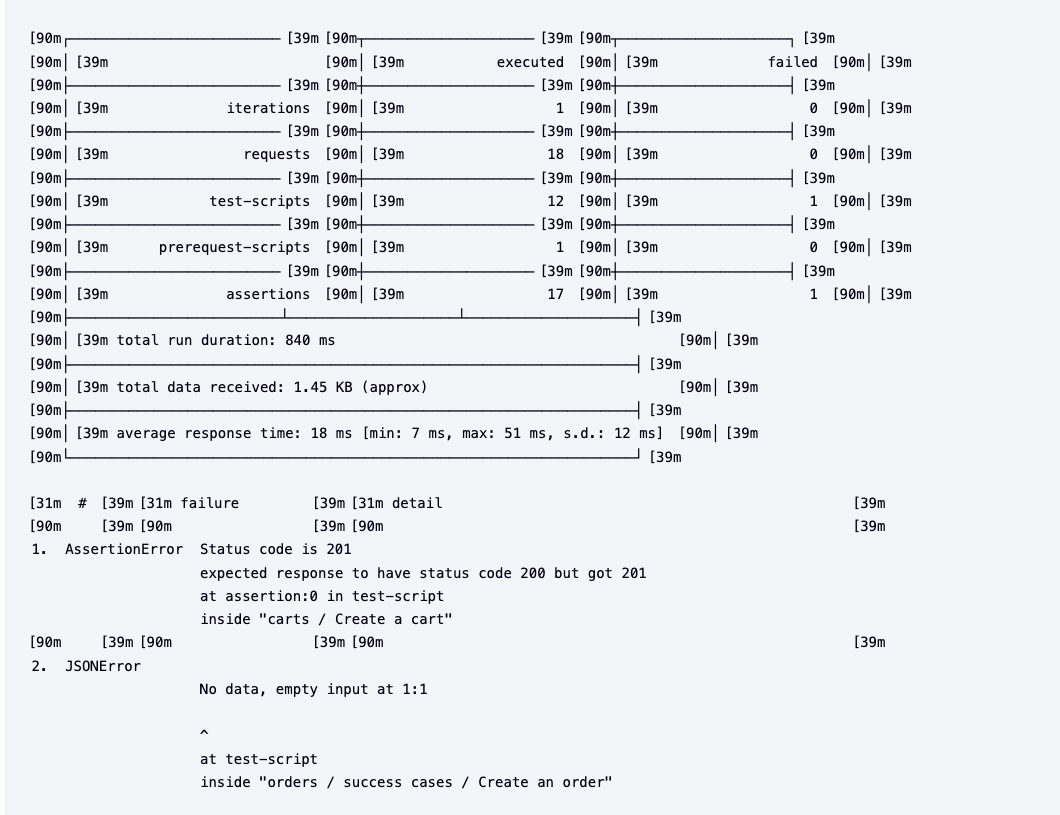
┌─────────────────────────┬────────────────────┬────────────────────┐
│ │ executed │ failed │
├─────────────────────────┼────────────────────┼────────────────────┤
│ iterations │ 1 │ 0 │
├─────────────────────────┼────────────────────┼────────────────────┤
│ requests │ 18 │ 0 │
├─────────────────────────┼────────────────────┼────────────────────┤
│ test-scripts │ 12 │ 1 │
├─────────────────────────┼────────────────────┼────────────────────┤
│ prerequest-scripts │ 1 │ 0 │
├─────────────────────────┼────────────────────┼────────────────────┤
│ assertions │ 17 │ 1 │
├─────────────────────────┴────────────────────┴────────────────────┤
│ total run duration: 521 ms │
├───────────────────────────────────────────────────────────────────┤
│ total data received: 1.45 KB (approx) │
├───────────────────────────────────────────────────────────────────┤
│ average response time: 12 ms [min: 4 ms, max: 77 ms, s.d.: 17 ms] │
└───────────────────────────────────────────────────────────────────┘
# failure detail
1. AssertionError Status code is 201
expected response to have status code 200 but got 201
at assertion:0 in test-script
inside "carts / Create a cart"
2. JSONError No data, empty input at 1:1
^
at test-script
inside "orders / success cases / Create an order"
Uploading Postman CLI run data to Postman Cloud...
Uploaded successfully! View on Postman: https://go.postman.co/workspace/workspace-id/run/unique_runner_idUI 的提示相对会好一些:
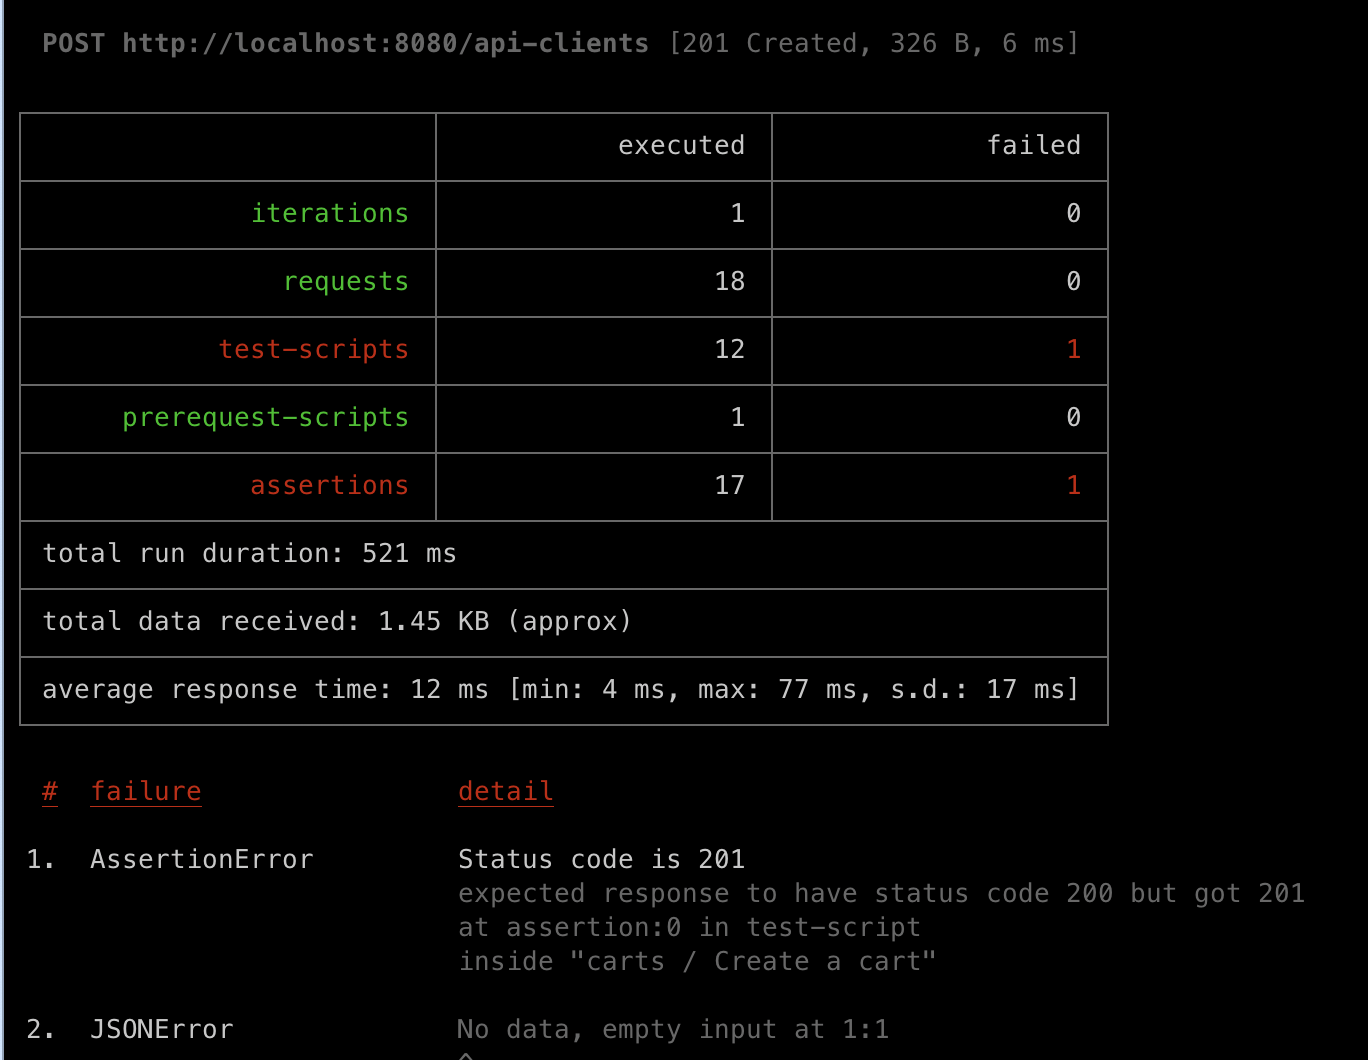
使用 runner 执行的结果可以直接在 postman collection 中进行查询 → 这也是 postman-cli 的优(缺?)点之一,和 postman 进行深度绑定,可以简化很多的操作,但是同时也有 quota 超标的风险......
postman cli 提供 3 种运行 collection 的方法:
- 登录后使用 collection id
- 通过共享网址和 api key(无需登录)
- 下载 collection 的 json 文件,本地断网运行
之后在 newman 的操作会用这个方法进行 demo
newman cli
newman cli 也是 postman 官方提供的,不过是开源免费版,GH 链接在:
https://github.com/postmanlabs/newman
目前来说,newman 的开发进度和 postman cli 比起来相对慢一些,不过也时候稳定的支持的。鉴于这是一个开源的工具,就算 postman 本身不提供支持,我感觉社区也会有人继续维护这个工具
不想和 postman client 本身进行深度绑定,只想使用免费开源的工具,可以继续考虑 newman
安装 & 运行
newman 可以直接通过 npm package 进行安装,从我个人的角度来说,我肯定是比较偏向这种安装方式的,清理起来也比较方便,也可以根据项目需求选择版本,在共享操作的环境下肯定是比 postman-cli 要更加的开发友好
安装方式如下:
bash
❯ npm i newman
npm warn deprecated har-validator@5.1.5: this library is no longer supported
npm warn deprecated uuid@3.4.0: Please upgrade  to version 7 or higher.  Older versions may use Math.random() in certain circumstances, which is known to be problematic.  See https://v8.dev/blog/math-random for details.
npm warn deprecated @faker-js/faker@5.5.3: Please update to a newer version.
npm warn deprecated @faker-js/faker@5.5.3: Please update to a newer version.
npm warn deprecated @faker-js/faker@5.5.3: Please update to a newer version.

added 104 packages, and audited 302 packages in 8s
安装完成后,就可以通过 npx 指令去运行,这里运行的是下载的 json 文件:
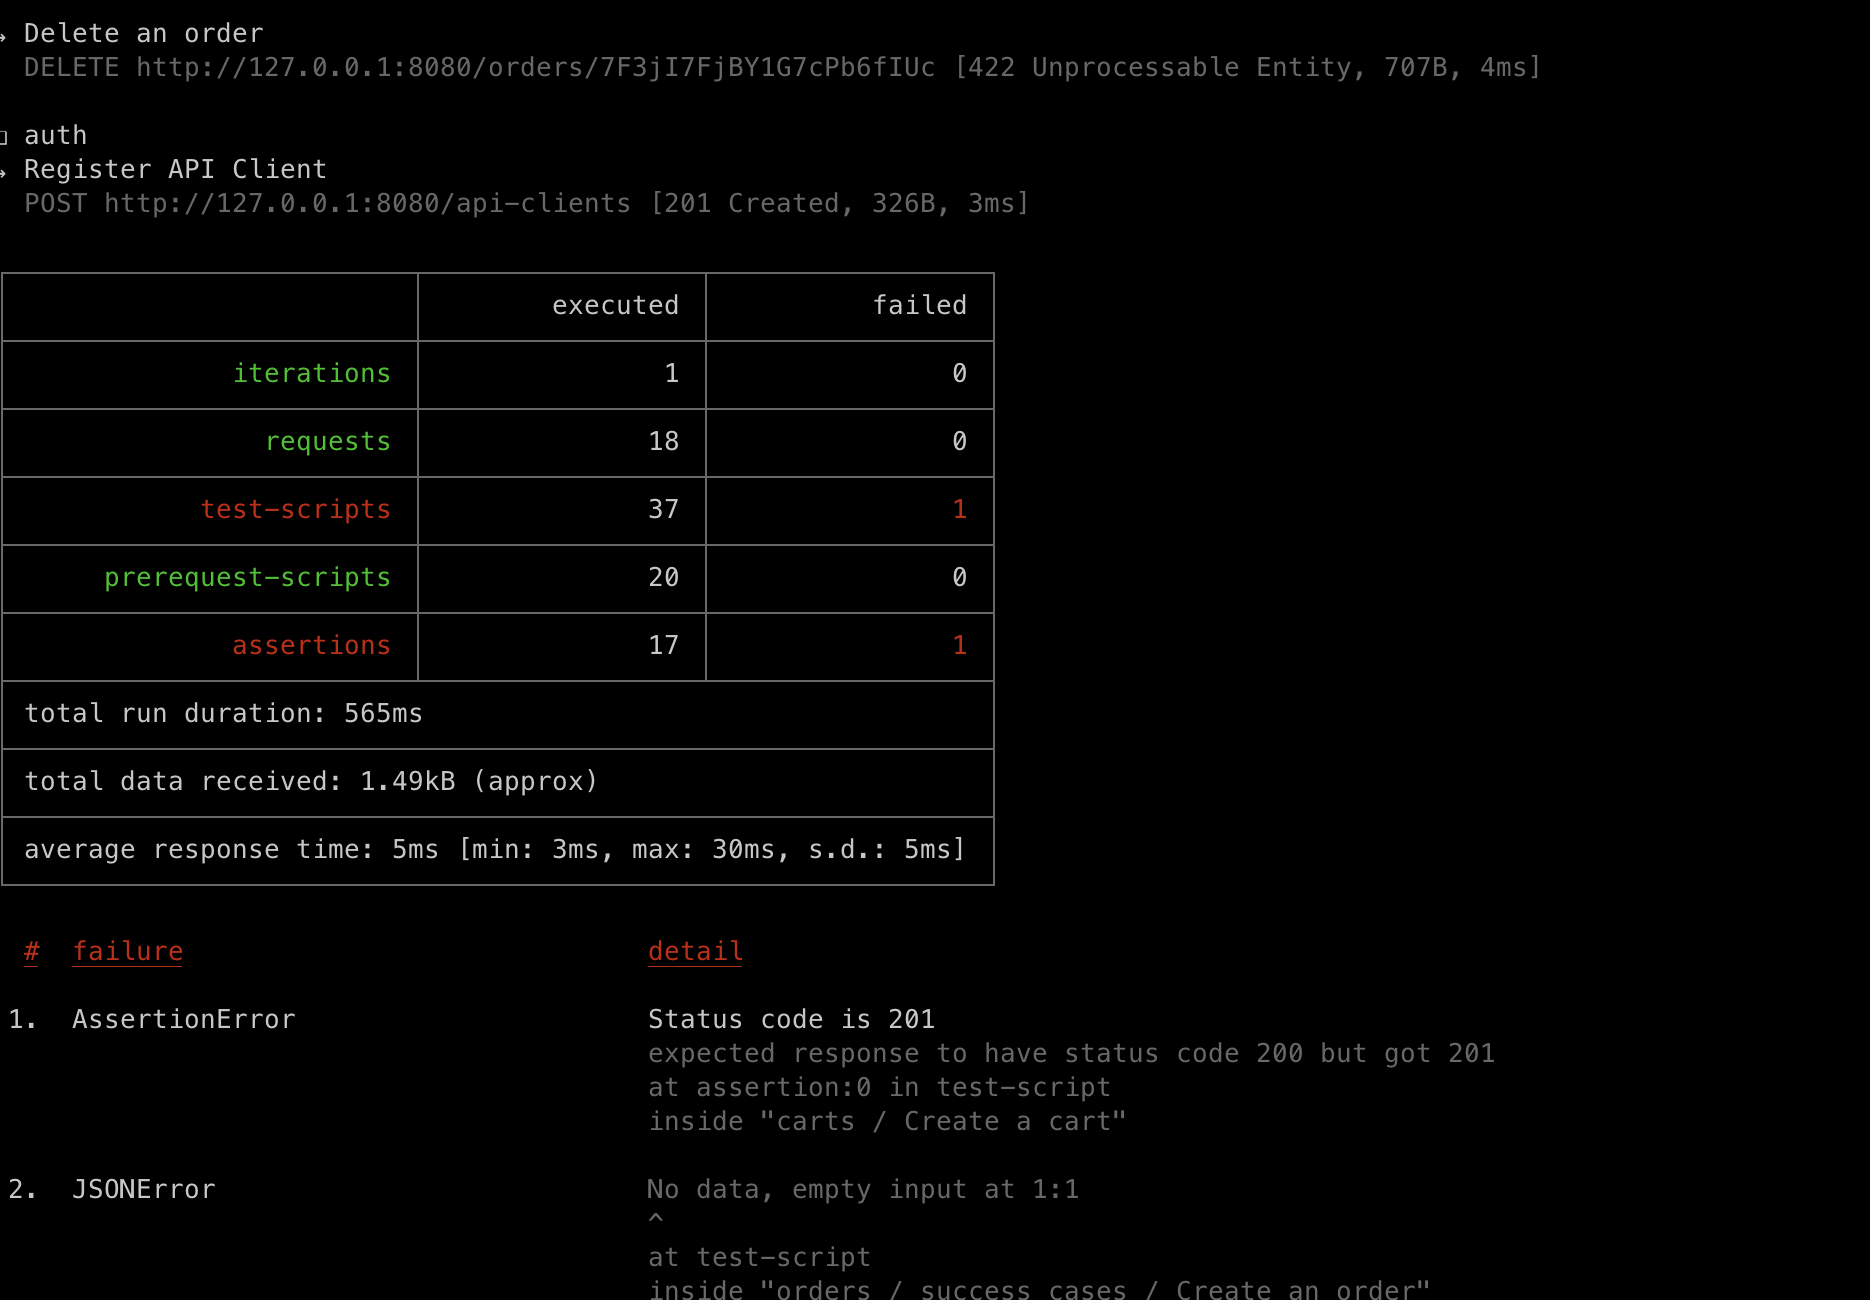
bash
❯ npx newman run postman/Simple\ Grocery\ Store\ API.postman_collection.json
newman

Simple Grocery Store API

❏ status
↳ API Status
  ┌
  │
  └
  GET http://127.0.0.1:8080/status [200 OK, 309B, 30ms]
  ✓  Status code is 200
  ✓  Status is OK

❏ products / error cases
↳ Get all products invalid category
  GET http://127.0.0.1:8080/products?= [400 Bad Request, 433B, 6ms]
  ✓  Status code is 400
  ✓  Error message

❏ products / success cases
↳ Get all products
  GET http://127.0.0.1:8080/products?available=true [200 OK, 596B, 4ms]
  ✓  At least one available product exists
  ✓  Return a valid product object and is in stock

↳ Get single product
  GET http://127.0.0.1:8080/products/4643 [200 OK, 408B, 3ms]
  ✓  Status code is 200
  ✓  Response is an object
  ✓  Correct product was retrieved
  ✓  Product name
  ✓  Product in stock
  ✓  Product price

❏ carts
↳ Create a cart
  POST http://127.0.0.1:8080/carts [201 Created, 348B, 7ms]
  1. Status code is 201
  ✓  Response returns a cartId

↳ Get cart by id
  GET http://127.0.0.1:8080/carts/bx0-ycNjqIm5IvufuuZ09 [200 OK, 343B, 5ms]

↳ Get cart items
  GET http://127.0.0.1:8080/carts/bx0-ycNjqIm5IvufuuZ09/items [200 OK, 295B, 4ms]

↳ Add cart items
  POST http://127.0.0.1:8080/carts/bx0-ycNjqIm5IvufuuZ09/items [201 Created, 330B, 5ms]
  ✓  Status code is 201
  ✓  Response returns a valid itemId

↳ Update an cart item
  PATCH http://127.0.0.1:8080/carts/bx0-ycNjqIm5IvufuuZ09/items/12345 [204 No Content, 250B, 6ms]

↳ Replace an cart item
  PUT http://127.0.0.1:8080/carts/bx0-ycNjqIm5IvufuuZ09/items/938550560 [204 No Content, 250B, 4ms]

↳ Delete an cart item
  DELETE http://127.0.0.1:8080/carts/bx0-ycNjqIm5IvufuuZ09/items/938550560 [204 No Content, 250B, 4ms]

❏ orders / error cases
↳ Test order authorized
  HEAD http://127.0.0.1:8080/orders [401 Unauthorized, 252B, 4ms]
  ✓  Status code is 401

❏ orders / success cases
↳ Test order endpoint
  HEAD http://127.0.0.1:8080/orders [200 OK, 242B, 4ms]

↳ Get all orders
  GET http://127.0.0.1:8080/orders [422 Unprocessable Entity, 707B, 4ms]

↳ Create an order
  POST http://127.0.0.1:8080/orders [400 Bad Request, 430B, 3ms]
  2⠄ JSONError in test-script

↳ Update an order
  PATCH http://127.0.0.1:8080/orders/ord_123456789 [400 Bad Request, 430B, 7ms]

↳ Delete an order
  DELETE http://127.0.0.1:8080/orders/7F3jI7FjBY1G7cPb6fIUc [422 Unprocessable Entity, 707B, 4ms]

❏ auth
↳ Register API Client
  POST http://127.0.0.1:8080/api-clients [201 Created, 326B, 3ms]

┌─────────────────────────┬─────────────────┬─────────────────┐
│                         │        executed │          failed │
├─────────────────────────┼─────────────────┼─────────────────┤
│              iterations │               1 │               0 │
├─────────────────────────┼─────────────────┼─────────────────┤
│                requests │              18 │               0 │
├─────────────────────────┼─────────────────┼─────────────────┤
│            test-scripts │              37 │               1 │
├─────────────────────────┼─────────────────┼─────────────────┤
│      prerequest-scripts │              20 │               0 │
├─────────────────────────┼─────────────────┼─────────────────┤
│              assertions │              17 │               1 │
├─────────────────────────┴─────────────────┴─────────────────┤
│ total run duration: 565ms                                   │
├─────────────────────────────────────────────────────────────┤
│ total data received: 1.49kB (approx)                        │
├─────────────────────────────────────────────────────────────┤
│ average response time: 5ms [min: 3ms, max: 30ms, s.d.: 5ms] │
└─────────────────────────────────────────────────────────────┘

  #  failure                             detail

 1.  AssertionError                      Status code is 201
                                         expected response to have status code 200 but got 201
                                         at assertion:0 in test-script
                                         inside "carts / Create a cart"

 2.  JSONError                           No data, empty input at 1:1
                                         ^
                                         at test-script
                                         inside "orders / success cases / Create an order"
因为是一家的产品,所以结果看起来是差不多的:
👀:newman cli 只是没有对登录功能的支持,同样也是可以通过 collection id+API key 的方式跑 collection,这点在后面接入 Jenkins 时会提到操作
生成 html 报告
这个也是使用社区的工具实现的,安装方式依旧通过 npm:
bash
❯ npm i newman-reporter-htmlextra

added 31 packages, and audited 333 packages in 3s
生成依旧是通过 newman 运行,然后 -r flag 中指定 htmlextra:
bash
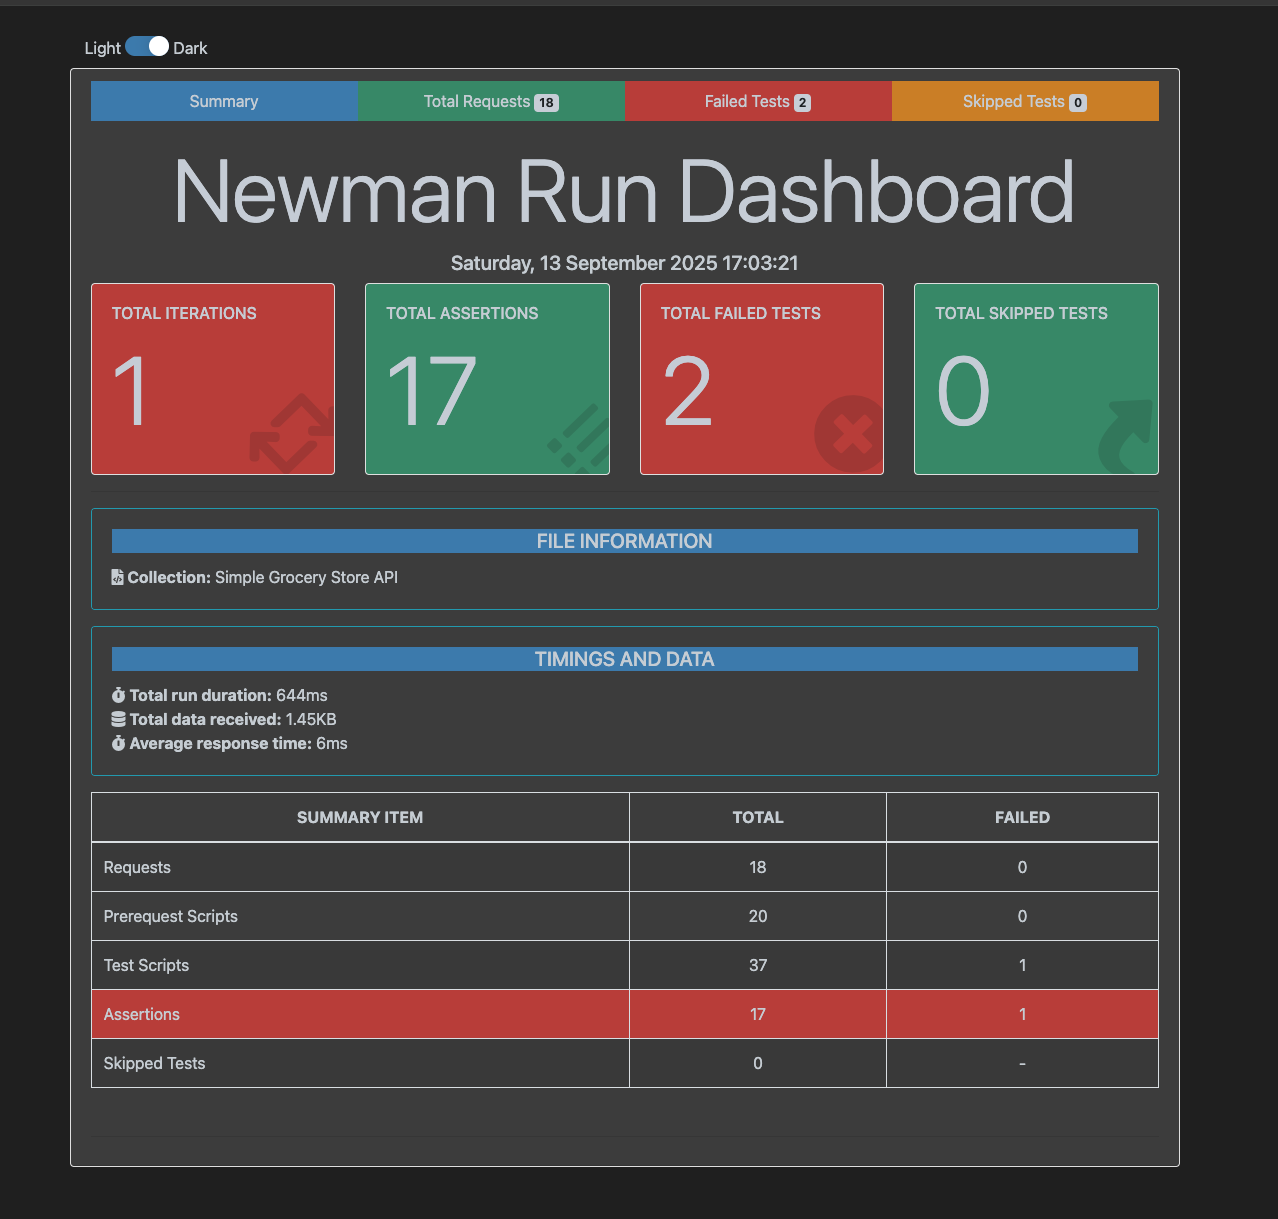
❯ npx newman run postman/Simple\ Grocery\ Store\ API.postman_collection.json -r htmlextra随后就会生成对应的 html report:

UI 还是挺清爽的:
生成 JUnit 报告
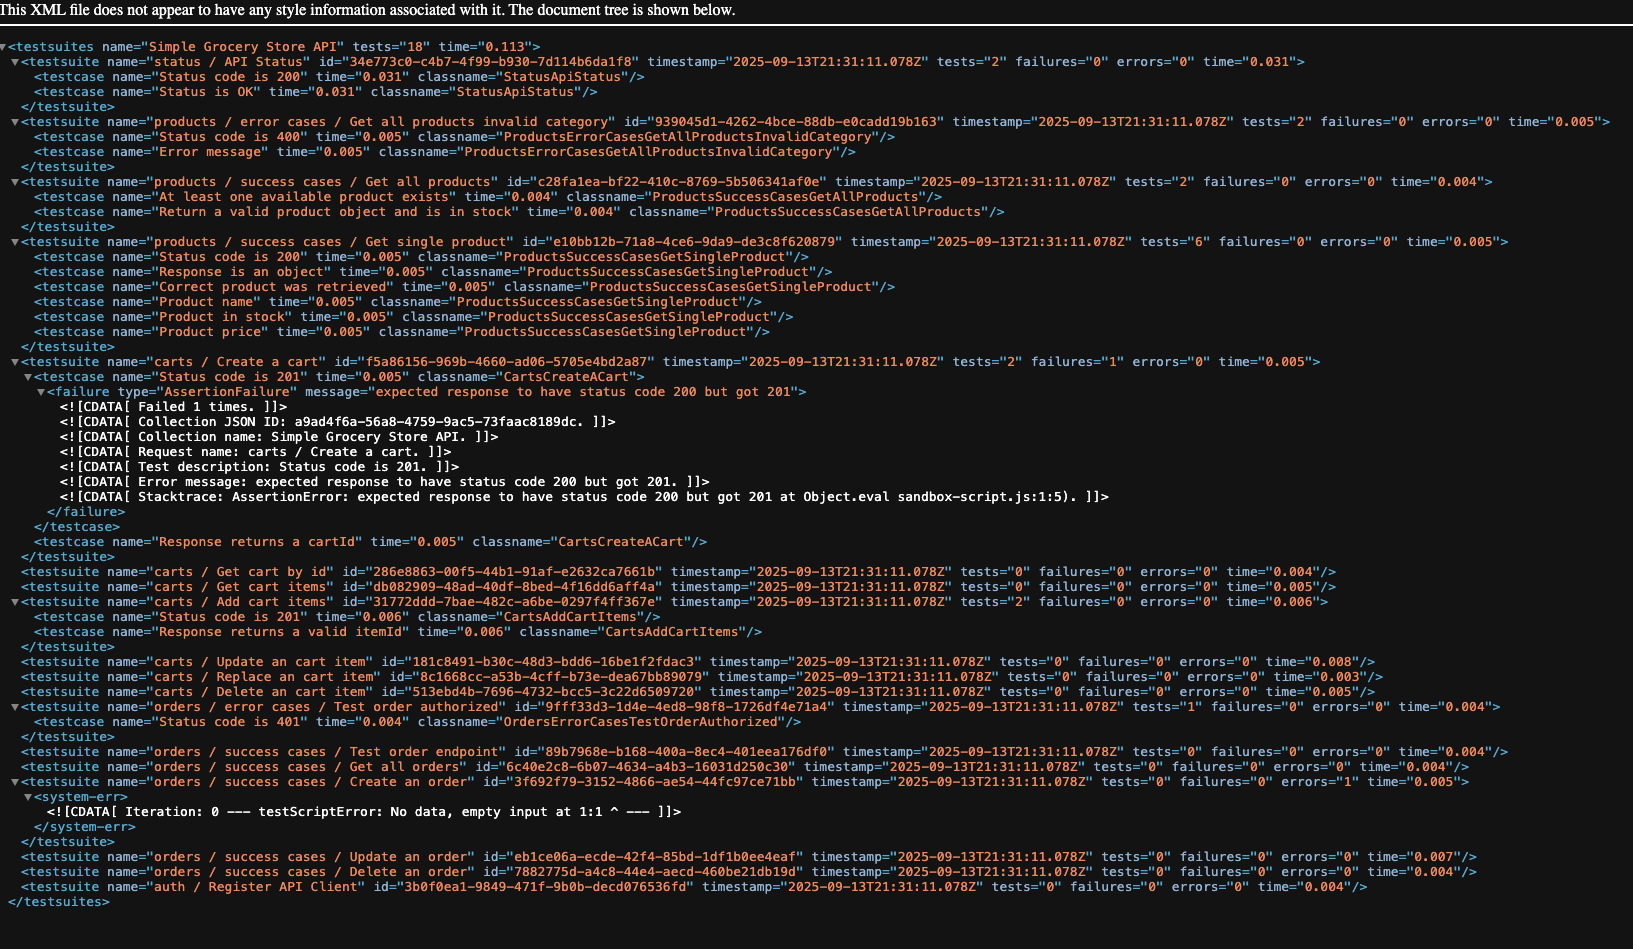
这是 newman 自带的功能:
bash
❯ npx newman run postman/Simple\ Grocery\ Store\ API.postman_collection.json -r junit生成的也是对应的 xml 文档:
Jenkins
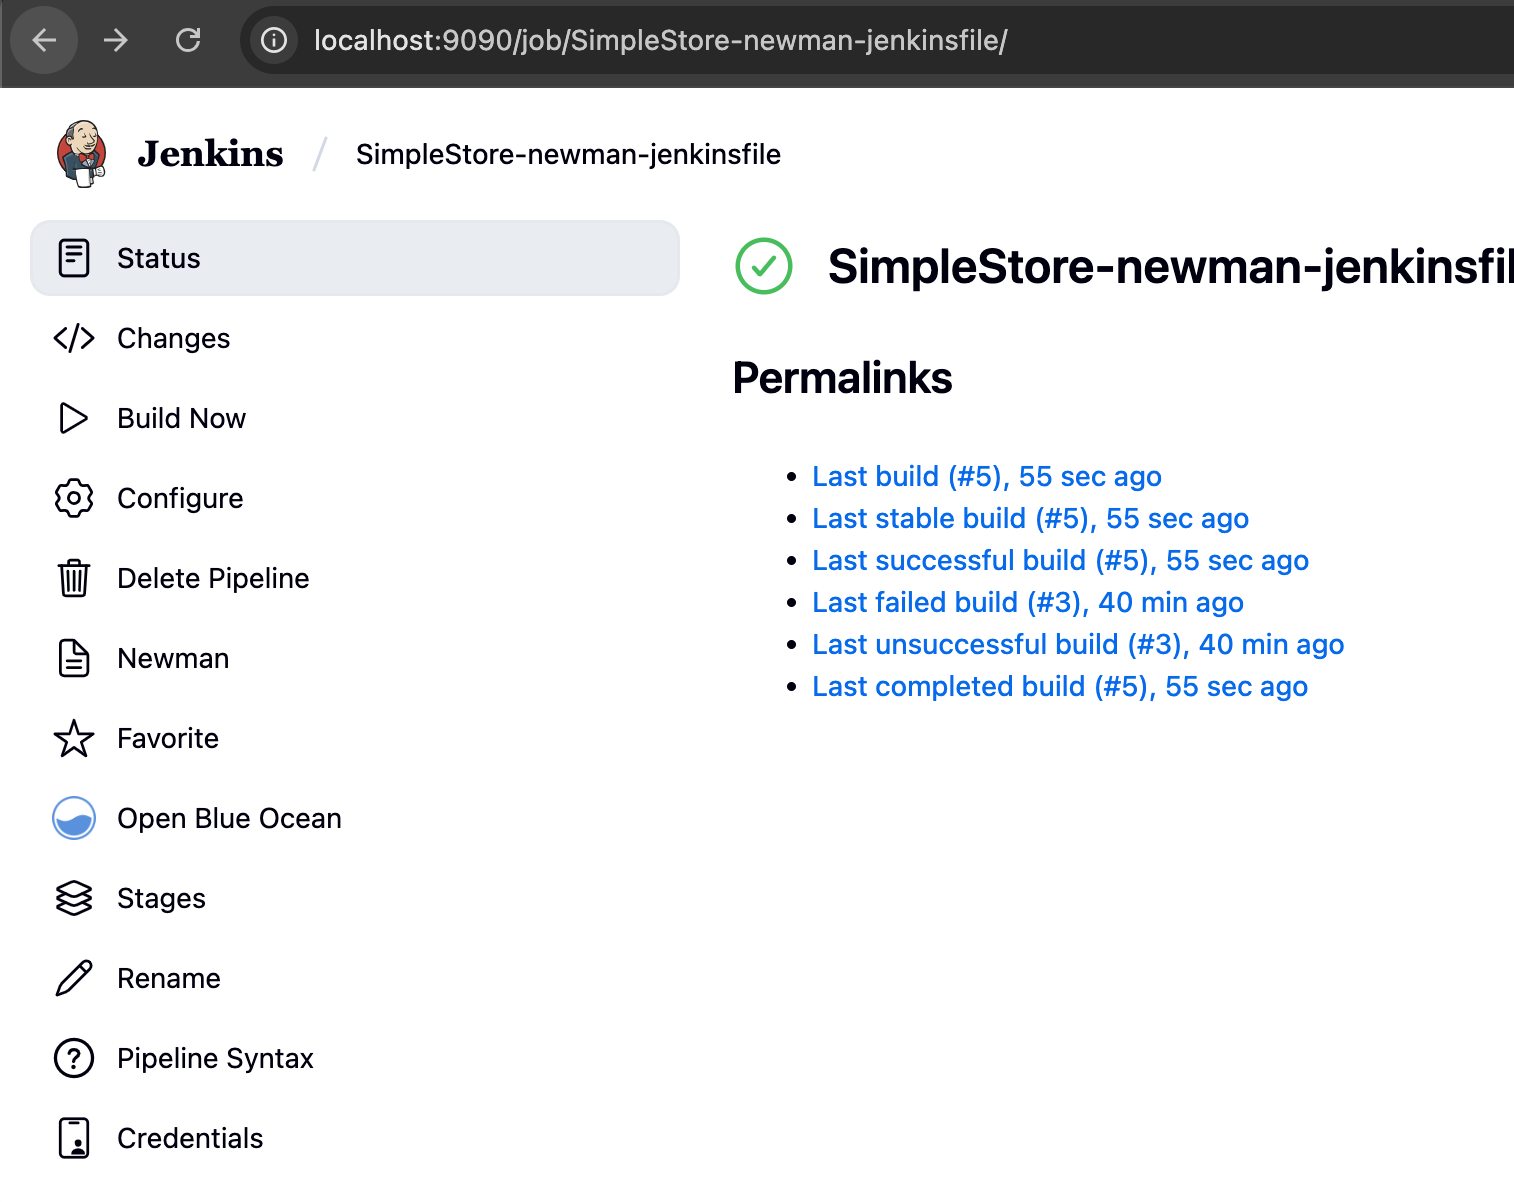
这里会用 docker 本地生成一个 Jenkins 容器,然后在容器里面进行操作。UI 会随着版本的不同而产生些微的差异。目前 jenkins:lts-jdk17 还是处在被支持的状态,不过 EOL 是明年(2026 年 5 月),个人建议之后是把 image 改成 jenkins/jenkins:latest-jdk21 比较好
具体的 Jenkins 版本是根据下载时间来说的,如果想指定对应的 Jenkins 版本,也可以到 docker 官网去拉固定的版本,我这里就用 LTS 了
docker 配置
完整的 docker 文件如下:
docker
FROM jenkins/jenkins:lts-jdk17

USER root

# --- Install Docker CLI inside the Jenkins container ---
RUN apt-get update && apt-get install -y \
    ca-certificates curl gnupg && \
    install -d /etc/apt/keyrings && \
    curl -fsSL https://download.docker.com/linux/debian/gpg \
      | gpg --dearmor -o /etc/apt/keyrings/docker.gpg && \
    echo "deb [arch=$(dpkg --print-architecture) signed-by=/etc/apt/keyrings/docker.gpg] \
      https://download.docker.com/linux/debian bookworm stable" \
      > /etc/apt/sources.list.d/docker.list && \
    apt-get update && apt-get install -y docker-ce-cli && \
    rm -rf /var/lib/apt/lists/*

# --- Install Node.js 18 + Newman (+ htmlextra) ---
# Nodesource 脚本会写入 sources.list 并做 apt update
RUN curl -fsSL https://deb.nodesource.com/setup_18.x | bash - && \
    apt-get install -y nodejs && \
    npm install -g newman newman-reporter-htmlextra && \
    npm cache clean --force && \
    rm -rf /var/lib/apt/lists/*

# --- Install Postman CLI ---
RUN curl -o- "https://dl-cli.pstmn.io/install/linux64.sh" | sh

# Map host docker group id so Jenkins can use the Docker socket
# Pass DOCKER_GID at build time if your host's 'docker' group has a different GID.
ARG DOCKER_GID=998
RUN groupadd -g ${DOCKER_GID} docker || true && \
    usermod -aG docker jenkins

# --- Preinstall plugins ---
COPY plugins.txt /usr/share/jenkins/ref/plugins.txt
RUN jenkins-plugin-cli --plugin-file /usr/share/jenkins/ref/plugins.txt

# Return to the regular Jenkins user
USER jenkins
docker-compose 文件配置:
yaml
version: "3.8"

services:
  jenkins:
    build:
      context: .
      args:
        DOCKER_GID: ${DOCKER_GID:-998}
    container_name: jenkins
    ports:
      - "9090:8080" # Jenkins UI
      - "50000:50000" # JNLP agent port (optional)
    environment:
      - TZ=${TZ:-America/New_York}
    volumes:
      - jenkins_home:/var/jenkins_home
      - /var/run/docker.sock:/var/run/docker.sock
    restart: unless-stopped

volumes:
  jenkins_home:
使用 free style 创建 job
这个点点点的步骤比较多,大多数的流程都是通过点点点实现的,只要写最小脚本就行
具体步骤如下:
-
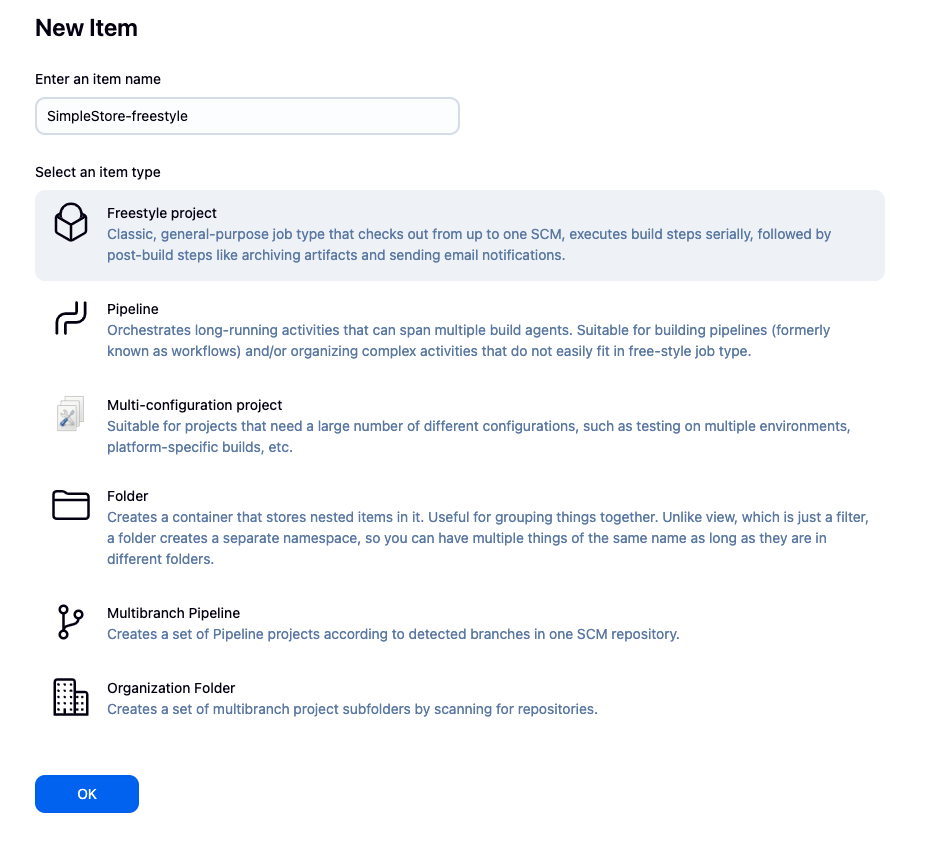
创建 new item
-
设置 build env
-
第一步我还是建议先测试一下,看看所有的依赖是不是都安装好了
这一步虽然是可选项,不过可以减少很多报错- 在 execute shell 中加入
postman --version指令并保存
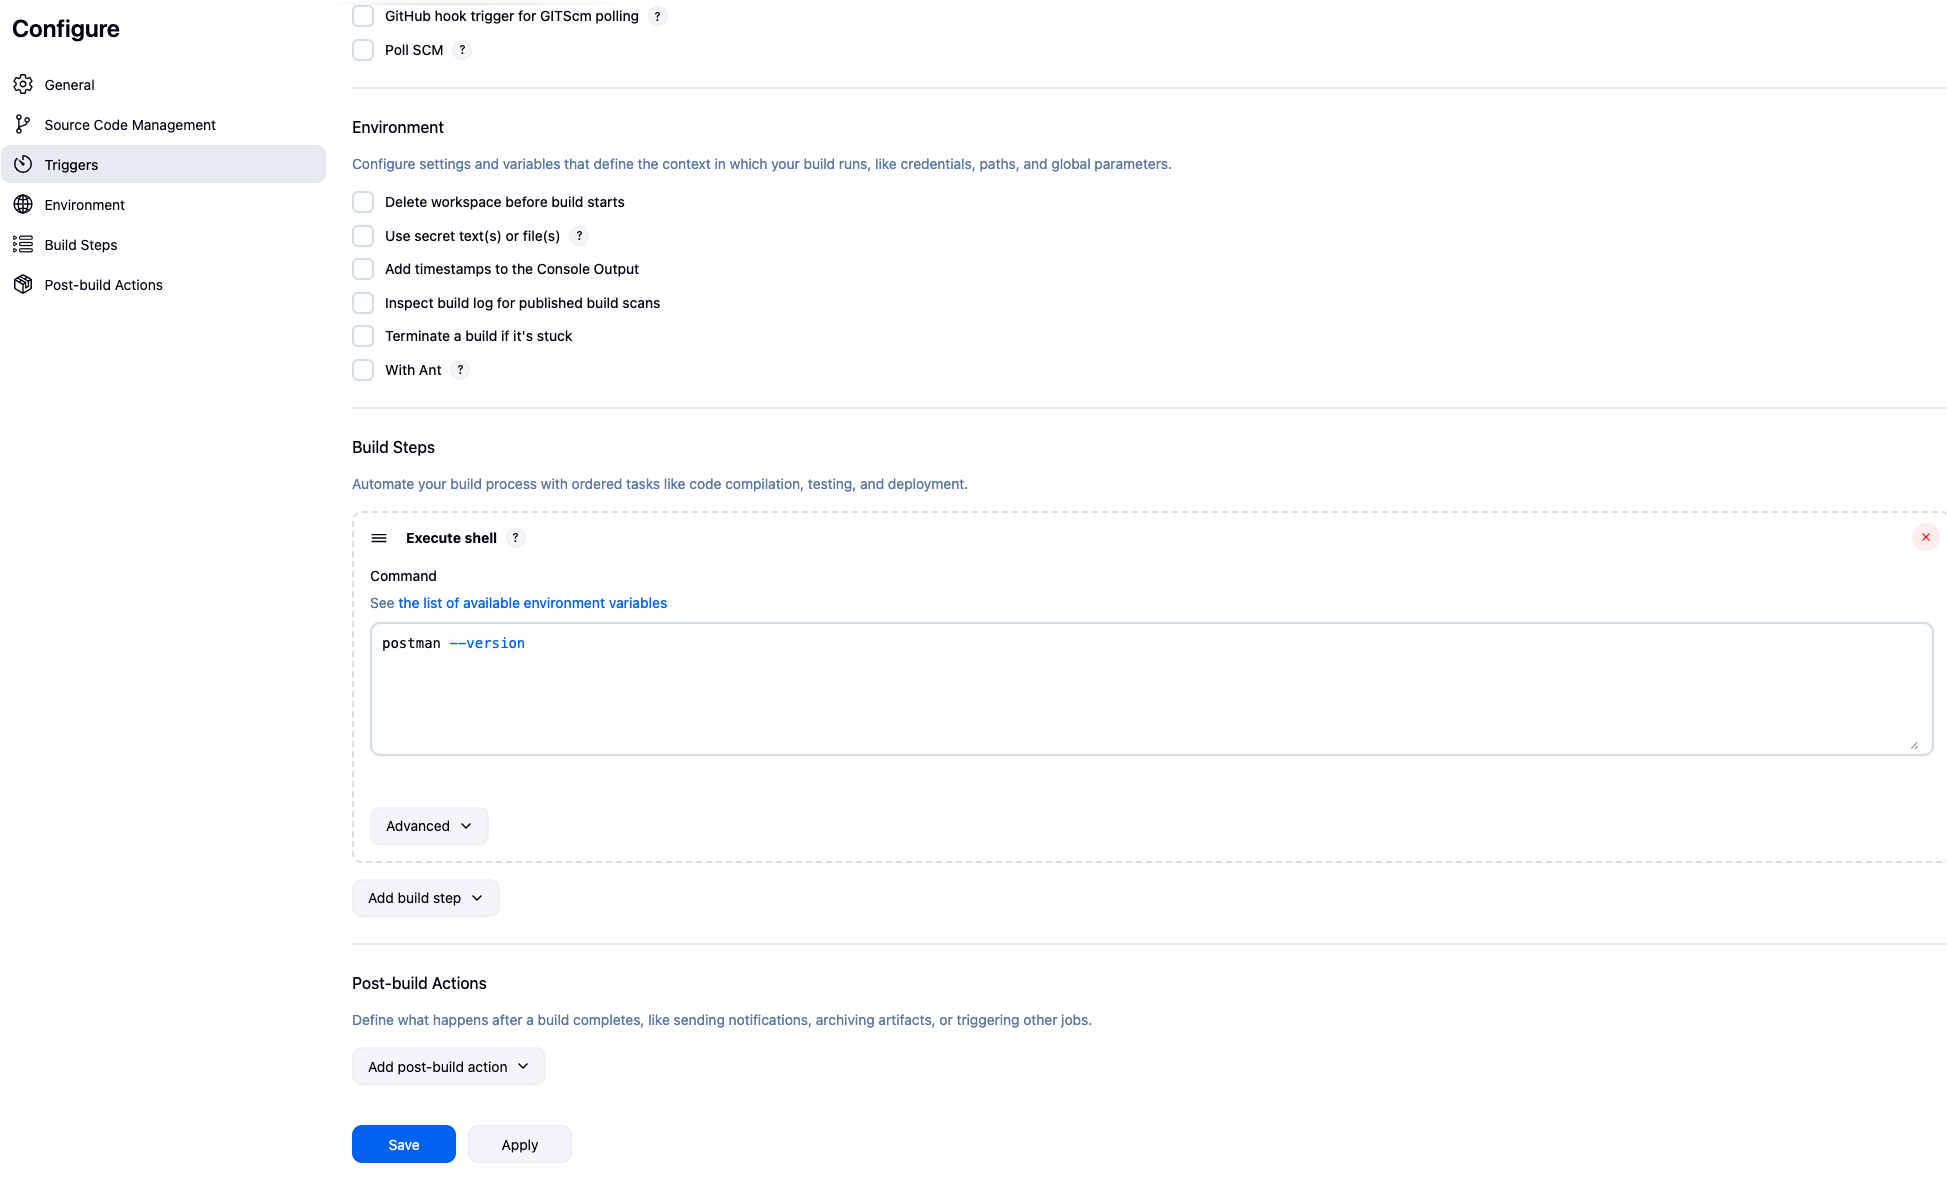
- 运行
build now生成一个新的 build
- 查看 console 输出确认结果
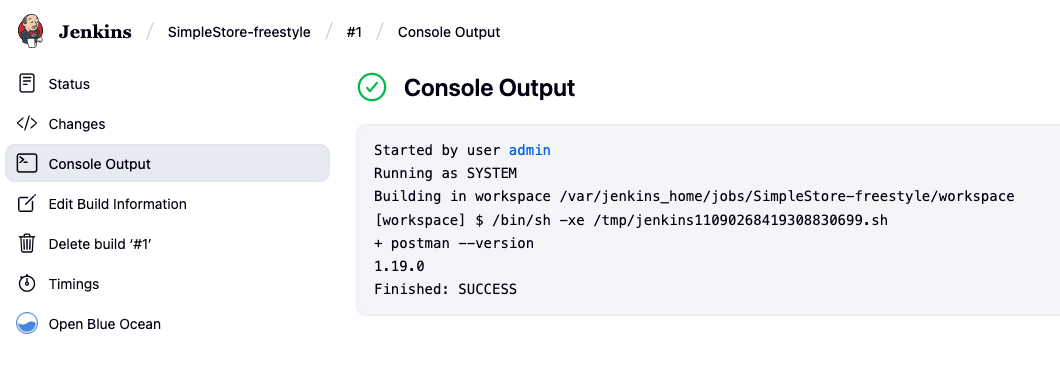
可以看到对应的版本以及 SUCCESS,就可以确认 deps 安装没问题了
- 在 execute shell 中加入
-
在 execute shell 中使用 postman 指令运行 runner
指令大体看起来是这样的:bashpostman login --with-api-key POSTMAN_GENERATED_API_KEY postman collection run collection_id -e environment_id \ --env-var baseUrl=http://host.docker.internal:8080其中
--env-var baseUrl=[http://host.docker.internal:8080](http://host.docker.internal:8080/)只是针对 server 在 local 上的配置。docker 本身是有一个独立的 VM,而且 VM 与外界默认是不沟通的。因此localhost会指向 Jenkins 自己的 server
这个环境变量告知 docker,baseUrl通过 docker 的内部进行路由/桥接,跑的是本机而非 VM 中的服务
-
-
执行 build
通过 Jenkins 管理 API key
上面的步骤中,API key 是写死在 comman 中的,这会有一个问题------这个 key 会通过 log,暴露在 console 中
这时候可以通过 Jenkins 自己的 credentials 管理 API key,这样 Jenkins 会自己 mask 对应的 secrets,也就不会明文暴露在 logs 中
当前的 UI 是这样的:

UI 会随着版本的变化而有些微的差异,不过只要找到对应的 settings 就没什么问题了
随后找到配置管理 credentials 的部分就好了,UI 大体如下:
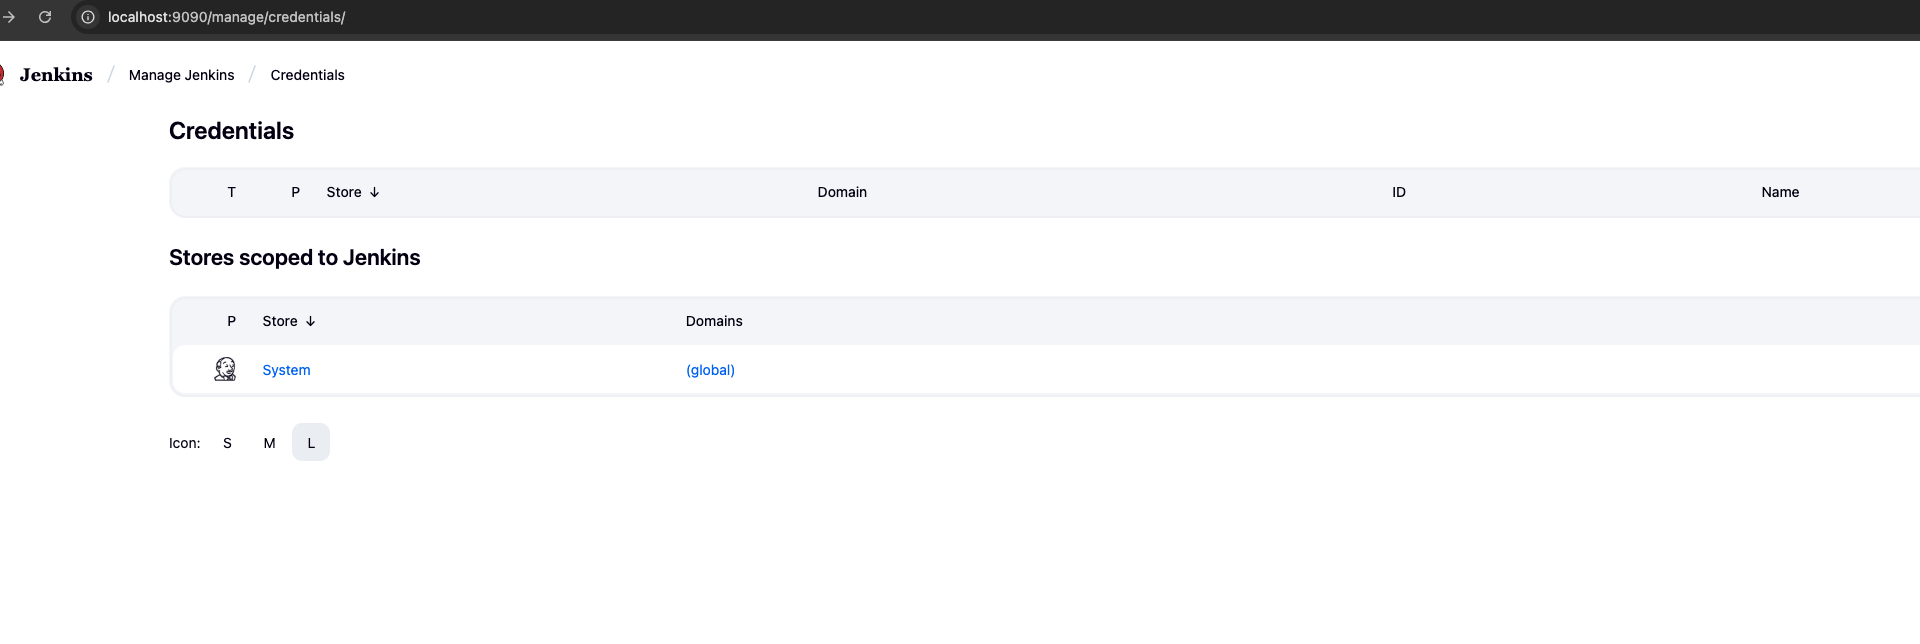
这门课毕竟不是关于 Jenkins 的学习,为了简化操作,所有的 credentials 都会保存在 global scope 下,大体的界面如下:
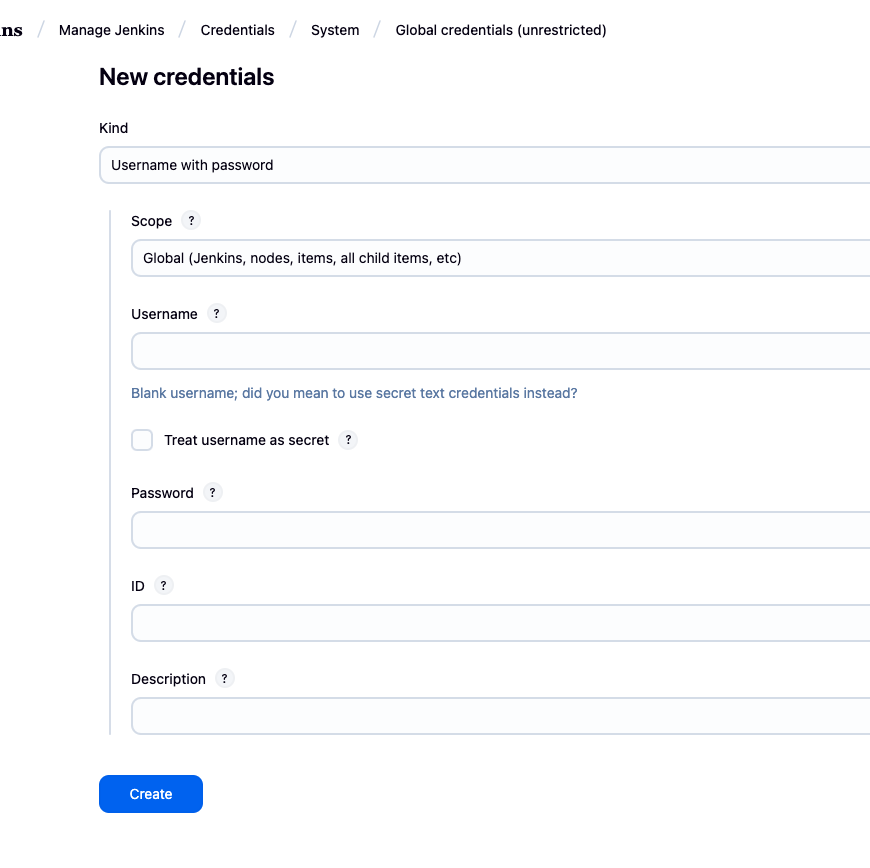
⚠️:API key,在 kind 里的选择应该是 secret(有一个 text secret 还是 secret text 的选项),我这里截图的时候截错了,如果要跟着教程的话别忘了修改选项,并且把对应的值放到 secret 里
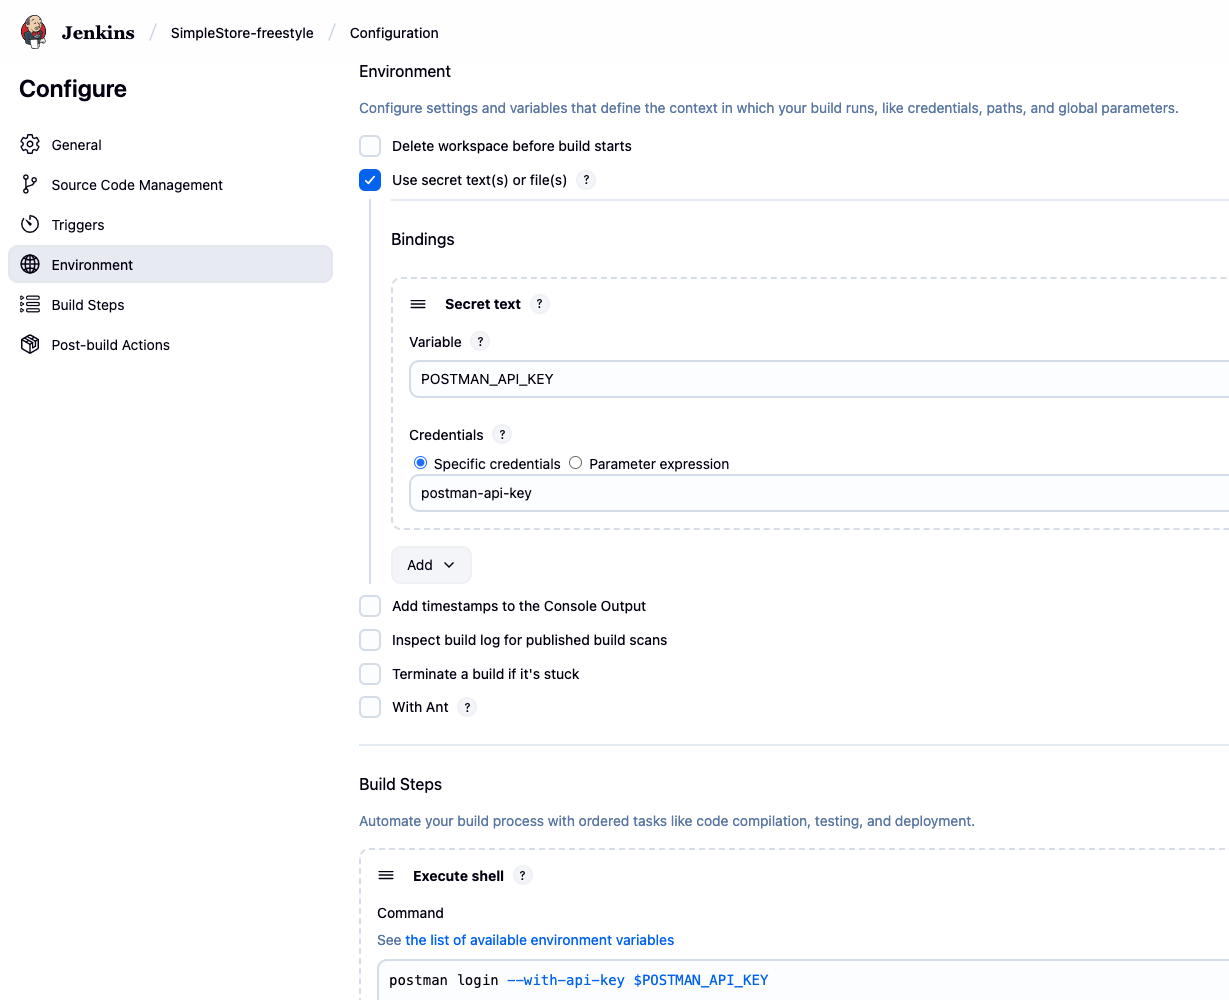
使用 secret 代替明文
free style 里面就是点点点就好了,这里需要勾选 secret,然后手动添加 binding,这样下面的 execute shel 中,就可以使用 binding 的变量了------也就是截图中出现的那部分代码
之后 Jenkins 运行的结果是这样的:
bash
Started by user admin
Running as SYSTEM
Building in workspace /var/jenkins_home/jobs/SimpleStore-freestyle/workspace
[workspace] $ /bin/sh -xe /tmp/jenkins16309283884840213624.sh
+ postman login --with-api-key ****
POSTMAN_API_KEY 的值会被 * 取代,也就不会暴露在 log 中
jenkinsfile
只是大体过一下流程,这是另外一种可以比较简单的创建 job 的方式,点点点中的每一个步骤,在 jenkinsfile 就变成了一个个的 stage,原理是一样的
这里依旧使用 postman-cli 进行操作,使用 newman 的话,会在后面生成 report 中简单提一下。其实操作流程都是一样的,只不过最终执行的,exec runner 那部分会有一点细微的差异
-
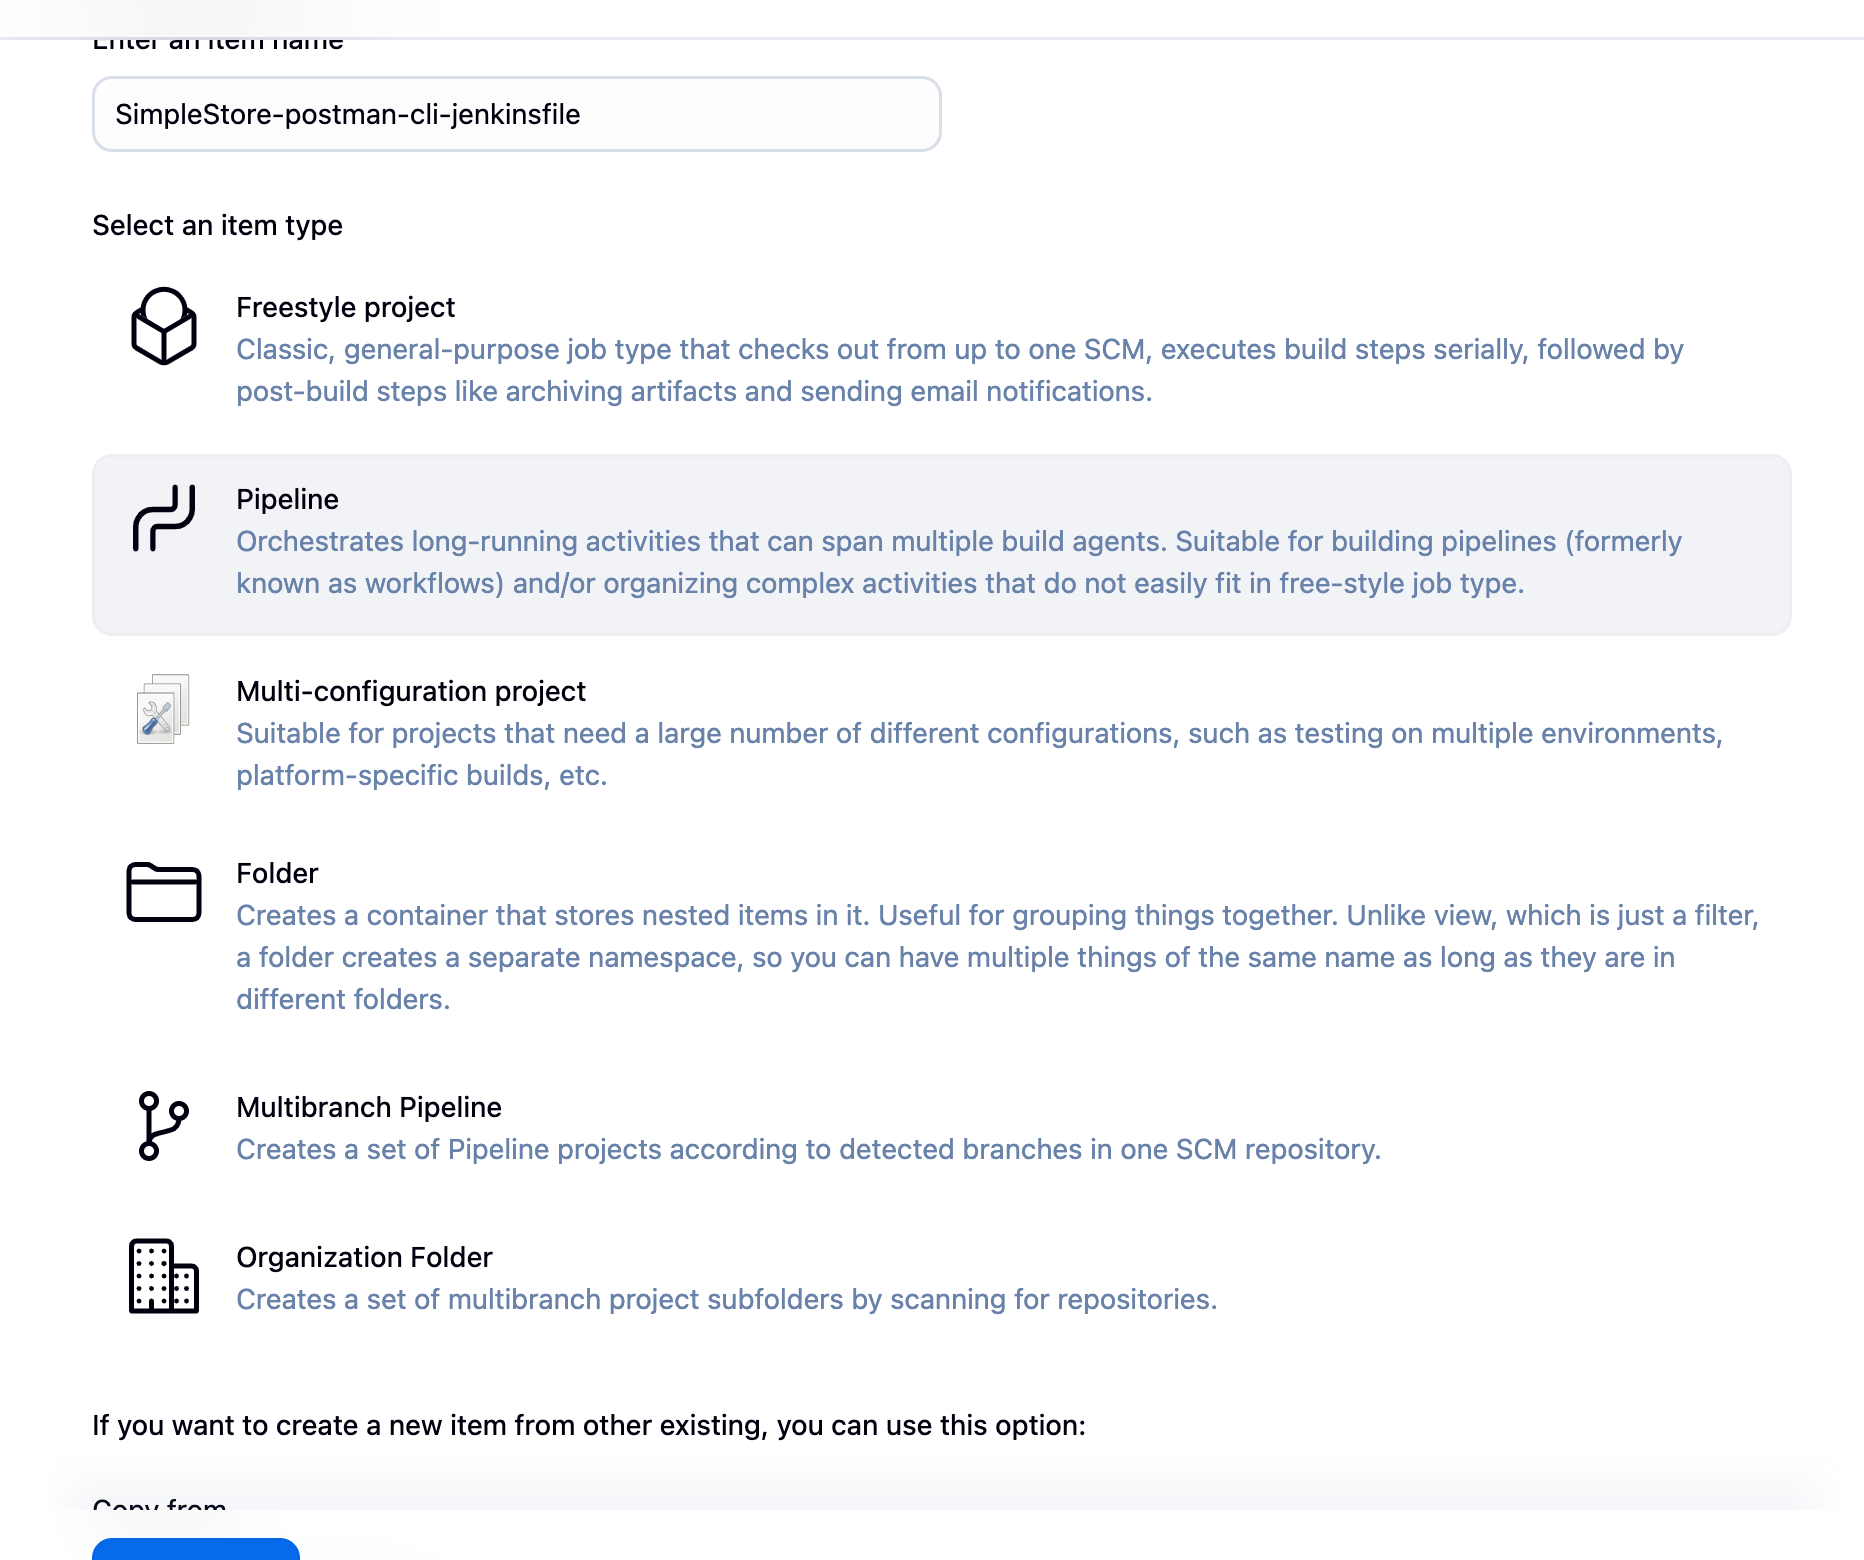
创建新的 job
这里的选择就是 pipeline 而不是 free style
-
通过 postman 生成基础的 script
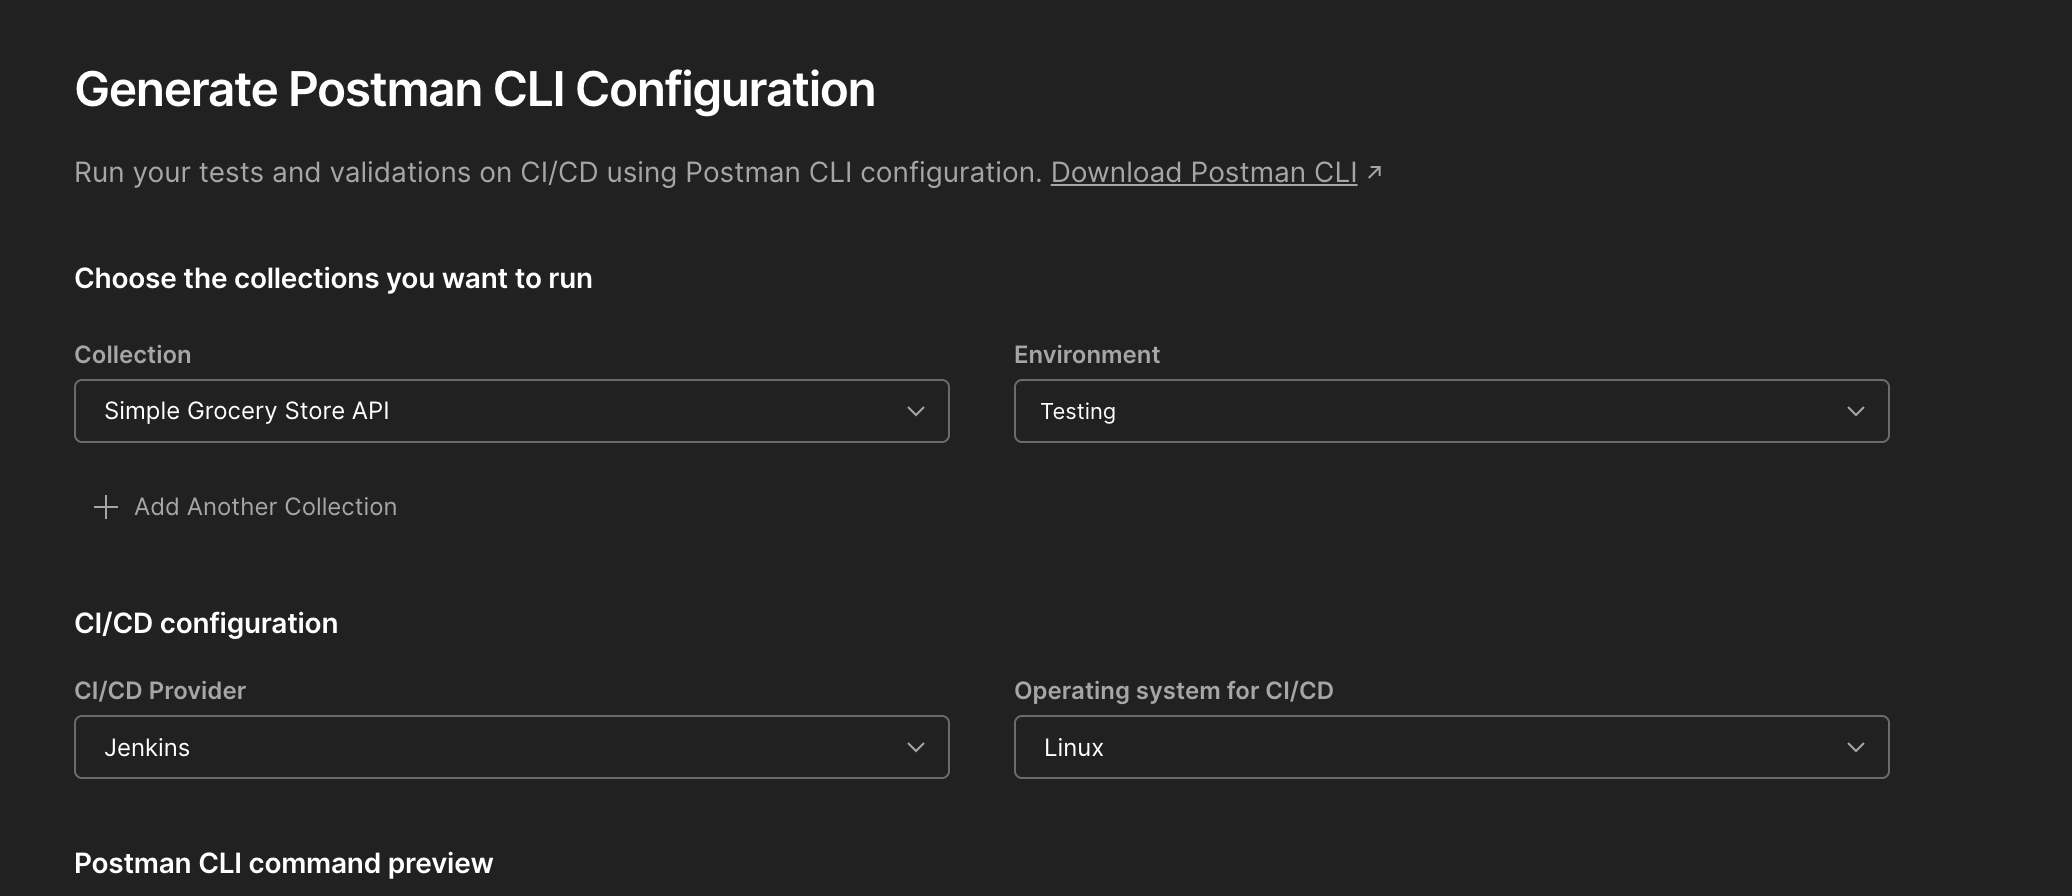
事实上 postman 直接生成的 Jenkins file 没办法在当前的这个版本中直接工作,我稍微修改了一下,目前可以运行的版本是这个:
bashpipeline { agent any stages { stage('Check Postman CLI') { steps { sh 'which postman && postman --version' } } stage('Postman CLI Login') { steps { withCredentials([string(credentialsId: 'postman-api-key', variable: 'POSTMAN_API_KEY')]) { sh 'postman login --with-api-key "$POSTMAN_API_KEY"' } } } stage('Run collection') { steps { withCredentials([ string(credentialsId: 'simple-store-collection-id', variable: 'COLLECTION_ID'), string(credentialsId: 'simple-store-testing-env-id', variable: 'ENV_ID') ]) { sh ''' postman collection run \ "$COLLECTION_ID" \ -e "$ENV_ID" \ --env-var baseUrl=http://host.docker.internal:8080 --integration-id "jenkins" ''' } } } } }我后面才发现,获取 credentials 的方法可以通过
environment进行简化,不用反复的写withCredentials:bashpipeline { agent any environment { POSTMAN_API_KEY = credentials("postman-api-key") } } -
查看运行结果:
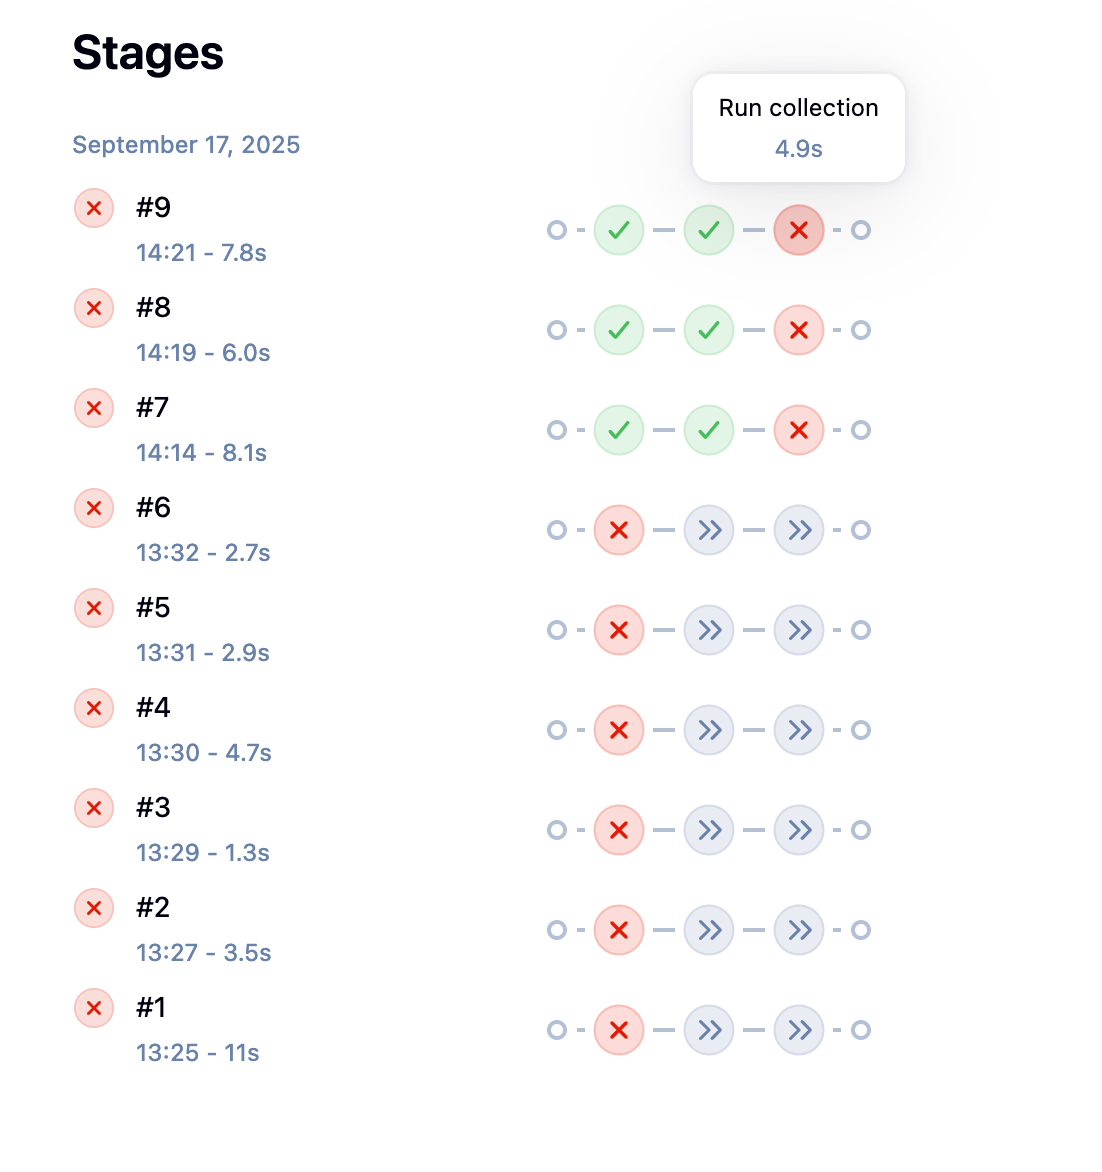
前两个 stages,也就是检查 postman 版本和登录都是成功的,最后一个 stage 报错是因为测没通过,整体运行是没啥问题的:
这个 stages 就和一些 CI/CD 中的结果差不多了,可以分批查看不同 stages 的问题,关于线形运行和并行运行,这部分超过了当前笔记的深度,这里不多做研究,不过 Jenkins 本身是可以实现这种操作的,只是需要在 Jenkinsfile 进行指定
在 Jenkins 中生成报告
操作和前面是差不多的,这里简单的走一下流程
-
freestyle
-
修改 execute shel
脚本如下:bashnewman --version newman run "https://api.postman.com/collections/${COLLECTION_ID}?apikey=${POSTMAN_API_KEY}" \ --environment "https://api.postman.com/environments/${ENV_ID}?apikey=${POSTMAN_API_KEY}" \ --env-var baseUrl=http://host.docker.internal:8080 \ --reporters cli,htmlextra \ --reporter-htmlextra-export newman/report.html -
执行 run
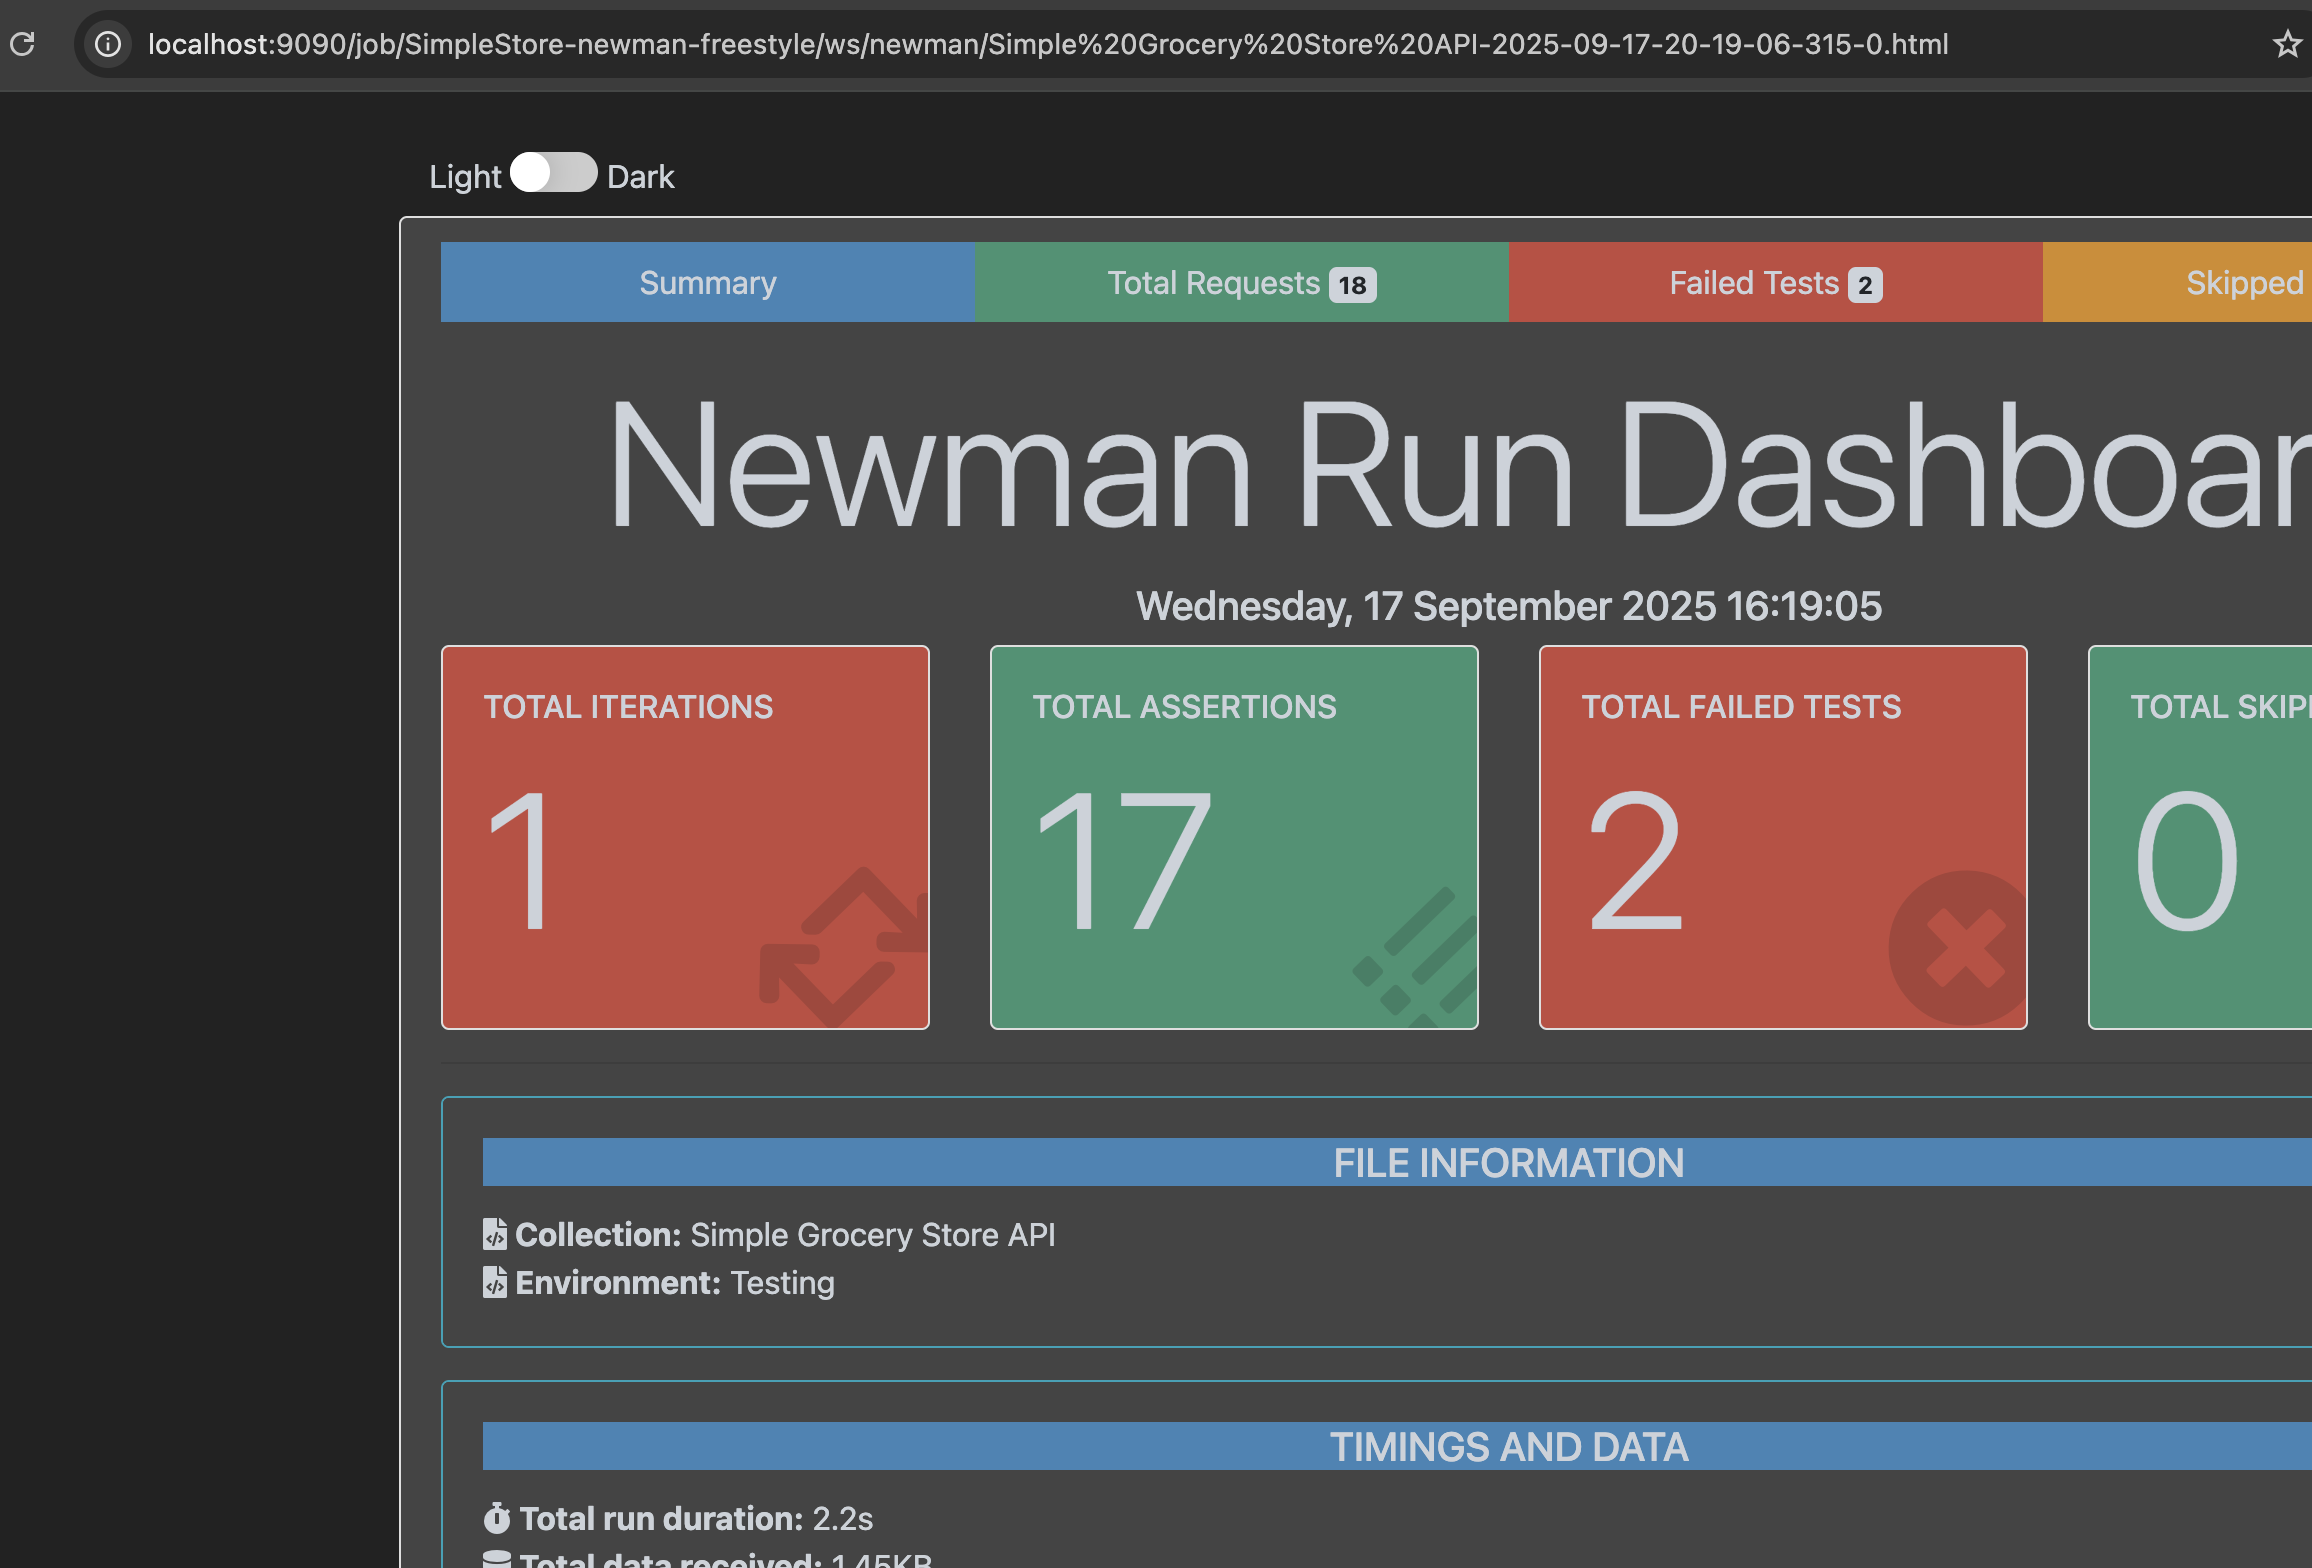
这种情况其实即刻就能生成报告了:
👀:注意这里的路径是在 workspace 下
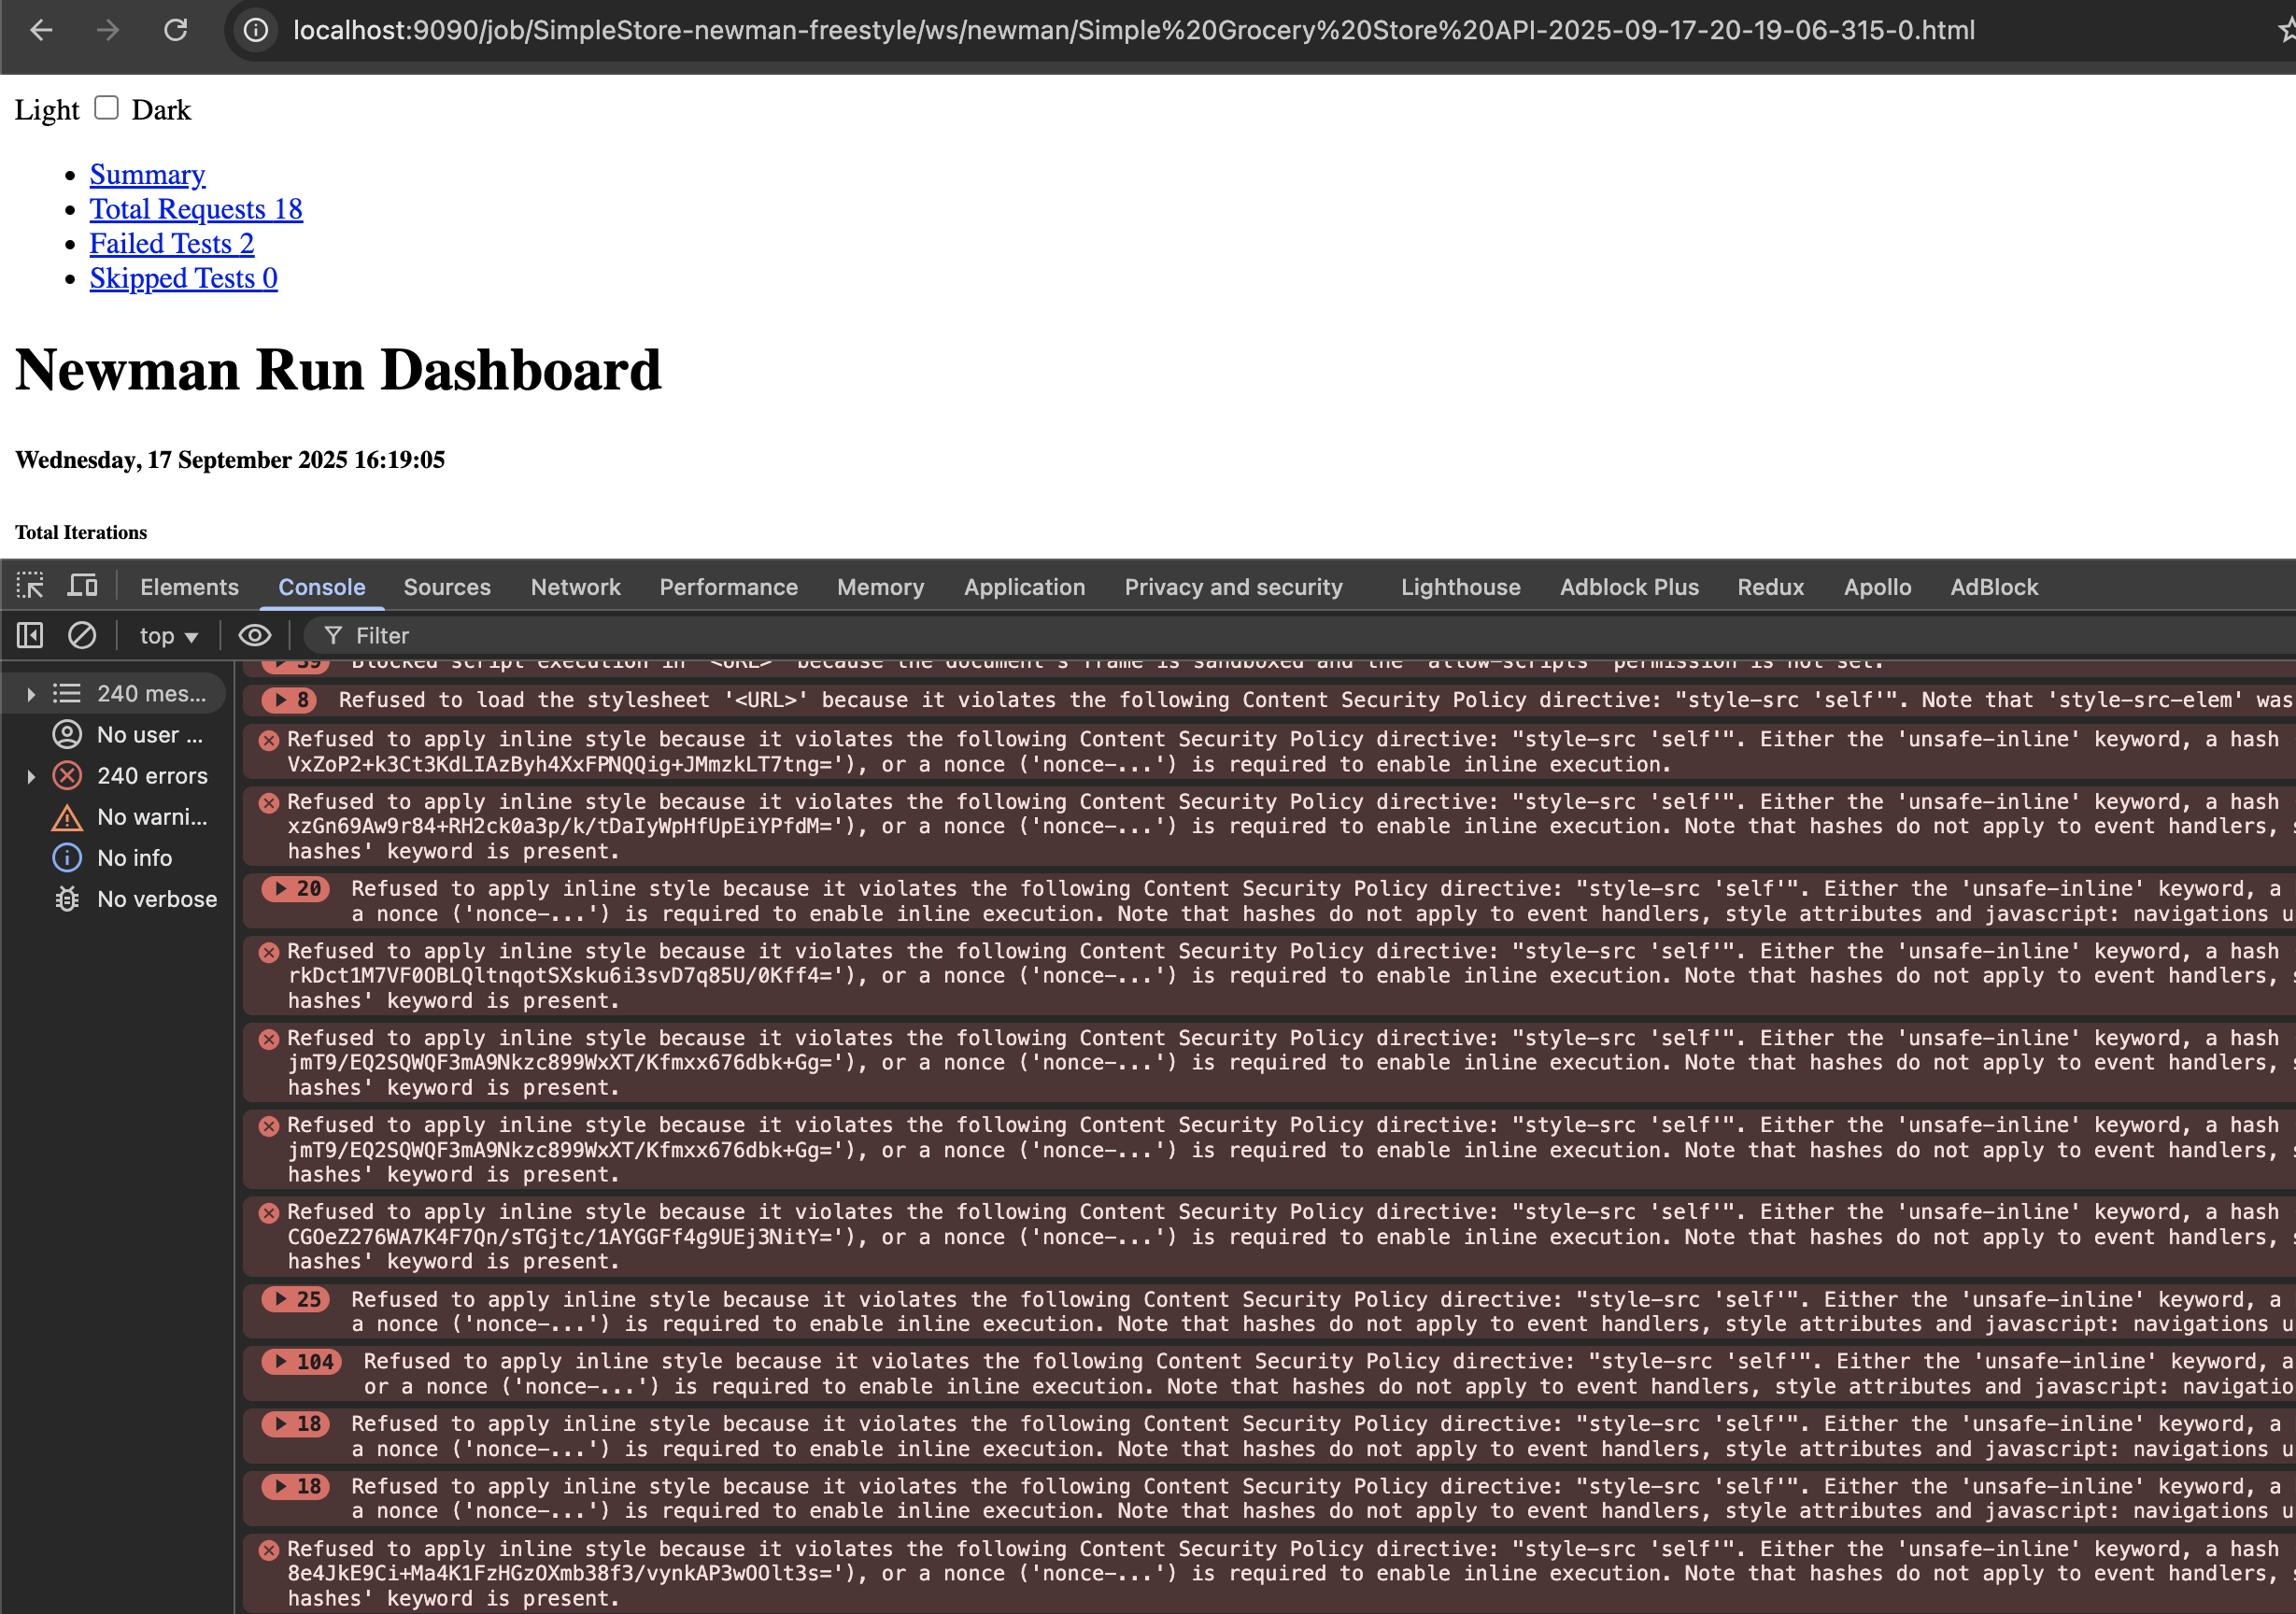
不过因为 security 的限制------Jenkins 会 block untrusted source,所以样式是有问题的的:
-
修改 script console

这里修改的配置其实就是修改 Content Security Policy,让 sandbox 可以访问外界的 script,将其修改为:bashSystem.setProperty("hudson.model.DirectoryBrowserSupport.CSP", "sandbox allow-scripts;")sandbox 可以正常访问外界的 script,就可以正常渲染了:
⚠️:具体的配置需要做更多的搜索学习,当前设置在生产环境中容易遭受 XSS、恶意脚本的攻击
-
-
jenkinsfile
实现方法如下:bashpipeline { agent any environment { POSTMAN_API_KEY = credentials('postman-api-key') SIMPLE_STORE_COLLECTION_ID = credentials('simple-store-collection-id') } stages { stage('Run Newman') { steps { sh ''' newman run "https://api.postman.com/collections/${SIMPLE_STORE_COLLECTION_ID}?apikey=${POSTMAN_API_KEY}" --env-var baseUrl=http://host.docker.internal:8080 ''' } } } }这里就使用了之前提到的
environment的方法获取 secrets,然后我也多加了一个变量取保存 collection id
执行完就会生成对应的 report 了:

将 report 推送到 dashboard
目前(2025 年 9 月)后,html publisher 是已经默认自动下载的,如果是早期的版本,可能需要单独下载这个 plugin
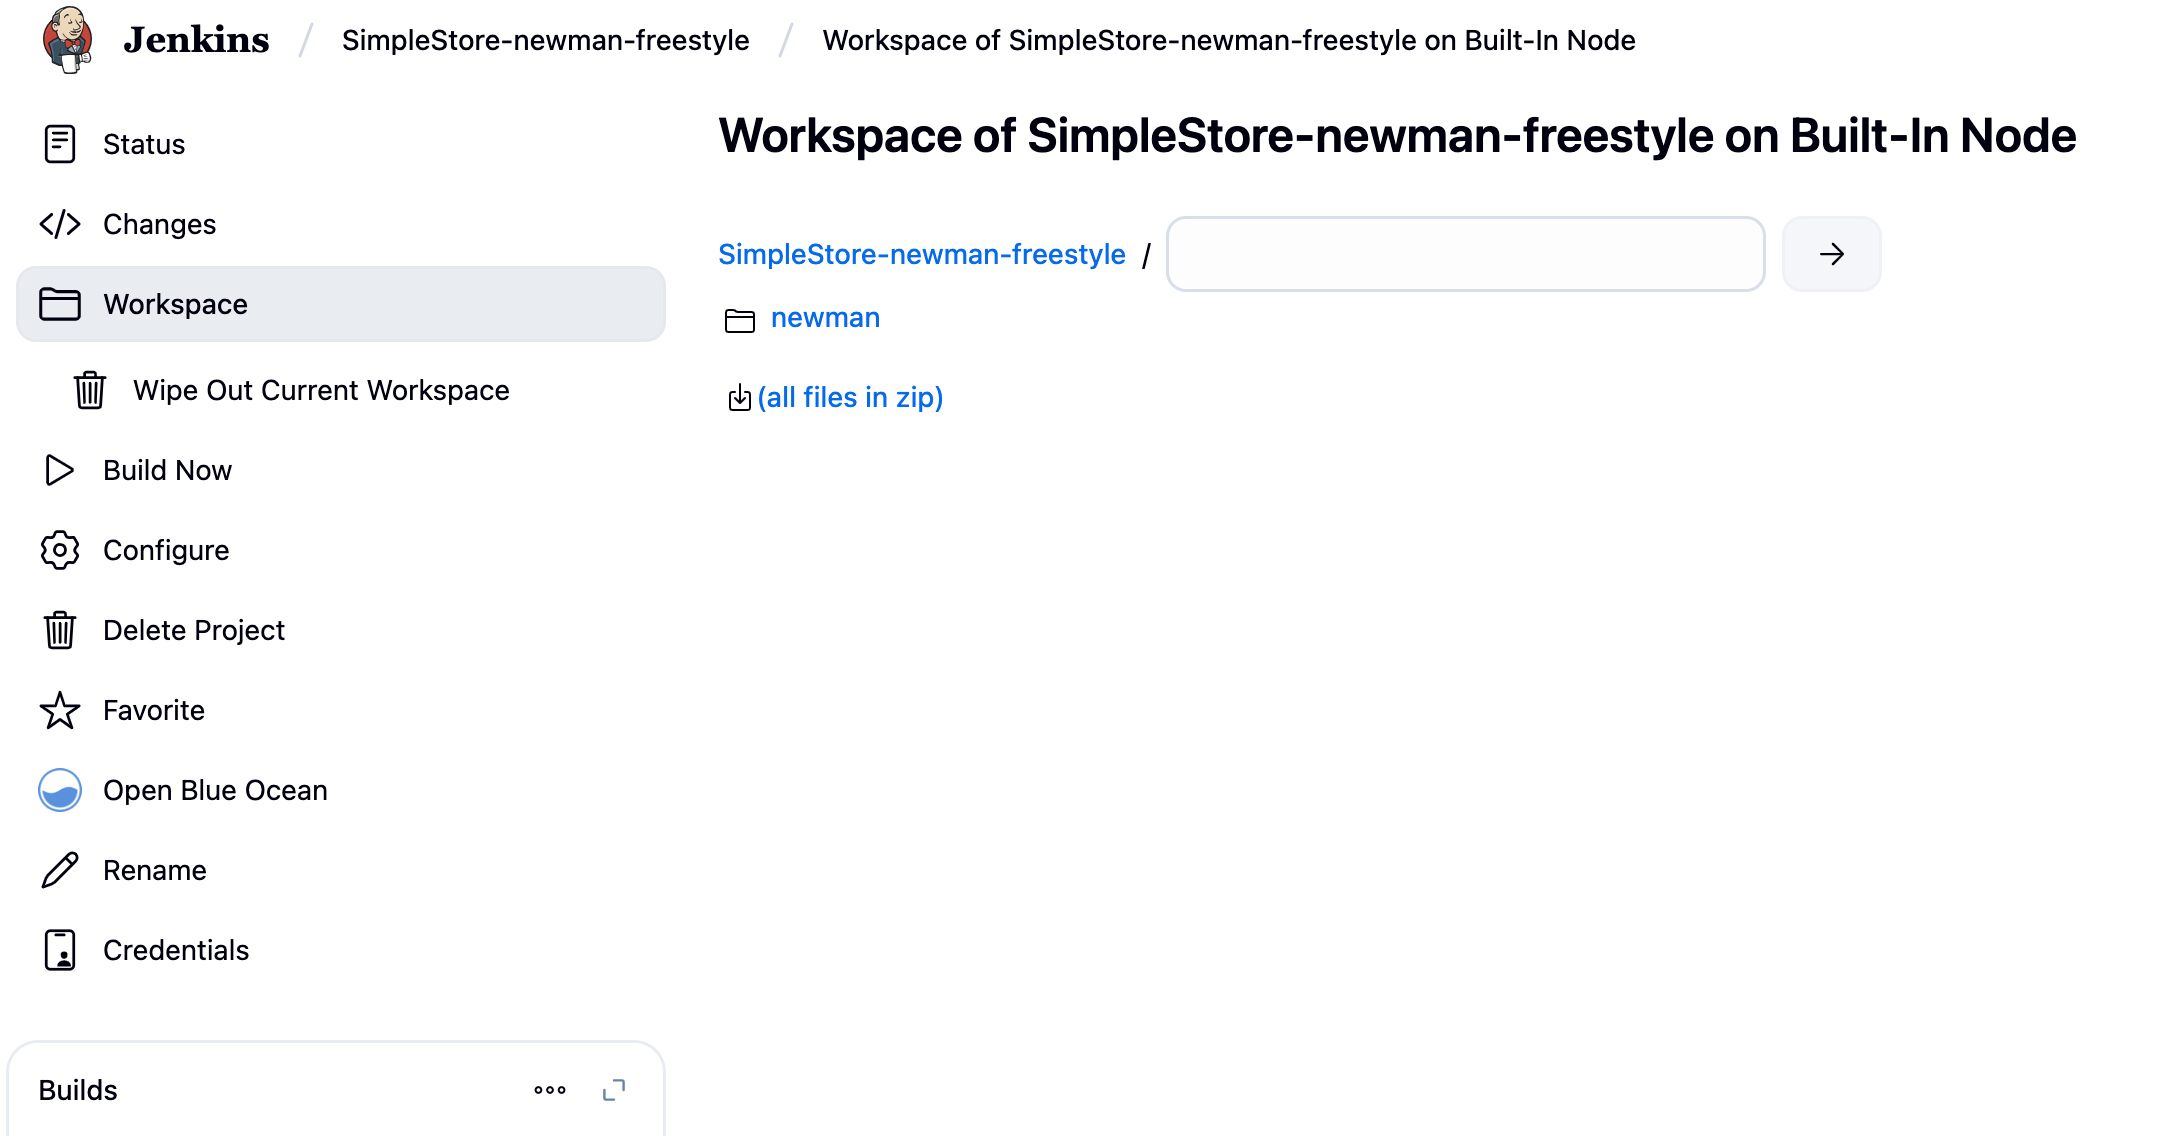
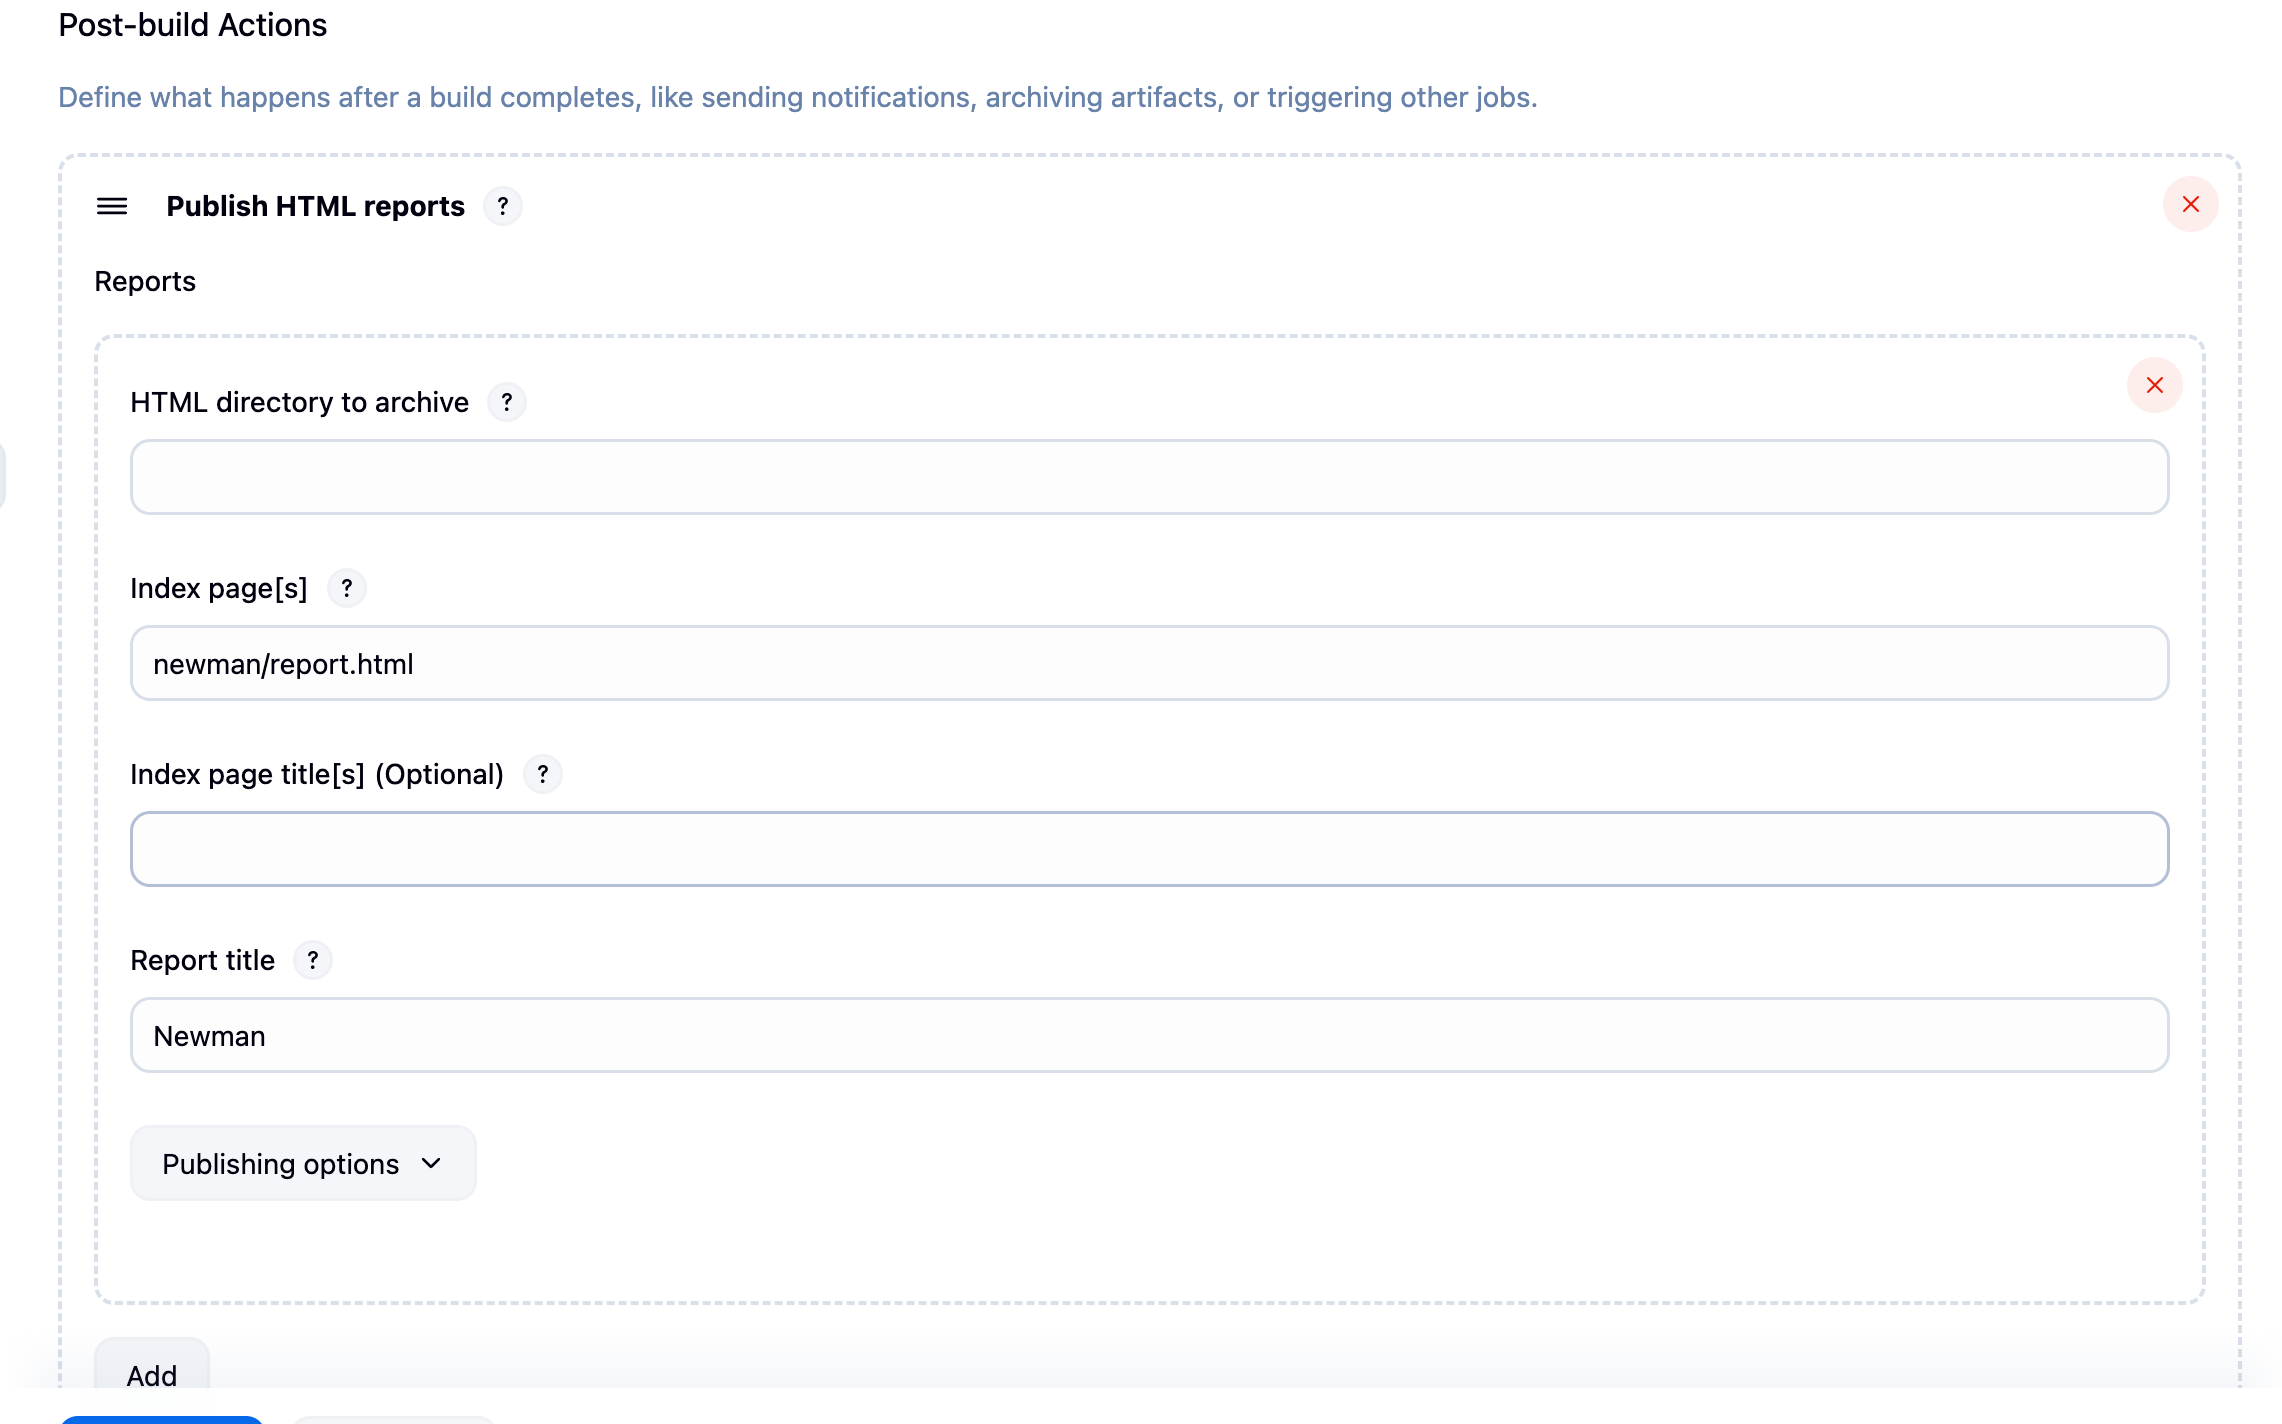
推送到 dashboard 是可以直接在根目录下查看 report,这一步需要用到 post build actions,依旧是分 free style 和 jenkinsfile 两个部分去走一下流程
-
free style
UI 中直接在 post-build actions 中进行修改即可:
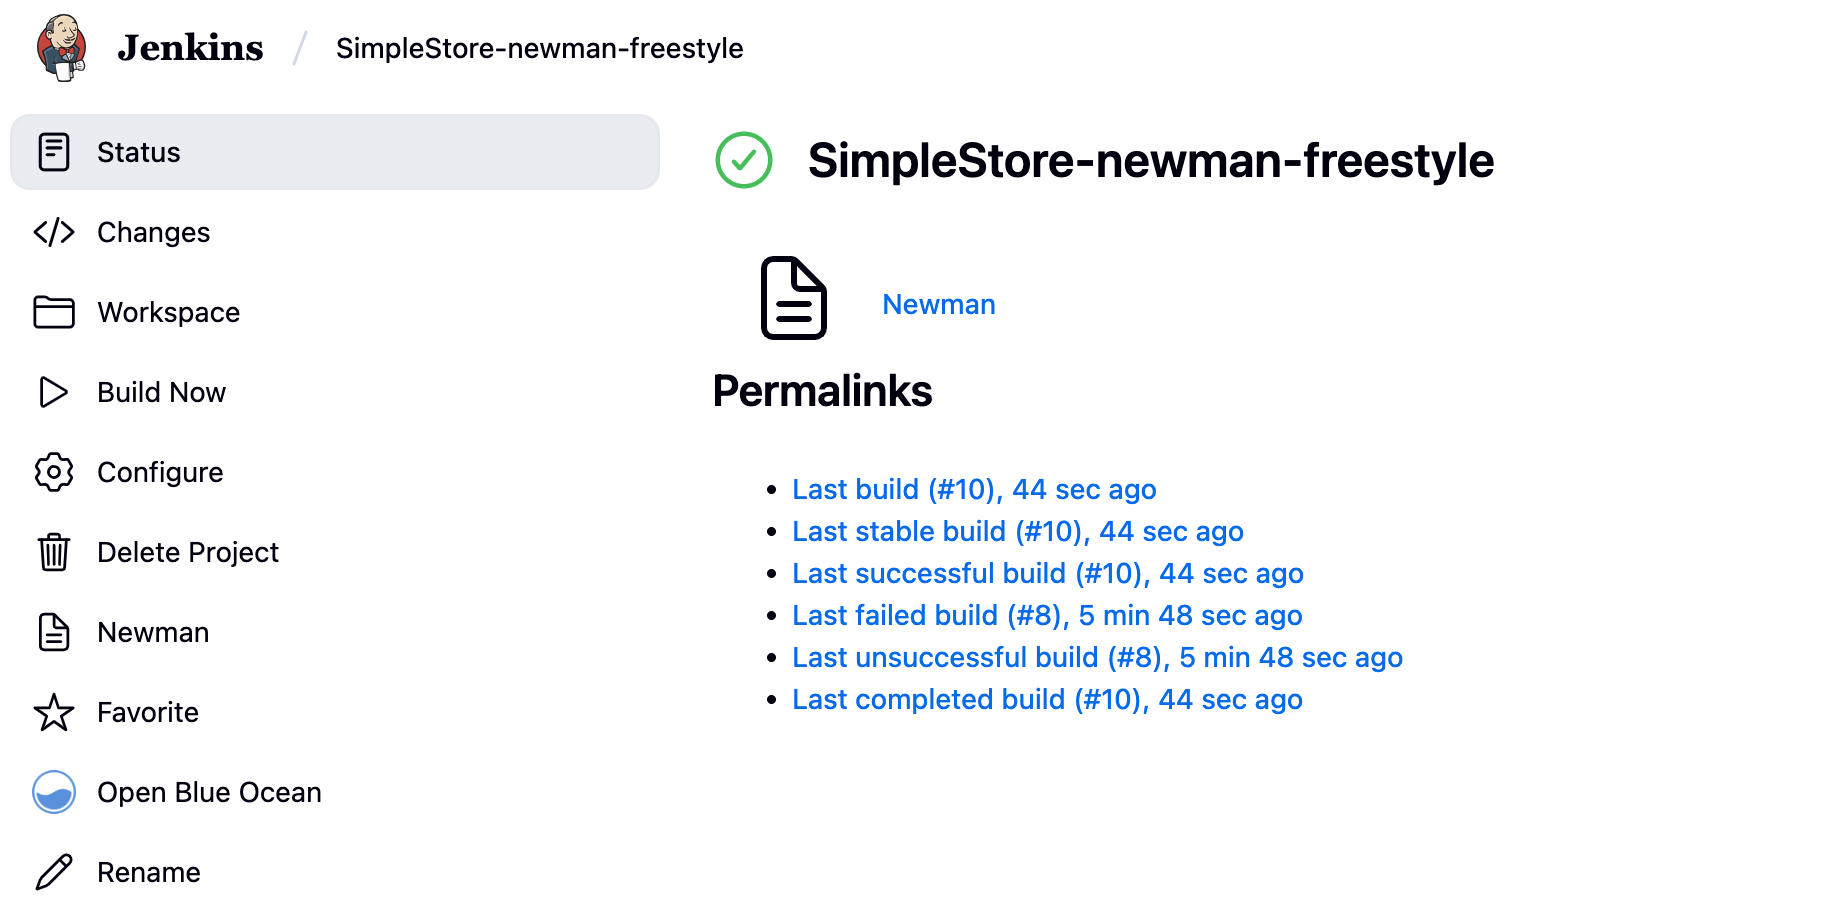
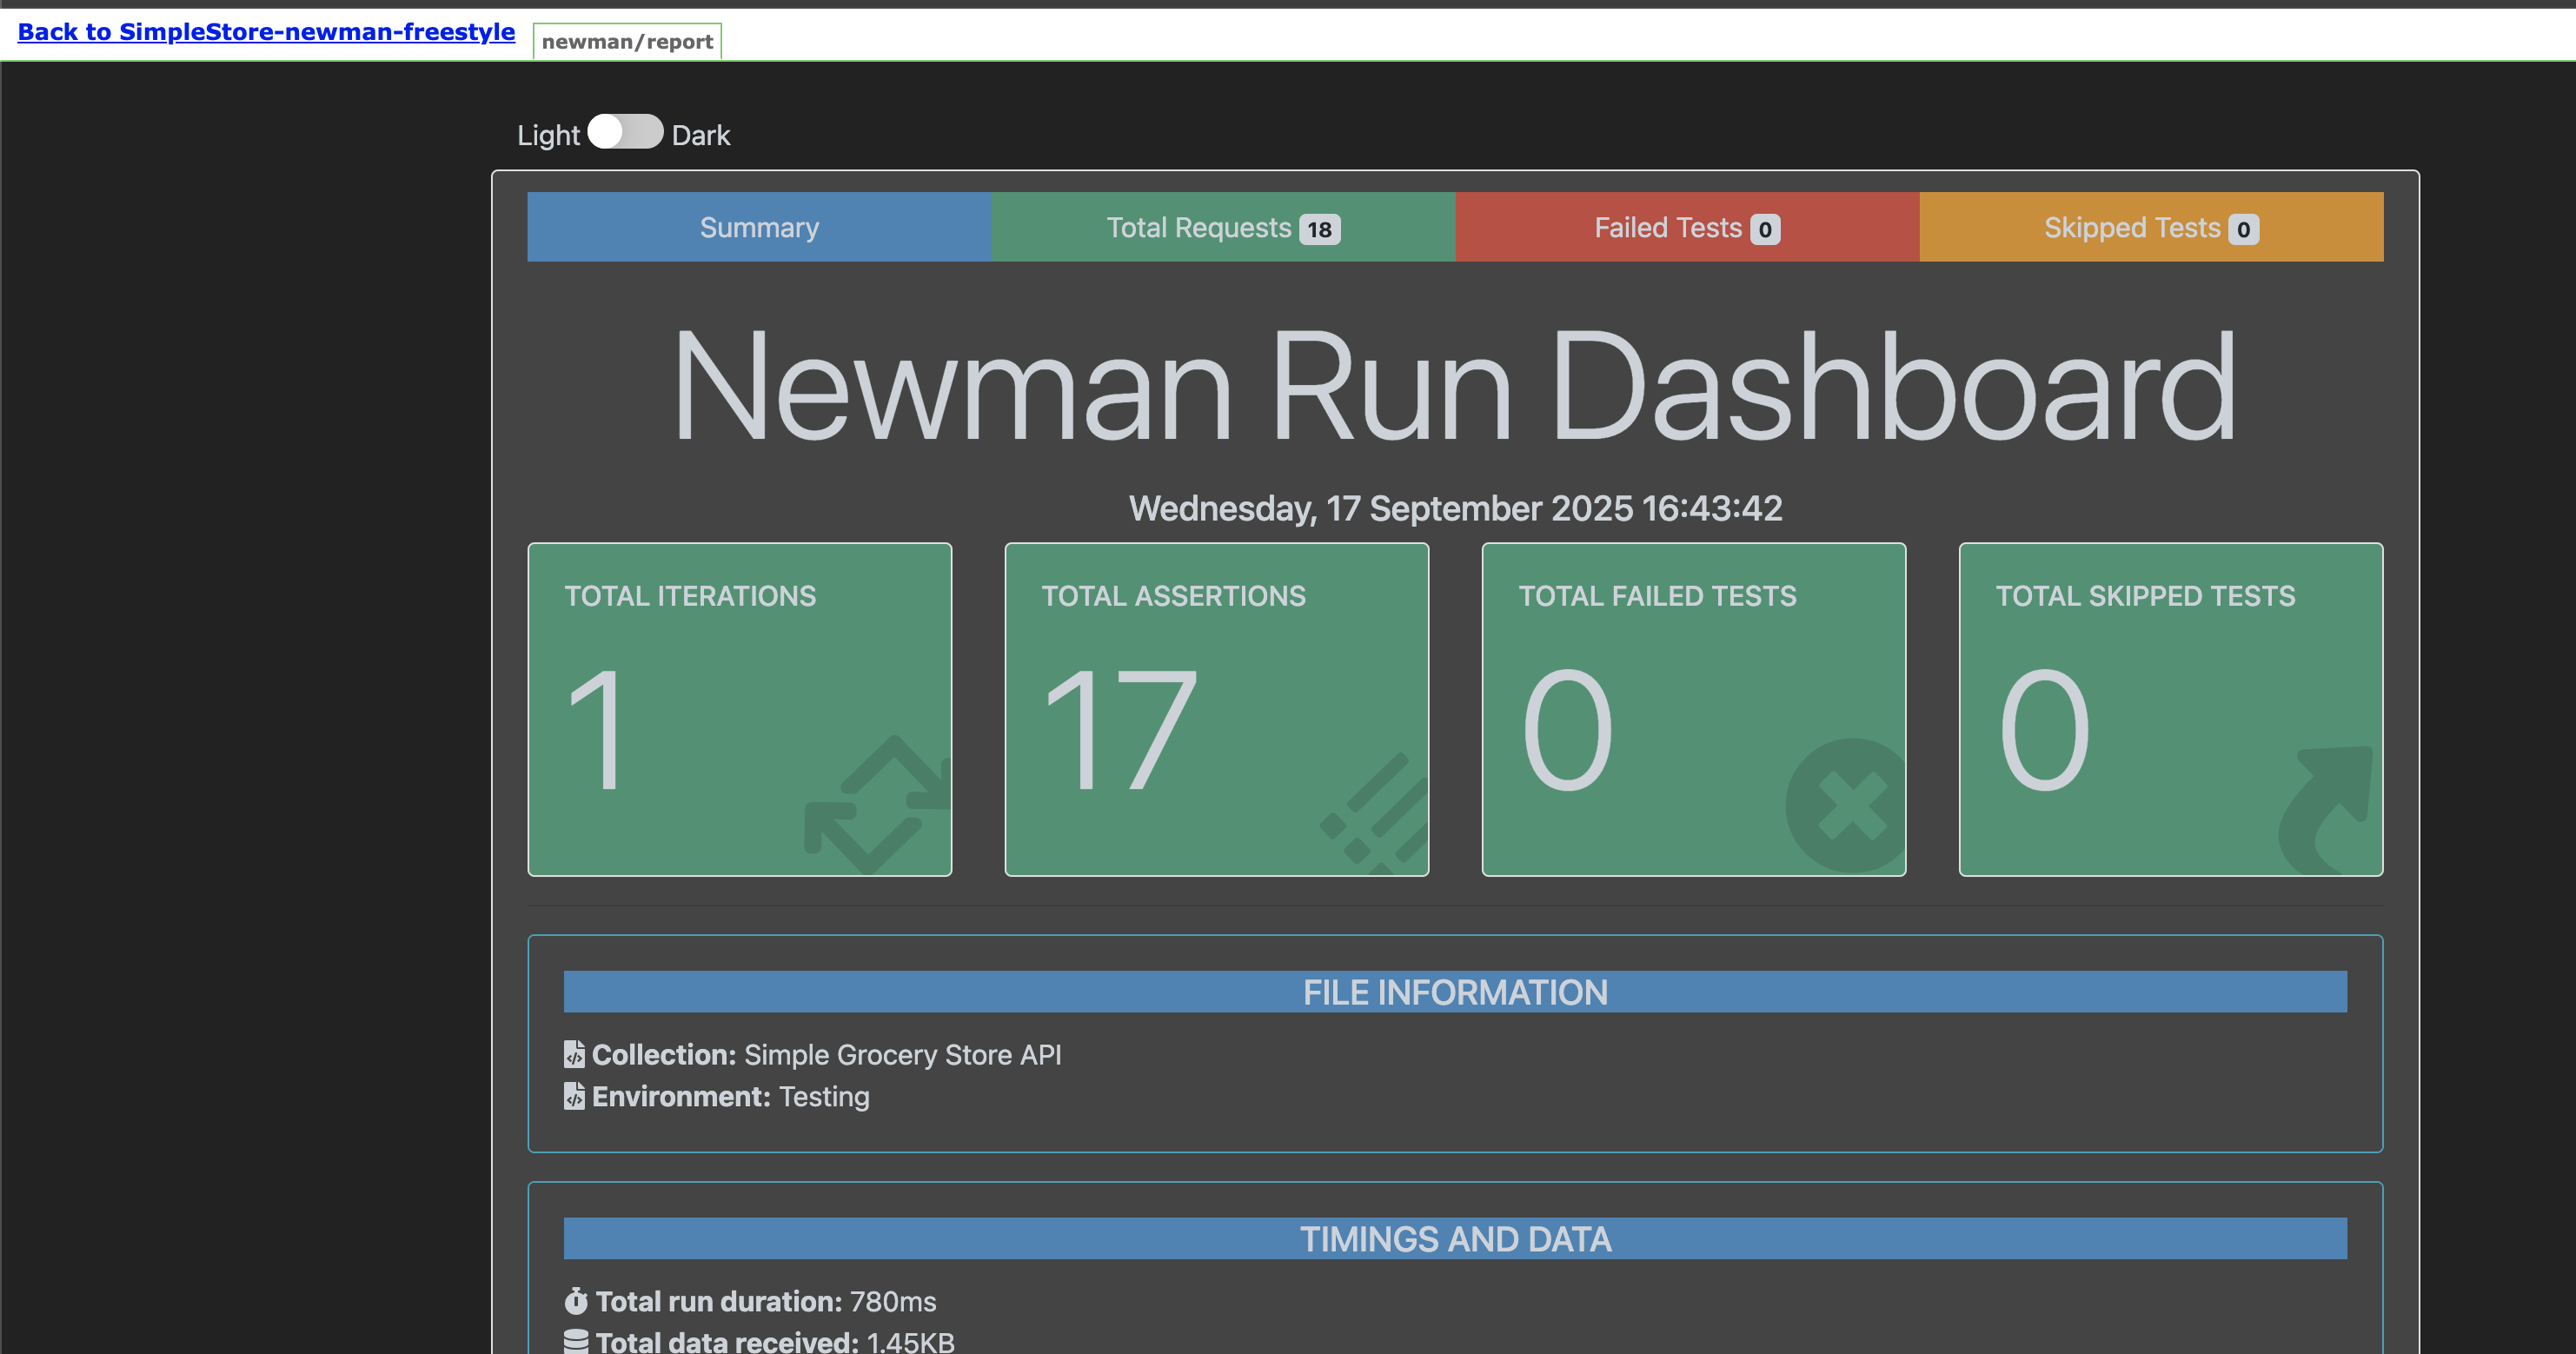
修改后再执行,会发现 console 中多了几行指令:bash┌─────────────────────────┬─────────────────┬─────────────────┐ │ │ executed │ failed │ ├─────────────────────────┼─────────────────┼─────────────────┤ │ iterations │ 1 │ 0 │ ├─────────────────────────┼─────────────────┼─────────────────┤ │ requests │ 18 │ 0 │ ├─────────────────────────┼─────────────────┼─────────────────┤ │ test-scripts │ 37 │ 0 │ ├─────────────────────────┼─────────────────┼─────────────────┤ │ prerequest-scripts │ 20 │ 0 │ ├─────────────────────────┼─────────────────┼─────────────────┤ │ assertions │ 17 │ 0 │ ├─────────────────────────┴─────────────────┴─────────────────┤ │ total run duration: 780ms │ ├─────────────────────────────────────────────────────────────┤ │ total data received: 1.49kB (approx) │ ├─────────────────────────────────────────────────────────────┤ │ average response time: 6ms [min: 4ms, max: 22ms, s.d.: 3ms] │ └─────────────────────────────────────────────────────────────┘ [htmlpublisher] Archiving HTML reports... [htmlpublisher] Archiving at PROJECT level /var/jenkins_home/jobs/SimpleStore-newman-freestyle/workspace to Newman [htmlpublisher] Copying recursive using current thread Finished: SUCCESS这时候首页就会出现一个
Newman,打开后就可以直接查看 report 了:
-
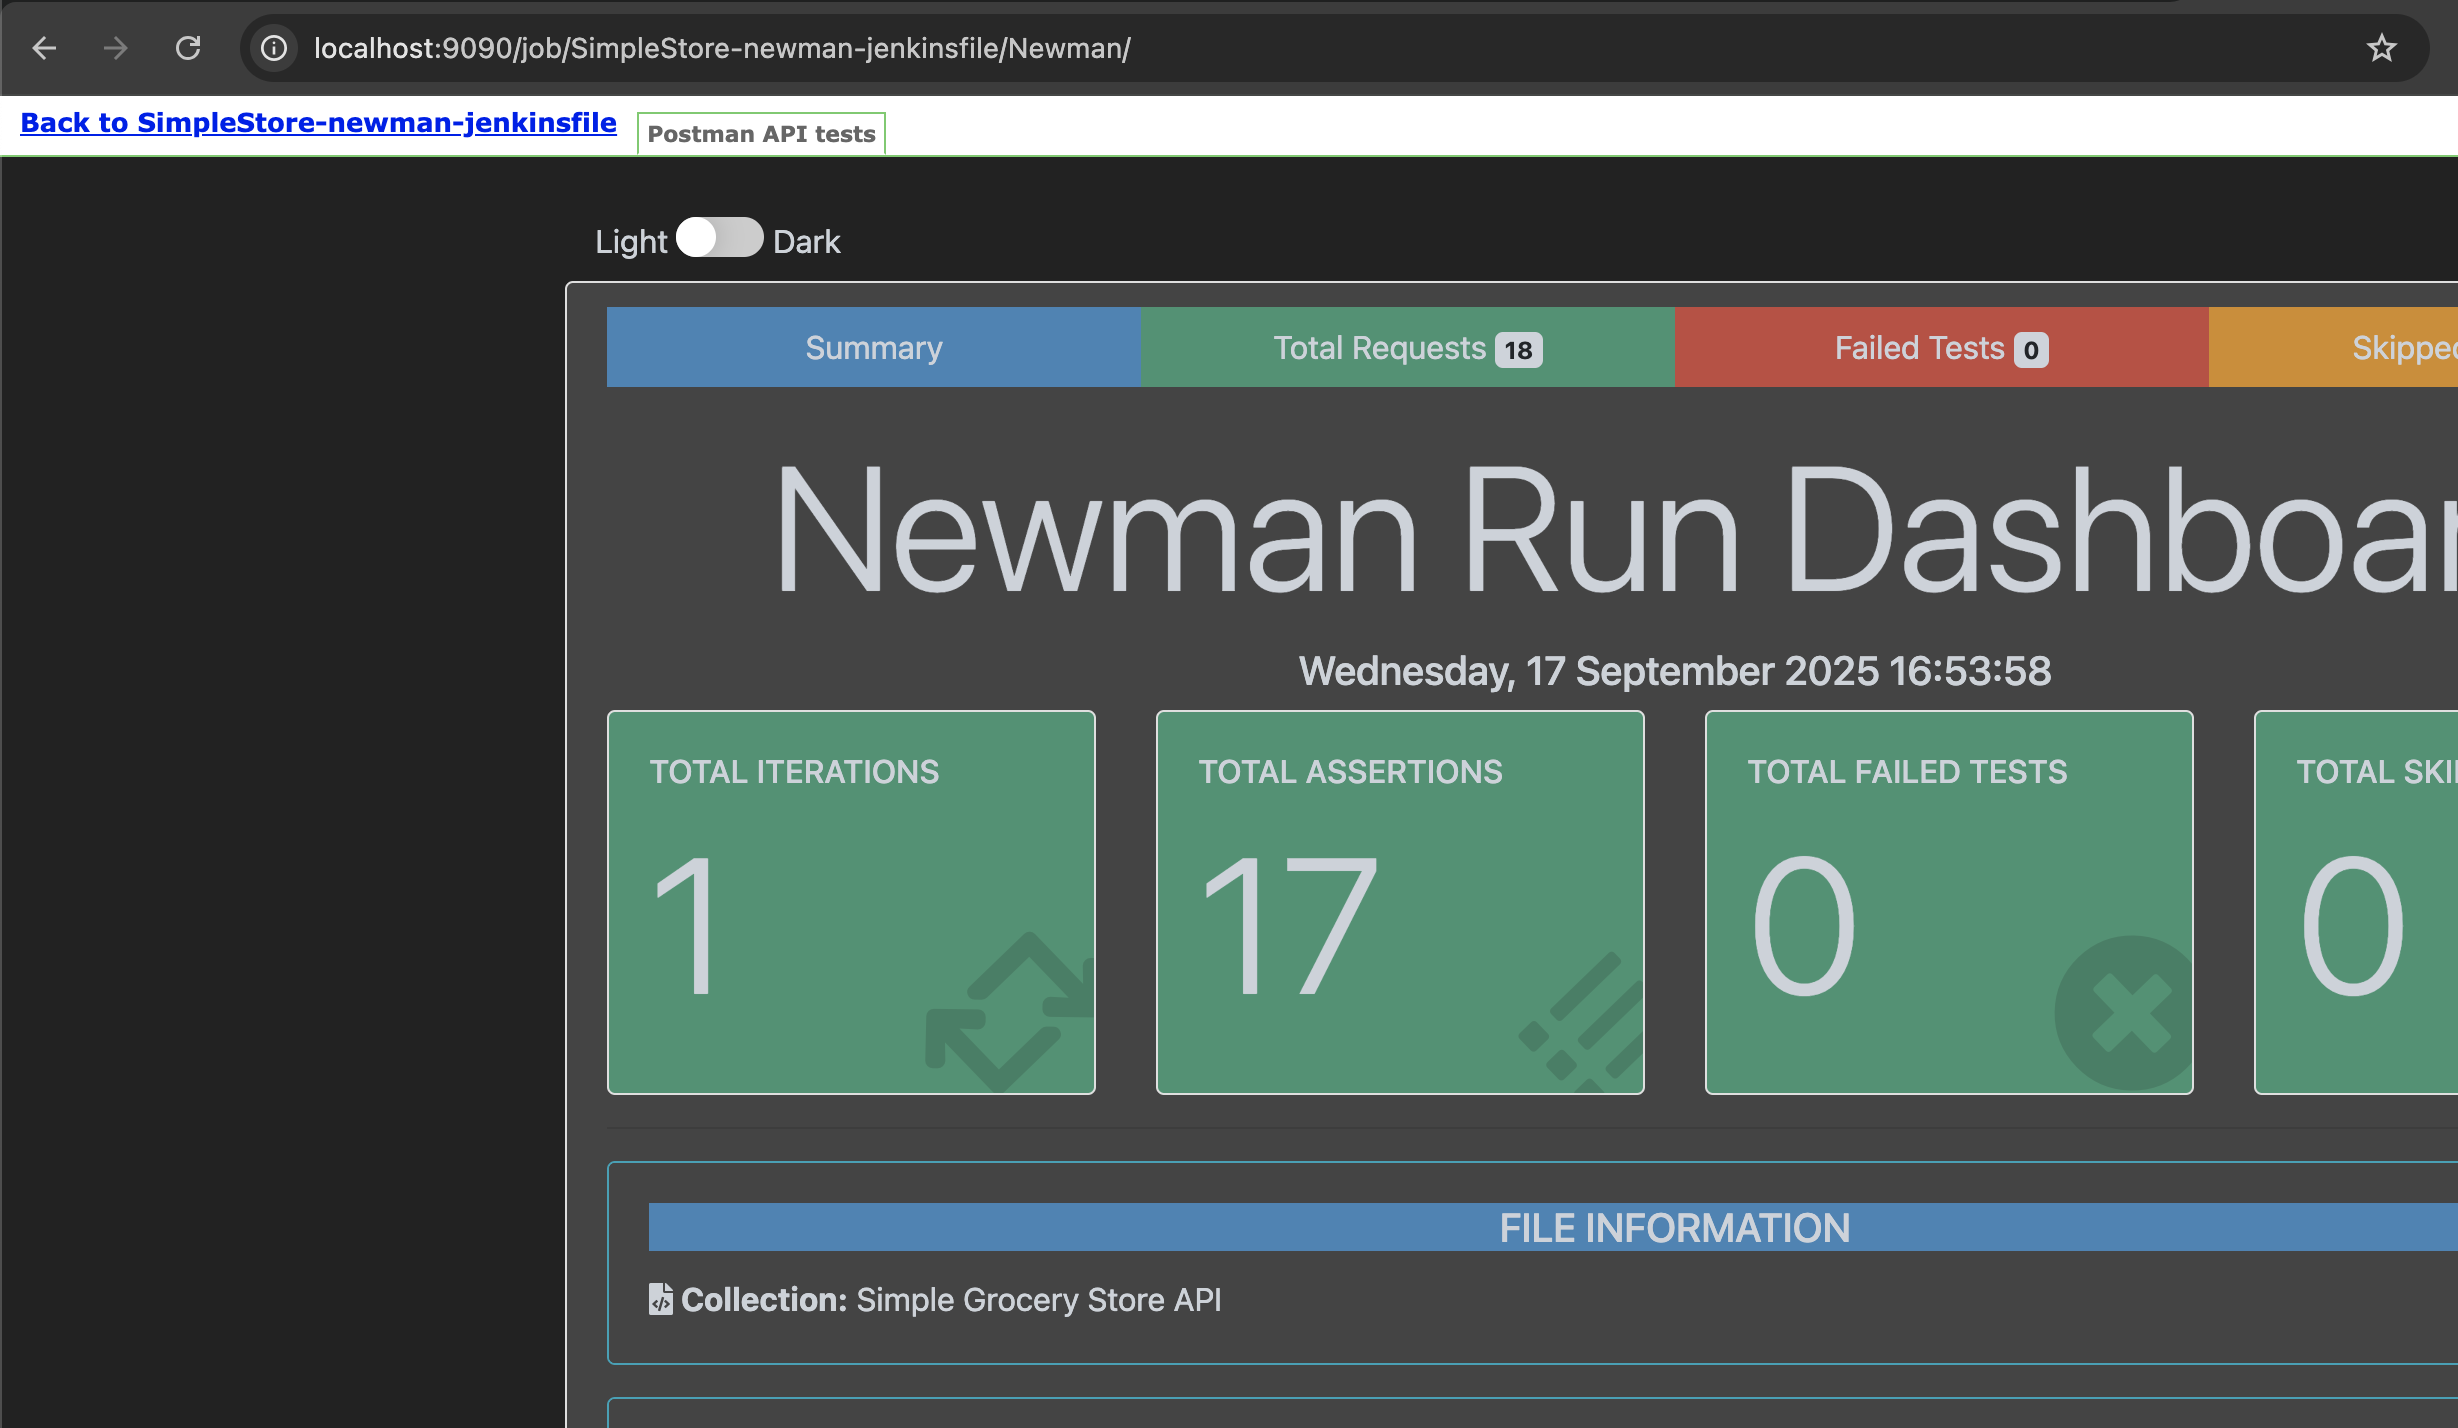
jenkinsfile
pipeline 修改如下:bashpipeline { agent any environment { POSTMAN_API_KEY = credentials('postman-api-key') SIMPLE_STORE_COLLECTION_ID = credentials('simple-store-collection-id') } stages { stage('Run Newman') { steps { sh ''' newman run "https://api.postman.com/collections/${SIMPLE_STORE_COLLECTION_ID}?apikey=${POSTMAN_API_KEY}"\ --env-var baseUrl=http://host.docker.internal:8080 \ --reporters cli,htmlextra \ --reporter-htmlextra-export newman/report.html ''' } } } post { always { publishHTML target: [ reportName: 'Newman', reportDir: 'newman', reportFiles: 'report.html', reportTitles: 'Postman API tests', keepAll: true, alwaysLinkToLastBuild: true, allowMissing: false ] } } }执行后,console 中也会出现对应的 publishing:
bash├─────────────────────────┼─────────────────┼─────────────────┤ │ assertions │ 17 │ 0 │ ├─────────────────────────┴─────────────────┴─────────────────┤ │ total run duration: 733ms │ ├─────────────────────────────────────────────────────────────┤ │ total data received: 1.49kB (approx) │ ├─────────────────────────────────────────────────────────────┤ │ average response time: 7ms [min: 4ms, max: 24ms, s.d.: 5ms] │ └─────────────────────────────────────────────────────────────┘ [Pipeline] } [Pipeline] // stage [Pipeline] stage [Pipeline] { (Declarative: Post Actions) [Pipeline] publishHTML [htmlpublisher] Archiving HTML reports... [htmlpublisher] Archiving at BUILD level /var/jenkins_home/jobs/SimpleStore-newman-jenkinsfile/workspace/newman to Newman [htmlpublisher] Copying recursive using current thread [Pipeline] } [Pipeline] // stage [Pipeline] } [Pipeline] // withCredentials [Pipeline] } [Pipeline] // node [Pipeline] End of Pipeline Finished: SUCCESS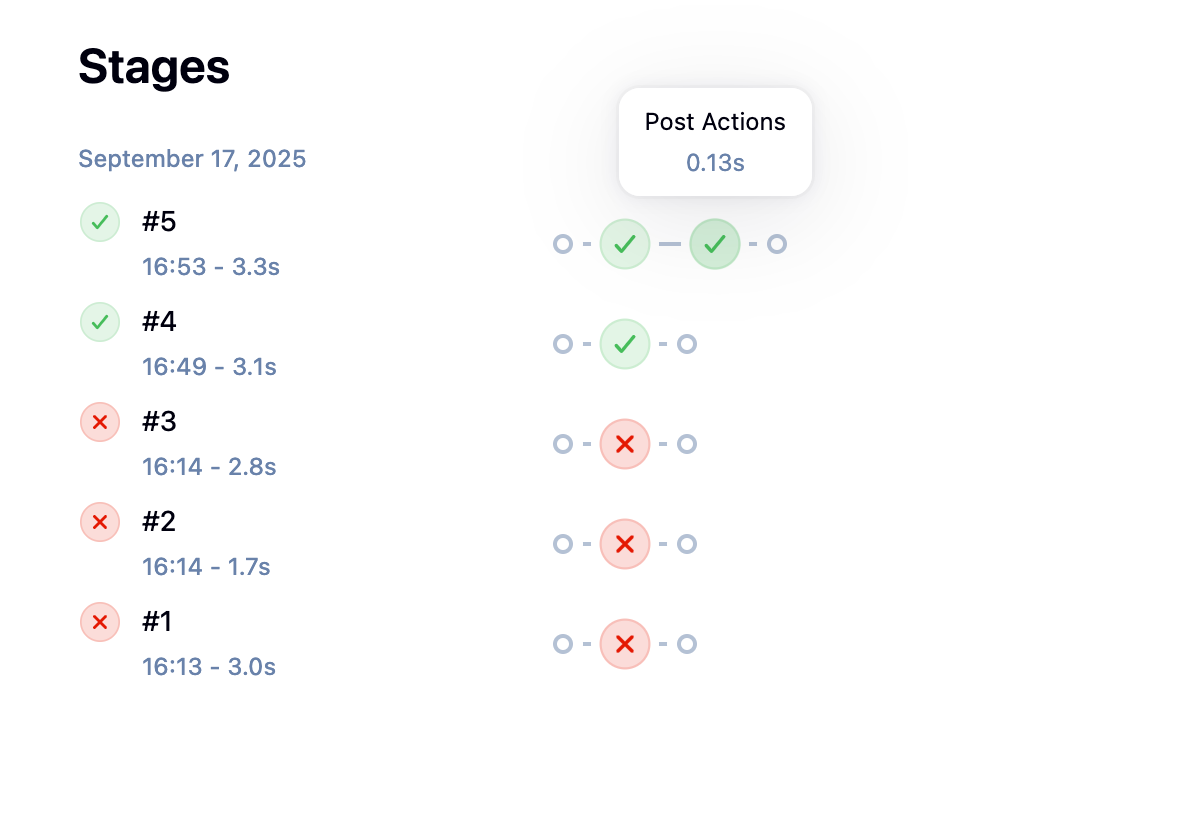
最后渲染结果如下,发现可以直接在首页看到 newman:
这个时候对比一下,会发现 URL 路径变得简单很多: