一、页面权限
封装指令权限,能简单快速实现按钮级别的权限判断
1.1 hasRole
角色权限处理
javascript
 /**
 * v-hasRole 角色权限处理
 * Copyright (c) 2019 ruoyi
 */
import useUserStore from '@/store/modules/user'

export default {
  mounted(el, binding, vnode) {
    const { value } = binding
    const super_admin = "admin"
    // 从useUserStore中获取当前用户的角色列表
    const roles = useUserStore().roles

    // 如果传入的指令值存在,value为非空数组
    if (value && value instanceof Array && value.length > 0) {
      const roleFlag = value
      // 验证用户是否具有指定角色之一,或者是否为超级管理员 admin
      const hasRole = roles.some(role => {
        return super_admin === role || roleFlag.includes(role)
      })

      // 如果不具有相应角色,则从DOM中移除该元素
      if (!hasRole) {
        el.parentNode && el.parentNode.removeChild(el)
      }
    } else {
      throw new Error(`请设置角色权限标签值`)
    }
  }
}
使用示例
javascript
<el-button v-hasRole="['admin', 'editor']">编辑</el-button>1.2 hasPermi
权限标识处理
javascript
import useUserStore from '@/store/modules/user'

export default {
  mounted(el, binding, vnode) {
    const { value } = binding
    const all_permission = "*:*:*"
    // 从useUserStore获取权限标识列表
    const permissions = useUserStore().permissions
    // 检查传入的指令值是否为非空数组
    if (value && value instanceof Array && value.length > 0) {
      const permissionFlag = value
      // 判断用户权限是否有全部权限或具有指定权限
      const hasPermissions = permissions.some(permission => {
        return all_permission === permission || permissionFlag.includes(permission)
      })

      // 如果不具有指定权限,则移除DOM元素
      if (!hasPermissions) {
        el.parentNode && el.parentNode.removeChild(el)
      }
    } else {
      throw new Error(`请设置操作权限标签值`)
    }
  }
}
使用示例
javascript
<el-button v-hasPermi="['system:user:add', 'system:user:edit']">新增用户</el-button>1.3 使用示例
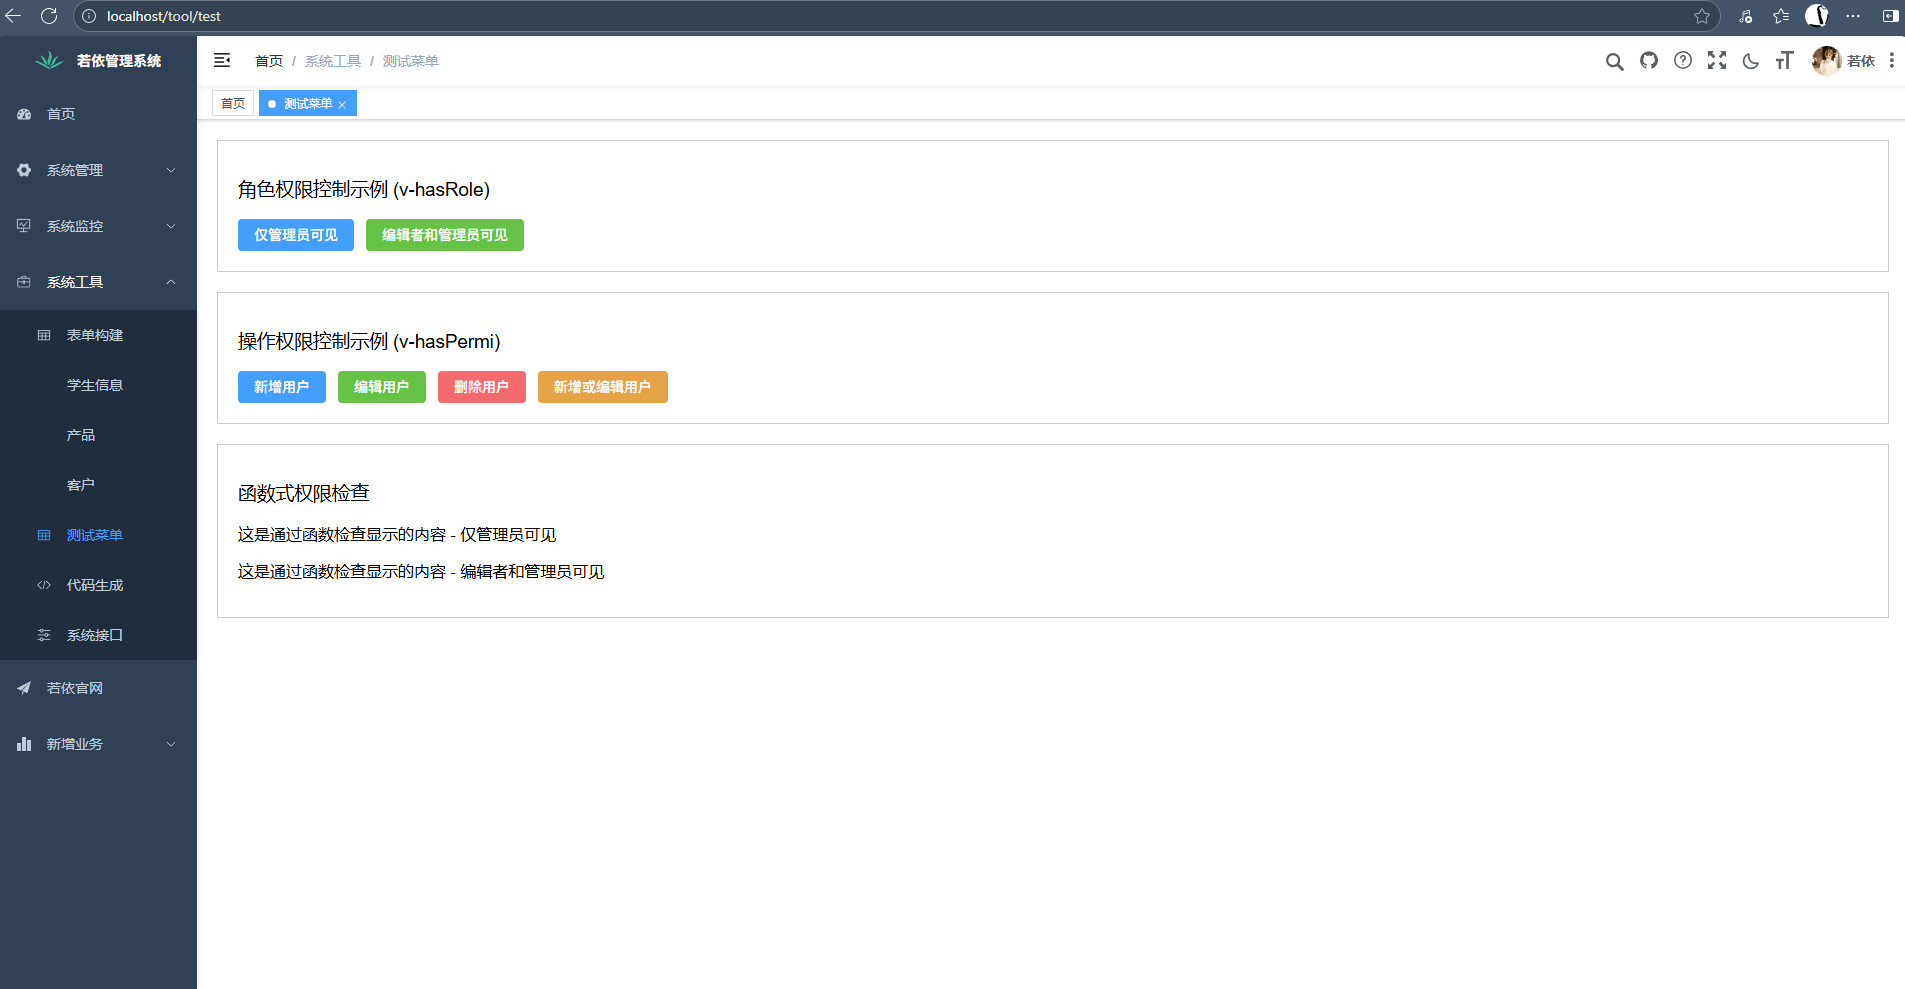
示例代码
javascript
<!-- 父组件 -->
<template>

  <!-- hasRole 使用示例 -->
  <div style="margin: 20px; padding: 20px; border: 1px solid #ccc;">
    <h3>角色权限控制示例 (v-hasRole)</h3>
    <el-button v-hasRole="['admin']" type="primary">仅管理员可见</el-button>
    // hasRole.js中设置了admin所有可见,所以这里v-hasRole="['common']" 管理员也是有权限的
    <el-button v-hasRole="['common']" type="success">编辑者和管理员可见</el-button>
  </div>

  <!-- hasPermi 使用示例 -->
  <div style="margin: 20px; padding: 20px; border: 1px solid #ccc;">
    <h3>操作权限控制示例 (v-hasPermi)</h3>
    <el-button v-hasPermi="['system:user:add']" type="primary">新增用户</el-button>
    <el-button v-hasPermi="['system:user:edit']" type="success">编辑用户</el-button>
    <el-button v-hasPermi="['system:user:remove']" type="danger">删除用户</el-button>
    <el-button v-hasPermi="['system:user:add', 'system:user:edit']" type="warning">新增或编辑用户</el-button>
  </div>

  <!-- 函数式权限检查示例 -->
  <div style="margin: 20px; padding: 20px; border: 1px solid #ccc;">
    <h3>函数式权限检查</h3>
    <div v-if="checkRole(['admin'])">
      <p>这是通过函数检查显示的内容 - 仅管理员可见</p>
    </div>
    <div v-if="checkPermi(['system:config:edit'])">
      <p>这是通过函数检查显示的内容 - 编辑者和管理员可见</p>
    </div>
  </div>
</template>

<script setup>
import { checkPermi, checkRole } from '@/utils/permission'

</script>
admin账号查看
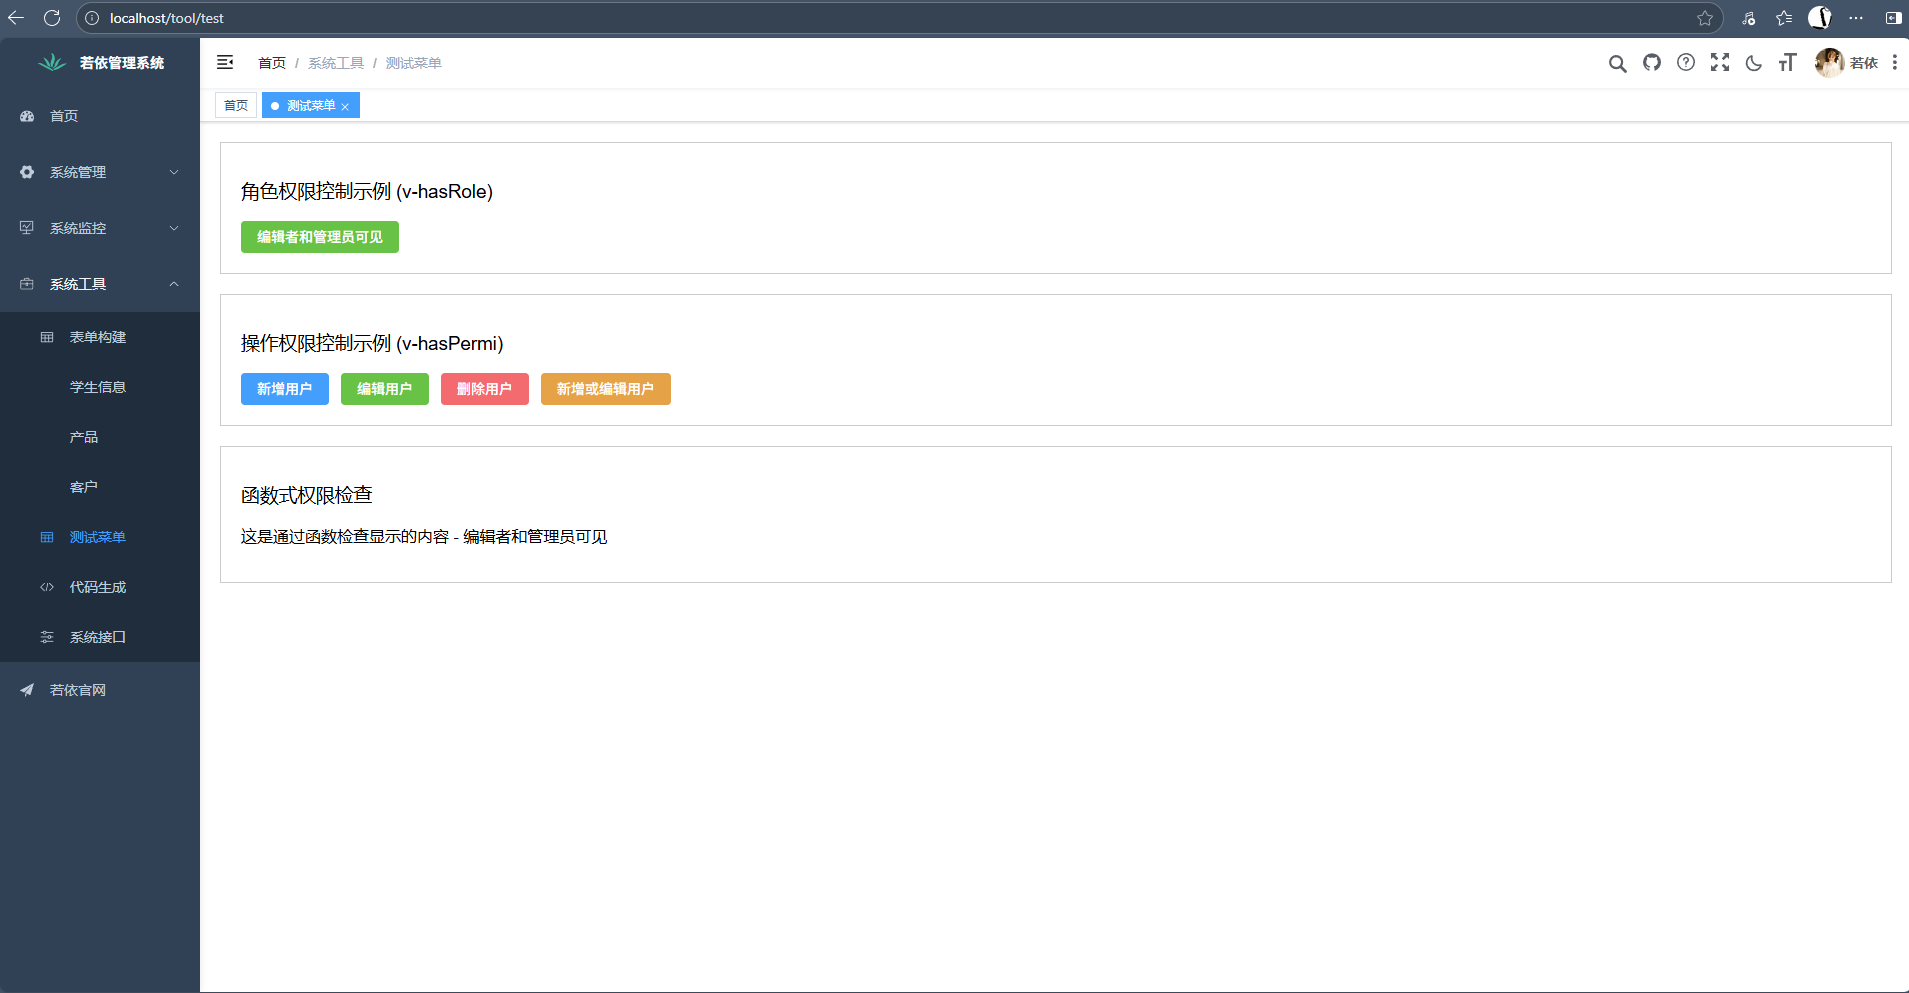
ry(普通角色)账号查看
这里注意要给普通角色添加新增的目录权限
v-if 是 Vue 的条件渲染指令,它根据表达式的真假值来决定是否渲染某个元素或组件;当 v-if 的值为 true 时,元素会被渲染到 DOM 中;
当 v-if 的值为 false 时,元素不会被渲染到 DOM 中(完全不存在于 DOM 树中)
二、页签缓存
页签缓存是一个重要的用户体验优化功能。在ruoyi中,它允许用户在切换不同页面时保持页面状态,避免重复加载和数据丢失。在ruoyi中,页签缓存主要通过Vue的组件实现
javascript
<template>
  <section class="app-main">
    <router-view v-slot="{ Component, route }">
      <transition name="fade-transform" mode="out-in">
        <keep-alive :include="tagsViewStore.cachedViews">
          <component v-if="!route.meta.link" :is="Component" :key="route.path"/>
        </keep-alive>
      </transition>
    </router-view>
  </section>
</template>- keep-alive是Vue内置组件,用于缓存动态组件
- :include="tagsViewStore.cachedViews"指定了需要缓存的组件列表
- 只有在cachedViews数组中的组件才会被缓存
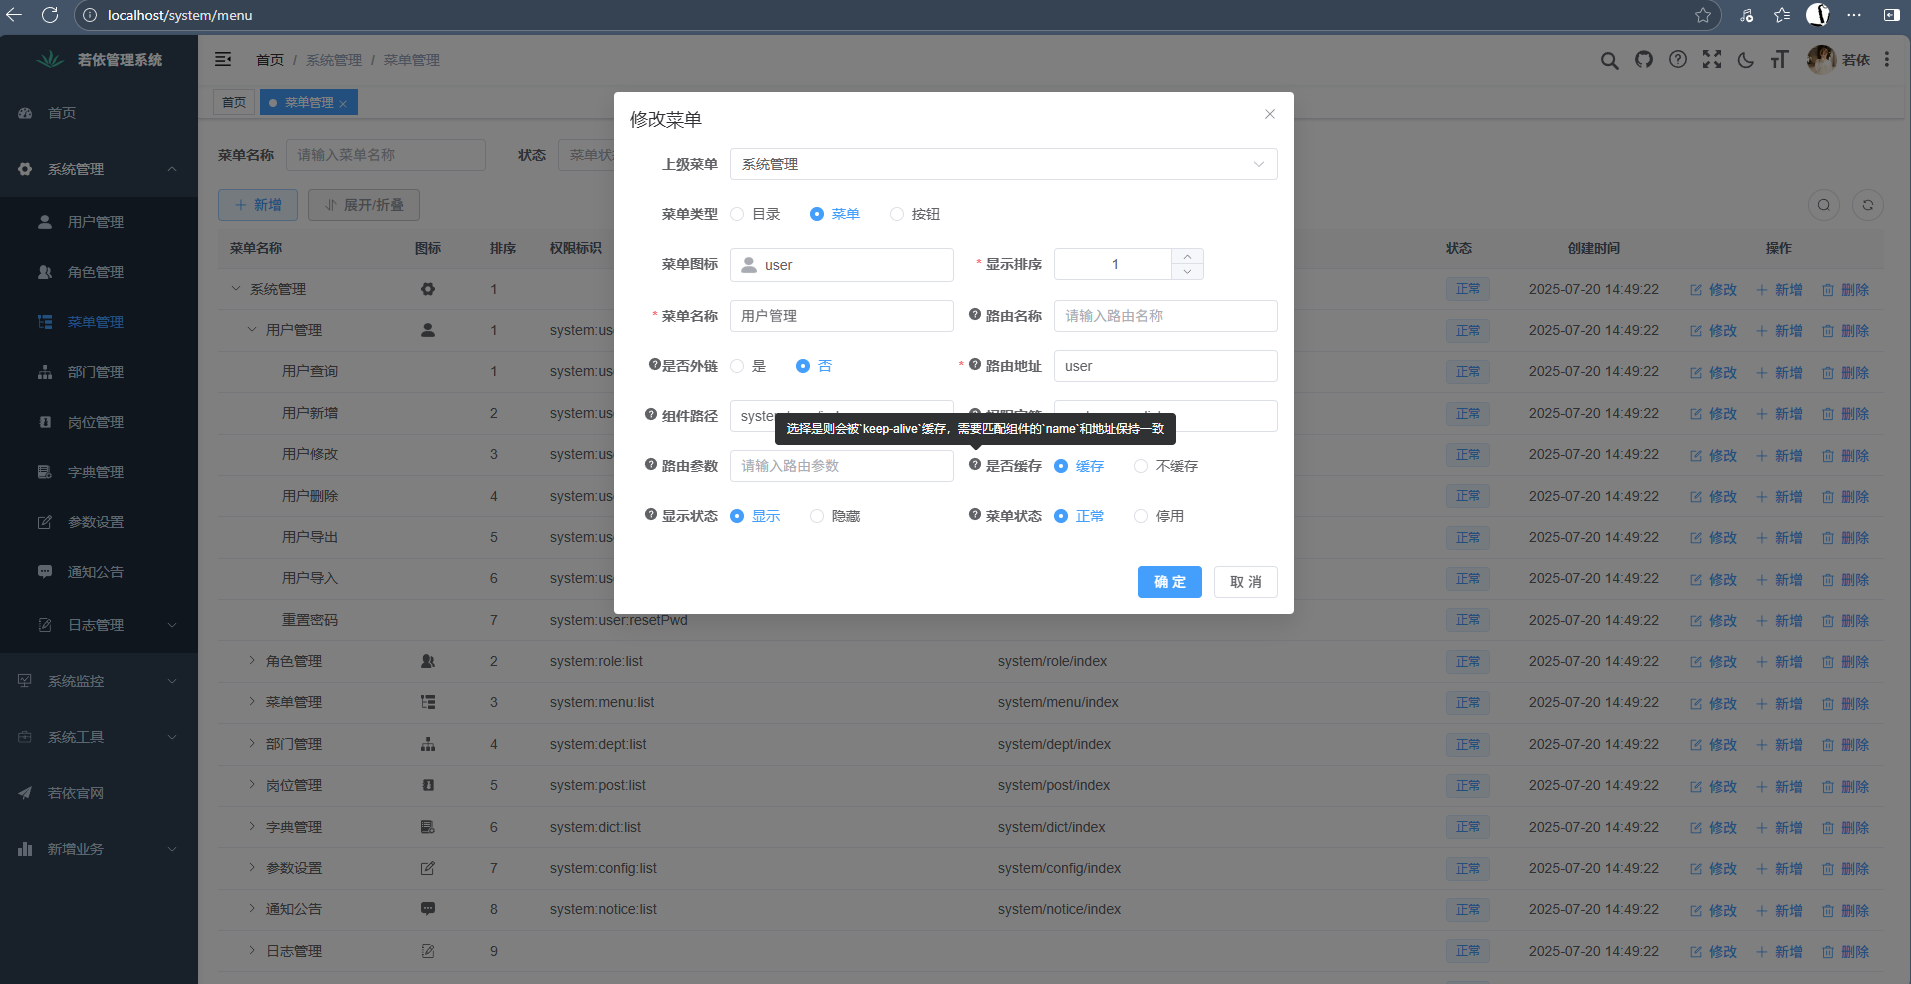
使用keep-alive进行组件缓存时,必须确保路由配置和组件的name属性保持一致,否则会导致缓存失效或者出现其他问题。在Vue中,keep-alive组件通过include属性来决定哪些组件需要被缓存。默认情况下,keep-alive会优先匹配组件的name属性。如果路由配置中的name与组件定义的name不一致,就会导致缓存机制失效。
在系统管理-菜单管理中可以配置菜单页签是否缓存,默认为缓存。
缓存的具体管理在src→store→modules→tagsViews.js中具体实现
javascript
addCachedView(view) {
    // 如果该页面已在缓存列表中,则不再重复添加
    if (this.cachedViews.includes(views.name)) return
    // 如果该页面的路由配置中meta.noCache不为true,则将路由的name添加到缓存列表
    if (!view.meta.noCache) {
        this.cachedViews.push(view.name)
    }
}
实际使用场景
1.用户首次访问/system/user页面,系统会加载用户管理组件
2.由于该路由未设置meta.noCache=true,所以该页面组件会被添加到cachedViews列表中
3.当用户切换到其他页面(如角色管理)再切换回来时,由于组件已在cachedViews列表中,keep-alive会直接从缓存中恢复组件状态,而不会重新创建组件
4.这样用户在用户管理页面中的操作状态(如表格的分页、筛选条件等)会被保留
三、使用图标
3.1 图标
icon图标放在src→assets→icons下
3.2 全局SvgIcon组件
src→components→SvgIcon→index.vue
javascript
<template>
  <svg :class="svgClass" aria-hidden="true">
    <use :xlink:href="iconName" :fill="color" />
  </svg>
</template>

<script>
export default defineComponent({
  // 定义从父组件接收的值
  props: {
    iconClass: {
      type: String,
      required: true
    },
    className: {
      type: String,
      default: ''
    },
    color: {
      type: String,
      default: ''
    },
  },
  setup(props) {
    // 要在模板中使用的响应式数据和方法
    return {
      iconName: computed(() => `#icon-${props.iconClass}`),
      svgClass: computed(() => {
        if (props.className) {
          return `svg-icon ${props.className}`
        }
        return 'svg-icon'
      })
    }
  }
})
</script>

// 定义组件样式
<style scope lang="scss">
.sub-el-icon,
.nav-icon {
  display: inline-block;
  font-size: 15px;
  margin-right: 12px;
  position: relative;
}

.svg-icon {
  width: 1em;
  height: 1em;
  position: relative;
  fill: currentColor;
  vertical-align: -2px;
}
</style>
使用方式
javascript
<!-- icon-class 为 icon 的名字; class-name 为 icon 自定义 class-->
javascript
<!-- 基本用法 -->
<svg-icon icon-class="user" />

<!-- 带颜色 -->
<svg-icon icon-class="edit" color="#409EFF" />

<!-- 带额外CSS类 -->
<svg-icon icon-class="dashboard" class-name="custom-class" />
实际示例
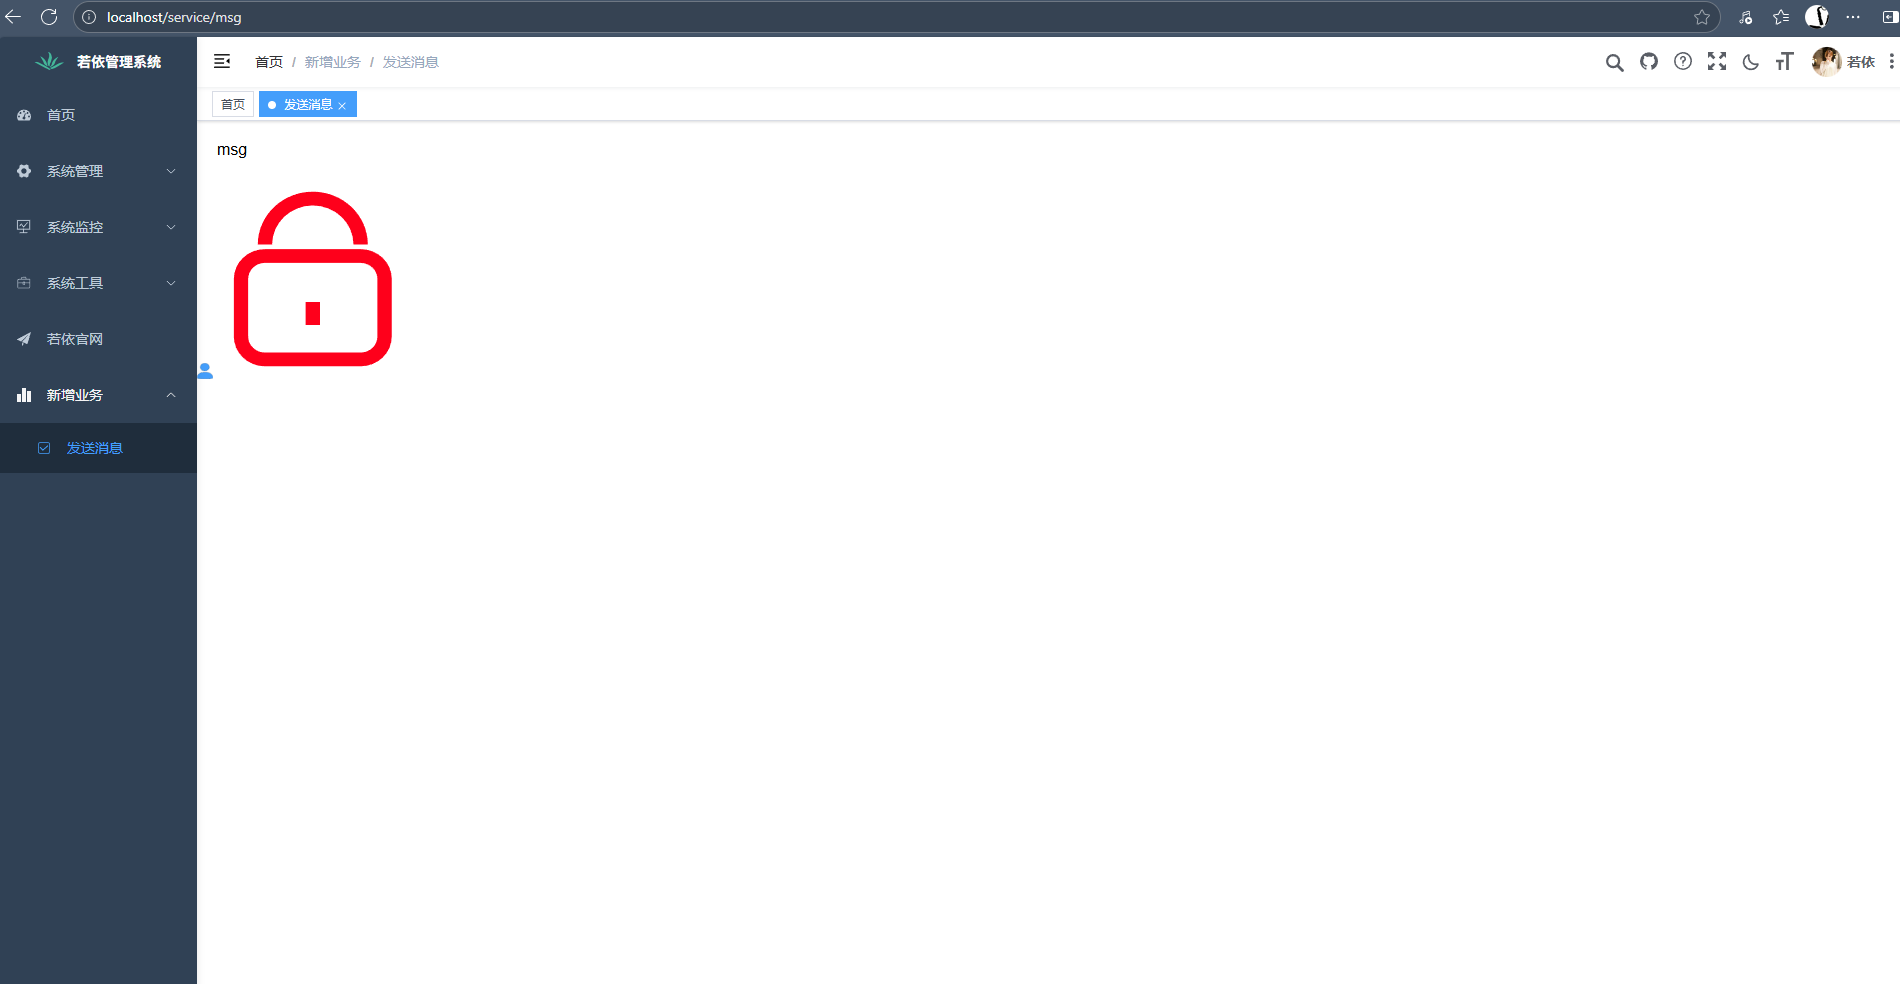
javascript
<script setup>

</script>

<template>
 <div class="app-container">
   msg
 </div>
  <svg-icon icon-class="user" color = "#409EFF" class-name="user-class"/>
  <svg-icon icon-class="password" class-name="password-class"/>
</template>

<style scoped lang="scss">
.password-class{
  font-size: 200px;
  fill: red;
}
</style>
显示效果
3.3 新增图标
提示
如果是从iconfont下载的图标,记得使用如 Sketch 等工具规范一下图标的大小问题,不然可能会造成项目中的图标大小尺寸不统一的问题。 项目中使用的图标都是 128*128 大小规格的。
将新图标放到src→assets→icons下,并使用即可,如:
javscript
<svg-icon icon-class="newIcon" class-name="newIcon-class"/>四、使用字典
数据字典系统是一个重要的功能模块,用于管理系统中的各种枚举数据,如状态、性别、类型等。它通过前后端配合,实现了数据字典的统一管理和使用。
流程:
1.初始化:通过 useDict 函数加载所需字典数据
2.缓存:将获取的字典数据存储在 dict.js 存储模块中,避免重复请求
3.显示:通过 DictTag 组件根据字典值显示对应标签
4.更新:当字典数据发生变化时,可以刷新缓存
4.1 核心组件和实现
4.1.1 DictTag组件
src→components→DictTag→index.vue是项目中用于显示字典标签的核心组件,它可以根据字典值显示对应的标签文本,并支持不同的显示样式。
javascript
<template>
  <div>
    // 遍历所有字典选项
    <template v-for="(item, index) in options">
      // 通过 values.includes(item.value) 判断当前值是否匹配字典项
      <template v-if="values.includes(item.value)">
        <span
          // 根据是否有自定义样式类和类型,决定使用普通 span 标签还是 el-tag 组件显示
          v-if="(item.elTagType == 'default' || item.elTagType == '') && (item.elTagClass == '' || item.elTagClass == null)"
          :key="item.value"
          :index="index"
          :class="item.elTagClass"
        >{{ item.label + " " }}</span>
        <el-tag
          v-else
          :disable-transitions="true"
          :key="item.value + ''"
          :index="index"
          :type="item.elTagType"
          :class="item.elTagClass"
        >{{ item.label + " " }}</el-tag>
      </template>
    </template>
  </div>
</template>

<script setup>
// 记录未匹配的项
const unmatchArray = ref([])

// 接收属性
const props = defineProps({
  // 数据
  options: {
    type: Array,
    default: null,
  },
  // 当前的值
  value: [Number, String, Array],
  // 当未找到匹配的数据时,显示value
  showValue: {
    type: Boolean,
    default: true,
  },
  // 分隔符,默认为逗号
  separator: {
    type: String,
    default: ",",
  }
})

// 计算属性 values 用于处理传入的值,将其统一转换为字符串数组
const values = computed(() => {
  if (props.value === null || typeof props.value === 'undefined' || props.value === '') return []
  return Array.isArray(props.value) ? props.value.map(item => '' + item) : String(props.value).split(props.separator)
})

const unmatch = computed(() => {
  unmatchArray.value = []
  // 没有value不显示
  if (props.value === null || typeof props.value === 'undefined' || props.value === '' || !Array.isArray(props.options) || props.options.length === 0) return false
  // 传入值为数组
  let unmatch = false // 添加一个标志来判断是否有未匹配项
  values.value.forEach(item => {
    if (!props.options.some(v => v.value === item)) {
      unmatchArray.value.push(item)
      unmatch = true // 如果有未匹配项,将标志设置为true
    }
  })
  return unmatch // 返回标志的值
})

function handleArray(array) {
  if (array.length === 0) return ""
  return array.reduce((pre, cur) => {
    return pre + " " + cur
  })
}
</script>

<style scoped>
.el-tag + .el-tag {
  margin-left: 10px;
}
</style>
4.1.2 字典获取工具
src→utils→dict.js 用于获取字段数据的工具函数
javascript
import useDictStore from '@/store/modules/dict'
import { getDicts } from '@/api/system/dict/data'

/**
 * 获取字典数据
 */
 // 接收多个字典类型参数
export function useDict(...args) {
  const res = ref({})
  return (() => {
    // 循环处理每个参数
    args.forEach((dictType, index) => {
      res.value[dictType] = []
      // 先尝试从本地获取
      const dicts = useDictStore().getDict(dictType)
      if (dicts) {
        res.value[dictType] = dicts
      } else {
        // 本地没有则调用api获取
        getDicts(dictType).then(resp => {
          // 将获取到的数据转换为统一格式(包含 label、value、elTagType、elTagClass)
          res.value[dictType] = resp.data.map(p => ({ label: p.dictLabel, value: p.dictValue, elTagType: p.listClass, elTagClass: p.cssClass }))
          useDictStore().setDict(dictType, res.value[dictType])
        })
      }
    })
    return toRefs(res.value)
  })()
}
字典api接口
src→api→system→dict→data.js
javascript
// 根据字典类型查询字典数据信息
export function getDicts(dictType) {
  return request({
    url: '/system/dict/data/type/' + dictType,
    method: 'get'
  })
}
4.1.3 字典存储
src→store→modules→dict.js 存储模块管理字典数据,避免重复请求
javascript
const useDictStore = defineStore(
  'dict',
  {
    state: () => ({
      dict: new Array()
    }),
    actions: {
      // 获取字典
      getDict(_key) {
        if (_key == null && _key == "") {
          return null
        }
        try {
          for (let i = 0; i < this.dict.length; i++) {
            if (this.dict[i].key == _key) {
              return this.dict[i].value
            }
          }
        } catch (e) {
          return null
        }
      },
      // 设置字典
      setDict(_key, value) {
        if (_key !== null && _key !== "") {
          this.dict.push({
            key: _key,
            value: value
          })
        }
      },
      // 删除字典
      removeDict(_key) {
        var bln = false
        try {
          for (let i = 0; i < this.dict.length; i++) {
            if (this.dict[i].key == _key) {
              this.dict.splice(i, 1)
              return true
            }
          }
        } catch (e) {
          bln = false
        }
        return bln
      },
      // 清空字典
      cleanDict() {
        this.dict = new Array()
      },
      // 初始字典
      initDict() {
      }
    }
  })

export default useDictStore
4.2 实际使用示例
在用户管理模块中的使用
在src/views/system/user/index.vue中
javascript
// 获取两个字典 sys_normal_disable: 通用状态字典(正常/停用),sys_user_sex: 用户性别字典
const { sys_normal_disable, sys_user_sex } = proxy.useDict("sys_normal_disable", "sys_user_sex")
模板中使用
javascript
<!-- 状态选择 -->
<el-select v-model="queryParams.status" placeholder="用户状态" clearable style="width: 240px">
  <el-option v-for="dict in sys_normal_disable" :key="dict.value" :label="dict.label" :value="dict.value" />
</el-select>

<!-- 性别选择 -->
<el-select v-model="form.sex" placeholder="请选择">
  <el-option v-for="dict in sys_user_sex" :key="dict.value" :label="dict.label" :value="dict.value"></el-option>
</el-select>

<!-- 状态显示 -->
<el-table-column label="状态" align="center" key="status" v-if="columns[5].visible">
  <template #default="scope">
    <el-switch
      v-model="scope.row.status"
      active-value="0"
      inactive-value="1"
      @change="handleStatusChange(scope.row)"
    ></el-switch>
  </template>
</el-table-column>
在字典数据管理中的使用
在 src/views/system/dict/data.vue 中:
javascript
<el-table-column label="状态" align="center" prop="status">
  <template #default="scope">
    // 这里使用了DicTag组件显示状态,通过:options传入字典选项,通过:value传入当前值
    <dict-tag :options="sys_normal_disable" :value="scope.row.status" />
  </template>
</el-table-column>
字典更新机制
在 src/views/system/dict/data.vue中
javascript
/** 提交按钮 */
function submitForm() {
  proxy.$refs["dataRef"].validate(valid => {
    if (valid) {
      if (form.value.dictCode != undefined) {
        updateData(form.value).then(response => {
          // 更新字典后清除缓存
          useDictStore().removeDict(queryParams.value.dictType)
          proxy.$modal.msgSuccess("修改成功")
          open.value = false
          getList()
        })
      } else {
        addData(form.value).then(response => {
          // 新增字典后清除缓存
          useDictStore().removeDict(queryParams.value.dictType)
          proxy.$modal.msgSuccess("新增成功")
          open.value = false
          getList()
        })
      }
    }
  })
}
点击刷新缓存按钮,调用api /system/dict/data 刷新缓存
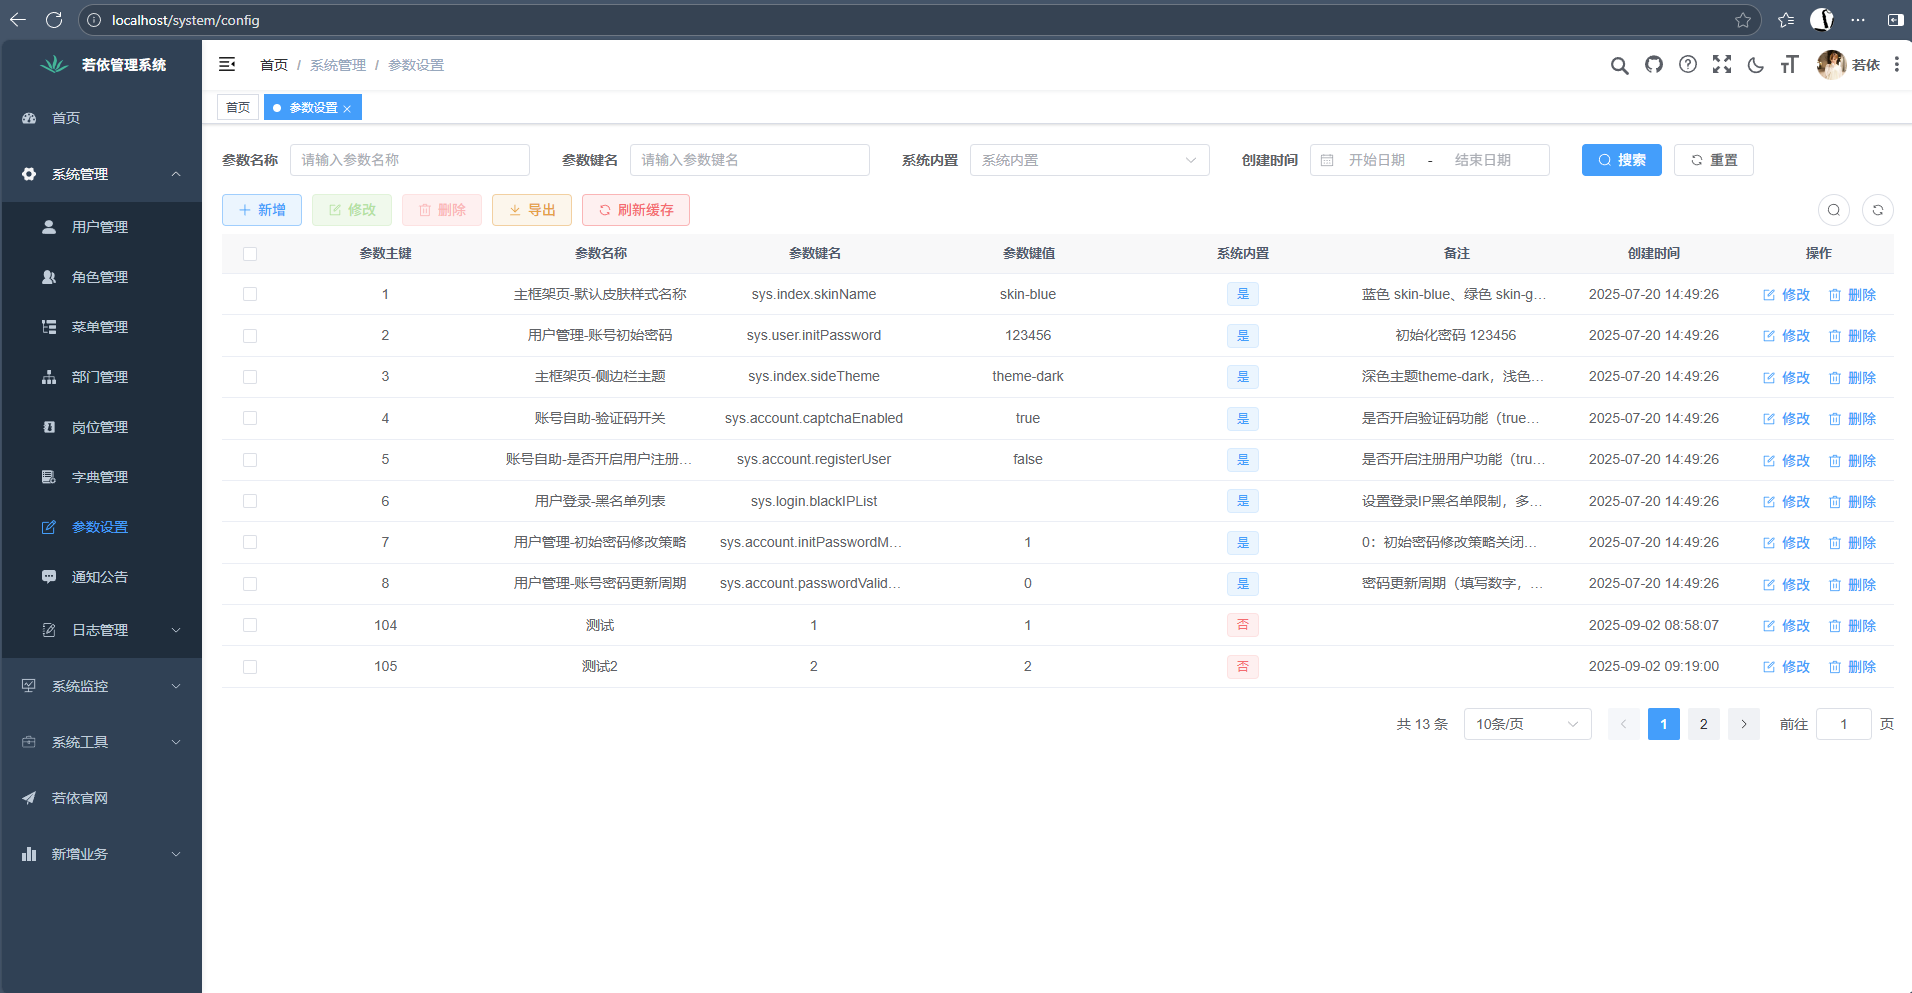
五、使用参数
参数设置是提供开发人员、实施人员的动态系统配置参数,不需要去频繁修改后台配置文件,也无需重启服务器即可生效。
5.1 参数修改流程
1.查看参数列表
用户在参数配置页面查看所有系统参数,包括参数名称、建名、键值等信息。
2.修改参数
2.1 点击修改按钮
2.2 修改参数键值
2.3 确定提交修改
3.刷新缓存
5.2 实现
api接口 src/api/system/config.js
- listConfig:查询参数列表
- getConfig:查询单个参数详情
- addConfig:新增参数
- updateConfig:修改参数
- delConfig:删除参数
- refreshCache:刷新参数缓存
src/views/system/config/index.vue 主要修改逻辑如下
javascript
/** 提交按钮 */
function submitForm() {
  proxy.$refs["configRef"].validate(valid => {
    if (valid) {
      if (form.value.configId != undefined) {
        updateConfig(form.value).then(response => {
          proxy.$modal.msgSuccess("修改成功")
          open.value = false
          getList()
        })
      } else {
        addConfig(form.value).then(response => {
          proxy.$modal.msgSuccess("新增成功")
          open.value = false
          getList()
        })
      }
    }
  })
}
当用户修改参数并提交时,会调用updateConfig API接口将更改保存到数据库。
调用refreshCache接口来清除后端缓存,确保修改的参数能够立即生效:
javascript
/** 刷新缓存按钮操作 */
function handleRefreshCache() {
  refreshCache().then(() => {
    proxy.$modal.msgSuccess("刷新缓存成功")
  })
}
5.3 参数使用
在用户管理页面 /src/views/system/user/index.vue 中可以看到
onMounted(() => {
  getDeptTree()
  getList()
  proxy.getConfigKey("sys.user.initPassword").then(response => {
    initPassword.value = response.msg
  })
})
在组件挂载时执行,通过调用getConfigKey("sys.user.initPassword")获取系统配置的默认密码参数值,并将其存储在initPassword.value中。