前言
在公司实习的时候,内部在大力推动 AI 编程,虽然市面上有很多 AI Coding 的产品,例如 Cursor、Trae 等。
对于从 0 开始的项目,或者一个小需求的修改,能很完美的达到我们预期的效果,但是如果我们只面对 LLM 的对话框,不打开浏览器,只让 AI 进行调试(对于前端项目,目的是让产品、后端能进行快速开发上线),就会有以下的问题:
叠 buff:这些问题对于我们前端工程师来说,可以自己手动调试,不是什么难事,但是对于产品、后端这些对前端不是那么熟悉的,更何况项目采用了 vue、react 这样的框架,对他们的上手程度就会变高。
- 登录态问题:目前公司内的项目几乎是采用 Cookie 的形式,AI 没办法感知,需要自己手动去登录页获得校验信息;
- 接口问题:对于某些接口,可能因为状态码的不同、响应的数据格式不同,导致 AI 无法进行识别,需要自己手动去调试接口,获取正确的数据格式;
- 页面异常问题:对于浏览器控制台、终端的错误,调试变得困难,只能不断去复制错误,再次丢给 AI,这样会大大浪费时间。
光是这三点,是 AI Coding 遇到的痛点问题,为了解决目前的问题,最终采用 MCP 工具,来加强 AI 纠错、自动化的问题。
文章后面也有对加强 AI Coding 的思路和具体代码。
在学习 MCP 之前我们需要先了解一下什么是 Function Calling,它和 MCP 的关系。
Function Calling
什么是 Function Calling
在 LLM 领域,Function Calling(函数调用) 指的是模型根据用户需求,主动触发并调用外部工具(如 API、数据库、计算器、第三方服务等)的能力,本质是让 AI 从 "纯文本生成" 升级为 "能执行具体任务的工具使用者",解决 LLM 自身无法处理的信息滞后、实时计算、数据查询等问题。
- 广义的 Function Calling :是指让大模型能够调用外部工具的一种技术实现 :先向大模型提供可用函数的列表及说明,由大模型在对话过程中智能判断是否需要调用函数,并自动生成调用所需的参数,最终用文字返回符合约定格式的函数调用请求。
- 狭义的 Function Calling :特指大模型提供商在模型内部与 API 层面做了支持的一种能力,它最早由 OpenAI 引入:
- 在模型层面:模型提供商需对大模型进行特别优化,使其具备根据上下文正确选择合适函数、生成有效参数的能力(比如有监督微调、强化学习)。
- 在 API 层面 :模型提供商需额外开放对 Function Calling 的支持(比如 API 中提供了一个
tools参数)。
思考:为什么需要 Function Calling?
大语言模型的核心能力是 "理解文本 + 生成文本",但存在天然短板:
- 信息滞后:训练数据有截止日期,无法获取实时信息;
- 缺乏外部数据访问权:无法直接连接企业内部数据库、CRM 系统、物联网设备(如控制智能家居);
- 无法执行操作:不能主动发送邮件、预订机票、调用地图 API 获取路线等。
Function Calling 正是为弥补这些短板而生 ------ 让 AI 成为 "任务协调者":先理解用户需求,判断是否需要调用工具,再按规则生成工具调用指令,最后将工具返回的结果整理成自然语言回答。
Function Calling 的工作流程
完整的函数调用通常分为 4 个关键步骤,形成 "用户需求 → AI 决策 → 工具执行 → 结果反馈" 的闭环:
- 步骤 1:定义函数(提前配置)
开发者需先明确 "AI 可调用的工具清单",并为每个工具定义标准化的函数参数格式(告诉 AI "调用这个工具需要传哪些信息")。
例:若要调用 "实时天气 API",需定义函数结构:
ts
// 函数名:getRealTimeWeather
// 参数说明:
// - city: 城市名称(字符串,必填)
// - date: 日期(格式YYYY-MM-DD,可选,默认当天)
function getRealTimeWeather(
  city: string,
  date?: string
): {
  temperature: number
  condition: string
  wind: string
} {
  // 调用外部天气API的逻辑
  return { temperature: 25, condition: '晴天', wind: '3级' }
}- 步骤 2:AI 判断是否调用函数
用户输入需求后,模型先分析:"这个需求能否仅用自身知识回答?还是需要调用工具?"
- 无需调用:如 "解释什么是人工智能",模型直接生成文本回答;
- 需调用:如 "北京 2025 年 9 月 30 日的天气",模型判断 "自身无 2025 年数据,需调用天气 API"。
- 步骤 3:AI 生成函数调用指令
若需调用工具,模型会按提前定义的格式,生成结构化的调用指令(避免歧义,确保工具能解析)。
例:针对 "北京 2025 年 9 月 26 日的天气",模型生成指令:
json
{
  "name": "getRealTimeWeather",  # 要调用的函数名
  "parameters": {
    "city": "北京",
    "date": "2025-09-26"
  }
}- 步骤 4:工具执行 + 结果整理
- 外部工具(如天气 API)接收指令,执行并返回原始结果(通常是 JSON 格式);
- 模型再将原始结果 "翻译" 成自然语言,反馈给用户:"北京 2025 年 9 月 26 日的天气为晴天,气温 25℃,风力 3 级。"
AI 执行工具的前提,必须是 AI 支持 Function Calling 才行。
MCP 是什么
MCP(Model Context Protocol),模型上下文协议) 是一种标准化的协议,用于在应用程序和 AI 模型之间建立通信标准。
它提供了一种统一的方式来共享上下文信息,使 AI 模型能够更好地理解和处理各种应用场景。有了 MCP,就可以扩展大模型的能力。
上下文:指的是模型在决策时可访问的所有信息,如当前用户输入、历史对话信息、外部工具(tool)信息、外部数据源(resource)信息、提示词(prompt)信息等等。
MCP 解决了什么问题(相较于 Function Calling)
- 代码冗余与开发效率问题:Function Call 在开发时存在代码冗余的问题,例如单个天气功能可能需编写 150 多行代码,包括 Schema 定义、提示词模板等。而 MCP 通过 SDK 封装通用逻辑,开发者只需专注业务逻辑,将工具开发时间从周级压缩至小时级,大大提高了开发效率。
- 厂商壁垒与标准化问题:Function Call 通常是大模型厂商提供的特有接口特性,如 OpenAI 的 JSON Schema 与 Anthropic 的 YAML 格式互不兼容,存在厂商壁垒。MCP 则是一个开放标准,支持 8 种语言 SDK,能让不同大模型与不同工具统一对接,解决了"一对多"的对接难题,降低了集成成本。
- 性能瓶颈问题:Function Call 采用同步调用方式,会导致每秒请求量下降,存在性能瓶颈。MCP 则是异步非阻塞的执行模式,支持长时任务后台执行,例如 30 分钟渲染视频等任务,其平均响应时间更短,并发处理能力更强。
- 状态管理与多轮推理问题:Function Call 是无状态的,单轮执行,在多轮推理中,函数状态不透明,模型难以追踪执行路径,上下文容易丢失。MCP 是有状态的,任务上下文可追踪,支持能力协商、上下文感知、任务复合执行等,让模型在多轮推理中能够更好地管理状态和追踪执行路径。
- 资源管理与调度问题:Function Call 没有资源管理能力,每增加一个函数需要重构 schema,调度能力也受限,主要是模型侧编排。MCP 支持工具、提示、资源目录,工具和资源注册后即可复用,服务端可调度、可代理模型行为,能够更好地进行资源管理和任务调度。
- 权限控制与生态建设问题:Function Call 很难做到细粒度的权限管理,且通常限定在特定语言生态内,不支持远程调用,不利于生态建设。MCP 可以为不同工具设置不同的权限和访问控制,工具可以用任何语言实现,还支持网络调用,为生态建设提供了统一的发布、发现、集成标准。
MCP 核心概念
MCP 遵循客户端-服务器架构,其中 MCP Host(Claude Code 或 Claude Desktop)等 AI 应用程序,与一个或多个 MCP Server 建立连接。
MCP 主机(Host)通过为每个 MCP Server 创建一个 MCP Client 来实现这一目标。每个 MCP Client 都与相应的 MCP Server 保持专用的一对一连接。MCP 架构的主要组成者是:
- MCP Host:往往指代 A 应用本身,用于发现 MCP Server 以及其中的工具列表
- MCP Client:用于和 MCP Server 通信的客户端,往往在 Host 内部开启,通常情况下,每启动一个 MCP Server,就会开启一个 MCP Client。从 MCP 服务器获取上下文,供 MCP 主机使用。
- MCP Server:一个为 MCP Client 提供上下文的程序
例如:VSCode 充当 MCP 主机。当 VSCode 建立与 MCP 服务器(如 Sentry MCP 服务器)的连接时,VSCode 运行时实例化了维护与 Sentry MCP 服务器连接的 MCP 客户端对象。当 VSCode 随后连接到另一个 MCP 服务器时,例如本地文件系统服务器,VSCode 运行时实例化一个额外的 MCP 客户端对象来维护此连接,从而保持 MCP 客户端与 MCP 服务器的一对一关系。
MCP 传输协议(通信方式)
Stdio
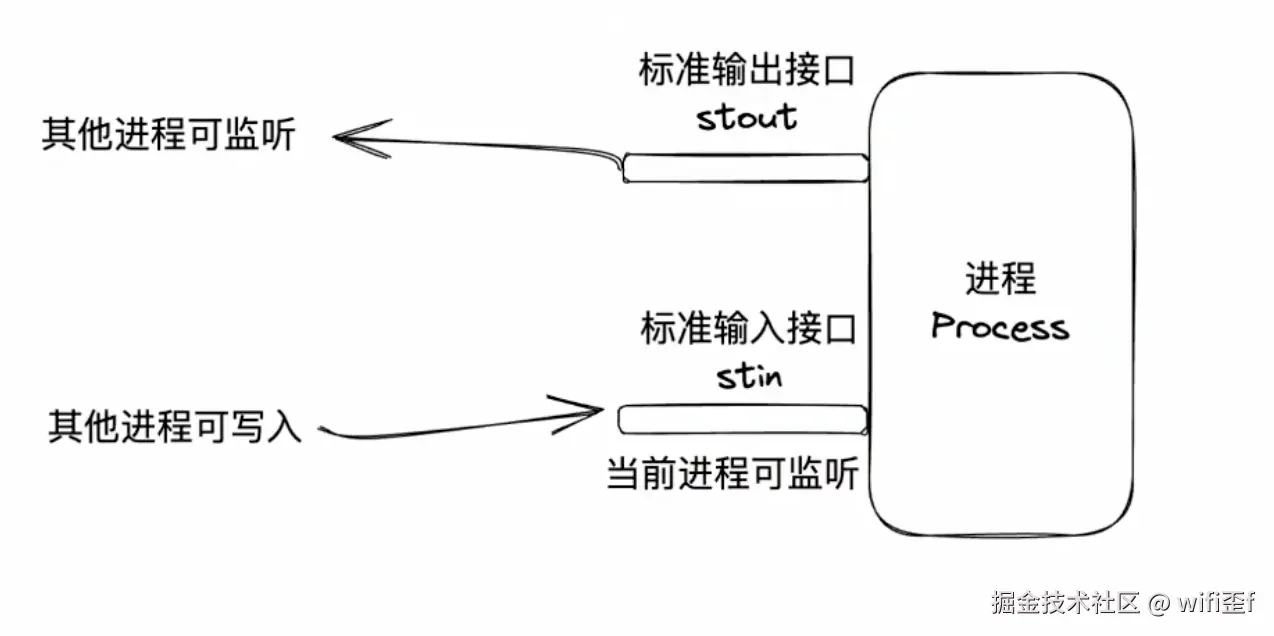
stdio:标准输入输出,这里可以理解为进程的两个接口:标准输入接口 和标准输出接口
这里我们拿 nodejs 举例:
- 新建一个
server.js文件
js
process.stdout.write('Hello World!\n')输出Hello World到终端中,和console.log效果一样,在 node 环境下,console.log 内部是调用了 stdout
我们可以再输出一个进程 id:
js
process.stdout.write(process.pid + '\n')当我们执行 node server.js 的时候,输出的 process.pid 是 node 进程的 id,和终端的 id 不是同一个,但是我们在终端中看到了 node 进程的内容,说明终端和 node 进程一定完成了通信。
通信过程如下:

可以用下面的代码监听终端的输入:
js
process.stdout.on('data', function (data) {
  console.log(data)
})这里的父进程输入内容充当client端,子进程收到后响应充当server端。
再看下面的例子:
client.js
js
import { spawn } from 'child_process'

// 启动server.js子进程,也就是执行node server.js
// serverProcess实例和process是一样的
const serverProcess = spawn('node', ['server.js'])

// 监听子进程(server,也就是server.js)的输出
serverProcess.stdout.on('data', (data) => {
  console.log('收到server数据: ' + data.toString())
})

setTimeout(() => {
  // 向子进程发送消息
  serverProcess.stdin.write('hello')
}, 1000)
server.js
js
process.stdin.setEncoding('utf8')
// 监听client的数据
process.stdin.on('data', (chunk) => {
  // 回复client数据
  process.stdout.write('res' + chunk)
})
当我们运行 node client.js 时,会启动一个 server.js 进程,然后 client.js 进程向 server.js 进程发送数据,server.js 进程会回复数据给 client.js 进程。
所以 父进程(client) 不一定是终端,只要能创建子进程,都能作为 client。
stdio通信简洁高效,但仅适用于本地进程间通信。
SSE 传输(旧方案,2024.10)
该方案是客户端通过 HTTP GET 向服务端发请求,服务端通过 SSE 通道返回响应结果。
SSE(Server-Sent Events 服务器发送事件),是一种服务器单向推送数据给客户端的技术,基于 HTTP 协议。
Streamable 传输(新方案,2025.03)
Streamable 是 SSE 传输方案的升级版,目前正在逐步取代原有的 SSE 传输方案
Streamable 并不是一个标准协议名,而是一个通用描述,指的是基于 HTTP 协议的"可流式传输"技术。它的核心思想是:在一个 HTTP 连接里,服务端可以持续不断地发送数据给客户端,客户端边接收边处理,类似"流"一样。与传统 HTTP 请求响应"一次性完成"不同,Streamable 保持连接不关闭,数据分片持续传输。
至于为什么要采用 Streamable,而不是 SSE,我们看看 SSE 的缺点就知道了:
- SSE 数据类型只支持文本格式,而 Streamable 的
Content-Type支持任意格式,如 JSON、HTML、二进制等,更适合 AI 场景(可能要传 JSON + 音频 + 图片) - 只支持 GET 请求,参数在 URL 中,相对来说不安全
- 兼容性:SSE 现代浏览器为主,IE 不支持;而 Streamable 兼容性更好,支持所有浏览器
- 性能问题:SSE 是基于 HTTP/1.1 长连接,Streamable HTTP 可以基于 HTTP/2/3
下面这张图可以很好的解释 MCP 的作用:统一接口规范
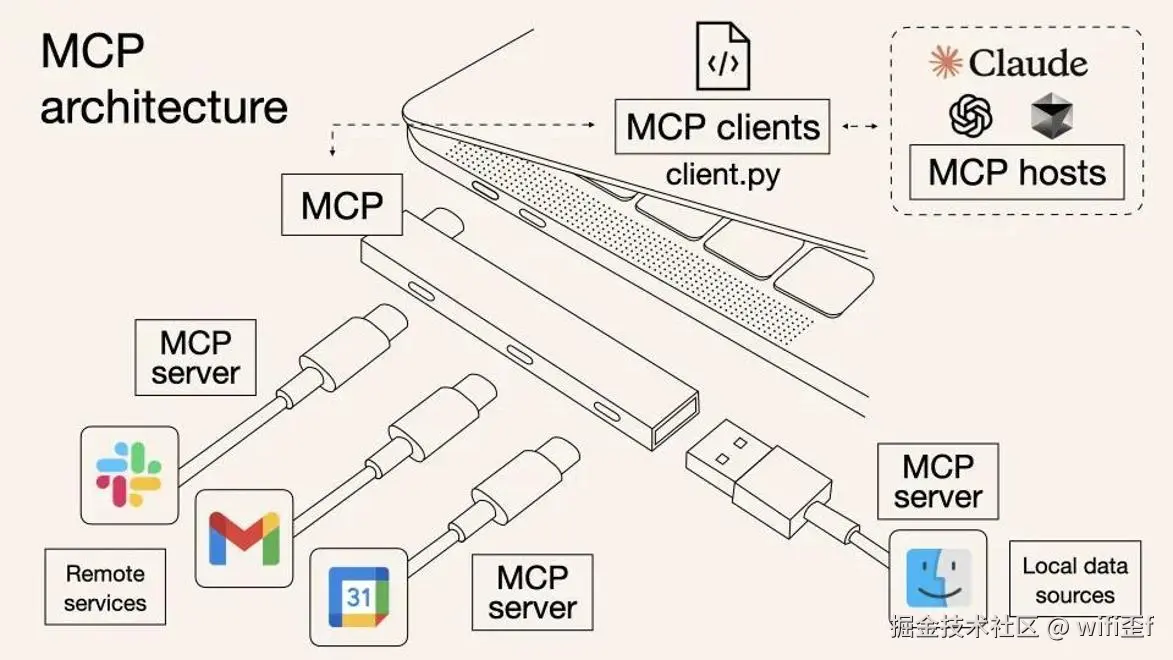
分为远程和本地两种方式。
MCP 通信格式 json-rpc
JSON-RPC 是一种轻量级的远程过程调用(RPC)协议,它使用 JSON 作为数据格式。
json-rpc 的消息类型:
- 请求(request)
json
{
  // jsonrpc协议版本
  "jsonrpc": "2.0",
  // 调用方法名
  "method": "methodName",
  "params": {
    "a": 1,
    "b": 2
  },
  // 标识,与响应中id一致
  "id": 1
}- 响应(response)
json
{
  "jsonrpc": "2.0",
  // 调用结果,任何类型
  "result": {
    "c": 3
  },
  "id": 1
}
我们来看一个例子:
server.js
js
import util from './util.js'

process.stdin.on('data', (data) => {
  const req = JSON.parse(data)
  const methodName = req.method
  const { a, b } = req.params
  const result = util[methodName](a, b)
  const res = {
    jsonrpc: '2.0',
    result,
    id: req.id
  }
  process.stdout.write(JSON.stringify(res) + '\n')
})

// util.js
export default {
  sum(a, b) {
    return a + b
  }
}
当我们执行 node server.js 的时候,在终端输入如下内容:
json
{ "jsonrpc": "2.0", "method": "sum", "params": { "a": 1, "b": 2 }, "id": 1 }此时会返回 {"jsonrpc":"2.0","result":3,"id":1} 这个数据,这就完成了一次 JSON-RPC 的调用。
MCP 基本规范
如何通信:
- 通信方式:
- stdio:推荐,优点是高效、简单、本地
- http:可远程
- 通信格式:基于 jsonrpc 的进一步规范
request 请求:
json
{
  "jsonrpc": "2.0",
  "id": 1,
  "method": "initialize", // 固定为initialize
  "params": {
    "protocolVersion": "2025-06-18", // mcp 协议版本
    "capabilities": {
      "roots": {
        "listChanged": true
      },
      "sampling": {},
      "elicitation": {}
    },
    "clientInfo": {
      // 告诉服务器,客户端的信息
      "name": "ExampleClient",
      "title": "Example Client Title",
      "version": "1.0.0"
    }
  }
}
response 响应:
json
{
  "jsonrpc": "2.0",
  "id": 1,
  "result": {
    "protocolVersion": "2025-06-18",
    "capabilities": {
      // 服务器具有哪些功能
      "logging": {},
      "prompts": {
        "listChanged": true
      },
      "resources": {
        "subscribe": true,
        "listChanged": true
      },
      "tools": {
        "listChanged": true
      }
    },
    "serverInfo": {
      // 服务端信息
      "name": "ExampleServer",
      "title": "Example Server Title",
      "version": "1.0.0"
    },
    "instructions": "..."
  }
}
只要 MCP 的请求/响应格式是上面的 json 规范格式,就可以让 AI 去按照规范调用它。
MCP Server
MCP Tool
Tool 是 MCP 里的"执行者",让 LLM 不只是进行语言输出,还能实际执行具体任务,本质上是服务器提供的一些函数或者 API。
用于执行具体的操作和计算,能够影响或修改外部系统的状态,比如进行数学计算、数据处理、API 调用、文件操作等。
服务器定义好工具后,客户端发现这些工具,LLM 可以根据需要调用,调用结果会返回给 LLM,以便其继续推理或者输出。
工具发现 tools/list
工具使模型能够与外部系统交互,例如查询数据库、调用 API 或执行计算。每个工具都由名称唯一标识,并包含描述其模式的元数据。 若要发现可用工具,客户端会发送工具/列表请求。
例如:
request 请求:
json
{
  "jsonrpc": "2.0",
  "id": 1,
  "method": "tools/list", // method固定
  "params": {
    "cursor": "optional-cursor-value"
  }
}
response 响应:
json
{
  "jsonrpc": "2.0",
  "id": 1,
  "result": {
    "tools": [
      {
        "name": "get_weather",
        "title": "Weather Information Provider",
        "description": "Get current weather information for a location",
        "inputSchema": {
          "type": "object",
          "properties": {
            "location": {
              "type": "string",
              "description": "City name or zip code"
            }
          },
          "required": ["location"]
        }
      }
    ],
    "nextCursor": "next-page-cursor"
  }
}
其实在
result.tools中就是我们后续定义的 mcp 工具了。
工具调用 tools/call
要调用工具,客户端发送工具/调用请求
request 请求:
json
{
  "jsonrpc": "2.0",
  "id": 2,
  "method": "tools/call", // method 固定
  "params": {
    "name": "get_weather", // 请求的方法名,需要和工具列表中的result.tools的name一致
    "arguments": {
      // 工具参数
      "location": "New York"
    }
  }
}
response 响应:
json
{
  "jsonrpc": "2.0",
  "id": 2,
  "result": {
    "content": [
      {
        "type": "text", // 响应类型
        "text": "Current weather in New York:\nTemperature: 72°F\nConditions: Partly cloudy"
      }
    ],
    "isError": false
  }
}
工具结果 Tool Result
文档:modelcontextprotocol.io/specificati...
工具结果也就是工具响应的类型,上面例子中是 text,还有其他内容如下:
- Text Content 文本内容
json
{
  "type": "text",
  "text": "Tool result text"
}- Image Content 图片内容
json
{
  "type": "image",
  "data": "base64-encoded-data",
  "mimeType": "image/png"
  "annotations": {
    "audience": ["user"],
    "priority": 0.9
  }

}- Audio Content 音频内容
json
{
  "type": "audio",
  "data": "base64-encoded-audio-data",
  "mimeType": "audio/wav"
}- Resource Links 资源链接
工具可以返回指向资源的链接,以提供额外的上下文或数据。在这种情况下,该工具将返回一个可以由客户端订阅或获取的 URI:
json
{
  "type": "resource_link",
  "uri": "file:///project/src/main.rs",
  "name": "main.rs",
  "description": "Primary application entry point",
  "mimeType": "text/x-rust",
  "annotations": {
    "audience": ["assistant"],
    "priority": 0.9
  }
}
还有一些别的返回类型结果,可以自行查阅文档。
编写一个 MCP Tool
MCP 提供了对应语言的 SDK,用来开发的 MCP 工具,来构建符合 MCP 规范的 jsonrpc 数据。
下面采用 ts 开发。
文档:modelcontextprotocol.io/docs/develo...
github:github.com/modelcontex...
- 初始化项目
bash
pnpm init- 安装依赖
这里需要安装的是 @modelcontextprotocol/sdk、zod@3
bash
pnpm add @modelcontextprotocol/sdk zod@3
# ts、node类型
pnpm add @types/node typescript -D- 修改
package.json
json
{
  "type": "module",
  "bin": {
    "weather": "./build/index.js"
  },
  "scripts": {
    "build": "tsc && chmod 755 build/index.js"
  },
  "files": ["build"]
}- 根目录创建
tsconfig.json
json
{
  "compilerOptions": {
    "target": "ES2022",
    "module": "Node16",
    "moduleResolution": "Node16",
    "outDir": "./build",
    "rootDir": "./src",
    "strict": true,
    "esModuleInterop": true,
    "skipLibCheck": true,
    "forceConsistentCasingInFileNames": true
  },
  "include": ["src/**/*"],
  "exclude": ["node_modules"]
}- 新建
src/index.ts
这里以官网文档中的例子为例:需求是写一个天气查询的 MCP 工具
ts
import { McpServer } from '@modelcontextprotocol/sdk/server/mcp.js'
import { StdioServerTransport } from '@modelcontextprotocol/sdk/server/stdio.js'
import { z } from 'zod'
import {
  AlertsResponse,
  formatAlert,
  getWeatherRequest
} from './utils/index.js'

// 创建服务器实例
const server = new McpServer({
  name: 'weather',
  version: '1.0.0'
})

// 注册天气工具
server.tool(
  'get-weather',
  '获取某个城市的天气警报',
  {
    state: z.string().length(2).describe('中国某城市的名字(例如 合肥,南京)')
  },
  async ({ state }) => {
    const WEATHER_API_BASE = 'http://127.0.0.1:4000'
    const stateCode = state.toUpperCase()
    const alertsUrl = `${WEATHER_API_BASE}/alerts?area=${stateCode}`
    // 用于发送http请求,获取天气信息
    const alertsData = await getWeatherRequest<AlertsResponse>(alertsUrl)

    // 下面就是根据不同情况返回对应MCP格式的json数据了
    if (!alertsData) {
      return {
        content: [
          {
            type: 'text',
            text: '无法检索城市警报数据'
          }
        ]
      }
    }

    const features = alertsData.features || []
    if (features.length === 0) {
      return {
        content: [
          {
            type: 'text',
            text: `没有 ${stateCode} 的活动警报`
          }
        ]
      }
    }

    const formattedAlerts = features.map(formatAlert)
    const alertsText = `活动警报 ${stateCode}:\n\n${formattedAlerts.join(
      '\n'
    )}`

    return {
      content: [
        {
          type: 'text',
          text: alertsText
        }
      ]
    }
  }
)

async function main() {
  // 连接传输
  const transport = new StdioServerTransport()
  await server.connect(transport)
  console.error('Weather MCP Server running on stdio')
}

main().catch((error) => {
  console.error('Fatal error in main():', error)
  process.exit(1)
})
utils/index.ts 文件:
ts
const USER_AGENT = 'weather-app/1.0'

// 用于发出天气查询API请求的辅助函数
export async function getWeatherRequest<T>(url: string): Promise<T | null> {
  const headers = {
    'User-Agent': USER_AGENT,
    Accept: 'application/geo+json'
  }

  try {
    const response = await fetch(url, { headers })
    if (!response.ok) {
      throw new Error(`HTTP error! status: ${response.status}`)
    }
    return (await response.json()) as T
  } catch (error) {
    console.error('Error making NWS request:', error)
    return null
  }
}

export interface AlertFeature {
  properties: {
    event?: string
    areaDesc?: string
    severity?: string
    status?: string
    headline?: string
  }
}

// 格式化警报数据
export function formatAlert(feature: AlertFeature): string {
  const props = feature.properties
  return [
    `Event: ${props.event || 'Unknown'}`,
    `Area: ${props.areaDesc || 'Unknown'}`,
    `Severity: ${props.severity || 'Unknown'}`,
    `Status: ${props.status || 'Unknown'}`,
    `Headline: ${props.headline || 'No headline'}`,
    '---'
  ].join('\n')
}

export interface ForecastPeriod {
  name?: string
  temperature?: number
  temperatureUnit?: string
  windSpeed?: string
  windDirection?: string
  shortForecast?: string
}

export interface AlertsResponse {
  features: AlertFeature[]
}

export interface PointsResponse {
  properties: {
    forecast?: string
  }
}

export interface ForecastResponse {
  properties: {
    periods: ForecastPeriod[]
  }
}- 创建后端 server 来响应请求
这里以 express 为例,mock 一些数据:
js
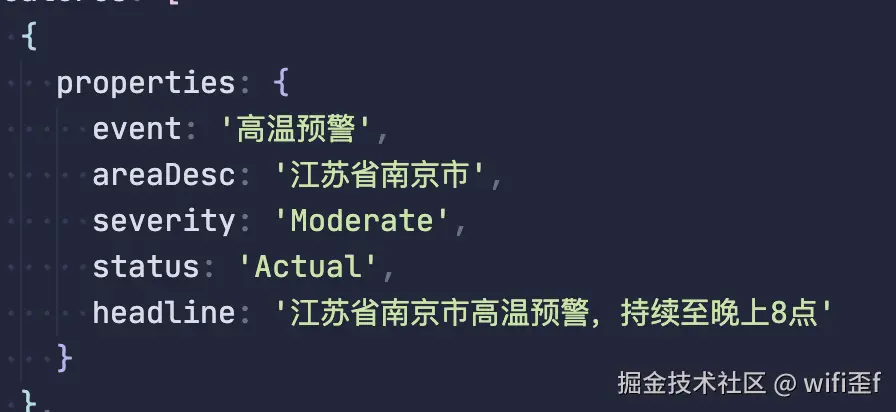
const mockAlertsData = {
  features: [
    {
      properties: {
        event: '高温预警',
        areaDesc: '江苏省南京市',
        severity: 'Moderate',
        status: 'Actual',
        headline: '江苏省南京市高温预警,持续至晚上8点'
      }
    },
    {
      properties: {
        event: '洪水警报',
        areaDesc: '浙江省沿海地区',
        severity: 'Severe',
        status: 'Actual',
        headline: '因强降雨影响,浙江省沿海地区发布洪水警报'
      }
    }
  ]
}

const express = require('express')
const app = express()

app.get('/alerts', (req, res) => {
  res.json(mockAlertsData)
})

app.listen(4000, () => {
  console.log('Weather API listening on port 4000!')
})- 对 MCP 进行打包
bash
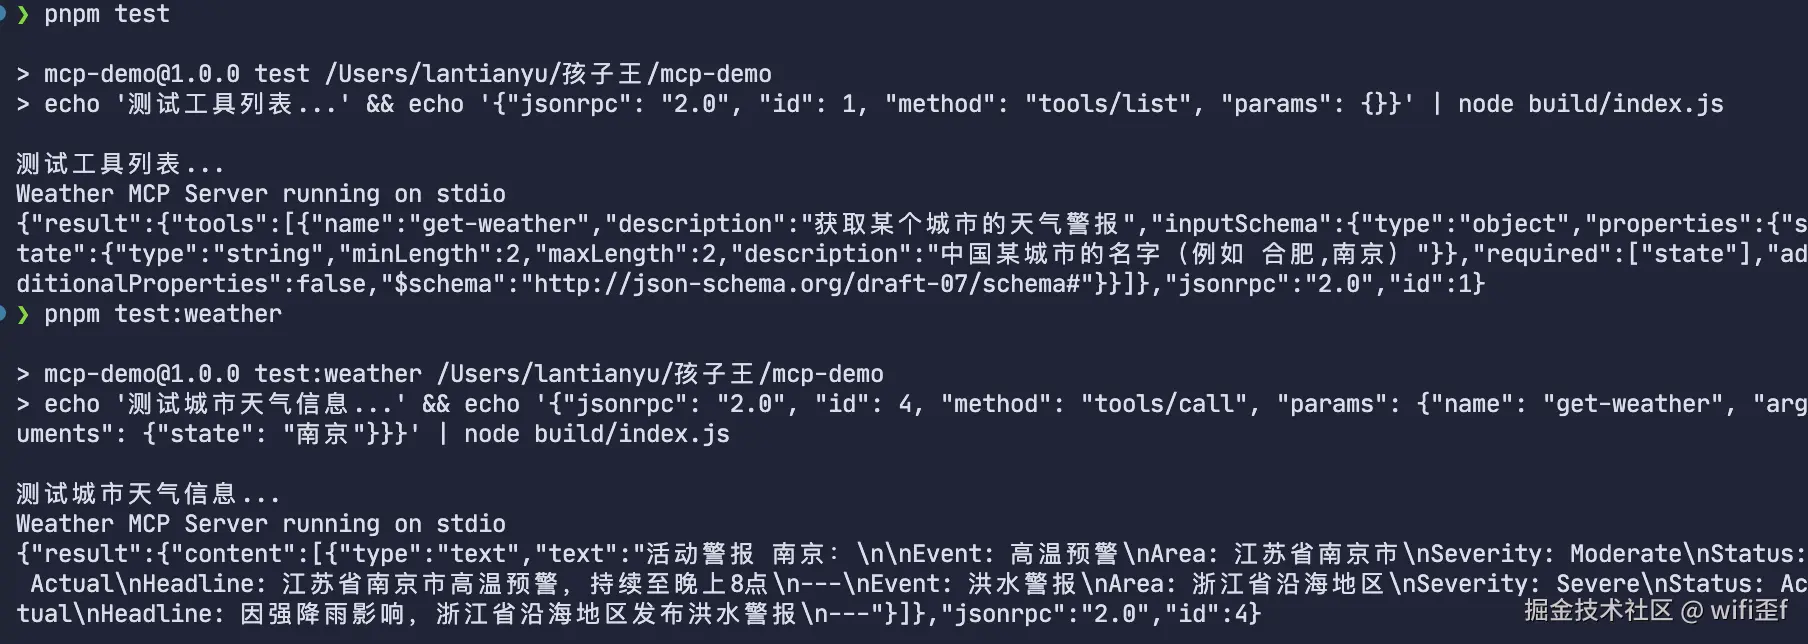
pnpm build- 测试 MCP
MCP 通过 node build/index.js 来启动
测试方法 1:
在 package.json 中添加如下脚本:
json
{
  "scripts": {
    // 查看MCP工具列表
    "test": "echo '测试工具列表...' && echo '{\"jsonrpc\": \"2.0\", \"id\": 1, \"method\": \"tools/list\", \"params\": {}}' | node build/index.js",
    // 查询城市天气
    "test:weather": "echo '测试城市天气信息...' && echo '{\"jsonrpc\": \"2.0\", \"id\": 4, \"method\": \"tools/call\", \"params\": {\"name\": \"get-weather\", \"arguments\": {\"state\": \"南京\"}}}' | node build/index.js"
  }
}
测试结果:
测试方法 2:
用一个支持 MCP 的客户端开进行测试,例如:VSCode、Cursor、通义灵码(VSCode 插件)...
这里拿灵码测试,找到对应的 MCP 配置文件,有可视化地方进行选择的,打开的一般是 mcp.json 文件。
json
{
  "mcpServers": {
    "weather": {
      "command": "node",
      "args": ["/Users/xxx/Desktop/demo/build/index.js"]
    }
  }
}
⚠️ 注意:
args参数需要填入上面build后的文件路径。
也可以将包发到 npm 上,然后通过 npx [包名] 来执行。
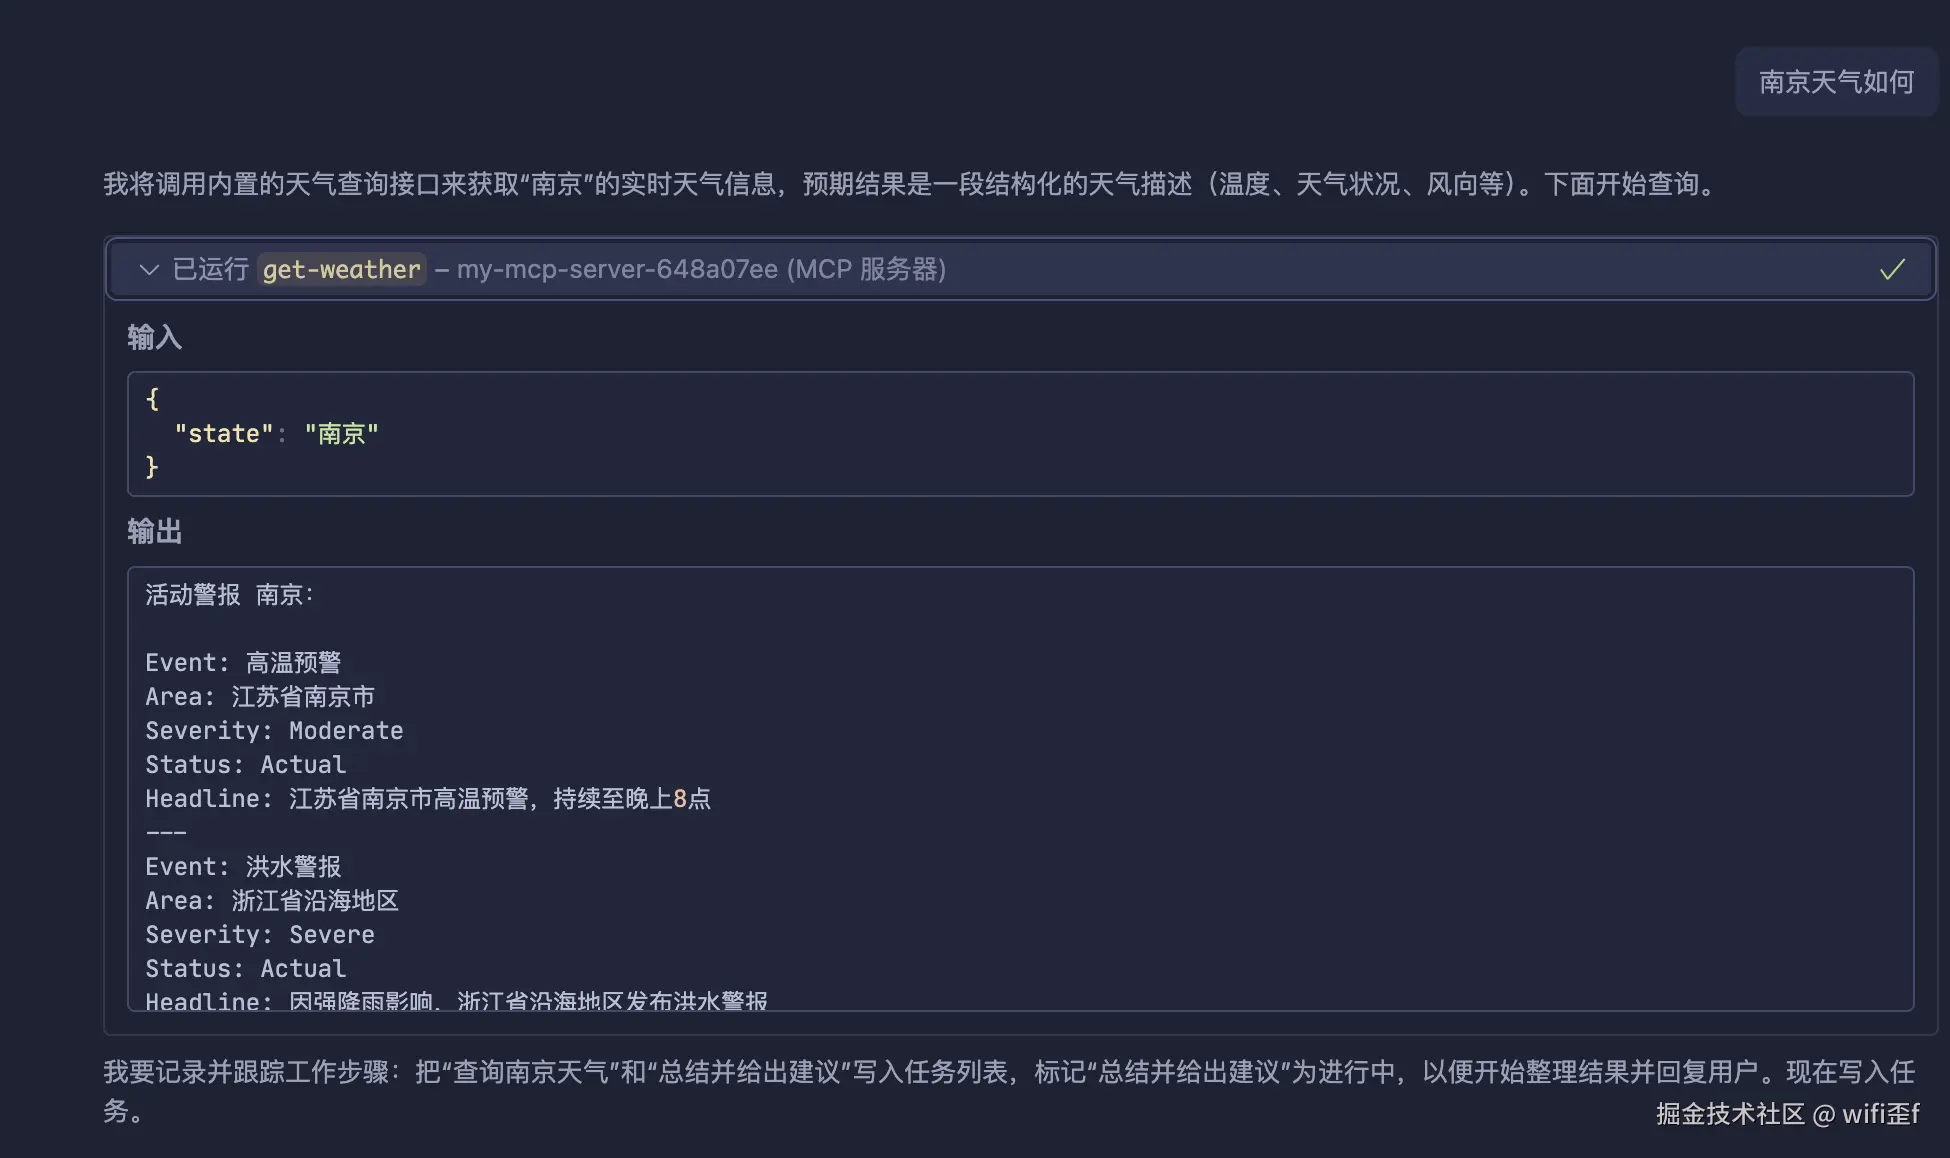
这里可以看到我们的 MCP 已经启动成功了:
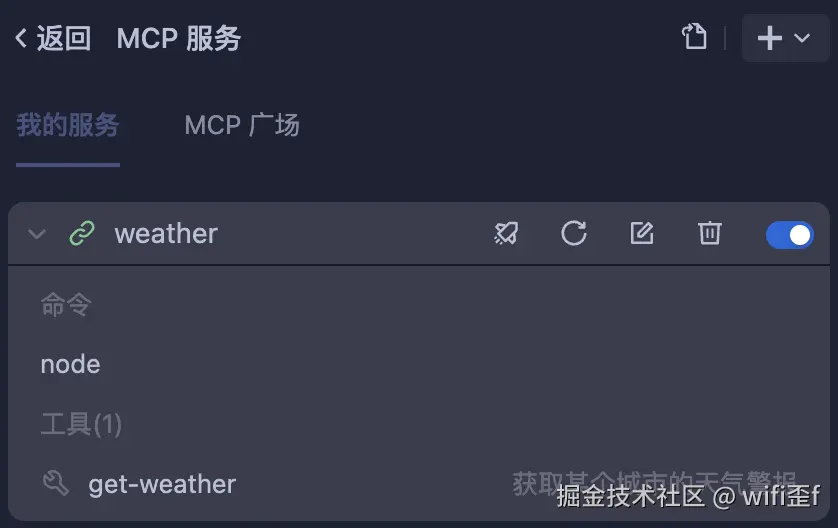
我们只需要向它提问即可(一些支持 MCP 的客户端,就可以直接进行提问,它内部会去自动调用 MCP)
MCP Prompt
模型上下文协议 (MCP) 为服务器提供了一种向客户端公开提示模板的标准化方法。提示允许服务器提供结构化消息和与语言模型交互的指令。客户端可以发现可用的提示,检索其内容,并提供参数来自定义它们。
Prompt 是 MCP 的"模板大师",提供预定义的交互模式或者推理指引,是 LLM 的"剧本",告诉它怎么开口、怎么思考。
主要用于定义与 LLM 交互的模板,指导 LLM 的输出。它可以提供结构化的提示模板,包含参数,用于标准化和共享常见的 LLM 交互,例如生成文本模板、定义对话流程、创建特定任务的指令等。
服务器定义好一堆 Prompt 模板,客户端可以直接选择一个,填入参数,然后交给 LLM 执行。
通常,提示将通过用户界面中用户启动的命令触发,这允许用户自然地发现和调用可用的提示。
例如,作为斜杠命令:
提示列表 prompts/list
request 请求:
json
{
  "jsonrpc": "2.0",
  "id": 1,
  "method": "prompts/list",
  "params": {
    "cursor": "optional-cursor-value"
  }
}
response 响应:
json
{
  "jsonrpc": "2.0",
  "id": 1,
  "result": {
    "prompts": [
      {
        "name": "code-review",
        "description": "审查代码以进行改进和发现问题",
        "arguments": [
          {
            "name": "code",
            "required": true
          }
        ]
      }
    ],
    "nextCursor": "next-page-cursor"
  }
}
获取提示 prompts/get
request 请求:
json
{
  "jsonrpc": "2.0",
  "id": 2,
  "method": "prompts/get",
  "params": {
    "name": "code_review",
    "arguments": {
      "code": "def hello():\n    print('world')"
    }
  }
}
response 响应:
json
{
  "jsonrpc": "2.0",
  "id": 2,
  "result": {
    "description": "Code review prompt",
    "messages": [
      {
        "role": "user",
        "content": {
          "type": "text",
          "text": "Please review this Python code:\ndef hello():\n    print('world')"
        }
      }
    ]
  }
}
编写一个 MCP Prompt
需求:编写一个代码 review 的 prompt
在之前的文件中,添加如下代码即可:
ts
server.prompt(
'code-review',
'审查代码以进行改进和发现问题',
{
code: z.string()
},
({ code }) => ({
messages: [
{
role: 'user',
content: {
type: 'text',
text: `需要review的代码:\n\n${code}`
}
}
]
})
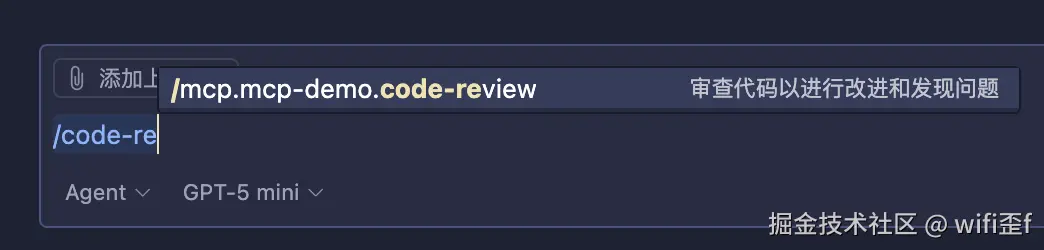
)通过 / 命令,来测试:
MCP Resource
MCP 为服务器提供了一种标准化的方式来公开 资源给客户。资源允许服务器共享数据,这些数据向 语言模型,例如文件、数据库模式或特定于应用程序的信息。 每个资源都有 URI。
Resource 是 MCP 的"知识库管理员",提供对各种数据源和信息资产的统一访问接口,是 LLM 的"外部记忆",让它能够访问和检索存储在外部系统中的信息。
例如,应用程序可以:
- 通过 UI 元素在树视图或列表视图中公开资源以供显式选择
- 允许用户搜索和筛选可用资源
- 根据启发式或 AI 模型的选择实现自动上下文包含
在平时使用 ai 的时候,有添加文件的作为上下文,这个就是 MCP Resource。
资源列表 resources/list
request 请求:
json
{
  "jsonrpc": "2.0",
  "id": 1,
  "method": "resources/list",
  "params": {
    "cursor": "optional-cursor-value"
  }
}
response 响应:
json
{
  "jsonrpc": "2.0",
  "id": 1,
  "result": {
    "resources": [
      {
        "uri": "file:///project/src/main.rs",
        "name": "main.rs",
        "title": "Rust Software Application Main File",
        "description": "Primary application entry point",
        "mimeType": "text/x-rust"
      }
    ],
    "nextCursor": "next-page-cursor"
  }
}
读取资源 resources/read
request 请求:
json
{
  "jsonrpc": "2.0",
  "id": 2,
  "method": "resources/read",
  "params": {
    "uri": "file:///project/src/main.rs"
  }
}
response 响应:
json
{
  "jsonrpc": "2.0",
  "id": 2,
  "result": {
    "contents": [
      {
        "uri": "file:///project/src/main.rs",
        "name": "main.rs",
        "title": "Rust Software Application Main File",
        "mimeType": "text/x-rust",
        "text": "fn main() {\n    println!(\"Hello world!\");\n}"
      }
    ]
  }
}
这部分也是调用 sdk 来实现即可,就不具体演示了。
MCP Client
官网的例子是使用 Claude 的大模型来完成的,这里我们自己调用其他的大模型来测试。
只要大模型支持 MCP 即可,这里使用的是
open router的qwen3(免费 😂)
所谓的 mcp client,可以想象是一个 ai 应用,服务端会先和 mcp server 进行连接(这里是 mcp client 通过命令启动一个 mcp server,具体代码有演示),获取到所有的 mcp 工具,将这些工具组装成 function call,这是准备工作。
当我们每次对话,将我们的消息,和调用的工具一起发给大模型:
ts
const res = this.openai.chat.completions.create({
  model,
  messages,
  tools
})

// [
//   {
//     id: 'chatcmpl-tool-13b3970424f24a2fb175b36ba6f1bd6b',
//     type: 'function',
//     index: 0,
//     function: { name: 'get-weather', arguments: '{"state": "南京"}' }
//   }
// ]
此时大模型会返回当前调用的工具,例如:
js
const mcpCallResult = await this.mcp.callTool({
  name: toolName,
  arguments: toolArgs
})
调用后的结果,一并同上下文 message 一起再次发给大模型,此时大模型就会根据这个 mcp 工具,来返回对应的结果。
对于大模型是如何能够根据我们的提示找到对应的 mcp 工具,其中一点是需要给 mcp 工具写好对应的描述,然后就是靠大模型自身了,内部是如何运转的这里就不深究了。
这里采用 open router + openai sdk 来实现一个 mcp client:
- 初始化
bash
pnpm init- 修改
package.json
json
{
  "type": "module",
  "scripts": {
    "build": "tsc && chmod 755 build/index.js"
  }
}- 安装依赖
bash
pnpm i @modelcontextprotocol/sdk openai dotenv
pnpm i @types/node typescript -D- 新增
tsconfig.json
json
{
  "compilerOptions": {
    "target": "ES2022",
    "module": "Node16",
    "moduleResolution": "Node16",
    "outDir": "./build",
    "rootDir": "./",
    "strict": true,
    "esModuleInterop": true,
    "skipLibCheck": true,
    "forceConsistentCasingInFileNames": true
  },
  "include": ["index.ts"],
  "exclude": ["node_modules"]
}- 新增
.env文件
这个需要在 openrouter.ai/ 官网去注册
env
OPENROUTER_API_KEY="YOUR_OPENROUTER_API_KEY"- 新增
index.ts
这个文件的注释也比较完善,流程就和上面说的一样,这部分就略过了。
ts
import OpenAI from 'openai'
import { Client } from '@modelcontextprotocol/sdk/client/index.js'
import { StdioClientTransport } from '@modelcontextprotocol/sdk/client/stdio.js'
import readline from 'readline/promises'
import dotenv from 'dotenv'

dotenv.config()

const OPENROUTER_API_KEY = process.env.OPENROUTER_API_KEY
const model = 'qwen/qwen3-235b-a22b:free'

class MCPClient {
  private mcp: Client
  private openai: OpenAI
  private transport: StdioClientTransport | null = null
  private tools: OpenAI.Chat.Completions.ChatCompletionTool[] = []

  constructor() {
    this.openai = new OpenAI({
      baseURL: 'https://openrouter.ai/api/v1',
      apiKey: OPENROUTER_API_KEY
    })
    this.mcp = new Client({ name: 'mcp-client-cli', version: '1.0.0' })
  }

  // 连接mcp server
  async connectToServer(serverScriptPath: string) {
    try {
      const command = process.execPath
      // client创建一个新的mcp server进程,来进行mcp server调用
      this.transport = new StdioClientTransport({
        command, // command: "node",
        args: [serverScriptPath] // args: ["server.js"]
      })
      await this.mcp.connect(this.transport)

      // 获取到mcp server所有工具
      const toolsResult = await this.mcp.listTools()
      // 在openai的标准中,调用工具是采用的是function calling
      // mcp也就是在function calling上套了一层协议
      this.tools = toolsResult.tools.map((tool) => {
        return {
          type: 'function',
          function: {
            name: tool.name,
            description: tool.description,
            parameters: tool.inputSchema
          }
        }
      })
      // 输出mcp工具
      console.log(
        'Connected to server with tools:',
        this.tools.map((tool) => (tool as any).function?.name || '') // [ 'get-weather' ]
      )
    } catch (e) {
      console.log('Failed to connect to MCP server: ', e)
      throw e
    }
  }

  // 处理查询逻辑
  async processQuery(query: string) {
    const messages: OpenAI.Chat.Completions.ChatCompletionMessageParam[] = [
      {
        role: 'user',
        content: query
      }
    ]

    // 将我们的参数组合成消息发送给大模型
    /**
     * response.choices[0].message中包含大模型返回的数据信息
     * {
     *      "role": "assistant",
     *      "content": "The weather in Beijing is 25 degrees Celsius and sunny.",
     *      "tool_calls": [
                {
                    id: 'chatcmpl-tool-13b3970424f24a2fb175b36ba6f1bd6b',
                    type: 'function',
                    index: 0,
                    function: { name: 'get-weather', arguments: '{"state": "南京"}' }
                }
            ],
            ...
     * }
     */
    const toolResponse = await this.openai.chat.completions.create({
      model,
      messages,
      tools: this.tools,
      tool_choice: 'auto' // 判断是否需要调用工具
    })

    /**
     * toolCalls会展示出工具调用
     * [
            {
                id: 'chatcmpl-tool-13b3970424f24a2fb175b36ba6f1bd6b',
                type: 'function',
                index: 0,
                function: { name: 'get-weather', arguments: '{"state": "南京"}' }
            }
        ]
     */
    const toolCalls = toolResponse.choices[0].message.tool_calls
    // 收集结果
    const finalText = []

    if (toolCalls && toolCalls.length > 0) {
      for (const toolCall of toolCalls) {
        // 这里只是做ts类型判断
        if (toolCall.type !== 'function') continue
        const toolName = toolCall.function.name
        // 参数解析
        const toolArgs = JSON.parse(toolCall.function.arguments)

        finalText.push(
          `[🚀 Calling tool ${toolName} with args ${toolCall.function.arguments}]`
        )

        // mcp工具调用结果
        /**
         * {
            content: [
                {
                    type: 'text',
                    text: '活动警报 南京:\n' +
                        '\n' +
                        'Event: 高温预警\n' +
                        'Area: 江苏省南京市\n' +
                        'Severity: Moderate\n' +
                        'Status: Actual\n' +
                        'Headline: 江苏省南京市高温预警,持续至晚上8点\n' +
                        '---\n' +
                        'Event: 洪水警报\n' +
                        'Area: 浙江省沿海地区\n' +
                        'Severity: Severe\n' +
                        'Status: Actual\n' +
                        'Headline: 因强降雨影响,浙江省沿海地区发布洪水警报\n' +
                        '---'
                    }
                ]
            }
         */
        const mcpCallResult = await this.mcp.callTool({
          name: toolName,
          arguments: toolArgs
        })
        messages.push(toolResponse.choices[0].message)
        messages.push({
          role: 'tool',
          content:
            typeof mcpCallResult.content === 'string'
              ? mcpCallResult.content
              : JSON.stringify(mcpCallResult.content),
          tool_call_id: toolCall.id
        })

        // 将mcp工具调用结果,和上下文信息交给大模型,重新调用提问
        const response = await this.openai.chat.completions.create({
          model,
          messages
        })

        finalText.push(response.choices[0].message.content || '')
      }
    }

    return finalText.join('\n')
  }

  // 交互式聊天循环,负责处理用户与mcp客户端之间的持续对话
  async chatLoop() {
    // 获取输入信息
    const rl = readline.createInterface({
      input: process.stdin,
      output: process.stdout
    })

    try {
      while (true) {
        const message = await rl.question('\nQuery: ')
        if (message.toLowerCase() === 'quit') {
          break
        }
        const responseMessage = await this.processQuery(message)
        console.log('\n' + responseMessage)
      }
    } finally {
      rl.close()
    }
  }

  async cleanup() {
    await this.mcp.close()
  }
}

async function main() {
  if (process.argv.length < 3) {
    console.log('Usage: node build/index.js <path_to_server_script>')
    return
  }
  const mcpClient = new MCPClient()
  try {
    await mcpClient.connectToServer(process.argv[2])
    await mcpClient.chatLoop()
  } catch (error) {
    console.error('Error in main:', error)
  } finally {
    await mcpClient.cleanup()
    process.exit(0)
  }
}

main()- 构建 ts
bash
pnpm build- 此时我们还需要一个 server 端,来为 mcp server 提供数据
这里的 mcp server 采用的是上面的城市天气查询的例子
至于我们如何将我们的 mcp client 与 mcp server 进行连接对应呢,是通过后续的启动命令来的。(因为 mcp client 会通过命令脚本来启动一个 mcp server)
这里还是采用 express 来实现一个 api 接口,【城市天气查询】例子也有说,可以略过。
js
const mockAlertsData = {
  features: [
    {
      properties: {
        event: '高温预警',
        areaDesc: '江苏省南京市',
        severity: 'Moderate',
        status: 'Actual',
        headline: '江苏省南京市高温预警,持续至晚上8点'
      }
    },
    {
      properties: {
        event: '洪水警报',
        areaDesc: '浙江省沿海地区',
        severity: 'Severe',
        status: 'Actual',
        headline: '因强降雨影响,浙江省沿海地区发布洪水警报'
      }
    }
  ]
}

const express = require('express')
const app = express()

app.get('/alerts', (req, res) => {
  console.log(mockAlertsData)
  res.json(mockAlertsData)
})

app.listen(4000, () => {
  console.log('Weather API listening on port 4000!')
})- 启动项目
bash
node build/index.js 【mcp server文件路径 -> 要求绝对路径,用于mcp client启动mcp server的】
# 例如:
node build/index.js /Users/xxx/Desktop/mcp-demo/build/index.js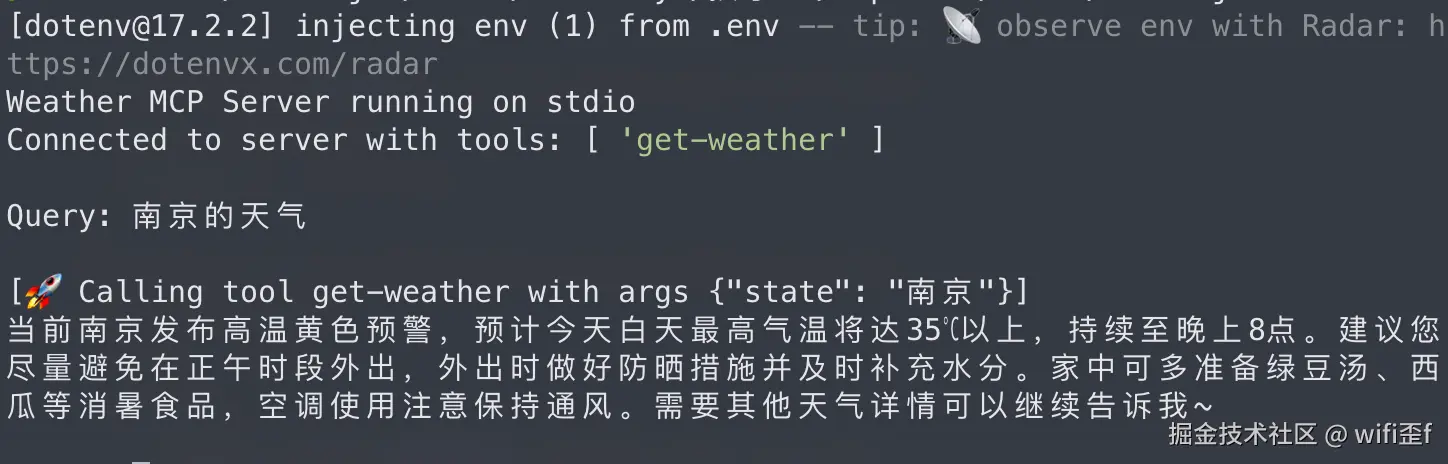
这也和我们模拟的数据是一致的:
MCP 调试
在上面【编写一个 MCP Tool】中说了两种测试的方法,下面介绍一种官方文档中的测试方法。
运行如下命令:
bash
npx @modelcontextprotocol/inspector要求:node 大于 22.7.5
连接检测
执行完成后会自动 http://localhost:6274/,界面如下:
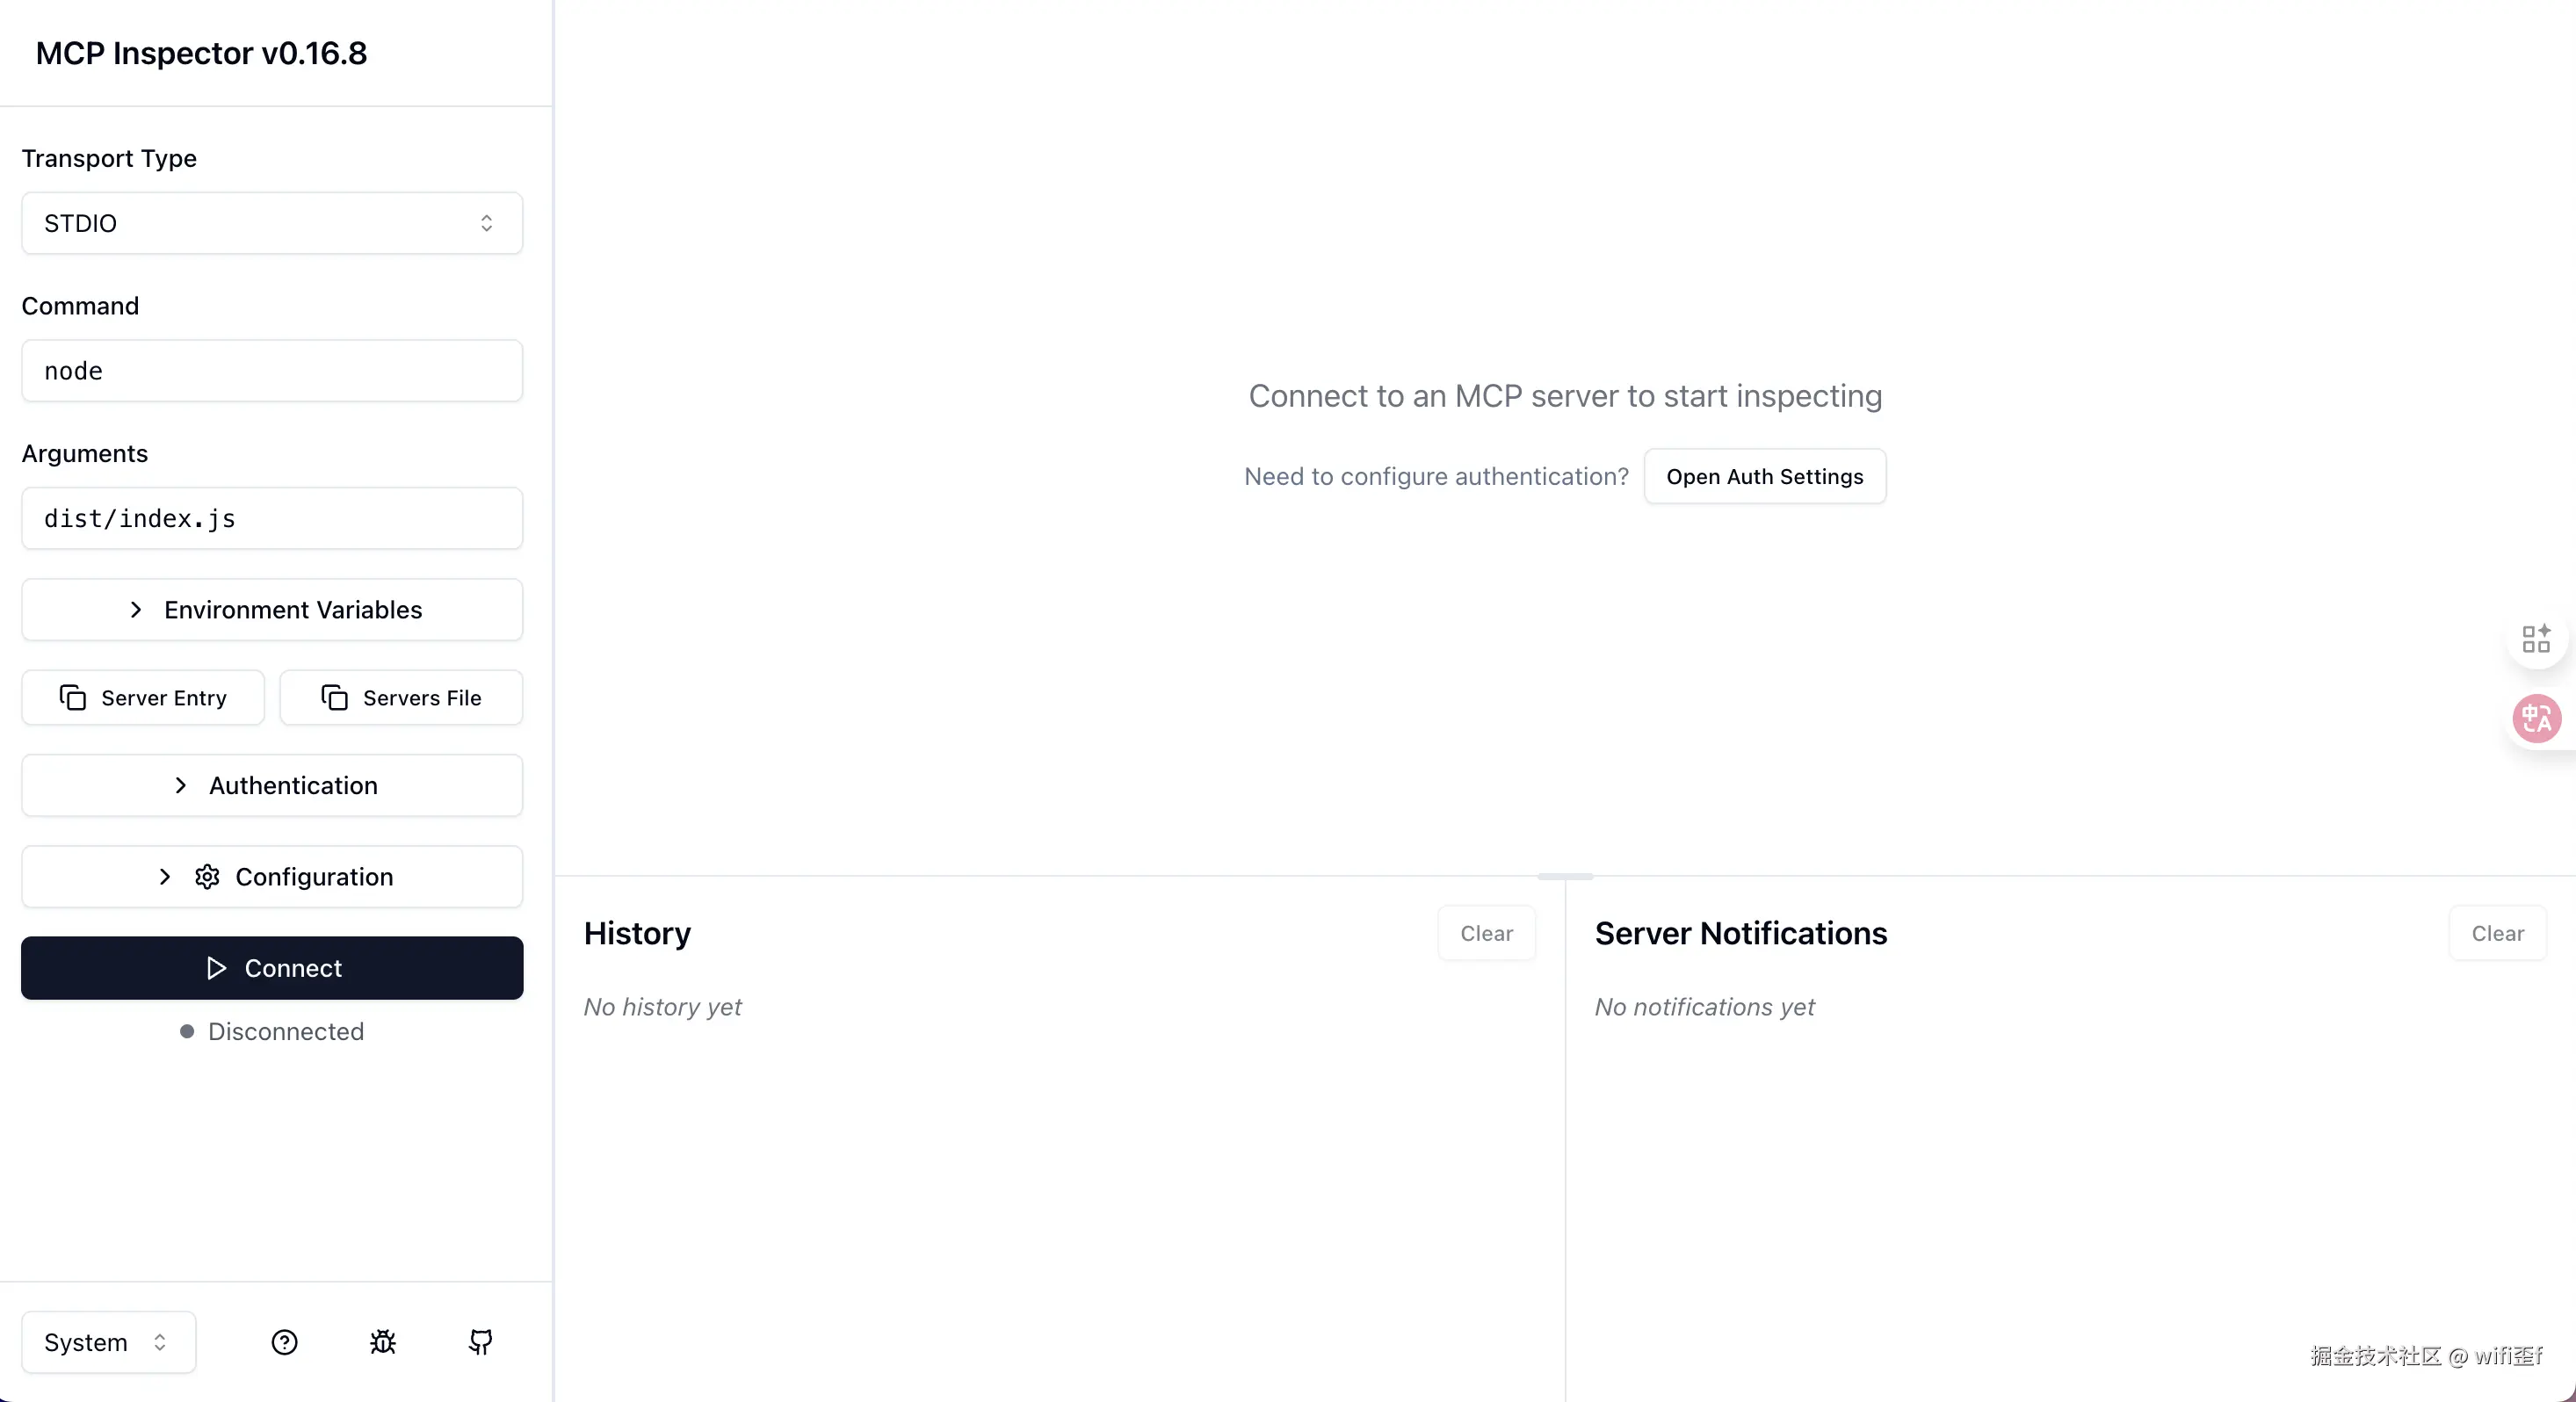
如图的:Command 就是启动 mcp 的命令,Arguments 就是启动 mcp 的参数。我这里是 node dist/index.js,路径是当前执行 npx @modelcontextprotocol/inspector 的相对路径。
我们点击 Connect 按钮,会发送请求链接 mcp,然后我们在 History 中可以查看到请求的内容。
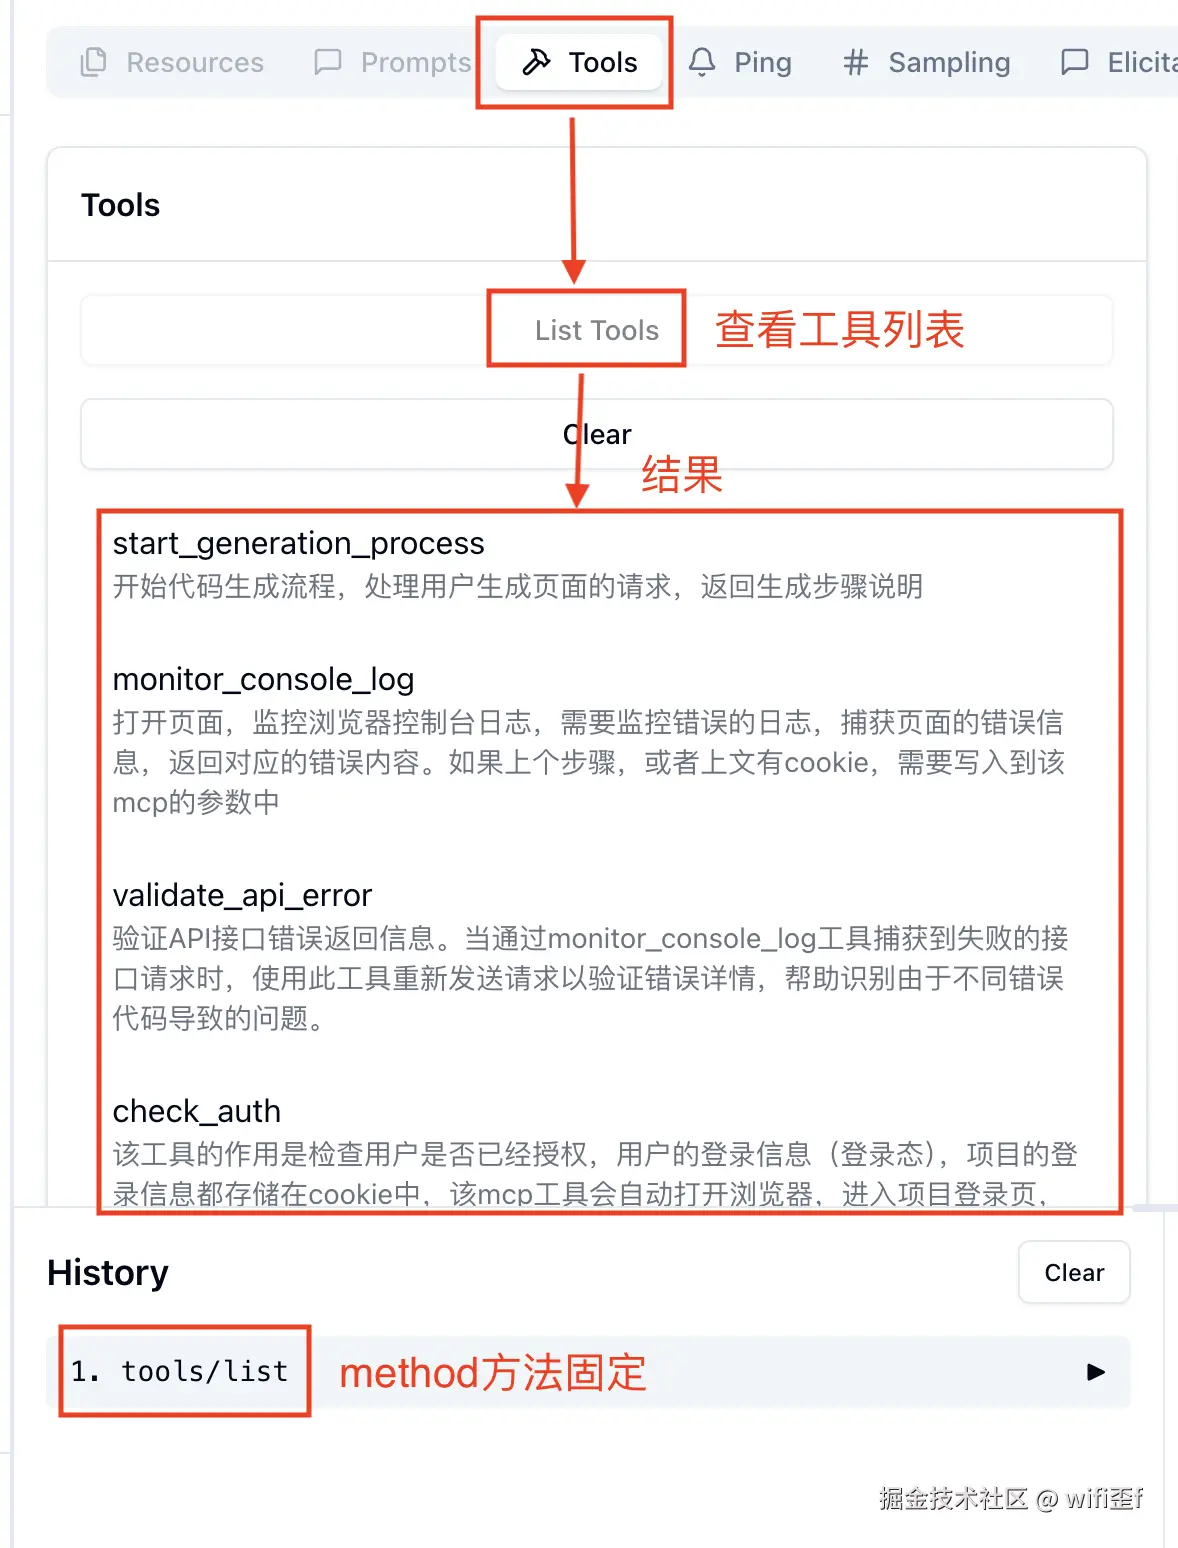
工具发现检测
工具调用检测
MCP 实战
在前言中提到一些 AI Coding 的一些缺点,那我们如何利用 MCP 去解决呢?
流程是这样的:原型需求文档 -> UI设计 -> 任务确认 -> AI 生成代码 -> 如果需要登录态,通过 PlayWright 进行登录获取 Cookie -> 错误捕获,重新"丢"给 AI -> 自检通过,执行结束
-
原型需求文档:通过内部
Cli工具,在生成模版的时候去自动拉去需求文档,添加到项目的Prompt.md中,MCP 让 AI 去读取该 md 文件,通过 cli 也提供了一些添加需求的命令,来减少手动修改 md 文件的步骤 -
错误捕获包括:终端运行时错误、浏览器错误
- 浏览器错误可以用 PlayWright 监听
console、pageerror、requestfailed这些事件 console:监听控制台消息(包括 log、warn、error 等类型)pageerror:监听页面未捕获的 JavaScript 异常requestfailed:监听网络请求失败事件
- 浏览器错误可以用 PlayWright 监听
目前 AI 编辑器功能越来越强,像 Trae 就能进行流程自检
让我们正式开始吧!
- 初始化项目
bash
pnpm init- 安装依赖
bash
# playwright不能安装在开发依赖中的,打包会没有哦
pnpm i @modelcontextprotocol/sdk playwright axios
pnpm i -D @types/node typescript rimraf- 项目根目录创建
tsconfig.json
json
{
  "compilerOptions": {
    "target": "ES2022",
    "module": "ESNext",
    "moduleResolution": "node",
    "allowSyntheticDefaultImports": true,
    "esModuleInterop": true,
    "allowJs": true,
    "outDir": "./dist",
    "rootDir": "./src",
    "strict": true,
    "noImplicitAny": true,
    "strictNullChecks": true,
    "strictFunctionTypes": true,
    "noImplicitReturns": true,
    "noFallthroughCasesInSwitch": true,
    "noUncheckedIndexedAccess": true,
    "noImplicitOverride": true,
    "exactOptionalPropertyTypes": true,
    "noPropertyAccessFromIndexSignature": true,
    "noImplicitThis": true,
    "alwaysStrict": true,
    "skipLibCheck": true,
    "forceConsistentCasingInFileNames": true,
    "declaration": true,
    "declarationMap": true,
    "sourceMap": true,
    "removeComments": false,
    "importHelpers": true,
    "experimentalDecorators": true,
    "emitDecoratorMetadata": true,
    "resolveJsonModule": true,
    "isolatedModules": true,
    "verbatimModuleSyntax": false,
    "baseUrl": ".",
    "paths": {
      "src/*": ["./src/*"]
    }
  },
  "include": ["src/**/*"],
  "exclude": ["node_modules", "dist", "**/*.test.ts", "**/*.spec.ts"]
}- 修改
package.json
json
{
  "main": "dist/index.js",
  "type": "module",
  "bin": {
    "generate-llm-mcp": "dist/index.js"
  },
  "scripts": {
    "build": "npm run clean && tsc",
    "start": "node dist/index.js",
    "test": "echo '测试工具列表...' && echo '{\"jsonrpc\": \"2.0\", \"id\": 1, \"method\": \"tools/list\", \"params\": {}}' | node dist/index.js",
    "clean": "rimraf dist"
  }
}- 创建
src/index.ts
目的是创建一个 MCP Server(new Server)
ts
#!/usr/bin/env node

import { Server } from '@modelcontextprotocol/sdk/server/index.js'
import { StdioServerTransport } from '@modelcontextprotocol/sdk/server/stdio.js'
import {
  CallToolRequestSchema,
  ListToolsRequestSchema,
  CallToolRequest,
  ListToolsRequest
} from '@modelcontextprotocol/sdk/types.js'
import { tools } from './tools/index.js'
import { logger } from './utils/index.js'

class GenerateLLMServer {
  private server: Server

  constructor() {
    this.server = new Server({
      name: 'generate-llm-mcp',
      version: '1.0.0'
    })

    this.setupToolHandlers()
    logger.info('GenerateLLM MCP 服务器初始化完成')
  }

  private setupToolHandlers(): void {
    // 工具列表处理器
    this.server.setRequestHandler(
      ListToolsRequestSchema,
      async (_request: ListToolsRequest) => {
        logger.debug(`列出可用工具,共 ${tools.length} 个`)
        return {
          tools: tools.map((tool) => tool.config)
        }
      }
    )

    // 工具调用处理器
    this.server.setRequestHandler(
      CallToolRequestSchema,
      async (request: CallToolRequest): Promise<any> => {
        const { name, arguments: args } = request.params

        logger.info(`调用工具: ${name}`)
        logger.debug(`工具参数: ${JSON.stringify(args)}`)

        try {
          const tool = tools.find((tool) => tool.config.name === name)
          if (!tool) {
            throw new Error(`未知工具: ${name}`)
          }

          const result = await tool.fn(args)
          logger.info(`工具 ${name} 执行成功`)

          return result
        } catch (error) {
          const errorMessage =
            error instanceof Error ? error.message : String(error)
          logger.error(`工具 ${name} 执行失败: ${errorMessage}`)

          return {
            content: [
              {
                type: 'text',
                text: `错误: ${errorMessage}`
              }
            ]
          }
        }
      }
    )
  }

  public async run(): Promise<void> {
    try {
      const transport = new StdioServerTransport()
      await this.server.connect(transport)
      logger.info('GenerateLLM MCP 服务器已启动并监听连接')
    } catch (error) {
      logger.error('服务器启动失败', error as Error)
      process.exit(1)
    }
  }
}

const server = new GenerateLLMServer()
server.run().catch(console.error)- 创建
src/tools/auth.ts
目的是创建一个获取登录态的 MCP Tool。
思路是借助 PlayWright 打开登录态 URL,把 Cookie 塞入上下文。
ts
async function checkAuth(params: { url?: string } = {}): Promise<ToolResponse> {
  // 创建浏览器实例并启动
  const browserAuth = new BrowserAuthorization()
  try {
    await browserAuth.start()
    if (params.url) {
      // 运行浏览器并等待cookie变化
      const cookies = await browserAuth.run(params.url)
      // 成功获取到cookies后返回结果
      /**
       * 直接返回cookies对象的JSON字符串,这样其他工具可以直接使用
       * 格式:{"cookieName":{"name":"cookieName","value":"cookieValue","domain":"..."},...}
       */
      return createSuccessResponse(JSON.stringify(cookies))
    } else {
      return createErrorResponse('请提供要检查的URL')
    }
  } catch (error) {
    return createErrorResponse(
      error instanceof Error ? error.message : '未知错误'
    )
  } finally {
    await browserAuth.stop()
  }
}

export default defineTool(
  {
    name: 'check_auth',
    description:
      '该工具的作用是检查用户是否已经授权,用户的登录信息(登录态),项目的登录信息都存储在cookie中,该mcp工具会自动打开浏览器,进入项目登录页,当用户登录成功后,该mcp工具会自动获取cookie,将内容返回,并做全局存储。当发现接口返回的请求响应码中包含未登录信息,或者返回的内容是未登录、登录状态失效等内容,也需要调用该工具进行重新登录。',
    inputSchema: {
      type: 'object',
      properties: {
        url: {
          type: 'string',
          description: '登录态的网页URL',
          format: 'uri'
        },
        cookies: {
          type: 'string',
          description: '暴露的登录态cookie信息'
        }
      },
      required: ['url', 'cookies']
    }
  },
  checkAuth
)
BrowserAuthorization 类的实现:
封装了常用的方法,例如 start启动、run运行等。
ts
import * as playwright from 'playwright'

class BrowserAuthorization extends BaseBrowser {
  currentCookies: { [name: string]: playwright.Cookie } = {}
  private cookieChangedCallback:
    | ((cookies: { [name: string]: playwright.Cookie }) => void)
    | null = null

  public override async start(): Promise<void> {
    this.browser = await playwright.chromium.launch({
      headless: false, // 有头模式,方便用户登录
      channel: 'chrome'
    })
    this.context = await this.browser.newContext()
    this.page = await this.context.newPage()
  }

  public async run(url: string): Promise<any> {
    // 让用户登录
    await this.page?.goto(url)
    // await this.initCookie();

    // 设置cookie变化监听器
    this.setupCookieListeners()

    // 返回一个Promise,当cookie变化时resolve
    return new Promise((resolve) => {
      // 设置cookie变化的回调函数
      this.cookieChangedCallback = (cookies) => {
        resolve(cookies)
      }
    })
  }

  private setupCookieListeners() {
    // 监听响应,可能会有cookie的变化
    this.page?.on('response', async (response) => {
      if (response.headers()['set-cookie']) {
        await this.checkChanges()
      }
    })

    // 监听跳转的load事件,也可能会有cookie的变化
    this.page?.on('load', async () => {
      await this.checkChanges()
    })

    // 监听页面的请求完成事件
    this.page?.on('requestfinished', async () => {
      await this.checkChanges()
    })
  }

  /**
   * 初始化清空cookie
   */
  private async initCookie() {
    await this.page?.context().clearCookies()
  }

  /**
   * 检查cookie变化
   */
  private async checkChanges() {
    const newCookies = await this.page?.context().cookies()
    const newCookiesMap: { [name: string]: playwright.Cookie } = {}
    newCookies?.forEach((cookie) => {
      newCookiesMap[cookie.name] = { ...cookie }
    })

    // 检测变化
    let hasNewOrChangedCookie = false
    for (const [name, newCookie] of Object.entries(newCookiesMap)) {
      const oldCookie = this.currentCookies[name]
      if (!oldCookie) {
        console.log(`[Cookie 新增] ${name}=${newCookie.value}`)
        hasNewOrChangedCookie = true
      } else if (oldCookie.value !== newCookie.value) {
        console.log(
          `[Cookie 修改] ${name}: ${oldCookie.value} → ${newCookie.value}`
        )
        hasNewOrChangedCookie = true
      }
    }

    // 检测删除
    for (const [name, _oldCookie] of Object.entries(this.currentCookies)) {
      if (!newCookiesMap[name]) {
        console.log(`[Cookie 删除] ${name}`)
      }
    }

    this.currentCookies = newCookiesMap

    // 如果检测到新的或变化的cookie,并且回调函数存在,则调用回调函数
    if (hasNewOrChangedCookie && this.cookieChangedCallback) {
      this.cookieChangedCallback(newCookiesMap)
      // 清空回调函数,防止重复调用
      this.cookieChangedCallback = null
    }
  }

  public getCookies() {
    return this.currentCookies
  }
}
BaseBrowser 基类的实现:
ts
export class BaseBrowser {
  protected browser: Browser | null = null
  protected context: playwright.BrowserContext | null = null
  protected page: Page | null = null

  constructor() {
    // 不在构造函数中启动,避免意外
  }

  public async start() {
    if (!this.browser) {
      this.browser = await chromium.launch({
        headless: false,
        channel: 'chrome'
      })
    }
    if (!this.page) {
      this.context = await this.browser.newContext()
      // 通过context创建的page会保留上下文
      this.page = await this.context.newPage()
    }
  }

  public async stop() {
    try {
      if (this.page) {
        await this.page.close()
        this.page = null
      }
    } catch (error) {
      process.stderr.write(`Error closing page: ${error}\n`)
    }

    try {
      if (this.browser) {
        await this.browser.close()
        this.browser = null
      }
    } catch (error) {
      process.stderr.write(`Error closing browser: ${error}\n`)
    }
  }

  public getPageInstance() {
    return this.page
  }

  public getBrowserInstance() {
    return this.browser
  }
}- 创建
src/tools/console.ts文件
作用是监控浏览器控制台的异常,并"丢给"AI。
ts
/**
* 控制台日志
* @returns {使用 PlayWright 监控浏览器控制台日志, 返回错误日志内容}
*/
async function console(
params: {
url?: string
cookies?: string
includeConsoleLogs?: boolean
includeErrors?: boolean
} = {}
): Promise<ToolResponse> {
const monitor = new ConsoleMonitor()
try {
// 处理cookies参数,支持多种格式
let cookiesArray: playwright.Cookie[] = []
if (params.cookies) {
try {
cookiesArray = parseCookieString(params.cookies, params.url)
} catch (error) {
return createErrorResponse(`Cookie格式解析错误: ${error}`)
}
}
await monitor.start(cookiesArray)
await monitor.run(
params.includeConsoleLogs || false,
params.includeErrors !== false
)
if (params.url) {
try {
const page = monitor.getPageInstance()
await page?.goto(params.url)
// 等待一段时间以确保所有资源加载完成
await new Promise((resolve) => setTimeout(resolve, 2000))
} catch (error) {
return createErrorResponse(`错误: ${error}`)
}
}
const text = monitor.getLogsToString()
return createSuccessResponse(text)
} finally {
await monitor.stop()
}
}
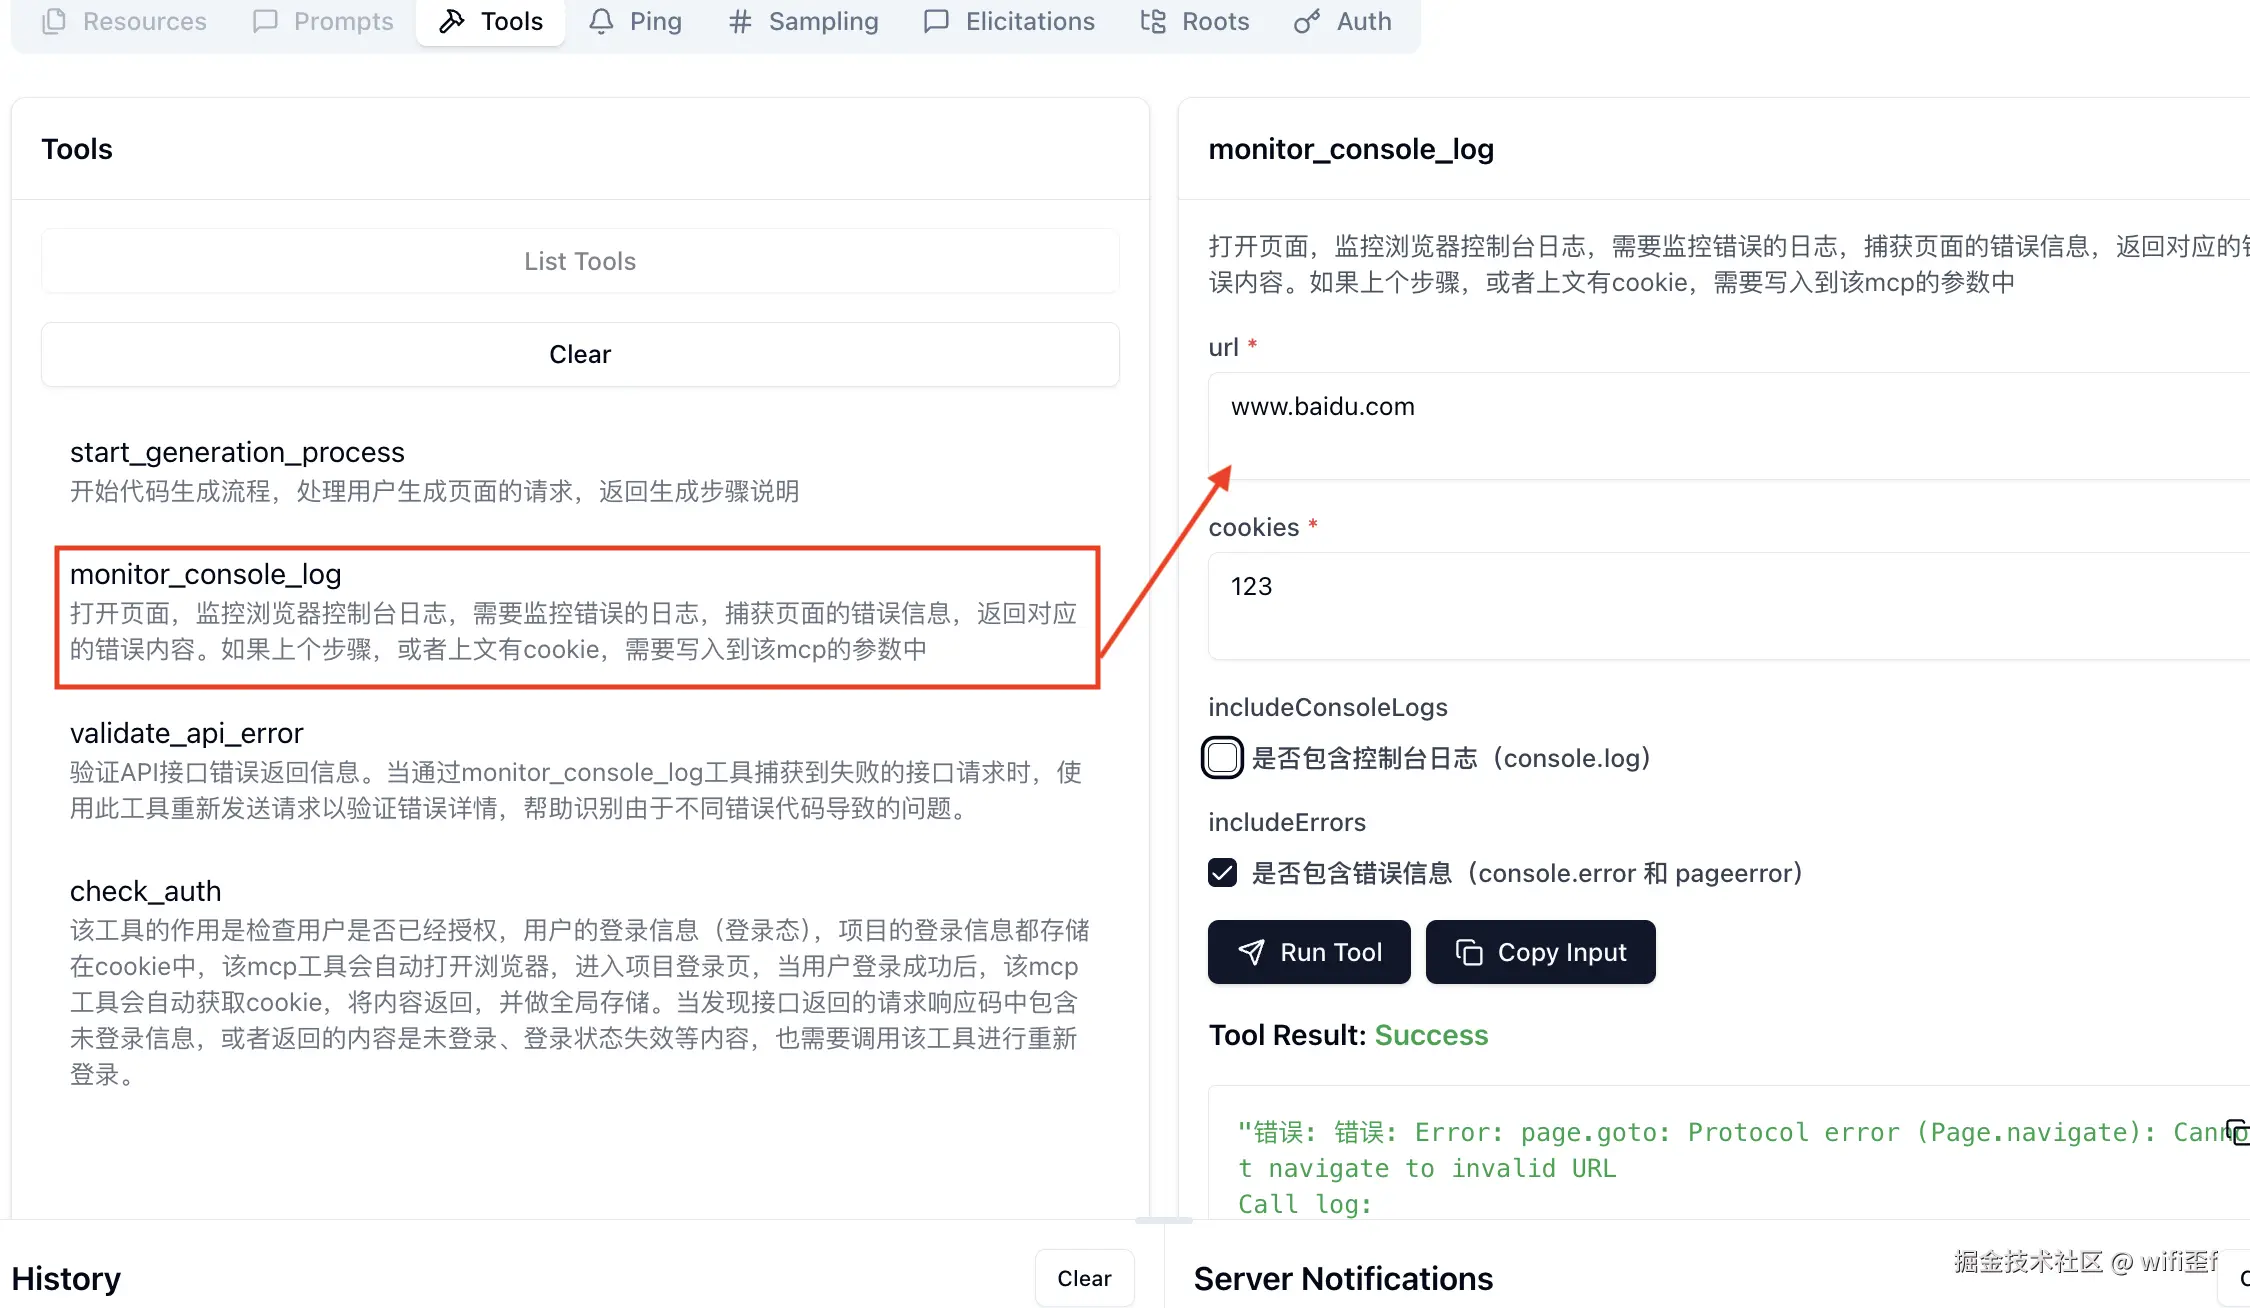
export default defineTool(
{
name: 'monitor_console_log',
description:
'打开页面,监控浏览器控制台日志,需要监控错误的日志,捕获页面的错误信息,返回对应的错误内容。如果上个步骤,或者上文有cookie,需要写入到该mcp的参数中',
inputSchema: {
type: 'object',
properties: {
url: {
type: 'string',
description: '要监控的网页URL',
format: 'uri'
},
cookies: {
type: 'string',
description: '网站登录的Cookie信息'
},
includeConsoleLogs: {
type: 'boolean',
description: '是否包含控制台日志(console.log)',
default: false
},
includeErrors: {
type: 'boolean',
description: '是否包含错误信息(console.error 和 pageerror)',
default: true
}
},
required: ['url', 'cookies']
}
},
console
)ConsoleMonitor 类的实现:
作用是使用 Playwright 向项目的页面注入 Cookie,并监听控制台日志和错误信息,如果有错误信息,则返回给 AI。
ts
class ConsoleMonitor extends BaseBrowser {
  private consoleLogs: ConsoleMessage[] = []

  constructor() {
    // 不在构造函数中启动,避免意外
    super()
  }

  public override async start(cookies: playwright.Cookie[] = []) {
    this.browser = await playwright.chromium.launch({
      headless: false, // 有头模式,方便用户登录
      channel: 'chrome'
    })
    this.context = await this.browser.newContext()
    this.page = await this.context.newPage()
    // 添加cookie
    if (this.context && cookies.length > 0) {
      await this.context.addCookies(cookies)
    }
  }

  /**
   * 页面监控
   * 该函数负责设置页面事件监听器,用于捕获和处理页面中的控制台消息
   * 和JavaScript错误。通过监听'console'和'pageerror'事件,将捕获到的
   * 消息转换为统一的格式并进行处理。
   *
   * 监听的事件类型:
   * - console: 监听控制台消息(包括log、warn、error等类型)
   * - pageerror: 监听页面未捕获的JavaScript异常
   * - requestfailed: 监听网络请求失败事件
   *
   * @param includeConsoleLogs - 是否包含控制台日志
   * @param includeErrors - 是否包含错误信息
   * @returns {Promise<void>} - 返回一个Promise,表示异步操作完成
   */
  public async run(
    includeConsoleLogs: boolean = false,
    includeErrors: boolean = true
  ): Promise<void> {
    // 监听控制台消息
    this.page?.on('console', async (event) => {
      const messageType = event.type()
      if (
        (includeErrors && messageType === 'error') ||
        (includeConsoleLogs &&
          ['log', 'info', 'warn', 'debug'].includes(messageType))
      ) {
        this.handleConsoleMessage(this.messageToConsoleMessage(event))
      }
    })

    // 捕获并记录页面抛出的JavaScript错误
    if (includeErrors) {
      this.page?.on('pageerror', async (error) =>
        this.handleConsoleMessage(this.pageErrorToConsoleMessage(error))
      )
    }

    // 监听网络请求失败事件
    if (includeErrors) {
      this.page?.on('requestfailed', async (request) => {
        const failure = request.failure()
        if (failure) {
          const message: ConsoleMessage = {
            type: 'error',
            text: `网络请求失败: ${request.url()} - ${failure.errorText}`,
            toString: () =>
              `[NETWORK] 网络请求失败: ${request.url()} - ${failure.errorText}`
          }
          this.handleConsoleMessage(message)
        }
      })
    }
  }

  /**
   * 处理控制台消息
   * @param message - 要处理的控制台消息对象
   */
  private handleConsoleMessage(message: ConsoleMessage) {
    this.consoleLogs?.push(message)
  }

  /**
   * 将Playwright的控制台消息转换为内部ConsoleMessage格式
   * @param message - Playwright的控制台消息对象
   * @returns 转换后的ConsoleMessage对象,包含类型、文本和格式化字符串表示
   */
  private messageToConsoleMessage(
    message: playwright.ConsoleMessage
  ): ConsoleMessage {
    return {
      type: message.type(),
      text: message.text(),
      // 使用统一的格式:[类型] 文本 @ URL:行号
      toString: () =>
        `[${message.type().toUpperCase()}] ${message.text()} @ ${
          message.location().url
        }:${message.location().lineNumber}`
    }
  }

  /**
   * 将页面错误转换为控制台消息对象
   * @param error - 发生的错误对象,可以是Error实例或任何其他类型的值
   * @returns 返回包含错误信息的控制台消息对象
   */
  private pageErrorToConsoleMessage(error: Error | any): ConsoleMessage {
    if (error instanceof Error) {
      return {
        type: 'error',
        text: error.message,
        toString: () => error.stack || error.message
      }
    }
    return {
      type: 'error',
      text: String(error),
      toString: () => String(error)
    }
  }

  public getLogs() {
    return this.consoleLogs || []
  }

  public getLogsToString() {
    return this.consoleLogs.join('\n') || ''
  }
}
parseCookieString 方法:用于解析 Cookie 字符串(因为上下文信息的内容是字符串,所以需要解析后才能塞入 Cookie)
ts
/**
 * 解析cookie字符串,支持多种格式
 * @param cookieString - cookie字符串,可能是JSON格式或浏览器cookie格式
 * @param url - 目标URL,用于推断域名
 * @returns 返回Playwright所需的cookie对象数组
 */
function parseCookieString(
  cookieString: string,
  url?: string
): playwright.Cookie[] {
  // 首先尝试解析为JSON格式
  try {
    const parsed = JSON.parse(cookieString)
    // 如果解析后的结果有cookies属性,说明是包装格式 {"cookies": {...}}
    if (parsed.cookies) {
      return Object.values(parsed.cookies) as playwright.Cookie[]
    } else if (typeof parsed === 'object' && parsed !== null) {
      // 直接是cookie对象格式 {"cookieName": {...}, ...}
      return Object.values(parsed) as playwright.Cookie[]
    }
  } catch (error) {
    // JSON解析失败,尝试解析为浏览器cookie字符串格式
  }

  // 从URL推断域名
  let domain = '.haiziwang.com' // 默认域名
  if (url) {
    try {
      const urlObj = new URL(url)
      const hostname = urlObj.hostname
      // 如果是子域名,使用顶级域名
      if (hostname.includes('.')) {
        const parts = hostname.split('.')
        if (parts.length >= 2) {
          domain = '.' + parts.slice(-2).join('.')
        }
      } else {
        domain = hostname
      }
    } catch (error) {
      // URL解析失败,使用默认域名
    }
  }

  // 解析浏览器cookie字符串格式: "name1=value1; name2=value2; ..."
  const cookies: playwright.Cookie[] = []
  const cookiePairs = cookieString.split(';')

  for (const pair of cookiePairs) {
    const trimmedPair = pair.trim()
    if (trimmedPair) {
      const [name, value] = trimmedPair.split('=')
      if (name && value !== undefined) {
        cookies.push({
          name: name.trim(),
          value: value.trim(),
          domain: domain,
          path: '/',
          expires: -1, // 会话cookie
          httpOnly: false,
          secure: false,
          sameSite: 'Lax'
        })
      }
    }
  }

  return cookies
}- 创建
src/tools/request.ts文件
该文件用于接口错误参数校验的工具,基于monitor_console_log工具,当发现到网络请求的错误后,去重新请求,把请求的信息结果返回
ts
async function sendRequest(params: {
  url: string
  method?: 'GET' | 'POST' | 'PUT' | 'DELETE' | 'PATCH'
  headers?: Record<string, string>
  body?: any
  timeout?: number
}): Promise<ToolResponse> {
  const { url, method = 'GET', headers = {}, body, timeout = 5000 } = params
  try {
    // 构建请求配置
    const config: any = {
      url,
      method,
      headers,
      timeout,
      validateStatus: () => true // 接受所有状态码,便于分析错误
    }

    // 如果有请求体且方法允许,则添加请求体
    if (body && ['POST', 'PUT', 'PATCH'].includes(method.toUpperCase())) {
      // 设置默认Content-Type
      if (!headers['Content-Type']) {
        headers['Content-Type'] = 'application/json'
      }
      config.data = body
    }

    // 发送请求
    const response = await axios(config)

    // 返回详细响应信息
    const result = {
      status: response.status,
      statusText: response.statusText,
      headers: response.headers,
      data: response.data,
      url: response.config?.url,
      method: response.config?.method?.toUpperCase()
    }

    return createSuccessResponse(JSON.stringify(result, null, 2))
  } catch (error: any) {
    // 处理请求错误
    if (error.isAxiosError) {
      const errorInfo = {
        message: error.message,
        code: error.code,
        url: error.config?.url,
        method: error.config?.method?.toUpperCase(),
        response: error.response
          ? {
              status: error.response.status,
              statusText: error.response.statusText,
              headers: error.response.headers,
              data: error.response.data
            }
          : null
      }

      return createSuccessResponse(
        `请求失败:
${JSON.stringify(errorInfo, null, 2)}`
      )
    }

    // 处理其他错误
    return createErrorResponse(
      error instanceof Error ? error : new Error(String(error))
    )
  }
}

export default defineTool(
  {
    name: 'validate_api_error',
    description:
      '验证API接口错误返回信息。当通过monitor_console_log工具捕获到失败的接口请求时,使用此工具重新发送请求以验证错误详情,帮助识别由于不同错误代码导致的问题。',
    inputSchema: {
      type: 'object',
      properties: {
        url: {
          type: 'string',
          description: '要请求的API地址',
          format: 'uri'
        },
        method: {
          type: 'string',
          description: 'HTTP请求方法',
          enum: ['GET', 'POST', 'PUT', 'DELETE', 'PATCH'],
          default: 'GET'
        },
        headers: {
          type: 'object',
          description: '请求头信息',
          additionalProperties: { type: 'string' }
        },
        body: {
          type: 'object',
          description: '请求体内容(仅适用于POST、PUT、PATCH请求)'
        },
        timeout: {
          type: 'number',
          description: '请求超时时间(毫秒)',
          default: 5000
        }
      },
      required: ['url']
    }
  },
  sendRequest
)- 最后进行打包
需要在如果是本地的话可以使用node或者npx。
npx 的话必须要在package.json中添加bin字段:
json
{
  "bin": {
    "generate-llm-mcp": "dist/index.js"
  }
}
npx 的主要作用是临时执行 npm 包中的可执行文件
如果要让别人使用你开发的 MCP 包,那就需要把包上传至 npm 仓库中即可,然后通过 npx 包名 运行使用。
也可以在 Cursor 这些 ide 中添加配置:
json
{
  "mcpServers": {
    "generate-llm-mcp": {
      "command": "npx",
      "args": ["-y", "generate-llm-mcp"]
    }
  }
}
补充:npx
npx 是什么?
npx 是一个命令行工具,它是 npm 5.2.0 版本中新增的功能。它允许用户在不安装全局包的情况下,运行已安装在本地项目中的包或者远程仓库中的包。
npx 的作用是在命令行中运行 node 包中的可执行文件,而不需要全局安装这些包。这可以使开发人员更轻松地管理包的依赖关系,并且可以避免全局污染的问题。
npx 的优势
- 避免全局安装:
npx允许你执行 npm 包,而不需要你先全局安装它 - 总是使用最新版本:如果你没有在本地安装相应的 npm 包,
npx会从 npm 的package仓库中下载并使用最新版 - 执行任意 npm 包:
npx不仅可以执行在package.json的scripts部分定义的命令,还可以执行任何 npm 包
npm 和 npx 区别
npm侧重于安装或者卸载某个模块的。重在安装,并不具备执行某个模块的功能。npx侧重于执行命令的,执行某个模块命令。虽然会自动安装模块,但是重在执行某个命令
npx 的运行规则和 npm 是一样的 本地目录查找 .bin 看有没有 如果没有就去全局的 node_moduels 查找,如果还没有就去下载这个包然后运行命令,然后删除这个包
所以用
npx安装的模块,安装完就会删除,是一次性的