 这个布局使用
 ConstraintLayout 作为根容器,在屏幕的五个个角落和中心各放置了一个 TextView,并额外放置了一个位置固定的 Button。下面是详细解析:
1. 根布局(ConstraintLayout)
xml
ini
<androidx.constraintlayout.widget.ConstraintLayout
    xmlns:android="http://schemas.android.com/apk/res/android"
    xmlns:app="http://schemas.android.com/apk/res-auto"
    xmlns:tools="http://schemas.android.com/tools"
    android:id="@+id/root"
    android:layout_width="match_parent"
android:layout_height="match_parent">- 根布局宽高均为
match_parent,即填满整个屏幕。 - 定义了三个命名空间:
android(系统属性)、app(ConstraintLayout 自定义属性)、tools(仅用于布局编辑器的临时属性)。 - 给根布局设置了 ID
@+id/root,用于子控件约束定位。
2. Button(button13)
xml
ini
<Button
    android:id="@+id/button13"
    android:layout_width="wrap_content"
    android:layout_height="wrap_content"
    android:text="Button"
    tools:layout_editor_absoluteX="80dp"
tools:layout_editor_absoluteY="149dp" />- 宽高均为
wrap_content,即大小由文字内容决定。 - 注意 :仅使用了
tools:前缀的属性(layout_editor_absoluteX/Y),这些属性仅在 Android Studio 布局编辑器中生效,实际运行时不会生效。因此,这个 Button 在真机 / 模拟器中会因缺少约束而默认显示在屏幕左上角(0,0 位置)。 - 这是一个不规范的写法,实际开发中必须添加真实约束(如
app:layout_constraintXXX)来确定位置。
3. 左上角 TextView
xml
xml
<TextView
    android:layout_width="wrap_content"
    android:layout_height="wrap_content"
    app:layout_constraintWidth_min="120dp"  <!-- 最小宽度120dp -->
    android:text="左上角"
    android:gravity="center"  <!-- 文字居中显示 -->
    android:textSize="32sp"
    android:background="@color/color_3"  <!-- 背景色(需在colors.xml中定义) -->
    app:layout_constraintStart_toStartOf="@id/root"  <!-- 左边缘与根布局左边缘对齐 -->
app:layout_constraintTop_toTopOf="parent" /> <!-- 上边缘与根布局上边缘对齐 -->- 定位 :通过
Start_toStartOf和Top_toTopOf约束,固定在屏幕左上角。 - 尺寸 :
wrap_content自适应内容,但app:layout_constraintWidth_min="120dp"保证宽度至少为 120dp(即使文字很短也不会窄于 120dp)。
4. 右上角 TextView
xml
ini
<TextView
    android:layout_width="wrap_content"
    android:layout_height="wrap_content"
    app:layout_constraintWidth_min="120dp"
    android:text="右上角"
    android:gravity="center"
    android:textSize="32sp"
    android:background="@color/color_1"
    app:layout_constraintEnd_toEndOf="parent"  <!-- 右边缘与根布局右边缘对齐 -->
app:layout_constraintTop_toTopOf="parent" /> <!-- 上边缘与根布局上边缘对齐 -->- 定位 :通过
End_toEndOf和Top_toTopOf约束,固定在屏幕右上角。 - 其他属性(尺寸、文字样式等)与左上角 TextView 一致。
5. 右下角 TextView
xml
ini
<TextView
    android:layout_width="wrap_content"
    android:layout_height="wrap_content"
    app:layout_constraintWidth_min="120dp"
    android:text="右下角"
    android:gravity="center"
    android:textSize="32sp"
    android:background="@color/color_8"
    app:layout_constraintEnd_toEndOf="parent"  <!-- 右边缘与根布局右边缘对齐 -->
app:layout_constraintBottom_toBottomOf="parent" /> <!-- 下边缘与根布局下边缘对齐 -->- 定位 :通过
End_toEndOf和Bottom_toBottomOf约束,固定在屏幕右下角。
6. 左下角 TextView
xml
ini
<TextView
    android:layout_width="wrap_content"
    android:layout_height="wrap_content"
    app:layout_constraintWidth_min="120dp"
    android:text="左下角"
    android:gravity="center"
    android:textSize="32sp"
    android:background="@color/color_12"
    app:layout_constraintStart_toStartOf="parent"  <!-- 左边缘与根布局左边缘对齐 -->
app:layout_constraintBottom_toBottomOf="parent" /> <!-- 下边缘与根布局下边缘对齐 -->- 定位 :通过
Start_toStartOf和Bottom_toBottomOf约束,固定在屏幕左下角。
7. 中间位置 TextView
xml
xml
<TextView
    android:layout_width="wrap_content"
    android:layout_height="wrap_content"
    app:layout_constraintWidth_min="120dp"
    android:text="中间位置"
    android:gravity="center"
    android:textSize="32sp"
    android:background="@color/color_10"
    app:layout_constraintTop_toTopOf="parent"    <!-- 上边缘与根布局上边缘对齐 -->
    app:layout_constraintEnd_toEndOf="parent"    <!-- 右边缘与根布局右边缘对齐 -->
    app:layout_constraintStart_toStartOf="parent"  <!-- 左边缘与根布局左边缘对齐 -->
app:layout_constraintBottom_toBottomOf="parent" /> <!-- 下边缘与根布局下边缘对齐 -->- 定位:同时约束了上下左右四个方向与根布局对齐,因此会被 "拉" 到屏幕正中心。
- 原理:上下约束使控件在垂直方向居中,左右约束使控件在水平方向居中,最终整体位于屏幕中心。
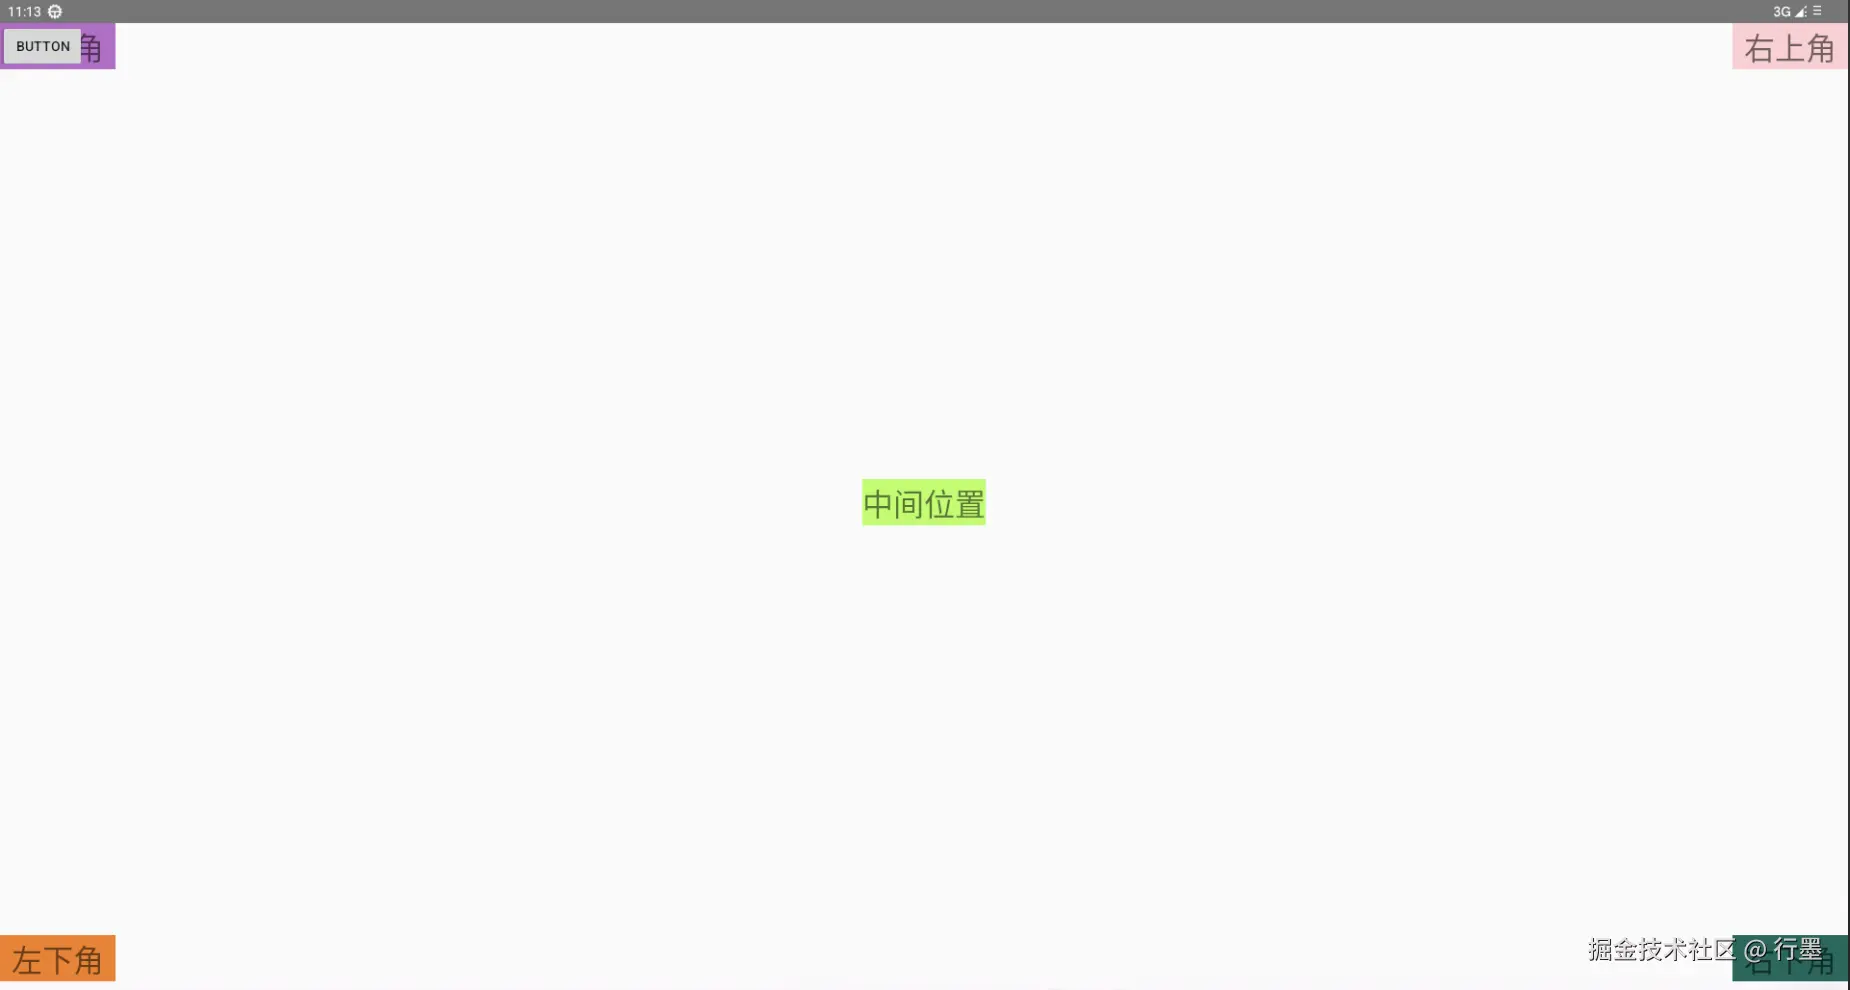
布局效果总结
- 屏幕四个角落分别有一个带背景色的 TextView,文字分别为 "左上角""右上角""右下角""左下角"。
- 屏幕正中心有一个 TextView,文字为 "中间位置"。
- Button 由于仅使用
tools:属性,实际运行时会默认显示在屏幕左上角(0,0 位置),需补充真实约束才能正确定位。
这种布局方式充分利用了 ConstraintLayout 的相对定位特性,通过简单的约束关系即可实现控件在屏幕关键位置的精确定位,且布局层级扁平(仅一层),性能优于嵌套布局。