[二、构建 Nginx 镜像](#二、构建 Nginx 镜像)
[三、Docker Compose 配置](#三、Docker Compose 配置)
[五、nginx.conf 配置](#五、nginx.conf 配置)
[docker compose安装步骤](#docker compose安装步骤)
前言
在现代微服务和容器化环境中,通过 Docker 部署 Nginx 并启用 HTTPS 已成为常见需求。本文将详细介绍从零搭建、配置自签证书到访问的完整流程,并提供可执行的命令示例。
一、目录结构设计
项目目录为 /opt/compose_nginx/,建议结构如下:
/opt/compose_nginx/
├─ docker-compose.yml      # Docker Compose 配置
├─ nginx/                  # Dockerfile 或 Nginx 源码
├─ nginx.conf              # 自定义 Nginx 配置文件
├─ ssl/                    # 存放证书
│  ├─ private/
│  └─ certs/
└─ wwwroot/                # 网站根目录
这种结构清晰区分了配置、证书和网页内容,并方便通过挂载保持数据持久化。
二、构建 Nginx 镜像
如果希望自定义编译 Nginx 并启用 SSL 模块,可以使用 Dockerfile:
#创建必要的文件夹以及配置文件
mkdir -p /opt/compose_nginx/nginx
mkdir -p /opt/compose_nginx/ssl/private
mkdir -p /opt/compose_nginx/ssl/certs
mkdir -p /opt/compose_nginx/wwwroot
cd /opt/compose_nginx/nginx
cp /etc/yum.repo.d/C* ./
cp /opt/nginx-1.20.2.tar.gz ./
touch /opt/compose_nginx/nginx.conf
echo "<h1>this is test web</h1>" > /opt/compose_nginx/wwwroot/index.html
-----------------------------------------------------------------------------
vim Dockerfile
FROM centos:7
MAINTAINER this is nginx image
RUN rm -rf /etc/yum.repos.d/*
ADD CentOS-Base.repo /etc/yum.repos.d/
RUN yum clean all && yum makecache && \
yum install -y pcre-devel zlib-devel gcc gcc-c++ make openssl-devel && \
useradd -M -s /sbin/nologin nginx
ADD nginx-1.20.2.tar.gz /opt
WORKDIR /opt/nginx-1.20.2
RUN ./configure \
--prefix=/usr/local/nginx \
--user=nginx \
--group=nginx \
--with-http_stub_status_module \
--with-http_ssl_module && \
make && make install
ENV PATH /usr/local/nginx/sbin:$PATH
EXPOSE 80
EXPOSE 443
RUN echo "daemon off;" >> /usr/local/nginx/conf/nginx.conf
ADD run.sh /run.sh
RUN chmod 755 /run.sh
CMD ["/run.sh"]
------------------------------------------------------------------
vim run.sh
#!/bin/bash
/usr/local/nginx/sbin/nginx如果使用官方
nginx:latest镜像,可以省略编译步骤,直接挂载配置即可。
三、Docker Compose 配置
cd /opt/compose_nginx
vim docker-compose.yml
version: '3'
services:
nginx:
container_name: web1
hostname: nginx
build:
context: ./nginx
dockerfile: Dockerfile
ports:
- 1216:80
- 1217:443
networks:
lnmp:
ipv4_address: 172.18.0.10
volumes:
- ./wwwroot:/usr/local/nginx/html
- ./nginx.conf:/usr/local/nginx/conf/nginx.conf
- ./ssl/private:/usr/local/nginx/ssl/private
- ./ssl/certs:/usr/local/nginx/ssl/certs
networks:
lnmp:
driver: bridge
ipam:
config:
- subnet: 172.18.0.0/24
--------------------------------------------------------------------------------
#这里写点东西以防启动报错,后面会改
vim nginx.conf
#user nobody;
worker_processes 1;
#error_log logs/error.log;
#error_log logs/error.log notice;
#error_log logs/error.log info;
#pid logs/nginx.pid;
events {
worker_connections 1024;
}
http {
include mime.types;
default_type application/octet-stream;
#log_format main '$remote_addr - $remote_user [$time_local] "$request" '
# '$status $body_bytes_sent "$http_referer" '
# '"$http_user_agent" "$http_x_forwarded_for"';
#access_log logs/access.log main;
sendfile on;
#tcp_nopush on;
#keepalive_timeout 0;
keepalive_timeout 65;
#gzip on;
server {
listen 80;
server_name localhost;
#charset koi8-r;
#access_log logs/host.access.log main;
location / {
root html;
index index.html index.htm;
}
#error_page 404 /404.html;
# redirect server error pages to the static page /50x.html
#
error_page 500 502 503 504 /50x.html;
location = /50x.html {
root html;
}
# proxy the PHP scripts to Apache listening on 127.0.0.1:80
#
#location ~ \.php$ {
# proxy_pass http://127.0.0.1;
#}
# pass the PHP scripts to FastCGI server listening on 127.0.0.1:9000
#
#location ~ \.php$ {
# root html;
# fastcgi_pass 127.0.0.1:9000;
# fastcgi_index index.php;
# fastcgi_param SCRIPT_FILENAME /scripts$fastcgi_script_name;
# include fastcgi_params;
#}
# deny access to .htaccess files, if Apache's document root
# concurs with nginx's one
#
#location ~ /\.ht {
# deny all;
#}
}
# another virtual host using mix of IP-, name-, and port-based configuration
#
#server {
# listen 8000;
# listen somename:8080;
# server_name somename alias another.alias;
# location / {
# root html;
# index index.html index.htm;
# }
#}
# HTTPS server
#
#server {
# listen 443 ssl;
# server_name localhost;
# ssl_certificate cert.pem;
# ssl_certificate_key cert.key;
# ssl_session_cache shared:SSL:1m;
# ssl_session_timeout 5m;
# ssl_ciphers HIGH:!aNULL:!MD5;
# ssl_prefer_server_ciphers on;
# location / {
# root html;
# index index.html index.htm;
# }
#}
}
daemon off;
--------------------------------------------------------------------
#执行命令,生成容器,注意先用docker pull centos:7,不然Dockerfile会报错
docker-compose -f docker-compose.yml up -d说明:
volumes保证网页目录、配置文件、证书挂载到容器,实现持久化
四、生成自签证书
#先进入容器
docker exec -it web1 /bin/bash
#安装依赖包
yum install epel-release -y
yum install certbot python2-certbot-nginx -y
#生成密钥文件和证书签名请求
openssl genpkey -algorithm RSA -out /usr/local/nginx/ssl/private/nginx-selfsigned.key -pkeyopt rsa_keygen_bits:2048
openssl req -new -key /usr/local/nginx/ssl/private/nginx-selfsigned.key -out /usr/local/nginx/ssl/certs/nginx-selfsigned.csr
#生成自签名证书
openssl x509 -req -days 365 -in /usr/local/nginx/ssl/certs/nginx-selfsigned.csr -signkey /usr/local/nginx/ssl/private/nginx-selfsigned.key -out /usr/local/nginx/ssl/certs/nginx-selfsigned.crt五、nginx.conf 配置
注:该配置在宿主机上操作
#user nobody;
worker_processes 1;
#error_log logs/error.log;
#error_log logs/error.log notice;
#error_log logs/error.log info;
#pid logs/nginx.pid;
events {
worker_connections 1024;
}
http {
include mime.types;
default_type application/octet-stream;
#log_format main '$remote_addr - $remote_user [$time_local] "$request" '
# '$status $body_bytes_sent "$http_referer" '
# '"$http_user_agent" "$http_x_forwarded_for"';
#access_log logs/access.log main;
sendfile on;
#tcp_nopush on;
#keepalive_timeout 0;
keepalive_timeout 65;
#gzip on;
server {
listen 443 ssl;
server_name localhost;
ssl_certificate /usr/local/nginx/ssl/certs/nginx-selfsigned.crt;
ssl_certificate_key /usr/local/nginx/ssl/private/nginx-selfsigned.key;
ssl_protocols TLSv1.2 TLSv1.3;
ssl_ciphers 'TLS_AES_128_GCM_SHA256:TLS_AES_256_GCM_SHA384:ECDHE-RSA-AES128-GCM-SHA256:ECDHE-RSA-AES256-GCM-SHA384';
ssl_prefer_server_ciphers on;
#access_log logs/host.access.log main;
location / {
root html;
index index.html index.htm;
}
#error_page 404 /404.html;
# redirect server error pages to the static page /50x.html
#
error_page 500 502 503 504 /50x.html;
location = /50x.html {
root html;
}
# proxy the PHP scripts to Apache listening on 127.0.0.1:80
#
#location ~ \.php$ {
# proxy_pass http://127.0.0.1;
#}
# pass the PHP scripts to FastCGI server listening on 127.0.0.1:9000
#
#location ~ \.php$ {
# root html;
# fastcgi_pass 127.0.0.1:9000;
# fastcgi_index index.php;
# fastcgi_param SCRIPT_FILENAME /scripts$fastcgi_script_name;
# include fastcgi_params;
#}
# deny access to .htaccess files, if Apache's document root
# concurs with nginx's one
#
#location ~ /\.ht {
# deny all;
#}
}
# another virtual host using mix of IP-, name-, and port-based configuration
#
#server {
# listen 8000;
# listen somename:8080;
# server_name somename alias another.alias;
# location / {
# root html;
# index index.html index.htm;
# }
#}
# HTTPS server
#
#server {
# listen 443 ssl;
# server_name localhost;
# ssl_certificate cert.pem;
# ssl_certificate_key cert.key;
# ssl_session_cache shared:SSL:1m;
# ssl_session_timeout 5m;
# ssl_ciphers HIGH:!aNULL:!MD5;
# ssl_prefer_server_ciphers on;
# location / {
# root html;
# index index.html index.htm;
# }
#}
}
daemon off;注意事项:
- 使用挂载的证书路径,保证容器重启不会丢失
六、启动与验证
检查挂载是否生效:
docker inspect web1 | grep -A 10 Mounts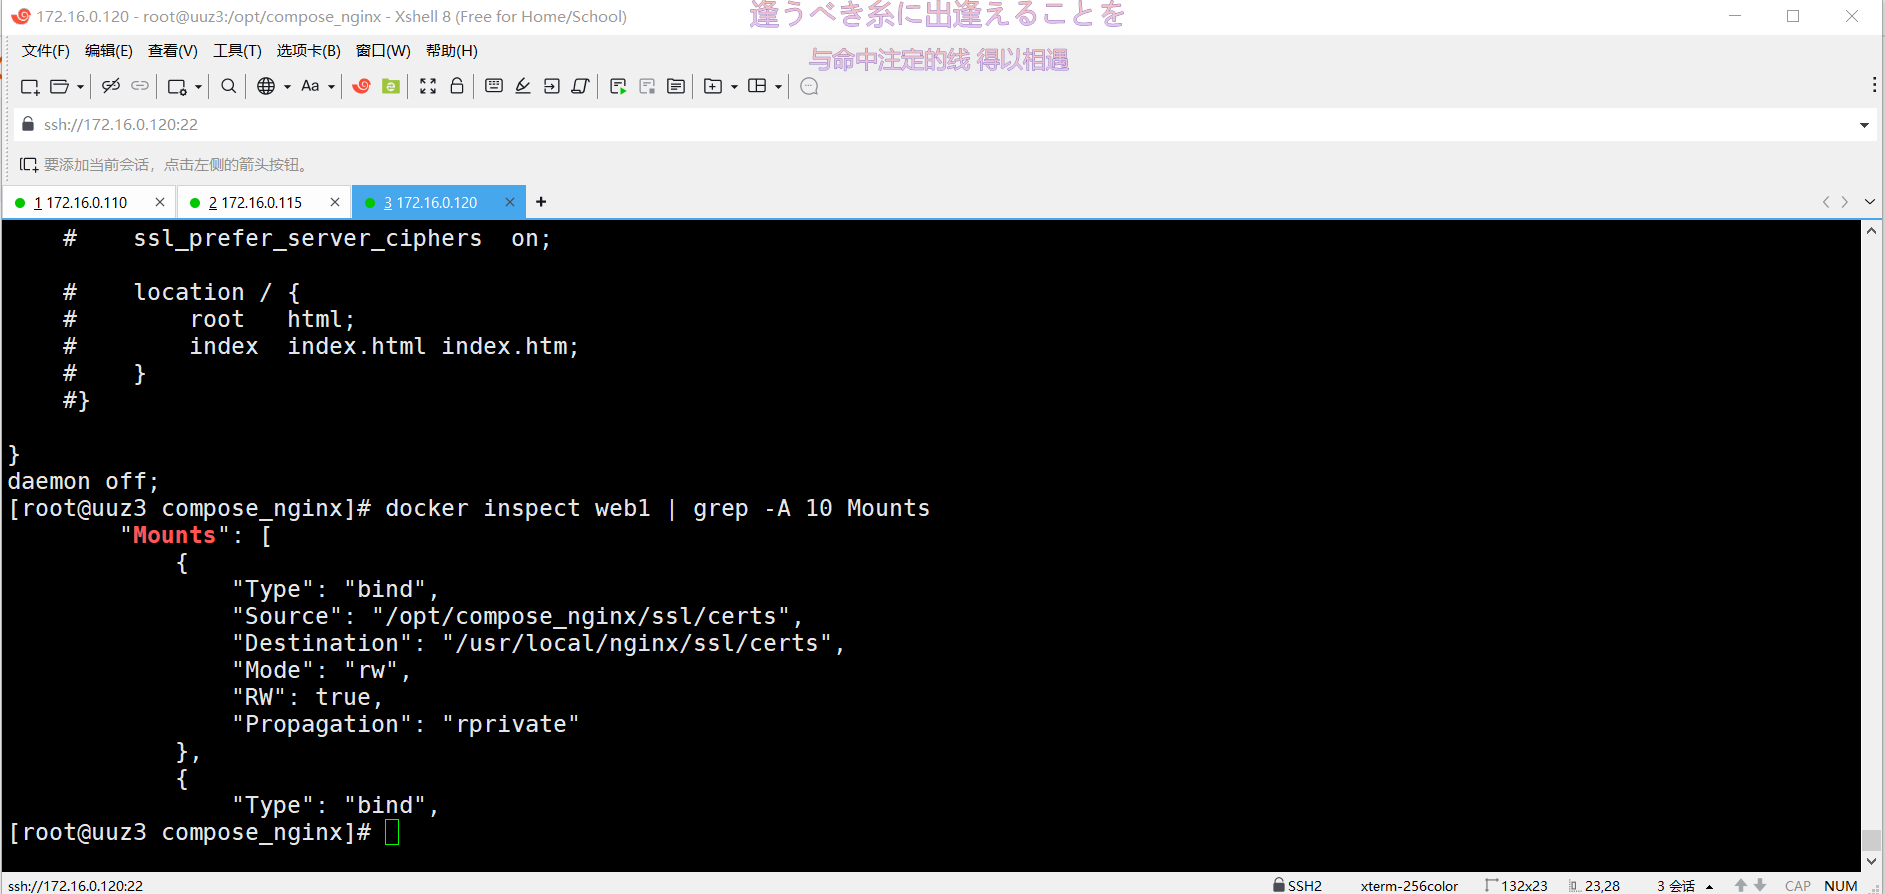
重载 Nginx 配置:
docker-compose down
docker-compose up -d访问网站:
https://宿主机IP:1217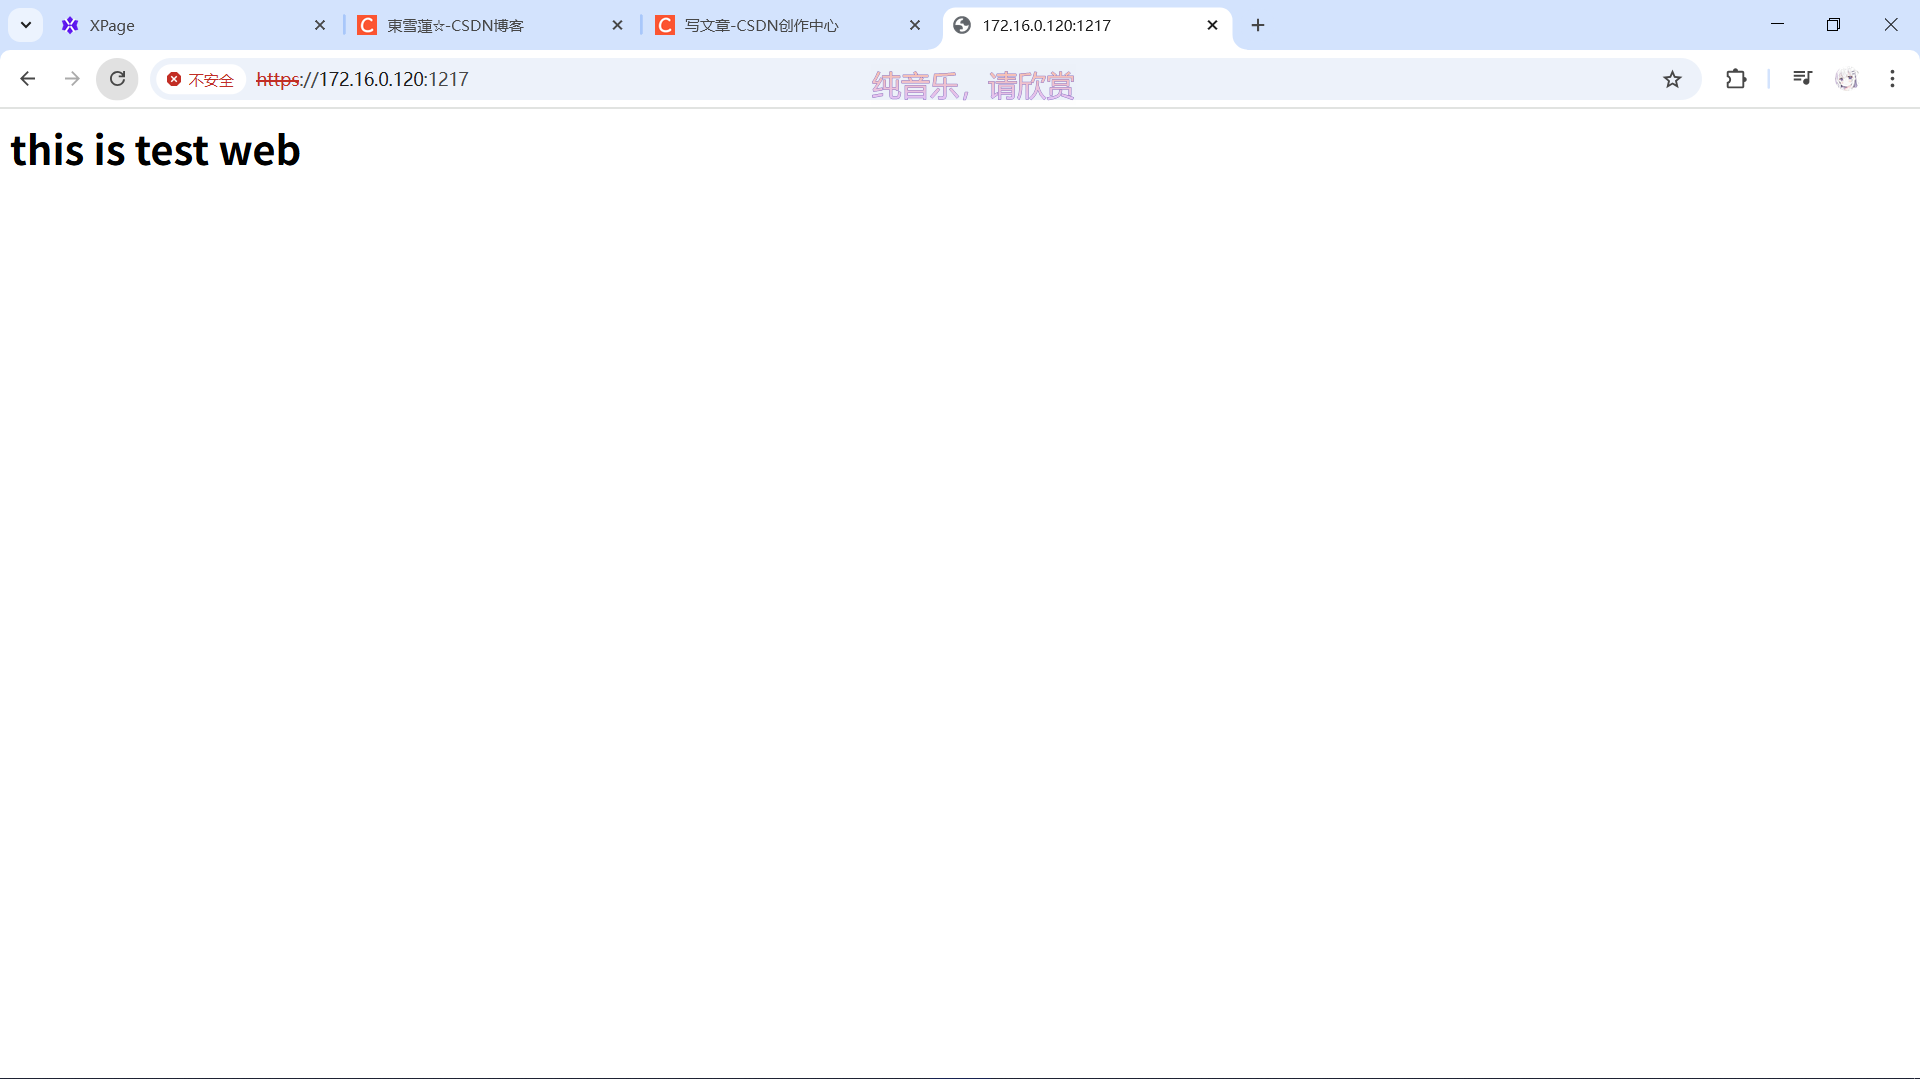
- HTTPS → 自签证书会提示浏览器安全警告,可忽略
七、总结
-
挂载配置、证书和网站目录,容器重启不丢失数据
-
宿主机修改配置或证书,只需 Nginx reload
-
生成自签证书可以在宿主机或容器内完成,但挂载到宿主机更安全
-
Docker Compose volume 修改后,必须重建容器才能生效
八、附录
docker安装步骤
#安装依赖包
yum install -y yum-utils device-mapper-persistent-data lvm2
#设置阿里云镜像源
yum-config-manager --add-repo https://mirrors.aliyun.com/docker-ce/linux/centos/docker-ce.repo
#安装Docker-CE
yum install -y docker-ce docker-ce-cli containerd.io
注意:如果是指定版本docker-ce-20.10.3
如:yum install -y docker-ce-20.10.3 docker-ce-cli-20.10.3 containerd.io
systemctl start docker.servicedocker compose安装步骤
#下载
curl -L https://github.com/docker/compose/releases/download/1.21.1/docker-compose-`uname -s`-`uname -m` -o /usr/local/bin/docker-compose
#安装
chmod +x /usr/local/bin/docker-compose
#查看版本
docker-compose --version