Introduction to drawing in Compose
全面了解如何在 Compose 中绘制自定义内容。
1. Introduction to drawing in Compose
当内置组件不能完全满足应用需求时,自定义绘图很有用。
drawBehind
drawBehind 允许我们在 Composables 内容后面绘制内容。例如:
kotlin
Spacer(
    modifier = Modifier
        .fillMaxSize()
        .drawBehind({
            // this = DrawScope
            drawCircle(Color.Magenta)
        })
)
kotlin
@Composable
@NonRestartableComposable
fun Spacer(modifier: Modifier) {
    Layout(measurePolicy = SpacerMeasurePolicy, modifier = modifier)
}
2. What is DrawScope?
DrawScope 接口部分源码:
kotlin
@DrawScopeMarker
@JvmDefaultWithCompatibility
interface DrawScope : Density {

    val drawContext: DrawContext

    val center: Offset
        get() = drawContext.size.center

    val size: Size
        get() = drawContext.size

    val layoutDirection: LayoutDirection

    fun drawLine(
        brush: Brush,
        start: Offset,
        end: Offset,
        strokeWidth: Float = Stroke.HairlineWidth,
        cap: StrokeCap = Stroke.DefaultCap,
        pathEffect: PathEffect? = null,
        @FloatRange(from = 0.0, to = 1.0) alpha: Float = 1.0f,
        colorFilter: ColorFilter? = null,
        blendMode: BlendMode = DefaultBlendMode
    )

    fun drawRect(
        brush: Brush,
        topLeft: Offset = Offset.Zero,
        size: Size = this.size.offsetSize(topLeft),
        @FloatRange(from = 0.0, to = 1.0) alpha: Float = 1.0f,
        style: DrawStyle = Fill,
        colorFilter: ColorFilter? = null,
        blendMode: BlendMode = DefaultBlendMode
    )

    fun drawImage(
        image: ImageBitmap,
        topLeft: Offset = Offset.Zero,
        @FloatRange(from = 0.0, to = 1.0) alpha: Float = 1.0f,
        style: DrawStyle = Fill,
        colorFilter: ColorFilter? = null,
        blendMode: BlendMode = DefaultBlendMode
    )

    @Deprecated(
        "Prefer usage of drawImage that consumes an optional FilterQuality parameter",
        level = DeprecationLevel.HIDDEN,
        replaceWith = ReplaceWith(
            "drawImage(image, srcOffset, srcSize, dstOffset, dstSize, alpha, style, " +
                "colorFilter, blendMode, FilterQuality.Low)",
            "androidx.compose.ui.graphics.drawscope",
            "androidx.compose.ui.graphics.FilterQuality"
        )
    ) // Binary API compatibility.
    fun drawImage(
        image: ImageBitmap,
        srcOffset: IntOffset = IntOffset.Zero,
        srcSize: IntSize = IntSize(image.width, image.height),
        dstOffset: IntOffset = IntOffset.Zero,
        dstSize: IntSize = srcSize,
        @FloatRange(from = 0.0, to = 1.0) alpha: Float = 1.0f,
        style: DrawStyle = Fill,
        colorFilter: ColorFilter? = null,
        blendMode: BlendMode = DefaultBlendMode
    )


    fun drawImage(
        image: ImageBitmap,
        srcOffset: IntOffset = IntOffset.Zero,
        srcSize: IntSize = IntSize(image.width, image.height),
        dstOffset: IntOffset = IntOffset.Zero,
        dstSize: IntSize = srcSize,
        @FloatRange(from = 0.0, to = 1.0) alpha: Float = 1.0f,
        style: DrawStyle = Fill,
        colorFilter: ColorFilter? = null,
        blendMode: BlendMode = DefaultBlendMode,
        filterQuality: FilterQuality = DefaultFilterQuality
    ) {
        drawImage(
            image = image,
            srcOffset = srcOffset,
            srcSize = srcSize,
            dstOffset = dstOffset,
            dstSize = dstSize,
            alpha = alpha,
            style = style,
            colorFilter = colorFilter,
            blendMode = blendMode
        )
    }

    fun drawRoundRect(
        brush: Brush,
        topLeft: Offset = Offset.Zero,
        size: Size = this.size.offsetSize(topLeft),
        cornerRadius: CornerRadius = CornerRadius.Zero,
        @FloatRange(from = 0.0, to = 1.0) alpha: Float = 1.0f,
        style: DrawStyle = Fill,
        colorFilter: ColorFilter? = null,
        blendMode: BlendMode = DefaultBlendMode
    )

    fun drawCircle(
        brush: Brush,
        radius: Float = size.minDimension / 2.0f,
        center: Offset = this.center,
        @FloatRange(from = 0.0, to = 1.0) alpha: Float = 1.0f,
        style: DrawStyle = Fill,
        colorFilter: ColorFilter? = null,
        blendMode: BlendMode = DefaultBlendMode
    )

    fun drawOval(
        brush: Brush,
        topLeft: Offset = Offset.Zero,
        size: Size = this.size.offsetSize(topLeft),
        @FloatRange(from = 0.0, to = 1.0) alpha: Float = 1.0f,
        style: DrawStyle = Fill,
        colorFilter: ColorFilter? = null,
        blendMode: BlendMode = DefaultBlendMode
    )

    fun drawArc(
        brush: Brush,
        startAngle: Float,
        sweepAngle: Float,
        useCenter: Boolean,
        topLeft: Offset = Offset.Zero,
        size: Size = this.size.offsetSize(topLeft),
        @FloatRange(from = 0.0, to = 1.0) alpha: Float = 1.0f,
        style: DrawStyle = Fill,
        colorFilter: ColorFilter? = null,
        blendMode: BlendMode = DefaultBlendMode
    )

    fun drawPath(
        path: Path,
        color: Color,
        @FloatRange(from = 0.0, to = 1.0) alpha: Float = 1.0f,
        style: DrawStyle = Fill,
        colorFilter: ColorFilter? = null,
        blendMode: BlendMode = DefaultBlendMode
    )

    fun drawPoints(
        points: List<Offset>,
        pointMode: PointMode,
        color: Color,
        strokeWidth: Float = Stroke.HairlineWidth,
        cap: StrokeCap = StrokeCap.Butt,
        pathEffect: PathEffect? = null,
        @FloatRange(from = 0.0, to = 1.0) alpha: Float = 1.0f,
        colorFilter: ColorFilter? = null,
        blendMode: BlendMode = DefaultBlendMode
    )
    ...
}
3. Canvas Composable
如果我们想要一个简单的绘图,可以使用 Canvas Composable。
kotlin
Canvas(modifier = Modifier, onDraw = {

})
看源码可以发现,Canvas Composable 只是 drawBehind 的便捷包装。
kotlin
@Composable
fun Canvas(modifier: Modifier, onDraw: DrawScope.() -> Unit) =
    Spacer(modifier.drawBehind(onDraw))
4. Drawing Modifiers
Drawing in Compose
-
Modifier.drawBehind
-
Modifier.drawWithContent
-
Modifier.drawWithCache

DrawScope 上的所有绘图功能都为绘图命令的大小和位置设置了默认值,当我们需要更改它们时,可以轻松覆盖它们。
5. Coordinate System

使用像素为单位执行绘制和布局,而不是用 dp。
绘制调用也始终与父可组合项相关。 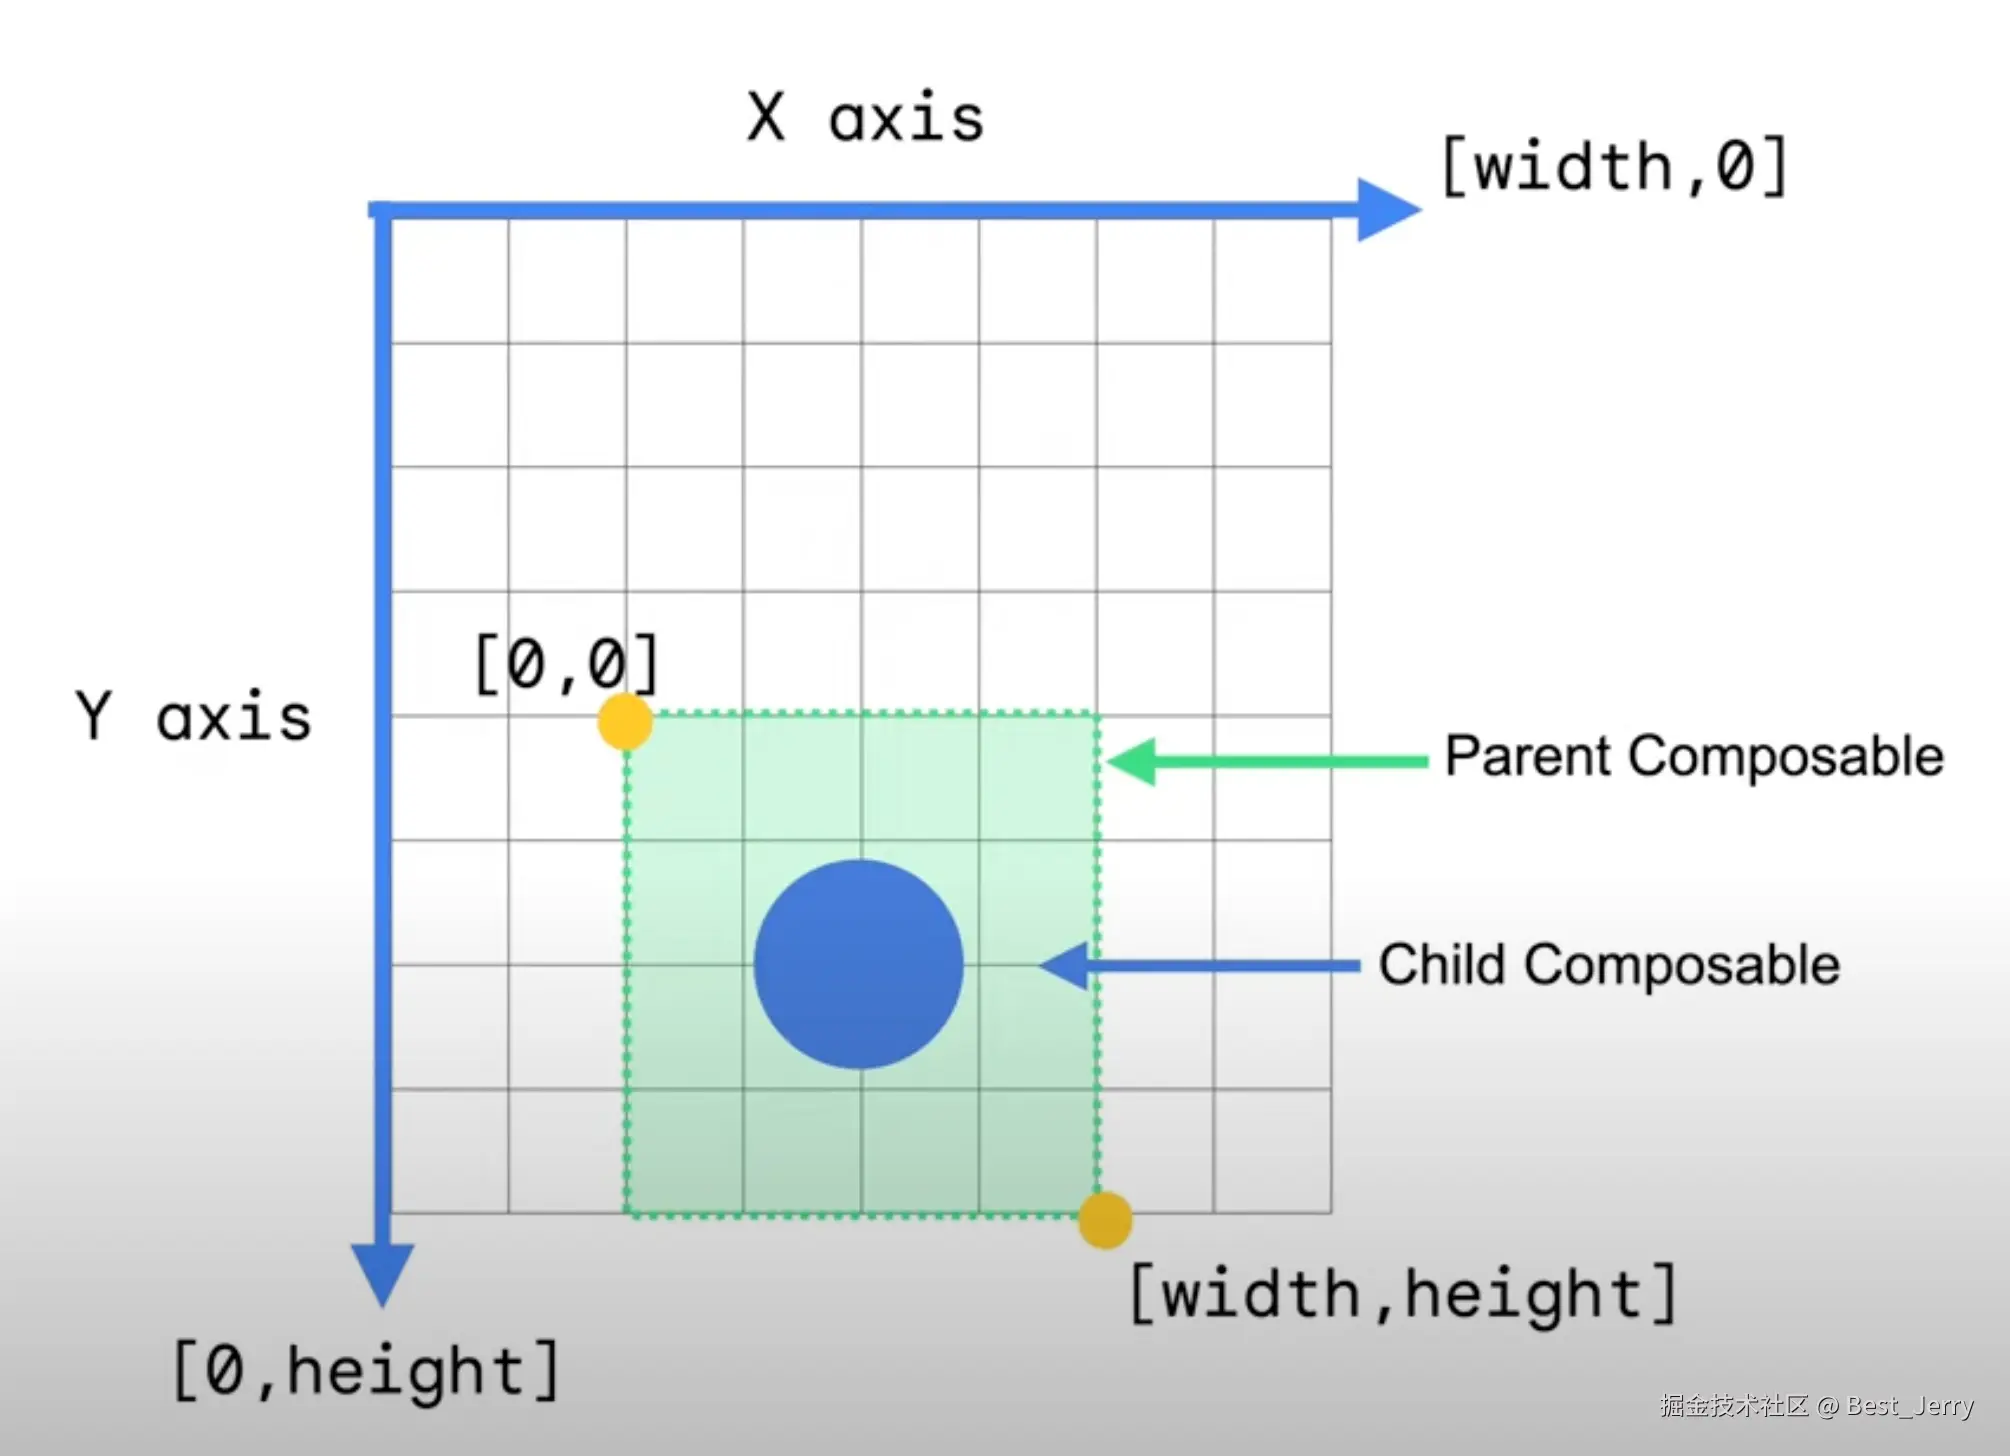
修改中心点的坐标: 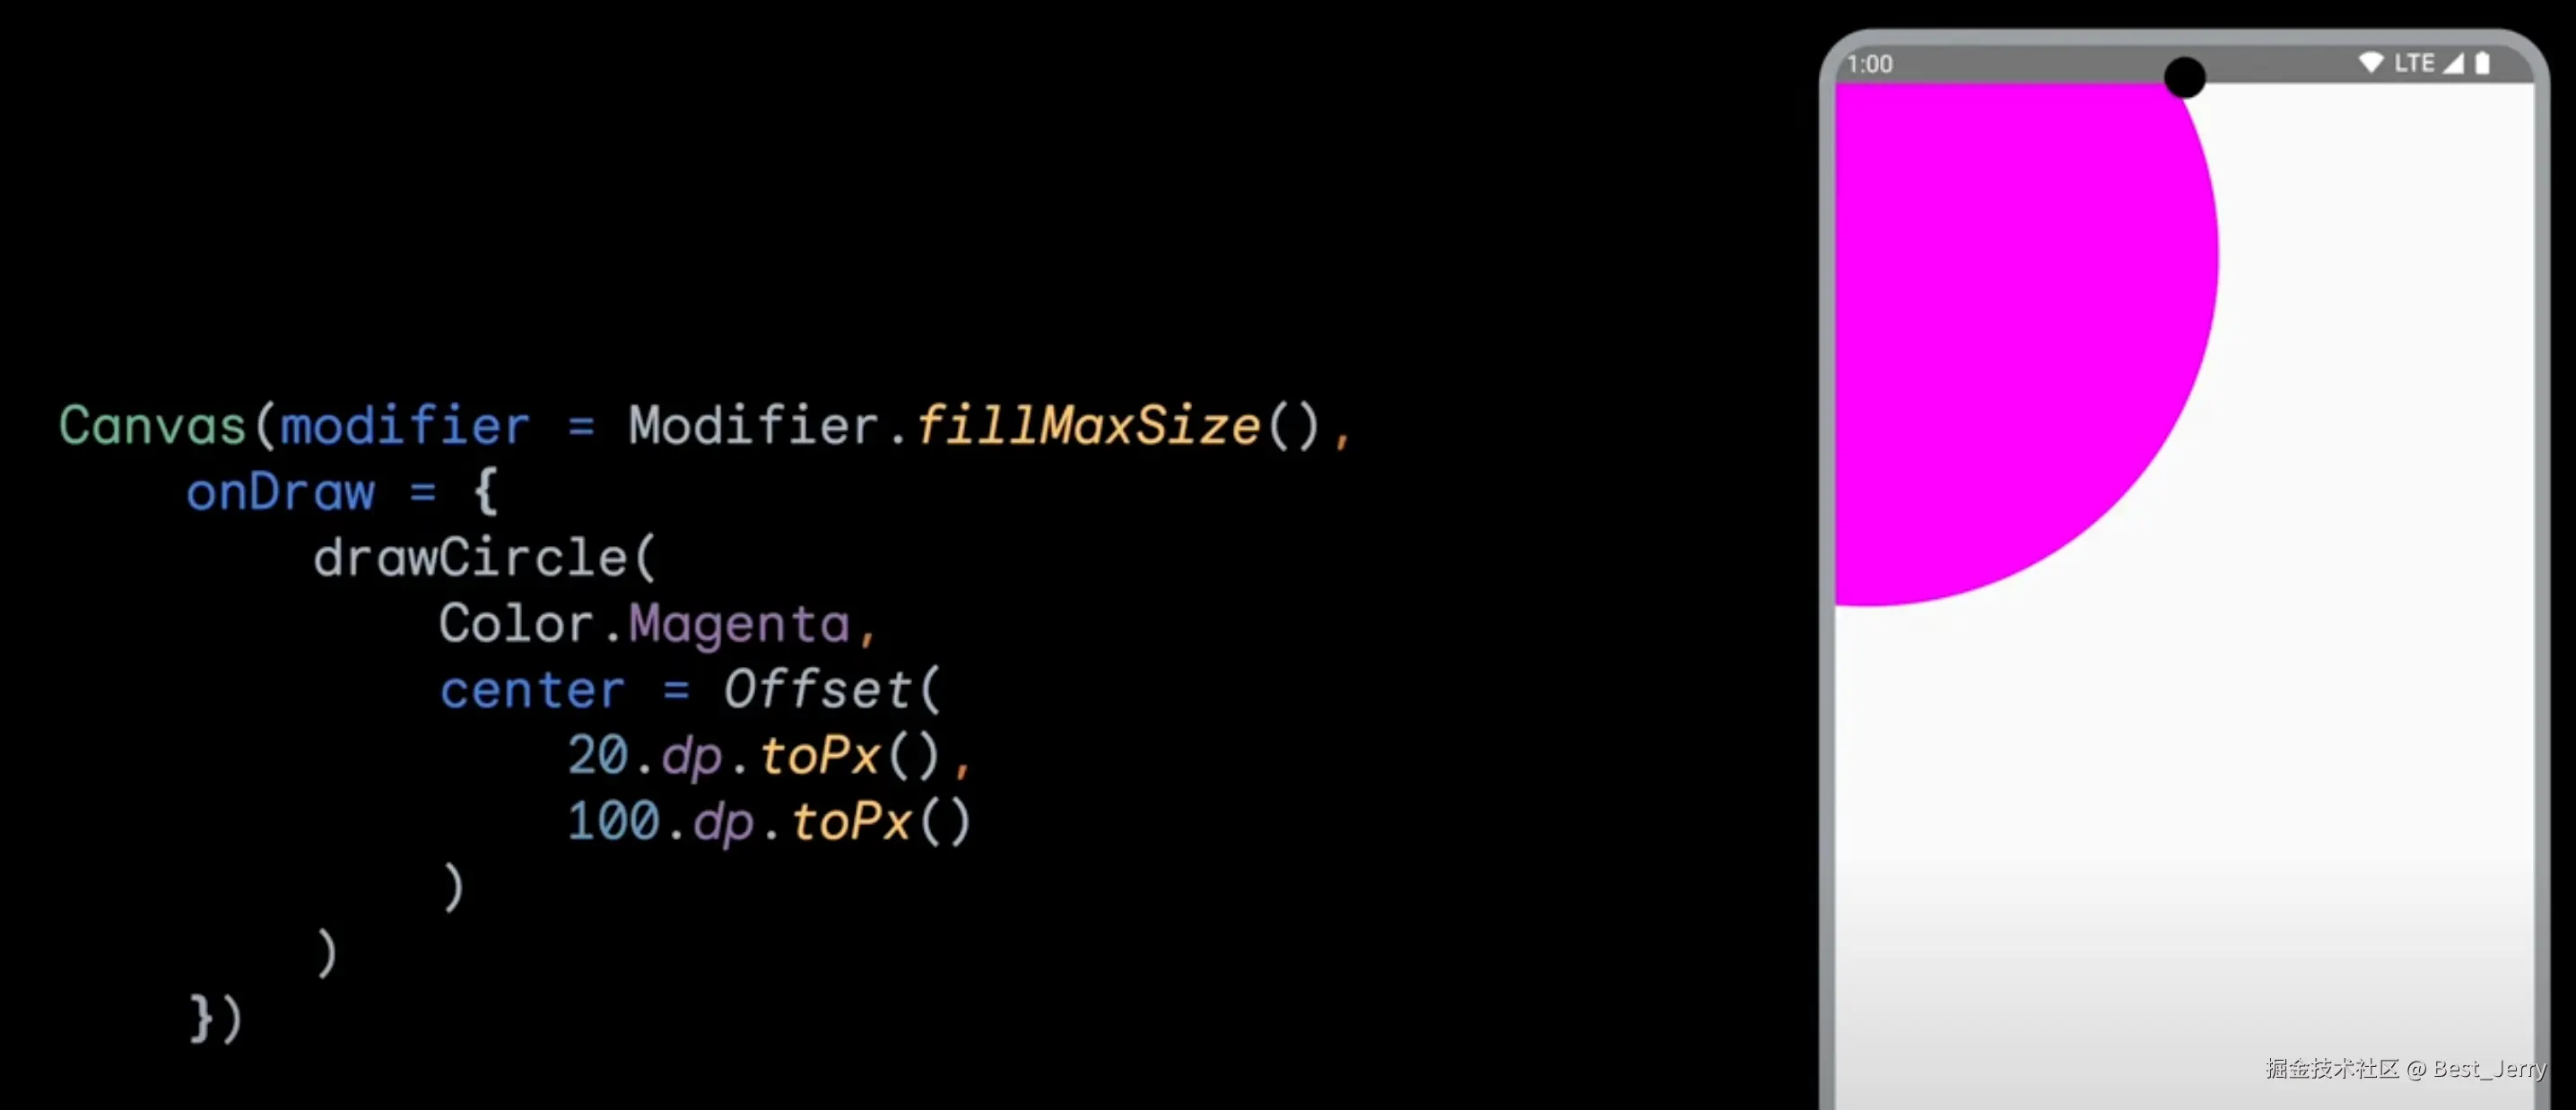
修改圆的半径: 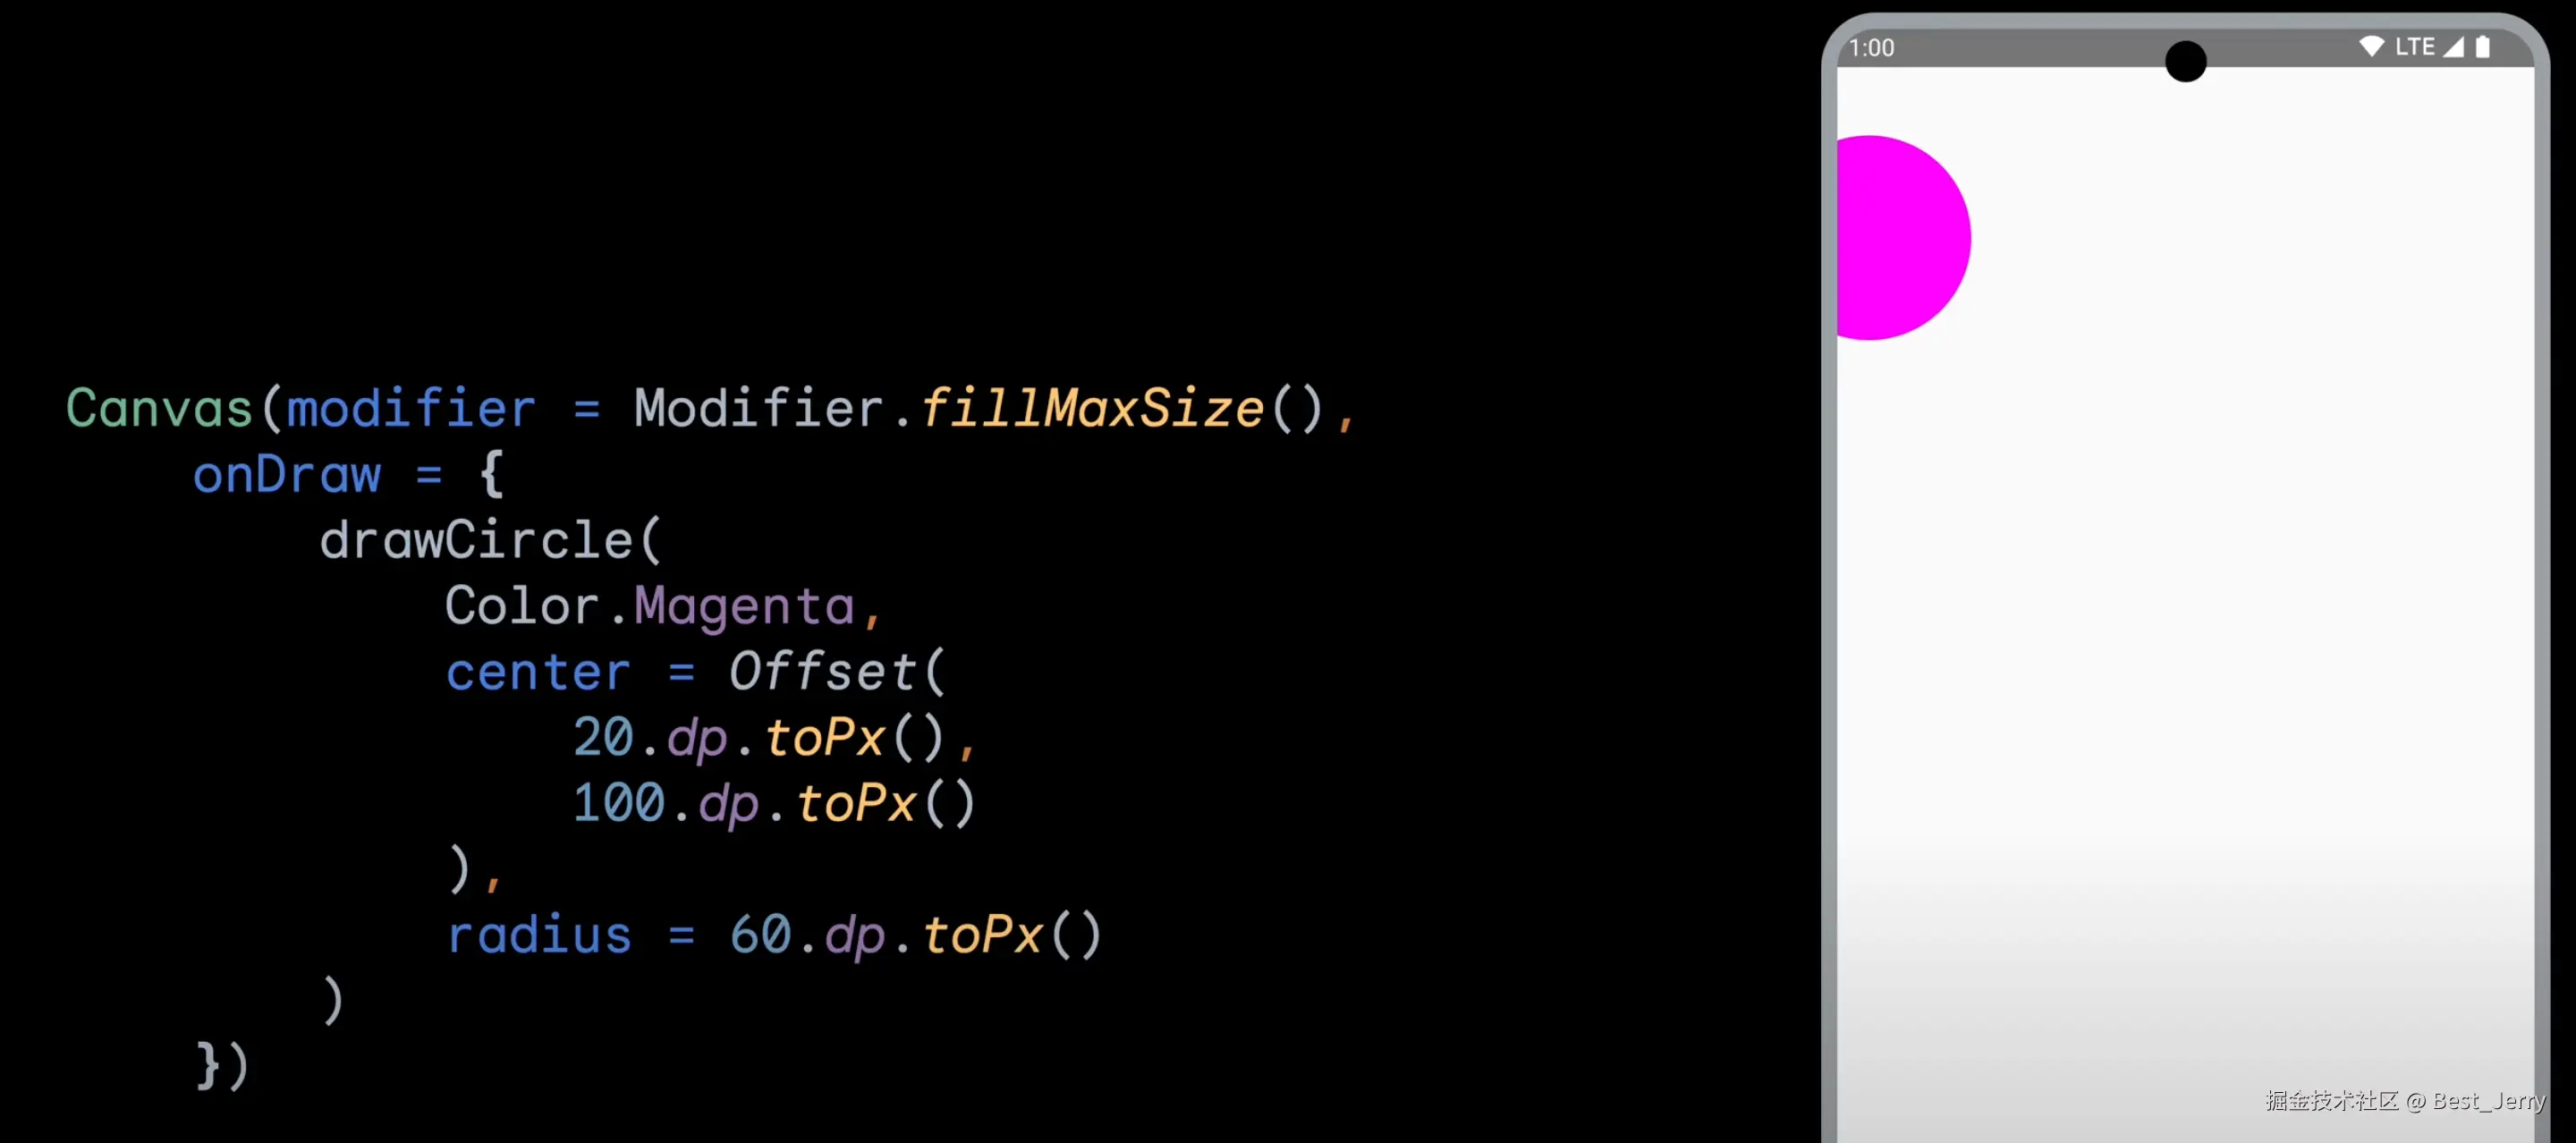
6. DrawScope Transformations
scale
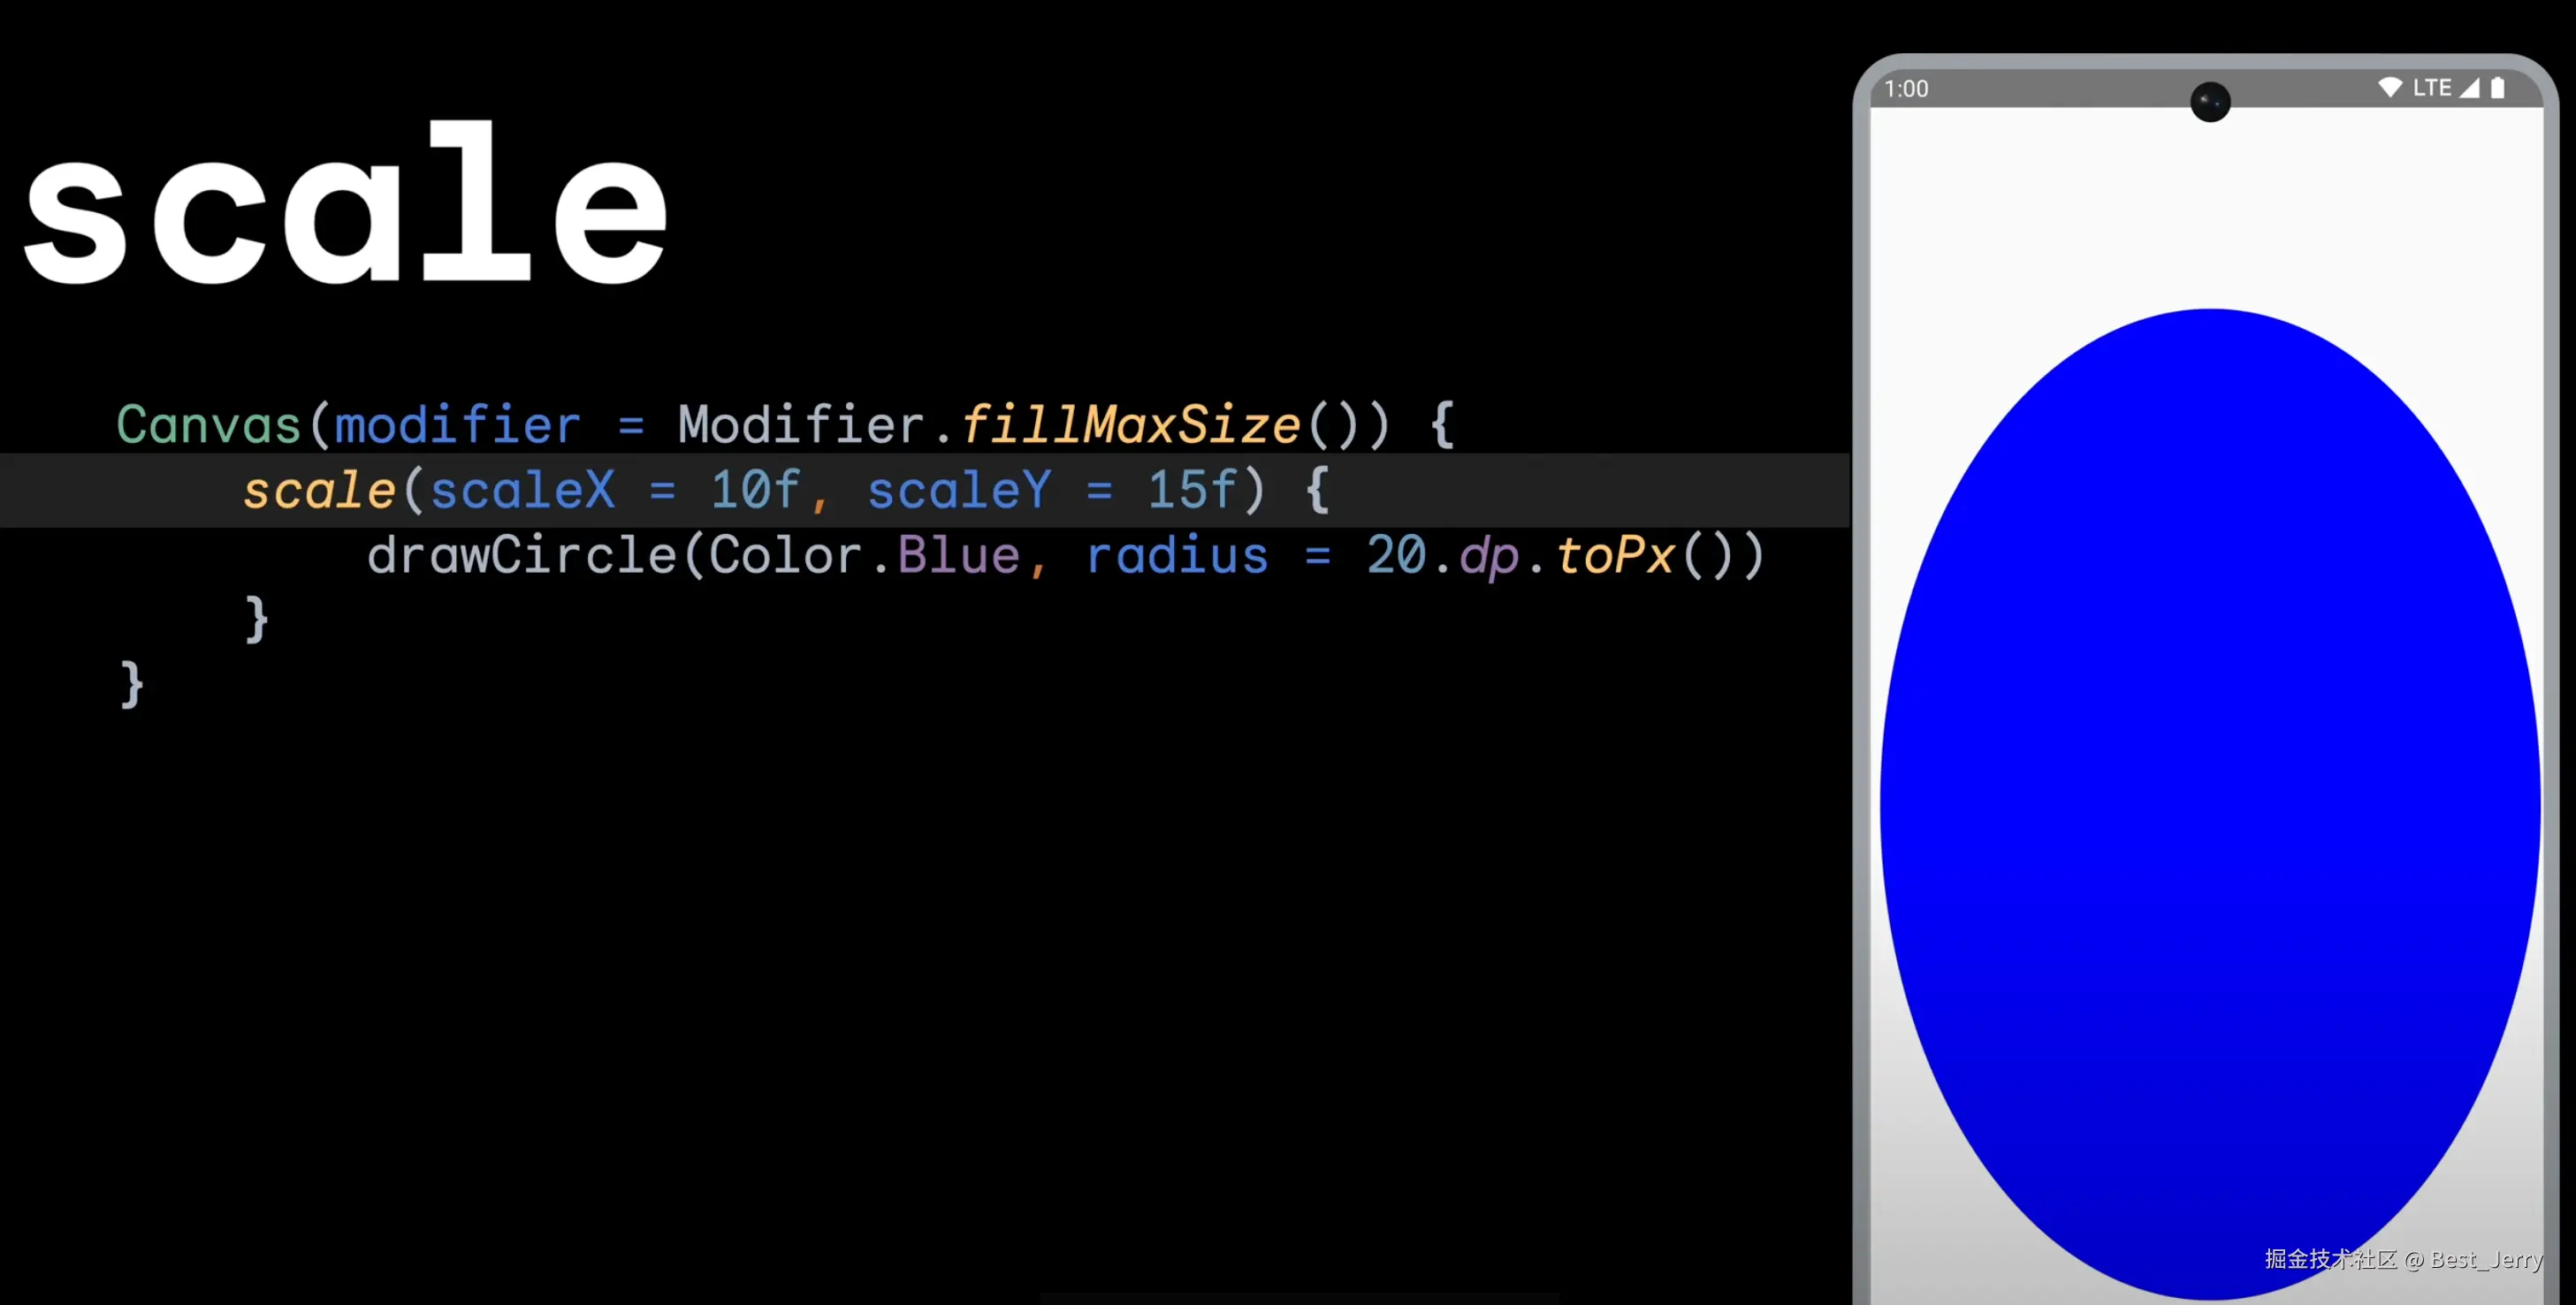
kotlin
inline fun DrawScope.scale(
    scaleX: Float,
    scaleY: Float,
    pivot: Offset = center,
    block: DrawScope.() -> Unit
) = withTransform({ scale(scaleX, scaleY, pivot) }, block)
translate
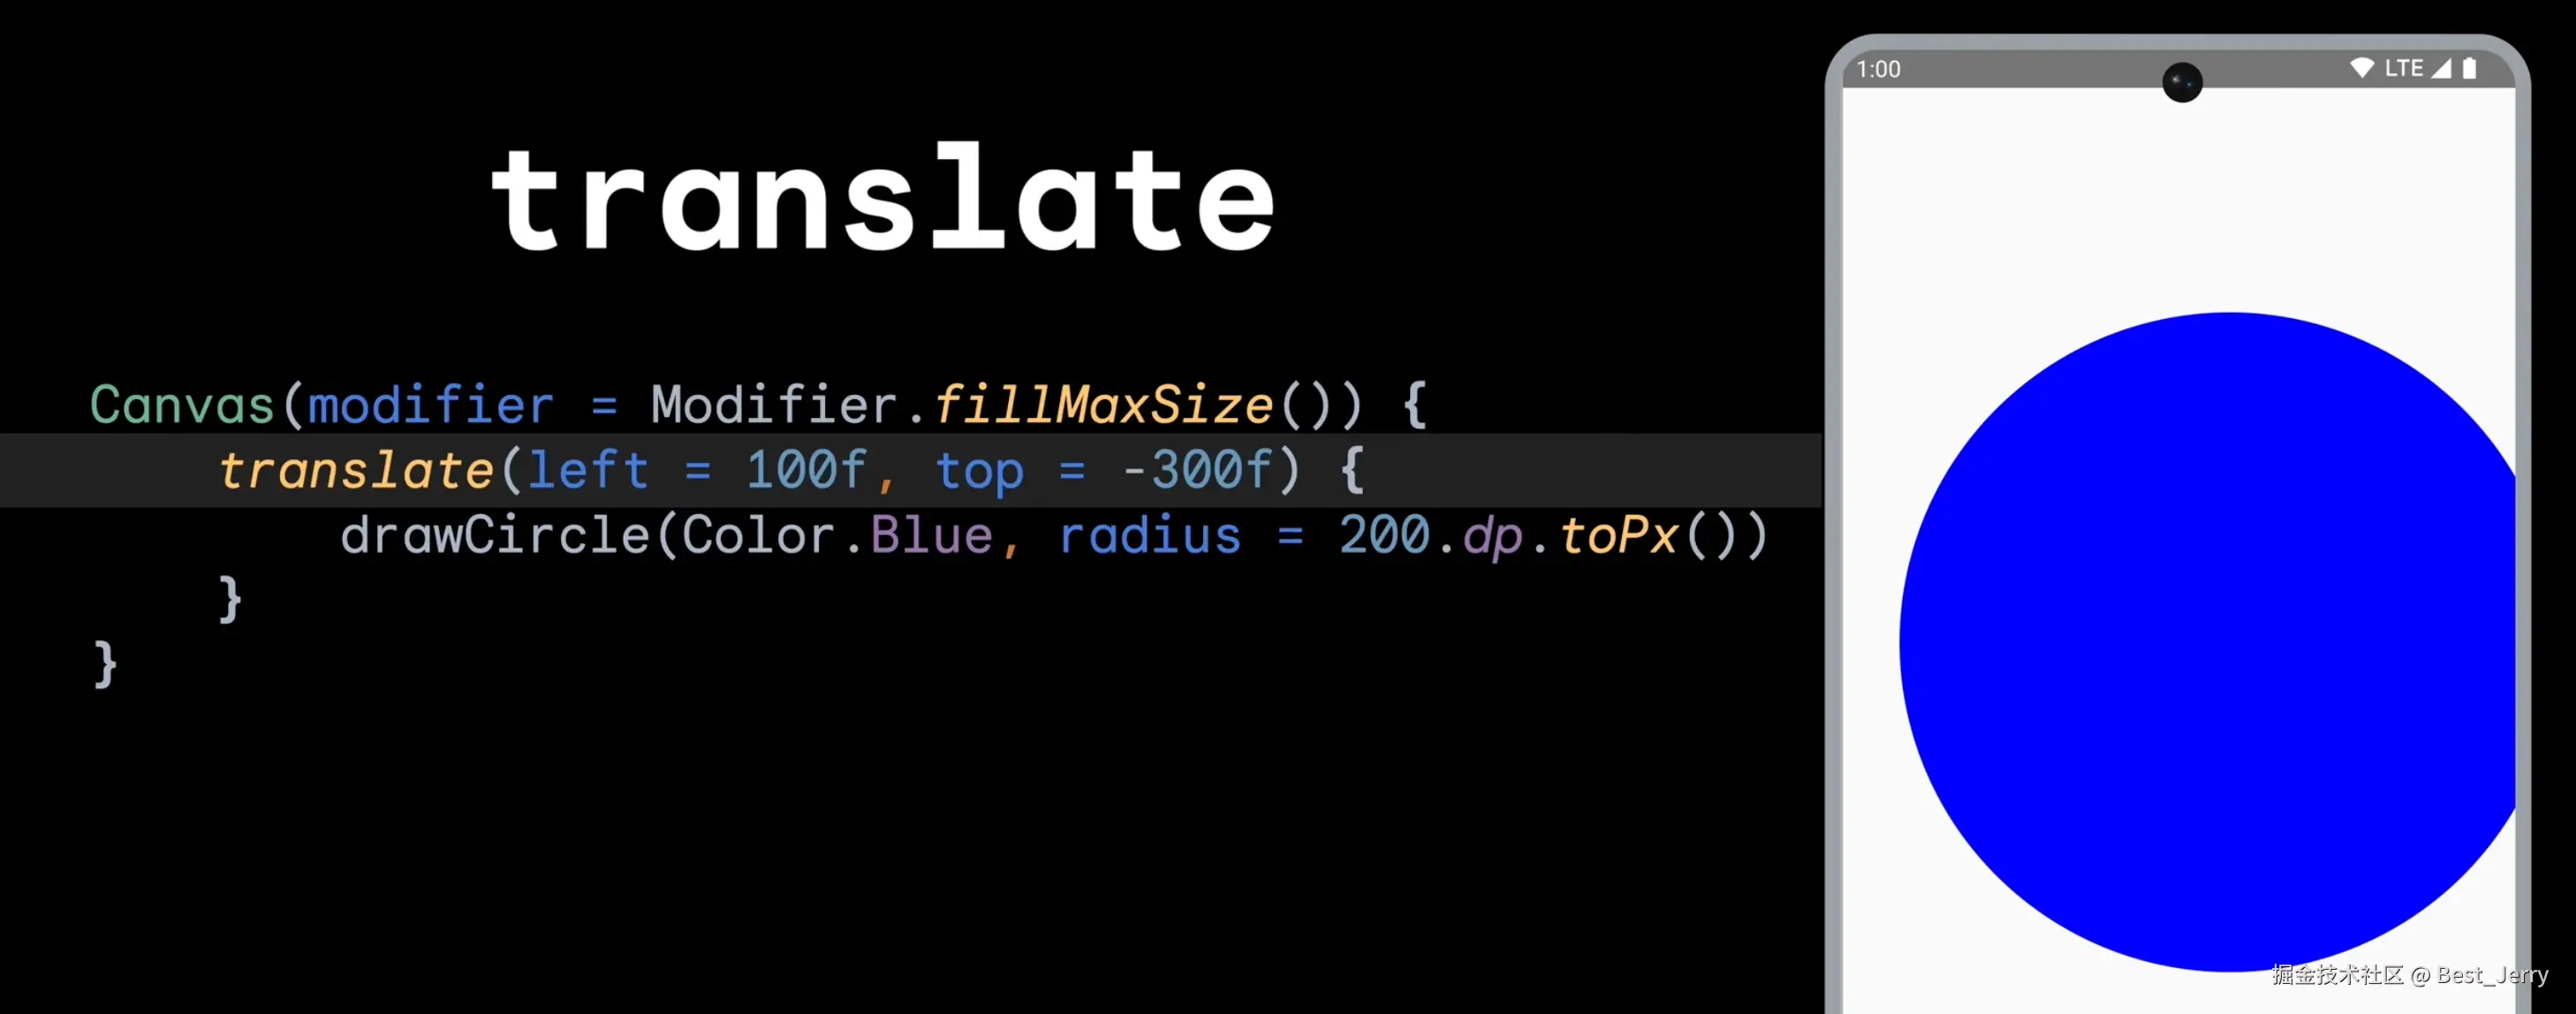
kotlin
inline fun DrawScope.translate(
    left: Float = 0.0f,
    top: Float = 0.0f,
    block: DrawScope.() -> Unit
) {
    drawContext.transform.translate(left, top)
    try {
        block()
    } finally {
        drawContext.transform.translate(-left, -top)
    }
}
rotate
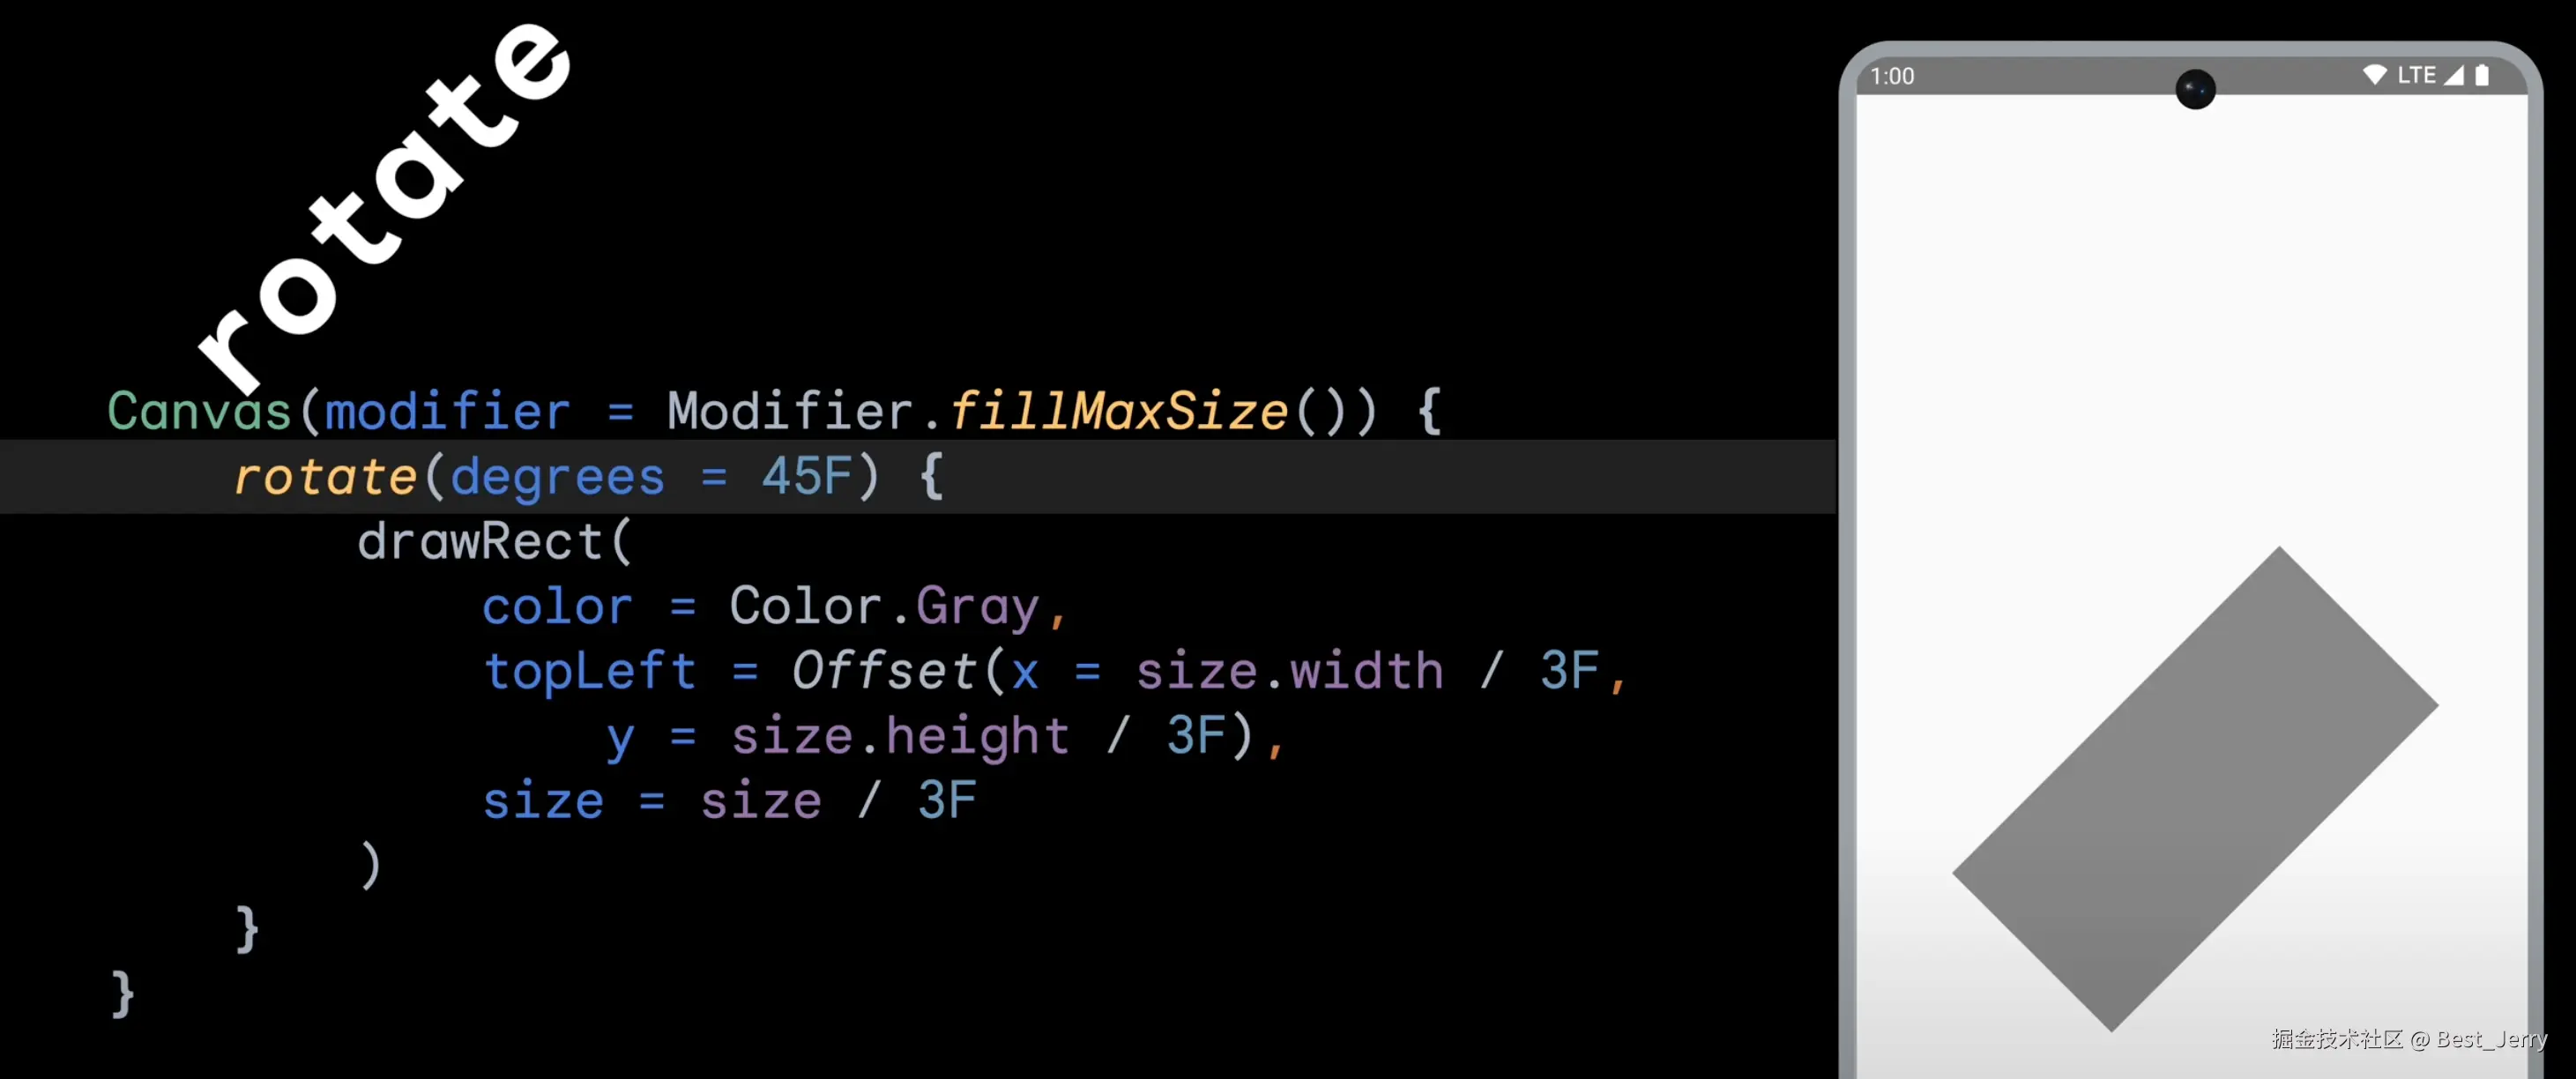
kotlin
inline fun DrawScope.rotate(
    degrees: Float,
    pivot: Offset = center,
    block: DrawScope.() -> Unit
) = withTransform({ rotate(degrees, pivot) }, block)
inset
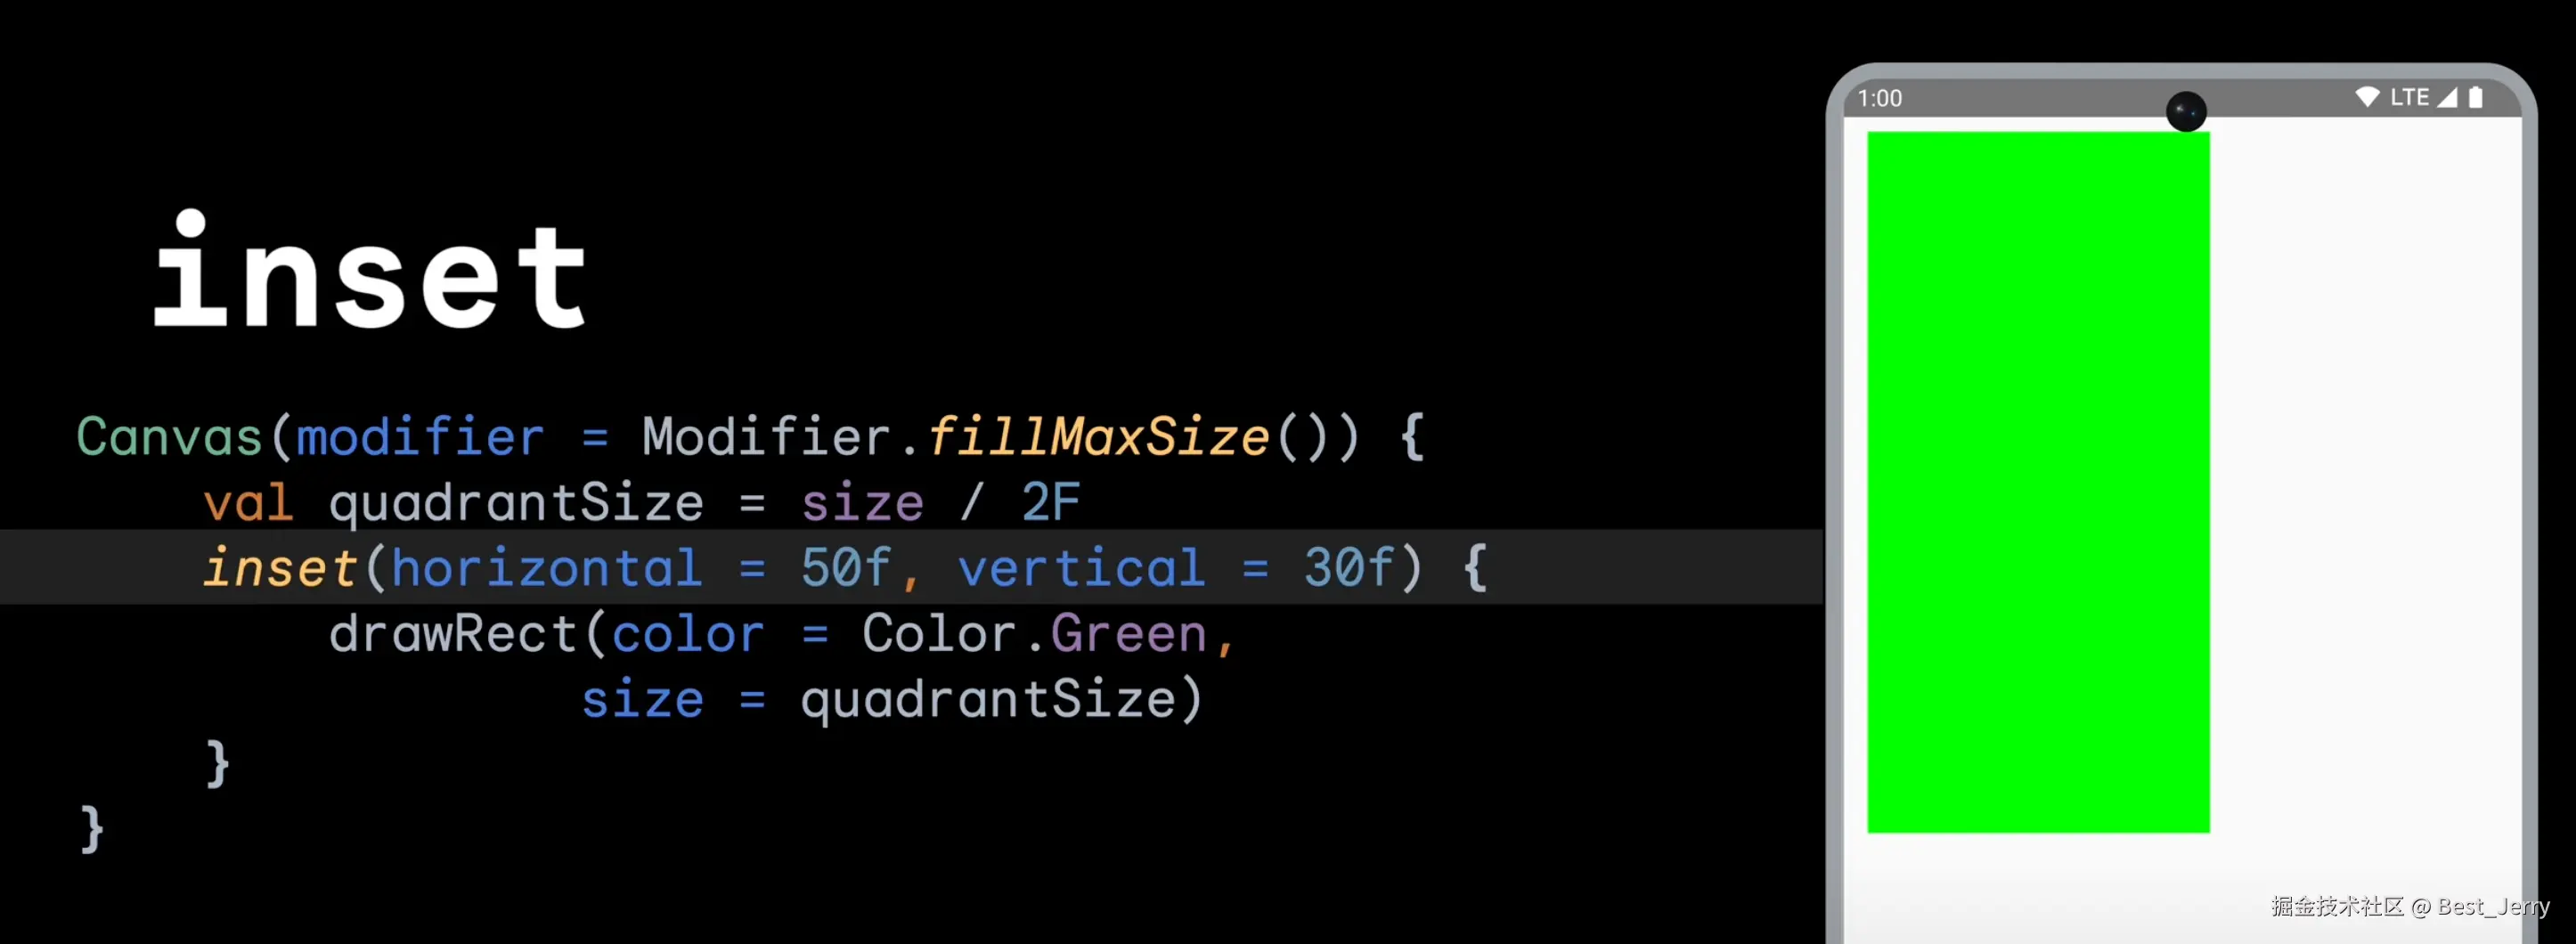
kotlin
inline fun DrawScope.inset(
left: Float,
top: Float,
right: Float,
bottom: Float,
block: DrawScope.() -> Unit
) {
drawContext.transform.inset(left, top, right, bottom)
try {
block()
} finally {
drawContext.transform.inset(-left, -top, -right, -bottom)
}
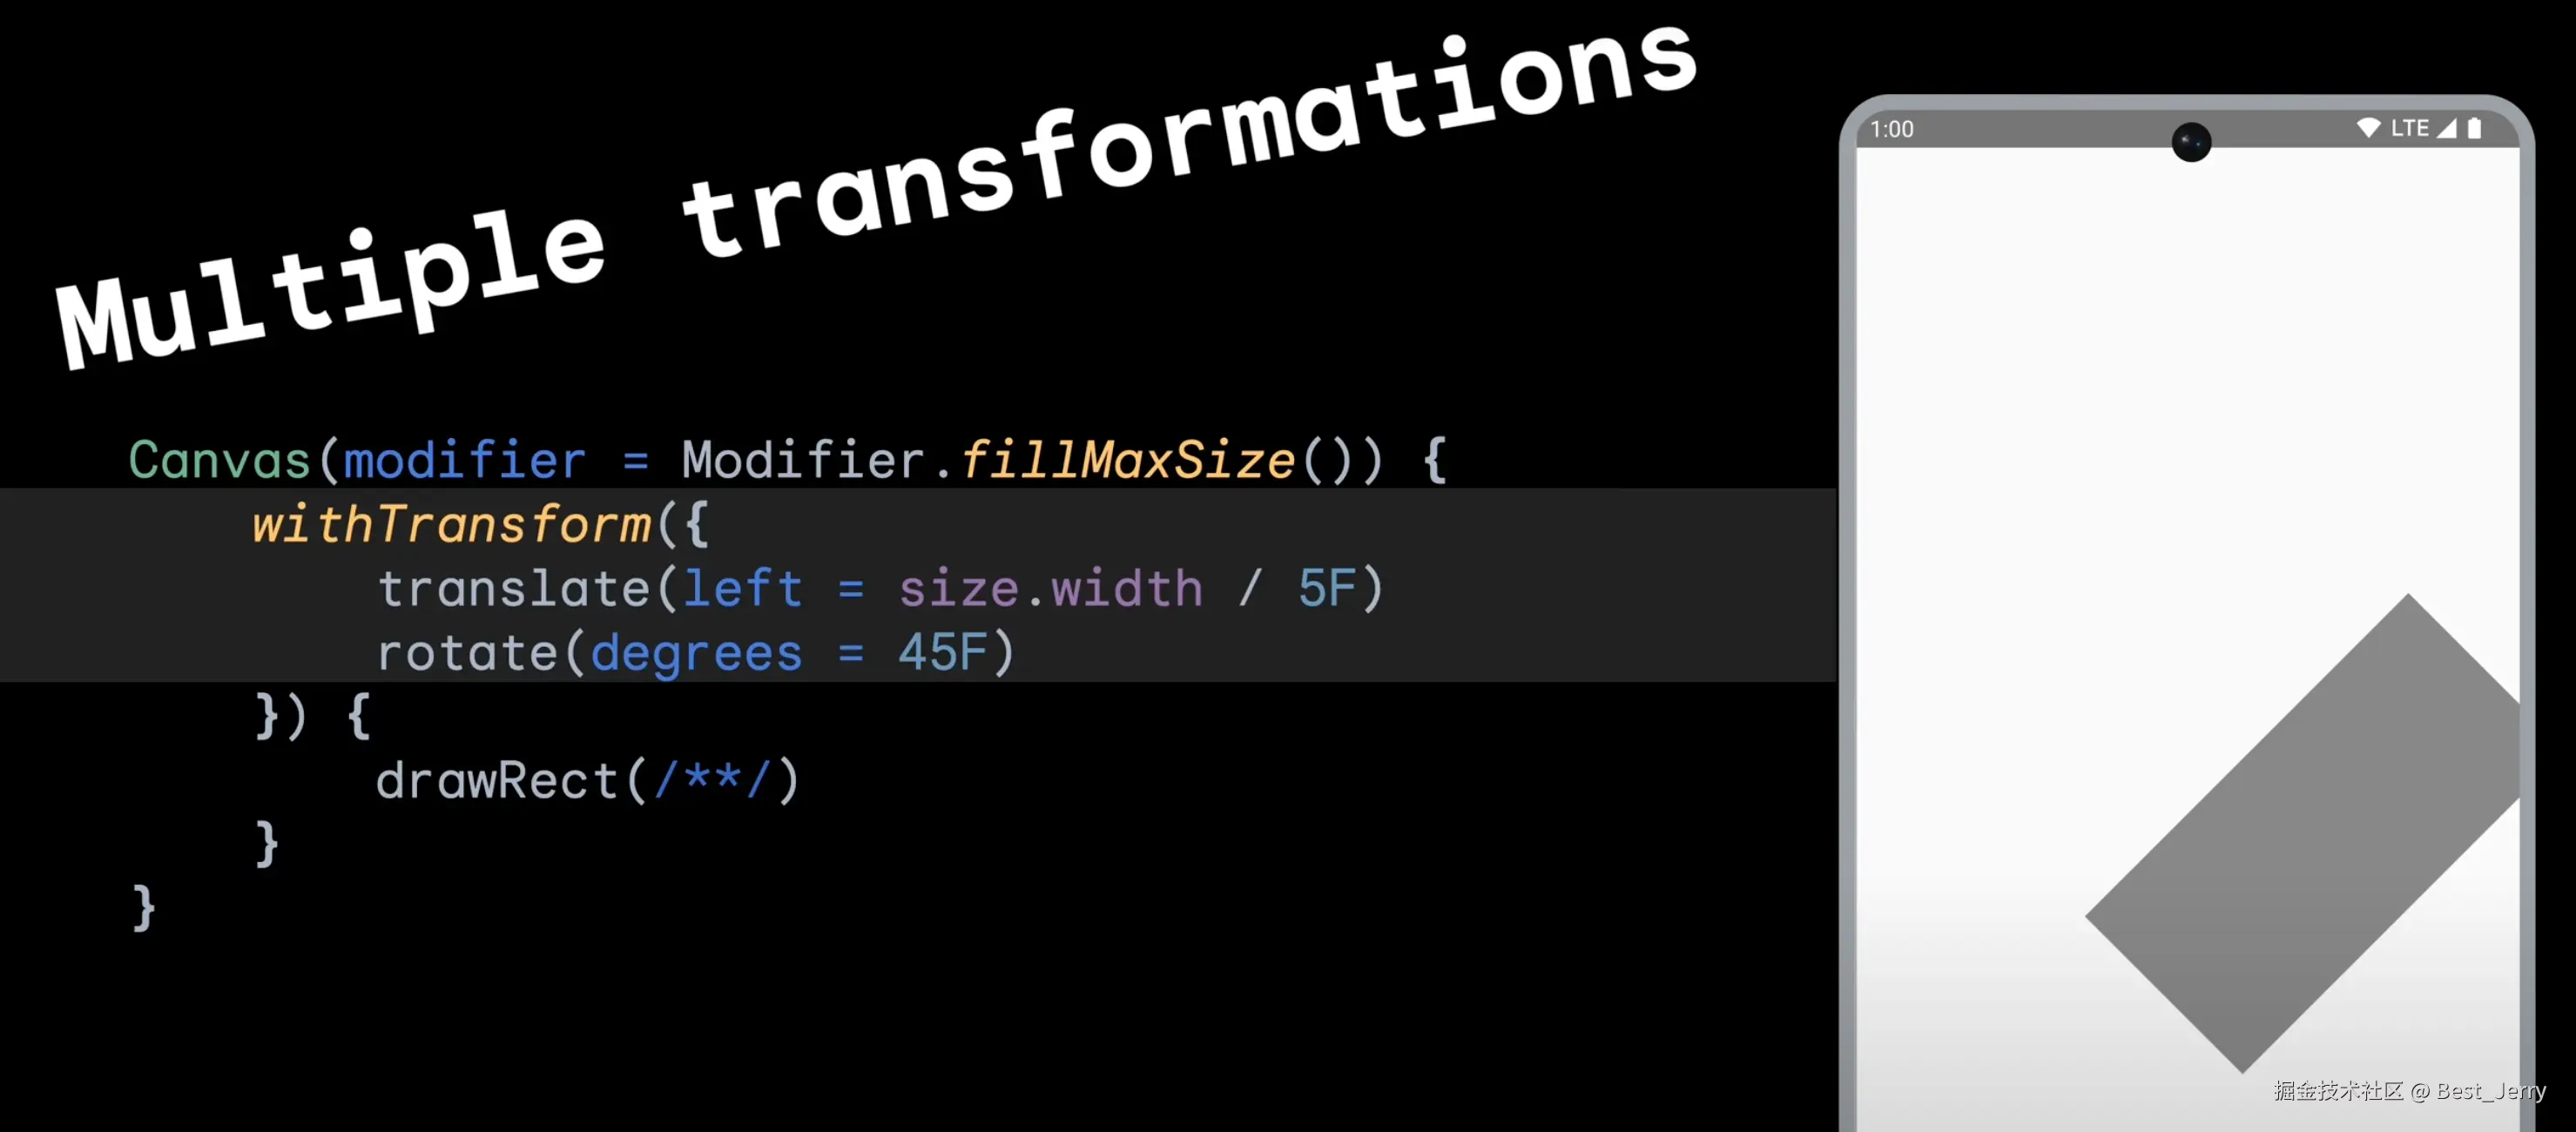
}Multiple transformations
使用 withTransform
kotlin
inline fun DrawScope.withTransform(
    transformBlock: DrawTransform.() -> Unit,
    drawBlock: DrawScope.() -> Unit
) = with(drawContext) {
    // Transformation can include inset calls which change the drawing area
    // so cache the previous size before the transformation is done
    // and reset it afterwards
    val previousSize = size
    canvas.save()
    try {
        transformBlock(transform)
        drawBlock()
    } finally {
        canvas.restore()
        size = previousSize
    }
}
7. Example - Line Graph
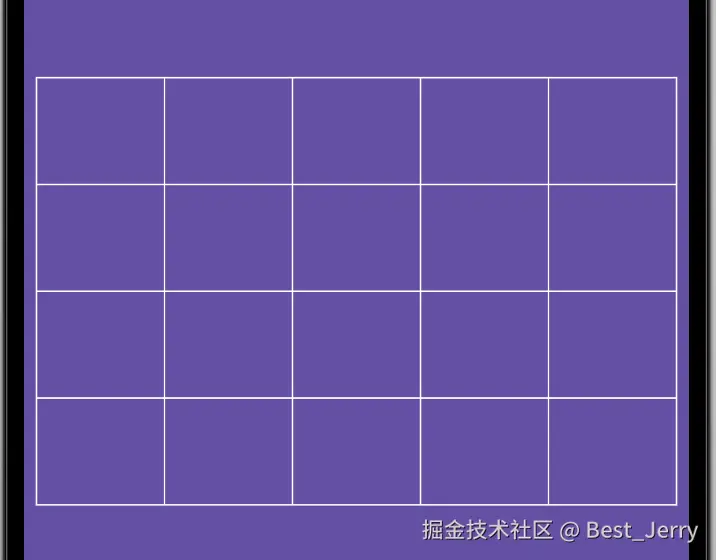
8. drawLine background
首先绘制背景
kotlin
@Composable
fun LineGraph() {
Box(
modifier = Modifier
.background(Purple40)
.fillMaxSize()
) {
Canvas(
modifier = Modifier
.padding(8.dp)
.aspectRatio(3 / 2f)
.fillMaxSize()
.align(Alignment.Center)
) {
val barWidthPx = 1.dp.toPx()
drawRect(Color.White, style = Stroke(barWidthPx))
val verticalLines = 4
val verticalSize = size.width / (verticalLines + 1)
repeat(verticalLines) { i ->
val startX = verticalSize * (i + 1)
drawLine(
Color.White,
start = Offset(startX, 0f),
end = Offset(startX, size.height),
strokeWidth = barWidthPx
)
}
val horizontalLines = 3
val sectionSize = size.height / (horizontalLines + 1)
repeat(horizontalLines) { i ->
val startY = sectionSize * (i + 1)
drawLine(
Color.White,
start = Offset(0f, startY),
end = Offset(size.width, startY),
strokeWidth = barWidthPx
)
}
}
}
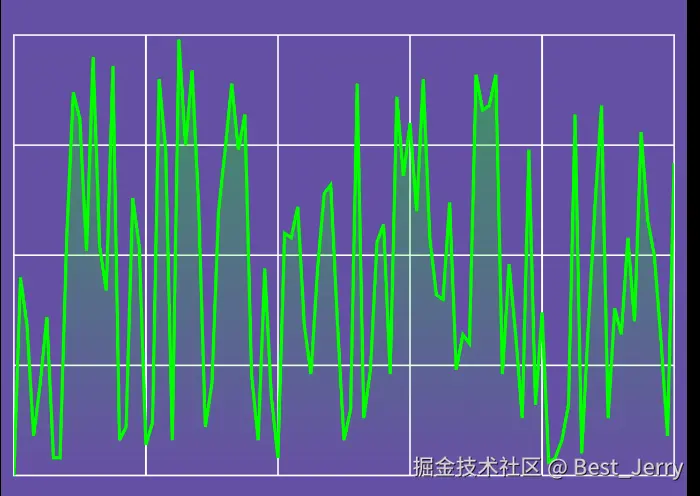
}9. drawPath
绘制代表数据的实际线条。
我们不想在每次重新组合时都重新创建这个路径对象。为了避免这种情况,我们可以切换到使用 drawWithCache 修饰符,它将负责缓存对象,直到绘图区域的大小发生变化。
创建路径数据:
kotlin
data class Balance(
    val x: Int,
    val y: Int
)


val graphData = mutableListOf<Balance>(
    Balance(0, 0),
    Balance(1, 45),
    Balance(2, 34),
    Balance(3, 9),
    Balance(4, 21),
    Balance(5, 36),
    Balance(6, 4),
    Balance(7, 4),
    Balance(8, 54),
    Balance(9, 87),
    Balance(10, 81),
    Balance(11, 51),
    Balance(12, 95),
    Balance(13, 52),
    Balance(14, 42),
    Balance(15, 93),
    Balance(16, 8),
    Balance(17, 11),
    Balance(18, 63),
    Balance(19, 52),
    Balance(20, 7),
    Balance(21, 12),
    Balance(22, 90),
    Balance(23, 74),
    Balance(24, 8),
    Balance(25, 99),
    Balance(26, 75),
    Balance(27, 92),
    Balance(28, 61),
    Balance(29, 11),
    Balance(30, 21),
    Balance(31, 60),
    Balance(32, 74),
    Balance(33, 89),
    Balance(34, 74),
    Balance(35, 82),
    Balance(36, 23),
    Balance(37, 8),
    Balance(38, 47),
    Balance(39, 18),
    Balance(40, 4),
    Balance(41, 55),
    Balance(42, 54),
    Balance(43, 61),
    Balance(44, 34),
    Balance(45, 23),
    Balance(46, 47),
    Balance(47, 64),
    Balance(48, 66),
    Balance(49, 35),
    Balance(50, 8),
    Balance(51, 15),
    Balance(52, 89),
    Balance(53, 13),
    Balance(54, 24),
    Balance(55, 53),
    Balance(56, 57),
    Balance(57, 23),
    Balance(58, 86),
    Balance(59, 68),
    Balance(60, 80),
    Balance(61, 60),
    Balance(62, 90),
    Balance(63, 54),
    Balance(64, 41),
    Balance(65, 40),
    Balance(66, 62),
    Balance(67, 24),
    Balance(68, 32),
    Balance(69, 30),
    Balance(70, 91),
    Balance(71, 83),
    Balance(72, 84),
    Balance(73, 91),
    Balance(74, 23),
    Balance(75, 48),
    Balance(76, 32),
    Balance(77, 13),
    Balance(78, 74),
    Balance(79, 16),
    Balance(80, 37),
    Balance(81, 3),
    Balance(82, 4),
    Balance(83, 8),
    Balance(84, 16),
    Balance(85, 82),
    Balance(86, 5),
    Balance(87, 34),
    Balance(88, 61),
    Balance(89, 84),
    Balance(90, 13),
    Balance(91, 38),
    Balance(92, 32),
    Balance(93, 54),
    Balance(94, 35),
    Balance(95, 78),
    Balance(96, 58),
    Balance(97, 50),
    Balance(98, 31),
    Balance(99, 9),
    Balance(100, 71)
)

fun generatePath(data: List<Balance>, size: Size): Path {
    val path = Path()
    data.forEachIndexed { i, balance ->
        // 处理路径起始点不从 (0,0) 开始
        if (i == 0) {
            path.moveTo(0f, size.height)
        }
        val x = (balance.x / 100f) * size.width
        val y = size.height - ((balance.y / 100f) * size.height)
        // 将途经点添加到路径中
        path.lineTo(x, y)
    }
    return path
}
kotlin
Spacer(
    modifier = Modifier
        .padding(8.dp)
        .aspectRatio(3 / 2f)
        .fillMaxSize()
        .align(Alignment.Center)
        .drawWithCache({
            val path = generatePath(graphData, size)

            onDrawBehind {
                drawPath(path, Color.Green, style = Stroke(2.dp.toPx()))
            }
        })
)
10. Filling graph area
kotlin
Spacer(
modifier = Modifier
.padding(8.dp)
.aspectRatio(3 / 2f)
.fillMaxSize()
.align(Alignment.Center)
.drawWithCache({
val path = generatePath(graphData, size)
val filledPath = Path()
filledPath.addPath(path)
// 封闭右侧
filledPath.lineTo(size.width, size.height)
// 封闭底部
filledPath.lineTo(0f, size.height)
// 关闭路径
filledPath.close()
onDrawBehind {
// 创建渐变刷子
val brush = Brush.verticalGradient(
listOf(
Color.Green.copy(alpha = 0.4f),
Color.Transparent
)
)
// 绘制线条路径
drawPath(path, Color.Green, style = Stroke(2.dp.toPx()))
// 绘制渐变区域
drawPath(filledPath, brush = brush, style = Fill)
}
})
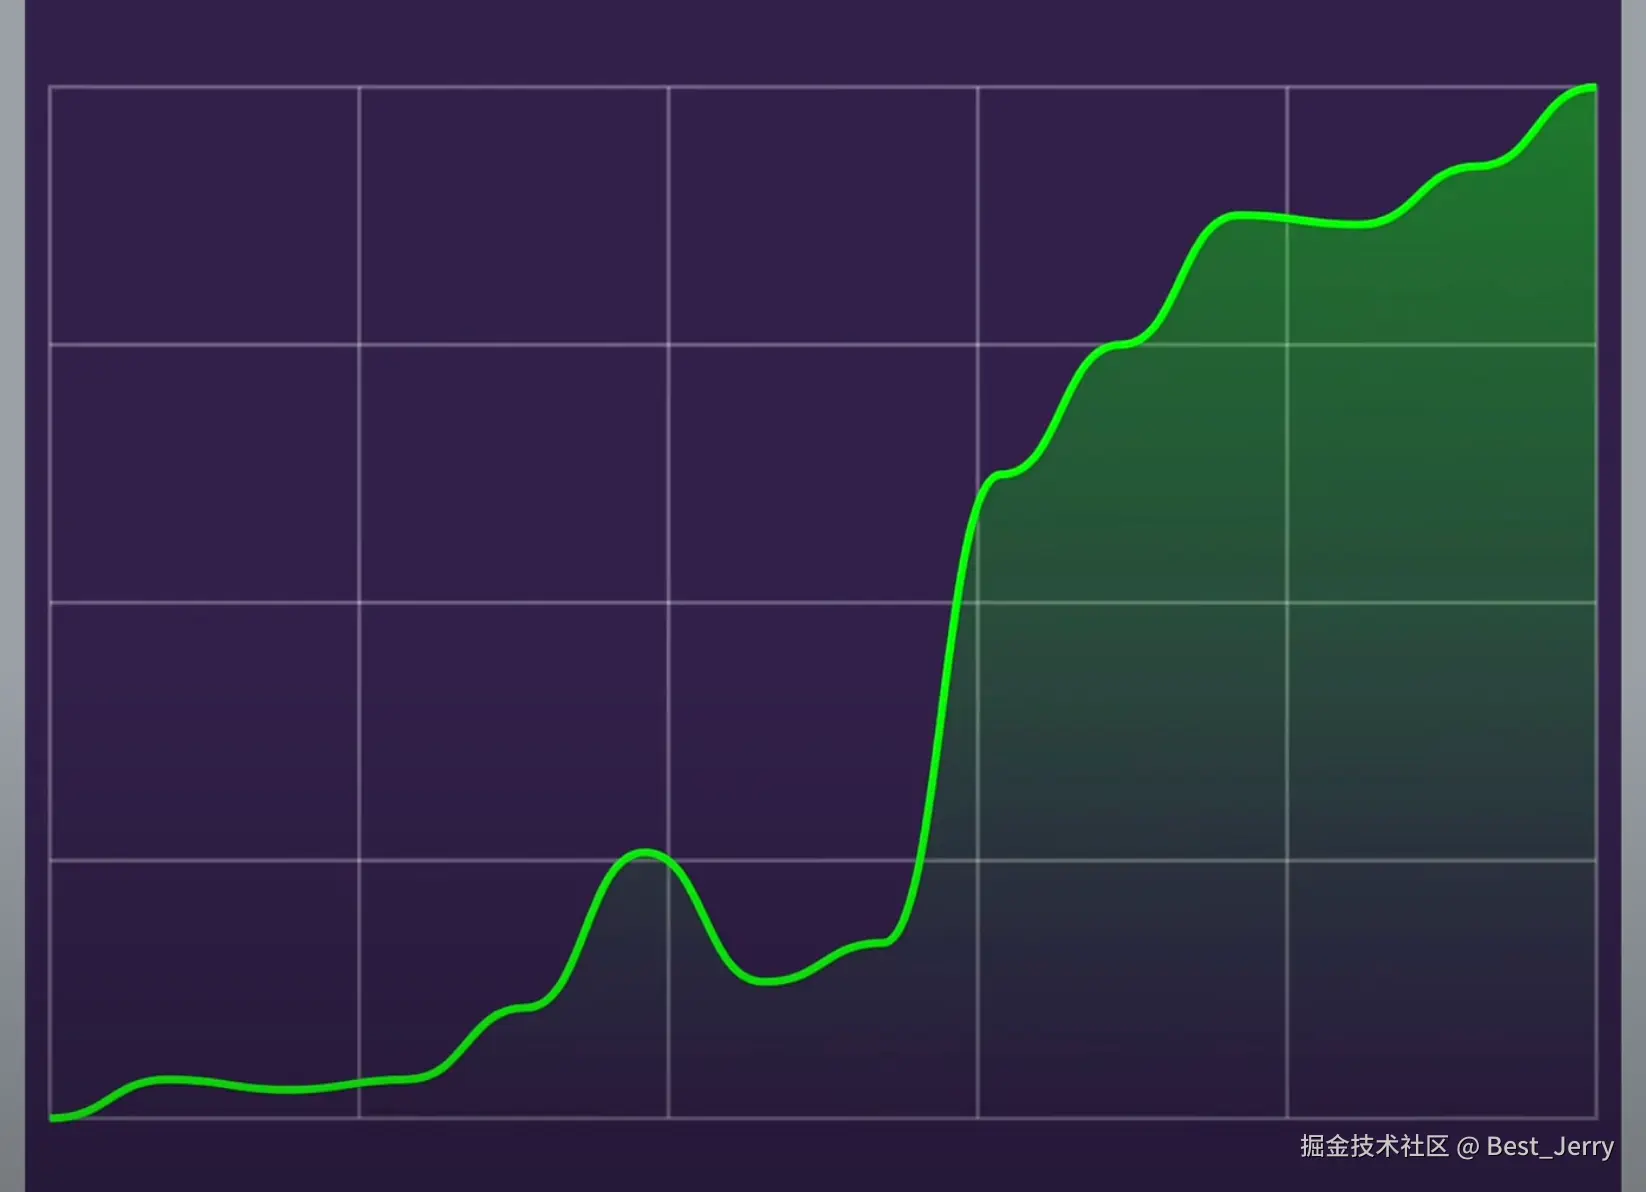
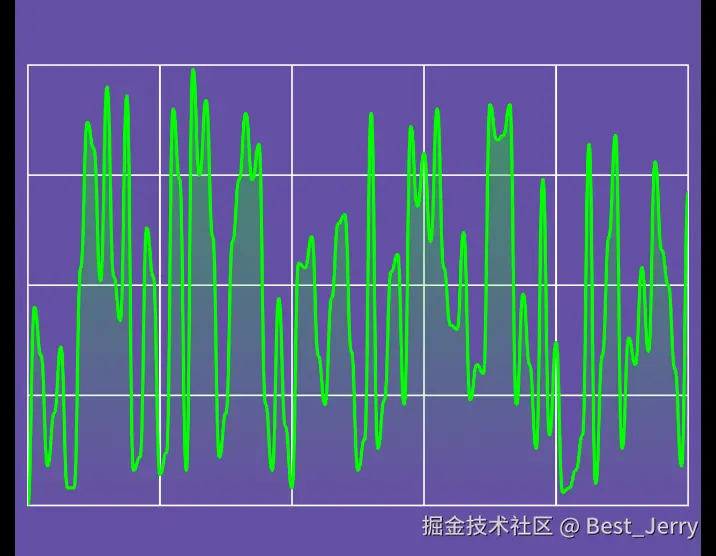
)11. Smoothing path lines
使路径线条变得平滑。
修改 generatePath() 方法,生成带有曲线的路径。
kotlin
fun generateSmoothPath(data: List<Balance>, size: Size): Path {
    val path = Path()
    var previousBalanceX = 0f
    var previousBalanceY = size.height
    data.forEachIndexed { i, balance ->
        if (i == 0) {
            path.moveTo(0f, size.height)
        }
        val x = (balance.x / 100f) * size.width
        val y = size.height - ((balance.y / 100f) * size.height)
        val controlPoint1 = PointF((x + previousBalanceX) / 2f, previousBalanceY)
        val controlPoint2 = PointF((x + previousBalanceX) / 2f, y)
        path.cubicTo(controlPoint1.x, controlPoint1.y, controlPoint2.x, controlPoint2.y, x, y)
        previousBalanceX = x
        previousBalanceY = y
    }
    return path
}
12. Animate graph drawing
启动图表时为绘制线条添加动画。
创建动画值并启动:
kotlin
val animationProgress = remember { Animatable(0f) }

LaunchedEffect(key1 = graphData) {
    animationProgress.animateTo(1f, tween(3000))
}
使用 clipRect 剪辑绘制:
kotlin
clipRect(right = size.width * animationProgress.value) {
    val brush = Brush.verticalGradient(
        listOf(
            Color.Green.copy(alpha = 0.4f),
            Color.Transparent
        )
    )

    drawPath(path, Color.Green, style = Stroke(2.dp.toPx()))
    drawPath(filledPath, brush = brush, style = Fill)
}
clipRect 源码实现:
kotlin
inline fun DrawScope.clipRect(
    left: Float = 0.0f,
    top: Float = 0.0f,
    right: Float = size.width,
    bottom: Float = size.height,
    clipOp: ClipOp = ClipOp.Intersect,
    block: DrawScope.() -> Unit
) = withTransform({ clipRect(left, top, right, bottom, clipOp) }, block)