ReplicaSet
假如我们现在有一个 Pod 正在提供线上的服务,我们来想想一下我们可能会遇到的一些场景:
- 某次运营活动非常成功,网站访问量突然暴增
- 运行当前 Pod 的节点发生故障了,Pod 不能正常提供服务了
第一种情况,可能比较好应对,活动之前我们可以大概计算下会有多大的访问量,提前多启动几个 Pod 副本,活动结束后再把多余的 Pod 杀掉,虽然有点麻烦,但是还是能够应对这种情况的。
第二种情况,可能某天夜里收到大量报警说服务挂了,然后起来打开电脑在另外的节点上重新启动一个新的 Pod,问题可以解决。
但是如果我们都人工的去解决遇到的这些问题,似乎又回到了以前刀耕火种的时代了是吧?如果有一种工具能够来帮助我们自动管理 Pod 就好了,Pod 挂了自动帮我在合适的节点上重新启动一个 Pod,这样是不是遇到上面的问题我们都不需要手动去解决了。
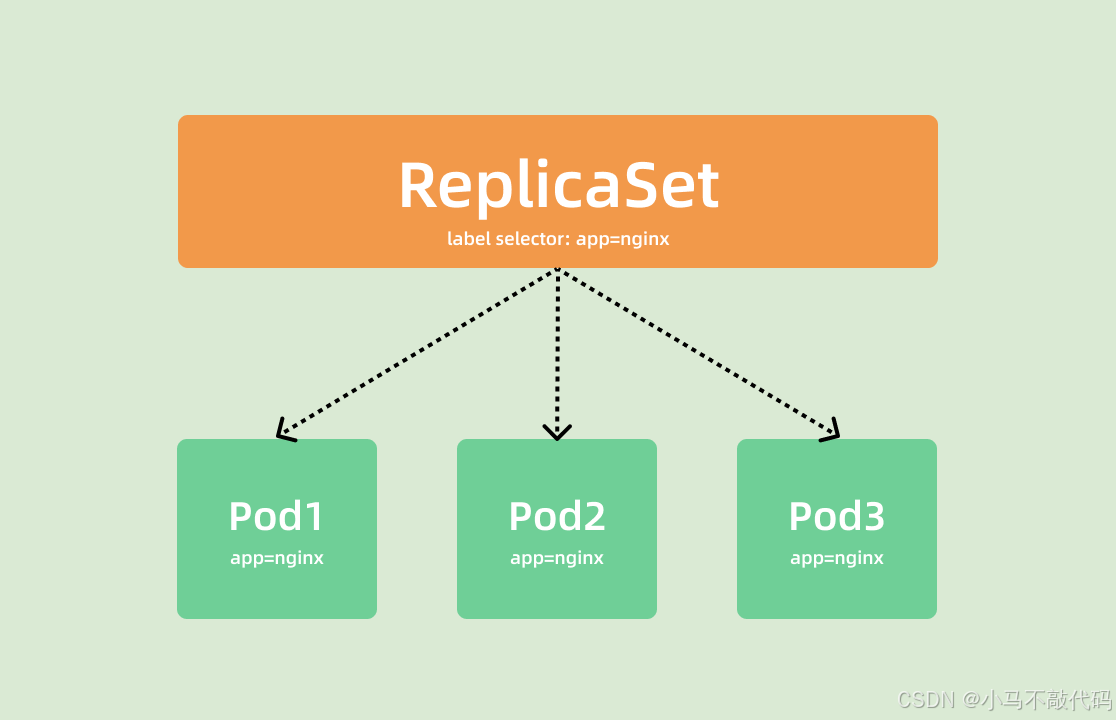
而 ReplicaSet 这种资源对象就可以来帮助我们实现这个功能,ReplicaSet(RS)的主要作用就是维持一组 Pod 副本的运行,保证一定数量的 Pod 在集群中正常运行,ReplicaSet 控制器会持续监听它说控制的这些 Pod 的运行状态,在 Pod 发送故障数量减少或者增加时会触发调谐过程,始终保持副本数量一定。
和 Pod 一样我们仍然还是通过 YAML 文件来描述我们的 ReplicaSet 资源对象,如下 YAML 文件是一个常见的 ReplicaSet 定义:(nginx-rs.yaml)
java
apiVersion: apps/v1
kind: ReplicaSet
metadata:
  name:  nginx-rs
  namespace: default
spec:
  replicas: 3  # 期望的 Pod 副本数量,默认值为1
  selector:  # Label Selector,必须匹配 Pod 模板中的标签
    matchLabels:
      app: nginx
  template:  # Pod 模板
    metadata:
      labels:
        app: nginx
    spec:
      containers:
      - name: nginx
        image: nginx
        ports:
        - containerPort: 80
上面的 YAML 文件结构和我们之前定义的 Pod 看上去没太大两样,有常见的 apiVersion、kind、metadata,在 spec 下面描述 ReplicaSet 的基本信息,其中包含3个重要内容:
- replias:表示期望的 Pod 的副本数量
- selector:Label Selector,用来匹配要控制的 Pod 标签,需要和下面的 Pod 模板中的标签一致
- template:Pod 模板,实际上就是以前我们定义的 Pod 内容,相当于把一个 Pod 的描述以模板的形式嵌入到了 ReplicaSet 中来。
Pod模板
Pod 模板这个概念非常重要,因为后面我们讲解到的大多数控制器,都会使用 Pod 模板来统一定义它所要管理的 Pod。更有意思的是,我们还会看到其他类型的对象模板,比如 Volume 的模板登。
上面就是我们定义的一个普通的 ReplicaSet 资源清单文件,ReplicaSet 控制器会通过定义的 Label Selector 标签去查找集群中的 Pod 对象:
我们直接来创建上面的资源对象:
java
$ kubectl apply -f nginx-rs.yaml
replicaset.apps/nginx-rs created
$ kubectl get rs nginx-rs
NAME       DESIRED   CURRENT   READY   AGE
nginx-rs   3         3         3       17m
通过查看 RS 可以看到当前资源对象的描述信息,包括DESIRED、CURRENT、READY的状态值,创建完成后,可以利用如下命令查看下 Pod 列表:
java
$ kubectl get pods -l app=nginx
NAME             READY   STATUS              RESTARTS   AGE
nginx-rs-nxklf   1/1     Running   0          52s
nginx-rs-t46qc   1/1     Running   0          52s
nginx-rs-xfqrn   1/1     Running   0          52s
可以看到现在有 3 个 Pod,这 3 个 Pod 就是我们在 RS 中声明的 3 个副本,比如我们删除其中一个 Pod:
java
$ kubectl delete pod nginx-rs-xfqrn
pod "nginx-rs-xfqrn" deleted
然后再查看 Pod 列表:
java
$ kubectl get pods -l app=nginx
NAME             READY   STATUS    RESTARTS   AGE
nginx-rs-nxklf   1/1     Running   0          3m19s
nginx-rs-t46qc   1/1     Running   0          3m19s
nginx-rs-xsb59   1/1     Running   0          10s
可以看到又重新出现了一个 Pod,这个就是上面我们所说的 ReplicaSet 控制器为我们做的工作,我们在 YAML 文件中声明了 3 个副本,然后现在我们删除了一个副本,就变成了两个,这个时候 ReplicaSet 控制器监控到控制的 Pod 数量和期望的 3 不一致,所以就需要启动一个新的 Pod 来保持 3 个副本,这个过程上面我们说了就是调谐的过程。同样可以查看 RS 的描述信息来查看到相关的事件信息:
java
$ kubectl describe rs nginx-rs
Name:         nginx-rs
Namespace:    default
Selector:     app=nginx
Labels:       <none>
Annotations:  kubectl.kubernetes.io/last-applied-configuration:
                {"apiVersion":"apps/v1","kind":"ReplicaSet","metadata":{"annotations":{},"name":"nginx-rs","namespace":"default"},"spec":{"replicas":3,"se...
Replicas:     3 current / 3 desired
Pods Status:  3 Running / 0 Waiting / 0 Succeeded / 0 Failed
Pod Template:
  Labels:  app=nginx
  Containers:
   nginx:
    Image:        nginx
    Port:         80/TCP
    Host Port:    0/TCP
    Environment:  <none>
    Mounts:       <none>
  Volumes:        <none>
Events:
  Type    Reason            Age   From                   Message
  ----    ------            ----  ----                   -------
  Normal  SuccessfulCreate  17m   replicaset-controller  Created pod: nginx-rs-xfqrn
  Normal  SuccessfulCreate  17m   replicaset-controller  Created pod: nginx-rs-nxklf
  Normal  SuccessfulCreate  17m   replicaset-controller  Created pod: nginx-rs-t46qc
  Normal  SuccessfulCreate  14m   replicaset-controller  Created pod: nginx-rs-xsb59
可以发现最开始通过 ReplicaSet 控制器创建了 3 个 Pod,后面我们删除了 Pod 后, ReplicaSet 控制器又为我们创建了一个 Pod,和上面我们的描述是一致的。如果这个时候我们把 RS 资源对象的 Pod 副本更改为 2spec.replicas=2,这个时候我们来更新下资源对象:
java
$ kubectl apply -f rs.yaml
replicaset.apps/nginx-rs configured
$ kubectl get rs nginx-rs
NAME       DESIRED   CURRENT   READY   AGE
nginx-rs   2         2         2       27m
$ kubectl describe rs nginx-rs
Name:         nginx-rs
Namespace:    default
Selector:     app=nginx
Labels:       <none>
Annotations:  kubectl.kubernetes.io/last-applied-configuration:
                {"apiVersion":"apps/v1","kind":"ReplicaSet","metadata":{"annotations":{},"name":"nginx-rs","namespace":"default"},"spec":{"replicas":2,"se...
Replicas:     2 current / 2 desired
Pods Status:  2 Running / 1 Waiting / 0 Succeeded / 0 Failed
Pod Template:
  Labels:  app=nginx
  Containers:
   nginx:
    Image:        nginx
    Port:         80/TCP
    Host Port:    0/TCP
    Environment:  <none>
    Mounts:       <none>
  Volumes:        <none>
Events:
  Type    Reason            Age   From                   Message
  ----    ------            ----  ----                   -------
  Normal  SuccessfulCreate  27m   replicaset-controller  Created pod: nginx-rs-xfqrn
  Normal  SuccessfulCreate  27m   replicaset-controller  Created pod: nginx-rs-nxklf
  Normal  SuccessfulCreate  27m   replicaset-controller  Created pod: nginx-rs-t46qc
  Normal  SuccessfulCreate  24m   replicaset-controller  Created pod: nginx-rs-xsb59
  Normal  SuccessfulDelete  7s    replicaset-controller  Deleted pod: nginx-rs-xsb59
可以看到 Replicaset 控制器在发现我们的资源声明中副本数变更为 2 后,就主动去删除了一个 Pod,这样副本数就和期望的始终保持一致了:
java
$ kubectl get pods -l app=nginx
NAME             READY   STATUS    RESTARTS   AGE
nginx-rs-nxklf   1/1     Running   0          30m
nginx-rs-t46qc   1/1     Running   0          30m
我们可以随便查看一个 Pod 的描述信息可以看到这个 Pod 的所属控制器信息:
java
$ kubectl describe pod nginx-rs-xsb59
Name:               nginx-rs-xsb59
Namespace:          default
Priority:           0
PriorityClassName:  <none>
Node:               ydzs-node1/10.151.30.22
Start Time:         Fri, 15 Nov 2019 14:18:10 +0800
Labels:             app=nginx
Annotations:        <none>
Status:             Running
IP:                 10.244.1.148
Controlled By:      ReplicaSet/nginx-rs
另外被 ReplicaSet 持有的 Pod 有一个metadata.ownerReferences指针指向当前的 ReplicaSet,表示当前 Pod 的所有者,这个引用主要会被集群中的垃圾收集器使用以清理失去所有者的 Pod 对象。这个ownerReferences和数据库中的外键是不是非常类似。可以通过将 Pod 资源描述信息导出查看:
java
$ kubectl get pod nginx-rs-xsb59 -o yaml
apiVersion: v1
kind: Pod
metadata:
  creationTimestamp: "2019-11-15T06:18:10Z"
  generateName: nginx-rs-
  labels:
    app: nginx
  name: nginx-rs-xsb59
  namespace: default
  ownerReferences:
  - apiVersion: apps/v1
    blockOwnerDeletion: true
    controller: true
    kind: ReplicaSet
    name: nginx-rs
    uid: 4a3121fa-b5ae-4def-b2d2-bf17bc06b7b7
  resourceVersion: "1781596"
  selfLink: /api/v1/namespaces/default/pods/nginx-rs-xsb59
  uid: 0a4cae9a-105b-4024-ae96-ee516bfb2d23
我们可以看到 Pod 中有一个metadata.ownerReferences的字段指向了 ReplicaSet 资源对象。如果要彻底删除 Pod,我们就只能删除 RS 对象:
java
$ kubectl delete rs nginx-rs
# 或者执行 kubectl delete -f nginx-rs.yaml
nginx-rs.yaml
java
# 作用:主要讲解ReplicaSet控制器 简称RS 创建pods信息
# 首先得要明白RS的作用到底是什么?
# 主要作用就是维持一组 Pod 副本的运行,保证一定数量的 Pod 在集群中正常运行
# ReplicaSet 控制器会持续监听它说控制的这些 Pod 的运行状态,在 Pod 发送故障数量减少或者增加时会触发调谐过程,始终保持副本数量一定
apiVersion: apps/v1            # 记住这里是 apps/v1
kind: ReplicaSet               # 声明为一个ReplicaSet
metadata:
  name: nginx-rs               # 声明的这个rs的名称为nginx-rs
  namespace: default           # rs也得要有所属的命名空间
spec:
  replicas: 2                  # 声明这个rs要管理维护几个pod
  selector:
    matchLabels:
      app: nginx               # 这里的标签 要和 下边的 template.metadata.labels当中的app:nginx保持一致 表示要维护的pod的对象是谁
  template:                    # 这里就是pod的模版  pod的名称会在rs的名称nginx-rs的基础上生成 比如nginx-rs-xxxxx
    metadata:
      labels:
        app: nginx             # 这个pod模版的labels标签  app:nginx   这个会在上边的spec.selector.matchLabels当中被引用到 表示这个rs要控制和管理的pod模版对象是谁
    spec:
      containers:
        - name: nginx
          image: nginx
          ports:
            - containerPort: 80


# 创建好了rs之后  kubectl apply -f nginx-rs.yaml  我们可以通过 kubectl get rs -n default 查看有哪些rs存在
# kubectl describe rs nginx-rs -n default 查看资源对象的详细信息 整个启动过程和event事件 很重要
# 通过RS创建管理维护的pod  pod的名称都会是nginx-rs-xxxxxx.pod 会在nginx-rs的基础上往后追加一段

# 如果要删除通过RS创建出来的pod资源对象  必须通过删除rs才能删除 因为你去删除pod 但是rs还会维护继续生成指定数量的pod出来  所以归根结底直接删除rs就行
# kubectl delete rs nginx-rs -n default