1.创建RingProgressBar类
using System;
using System.Collections.Generic;
using System.Linq;
using System.Text;
using System.Threading.Tasks;
using System.Windows;
using System.Windows.Media;
namespace CircularProgressBar
{
public class RingProgressBar : FrameworkElement
{
/// <summary>
/// 声明并注册一个依赖属性 Progress,用于控制进度条显示的百分比(0 ~ 100)。
/// </summary>
public static readonly DependencyProperty ProgressProperty =
DependencyProperty.Register(
nameof(Progress), // 属性名称
typeof(double), // 属性类型
typeof(RingProgressBar), // 所属类型
new FrameworkPropertyMetadata(
0.0, // 默认值
FrameworkPropertyMetadataOptions.AffectsRender // 当值变化时自动触发重绘
));
/// <summary>
/// Progress 属性包装器,提供进度值的获取和设置。
/// 设置时自动裁剪到 0~100 范围。
/// </summary>
public double Progress
{
get => (double)GetValue(ProgressProperty);
set => SetValue(ProgressProperty, Math.Max(0, Math.Min(100, value)));
}
/// <summary>
/// 重写 OnRender 方法,使用 DrawingContext 绘制控件外观。
/// </summary>
protected override void OnRender(DrawingContext dc)
{
double width = ActualWidth;
double height = ActualHeight;
// 根据控件尺寸计算圆环半径,保留 5 像素边距
double radius = Math.Min(width, height) / 2 - 5;
// 圆心位置
Point center = new Point(width / 2, height / 2);
// 1. 绘制背景圆环(灰色圆环)
dc.DrawEllipse(
null, // 无填充
new Pen(Brushes.LightGray, 10), // 使用浅灰色画笔,宽度10
center, // 圆心
radius, radius // 水平半径 & 垂直半径
);
// 2. 计算进度角度(转换为 0~360)
double angle = Progress / 100 * 360;
// 3. 将角度转换为弧度,-90 是为了从正上方开始绘制
double radians = (angle - 90) * Math.PI / 180;
// 4. 圆环起点:圆顶部
Point startPoint = new Point(center.X, center.Y - radius);
// 5. 计算终点:根据弧度计算 X/Y
Point endPoint = new Point(
center.X + radius * Math.Cos(radians),
center.Y + radius * Math.Sin(radians)
);
// 6. 判断是否需要绘制大角度弧(超过180度)
bool isLargeArc = angle > 180;
// 7. 创建一个弧线段,从 startPoint 到 endPoint,构成圆环的一部分
PathFigure figure = new PathFigure(
startPoint, // 弧线起点
new[]
{
new ArcSegment(
endPoint, // 弧线终点
new Size(radius, radius), // 弧线的X/Y半径
0, // 旋转角度
isLargeArc, // 是否为大角度弧线
SweepDirection.Clockwise, // 顺时针方向
true // 弧线是否可见(用于裁剪,一般设为 true)
)
},
false // 图形是否闭合(环形不闭合)
);
// 8. 创建 PathGeometry 对象用于绘制
PathGeometry geometry = new PathGeometry();
geometry.Figures.Add(figure);
// 9. 绘制进度圆环(蓝色)
dc.DrawGeometry(
null, // 无填充
new Pen(Brushes.SteelBlue, 10), // 钢蓝色画笔,宽度10
geometry // 绘制路径
);
}
/// <summary>
/// Measure 阶段:建议大小为 100x100。
/// </summary>
protected override Size MeasureOverride(Size availableSize) => new Size(100, 100);
/// <summary>
/// Arrange 阶段:直接接受布局系统给予的最终大小。
/// </summary>
protected override Size ArrangeOverride(Size finalSize) => finalSize;
}
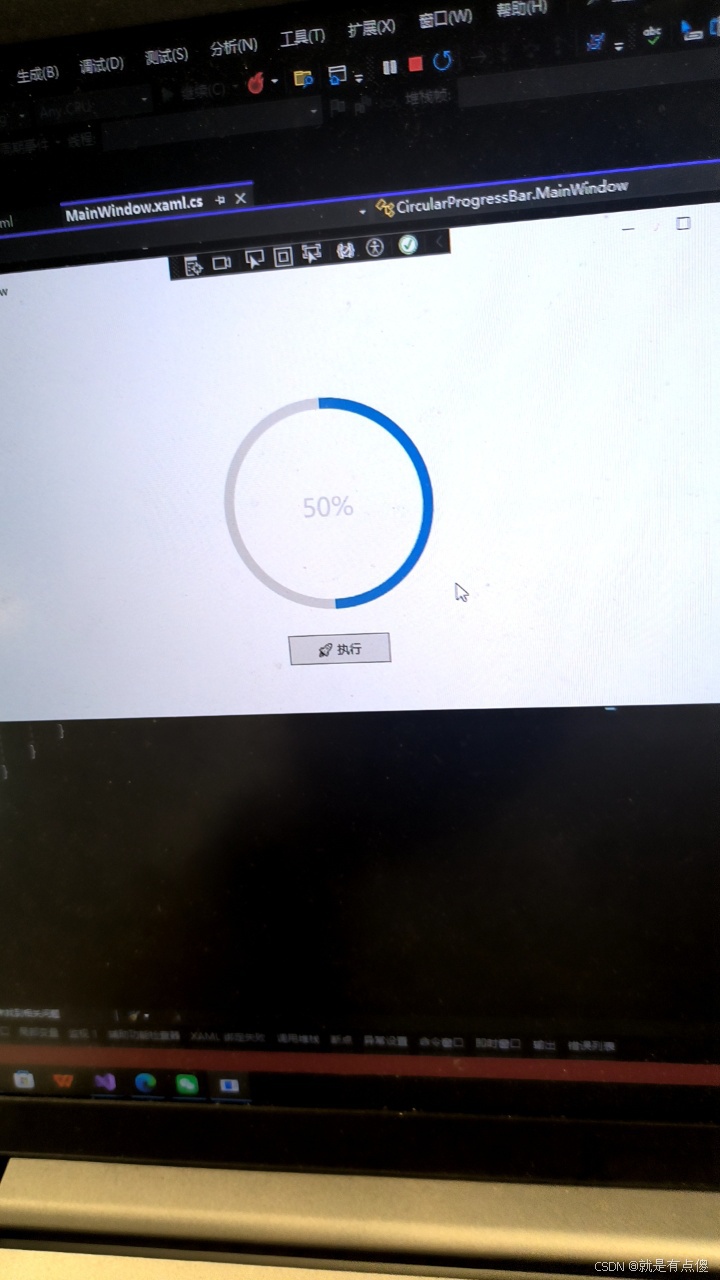
}2.在XAML中使用
我们需要在 XAML 文件中使用该控件,需要在窗体或页面里引入命名空间
cs
<Window x:Class="CircularProgressBar.MainWindow"
        xmlns="http://schemas.microsoft.com/winfx/2006/xaml/presentation"
        xmlns:x="http://schemas.microsoft.com/winfx/2006/xaml"
        xmlns:d="http://schemas.microsoft.com/expression/blend/2008"
        xmlns:mc="http://schemas.openxmlformats.org/markup-compatibility/2006"
        xmlns:local="clr-namespace:CircularProgressBar"
        mc:Ignorable="d"
        Title="MainWindow" Height="450" Width="800">
    <Grid>
        <Grid.RowDefinitions>
            <RowDefinition />
        </Grid.RowDefinitions>
        <!--  // 自定义控件 - 预览主体部分  注意地址不一定是local  要看RingProgressBar类放在哪里 //  -->
        <local:RingProgressBar x:Name="ringProgress"
                            Width="200"
                            Height="200"
                            HorizontalAlignment="Center"
                            VerticalAlignment="Center"
                            Progress="0" />
        <TextBlock x:Name="ShowProgressValue"
                   HorizontalAlignment="Center"
                   VerticalAlignment="Center"
                   FontSize="24"
                   Foreground="#d3d3d3" />
        <Button Width="100"
                Height="30"
                Margin="0,50"
                HorizontalAlignment="Center"
                VerticalAlignment="Bottom"
                Content="🚀 执行"
                Click="Button_Click" />

    </Grid>
</Window>
3.MainWindow.cs代码
cs
using System;
using System.Collections.Generic;
using System.Linq;
using System.Text;
using System.Threading;
using System.Threading.Tasks;
using System.Windows;
using System.Windows.Controls;
using System.Windows.Data;
using System.Windows.Documents;
using System.Windows.Input;
using System.Windows.Media;
using System.Windows.Media.Imaging;
using System.Windows.Navigation;
using System.Windows.Shapes;

namespace CircularProgressBar
{
    /// <summary>
    /// MainWindow.xaml 的交互逻辑
    /// </summary>
    public partial class MainWindow : Window
    {
        public MainWindow()
        {
            InitializeComponent();
        }

        private async void Button_Click(object sender, RoutedEventArgs e)
        {
            for (int i = 0; i < 101; i++)
            {

                ringProgress.Progress = i;
                ShowProgressValue.Text = ringProgress.Progress.ToString() + "%";
               await RelayAsync(100);
            }
        }
        private async Task RelayAsync(int milliseconds, CancellationToken cancellationToken = default)
        {
            if (milliseconds < 0)
            {
                milliseconds = 100;
            }

            try
            {
                await Task.Delay(milliseconds, cancellationToken);
            }
            catch (TaskCanceledException)
            {
                // 取消操作
            }
        }
    }
}