技术说明:
- springboot:2.1.4.RELEASE
- jQuery
- Ajax
- mysql:8.0.32
pom.xml,引入jar包,方便图片压缩。如果你图片不需要压缩,那这个可以不要
 <!--处理图片压缩大小-->
    <dependency>
      <groupId>net.coobird</groupId>
        <artifactId>thumbnailator</artifactId>
      <version>0.4.21</version>
    </dependency>
前端代码如下
<div class="form-group col-md-3">
   <label>上传合同图片</label>
   <form enctype="multipart/form-data">
     <input type="file" class="form-control" id="contractPhoto" name="contractPhoto">
      <p id="message" style="color:red;"> </p>
    </form>
 </div>
注意:form中使用enctype="multipart/form-data"标签,type必须是file
效果如下
···
上传合同图片
···
当我们点击上传图片的时候,会获取表单的数据,然后发送给后端接收,具体的代码详情如下
<script>
  /**
   * 图片上传
   */
  $("#contractPhoto").on("change",function(e){

    const contractPhoto = document.getElementById('contractPhoto');
    const message = document.getElementById('message');

    //限制文件大小
    var fileInput = $('#contractPhoto')[0];
    var file = fileInput.files[0]; // 获取文件对象
    if (file) {
      var fileSize = file.size; // 获取文件大小(字节)
      var fileSizeMB = fileSize / (1024 * 1024); // 转换为MB
      if (fileSizeMB > 10) { // 例如,限制为10MB
        $('#message').html('文件大小不能超过10MB,请重新选择文件。')
        return false; // 不执行上传
      }
    }

      // 可选:检查文件类型是否为图片
    const fileType = contractPhoto.files[0].type;
    if (!fileType.startsWith('image/')) {
      e.preventDefault();
      message.textContent = '请上传有效的图片文件';
      message.style.display = 'block';

      setTimeout(() => {
        message.style.display = 'none';
      }, 3000);
      return false;
    }


    //获取表单数据
    var formData = new FormData(document.querySelector('form'));

    $.ajax({
      type:"post",
      url:"http://localhost:8081/contract/uploadContractPhoto",
      xhrFields:{
        widthCredentials:true
      },
      async:false,
      data:formData,
      /**
       *必须false才会自动加上正确的Content-Type
       */
      contentType: false,
      /*
      *
      * 必须false才会避开jQuery对 formdata 的默认处理
      * XMLHttpRequest会对 formdata 进行正确的处理
      */

      processData: false,
      success:function (result) {
        if(0 === result.code){
          $("#message").html("图片上传成功");
        }else{
          $("#message").html("图片上传失败");
        }
      },
      error:function (result) {
        alert("未知错误");
      }
    })
  });
</script>
后端接收代码如下
@Controller
@RequestMapping("/contract")
public class ContractController {
/**
* 上传合同,源文件拓展名称
*/
private static String newFileName;//因为我上传图片,和提交到数据库不是一步完成的,所以,我这里单独写的字段,目的是获取到文件名,然后单独把文件名保存数据库
/**
* 上传合同图片
* @param
* @return
*/
@RequestMapping("/uploadContractPhoto")
@ResponseBody
public CommonReturnType uploadContractPhoto(@RequestParam(value="contractPhoto") MultipartFile file,HttpSession session) {//注意这里的contractPhoto参数,是前端form表格中的id,如果你不写,那就默认file
//1. 登录验证
if (session.getAttribute("username")==null){
return CommonReturnType.fail("用户未登陆");
}
/**
* 2. 配置上传路径
* 上传图片
*/
//图片上传成功后,将图片的地址写到数据库
String filePath = "/www/yuanshengrong/upload";//保存图片的路径,这个是Linux下的
// String filePath = "D:\\upload";//保存图片的路径,这个是Windows下的
// 创建上传图片目录(如果不存在)
File uploadDir = new File(filePath);
if (!uploadDir.exists()) {
uploadDir.mkdirs();
}
//3. 生成唯一文件名
//获取原始图片的拓展名
String originalFilename = file.getOriginalFilename();
// System.out.println("文件名称是:"+originalFilename);
//生成唯一文件名
newFileName = UUID.randomUUID()+originalFilename;//把重新生成的文件名,赋值给newFileName ,方便我后边保存到数据库。
//封装上传文件位置的全路径
File targetFile = new File(filePath,newFileName);
//把本地文件上传到封装上传文件位置的全路径
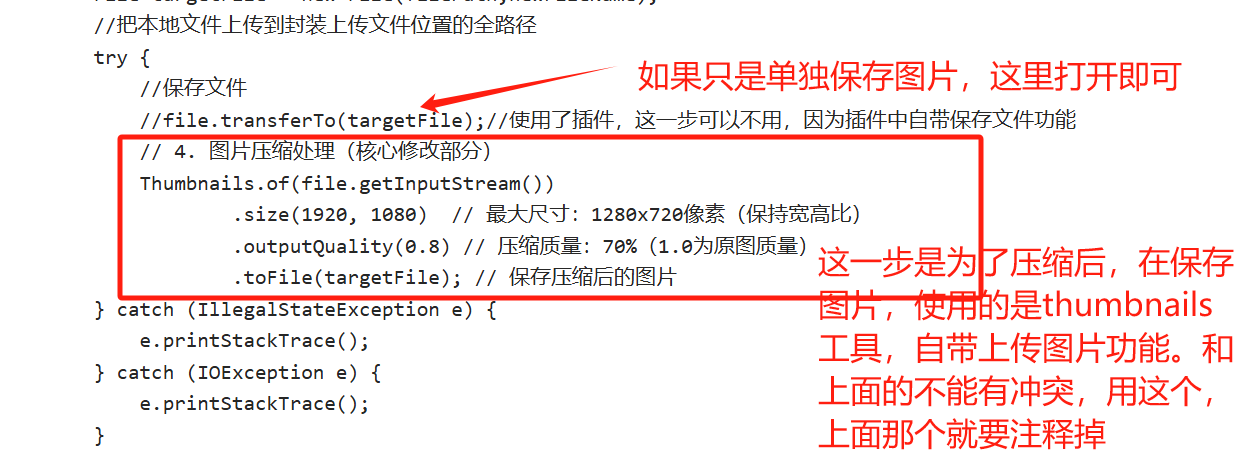
try {
//保存文件
//file.transferTo(targetFile);//使用了插件,这一步可以不用,因为插件中自带保存文件功能
// 4. 图片压缩处理(核心修改部分)
Thumbnails.of(file.getInputStream())
.size(1920, 1080) // 最大尺寸:1280x720像素(保持宽高比)
.outputQuality(0.8) // 压缩质量:70%(1.0为原图质量)
.toFile(targetFile); // 保存压缩后的图片
} catch (IllegalStateException e) {
e.printStackTrace();
} catch (IOException e) {
e.printStackTrace();
}
return CommonReturnType.success();//返回成功,这里是我自定义的格式
}
}如果你只是单独的上传图片,仅仅使用file.transferTo(targetFile);即可。如果是压缩图片之后,在上传,file.transferTo(targetFile);这一步必须注释掉。使用如下图说明的工具。