概述
本教程详细介绍了如何在SpringBoot项目中整合Mybatis-Plus,这是一个强大的Mybatis增强工具,可以大大简化数据库操作。
环境准备
1. 创建数据库和表
sql
-- 创建数据库
CREATE DATABASE `0813_demo`;

-- 创建用户表
CREATE TABLE `user` (
  `id` bigint(20) NOT NULL AUTO_INCREMENT COMMENT '主键ID',
  `name` varchar(30) DEFAULT NULL COMMENT '姓名',
  `age` int(11) DEFAULT NULL COMMENT '年龄',
  `email` varchar(50) DEFAULT NULL COMMENT '邮箱',
  PRIMARY KEY (`id`)
) ENGINE=InnoDB DEFAULT CHARSET=utf8;

-- 插入测试数据
INSERT INTO `user` (`id`, `name`, `age`, `email`) VALUES
(1, 'Jone', 18, 'test1@baomidou.com'),
(2, 'Jack', 20, 'test2@baomidou.com');
创数据库,创表,加数据。
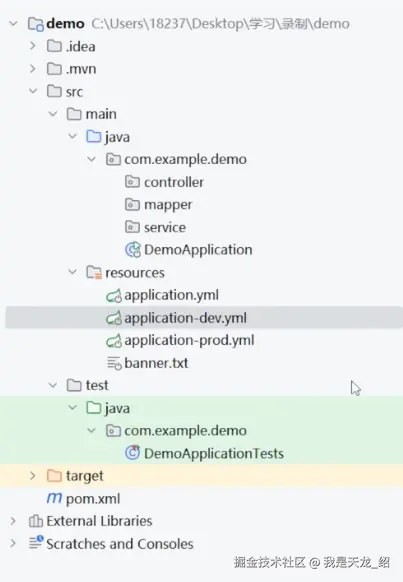
目录结构:
SpringBoot项目配置
用的Spring Boot3的依赖代码,如下面代码:
1. 添加依赖
在pom.xml中添加必要的依赖:
xml
<!-- Mybatis-Plus -->
<dependency>
    <groupId>com.baomidou</groupId>
    <artifactId>mybatis-plus-boot-starter</artifactId>
    <version>3.4.3.4</version>
</dependency>

<!-- MySQL驱动 -->
<dependency>
    <groupId>mysql</groupId>
    <artifactId>mysql-connector-java</artifactId>
    <version>8.0.28</version>
</dependency>

<!-- Lombok -->
<dependency>
    <groupId>org.projectlombok</groupId>
    <artifactId>lombok</artifactId>
    <optional>true</optional>
</dependency>
2. 配置文件
在application.yml中配置数据源:
yaml
spring:
  datasource:
    driver-class-name: com.mysql.cj.jdbc.Driver
    url: jdbc:mysql://localhost:3306/0813_demo?useUnicode=true&characterEncoding=utf-8&useSSL=false&serverTimezone=Asia/Shanghai
    username: root
    password: 123456
在resources文件夹创建一个mapper文件。
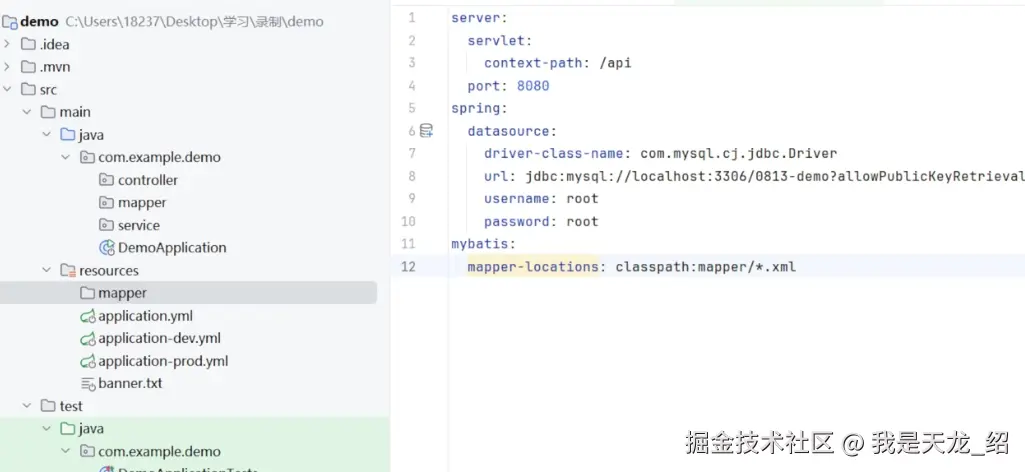
然后粘贴mybatis配置:
yaml
spring:
  datasource:
    driver-class-name: com.mysql.cj.jdbc.Driver
    url: jdbc:mysql://localhost:3306/0813_demo?useUnicode=true&characterEncoding=utf-8&useSSL=false&serverTimezone=Asia/Shanghai
    username: root
    password: 123456
mybatis:
mapper-locations: classpath:mapper/*.xml在DemoApplication启动文件里面粘贴一下: @MappeprScan("com.baomidou.mybatisplus.samples.quickstart.mapper")
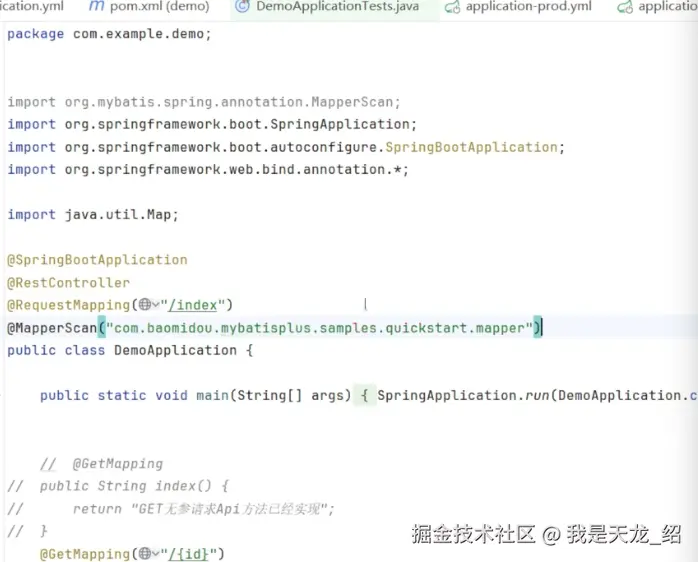
把com.baomidou.mybatisplus.samples.quickstart.mapper这个路径改成我们的项目的路径com.example.demo.mapper,
接着还要引一个包,就是上面的lombok,直接写实体类的get set方法特别冗余。
有lombok就可以不用再写get set方法了。直接用data注解就可以替代了。
// pom.xml
xml
<!-- Lombok -->
<dependency>
    <groupId>org.projectlombok</groupId>
    <artifactId>lombok</artifactId>
    <optional>true</optional>
</dependency>然后在com.example.demo下创建一个实体类entity,然后再entity下面创建User类,
User类给它复制过来: // java/com.example.demo/entity/User // User.java
java
@Data // 鼠标放上去导包
@TableName("`user`")
public class User {
  private Long id;
  private String name;
  private Integer age;
  private String email;
}
java
package com.example.demo.entity;

@Data // 鼠标放上去导包
@TableName("`user`")
public class User {
  private Long id;
  private String name;
  private Integer age;
  private String email;
}
导包之后的代码是:
java
package com.example.demo.entity;

import com.baomidou.mybatisplus.annotation.TableName;
import lombok.Data;

@Data // 鼠标放上去导包
@TableName("`user`")
public class User {
  private Long id;
  private String name;
  private Integer age;
  private String email;
}在mapper创建mapper接口类,UserMapper:
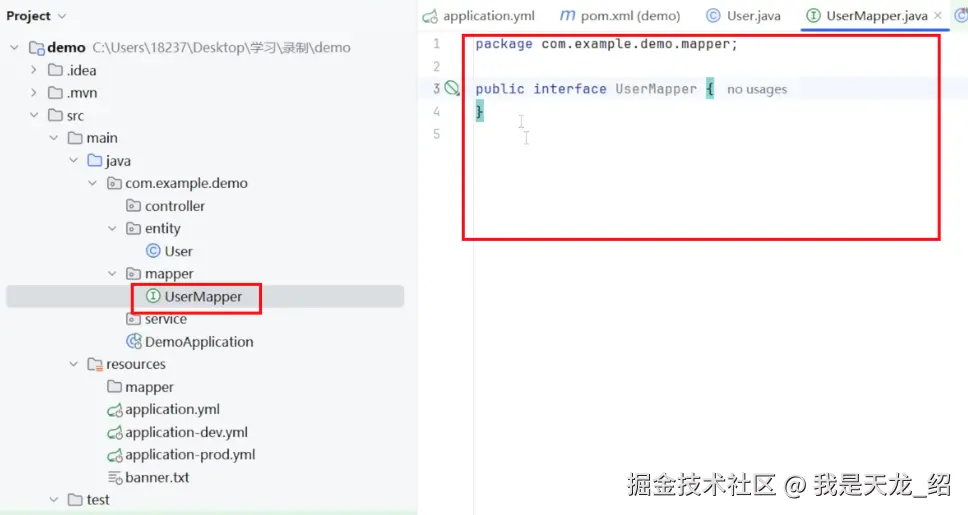
// mapper/UserMapper
java
package com.example.demo.mapper;

本来是:
public interface UserMapper {
}

换成这种:
public interface UserMapper extends BaseMapper<User> {
}鼠标放在这两个单词上面,然后去导包:
java
package com.example.demo.mapper;

import com.baomidou.mybatisplus.core.mapper.BaseMapper;
import  com.example.demo.entity.User;

public interface UserMapper extends BaseMapper<User> {
}为啥是个接口类,因为User继承了BaseMapper,BaseMapper在这里定义了很多方法,启动的时候,Mybatis-Plus会识别继承BaseMapper的接口,通过传进去的泛型对象,自动为它们创建实现类,并且添加到springboot容器中,所以需要这个MapperScan去确定一下这个map包的路径。
java
package com.example.demo.mapper;

import com.baomidou.mybatisplus.core.mapper.BaseMapper;
import  com.example.demo.entity.User;

public interface UserMapper extends BaseMapper<User> {
}这个接口还可以添加一个@Mapper去进行标识:
java
package com.example.demo.mapper;

import com.baomidou.mybatisplus.core.mapper.BaseMapper;
import  com.example.demo.entity.User;
import org.apache.ibatis.annotations.Mapper;

@Mapper
public interface UserMapper extends BaseMapper<User> {
}
这个时候增删改查就写完了。
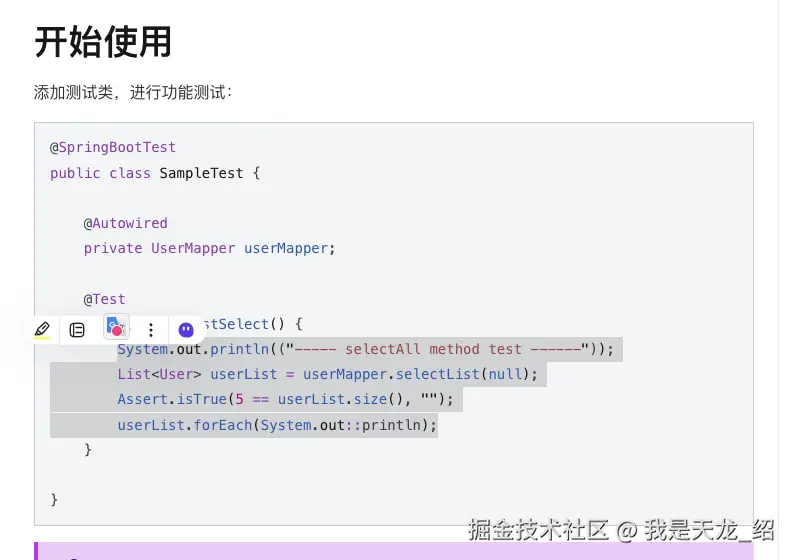
然后怎么测试,可以在test/java/com.example.demo/DemoApplicationTests这个类中去用一下去测试一下,
java
// DemoApplicationTests.java
package com.example.demo;

import

@SpringBootTest
class DemoApplicationTests {
  @Test
  void contextLoads() {
  }
}
可以在这里注入userMapper对象, 可以用outwhite注解还可以用resouce注解,然后在其他类中注入springBoot容器中的对象。
用outwhite写:
java
// DemoApplicationTests.java
package com.example.demo;

import

@SpringBootTest
class DemoApplicationTests {
  @Autowired
  private UserMapper userMapper;
  @Test
  void contextLoads() {
  }
}没有通过new去创建对象,只通过注解修饰就可以使用它里面的方法了,也可以把@Autowired换成@Resource,一个是依据类型寻找对象,一个是根据名称寻找对象。
所以就可以明白如何在这个springboot中使用容器中的这个对象。
mybatis-plus在项目启动后,会根据mapper scan注解去找map接口,并且实例化放到容器中。
然后在测试方法中去测试一下:
java
// DemoApplicationTests.java
package com.example.demo;

import

@SpringBootTest
class DemoApplicationTests {
  @Autowired
  private UserMapper userMapper;
  @Test
  void contextLoads() {
    System.out.println(("----- selectAll method test ------"));

    List<User> userList = userMapper.selectList(null);

    Assert.isTrue(5 == userList.size(), "");

    userList.forEach(System.out::println);
  }
}
在这里去复制一下代码,官网地址是:baomidou.com/getting-sta...
凡是需要导包的,都放鼠标上去然后回车一下就可以导包成功。
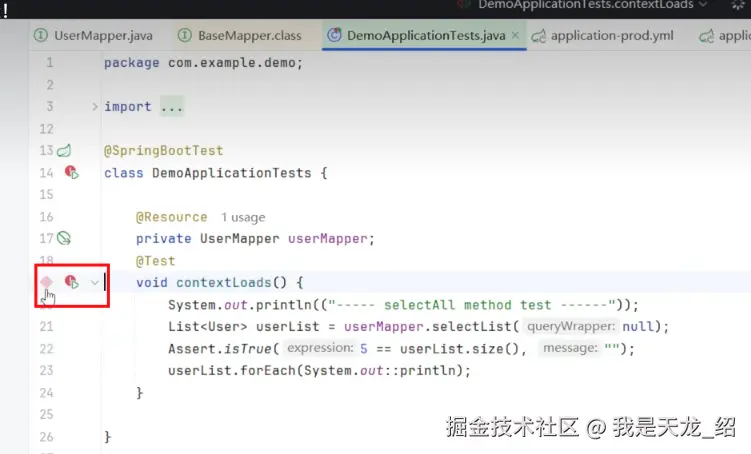
点击去运行一下。
运行成功,这是查询列表的方法。
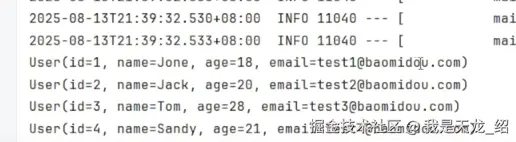

很简单,一行sql都没有。
yaml
# Mybatis-Plus配置
mybatis-plus:
  configuration:
    log-impl: org.apache.ibatis.logging.stdout.StdOutImpl  # 打印SQL日志
  mapper-locations: classpath*:/mapper/**/*.xml
  global-config:
    db-config:
      id-type: auto
      table-prefix: t_
代码实现
1. 实体类
创建User实体类:
java
package com.example.demo.entity;

import com.baomidou.mybatisplus.annotation.TableName;
import lombok.Data;

@Data
@TableName("user")  // 指定对应数据库表名
public class User {
    private Long id;
    private String name;
    private Integer age;
    private String email;
}
2. Mapper接口
创建UserMapper接口:
java
package com.example.demo.mapper;

import com.baomidou.mybatisplus.core.mapper.BaseMapper;
import com.example.demo.entity.User;
import org.apache.ibatis.annotations.Mapper;

@Mapper
public interface UserMapper extends BaseMapper<User> {
    // 继承BaseMapper后,无需编写基本CRUD方法
}
3. 启动类配置
在启动类上添加Mapper扫描注解:
java
package com.example.demo;

import org.springframework.boot.SpringApplication;
import org.springframework.boot.autoconfigure.SpringBootApplication;

@SpringBootApplication
public class DemoApplication {
    public static void main(String[] args) {
        SpringApplication.run(DemoApplication.class, args);
    }
}
使用示例
1. 服务类中使用
java
package com.example.demo.service;

import com.baomidou.mybatisplus.core.conditions.query.QueryWrapper;
import com.example.demo.entity.User;
import com.example.demo.mapper.UserMapper;
import org.springframework.beans.factory.annotation.Autowired;
import org.springframework.stereotype.Service;

import java.util.List;

@Service
public class UserService {

    @Autowired
    private UserMapper userMapper;

    // 查询所有用户
    public List<User> findAll() {
        return userMapper.selectList(null);
    }

    // 根据ID查询
    public User findById(Long id) {
        return userMapper.selectById(id);
    }

    // 条件查询
    public List<User> findByName(String name) {
        QueryWrapper<User> wrapper = new QueryWrapper<>();
        wrapper.like("name", name);
        return userMapper.selectList(wrapper);
    }

    // 新增用户
    public int insert(User user) {
        return userMapper.insert(user);
    }

    // 更新用户
    public int update(User user) {
        return userMapper.updateById(user);
    }

    // 删除用户
    public int delete(Long id) {
        return userMapper.deleteById(id);
    }
}
2. 控制器类
java
package com.example.demo.controller;

import com.example.demo.entity.User;
import com.example.demo.service.UserService;
import org.springframework.beans.factory.annotation.Autowired;
import org.springframework.web.bind.annotation.*;

import java.util.List;

@RestController
@RequestMapping("/user")
public class UserController {

    @Autowired
    private UserService userService;

    @GetMapping
    public List<User> list() {
        return userService.findAll();
    }

    @GetMapping("/{id}")
    public User getById(@PathVariable Long id) {
        return userService.findById(id);
    }

    @PostMapping
    public String add(@RequestBody User user) {
        userService.insert(user);
        return "添加成功";
    }

    @PutMapping
    public String update(@RequestBody User user) {
        userService.update(user);
        return "更新成功";
    }

    @DeleteMapping("/{id}")
    public String delete(@PathVariable Long id) {
        userService.delete(id);
        return "删除成功";
    }
}
3. 测试类
java
package com.example.demo;

import com.example.demo.entity.User;
import com.example.demo.mapper.UserMapper;
import org.junit.jupiter.api.Test;
import org.springframework.beans.factory.annotation.Autowired;
import org.springframework.boot.test.context.SpringBootTest;

import java.util.List;

@SpringBootTest
class DemoApplicationTests {

    @Autowired
    private UserMapper userMapper;

    @Test
    void testSelect() {
        System.out.println("----- 查询所有用户 ------");
        List<User> userList = userMapper.selectList(null);
        userList.forEach(System.out::println);

        System.out.println("----- 根据ID查询 ------");
        User user = userMapper.selectById(1L);
        System.out.println(user);

        System.out.println("----- 统计用户数量 ------");
        Integer count = userMapper.selectCount(null);
        System.out.println("总用户数: " + count);
    }
}
Mybatis-Plus核心特性
1. 常用注解
@TableName:表名注解@TableId:主键注解@TableField:字段注解@Version:乐观锁注解@EnumValue:枚举注解
2. 条件构造器
java
// 复杂查询示例
QueryWrapper<User> wrapper = new QueryWrapper<>();
wrapper.select("id", "name", "age")
      .like("name", "张")
      .between("age", 18, 30)
      .orderByDesc("id");
List<User> users = userMapper.selectList(wrapper);
3. 分页查询
java
// 配置分页插件
@Configuration
public class MybatisPlusConfig {
    @Bean
    public MybatisPlusInterceptor mybatisPlusInterceptor() {
        MybatisPlusInterceptor interceptor = new MybatisPlusInterceptor();
        interceptor.addInnerInterceptor(new PaginationInnerInterceptor(DbType.MYSQL));
        return interceptor;
    }
}

// 使用分页
Page<User> page = new Page<>(1, 10);  // 第1页,每页10条
Page<User> result = userMapper.selectPage(page, null);
List<User> records = result.getRecords();
long total = result.getTotal();
总结
通过本教程,您已经学会了:
- 创建数据库和表
- 在SpringBoot中集成Mybatis-Plus
- 配置数据源和Mybatis-Plus
- 创建实体类和Mapper接口
- 使用Mybatis-Plus进行CRUD操作
- 使用条件构造器进行复杂查询
Mybatis-Plus大大简化了数据库操作,让开发者可以更专注于业务逻辑的实现,提高了开发效率。