文章目录
一、用户管理
linux中用户分为两类:超级用户(root,uid=0,拥有所有权限)普通用户(uid>=1000,权限受限)
1,创建用户(useradd)
| 命令选项 | |
|---|---|
| 无 | 创建用户(默认无家目录,无登录shell,需要手动配置) |
| -m | 自动创建用户家目录(默认路径:/home/用户名) |
| -s | 指定用户登录shell(/bin/bash,可登录)/sbin/nologin,禁止登录 |
| -u | 指定用户UID(UID>=1000) |
| -d | 自定义家目录 |
| -e | 设置用户过期时间(格式:YYYY-MM-DD),过期后无法登录 |
!NOTE
创建用户后,需要用
passwd 用户名来设置密码,否则无法登录。
bash
!!bantu中不加选项默认不创建家目录
[root@localhost redhat-test]# useradd test1
[root@localhost redhat-test]# tail -1 /etc/passwd
test1:x:1001:1001::/home/test1:/bin/bash

创建test4,禁止登录
[root@localhost redhat-test]# useradd -s /sbin/nologin test4
[root@localhost redhat-test]# tail -1 /etc/passwd
test4:x:1006:1006::/home/test4:/sbin/nologin


示例:新建一个用户wang5,指定其UID为1005、登录Shell为/bin/bash,账号2030年1月1日
[root@localhost redhat-test]# useradd -u 1005 -s /bin/bash -e 20300101 test3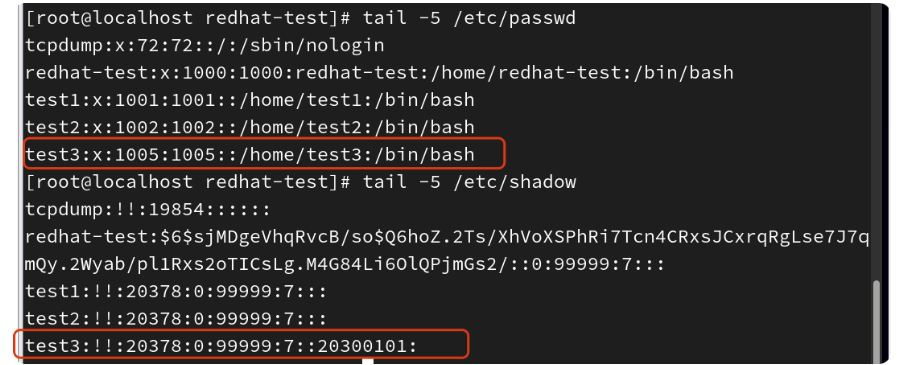
2、修改用户属性(usermod)
usermod用于修改(家目录,shell,uid,过期时间等属性)
| -d | 修改家目录 |
|---|---|
| -s | 修改登录shell(禁止用户登陆) |
| -u | 修改uid |
| -L | 锁定用户(无法登录,密码失效) |
| -U | 解锁用户(恢复登录) |
| -e | 修改用户过期时间 |
3、删除用户(userdel)
userdel用于删除用户,默认删除用户账号,不删除家目录
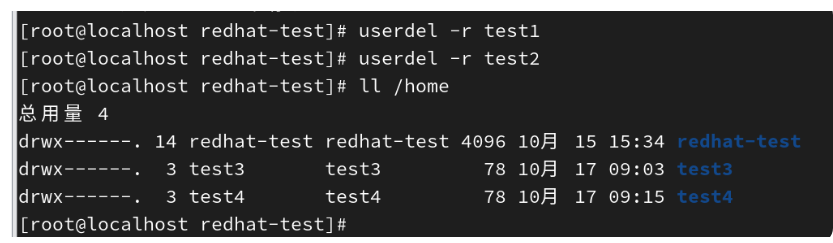
| -r | 测底删除用户 |
|---|
删除test1,test2
二、组管理
组是用户的集合,用于批量分配权限。组分为私有组(默认创建用户时自动生成,与用户名同名)和自定义组(手动创建)
1,组创建(groupadd)
| 无选项 | 创建组(默认gid从1000开始递增) |
|---|---|
| -g | 指定GID |
| -r | 创建系统组 |
bash
[root@localhost redhat-test]# groupadd group1
[root@localhost redhat-test]# grep group1 /etc/group
group1:x:1007:

#创建组group2,gid为1010
[root@localhost redhat-test]# groupadd -g 1010 group2
[root@localhost redhat-test]# grep group2 /etc/group
group2:x:1010:

#创建系统组
[root@localhost redhat-test]# groupadd -r groupsys
[root@localhost redhat-test]# grep groupsys /etc/group
groupsys:x:977:
2,修改组属性(groupmod)
| -n | 修改组名称 |
|---|---|
| -g | 修改组gid |
bash
#修改group1为newgroup1,gid为1020
[root@localhost redhat-test]# groupmod -n newgroup1 -g 1020 group1
[root@localhost redhat-test]# grep newgroup1 /etc/group
newgroup1:x:1020:
3,删除组(groupdel)
groupdel删除组时,组内应无用户(若有用户需要先将用户移除组或删除用户)
| groupdel 组名 | 删除指定组 |
|---|
若组test组内用用户haha,需要先将haha移除组,在删除组
bash
sudo gpasswd -d haha test
sudo groupdel test
4,用户与组
用户可以属于一个主组和多个附加组
usermod -g 主组 用户名 |
更改用户主组 |
|---|---|
usermod -aG 附加组 用户名 |
给用户天添加附加组(-a表示追加,避免覆盖) |
gpasswd -d 用户名 组名 |
将用户从指定组中移除 |
bash
#修改test3的主组为group2
[root@localhost redhat-test]# usermod -g group2 test3
[root@localhost redhat-test]# id test3
用户id=1005(test3) 组id=1010(group2) 组=1010(group2)


#给test3添加附加组fujia
[root@localhost redhat-test]# usermod -aG fujia test3
[root@localhost redhat-test]# id test3
用户id=1005(test3) 组id=1010(group2) 组=1010(group2),1022(fujia)
三、权限管理
每个文件都有所有者(u),所属组(g),其他用户(o)三类权限。分为读(r=4),写(w=2),执行(x=1),通过ls -l可以查看权限,chmod修改权限,chown修改所有者,chgrp修改所属组
bash
[root@localhost redhat-test]# ls -l test.txt
-rw-r--r--. 1 root root 6 10月 17 13:51 test.txt
- 表示普通文件
rw- 表示所有者root的权限(可读可写,不能执行)
r-- 表示所属组root的权限(可读,不能写,不能执行)
r-- 表示其他用户的权限,同上
1,修改权限(chmod)
chmod用于修改文件、目录的权限,有符号模式和数字模式
- 角色:u所有者,g所属组,o其他用户,a所有角色()
- 操作:+,-,=
- 权限:r,w,x
(1)符号模式
| 命令 | 说明 |
|---|---|
| chmod u+x test.sh | 给所有者u添加执行权限x(脚本文件需要执行权限) |
| chmod g+rw group/ | 给所属组添加读写权限(允许组内用户修改目录内容) |
| chmod o-r test.txt | 移除其他用户的读权限(只有所有者和组内用户可读) |
| chmod a=rw file.txt | 给所有角色设置读写权限 |
| chmod ug+x o-x test.sh | 给所有者和所属组添加执行权限,移除其他用户的执行权限 |
(2)数字模式
用三位数字表示权限(r=4,w=2,x=1,总和为权限值)
| rw-r--r-- | 644 | 所有者读写,其他只读 |
|---|---|---|
| rwxr-xr-x | 755 | 所有者全部权限,其他可读可执行 |
| rw-rw-r-- | 664 | 所有者和组内可读写,其他只读 |
bash
chmod 755 test.sh  #所有者全部权限,其他用户可读可执行
chmod 775 doc/    #所有者和组内用户可读可写可执行,其他用户可读可执行
!NOTE
目录必须有x权限才能进入,及时有r权限,无x也无法查看目录内容
修改目录权限时,若要递归修改目录所有文件或子目录,需要加-R
2,修改所有者(chown)
可单独修改文件或目录的所有者
| chown haha test.txt | 将test.txt的所有者改为haha |
|---|---|
| chown xixi:group doc/ | 将doc/的所有者改为xixi,所属组改为group |
3,修改所属组(chgrp)
chgrp 仅用于修改文件和目录的所属组(chown也可以修改)
chgrp group test.txt 将test.txt的所属组改为group

chgrp -R test doc/  递归修改doc/和内部文件所属组为test
4,acl权限
acl提供跟细的权限控制,可以针对单个用户或组设置权限
- setfacl:设置acl规则
- getfacl:查看acl规则
(1)查看acl权限getfacl
bash
[root@localhost redhat-test]# getfacl test.txt
# file: test.txt
# owner: root
# group: root
user::rw-
group::r--
other::r--
(2)为用户设置权限acl
bash
setfacl -m u:test:rw test.txt  授予用户test对文件test.txt的读写权限
[root@localhost redhat-test]# setfacl -m u:test1:rw test.txt

[root@localhost redhat-test]# getfacl test.txt
# file: test.txt
# owner: root
# group: root
user::rw-
user:test1:rw-
group::r--
mask::rw-
other::r--


#对组设置acl权限

[root@localhost group6]# setfacl -m g:group4:rwx file.txt
[root@localhost group6]# getfacl file.txt
# file: file.txt
# owner: root
# group: root
user::rw-
group::r--
group:group4:rwx
mask::rwx
other::r--
(3)设置默认acl
bash
# 在 /home/test1 上设置默认 ACL,使得未来所有新文件都对group4 组可读
[root@localhost home]# setfacl -m d:g:group4:r ./test1
[root@localhost home]# cd test1
[root@localhost test1]# touch test.txt
[root@localhost test1]# getfacl test.txt
# file: test.txt
# owner: root
# group: root
user::rw-
group::---
group:group4:r--
mask::r--
other::---
 # 自动继承了默认 ACL
(4)删除特定acl
bash
# 删除用户 test1 在 test.txt 上的 ACL 规则
[root@localhost redhat-test]# getfacl test.txt
# file: test.txt
# owner: root
# group: root
user::rw-
user:test1:rw-
group::r--
mask::rw-
other::r--

[root@localhost redhat-test]# setfacl -x u:test1 test.txt

[root@localhost redhat-test]# getfacl test.txt
# file: test.txt
# owner: root
# group: root
user::rw-
group::r--
mask::r--
other::r--

# 删除组 gourp4 在 file。txt上的 ACL 规则
[root@localhost group6]# getfacl file.txt
# file: file.txt
# owner: root
# group: root
user::rw-
group::r--
group:group4:rwx
mask::rwx
other::r--
[root@localhost group6]# setfacl -x g:group4 file.txt
[root@localhost group6]# getfacl file.txt
# file: file.txt
# owner: root
# group: root
user::rw-
group::r--
mask::r--
other::r--
(5)清除所有acl
bash
# 清除 file.txt 上的所有扩展 ACL 规则,恢复标准权限
$ setfacl -b file.txt