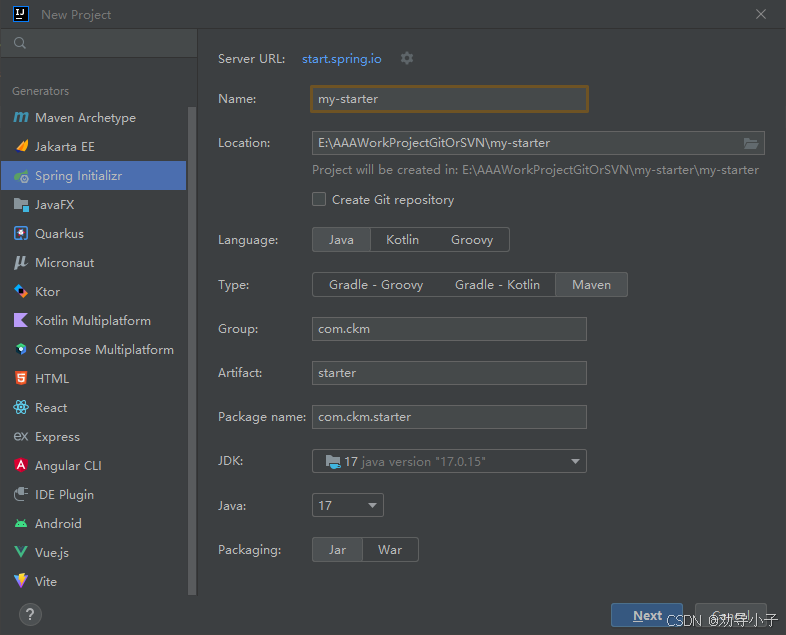
1、创建starter项目
我电脑只有JDK 8,但是创建项目的时候最低只能选择17,后续创建完后去修改即可
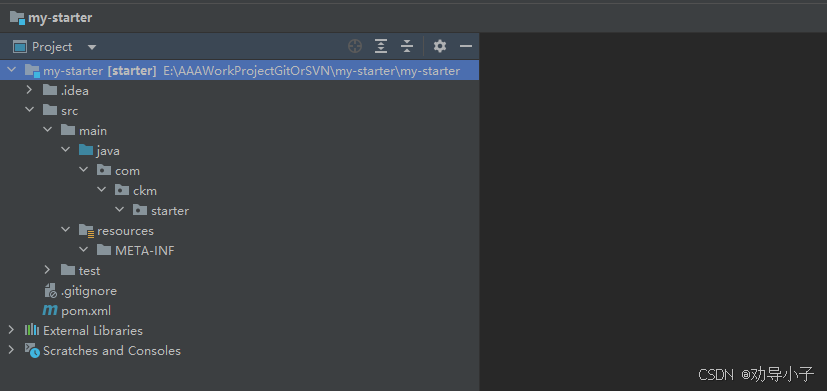
2、项目结构
- 删除主启动类Application:Starter不需要启动类
- 删除配置文件application.properties:Starter不需要自己的配置文件
- 删除test里面的测试启动类
在resources下创建META-INF文件夹
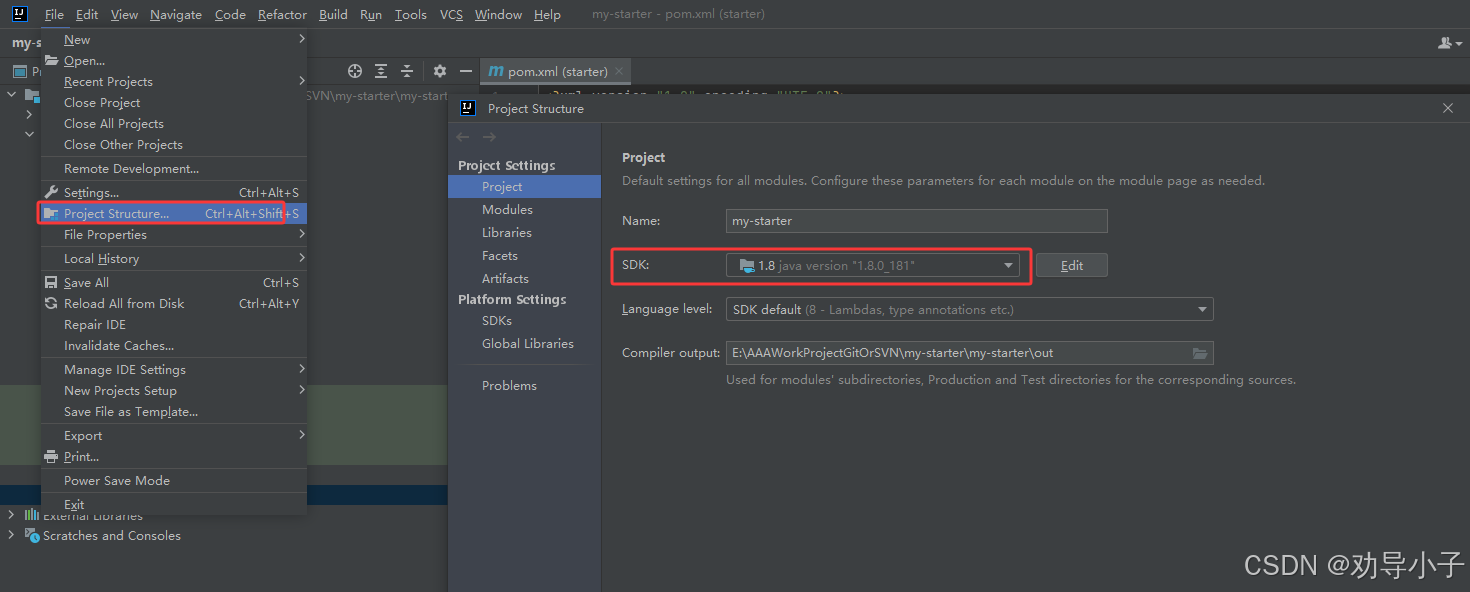
3、修改JDK
修改成JDK8,如果你有更高的版本请切换
4、配置pom.xml
xml
<?xml version="1.0" encoding="UTF-8"?>
<project xmlns="http://maven.apache.org/POM/4.0.0" xmlns:xsi="http://www.w3.org/2001/XMLSchema-instance"
         xsi:schemaLocation="http://maven.apache.org/POM/4.0.0 https://maven.apache.org/xsd/maven-4.0.0.xsd">
    <modelVersion>4.0.0</modelVersion>
    <!-- 继承SpringBoot父项目 -->
    <parent>
        <groupId>org.springframework.boot</groupId>
        <artifactId>spring-boot-starter-parent</artifactId>
        <version>2.6.3</version> <!-- 适配JDK 8 的版本 -->
        <relativePath/> <!-- lookup parent from repository -->
    </parent>
    <!-- 项目基本信息 -->
    <groupId>com.ckm</groupId>
    <artifactId>starter</artifactId>
    <version>0.0.1-SNAPSHOT</version>
    <name>my-starter</name>
    <description>my-starter</description>
    <url/>
    <licenses>
        <license/>
    </licenses>
    <developers>
        <developer/>
    </developers>
    <scm>
        <connection/>
        <developerConnection/>
        <tag/>
        <url/>
    </scm>

    <properties>
        <java.version>8</java.version> <!-- JDK 8 -->
    </properties>
    <dependencies>
        <dependency>
            <groupId>org.springframework.boot</groupId>
            <artifactId>spring-boot-starter</artifactId>
        </dependency>

        <!-- 可选:配置元数据(后面文章会讲) -->
        <dependency>
            <groupId>org.springframework.boot</groupId>
            <artifactId>spring-boot-configuration-processor</artifactId>
            <optional>true</optional>
        </dependency>

        <!-- 可选:Lombok,简化代码 -->
        <dependency>
            <groupId>org.projectlombok</groupId>
            <artifactId>lombok</artifactId>
            <optional>true</optional>
        </dependency>
    </dependencies>

    <build>
        <plugins>
            <plugin>
                <groupId>org.springframework.boot</groupId>
                <artifactId>spring-boot-maven-plugin</artifactId>
                <configuration>
                    <skip>true</skip> <!-- 打包时跳过主启动类,必须加这个不然打包会报错 -->
                </configuration>
            </plugin>
        </plugins>
    </build>

</project>
注意这里的<optional>
xml
<!-- Starter项目 -->
<!-- Starter项目 -->
<dependency>
    <groupId>org.projectlombok</groupId>
    <artifactId>lombok</artifactId>
    <optional>true</optional>  ← 注意这里
</dependency>
<optional>true</optional>的意思是Starter项目自己可以用Lombok,引用Starter项目的项目不会自动引入Lombok
5、创建业务类、自动配置类、配置属性类
5.1 业务类
java
package com.ckm.starter;

/**
 * Hello服务类
 * 提供简单的问候功能
 */
public class HelloService {

    private String prefix;  // 前缀
    private String suffix;  // 后缀

    public HelloService(String prefix, String suffix) {
        this.prefix = prefix;
        this.suffix = suffix;
    }

    /**
     * 说Hello
     * @param name 名字
     * @return 问候语
     */
    public String sayHello(String name) {
        return prefix + " " + name + " " + suffix;
    }
}
5.2 自动配置类(核心)
java
package com.ckm.starter;

import org.springframework.boot.autoconfigure.condition.ConditionalOnMissingBean;
import org.springframework.boot.context.properties.EnableConfigurationProperties;
import org.springframework.context.annotation.Bean;
import org.springframework.context.annotation.Configuration;

/**
 * Hello自动配置类
 * SpringBoot启动时会自动加载这个配置类
 */
@Configuration  // ← 标记为配置类
@EnableConfigurationProperties(HelloProperties.class)  // ← 启用配置属性
public class HelloAutoConfiguration {

    /**
     * 注册HelloService到Spring容器
     * @param properties 配置属性
     * @return HelloService实例
     */
    @Bean  // ← 注册为Bean
    @ConditionalOnMissingBean  // ← 如果容器中没有HelloService才注册
    public HelloService helloService(HelloProperties properties) {
        return new HelloService(properties.getPrefix(), properties.getSuffix());
    }
}
5.3 配置属性类
java
package com.ckm.starter;

import org.springframework.boot.context.properties.ConfigurationProperties;

/**
 * Hello配置属性类
 * 对应配置文件中的 hello.* 配置
 */
@ConfigurationProperties(prefix = "hello")
public class HelloProperties {

    /**
     * 前缀,默认值:Hello
     */
    private String prefix = "Hello";

    /**
     * 后缀,默认值:!
     */
    private String suffix = "!";

    // Getter 和 Setter
    public String getPrefix() {
        return prefix;
    }

    public void setPrefix(String prefix) {
        this.prefix = prefix;
    }

    public String getSuffix() {
        return suffix;
    }

    public void setSuffix(String suffix) {
        this.suffix = suffix;
    }
}
三个类的关系:
bash
HelloProperties(配置)
        ↓ 读取配置文件
HelloAutoConfiguration(自动配置)
        ↓ 创建并注册Bean
HelloService(业务类)
        ↓ 被注入到Spring容器
使用方可以 @Autowired 使用
6、创建spring.factories
在resource的META-INF文件夹下创建spring.factories
文件内容:
bash
# Auto Configure
org.springframework.boot.autoconfigure.EnableAutoConfiguration=\
com.ckm.starter.HelloAutoConfiguration
如果有多个可以使用逗号分割,如:
xml
org.springframework.boot.autoconfigure.EnableAutoConfiguration=\
com.ckm.starter.HelloAutoConfiguration,\
com.ckm.starter.OtherAutoConfiguration
格式解读:
bash
org.springframework.boot.autoconfigure.EnableAutoConfiguration=\
  ↓
这是固定的key,SpringBoot会读取这个key

com.ckm.starter.HelloAutoConfiguration
  ↓
你的自动配置类的全限定名
SpringBoot约定必须是读取META-INF/spring.factories
java
// SpringBoot源码(简化版)
public class SpringFactoriesLoader {
public static final String FACTORIES_RESOURCE_LOCATION =
"META-INF/spring.factories"; // ← 看!写死的路径
public static List<String> loadFactoryNames() {
// 扫描所有jar包的 META-INF/spring.factories
// 读取配置
// 加载自动配置类
}
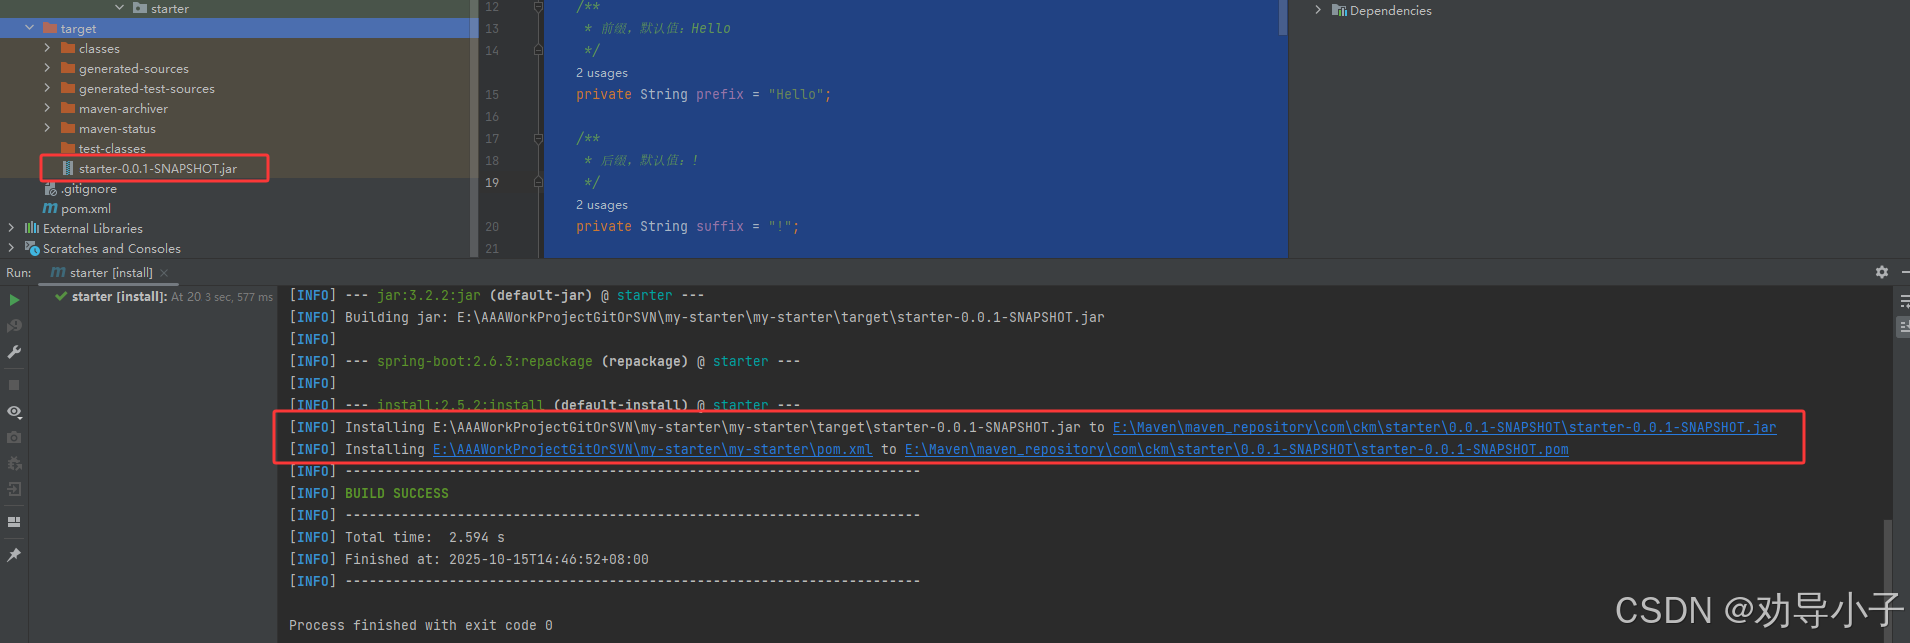
}7、打包
Maven三大打包命令
命令对比:
| 命令 | 全称 | 作用 | 结果 |
|---|---|---|---|
package |
打包 | 编译+测试+打jar包 | jar包在target目录 |
install |
安装 | package + 部署到本地仓库 | jar包在本地Maven仓库 |
deploy |
部署 | install + 部署到远程仓库 | jar包在本地+远程仓库 |
我们这里测试直接使用install打包
8、其他项目使用
8.1 在其他项目pom.xml中引入
xml
<dependency>
    <groupId>com.ckm</groupId>
    <artifactId>starter</artifactId>
    <version>0.0.1-SNAPSHOT</version>
</dependency>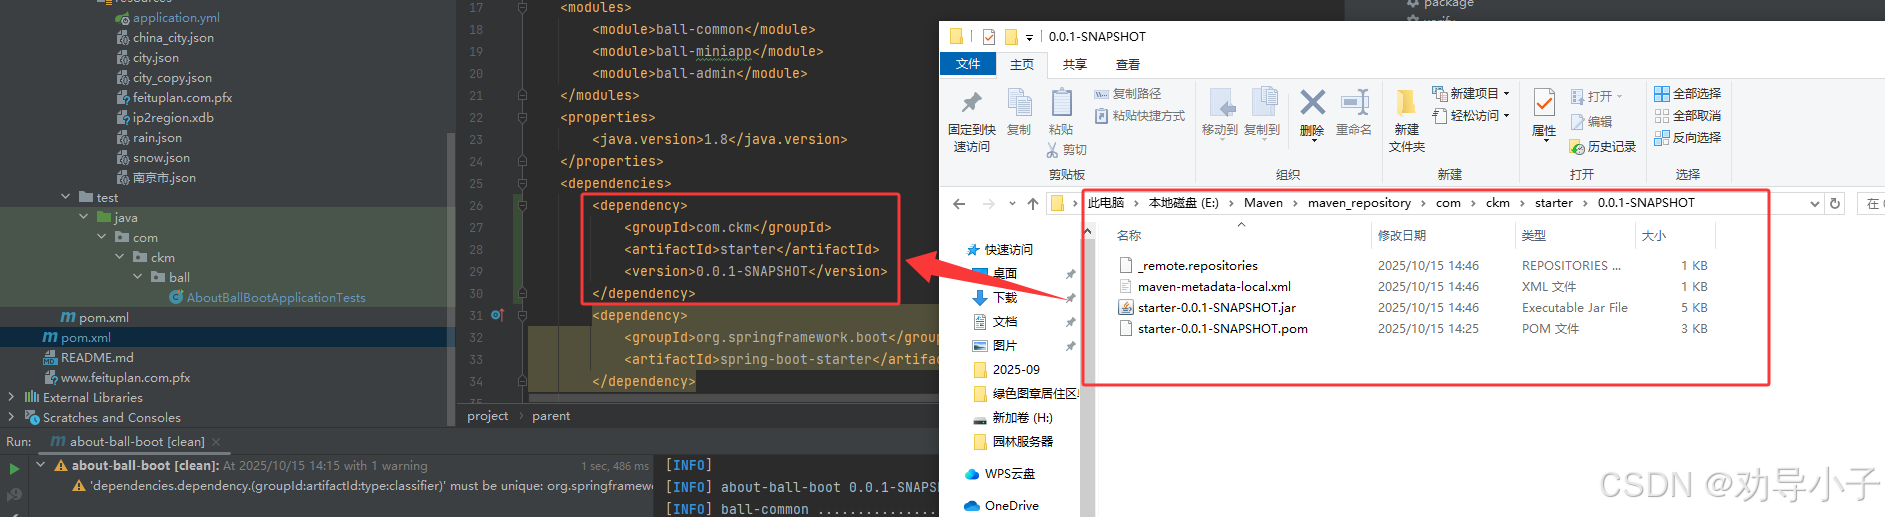
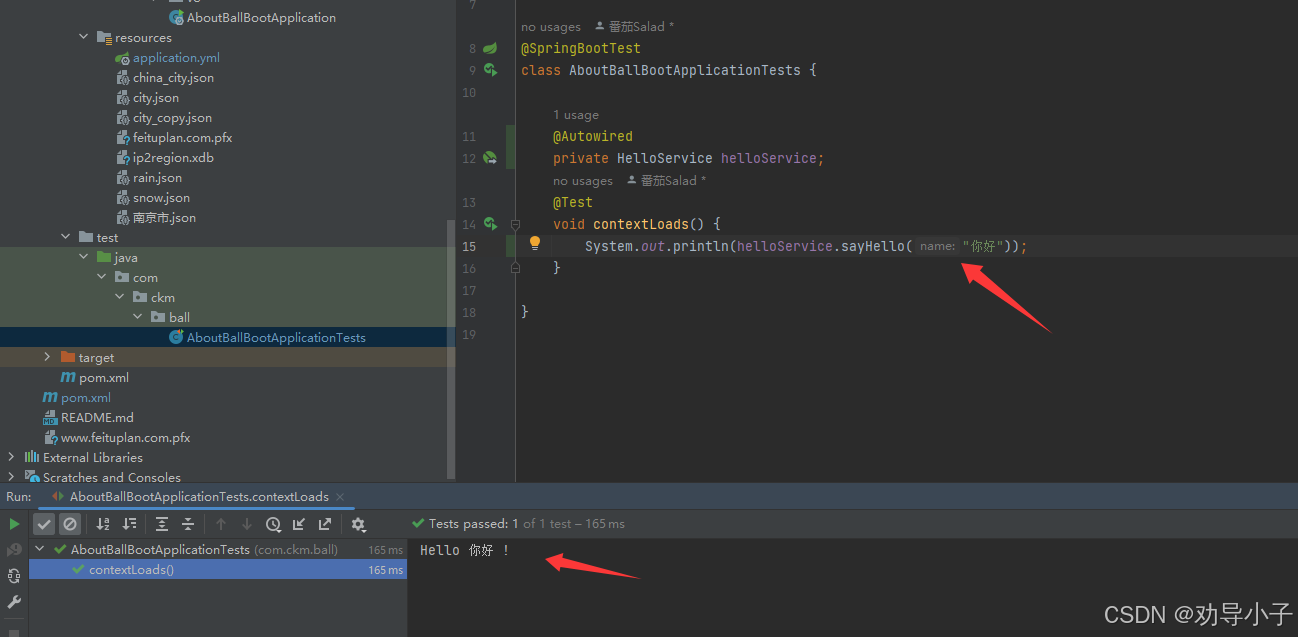
8.2 编写测试类
java
package com.ckm.ball;

import com.ckm.starter.HelloService;
import org.junit.jupiter.api.Test;
import org.springframework.beans.factory.annotation.Autowired;
import org.springframework.boot.test.context.SpringBootTest;

@SpringBootTest
class AboutBallBootApplicationTests {

    @Autowired
    private HelloService helloService;
    @Test
    void contextLoads() {
        System.out.println(helloService.sayHello("你好"));
    }

}
8.3 自定义配置hello属性值
xml
hello:
  prefix: "世界"
  suffix: "。"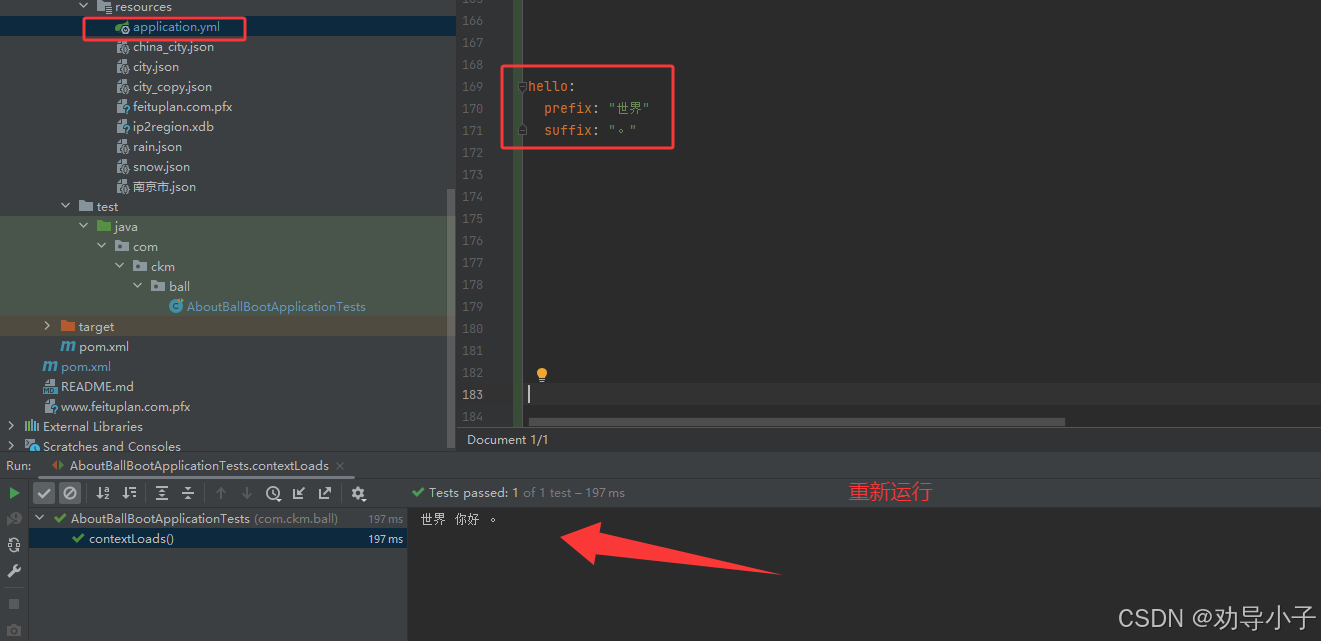
本文参考:https://blog.csdn.net/2301_78967994/article/details/152665942
9、实现可插拔Starter
https://blog.csdn.net/2301_78967994/article/details/152666034
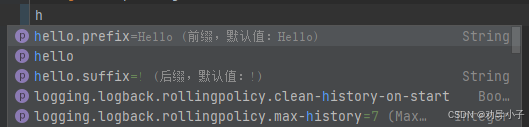
10、配置元数据让你的Starter拥有智能提示
https://blog.csdn.net/2301_78967994/article/details/152666090
随着版本的更新,现在不用自动配置元数据就能识别出来了
没有配置元数据: