玩Android 纯血鸿蒙版
最近利用一些休息时间,开发了纯血鸿蒙版的玩Android,代码已经提交到gitee,感兴趣的同学可以下载打包使用(文章同步发布到稀土掘金)
仓库地址
项目介绍
结合v2版本的状态管理,使用MVVM模式,官方demo可参考:MVVM模式(状态管理V2)
- 支持浅色/深色模式(跟随系统)
- 支持语言切换(跟随系统)
- 支持沉浸式状态栏
- 通用的appbar
- 支持页面导航路由
- ...
相关技术
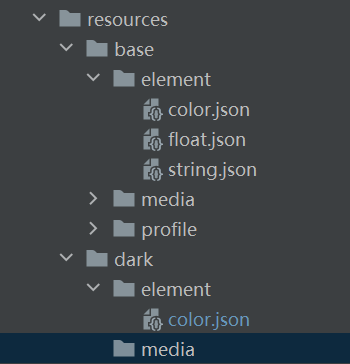
一、浅色/深色模式
与android配置类似,在resources下创建dark目录,在目录下存放深色模式的颜色&图片等资源。其中base则是浅色使用的资源
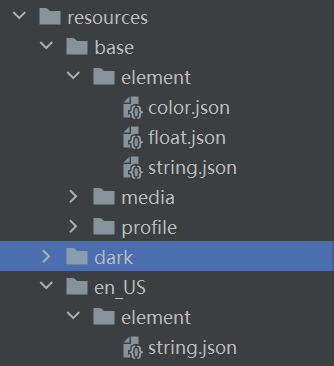
二、语言切换
与android配置类似,在resources下创建en_US目录,在目录下存放en_US等资源。其中base则是默认使用的资源
三、沉浸式状态栏
目前官方提供两种方式支持沉浸式状态栏:
-
窗口全屏布局方案(项目中使用该方案)
// 1. 设置窗口全屏
windowStage.loadContent('pages/Index', (err) => {
...
let isLayoutFullScreen = true;
windowClass.setWindowLayoutFullScreen(isLayoutFullScreen).then(() => {
console.info('Succeeded in setting the window layout to full-screen mode.');
}).catch((err: BusinessError) => {
});
});
});// 2. 在Page中通过设置padding避让
export struct BasePage {
@Local statusBarHeight: number = 0
@Local bottomNavHeight: number = 0aboutToAppear(): void {
window.getLastWindow(getContext(this)).then((data) => {
let avoidArea1 = data.getWindowAvoidArea(window.AvoidAreaType.TYPE_SYSTEM)
this.statusBarHeight = avoidArea1.topRect.height
let avoidArea2 = data.getWindowAvoidArea(window.AvoidAreaType.TYPE_NAVIGATION_INDICATOR)
this.bottomNavHeight = avoidArea2.bottomRect.height
}).catch((err: BusinessError) => {
})
}build() {
Column() {
if (this.showAppBar) {
BassAppBar({
appBarColor: this.appBarColor,
title: this.titleName,
backPress: () => {
this.backPress()
},
appBarActionBuild: this.appBarActionBuild
})
}
this.contentBuild()
}
.width("100%")
.height("100%")
.padding({
bottom: this.getUIContext().px2vp(this.bottomNavHeight),
top: this.showAppBar ? 0 : this.getUIContext().px2vp(this.statusBarHeight)
}).backgroundColor($r('app.color.bg_container_color'))
}
}
这里封装了BasePage,结合BaseAppBar,可轻松实现沉浸式状态栏的components
-
组件安全区方案(要注意延伸出去的组件是否与状态栏/导航栏相交)
// xxx.ets
@Entry
@Component
struct Example {
build() {
Column() {
Row() {
Text('Top Content').fontSize(40).textAlign(TextAlign.Center).width('100%')
}.backgroundColor('#2786d9')
// 设置顶部绘制延伸到状态栏
.expandSafeArea([SafeAreaType.SYSTEM], [SafeAreaEdge.TOP])Row() { Text('Display Content 2').fontSize(30) }.backgroundColor(Color.White).padding(20).borderRadius(15).width('80%') Row() { Text('Display Content 3').fontSize(30) }.backgroundColor(Color.White).padding(20).borderRadius(15).width('80%') Row() { Text('Display Content 4').fontSize(30) }.backgroundColor(Color.White).padding(20).borderRadius(15).width('80%') Row() { Text('Display Content 5').fontSize(30) }.backgroundColor(Color.White).padding(20).borderRadius(15).width('80%') Row() { Text('Bottom Content').fontSize(40).textAlign(TextAlign.Center).width('100%') }.backgroundColor('#96dffa') // 设置底部绘制延伸到导航区域 .expandSafeArea([SafeAreaType.SYSTEM], [SafeAreaEdge.BOTTOM]) } .width('100%').height('100%') .alignItems(HorizontalAlign.Center) .backgroundColor('#d5d5d5') .justifyContent(FlexAlign.SpaceBetween)}
}
四、导航路由
比较好用,使用 @HMRouter 标签定义页面,绑定拦截器、生命周期及自定义转场动画
1、全局初始化
export default class EntryAbility extends UIAbility {
  onCreate(want: Want, launchParam: AbilityConstant.LaunchParam): void {
    // 初始化路由管理器
    HMRouterMgr.init({ context: this.context })
    HMRouterMgr.openLog("DEBUG")
  }
}
2. 页面定义
@HMRouter({ pageUrl: AppRoutes.ArticlePage })
@ComponentV2
export default struct ArticlePage {
  ......
}
3. 页面跳转
let commonBrowserModel: CommonBrowserModel = { title: item.title, link: item.link }
RouteManager.toPage({
  route: AppRoutes.ArticlePage,
  param: commonBrowserModel
})
4. 页面携带参数获取
async aboutToAppear(): Promise<void> {
  this.param = RouteManager.getCurrentParam<HotBuzzwordModel>()
  this.searchViewModel.loadSearchData(this.param?.name ?? "", this.currentPage)
}
项目中对HMRouterMgr进行了二次封装,避免繁琐的调用
export default interface RouteParam {
  navigationId?: string
  route: string
  param?: ESObject
  onResult?: Callback<HMPopInfo>
}

export class RouteManager {
  static toPage(routeParam: RouteParam) {
    HMRouterMgr.to(routeParam.route)
      .withNavigation(routeParam.navigationId ?? AppRoutes.NavigationId)
      .withParam(routeParam.param)
      .onResult(routeParam.onResult)
      .pushAsync()
  }

  static toPageAsync(routeParam: RouteParam): Promise<void> {
    return HMRouterMgr.to(routeParam.route)
      .withNavigation(routeParam.navigationId ?? AppRoutes.NavigationId)
      .withParam(routeParam.param)
      .onResult(routeParam.onResult)
      .pushAsync()
  }

  static back(pathInfo?: HMRouterPathInfo): void {
    HMRouterMgr.pop(pathInfo);
  }

  static backAsync(pathInfo?: HMRouterPathInfo): Promise<void> {
    return HMRouterMgr.popAsync(pathInfo);
  }

  static getCurrentParam<T>(type?: HMParamType): T | null {
    let param = HMRouterMgr.getCurrentParam(type)
    try {
      return param as T
    } catch (e) {
      return null
    }
  }
}
五、MVVM
@ObservedV2
export default class HomeViewModel {
  ...
  // banner数据集
  @Trace banners: Array<BannerModel> = new Array<BannerModel>()

  async loadBannerData() {
    get<Array<BannerModel>>({
      url: "banner/json", response: (response) => {
        if (response.data != null && response.data.length > 0) {
          this.banners.push(...response.data)
        }
      }, error: (error: AxiosError) => {
        return Promise.reject(error)
      }
    })
  }
  ...
}

// page中使用
@ComponentV2
export struct Home {
  ...
  // viewmodel
  @Local homeViewModel: HomeViewModel = new HomeViewModel()

  aboutToAppear(): void {
    // 加载数据
    this.homeViewModel.loadBannerData()
  }

  @Builder
  headerLayout() {
    ListItem() {
      // 使用数据
      HomeBanner({ bannerList: this.homeViewModel.banners })
    }
  }
}
六、其他功能
以下功能都进行了二次封装,放在common下