前言
相信大家在节假日中,总能发现,大家的头像的覆上了一层节日限定皮肤,那一下节日氛围就满满的了!🎊🎊🎊
自然而然,就衍生出了,下面那些头像制作网站,帮你赶时髦。
但那些远远不够丰富和完善,你为不同的效果到处奔波,甚至还要付费时,就些许狼狈了。
因此我要打造一款功能更强大、更丰富、开源免费的头像制作插件!

设计
概述

FuncAvatar 是一款专为个性化头像制作而设计的浏览器插件。它集成了多种创意风格处理功能,让用户能够轻松地将普通头像转换为独特的艺术作品。
🎪 适用场景:
- 社交媒体:为微信、QQ、微博等平台制作个性头像
- 节日庆祝:快速制作节日主题头像
- 游戏娱乐:创建复古像素风格的游戏头像
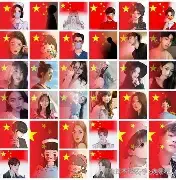
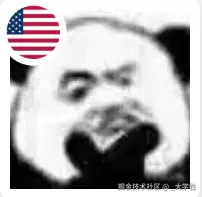
- 爱国情感:添加国旗元素展示爱国情怀
流程图
项目结构
csharp
FuncAvatar/
├── manifest.json              # 插件配置文件
├── background.js              # 后台服务脚本
├── popup.html                 # 插件弹窗界面
├── popup.css                  # 插件专用样式
├── js/                        # JavaScript模块
│   ├── init.js                # 初始化脚本
│   ├── core/                  # 核心模块
│   │   └── AvatarMaker.js     # 主控制器类
│   ├── handlers/              # 功能处理模块
│   │   ├── ImageHandler.js    # 图片处理
│   │   ├── CropHandler.js     # 图片裁剪
│   │   ├── ThemeHandler.js    # 主题覆盖
│   │   ├── PixelHandler.js    # 像素风格
│   │   └── FlagHandler.js     # 国旗风格
│   └── ui/                    # UI控制模块
│       └── UIController.js    # 界面控制器
├── icons/                     # 插件图标
│   ├── ...
├── images/                    # 主题图片资源
│   ├── ...
├── flag/                      # 标准国旗图片
│   ├── ...
├── flag-fly/                  # 飘动效果国旗图片
│   ├── ...
└── README.md                  # 说明文档
实现
上传
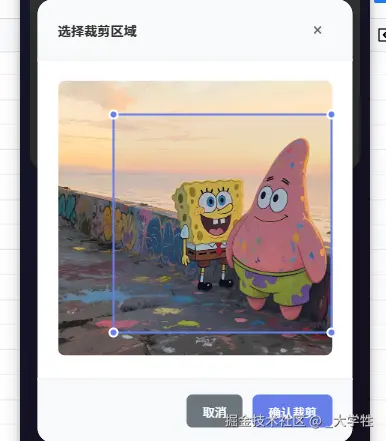
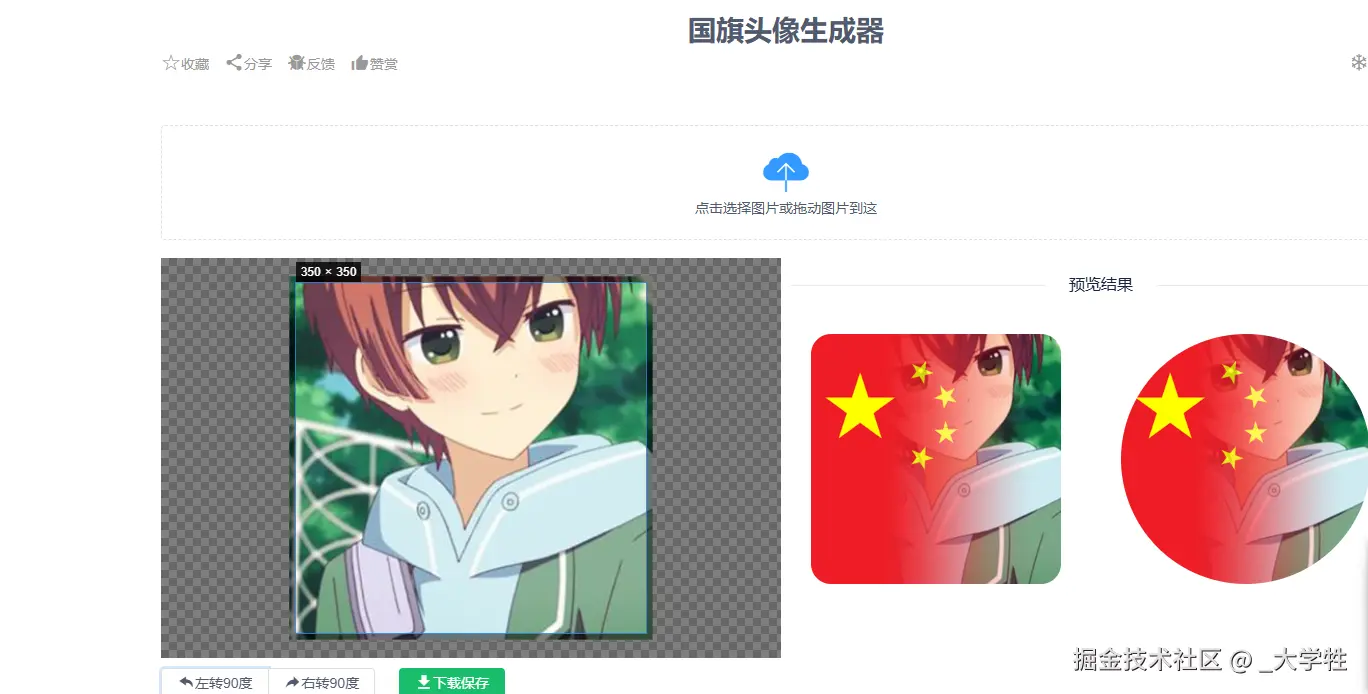
上传 就是上传头像的过程。用户上传图片后弹出裁剪窗口,可通过拖拽或缩放调整裁剪区域,系统记录裁剪比例,最终生成裁剪后的图片并更新预览。
核心代码:
js
this.cropData = {
    x: 0,      // 相对于图片左上角的比例位置 (0~1)
    y: 0,
    width: 0,  // 裁剪区域宽度比例
    height: 0
};

// 更新裁剪数据(计算比例)
updateCropData() {
    const imageRect = this.cropImage.getBoundingClientRect();
    const boxRect = this.cropBox.getBoundingClientRect();

    this.cropData = {
        x: (boxRect.left - imageRect.left) / imageRect.width,
        y: (boxRect.top - imageRect.top) / imageRect.height,
        width: boxRect.width / imageRect.width,
        height: boxRect.height / imageRect.height
    };
}
js
// 拖拽裁剪框移动
dragCropBox(event) {
    let newLeft = event.clientX - this.dragStart.x;
    let newTop = event.clientY - this.dragStart.y;

    // 限制在图片范围内
    newLeft = Math.max(minLeft, Math.min(maxLeft, newLeft));
    newTop = Math.max(minTop, Math.min(maxTop, newTop));

    this.cropBox.style.left = newLeft + 'px';
    this.cropBox.style.top = newTop + 'px';
    this.updateCropData();
}
js
// 调整裁剪框大小(保持正方形)
resizeCropBox(event) {
    const mouseX = event.clientX;
    const mouseY = event.clientY;

    // 根据拖动方向调整宽高
    switch (this.resizeHandle) {
        case 'nw': ...; break;
        case 'ne': ...; break;
        case 'sw': ...; break;
        case 'se': ...; break;
    }

    // 保持正方形
    const size = Math.min(newWidth, newHeight);
    newWidth = newHeight = Math.max(50, size);

    this.cropBox.style.width = newWidth + 'px';
    this.cropBox.style.height = newHeight + 'px';
    this.updateCropData();
}
js
// 生成裁剪后图片
createCroppedImage() {
    const canvas = document.createElement('canvas');
    const ctx = canvas.getContext('2d');
    const size = 400;
    canvas.width = size;
    canvas.height = size;

    const img = this.cropImage;
    const cropX = this.cropData.x * img.naturalWidth;
    const cropY = this.cropData.y * img.naturalHeight;
    const cropW = this.cropData.width * img.naturalWidth;
    const cropH = this.cropData.height * img.naturalHeight;

    ctx.drawImage(img, cropX, cropY, cropW, cropH, 0, 0, size, size);

    const croppedImageUrl = canvas.toDataURL();
    this.app.croppedImageUrl = croppedImageUrl;
    this.app.updatePreview();
}
覆盖风
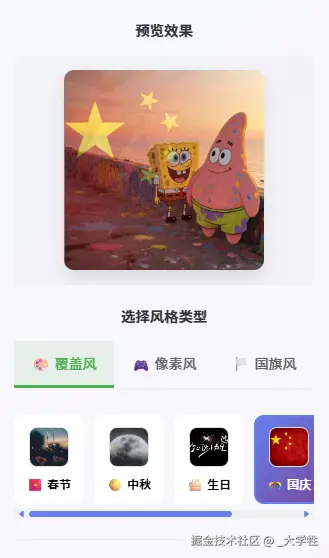
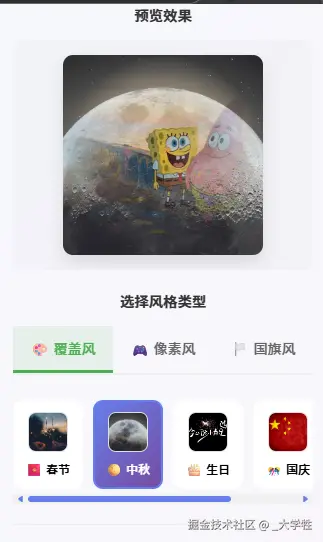
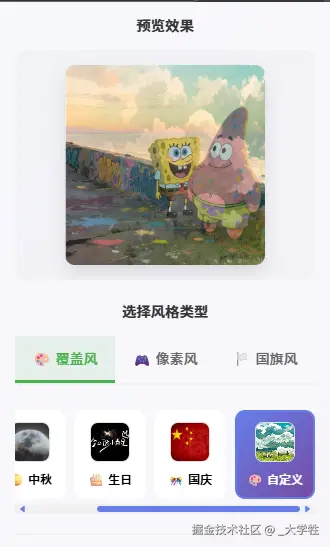
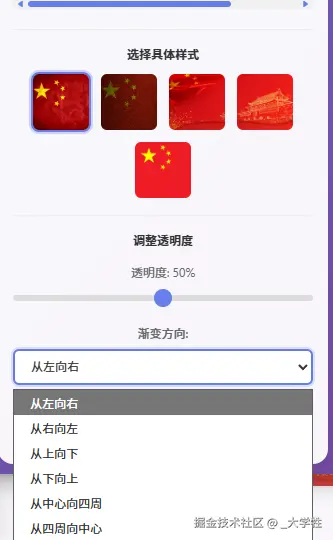
覆盖风 是一种将喜爱的效果图叠加在头像上方的风格,通过调节渐变的浓度与方向,使头像与效果图自然融合,呈现出理想的视觉效果。
在 FuncAvatar 中,覆盖风功能:
- 预设主题 :
- 春节主题 🧧:春节元素装饰
- 中秋主题 🌕:中秋节庆装饰效果
- 生日主题 🎂:生日庆祝装饰
- 国庆主题 🎊:国庆节庆装饰
- 自定义主题:支持上传自定义装饰图片
- 透明度调节:可调整装饰效果的透明度
- 渐变方向 :可调整透明度的渐变方向
- 从左向右
- 从右向左
- 从上向下
- 从下向上
- 从中心向四周
- 从四周向中心
核心代码:
js
 // 渐变效果绘制
 applyOverlayWithGradient(ctx, size) {
        if (!this.overlayImage) return;

        // 获取渐变方向和透明度
        const gradientDirection = document.getElementById('gradientDirection')?.value || 'left-to-right';
        const opacity = this.opacity / 100; // 透明度控制效果强烈程度

        // 创建临时画布用于绘制渐变效果
        const tempCanvas = document.createElement('canvas');
        tempCanvas.width = size;
        tempCanvas.height = size;
        const tempCtx = tempCanvas.getContext('2d');

        // 先在临时画布上绘制覆盖图片
        tempCtx.drawImage(this.overlayImage, 0, 0, size, size);

        // 创建透明度渐变
        let gradient;
        switch (gradientDirection) {
            case 'left-to-right':
                gradient = tempCtx.createLinearGradient(0, 0, size, 0);
                gradient.addColorStop(0, `rgba(255, 255, 255, ${opacity})`);  // 左侧不透明
                gradient.addColorStop(1, `rgba(255, 255, 255, 0)`);           // 右侧透明
                break;
            case 'right-to-left':
                gradient = tempCtx.createLinearGradient(size, 0, 0, 0);
                gradient.addColorStop(0, `rgba(255, 255, 255, ${opacity})`);  // 右侧不透明
                gradient.addColorStop(1, `rgba(255, 255, 255, 0)`);           // 左侧透明
                break;
            case 'top-to-bottom':
                gradient = tempCtx.createLinearGradient(0, 0, 0, size);
                gradient.addColorStop(0, `rgba(255, 255, 255, ${opacity})`);  // 顶部不透明
                gradient.addColorStop(1, `rgba(255, 255, 255, 0)`);           // 底部透明
                break;
            case 'bottom-to-top':
                gradient = tempCtx.createLinearGradient(0, size, 0, 0);
                gradient.addColorStop(0, `rgba(255, 255, 255, ${opacity})`);  // 底部不透明
                gradient.addColorStop(1, `rgba(255, 255, 255, 0)`);           // 顶部透明
                break;
            case 'center-to-edge':
                gradient = tempCtx.createRadialGradient(size/2, size/2, 0, size/2, size/2, size/2);
                gradient.addColorStop(0, `rgba(255, 255, 255, ${opacity})`);  // 中心不透明
                gradient.addColorStop(1, `rgba(255, 255, 255, 0)`);           // 边缘透明
                break;
            case 'edge-to-center':
                gradient = tempCtx.createRadialGradient(size/2, size/2, size/2, size/2, size/2, 0);
                gradient.addColorStop(0, `rgba(255, 255, 255, ${opacity})`);  // 边缘不透明
                gradient.addColorStop(1, `rgba(255, 255, 255, 0)`);           // 中心透明
                break;
            default:
                gradient = tempCtx.createLinearGradient(0, 0, size, 0);
                gradient.addColorStop(0, `rgba(255, 255, 255, ${opacity})`);
                gradient.addColorStop(1, `rgba(255, 255, 255, 0)`);
        }

        // 应用渐变透明度遮罩
        tempCtx.globalCompositeOperation = 'destination-in';
        tempCtx.fillStyle = gradient;
        tempCtx.fillRect(0, 0, size, size);

        // 将处理后的图片绘制到主画布上
        ctx.drawImage(tempCanvas, 0, 0, size, size);
    }
像素风
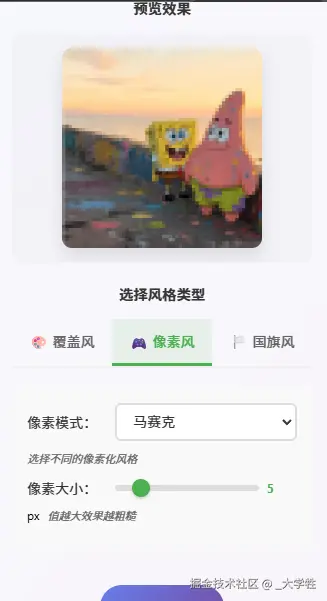
像素风 是一种将图片进行 低分辨率化处理 的视觉效果,它通过减少图片细节、放大像素单元,营造出复古的数字像素感或点阵风格。
在 FuncAvatar 中,像素风主要分为两种模式:
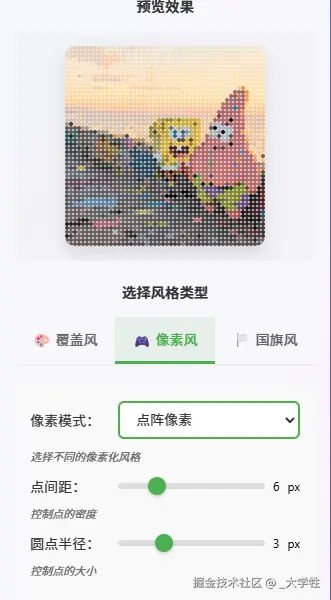
- 马赛克模式(Block Pixel) :以方块为单位对图片取色、平均化,生成经典的像素块效果。
- 点阵模式(Dot Pixel) :用规则排列的小圆点表示图像颜色,模拟显示屏点阵或印刷网点质感。
马赛克模式(Block Pixel)
原理:
将图像划分为固定大小的方块(pixelSize),对每个方块内所有像素的颜色求平均,然后用该平均色填充整个方块,从而形成像素化视觉。
核心代码:
js
applyBlockPixelEffect(canvas, ctx, image) {
    const pixelSize = this.app.pixelSize || 8;
    ctx.clearRect(0, 0, canvas.width, canvas.height);
    ctx.drawImage(image, 0, 0, canvas.width, canvas.height);
    const imageData = ctx.getImageData(0, 0, canvas.width, canvas.height);
    const data = imageData.data;
    ctx.clearRect(0, 0, canvas.width, canvas.height);

    for (let y = 0; y < canvas.height; y += pixelSize) {
        for (let x = 0; x < canvas.width; x += pixelSize) {
            let r = 0, g = 0, b = 0, a = 0, count = 0;
            for (let dy = 0; dy < pixelSize && y + dy < canvas.height; dy++) {
                for (let dx = 0; dx < pixelSize && x + dx < canvas.width; dx++) {
                    const i = ((y + dy) * canvas.width + (x + dx)) * 4;
                    r += data[i]; g += data[i + 1]; b += data[i + 2]; a += data[i + 3];
                    count++;
                }
            }
            if (count > 0) {
                r = Math.round(r / count);
                g = Math.round(g / count);
                b = Math.round(b / count);
                a = Math.round(a / count);
                ctx.fillStyle = `rgba(${r},${g},${b},${a / 255})`;
                ctx.fillRect(x, y, pixelSize, pixelSize);
            }
        }
    }
}
点阵模式(Dot Pixel)
原理:
通过在规则间距的网格点上取图像颜色,并以小圆点绘制出来。
用户可调整点间距(dotSpacing)与点半径(dotRadius),以获得更稀疏或更密集的点阵效果。
核心代码:
js
applyDotPixelEffect(canvas, ctx, image) {
    const dotSpacing = this.app.dotSpacing || 6;
    const dotRadius = this.app.dotRadius || 3;
    ctx.clearRect(0, 0, canvas.width, canvas.height);

    const tempCanvas = document.createElement('canvas');
    const tempCtx = tempCanvas.getContext('2d');
    tempCanvas.width = canvas.width;
    tempCanvas.height = canvas.height;
    tempCtx.drawImage(image, 0, 0, canvas.width, canvas.height);

    const imageData = tempCtx.getImageData(0, 0, canvas.width, canvas.height);
    const data = imageData.data;

    for (let y = dotRadius; y < canvas.height; y += dotSpacing) {
        for (let x = dotRadius; x < canvas.width; x += dotSpacing) {
            const i = (y * canvas.width + x) * 4;
            const [r, g, b, a] = [data[i], data[i+1], data[i+2], data[i+3]];
            if (a > 0) {
                ctx.fillStyle = `rgba(${r},${g},${b},${a / 255})`;
                ctx.beginPath();
                ctx.arc(x, y, dotRadius, 0, Math.PI * 2);
                ctx.fill();
            }
        }
    }
}
国旗风
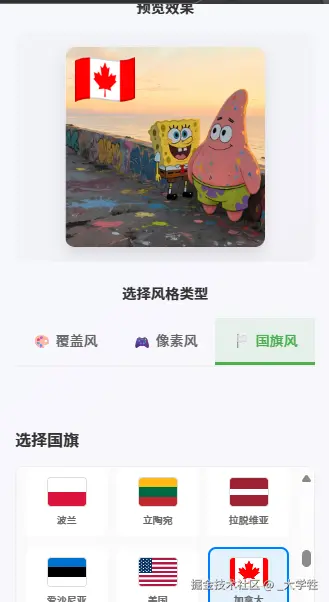
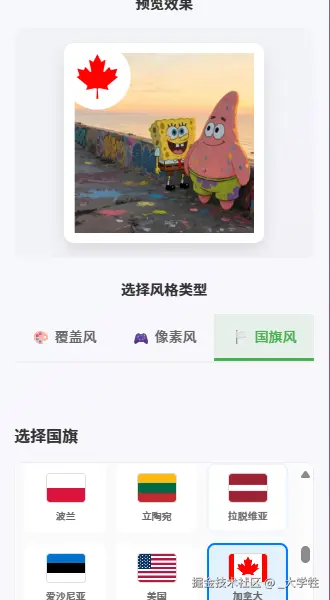
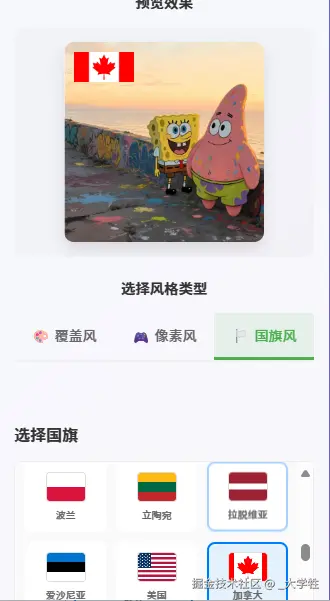
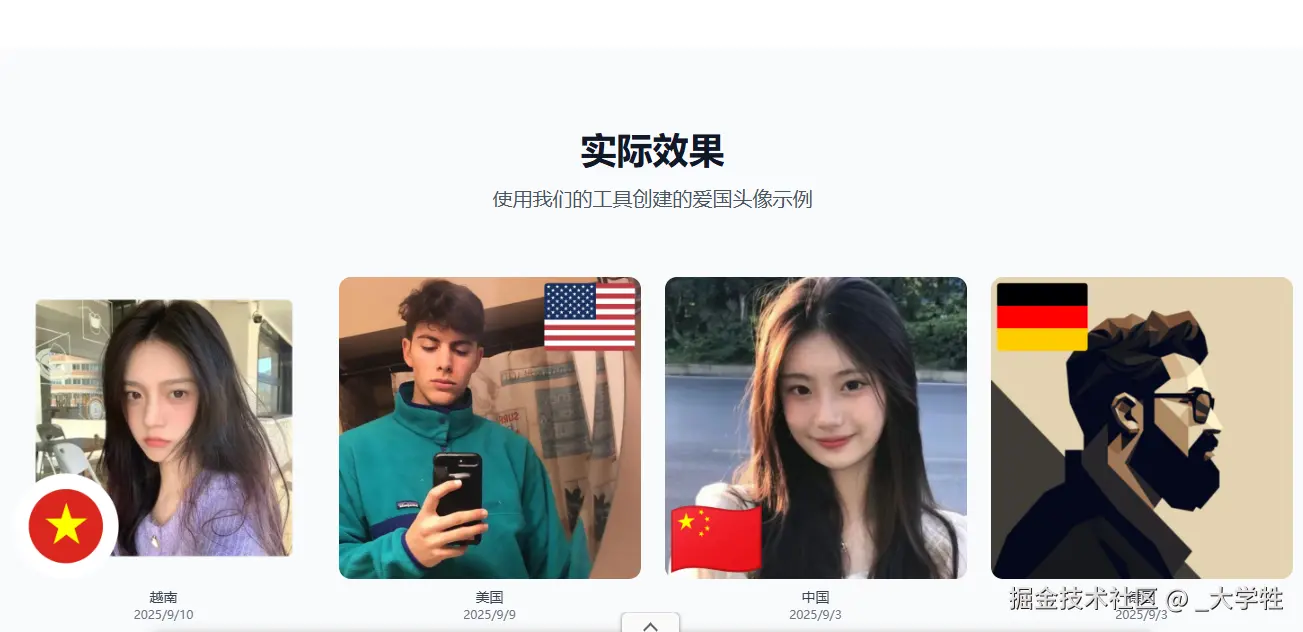
国旗风 是一种通过在头像上添加所选国家国旗元素的风格。用户可根据个人喜好选择不同国旗,并调节显示风格与位置,使头像既保留个性,又能表达对国家的热爱与归属感。
在 FuncAvatar 中,国旗风功能:
- 国家国旗 :插件中内含 254 个国家旗帜
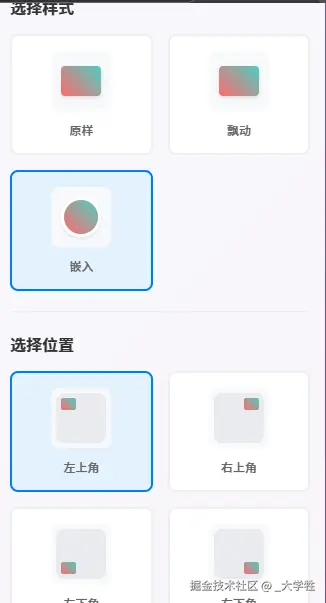
- 国旗样式 :
- 原样:正常平面国旗样式
- 飘动:类似波浪形状,飘动的国旗样式
- 嵌入:选取一个圆形裁取国旗核心位置,放置边缘,原图片缩小10%,营造出嵌入效果
- 国旗位置 :
- 左上角
- 右上角
- 左下角
- 右下角
核心代码:
js
// 国家配置文件
// code     国家代码
// name     国家名称
// cropMode 裁取位置
[
    // 亚洲国家
    { code: 'cn', name: '中国', cropMode: 'center' },
    { code: 'jp', name: '日本', cropMode: 'center' },
    { code: 'kr', name: '韩国', cropMode: 'center' },
    { code: 'kp', name: '朝鲜', cropMode: 'center' },
    ......
]
js
// 原样:将flag内图片在头像图片上展示,根据选择位置变化
applyOriginalStyle(canvas, ctx, flagImage) {
        const flagSize = Math.min(canvas.width, canvas.height) * 0.3; // 国旗大小为画布的30%
        const flagHeight = flagSize * (flagImage.height / flagImage.width); // 实际国旗高度
        const margin = 15; // 统一边距
        const position = this.calculateFlagPosition(canvas, flagSize, flagHeight, margin);

        ctx.drawImage(flagImage, position.x, position.y, flagSize, flagHeight);
    }
js
// 飘动:加载flag-fly下选择国旗的同名图片按位置展示
applyFlyingStyle(canvas, ctx, flagImage) {
    const flagSize = Math.min(canvas.width, canvas.height) * 0.3; // 与原样保持一致的大小
    const flagHeight = flagSize * (flagImage.height / flagImage.width); // 实际国旗高度
    const margin = 15; // 统一边距
    const position = this.calculateFlagPosition(canvas, flagSize, flagHeight, margin);

    ctx.drawImage(flagImage, position.x, position.y, flagSize, flagHeight);
}
js
// 嵌入:根据位置选择在对应角落按圆形截取国旗展示,周围十像素为白色,原头像等比例缩小8%
applyCircleStyle(canvas, ctx, flagImage) {
    const r = 40;               // 国旗圆半径
    const margin = 10;          // 白边
    const totalR = r + margin;

    // 保存原头像并缩小绘制
    const imgData = ctx.getImageData(0, 0, canvas.width, canvas.height);
    ctx.clearRect(0, 0, canvas.width, canvas.height);
    ctx.fillStyle = 'white';
    ctx.fillRect(0, 0, canvas.width, canvas.height);

    const tmp = document.createElement('canvas');
    tmp.width = canvas.width;
    tmp.height = canvas.height;
    tmp.getContext('2d').putImageData(imgData, 0, 0);

    const s = 0.9;
    const off = (1 - s) / 2;
    ctx.drawImage(tmp, 0, 0, canvas.width, canvas.height,
        canvas.width * off, canvas.height * off,
        canvas.width * s, canvas.height * s);

    // 国旗位置
    const pos = {
        'top-left':     { x: totalR, y: totalR },
        'top-right':    { x: canvas.width - totalR, y: totalR },
        'bottom-left':  { x: totalR, y: canvas.height - totalR },
        'bottom-right': { x: canvas.width - totalR, y: canvas.height - totalR }
    }[this.selectedPosition] || { x: totalR, y: totalR };

    // 绘制白底圆
    ctx.save();
    ctx.beginPath();
    ctx.arc(pos.x, pos.y, totalR, 0, 2 * Math.PI);
    ctx.fillStyle = 'white';
    ctx.fill();

    // 剪切圆形区域并绘制国旗
    ctx.beginPath();
    ctx.arc(pos.x, pos.y, r, 0, 2 * Math.PI);
    ctx.clip();

    const size = r * 2;
    const ratio = flagImage.width / flagImage.height;
    let sx, sy, sw, sh;

    if (ratio > 1) {
        sw = sh = flagImage.height;
        sx = (flagImage.width - sw) / 2;
        sy = 0;
    } else {
        sw = sh = flagImage.width;
        sx = 0;
        sy = (flagImage.height - sh) / 2;
    }

    ctx.drawImage(flagImage, sx, sy, sw, sh,
        pos.x - r, pos.y - r, size, size);
    ctx.restore();
}
下载

轻轻一点 收工 😎
嵌入式国旗展示问题
在 国旗风 中,因为图片量较多,目前嵌入式风格,有些国旗展示不够 核心 :
如下图,虽然配置中设置了左裁取,但是因为国旗核心区域的大小等原因,导致效果不理想🥲。
未来打算,专门设置圆形国旗文件夹,存储处理好的圆形国旗,一劳永逸🫡。

未来展望
- 添加更多预设的节日主题支持
- 添加更多其他风格玩法
- 拓展多端(Andorid、Ios、Web等)