文章目录
- 基本概念
- [一、父组件向子组件传值(使用 props)](#一、父组件向子组件传值(使用 props))
- 二、子组件向父组件传值(使用事件)
- [三、使用 v-model 进行双向绑定](#三、使用 v-model 进行双向绑定)
- [四、使用 .sync 修饰符(双向绑定多个 prop)](#四、使用 .sync 修饰符(双向绑定多个 prop))
- 五、完整实例代码(可复制到文本中直接运行查看效果)
- 六、核心概念说明
-
-
- [**1. Props 定义方式**](#1. Props 定义方式)
- [**2. Props 验证**](#2. Props 验证)
- [**3. 单向数据流**](#3. 单向数据流)
- [4. 事件通信](#4. 事件通信)
-
- 七、总结
在 Vue2 中,组件间的数据传递是核心概念之一。下面我将详细介绍父子组件传值的方法以及 props 的定义和使用。
基本概念
在 Vue 中,父子组件通信主要通过 props 向下传递数据,通过事件向上传递数据。
在 Vue2 中,父子组件之间的数据传递主要通过
props和events实现。父组件向子组件传递数据使用 props ,**子组件向父组件传递数据则通过事件(emit)**。此外,还有一些其他方式如使用 v-model、sync 修饰符(在 Vue2.3.0+ 中引入)或者使用 parent / $children 等,但主要推荐使用 props 和 events。
提示:下面我们主要讨论 props 的定义和使用,以及父子组件传值的方法
一、父组件向子组件传值(使用 props)
1.定义 props
在子组件中,可以通过 props 选项来定义期望从父组件接收的数据。props 可以是数组或对象形式,对象形式允许进行更详细的配置(如类型检查、默认值、验证等)。
数组形式:
javascript
props: ['title', 'content']对象形式(推荐):
javascript
props: {
  title: String,
  content: {
    type: String,
    required: true,
    default: 'Default content'
  }
}
2.使用 props
在子组件中,定义好 props 后,就可以像使用 data 一样使用 props 了。例如在模板中直接使用,或者在方法、计算属性中使用。
子组件示例:
javascript
<template>
  <div>
    <h2>{{ title }}</h2>
    <p>{{ content }}</p>
  </div>
</template>

<script>
export default {
  name: 'ChildComponent',
  props: {
    title: String,
    content: {
      type: String,
      required: true,
      default: 'Default content'
    }
  }
}
</script>
父组件使用:
在父组件中,通过子组件的标签属性传递数据。
javascript
<template>
  <div>
    <child-component :title="parentTitle" :content="parentContent"></child-component>
  </div>
</template>

<script>
import ChildComponent from './ChildComponent.vue'

export default {
  name: 'ParentComponent',
  components: {
    ChildComponent
  },
  data() {
    return {
      parentTitle: 'Hello',
      parentContent: 'This is content from parent'
    }
  }
}
</script>
二、子组件向父组件传值(使用事件)
子组件可以通过 $emit 方法触发一个自定义事件,并且可以传递数据。父组件则可以在使用子组件的地方监听这个事件,并执行相应的处理函数。
子组件示例:
javascript
<template>
  <div>
    <button @click="sendMessageToParent">Send Message to Parent</button>
  </div>
</template>

<script>
export default {
  name: 'ChildComponent',
  data() {
    return {
      message: 'Hello from child'
    }
  },
  methods: {
    sendMessageToParent() {
      this.$emit('child-message', this.message)
    }
  }
}
</script>
父组件示例:
javascript
<template>
  <div>
    <child-component @child-message="handleChildMessage"></child-component>
    <p>Message from child: {{ childMessage }}</p>
  </div>
</template>

<script>
import ChildComponent from './ChildComponent.vue'

export default {
  name: 'ParentComponent',
  components: {
    ChildComponent
  },
  data() {
    return {
      childMessage: ''
    }
  },
  methods: {
    handleChildMessage(message) {
      this.childMessage = message
    }
  }
}
</script>
三、使用 v-model 进行双向绑定
在 Vue2 中,
v-model默认用于表单元素的双向绑定,但也可以用于组件。在组件上使用 v-model 默认会利用valueprop 和input 事件。
子组件示例:
javascript
<template>
  <input
    type="text"
    :value="value"
    @input="$emit('input', $event.target.value)"
  >
</template>

<script>
export default {
  name: 'CustomInput',
  props: ['value']
}
</script>
父组件示例:
javascript
<template>
  <div>
    <custom-input v-model="message"></custom-input>
    <p>Message: {{ message }}</p>
  </div>
</template>

<script>
import CustomInput from './CustomInput.vue'

export default {
  name: 'ParentComponent',
  components: {
    CustomInput
  },
  data() {
    return {
      message: ''
    }
  }
}
</script>
四、使用 .sync 修饰符(双向绑定多个 prop)
在某些情况下,我们可能需要对多个 prop 进行"双向绑定"。在 Vue2.3.0+ 引入了 .sync 修饰符,它实际上是一个语法糖,会自动扩展为一个自动更新父组件属性的 v-on 监听器。
子组件示例:
javascript
<template>
  <div>
    <button @click="updateTitle">Update Title</button>
  </div>
</template>

<script>
export default {
  name: 'ChildComponent',
  props: ['title'],
  methods: {
    updateTitle() {
      this.$emit('update:title', 'New Title')
    }
  }
}
</script>
父组件示例:
javascript
<template>
<div>
<child-component :title.sync="pageTitle"></child-component>
<p>Title: {{ pageTitle }}</p>
</div>
</template>
<script>
import ChildComponent from './ChildComponent.vue'
export default {
name: 'ParentComponent',
components: {
ChildComponent
},
data() {
return {
pageTitle: 'Old Title'
}
}
}
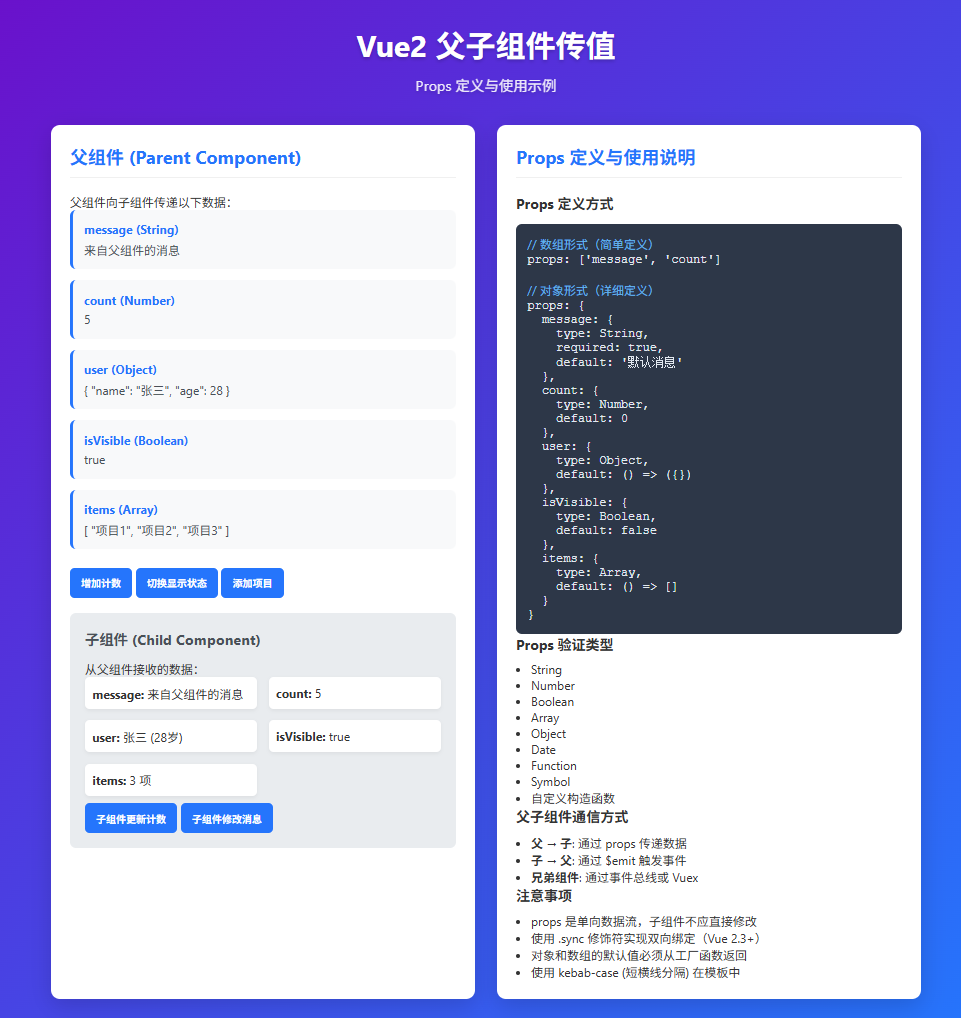
</script>五、完整实例代码(可复制到文本中直接运行查看效果)
html
<!DOCTYPE html>
<html lang="zh-CN">
<head>
<meta charset="UTF-8">
<meta name="viewport" content="width=device-width, initial-scale=1.0">
<title>Vue2 父子组件传值</title>
<script src="https://cdn.jsdelivr.net/npm/vue@2.6.14/dist/vue.js"></script>
<style>
* {
box-sizing: border-box;
margin: 0;
padding: 0;
font-family: 'Segoe UI', Tahoma, Geneva, Verdana, sans-serif;
}
body {
background: linear-gradient(135deg, #6a11cb 0%, #2575fc 100%);
color: #333;
min-height: 100vh;
padding: 20px;
}
.container {
max-width: 1200px;
margin: 0 auto;
padding: 20px;
}
header {
text-align: center;
margin-bottom: 40px;
color: white;
text-shadow: 0 2px 5px rgba(0,0,0,0.2);
}
h1 {
font-size: 2.5rem;
margin-bottom: 10px;
}
.subtitle {
font-size: 1.2rem;
opacity: 0.9;
}
.content {
display: grid;
grid-template-columns: 1fr 1fr;
gap: 30px;
}
@media (max-width: 768px) {
.content {
grid-template-columns: 1fr;
}
}
.card {
background: white;
border-radius: 12px;
box-shadow: 0 10px 30px rgba(0,0,0,0.15);
padding: 25px;
transition: transform 0.3s, box-shadow 0.3s;
}
.card:hover {
transform: translateY(-5px);
box-shadow: 0 15px 35px rgba(0,0,0,0.2);
}
.card-title {
font-size: 1.5rem;
color: #2575fc;
margin-bottom: 20px;
padding-bottom: 10px;
border-bottom: 2px solid #f0f0f0;
}
.prop-item {
margin-bottom: 15px;
padding: 15px;
background: #f8f9fa;
border-radius: 8px;
border-left: 4px solid #2575fc;
}
.prop-name {
font-weight: bold;
color: #2575fc;
}
.prop-value {
margin-top: 5px;
color: #495057;
}
.child-component {
background: #e9ecef;
padding: 20px;
border-radius: 8px;
margin-top: 20px;
}
.child-title {
font-size: 1.2rem;
margin-bottom: 15px;
color: #495057;
}
.child-content {
display: grid;
grid-template-columns: 1fr 1fr;
gap: 15px;
}
.child-item {
padding: 10px;
background: white;
border-radius: 6px;
box-shadow: 0 2px 5px rgba(0,0,0,0.05);
}
button {
background: #2575fc;
color: white;
border: none;
padding: 10px 15px;
border-radius: 6px;
cursor: pointer;
font-weight: bold;
transition: background 0.3s;
margin-top: 10px;
}
button:hover {
background: #1b65d8;
}
.code-block {
background: #2d3748;
color: #e2e8f0;
padding: 15px;
border-radius: 8px;
font-family: 'Courier New', monospace;
margin-top: 15px;
overflow-x: auto;
}
.highlight {
color: #63b3ed;
}
</style>
</head>
<body>
<div id="app" class="container">
<header>
<h1>Vue2 父子组件传值</h1>
<p class="subtitle">Props 定义与使用示例</p>
</header>
<div class="content">
<!-- 父组件区域 -->
<div class="card">
<h2 class="card-title">父组件 (Parent Component)</h2>
<p>父组件向子组件传递以下数据:</p>
<div class="prop-item">
<div class="prop-name">message (String)</div>
<div class="prop-value">{{ parentMessage }}</div>
</div>
<div class="prop-item">
<div class="prop-name">count (Number)</div>
<div class="prop-value">{{ parentCount }}</div>
</div>
<div class="prop-item">
<div class="prop-name">user (Object)</div>
<div class="prop-value">{{ parentUser }}</div>
</div>
<div class="prop-item">
<div class="prop-name">isVisible (Boolean)</div>
<div class="prop-value">{{ parentIsVisible }}</div>
</div>
<div class="prop-item">
<div class="prop-name">items (Array)</div>
<div class="prop-value">{{ parentItems }}</div>
</div>
<button @click="incrementCount">增加计数</button>
<button @click="toggleVisibility">切换显示状态</button>
<button @click="addItem">添加项目</button>
<!-- 子组件 -->
<child-component
:message="parentMessage"
:count="parentCount"
:user="parentUser"
:is-visible="parentIsVisible"
:items="parentItems"
@count-updated="updateCount"
@message-changed="updateMessage">
</child-component>
</div>
<!-- 说明区域 -->
<div class="card">
<h2 class="card-title">Props 定义与使用说明</h2>
<h3>Props 定义方式</h3>
<div class="code-block">
<span class="highlight">// 数组形式(简单定义)</span><br>
props: ['message', 'count']<br><br>
<span class="highlight">// 对象形式(详细定义)</span><br>
props: {<br>
message: {<br>
type: String,<br>
required: true,<br>
default: '默认消息'<br>
},<br>
count: {<br>
type: Number,<br>
default: 0<br>
},<br>
user: {<br>
type: Object,<br>
default: () => ({})<br>
},<br>
isVisible: {<br>
type: Boolean,<br>
default: false<br>
},<br>
items: {<br>
type: Array,<br>
default: () => []<br>
}<br>
}
</div>
<h3>Props 验证类型</h3>
<ul style="padding-left: 20px; margin-top: 10px;">
<li>String</li>
<li>Number</li>
<li>Boolean</li>
<li>Array</li>
<li>Object</li>
<li>Date</li>
<li>Function</li>
<li>Symbol</li>
<li>自定义构造函数</li>
</ul>
<h3>父子组件通信方式</h3>
<ul style="padding-left: 20px; margin-top: 10px;">
<li><strong>父 → 子</strong>: 通过 props 传递数据</li>
<li><strong>子 → 父</strong>: 通过 $emit 触发事件</li>
<li><strong>兄弟组件</strong>: 通过事件总线或 Vuex</li>
</ul>
<h3>注意事项</h3>
<ul style="padding-left: 20px; margin-top: 10px;">
<li>props 是单向数据流,子组件不应直接修改</li>
<li>使用 .sync 修饰符实现双向绑定(Vue 2.3+)</li>
<li>对象和数组的默认值必须从工厂函数返回</li>
<li>使用 kebab-case (短横线分隔) 在模板中</li>
</ul>
</div>
</div>
</div>
<script>
// 定义子组件
Vue.component('child-component', {
template: `
<div class="child-component">
<h3 class="child-title">子组件 (Child Component)</h3>
<p>从父组件接收的数据:</p>
<div class="child-content">
<div class="child-item">
<strong>message:</strong> {{ message }}
</div>
<div class="child-item">
<strong>count:</strong> {{ count }}
</div>
<div class="child-item">
<strong>user:</strong> {{ user.name }} ({{ user.age }}岁)
</div>
<div class="child-item">
<strong>isVisible:</strong> {{ isVisible }}
</div>
<div class="child-item">
<strong>items:</strong> {{ items.length }} 项
</div>
</div>
<button @click="updateCount">子组件更新计数</button>
<button @click="changeMessage">子组件修改消息</button>
</div>
`,
// Props 定义 - 对象形式(推荐)
props: {
message: {
type: String,
required: true,
default: '默认消息'
},
count: {
type: Number,
default: 0
},
user: {
type: Object,
default: () => ({})
},
isVisible: {
type: Boolean,
default: false
},
items: {
type: Array,
default: () => []
}
},
methods: {
updateCount() {
// 子组件不能直接修改 props,需要通过事件通知父组件
this.$emit('count-updated', this.count + 1);
},
changeMessage() {
this.$emit('message-changed', '子组件修改后的消息');
}
}
});
// 父组件实例
new Vue({
el: '#app',
data: {
parentMessage: '来自父组件的消息',
parentCount: 0,
parentUser: {
name: '张三',
age: 28
},
parentIsVisible: true,
parentItems: ['项目1', '项目2', '项目3']
},
methods: {
incrementCount() {
this.parentCount += 1;
},
toggleVisibility() {
this.parentIsVisible = !this.parentIsVisible;
},
addItem() {
this.parentItems.push(`项目${this.parentItems.length + 1}`);
},
updateCount(newCount) {
this.parentCount = newCount;
},
updateMessage(newMessage) {
this.parentMessage = newMessage;
}
}
});
</script>
</body>
</html>运行效果:
这个示例完整展示了 Vue2 中父子组件传值的各种方式,包括 props 的定义、验证和使用,以及子组件向父组件通信的方法。通过这个可视化界面,您可以直观地理解 Vue 组件通信的核心概念。
六、核心概念说明
1. Props 定义方式
数组形式(简单定义)
javascript
props: ['message', 'count', 'user']对象形式(推荐使用)
javascript
props: {
  message: {
    type: String,
    required: true,
    default: '默认消息'
  },
  count: {
    type: Number,
    default: 0
  },
  user: {
    type: Object,
    default: () => ({})
  }
}
2. Props 验证
Vue 提供了多种 props 验证选项:
-
type: 数据类型 (String, Number, Boolean, Array, Object, Date, Function, Symbol)
-
required: 是否必需
-
default: 默认值(对象和数组必须使用工厂函数返回)
-
validator: 自定义验证函数
3. 单向数据流
Props 遵循单向数据流原则:
-
父组件数据变化会自动流向子组件
-
子组件不应直接修改 props
-
如需修改,应通过事件通知父组件
4. 事件通信
子组件通过 $emit 向父组件发送事件:
javascript
// 子组件
this.$emit('event-name', data)

// 父组件
<child-component @event-name="handleEvent"></child-component>
七、总结
-
父传子:使用 props,子组件中定义 props,父组件通过属性传递。
-
子传父:使用事件,子组件通过 $emit 触发事件,父组件通过 v-on 监听事件。
-
双向绑定:可以使用 v-model(默认针对 value 和 input)或 .sync 修饰符(针对任意 prop,需要子组件触发 update:propName 事件)。
-
注意:在 Vue2 中,直接修改 props 是不推荐的,因为这样会使得数据流难以理解。如果子组件需要修改父组件的数据,应该通过事件通知父组件,让父组件去修改。
以上是 Vue2 中父子组件传值的基本方法,希望对你有所帮助。