最近有反馈官网访问异常卡顿,查看 Portainer 面板发现官网后台的后端服务所依赖的 jdk、mysql 等 docker 容器在不断的奔溃重建,查询发现奔溃日志,交由后端排查。
后端反馈服务器磁盘不足导致 mysql 无法启动,后端访问连不上数据库导致的。
查询磁盘占用,发现官网的 nginx 日志文件占用近 20GB,删除后官网后端访问正常运行。
日志切分与压缩
为了避免日志持续增长占用磁盘空间,需要对日志进行管理,这里使用 linux 系统自带的 logrotate 日志管理工具实现自动切割、压缩与清理。
创建 logrotate 配置文件:
sh
vim /etc/logrotate.d/nginx写入特定配置:
sh
path/to/log/*.log {
    size 500M                 # 达到指定大小时轮转一次
    missingok                 # 日志文件缺失时不报错
    rotate 14                 # 保留最近 14 个日志文件(约 2 周)
    compress                  # 压缩旧日志(gzip 格式)
    delaycompress             # 延迟压缩(下次轮转时压缩上一次日志,避免影响当前日志读写)
    notifempty                # 日志为空时不轮转
    create 0644 root root     # 新建日志文件的权限和属主
    sharedscripts
    postrotate                # 轮转后执行的命令,通知Nginx重新打开日志
        # 检查宝塔环境 Nginx 的 PID 文件是否存在且可读
        if [ -f /www/server/nginx/logs/nginx.pid ] && [ -r /www/server/nginx/logs/nginx.pid ]; then
            # 向正确的 Nginx 实例发送 USR1 信号
            kill -USR1 $(cat /www/server/nginx/logs/nginx.pid) >/dev/null 2>&1 || true
        else
            # 记录警告日志(可选,需 root 权限)
            logger -t logrotate "宝塔 Nginx PID 文件缺失,日志切割可能失败"
        fi
    endscript
}
手动触发一次以查看效果:
sh
logrotate -f /etc/logrotate.d/nginx # -f 强制执行排查日志
对日志进行管理后,官网访问仍旧缓慢,查看 nginx 日志发现日志增长飞速,且服务器监控面板显示外网出带宽使用率每天 24 小时都在 85% 及以上:
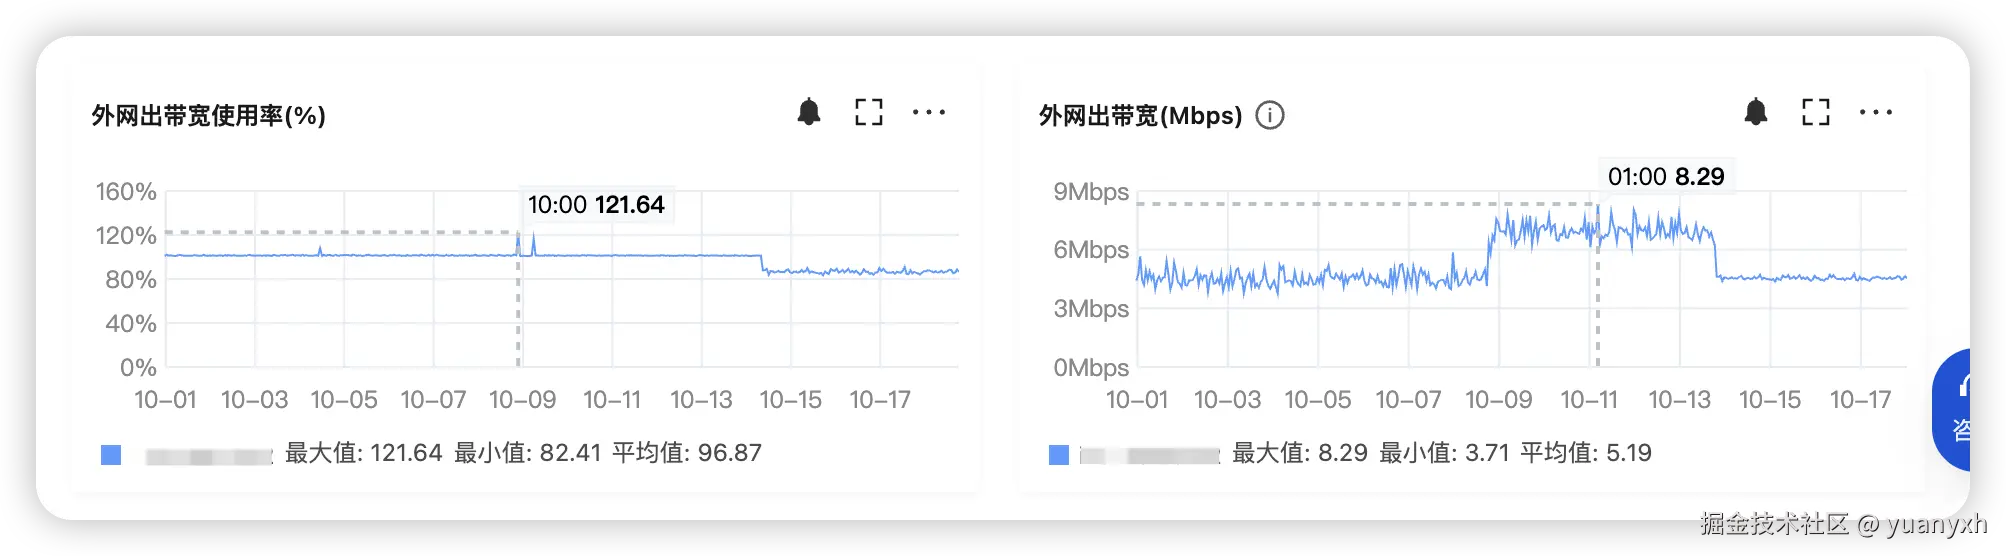
猜测可能遭遇流量攻击,在 nginx 配置中添加多项简易的代码,校验请求是否异常,其中下列代码可以拦截大部分异常请求,外网出带宽使用率回落至正常状态:
conf
if ($http_referer = "") {
    return 403;
}
Referer 记录请求的来源地址,浏览器一般会在请求中自动加上 Referer 头,通常伪装浏览器请求时都会伪造此请求头,但此次的攻击者显然是忽略。
话虽如此,我们却无法仅通过是否存在 referer 头来判断请求是否正常,因为浏览器刷新时、从书签访问时都不会携带此请求头,且为了隐私考虑,加载外部资源(图片、js、css)时可以明确禁止发送 referer,如果一刀切的话,官网运行会收到影响。
封禁固定 IP
为了官网尽快恢复访问,需要一个临时解决方案,分析 nginx 日志后,决定采用简易的策略记录查找异常 IP 并封禁,nginx 日志格式如下:
log
IP - - [TIME] "Request_Method URI HTTP_Version" Status ContentLength "-" "User-Agent"注意需要有足够数量的日志,能够反映出异常 IP,这里的日志是 2-3 天的,产生了约 3GB 的日志文件,约 1250 万次请求。
策略:
- 以 IP + URI + User-Agent 为 key,记录出现的次数
- 由于设置了浏览器缓存,正常访问不应该在这么短的时间范围内多次重复请求
- 针对 IP + User-Agent 判断不同 URI 多次请求的次数,大于阈值时判定异常
最终筛选出来的 IP 通过 nginx 配置封禁,这里筛选出了一万多个 IP。
观察筛选后的结果,发现很多 IP 的网段(115.115.2.89, 115.115.2.90)相同,可以归属于同一组下;优化筛选逻辑:上一步筛选过的结果进行二次筛选,提取 IP 的网段,得到 xx.xx.0.0/16 的结果(115.115.0.0/16),将这一个网段下的所有请求封禁,这里分组后只剩下 100 多组。
动态限流(尝试)
封禁异常 IP 网段后,服务器流量基本正常,但此非长久之计,不能保证后续不会有新的 IP 攻击出现,且封禁网段的做法有概率影响到正常用户。
为了长久发展,需要实现动态限流策略;使用 nginx 模块 limit_req 与 limit_conn 限制特定时间内的请求数量与单 IP 并发数量:
conf
http {
    # ① 请求频率限制:10M 内存存储 IP 状态,限制每秒 10 个请求
    limit_req_zone $binary_remote_addr zone=ip_limit:10m rate=10r/s;
    # ② 并发连接限制:10M 内存存储 IP 连接数
    limit_conn_zone $binary_remote_addr zone=conn_limit:10m;

    server {
        listen 80;
        server_name example.com;

        location / {
            # 应用请求频率限制:允许突发 5 个请求,超出立即返回 429
            limit_req zone=ip_limit burst=5 nodelay;
            # 限制单 IP 最大并发连接数为 10
            limit_conn conn_limit 10;

            # 自定义限流响应状态码(默认 503,推荐 429 Too Many Requests)
            limit_req_status 429;
            limit_conn_status 429;

            proxy_pass http://backend;
        }

        # 自定义 429 错误页面
        error_page 429 /429.html;
        location = /429.html {
            root /var/www/html;
            internal;  # 仅内部访问
        }
    }
}
实际测试效果不佳,原因:官网服务器带宽较小(5Mbps),设置较大的连接数与并发数时,起不到限制效果;设置较小的连接数与并发数时,会影响正常用户的访问,因为无缓存加载网页时会请求较多的 js、css、图片资源。
动态限流-策略 1
为了更精准的识别异常 IP,需要更灵活的逻辑控制,可以使用添加过 lua-nginx-module 模块的 nginx,通过组合 nginx + lua(逻辑控制) + redis(缓存) 实现复杂限流策略。
策略 1:
- IP + URI + User-Agent 为 key,记录访问次数
- 由于设置了浏览器缓存,正常访问不应该在这么短的时间范围内多次重复请求
- 如果 key 对应的访问次数大于阈值,直接返回 429
conf
http {
    # 加载 Lua 模块
    lua_package_path "/path/to/lua/?.lua;;";

    server {
        listen 80;
        server_name yourdomain.com;

        # 首页及动态内容
        location / {
            access_by_lua_file /etc/nginx/lua/limit.lua;
            proxy_pass http://backend;
        }
    }
}
lua
local redis = require "resty.redis"
local red = redis:new()
red:set_timeout(1000)  -- 1 秒超时

-- 连接 Redis(替换为实际地址)
local ok, err = red:connect("127.0.0.1", 6379)
if not ok then
    ngx.log(ngx.ERR, "Redis 连接失败: ", err)
    return ngx.exit(500)
end

-- 构建复合键:IP + User-Agent + URI
local ip = ngx.var.binary_remote_addr
local ua = ngx.var.http_user_agent or "unknown"
local uri = ngx.var.uri
local key = "req:" .. ip .. ":" .. ngx.md5(ua) .. ":" .. uri

-- 10 秒内最多允许 2 次请求(缓存有效期内重复请求视为异常)
local limit = 2
local expire = 10

-- Redis 原子操作:计数 + 过期时间设置
local res, err = red:eval([[
    local count = redis.call('incr', KEYS[1])
    if count == 1 then
        redis.call('expire', KEYS[1], ARGV[2])
    end
    return count
]], 1, key, limit, expire)

-- 判断是否超限
if res and tonumber(res) > limit then
    ngx.log(ngx.WARN, "触发限流: ", key)
    return ngx.exit(429)  -- 返回 429 Too Many Requests
end

-- 保持 Redis 连接池
red:set_keepalive(10000, 100)  -- 空闲超时 10 秒,池大小 100
效果不佳,问题在于对于每个 IP 不同的 URI 默认允许访问一次,在大批量的 IP 流量攻击下,外网出带宽使用率仍旧巨高不下。
动态限流-策略 2
针对上述痛点,思考出了以 Cookie 标识正常用户的策略:
- 接收到访问时,查询 IP + User-Agent 的 key 是否在 redis 中
- 如果存在,要求此次请求必须包含指定的 cookie,如果不包含,直接 403
- 如果不存在,生成 cookie 并 set-cookie,同时将 cookie 缓存至 redis
lua
local redis = require "resty.redis"
local str = require "resty.string"
local hmac = require "resty.hmac"

-- 配置参数
local config = {
    redis_host = "127.0.0.1",
    redis_port = 6379,
    expire_seconds = 518400,  -- 6 天 = 6 * 24 * 3600 秒
  	token = "xss_t90",
  	pool_size = 100,
    idle_timeout = 30000
}

-- 获取客户端真实 IP
local function get_client_ip()
    local ip = ngx.req.get_headers()["X-Real-IP"]

    if not ip then
        ip = ngx.req.get_headers()["X-Forwarded-For"]
    end

    if not ip then
        ip = ngx.var.remote_addr
    end

    return ip or "unknown"
end

-- 连接 Redis 并设置连接池
local function connect_redis()
    local red = redis:new()

    red:set_timeout(1000)  -- 1 秒超时


    local ok, err = red:connect(config.redis_host, config.redis_port)
    if not ok then
        ngx.log(ngx.ERR, "Redis 连接失败: ", err)
        return nil, err
    end

    -- 复用连接池
    local count, err = red:get_reused_times()
    if 0 == count then
        -- 新连接需认证(如有密码)
        -- red:auth("your_redis_password")
    elseif err then
        ngx.log(ngx.ERR, "Redis get reused times failed: ", err)
    end

    return red
end

-- 生成加密令牌
local function generate_token()
  	local client_ip = get_client_ip()
    local user_agent = ngx.var.http_user_agent or "unknown"
    local secret = config.token
    local timestamp = ngx.time()
    local nonce = math.random(100000, 999999)  -- 6 位随机数
    local plaintext = client_ip .. user_agent .. timestamp .. nonce

    -- HMAC-SHA256 加密
    local hmac_obj = hmac:new(secret, hmac.ALGOS.SHA256)
    hmac_obj:update(plaintext)

    return str.to_hex(hmac_obj:final()), timestamp
end

-- 主逻辑
local function main()
    -- 1. 获取请求标识要素
    local client_ip = get_client_ip()
    local user_agent = ngx.var.http_user_agent or "unknown"

    -- 2. 生成唯一键(IP + UA 哈希)
  	local redis_key = "os_visit:" .. client_ip .. ":" .. ngx.md5(user_agent)  -- 用 MD5 哈希 UA 避免过长

    -- 4. 连接 Redis 并获取计数
    local red = connect_redis()
    if not red then
        return -- Redis 故障时放行,避免影响正常访问
    end

    local stored_token, err = red:get(redis_key)
    if err then
        ngx.log(ngx.ERR, "Redis get stored_token failed: ", err)
        red:set_keepalive(config.idle_timeout, config.pool_size)
        return
    end

    -- 2. 无存储令牌:生成新令牌并设置 Cookie
    if stored_token == ngx.null then
        local token, timestamp = generate_token()

        -- 存储令牌到 Redis
        red:setex(redis_key, config.expire_seconds, token)

        -- 设置 Cookie (HttpOnly + Secure,生产环境建议开启 Secure)
        ngx.header["Set-Cookie"] = string.format(
            "os_visit_token=%s; HttpOnly; SameSite=Strict; Path=/; Max-Age=%d",
            token,
      		config.expire_seconds
        )

        red:set_keepalive(config.idle_timeout, config.pool_size)

        return
    end

    red:set_keepalive(config.idle_timeout, config.pool_size)  -- 提前归还连接池

  	local client_token = ngx.var.cookie_os_visit_token

    if not client_token then

        ngx.log(ngx.ERR, "异常用户, Cookie 不存在")

        return ngx.exit(403)

    elseif client_token ~= stored_token then
        ngx.log(ngx.ERR, "异常用户, Cookie 不匹配")

        -- Cookie 不匹配:拒绝访问
        ngx.exit(403)
    end

    -- 7. 正常请求,继续处理
end

-- 执行主逻辑
main()
预期的结果是攻击方没有处理 cookie 携带的逻辑,当 IP 首次访问时设置 Cookie,后续资源请求未携带 cookie 而被拦截;实际结果是 Cookie 过于常见,大部分工具都会自动处理他。
动态限流-策略 3
提出人机验证的想法,要求用户访问时进行真人验证,通过则允许访问,未实践,因为用户体验较差。
动态限流-策略 4
观察日志,发现异常 IP 都使用 HTTP/1.1 的协议版本,而正常用户使用的现代浏览器基本使用 HTTP/2.0 协议版本,基于此,实现多级校验策略:
- 如果 HTTP 协议版本大于等于 2.0, 或 Referer 请求头不为空,不做后续步骤直接放行
- 针对 HTTP 协议版本小于 2.0, 或 Referer 请求头为空的,执行下列逻辑
- 判断当前 IP 是否存在于白名单列表,存在直接放行,反之执行下列逻辑
- 提前当前 IP 的网段,(115.115.2.80 -> 115.115),查询此网段下的 IP 数量,大于阈值时,重定向至人机校验页面,小于阈值时允许访问
- 将此 IP 添加到网段集合
人机校验逻辑:
- 生成 4 位随机字符串,缓存至 redis,key = IP + User-Agent
- 根据字符串生成图片,展示在前端页面
- 用户输入并提交
- 验证是否通过,通过则将此 IP + User-Agent 添加进白名单中,设置较长的过期时间
此逻辑的优点:
- 根据现有日志分析,明确正常用户的特征,减少正常用户的操作步骤
- 基于网段分组的封禁,网段组内 IP 大于阈值时,后续新的 IP 进来直接重定向至人机校验,较少了服务器压力
- 使用人机校验添加兜底处理,避免正常用户被误封,且校验通过后较长一段时间内白名单通行,避免了多次校验
完整代码:
conf
http {
    server {
        lua_package_path "/www/server/nginx/lib/lua/?.lua;;";
        lua_package_cpath "/www/server/nginx/lib/lua/?.so;;";

        # 代理与校验
        location / {
            access_by_lua_file /usr/local/openresty/nginx/lua/auth.lua;
            proxy_pass http://xxxx:xx;
        }

        # 验证码图片生成接口
        location /captcha-image {
            content_by_lua_file /usr/local/openresty/nginx/lua/generate_captcha.lua;
        }

        # 验证码验证接口
        location /captcha-verify {
            content_by_lua_file /usr/local/openresty/nginx/lua/verify_captcha.lua;
        }

        # 验证码展示页面
        location = /captcha {
            alias /www/server/nginx/html/verify.html;
            default_type text/html;
            charset utf-8;
            expires -1;
            add_header Cache-Control "no-store, no-cache, must-revalidate";
        }
    }
}
auth.lua:
lua
local redis = require "resty.redis"

-- 配置参数(可根据业务调整)
local config = {
    redis_host = "127.0.0.1",
    redis_port = 6379,
    whitelist_key = "os_whitelist",
    subnet_threshold = 2,
    subnet_window = 1209600           -- 14 天
}

-- Redis 连接池管理
local function close_redis(red)
    if not red then return end

    local ok, err = red:set_keepalive(10000, 100)  -- 10 秒空闲超时,池大小 100
    if not ok then
        ngx.log(ngx.NOTICE, "Redis keepalive error: ", err)
        red:close()
    end
end

-- 获取客户端真实 IP(支持代理场景)
local function get_client_ip()
    local ip = ngx.req.get_headers()["X-Real-IP"]

    if not ip then
        ip = ngx.req.get_headers()["X-Forwarded-For"] or ngx.var.remote_addr
    end

    return ip:match("^[%d%.]+")  -- 提取首个 IP(避免代理链干扰)
end

-- 连接 Redis 并设置连接池
local function connect_redis()
    local red = redis:new()
    red:set_timeout(1000)  -- 1 秒超时

    local ok, err = red:connect(config.redis_host, config.redis_port)

    if not ok then
        ngx.log(ngx.NOTICE, "Redis 连接失败: ", err)
        return nil, err
    end

    -- 复用连接池
    local count, err = red:get_reused_times()

    if count == 0 then
        -- ngx.log(ngx.NOTICE, "Redis 无法连接, 需要密码")
    elseif err then
        ngx.log(ngx.NOTICE, "Redis 复用连接失败: ", err)
    end

    return red
end

-- 主逻辑
local function main()
    local red = connect_redis()

    if not red then
        return -- Redis 故障时放行,避免影响正常访问
    end

    -- 1. 协议与 Referer 校验
    local http_version = ngx.req.http_version()
    local referer = ngx.var.http_referer or ""

    if http_version >= 2.0 or referer ~= "" then -- and & or
        ngx.log(ngx.NOTICE, "HTTP 版本大于等于 2 或 referer 不为空, 默认放行, ", client_ip)

        return close_redis(red)  -- 直接放行
    end

    -- 1. 白名单检查(最高优先级)
    local client_ip = get_client_ip()
    local user_agent = ngx.var.http_user_agent or "unknown"
    local white_key = config.whitelist_key .. ":" .. client_ip .. "_" .. ngx.md5(user_agent)
    local is_white, err = red:get(white_key)

    if is_white and is_white ~= ngx.null then
        return close_redis(red) -- 白名单直接放行
    end

    -- 3. 网段级访问控制(提取 IP 前两段)
    local ip_segments = {}

    for seg in string.gmatch(client_ip, "%d+") do
        table.insert(ip_segments, seg)
    end

    local subnet_key = "os_visit:" .. ip_segments[1] .. "." .. ip_segments[2]
    local full_ip_key = subnet_key .. ":" .. client_ip

    -- 3.1 检查网段 IP 数量
    local subnet_ip_count, err = red:scard(subnet_key)  -- SCARD 获取集合元素数

    -- 3.2 添加新 IP 到网段集合
    local is_new_ip, err = red:sadd(subnet_key, client_ip)  -- SADD 返回 1 表示新添加
    if is_new_ip == 1 then
        red:expire(subnet_key, config.subnet_window)  -- 重置网段过期时间
    end

    if subnet_ip_count and subnet_ip_count >= config.subnet_threshold then
        -- 网段超限,触发人机验证
        close_redis(red)
        return ngx.redirect("/captcha")
    end

    close_redis(red)
end

-- 执行主逻辑
main()
verify_captcha.lua:
lua
local redis = require "resty.redis"

local config = {
    redis_host = "127.0.0.1",
    redis_port = 6379,
    whitelist_expire = 1036800,         -- 白名单有效期(12 天)
    whitelist_key = "os_whitelist",
    auth_key = "os_auth"
}

-- Redis 连接池管理
local function close_redis(red)
    if not red then return end

    local ok, err = red:set_keepalive(10000, 100)  -- 10 秒空闲超时,池大小 100
    if not ok then
        ngx.log(ngx.NOTICE, "Redis keepalive error: ", err)
        red:close()
    end
end

-- 获取客户端真实 IP(支持代理场景)
local function get_client_ip()
    local ip = ngx.req.get_headers()["X-Real-IP"]

    if not ip then
        ip = ngx.req.get_headers()["X-Forwarded-For"] or ngx.var.remote_addr
    end

    return ip:match("^[%d%.]+")  -- 提取首个 IP(避免代理链干扰)
end

-- 连接 Redis 并设置连接池
local function connect_redis()
    local red = redis:new()
    red:set_timeout(1000)  -- 1 秒超时

    local ok, err = red:connect(config.redis_host, config.redis_port)

    if not ok then
        ngx.log(ngx.NOTICE, "Redis 连接失败: ", err)
        return nil, err
    end

    -- 复用连接池
    local count, err = red:get_reused_times()

    if count == 0 then
        -- ngx.log(ngx.NOTICE, "Redis 无法连接, 需要密码")
    elseif err then
        ngx.log(ngx.NOTICE, "Redis 复用连接失败: ", err)
    end

    return red
end

-- 获取请求参数
local args = ngx.req.get_uri_args()
local authCode = args.code or ""

if authCode == "" then
    ngx.status = 400
    ngx.say('{"status": "error", "msg": "Missing parameters"}')
    return
end

-- 主逻辑
local red = connect_redis()

if not red then
    ngx.status = 500
    ngx.say('{"status": "error", "msg": "Service exception, please try again later"}')

    return
end

-- 生成唯一标识与验证码
local client_ip = get_client_ip()
local user_agent = ngx.var.http_user_agent or "unknown"
local redis_key = config.auth_key .. ":" .. client_ip .. "_" .. ngx.md5(user_agent)
local white_key = config.whitelist_key .. ":" .. client_ip .. "_" .. ngx.md5(user_agent)

local is_white, err = red:get(white_key)

if is_white and is_white ~= ngx.null then -- 白名单禁止多次验证
    return ngx.exit(403)
end

-- 验证验证码
local stored_code, err = red:get(redis_key)

if stored_code and stored_code ~= ngx.null then
    -- 不区分大小写验证(增强用户体验)
    if string.upper(authCode) == string.upper(stored_code) then
        red:del(redis_key)  -- 验证通过后删除缓存

        local white_key = config.whitelist_key .. ":" .. client_ip .. "_" .. ngx.md5(user_agent)
        red:setex(white_key, config.whitelist_expire, "1")

        ngx.say('{"status": "success", "msg": "OK"}')
    else
        ngx.say('{"status": "error", "msg": "Incorrect captcha"}')
    end
else
    ngx.say('{"status": "error", "msg": "Captcha expired or invalid"}')
end

close_redis(red)
generate_captcha.lua:
lua
local gd = require "gd"
local redis = require "resty.redis"
local str = require "resty.string"

-- 配置参数
local config = {
    width = 200,              -- 图像宽度
    height = 120,             -- 图像高度
    length = 4,               -- 验证码长度
    redis_host = "127.0.0.1",
    redis_port = 6379,
    whitelist_key = "os_whitelist",
    auth_key = "os_auth",
    expire = 600
}

-- Redis 连接池管理
local function close_redis(red)
    if not red then return end

    local ok, err = red:set_keepalive(10000, 100)  -- 10 秒空闲超时,池大小 100
    if not ok then
        ngx.log(ngx.NOTICE, "Redis keepalive error: ", err)
        red:close()
    end
end

-- 获取客户端真实 IP(支持代理场景)
local function get_client_ip()
    local ip = ngx.req.get_headers()["X-Real-IP"]

    if not ip then
        ip = ngx.req.get_headers()["X-Forwarded-For"] or ngx.var.remote_addr
    end

    return ip:match("^[%d%.]+")  -- 提取首个 IP(避免代理链干扰)
end

-- 连接 Redis 并设置连接池
local function connect_redis()
    local red = redis:new()
    red:set_timeout(1000)  -- 1 秒超时

    local ok, err = red:connect(config.redis_host, config.redis_port)

    if not ok then
        ngx.log(ngx.NOTICE, "Redis 连接失败: ", err)
        return nil, err
    end

    -- 复用连接池
    local count, err = red:get_reused_times()

    if count == 0 then
        -- ngx.log(ngx.NOTICE, "Redis 无法连接, 需要密码")
    elseif err then
        ngx.log(ngx.NOTICE, "Redis 复用连接失败: ", err)
    end

    return red
end

-- 生成随机验证码字符串
local function generate_code()
    local chars = "ABCDEFGHJKLMNPQRSTUVWXYZabcdefghjkmnpqrstuvwxyz0123456789"
    local code = ""

    math.randomseed(os.time() + ngx.worker.pid())

    for _ = 1, config.length do
        local idx = math.random(1, #chars)
        code = code .. chars:sub(idx, idx)
    end

    return code
end

-- 创建带干扰的验证码图像
local function create_image(code)
    local img = gd.createTrueColor(config.width, config.height)
    local white = img:colorAllocate(255, 255, 255)
    local black = img:colorAllocate(0, 0, 0)

    img:filledRectangle(0, 0, config.width, config.height, white)

    -- 绘制随机字符(带旋转和随机颜色)
    for i = 1, #code do
        local c = code:sub(i, i)
        local color = img:colorAllocate(
            math.random(30, 100),  -- R
            math.random(30, 100),  -- G
            math.random(30, 100)   -- B
        )
        -- 随机字体大小与旋转角度
        local font_size = math.random(26, 32)
        local x = 35 + (i - 1) * 30 + math.random(-8, 8)
        local y = (config.height / 2 + 14) + math.random(-8, 8)

        img:stringFT(
            color,
            "/usr/share/fonts/xxx/xxx.ttf",
            font_size,
            0,
            x,
            y,
            c
        )
    end

    -- 添加噪点(100 个随机像素)
    for _ = 1, 100 do
        local color = img:colorAllocate(
            math.random(0, 255),
            math.random(0, 255),
            math.random(0, 255)
        )

        img:setPixel(
            math.random(0, config.width),
            math.random(0, config.height),
            color
        )
    end

    return img
end

-- 主逻辑
local red = connect_redis()

if not red then
    return ngx.exit(500) -- 生成图片失败
end

-- 生成唯一标识与验证码
local client_ip = get_client_ip()
local user_agent = ngx.var.http_user_agent or "unknown"
local redis_key = config.auth_key .. ":" .. client_ip .. "_" .. ngx.md5(user_agent)
local white_key = config.whitelist_key .. ":" .. client_ip .. "_" .. ngx.md5(user_agent)

local is_white, err = red:get(white_key)

if is_white and is_white ~= ngx.null then -- 白名单禁止多次获取图像
    return ngx.exit(403)
end

local code = generate_code()
local img = create_image(code)

-- 存储验证码到 Redis
red:setex(redis_key, config.expire, code)
close_redis()

-- 输出图像响应
ngx.header["Content-Type"] = "image/png"
ngx.print(img:pngStrEx(6)) -- 返回图片数据
verify.html:
html
<!DOCTYPE html>
<html lang="zh">
  <head>
    <meta charset="UTF-8" />
    <meta name="viewport" content="width=device-width, initial-scale=1.0" />
    <title>系统校验/System check</title>

    <style>
      :root {
        --color-text: #333;
        --color-primary: #53aed6;
        --color-info: #909399;
        --color-background: #fff;
        --radis-base: 4px;
        --color-text-revert: #fff;
        --color-danger: #f56c6c;
      }

      @media (prefers-color-scheme: dark) {
        :root {
          --color-text: rgba(200, 200, 200);
          --color-background: #000;
          --color-primary: #405761;
          --color-text-revert: rgb(200, 200, 200);
          --color-info: #909399;
        }
      }

      * {
        margin: 0;
        padding: 0;
        box-sizing: border-box;
      }

      body {
        font-family: "Segoe UI", Tahoma, Geneva, Verdana, sans-serif;
        font-size: 15px;
        font-weight: 400;
        color: var(--color-text);
        color-scheme: light dark;
        max-width: 100vw;
        overflow-x: hidden;
        background-color: var(--color-background);
        transition: background 0.3s ease-out;
        text-rendering: optimizelegibility;
        -webkit-font-smoothing: antialiased;
        -moz-osx-font-smoothing: grayscale;
        line-height: 1;
      }

      button {
        padding: 5px 10px;
        outline: none;
        border: none;
        background-color: transparent;
        cursor: pointer;
        border-radius: var(--radis-base);
        transition: opacity 0.3 ease-in;
      }

      .button:hover {
        opacity: 0.8;
      }

      .button:active {
        opacity: 0.7;
      }

      button.primary {
        background-color: var(--color-primary);
        color: var(--color-text-revert);
      }

      button.info {
        background-color: var(--color-info);
        color: #fff;
      }

      .main {
        padding: 20px;
        width: 100%;
      }

      .title {
        font-size: 17px;
        font-weight: 500;
      }

      .img-wrapper {
        margin-top: 16px;
      }

      #captcha-img {
        vertical-align: bottom;
        border: 1px solid #ddd;
        border-radius: var(--radis-base);
      }

      .input-wrapper {
        margin-top: 12px;
      }

      #captcha-input {
        padding: 0 5px;
        height: 28px;
        line-height: 28px;
        outline: none;
        border-radius: var(--radis-base);
        border: 1px solid #ccc;
        transition: border 0.3 ease-in;
      }

      #captcha-input:hover,
      #captcha-input:focus {
        border-color: var(--color-primary);
      }

      .result-wrapper {
        padding: 8px;
        display: none;
        justify-content: center;
        align-items: center;
        margin-top: 12px;
        width: 240px;
        height: 80px;
        border-radius: var(--radis-base);
        background-color: var(--color-danger);
        transition: background 0.3s ease-in;
        color: #fff;
        font-size: 14px;
        word-break: break-all;
      }
    </style>
  </head>
  <body>
    <div class="main">
      <h1 class="title">请完成安全验证/Security verification required</h1>

      <div class="img-wrapper">
        <img id="captcha-img" width="200" height="120" />

        <button class="button info" onclick="refreshCaptcha()">刷新/Refresh</button>
      </div>

      <div class="input-wrapper">
        <input id="captcha-input" type="text" />

        <button class="button primary" type="submit" onclick="verifyCaptcha()">
          提交/Submit
        </button>
      </div>

      <div class="result-wrapper"></div>
    </div>

    <script>
      const img = document.getElementById("captcha-img");
      const input = document.getElementById("captcha-input");
      const resultEl = document.getElementsByClassName("result-wrapper")[0];

      let verifying = false;

      // 刷新验证码
      function refreshCaptcha() {
        // 添加随机参数防止缓存
        img.src = "/captcha-image?" + Math.random().toString() + Date.now();
      }

      function onError(message) {
        resultEl.style.display = "flex";
        resultEl.textContent = message;
      }

      // 验证验证码
      async function verifyCaptcha() {
        if (verifying) {
          return false;
        }

        const code = input.value;

        if (!code || code.trim() === "") {
          return onError("输入不能为空/Input cannot be empty");
        }

        verifying = true;

        try {
          const res = await fetch(`/captcha-verify?code=${code}`);
          const data = await res.json();

          if (data.status === "success") {
            window.location.href = "/";
          } else {
            onError(data.msg);
            refreshCaptcha(); // 验证失败自动刷新
            input.focus();
          }
        } catch (err) {
          onError("验证失败, 请稍后重试/Verification failed, please try again later");
        } finally {
          verifying = false;
        }
      }

      // 初始化验证码
      window.onload = refreshCaptcha;
      input.addEventListener("keydown", (e) => {
        if (e.key.toLowerCase() === "enter") {
          verifyCaptcha();
        }
      });
    </script>
  </body>
</html>
效果显著,在删除 100 多个网段封禁后,在极短的时间内控制住了流量访问,外网出带宽使用率在初期出现了涨幅,十几分钟后趋于平稳。
--end