gitlab介绍与部署
一、版本控制核心信息
版本控制是软件配置管理的核心,主要用于追踪文件变更和支持并行开发
1. 核心功能
- 追踪变更:记录文件的修改时间、修改人及具体修改内容,每次变更后版本号自动增加
- 并行开发:解决多人协同开发的版本同步与通信问题,通过分支与合并功能处理 Bug 修正
- 版本管理:基于开发基线确定初始版本,需求变更时延伸版本树或创建新分支,支持回退到历史版本
2. 关键规范
- 版本标识:配置库中的所有元素自动生成唯一版本号,按设定模型分支、演进
- 元数据收集:除系统自动记录的信息外,需定义辅助元数据,用于规范流程和支持软件过程度量
- 权限控制:基线版本之前的版本默认锁定,变更需遵循变更控制流程
3. 常用工具
| 工具名称 | 官网链接 | 国内镜像 |
|---|---|---|
| GitLab | https://about.gitlab.com/ | https://mirrors.tuna.tsinghua.edu.cn/gitlab-ce/yum/ |
| GitHub | - | - |
| Subversion | - | - |
二、GitLab 部署要求
部署 GitLab 前需确保环境符合基础配置,避免因资源不足导致运行异常
1. 环境要求
- 环境状态:必须为纯洁环境(无多余依赖或冲突软件)
- 硬件配置:最低需满足 CPU 2 核、内存 8GB,建议根据实际使用规模提升配置
三、上线流程(含角色分工)
上线过程需开发、测试、运维三方协同,严格遵循步骤以保障稳定发布
- 开发代码:开发人员完成代码开发
- 测试验证:测试人员对开发代码进行首轮测试
- 初步发布:运维人员将代码部署到测试或预发布环境
- 二次测试:测试人员在部署环境中再次测试
- 申请发布:开发人员发送邮件申请正式发布,抄送给开发领导与运维团队
- 填写变更单:记录发布细节,明确责任,避免后续问题争议
- 领导审批:开发领导对发布申请进行审批
- 影响评估:运维人员评估发布对生产环境的影响范围
- 汇报确认:运维人员向运维领导汇报评估结果
- 协商方案:运维领导与开发领导协商最终发布方案
- 生产发布:运维人员将代码部署到生产环境
- 最终测试与回滚:测试人员验证生产环境功能,若出现问题,由运维人员执行回滚操作
四、GitLab 常用命令
| 命令 | 含义 |
|---|---|
| gitlab-ctl start | 启动全部服务 |
| gitlab-ctl restart | 重启全部服务 |
| gitlab-ctl stop | 停止全部服务 |
| gitlab-ctl restart nginx | 重启单个服务(示例为 nginx) |
| gitlab-ctl status | 查看服务状态 |
| gitlab-ctl reconfigure | 使配置文件生效 |
| gitlab-ctl show-config | 验证配置文件 |
| gitlab-ctl uninstall | 删除 GitLab(保留数据) |
| gitlab-ctl cleanse | 删除所有数据,重新初始化 |
| gitlab-ctl tail | 查看所有服务的日志 |
| gitlab-ctl tail nginx | 查看指定服务的日志(示例为 nginx) |
| gitlab-rails console | 进入 GitLab 控制台 |
具体示例:
已关闭防火墙与selinux
配置yum源:
[root@server ~]# cd /etc/yum.repos.d/
[root@server yum.repos.d]# ls
CentOS-Base.repo  CentOS-Debuginfo.repo  CentOS-Media.repo    CentOS-Vault.repo
CentOS-CR.repo    CentOS-fasttrack.repo  CentOS-Sources.repo
[root@server yum.repos.d]# rm -rf *
[root@server yum.repos.d]# curl -o /etc/yum.repos.d/CentOS-Base.repo https://mirrors.aliyun.com/repo/Centos-7.repo
  % Total    % Received % Xferd  Average Speed   Time    Time     Time  Current
                                 Dload  Upload   Total   Spent    Left  Speed
100  2523  100  2523    0     0  10074      0 --:--:-- --:--:-- --:--:-- 10092
[root@server yum.repos.d]# yum -y install epel-release
安装git:
[root@server ~]# yum -y install git安装依赖包:
[root@server ~]# yum -y install curl openssh-server openssh-clients postfix cronie perl设置时钟同步:
[root@server ~]# systemctl restart chronyd
[root@server ~]# systemctl enable chronyd
Created symlink from /etc/systemd/system/multi-user.target.wants/chronyd.service to /usr/lib/systemd/system/chronyd.service.
[root@server ~]# hwclock -w
启动postfix服务并设置开机自启:
[root@server ~]# systemctl restart postfix
[root@server ~]# systemctl enable postfix
下载gitlab的rpm包:(注:这里是直接上传)
[root@server ~]# cd /usr/src/
[root@server src]# ls
debug  kernels
[root@server src]# rz -E
rz waiting to receive.
[root@server src]# ls
debug  gitlab-ce-15.3.3-ce.0.el7.x86_64.rpm  kernels
此时我们需要使用rpm -qa|grep policy 找到policycoreutils:
[root@server ~]# rpm -qa|grep policy
policycoreutils-2.5-29.el7.x86_64
checkpolicy-2.5-8.el7.x86_64
selinux-policy-targeted-3.13.1-229.el7.noarch
selinux-policy-3.13.1-229.el7.noarch
policycoreutils-python-2.5-29.el7.x86_64
安装gitlab:
[root@server src]# rpm -ivh gitlab-ce-15.3.3-ce.0.el7.x86_64.rpm
warning: gitlab-ce-15.3.3-ce.0.el7.x86_64.rpm: Header V4 RSA/SHA1 Signature, key ID f27eab47: NOKEY
Preparing...                          ################################# [100%]
Updating / installing...
   1:gitlab-ce-15.3.3-ce.0.el7        ################################# [100%]
It looks like GitLab has not been configured yet; skipping the upgrade script.

       *.                  *.
      ***                 ***
     *****               *****
    .******             *******
    ********            ********
   ,,,,,,,,,***********,,,,,,,,,
  ,,,,,,,,,,,*********,,,,,,,,,,,
  .,,,,,,,,,,,*******,,,,,,,,,,,,
      ,,,,,,,,,*****,,,,,,,,,.
         ,,,,,,,****,,,,,,
            .,,,***,,,,
                ,*,.


     _______ __  __          __
    / ____(_) /_/ /   ____ _/ /_
   / / __/ / __/ /   / __ `/ __ \
  / /_/ / / /_/ /___/ /_/ / /_/ /
  \____/_/\__/_____/\__,_/_.___/


Thank you for installing GitLab!
GitLab was unable to detect a valid hostname for your instance.
Please configure a URL for your GitLab instance by setting `external_url`
configuration in /etc/gitlab/gitlab.rb file.
Then, you can start your GitLab instance by running the following command:
  sudo gitlab-ctl reconfigure

For a comprehensive list of configuration options please see the Omnibus GitLab readme
https://gitlab.com/gitlab-org/omnibus-gitlab/blob/master/README.md

Help us improve the installation experience, let us know how we did with a 1 minute survey:
https://gitlab.fra1.qualtrics.com/jfe/form/SV_6kVqZANThUQ1bZb?installation=omnibus&release=15-3
修改配置文件:
[root@server ~]# vim /etc/gitlab/gitlab.rb
.....    //此处为省略内容
external_url 'http://192.168.100.20'      //将此处设为gitlab的服务器IP地址亦或域名
.....    //此处为省略内容
重载配置文件并重启gitlab:
[root@server ~]# gitlab-ctl reconfigure
....
[root@server ~]# gitlab-ctl restart
ok: run: alertmanager: (pid 11212) 0s
ok: run: gitaly: (pid 11226) 1s
ok: run: gitlab-exporter: (pid 11241) 1s
ok: run: gitlab-kas: (pid 11244) 0s
ok: run: gitlab-workhorse: (pid 11258) 1s
ok: run: logrotate: (pid 11270) 0s
ok: run: nginx: (pid 11275) 0s
ok: run: node-exporter: (pid 11278) 0s
ok: run: postgres-exporter: (pid 11284) 1s
ok: run: postgresql: (pid 11294) 0s
ok: run: prometheus: (pid 11304) 1s
ok: run: puma: (pid 11321) 0s
ok: run: redis: (pid 11326) 0s
ok: run: redis-exporter: (pid 11336) 0s
ok: run: sidekiq: (pid 11423) 0s
查看当前的gitlab版本:
[root@server ~]# head /opt/gitlab/version-manifest.txt
gitlab-ce 15.3.3
....
破解管理员密码:
[root@server ~]# gitlab-rails console -e production
--------------------------------------------------------------------------------
 Ruby:         ruby 2.7.5p203 (2021-11-24 revision f69aeb8314) [x86_64-linux]
 GitLab:       15.3.3 (c629a47f87f) FOSS
 GitLab Shell: 14.10.0
 PostgreSQL:   13.6
------------------------------------------------------------[ booted in 43.24s ]
Loading production environment (Rails 6.1.6.1)
irb(main):001:0> user = User.where(id:1).first   //id为1的是超级管理员
=> #<User id:1 @root>
irb(main):002:0> user.password = 'redhat123!'     //密码必须至少8个字符
=> "redhat123!"
irb(main):003:0> user.password_confirmation = 'redhat123!'
=> "redhat123!"
irb(main):004:0> user.save!            //保存修改,若无问题将返回true
=> true
irb(main):005:0> exit          //退出
gitlab管理:
在浏览器中使用gitlab服务器的IP访问
192.168.100.20
用户名为root 默认管理员为root
密码为刚刚设置的密码:redhat123!
汉化
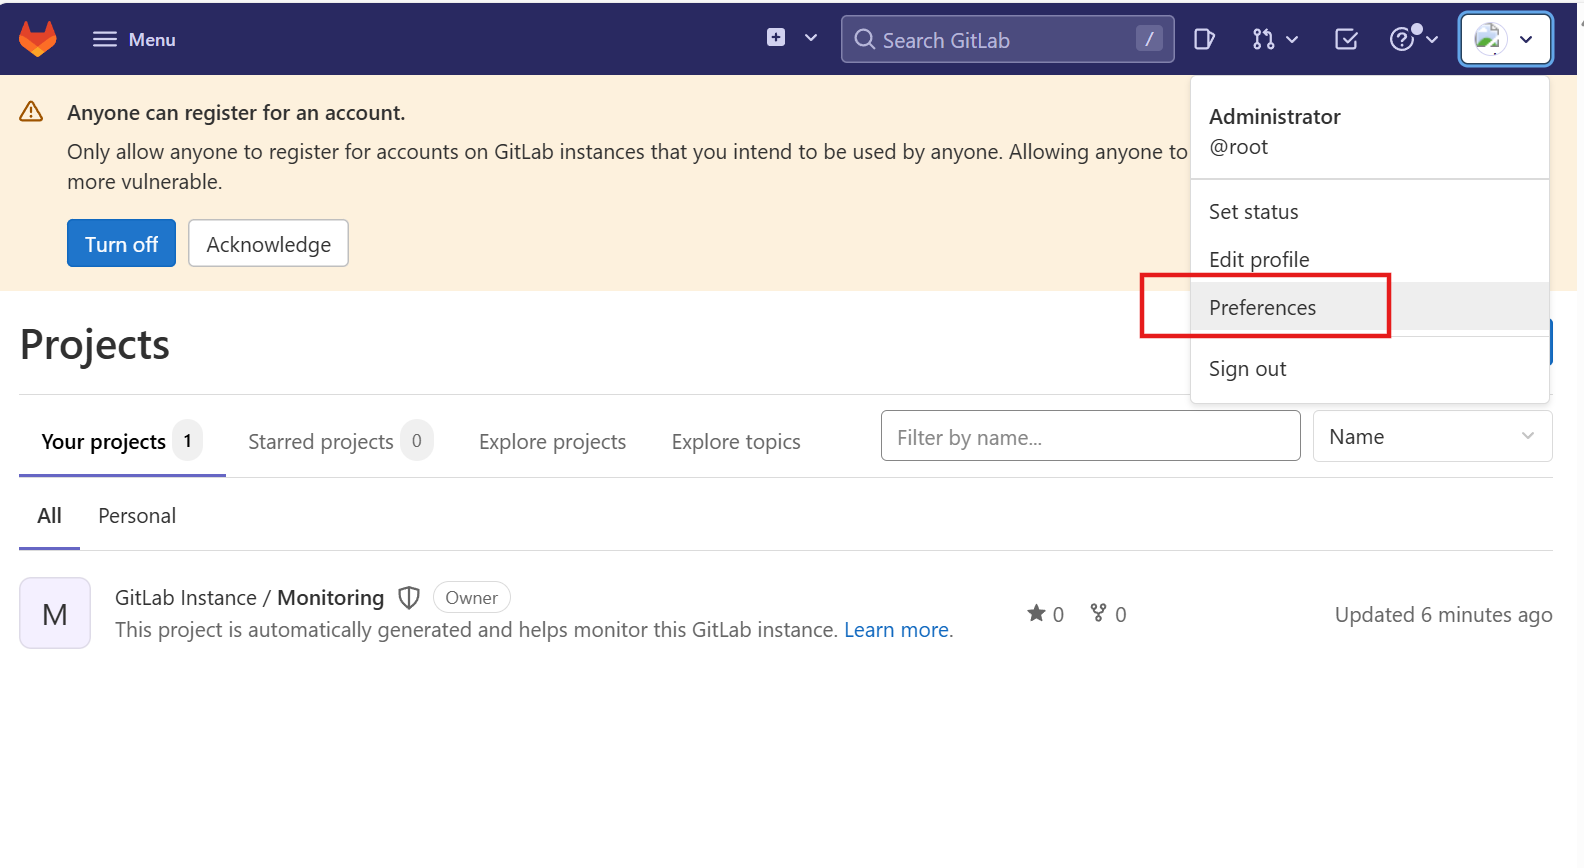
用户旁边下拉箭头---preferences---localization---language--选择简体中文--保存更改

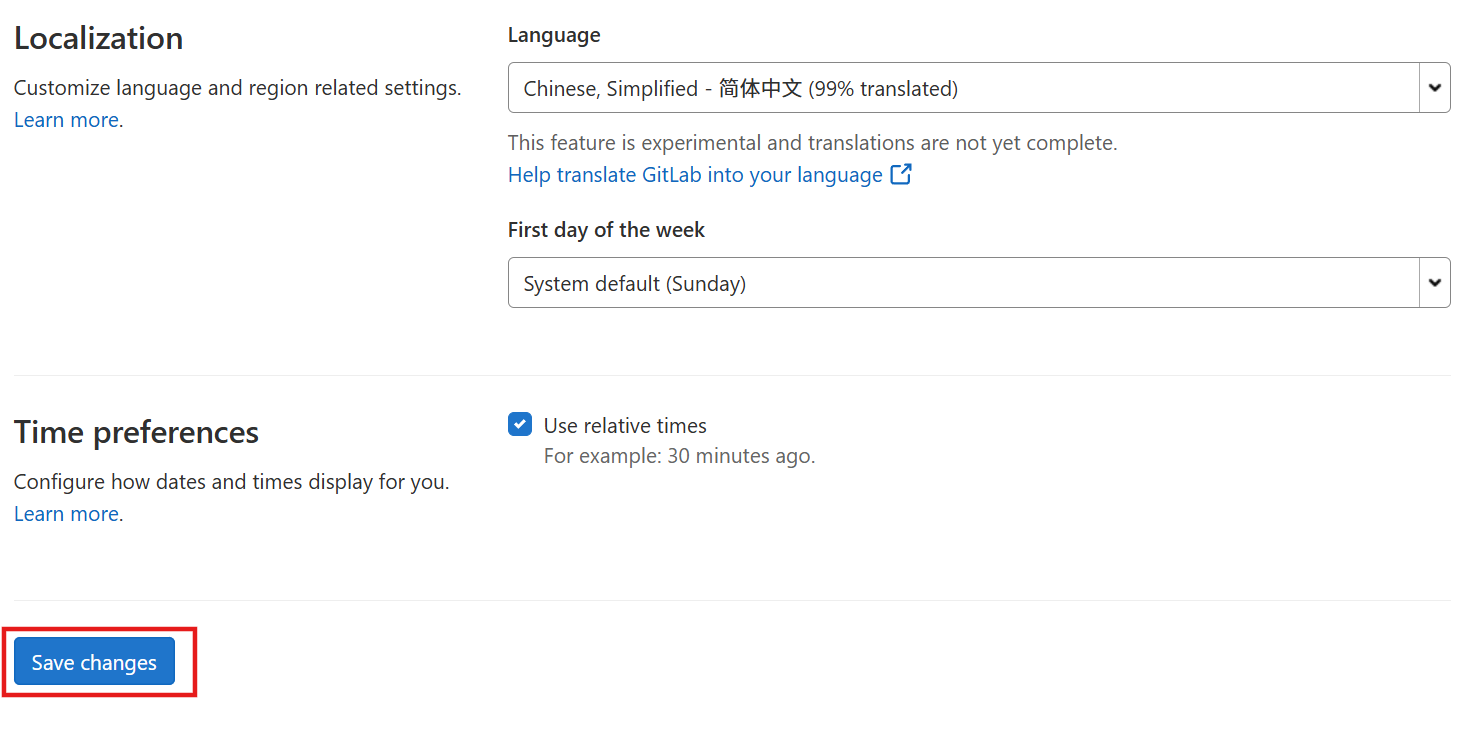
保存后刷新一下就是中文了
关闭注册功能
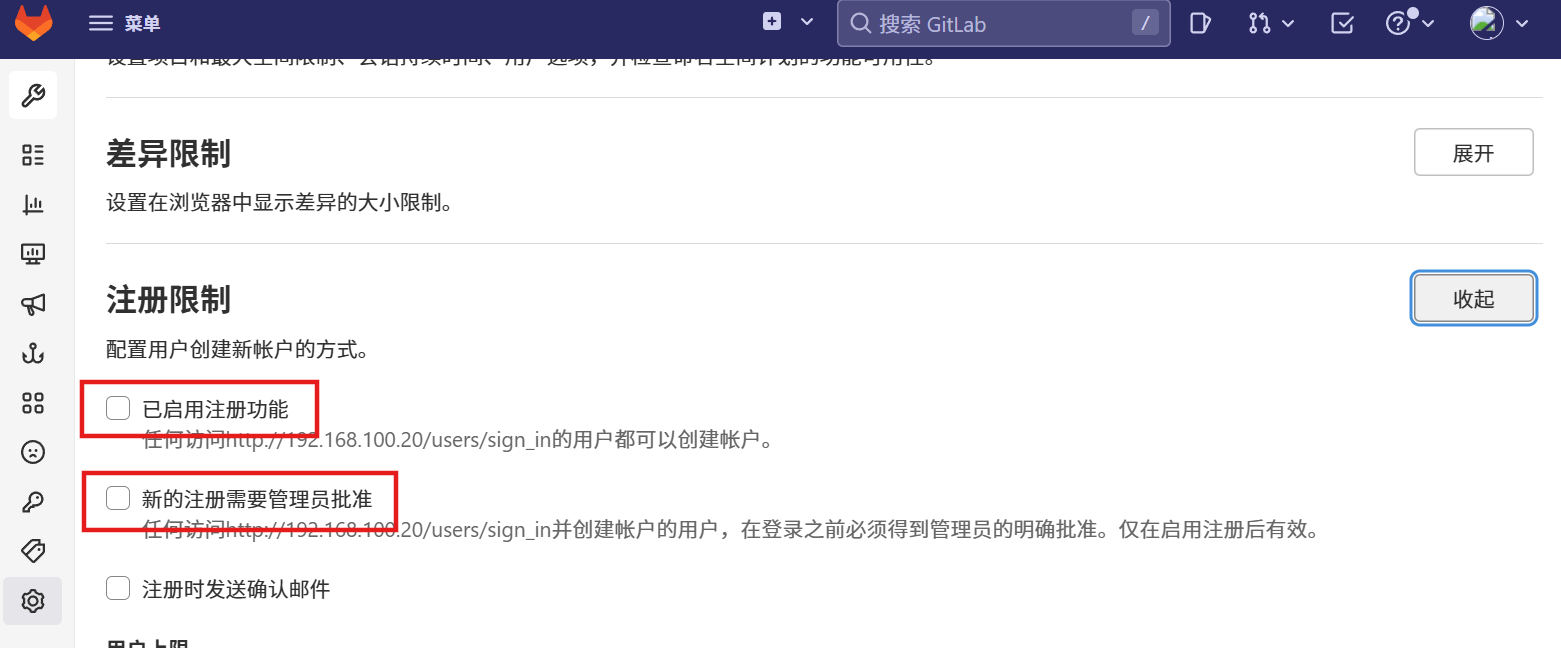
由于我们gitlab是私有仓库,一般用户都是由管理员创建和分派的,所以我们需要关闭注册
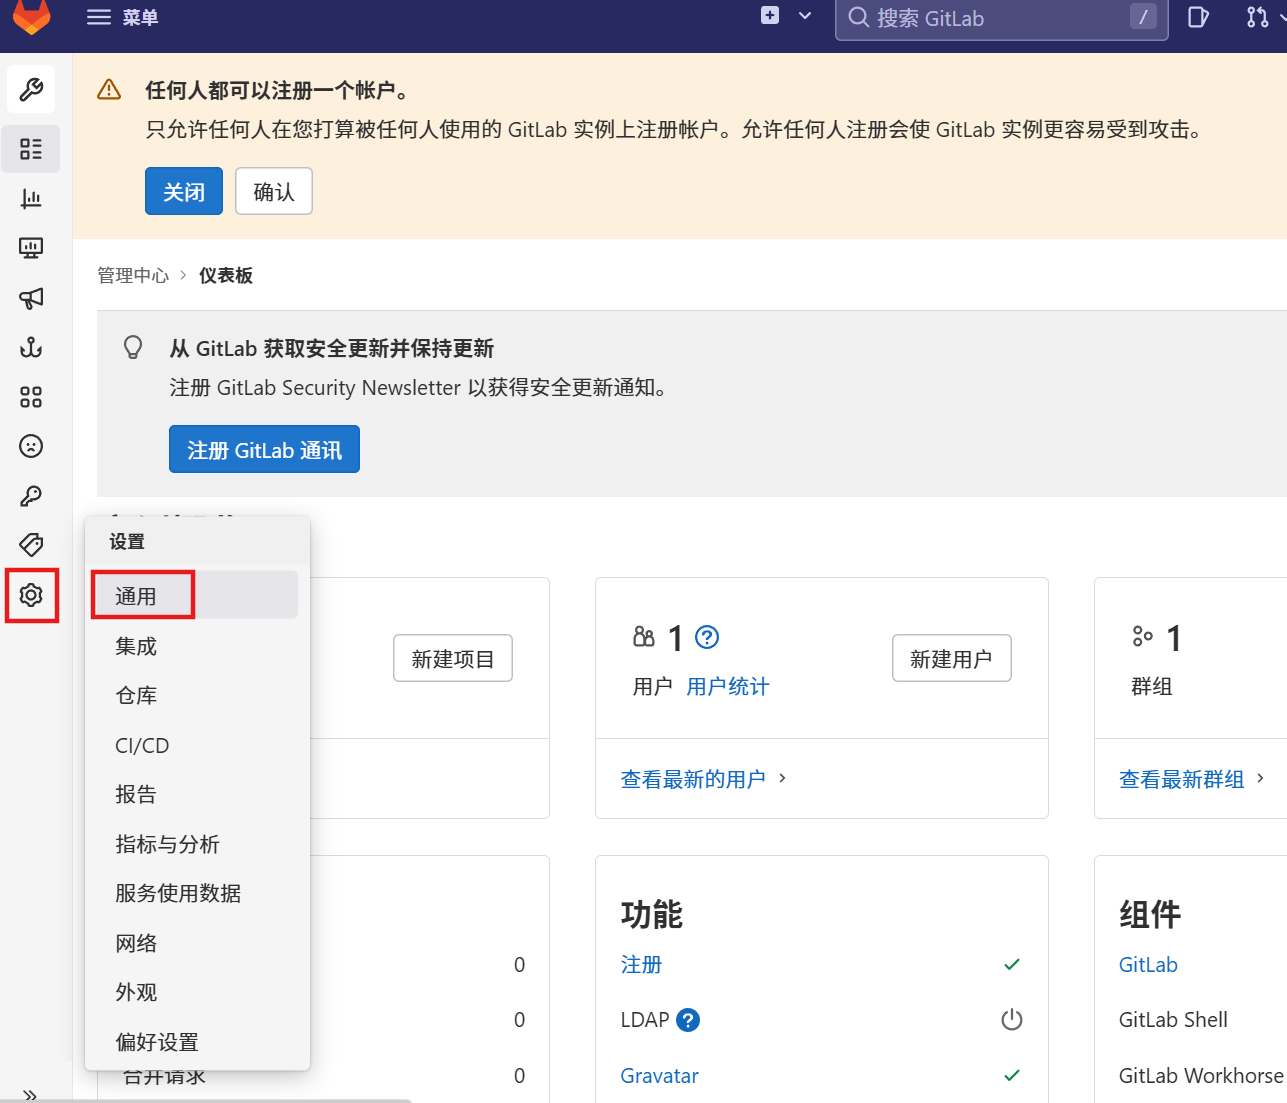
管理员---设置--通用--注册限制---把已启用注册功能的勾去掉--保存更改
gitlab常用管理操作
项目管理(通常只是创建新项目)
创建成员组(针对某个项目创建一个成员组)
用户管理(此用户乃gitlab用户而非系统用户)
来了新员工,为其添加gitlab用户
员工离职,将其gitlab用户禁用或者删除
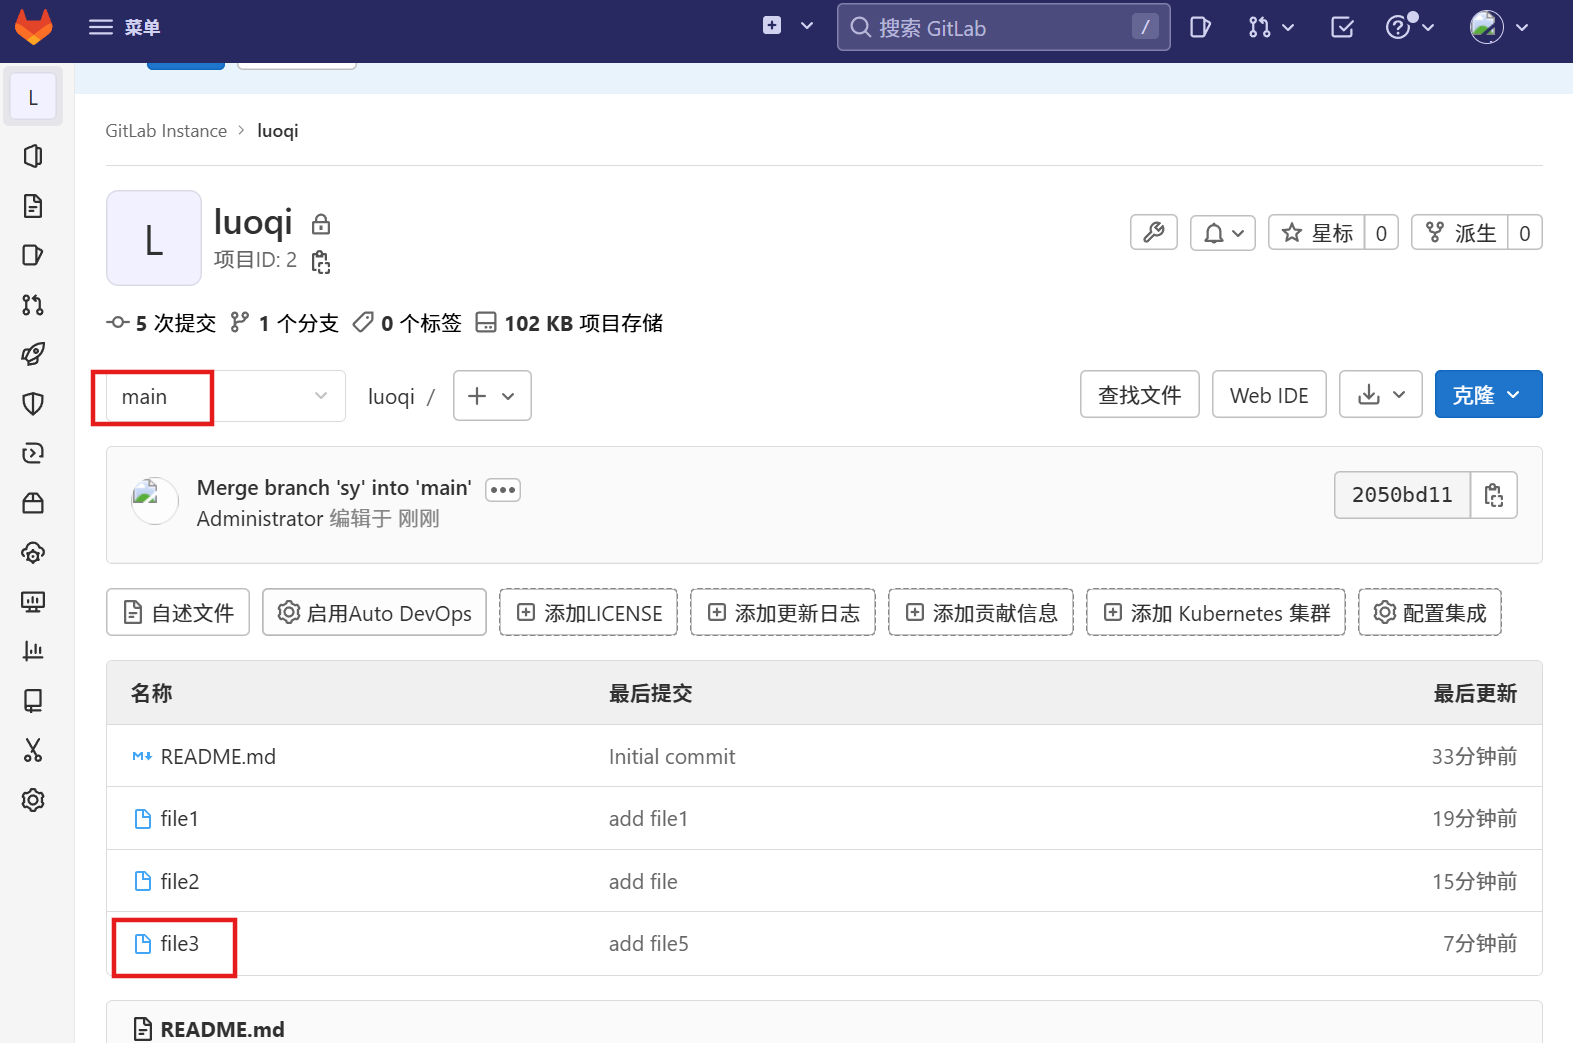
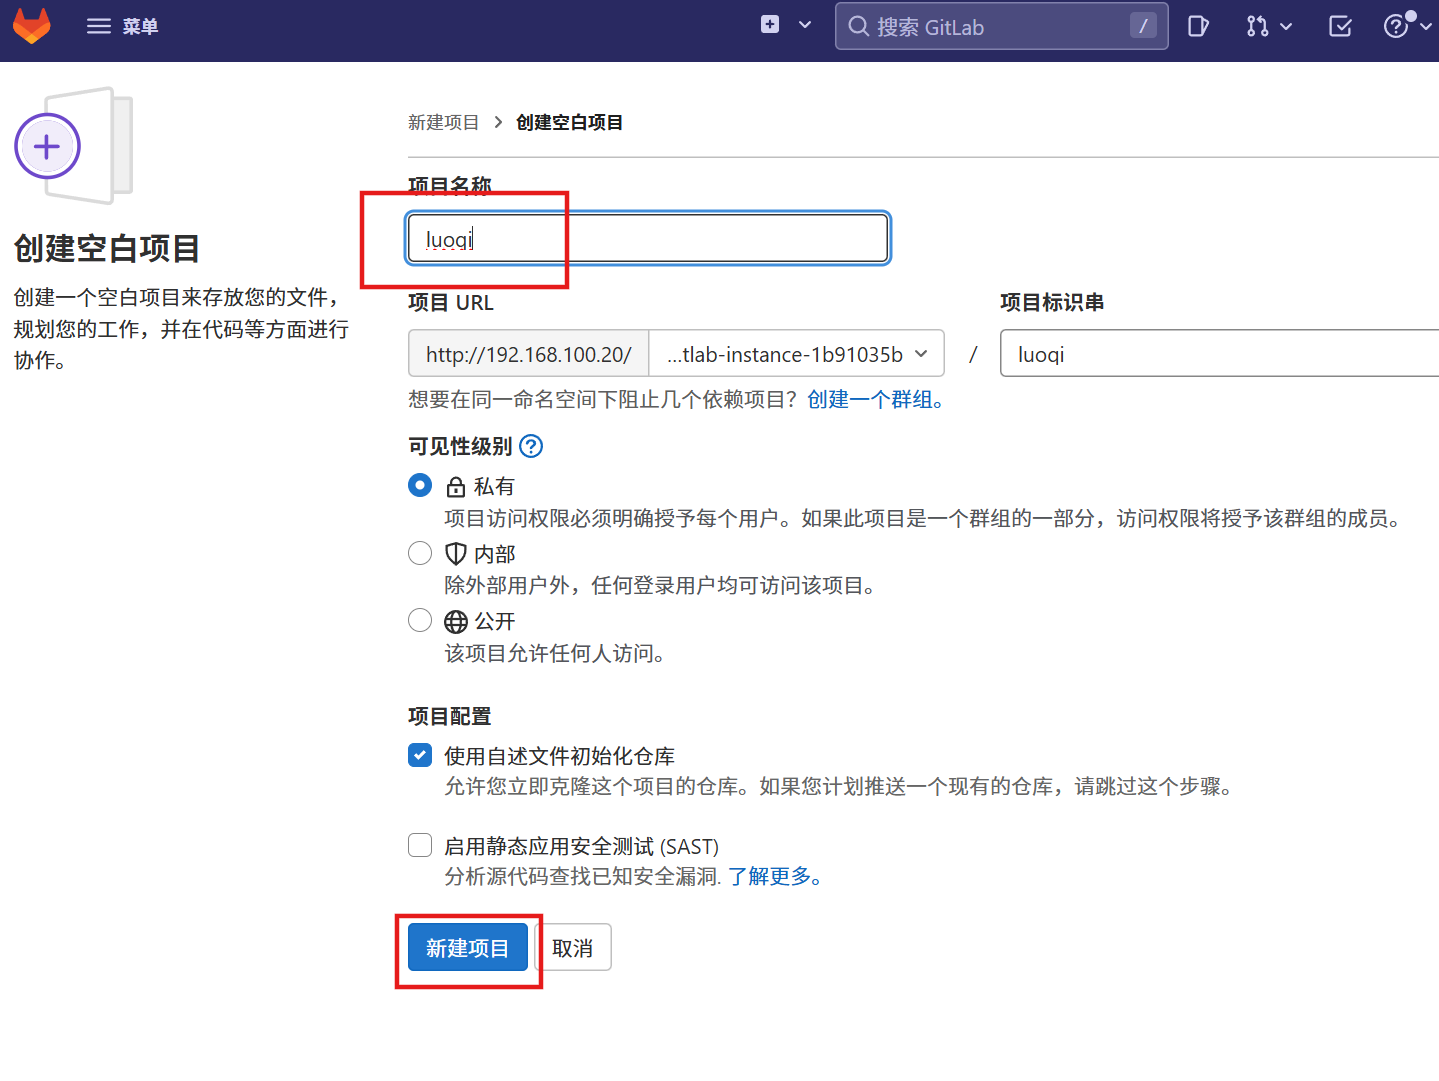
1、创建项目
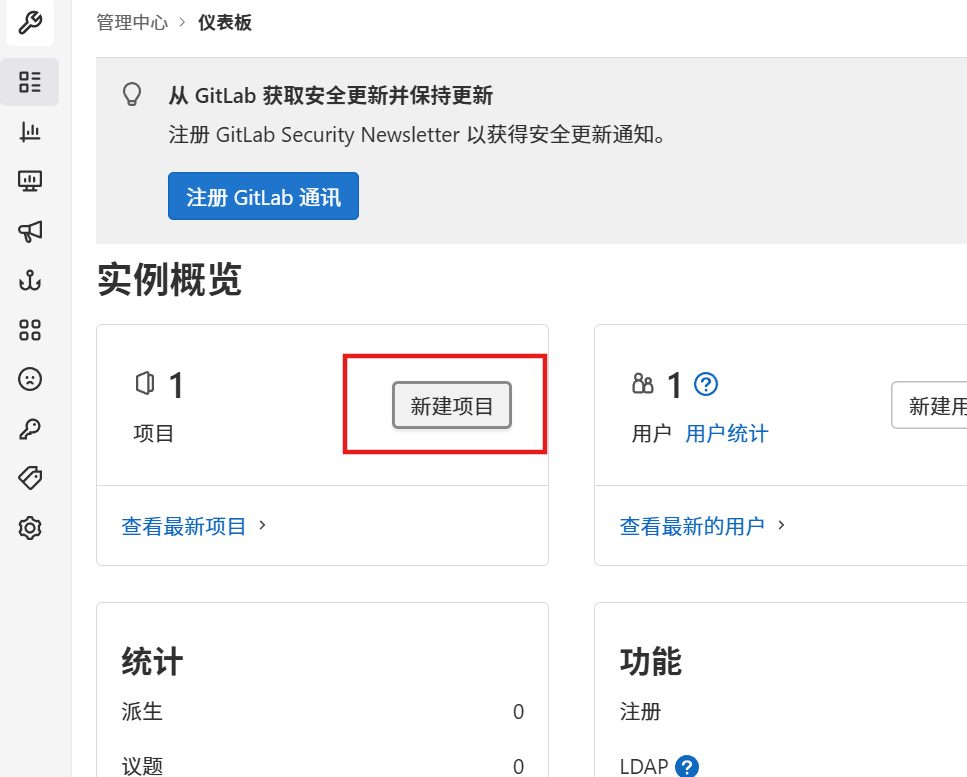
创建空白项目:
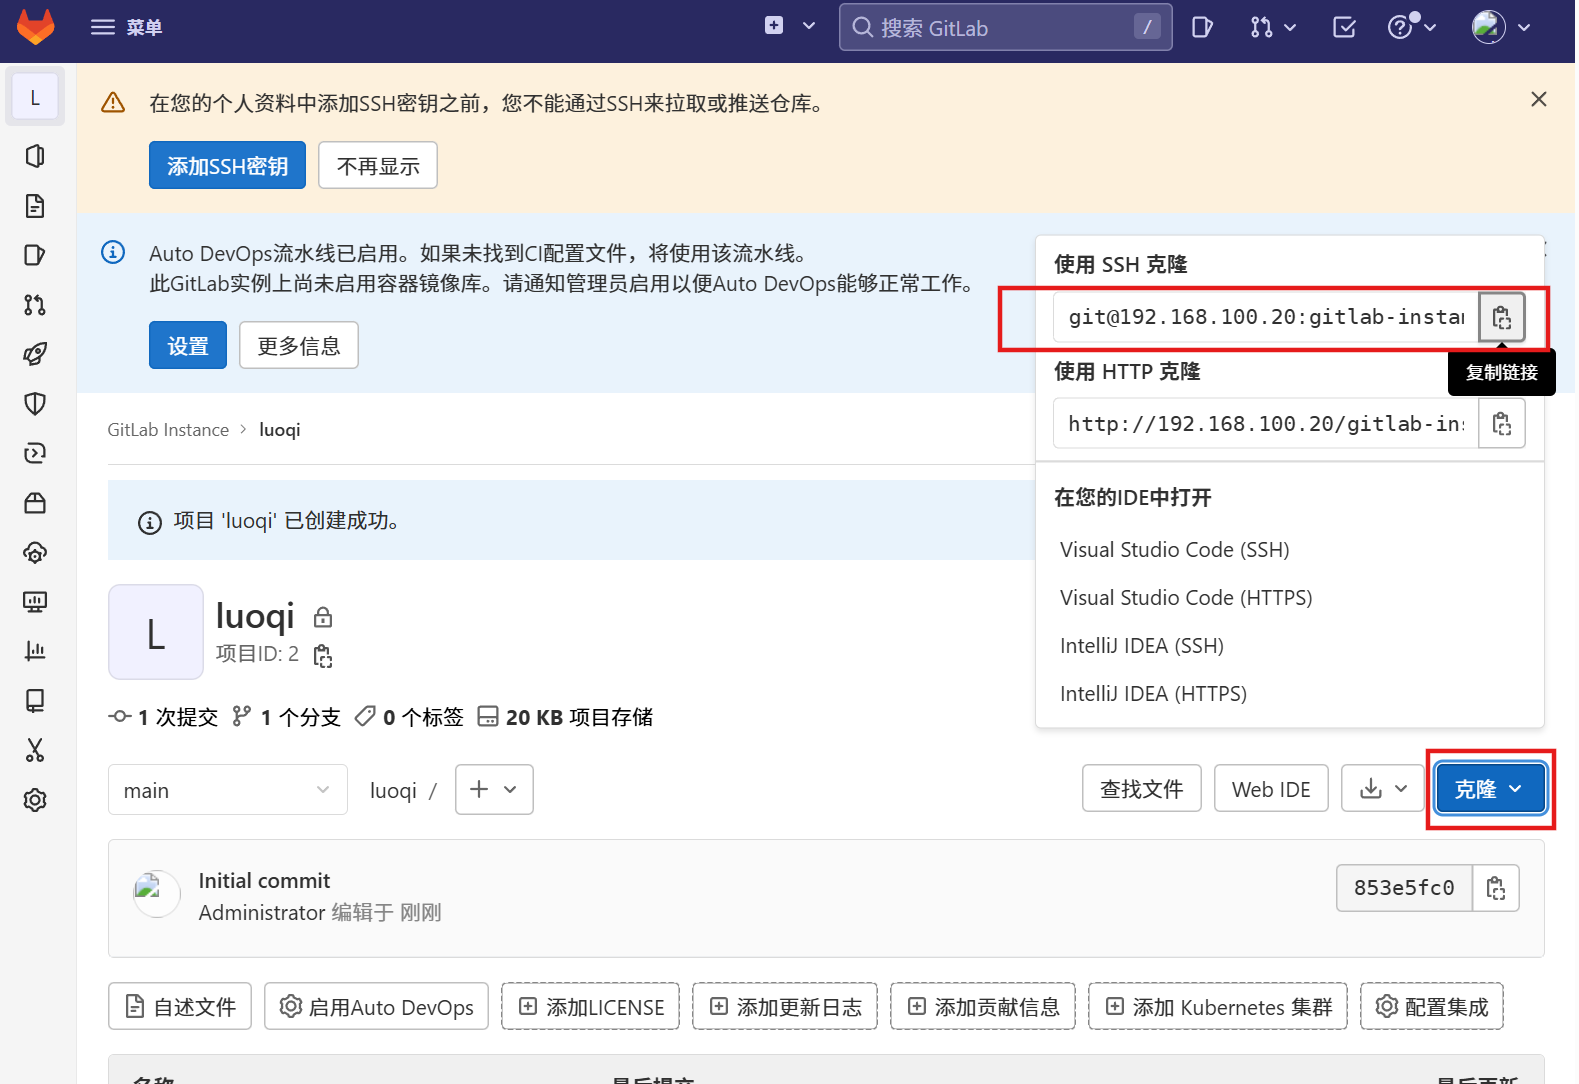
2、在Linux中使用git clone git@192.168.100.20:gitlab-instance-1b91035b/luoqi.git 克隆到本地
[root@server ~]# ssh-keygen
Generating public/private rsa key pair.
Enter file in which to save the key (/root/.ssh/id_rsa):
Enter passphrase (empty for no passphrase):
Enter same passphrase again:
Your identification has been saved in /root/.ssh/id_rsa.
Your public key has been saved in /root/.ssh/id_rsa.pub.
The key fingerprint is:
SHA256:H6d6nFZoJy1yV+eP7KPLd0NFyjid+V/7Ip4Lh9PjJRQ root@server.example.com
The key's randomart image is:
+---[RSA 2048]----+
|                 |
|                .|
|            E+ = |
|            o.B o|
|        S .ooo +.|
|        ..*B=  .+|
|         =*B=.o.=|
|         .=*.=*o+|
|        .o .OB.++|
+----[SHA256]-----+
[root@server ~]# cd ~/.ssh/
[root@server .ssh]# ls
id_rsa  id_rsa.pub
[root@server .ssh]# cat id_rsa.pub
ssh-rsa AAAAB3NzaC1yc2EAAAADAQABAAABAQDAg+u9p9T9kyuYtHJVF2ZESi4238gLigIBFQUS9eKyQEJB9IkRF2TrAqJ3HVaYH0YWDSEgSTZWuve76HwEHtHyLIWzv9W5j1BlZ5Iu2C3c/jgKnIR1NouLDBxUcxi9ZQOJMEe5IONMoOQjV3thg5bw3NTubYOJTWmf+KnRgRQYSzxWWKQXupInX5aw6vCLTRNS4/HaLY8HWuYrULWk1kWWTE6bEYY2L4YKJsnvG96Frhhfxbn2hd7OexfxhX1x4a1tZDnD076djfAZRVcqMLddSytxMT5Gb/DkXle2Psody6tOj7opqdJ1CLiPA3CLj6Qesk+Sd+z7JA1zjr/vSjtV root@server.example.com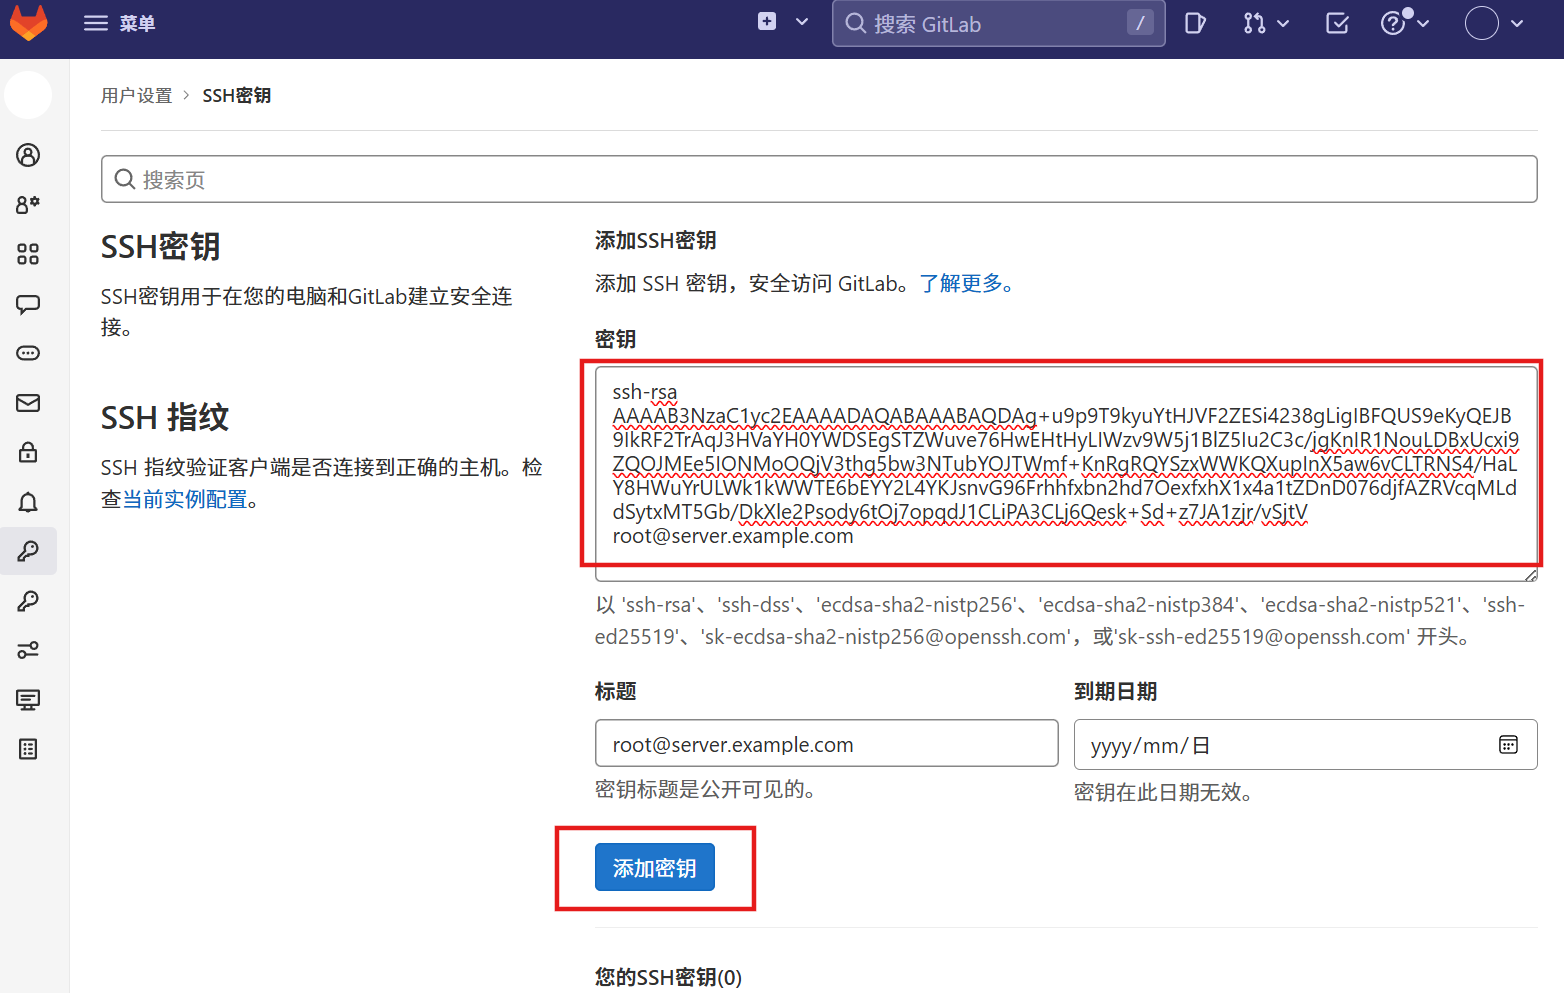
[root@server ~]# git clone git@192.168.100.20:gitlab-instance-1b91035b/luoqi.git
Cloning into 'luoqi'...
The authenticity of host '192.168.100.20 (192.168.100.20)' can't be established.
ECDSA key fingerprint is SHA256:UN0UZbtBfFQeLR3836aFd9k4cm9na95JOPqBnPk05VU.
ECDSA key fingerprint is MD5:20:05:39:25:84:f6:1b:bb:8b:b3:ed:b9:bf:96:99:ba.
Are you sure you want to continue connecting (yes/no)? yes
Warning: Permanently added '192.168.100.20' (ECDSA) to the list of known hosts.
remote: Enumerating objects: 3, done.
remote: Counting objects: 100% (3/3), done.
remote: Compressing objects: 100% (2/2), done.
remote: Total 3 (delta 0), reused 0 (delta 0), pack-reused 0
Receiving objects: 100% (3/3), done.
3、切换到项目中 cd luoqi/
[root@server ~]# ls
anaconda-ks.cfg  Documents  initial-setup-ks.cfg  Music     Public     Videos
Desktop          Downloads  luoqi                 Pictures  Templates
[root@server ~]# cd luoqi/
[root@server luoqi]# ls
README.md
4、配置邮件账户和账户
5、测试验证:
[root@server luoqi]# touch file1
[root@server luoqi]# ls
file1  README.md
[root@server luoqi]# git add file1
[root@server luoqi]# git commit -m "add file1"
[main e72af9f] add file1
 Committer: root <root@server.example.com>
Your name and email address were configured automatically based
on your username and hostname. Please check that they are accurate.
You can suppress this message by setting them explicitly:

    git config --global user.name "Your Name"
    git config --global user.email you@example.com

After doing this, you may fix the identity used for this commit with:

    git commit --amend --reset-author

 1 file changed, 0 insertions(+), 0 deletions(-)
 create mode 100644 file1
[root@server luoqi]# git config --global user.name "root"
[root@server luoqi]# git config --global user.email root@example.com
[root@server luoqi]# git push         //默认是上传到main分支中
warning: push.default is unset; its implicit value is changing in
Git 2.0 from 'matching' to 'simple'. To squelch this message
and maintain the current behavior after the default changes, use:

  git config --global push.default matching

To squelch this message and adopt the new behavior now, use:

  git config --global push.default simple

See 'git help config' and search for 'push.default' for further information.
(the 'simple' mode was introduced in Git 1.7.11. Use the similar mode
'current' instead of 'simple' if you sometimes use older versions of Git)

Counting objects: 4, done.
Delta compression using up to 4 threads.
Compressing objects: 100% (2/2), done.
Writing objects: 100% (3/3), 268 bytes | 0 bytes/s, done.
Total 3 (delta 0), reused 0 (delta 0)
To git@192.168.100.20:gitlab-instance-1b91035b/luoqi.git
   853e5fc..e72af9f  main -> main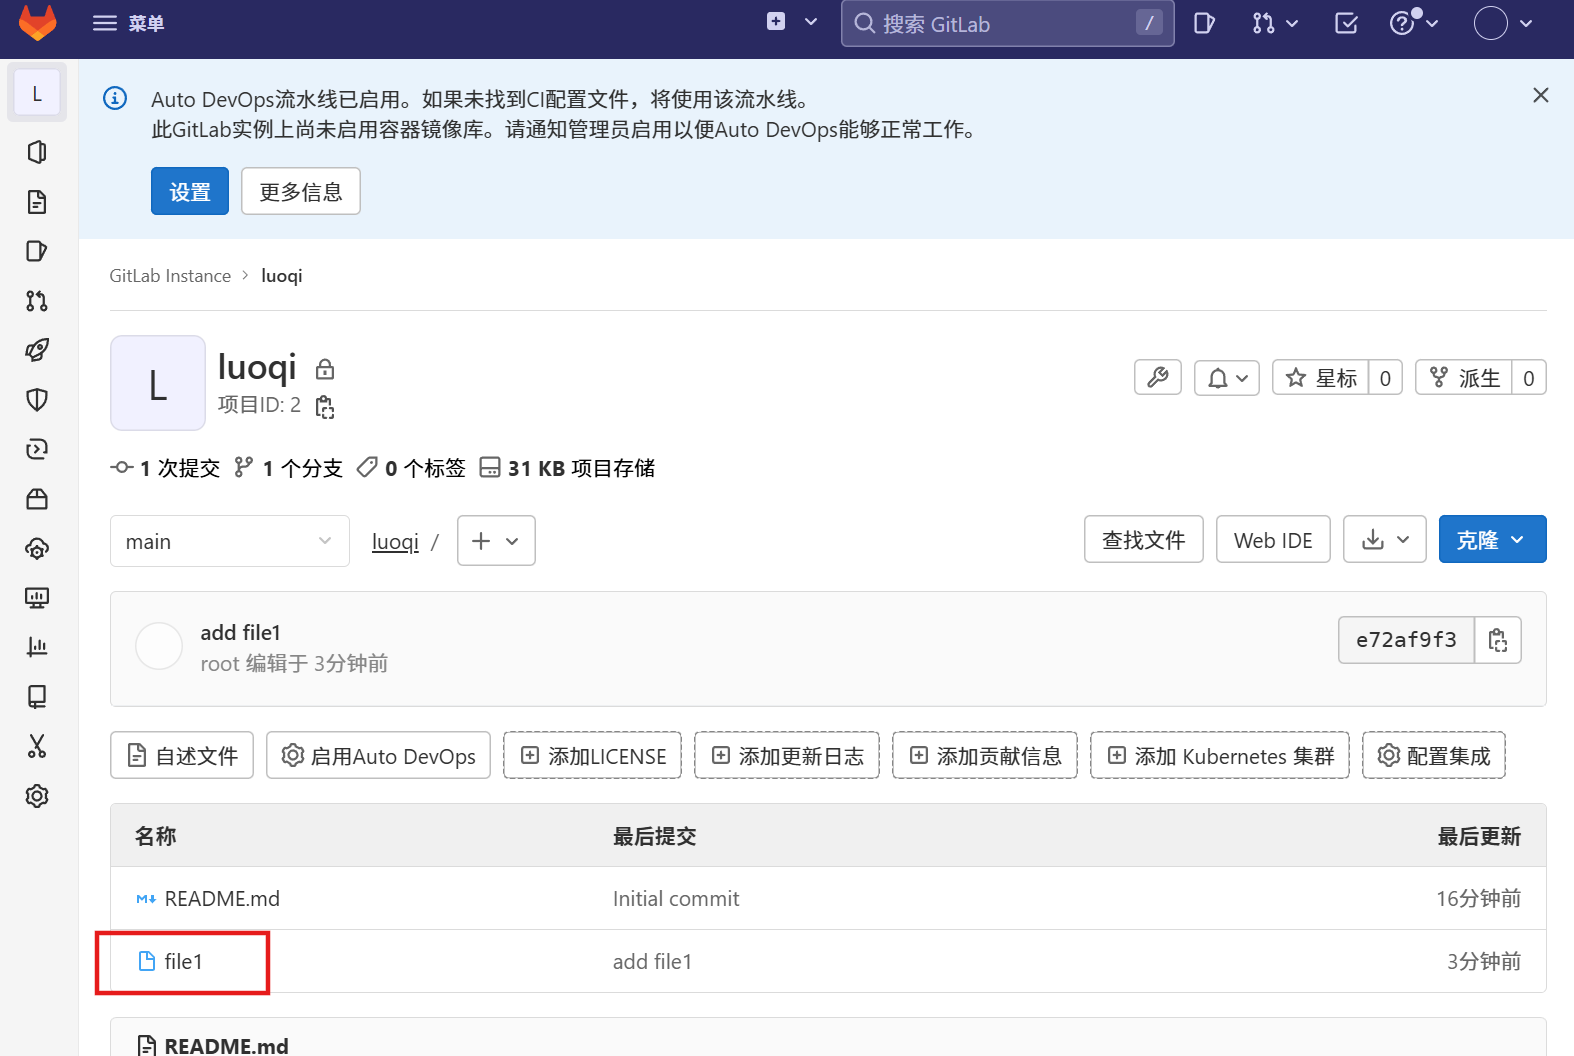
[root@server luoqi]# touch file2
[root@server luoqi]# git add .     //.代表所有文件
[root@server luoqi]# git commit -m "add file"
[main 7e58113] add file
 1 file changed, 0 insertions(+), 0 deletions(-)
 create mode 100644 file2
[root@server luoqi]# git push
warning: push.default is unset; its implicit value is changing in
Git 2.0 from 'matching' to 'simple'. To squelch this message
and maintain the current behavior after the default changes, use:

  git config --global push.default matching

To squelch this message and adopt the new behavior now, use:

  git config --global push.default simple

See 'git help config' and search for 'push.default' for further information.
(the 'simple' mode was introduced in Git 1.7.11. Use the similar mode
'current' instead of 'simple' if you sometimes use older versions of Git)

Counting objects: 3, done.
Delta compression using up to 4 threads.
Compressing objects: 100% (2/2), done.
Writing objects: 100% (2/2), 258 bytes | 0 bytes/s, done.
Total 2 (delta 0), reused 0 (delta 0)
To git@192.168.100.20:gitlab-instance-1b91035b/luoqi.git
   e72af9f..7e58113  main -> main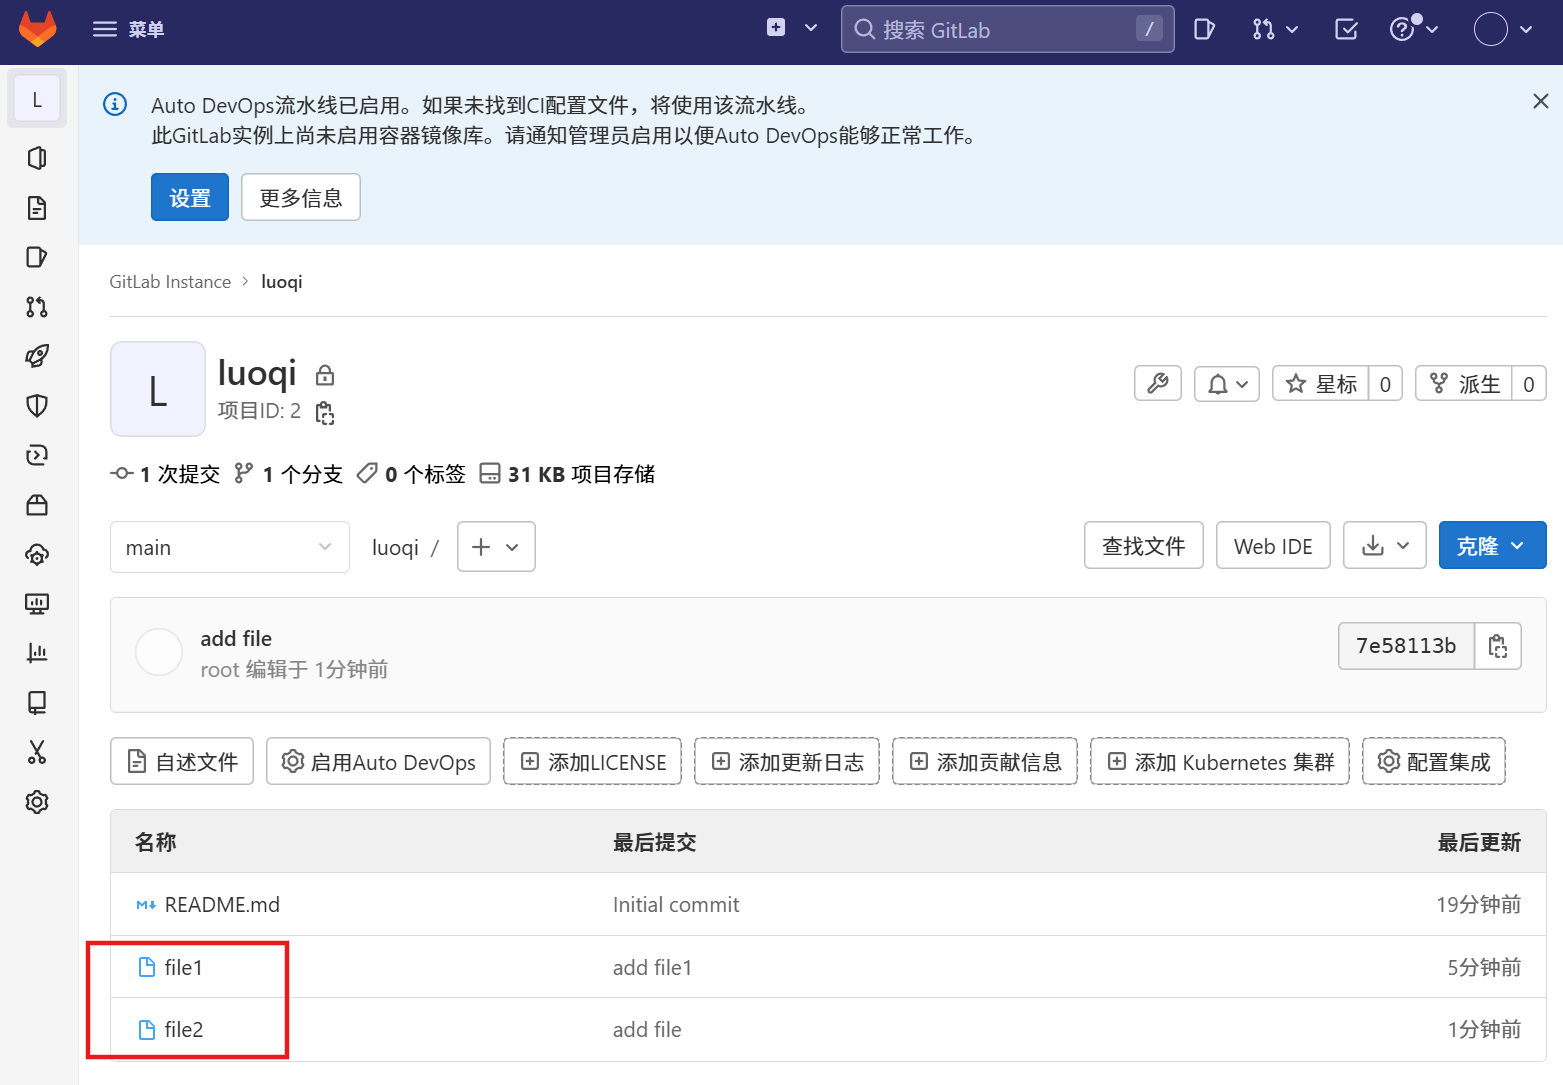
创建分支:
[root@server luoqi]# git branch sy将分支提交到线上:
[root@server luoqi]# git push origin sy
Total 0 (delta 0), reused 0 (delta 0)
remote:
remote: To create a merge request for sy, visit:
remote:   http://192.168.100.20/gitlab-instance-1b91035b/luoqi/-/merge_requests/new?merge_request%5Bsource_branch%5D=sy
remote:
To git@192.168.100.20:gitlab-instance-1b91035b/luoqi.git
 * [new branch]      sy -> sy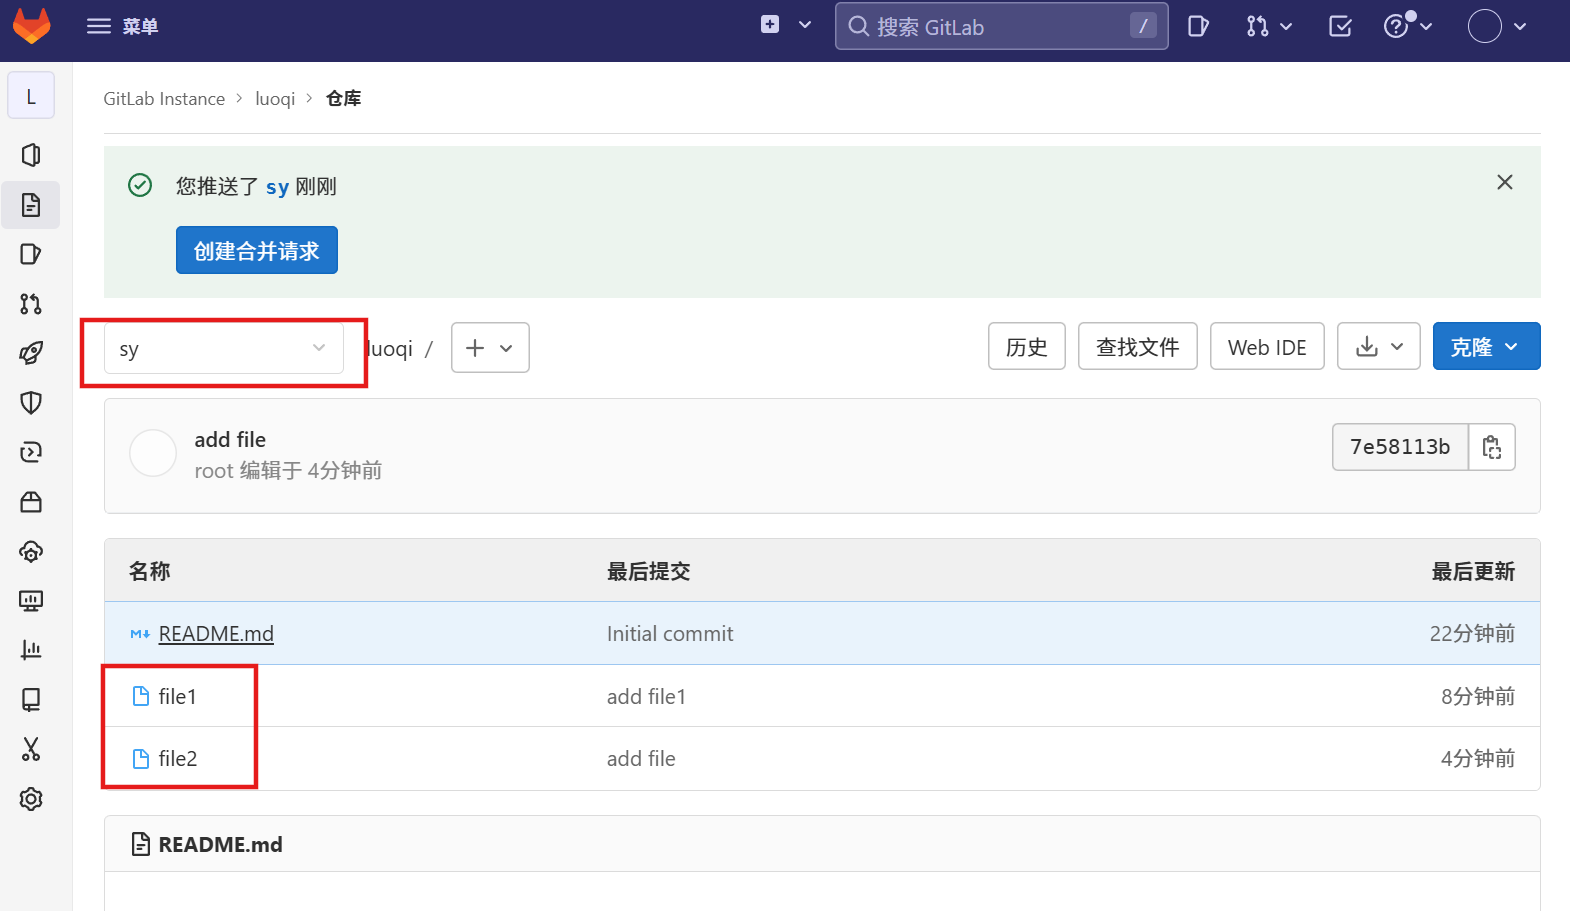
切换到分支sy:
[root@server luoqi]# git checkout sy
Switched to branch 'sy'
[root@server luoqi]# ls
file1 file2 README.md
[root@server luoqi]# touch file3
[root@server luoqi]# git add file3
[root@server luoqi]# git commit -m "add file3"
[sy 8cab7a3] add file3
1 file changed, 0 insertions(+), 0 deletions(-)
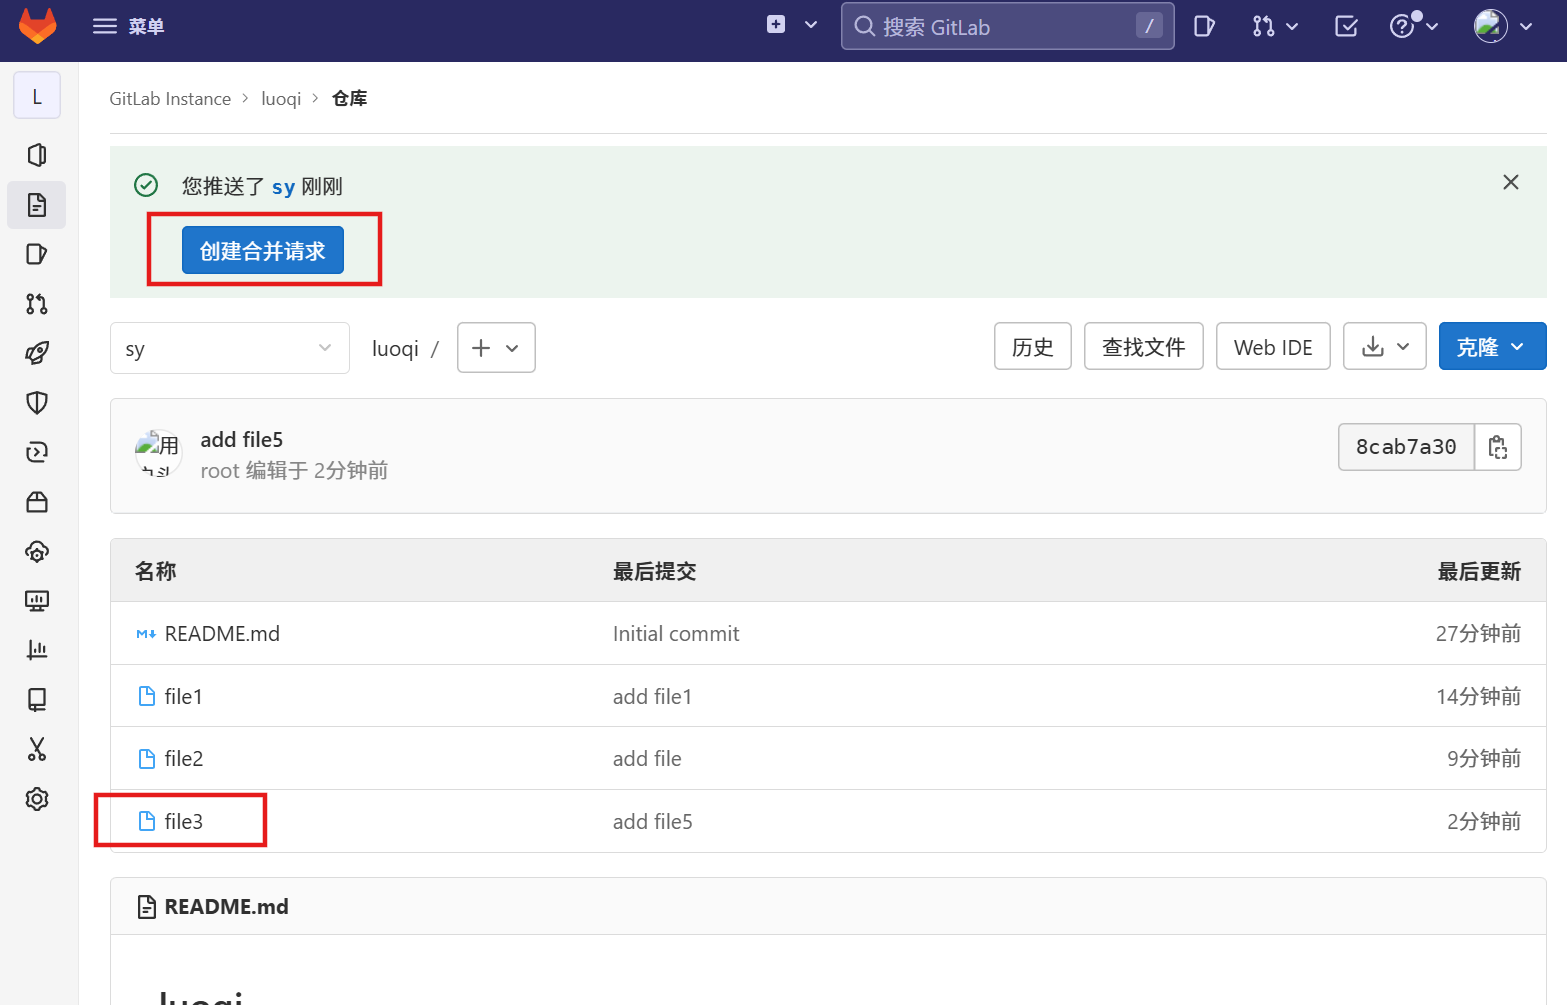
create mode 100644 file3同步分支内容到sy:
[root@server luoqi]# git push origin sy
Counting objects: 3, done.
Delta compression using up to 4 threads.
Compressing objects: 100% (2/2), done.
Writing objects: 100% (2/2), 226 bytes | 0 bytes/s, done.
Total 2 (delta 1), reused 0 (delta 0)
remote:
remote: To create a merge request for sy, visit:
remote:   http://192.168.100.20/gitlab-instance-1b91035b/luoqi/-/merge_requests/new?merge_request%5Bsource_branch%5D=sy
remote:
To git@192.168.100.20:gitlab-instance-1b91035b/luoqi.git
   7e58113..8cab7a3  sy -> sy