目录
重要一步:配置自定义的tab页面路由和自定义导航栏配置,app.config.ts:
我的自定义tab跳转hook,这是基于官方的tab跳转api进一步实现的:
一、为什么不采用官方的方法
官方步骤:微信小程序自定义 Tabbar | Taro 文档
本次不采用官方提供的步骤,因为官方提供的方法存在以下弊端:
1、无法使用自己项目的iconfont库进行编写,直接效果就是在官方步骤下,有些图片会直接失效不显示。这不是我们期望的。

2、即使使用了自定义Tab栏,在每个tab初始化时也会重新渲染tabBar,每个tabBar之间是没有状态共享的,这和我们直接调用组件来书写效果一样。

总之,官方的方法弊大于益,采用组件化书写效果更好些。
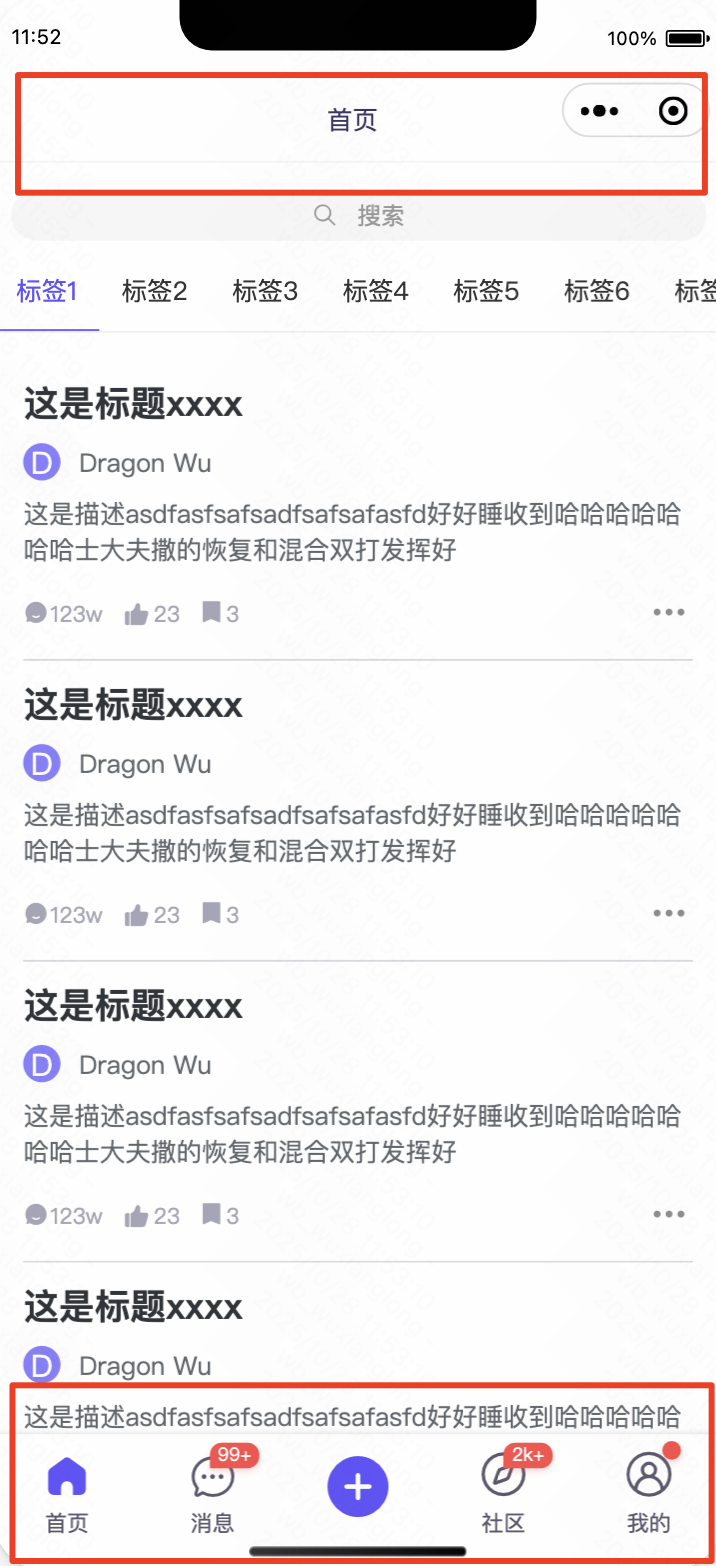
我的实现效果截图:
二、公共布局
由于小程序的入口文件app.tsx里的公共组件不会直接生效,我们不得不在每个需要公共组件的页面上进行调用。
如:Layout为你自己的公共布局组件,像自定义NavBar或自定义TabBar放这里是最好管理的。由于app.tsx里不支持直接放置Layout组件渲染,我通过高级组件来包裹每个tab页面组件实现状态互通效果和公共布局效果,如下:
javascript
/**
 * @author: Dragon Wu
 * @since: 2025/3/6 12:42
 * @description: 路由守卫,通过高级组件hoc生成一个新的组件公用hook
 */

import React from "react";
import useRouteAccess from "@/hooks/useRouteAccess";
import Layout from "@/components/layout";

/**
 * 路由守卫
 * @param PageComponent     需要守卫的组件
 * @param withLayout        是否使用通用布局
 */
const routeGuard = (PageComponent: React.FC, withLayout: boolean = true): React.FC => {

  // 获取最终的结果
  const getResult = () => {
    return withLayout ? (<Layout>
      <PageComponent/>
    </Layout>) : (<>
      <PageComponent/>
    </>)
  }

  return () => {
    const routeAccess: boolean | undefined = useRouteAccess()

    if (routeAccess) {
      return getResult()
    }
  }
}

export default routeGuard;
我的Layout公共组件,如下:
html
    <View className={styles.layout}>
      <View className={styles.header}
            style={safeAreaStyle}>
        <NavBar className={styles.nav_bar_fixed}
                style={safeAreaStyle}/>
      </View>
      <View className={styles.main}>
        {children}
      </View>
      <TabBar style={tabStyle} data={TABS}/>
    </View>
重要一步:配置自定义的tab页面路由和自定义导航栏配置,app.config.ts:
javascript
export default defineAppConfig({
  pages: [
    "pages/auth/index",
    "pages/(tabs)/home/index",
    "pages/(tabs)/message/index",
    "pages/(tabs)/profile/index",
    "pages/(tabs)/community/index",
    "pages/(tabs)/create/index",
  ],
  window: {
    backgroundTextStyle: "light",
    navigationBarBackgroundColor: "#fff",
    navigationBarTitleText: "WeChat",
    navigationBarTextStyle: "black",
    navigationStyle: "custom",              // 自定义顶部导航栏
  },
  tabBar: {
    custom: true,                           // 自定义tabBar
    color: "#5c596f",
    selectedColor: "#6153fc",
    backgroundColor: "#fff",
    list: [
      {
        pagePath: "pages/(tabs)/home/index",
        text: "首页",
      },
      {
        pagePath: "pages/(tabs)/message/index",
        text: "消息",
      },
      {
        pagePath: "pages/(tabs)/create/index",
        text: "创作",
      },
      {
        pagePath: "pages/(tabs)/community/index",
        text: "社区",
      },
      {
        pagePath: "pages/(tabs)/profile/index",
        text: "我的",
      },
    ],
  },
})
三、自定义导航栏
javascript
/**
 * @author: Dragon Wu
 * @since: 2025/5/19 11:32
 * @description: 自定义导航栏
 */

import React, {CSSProperties, useEffect, useState} from "react";
import {getCurrentInstance, getCurrentPages, navigateBack} from "@tarojs/taro";
import {ITouchEvent, Text, View} from "@tarojs/components";
import styles from "./index.module.scss";

const NavBar: React.FC<{
  onLeftButtonClick?: (e?: ITouchEvent) => void,   // 自定义返回触发事件
  className?: string,
  style?: CSSProperties
}> = ({className, style, onLeftButtonClick}) => {
  const [title, setTitle] = useState<undefined | string>()
  const [showLeftButton, setShowLeftButton] = useState(false)

  useEffect(() => {
    setTitle(getCurrentInstance().page?.config?.navigationBarTitleText)
    setShowLeftButton(getCurrentPages().length > 1)
  }, [])

  const clickLeftButton = (e?: ITouchEvent) => {
    if (onLeftButtonClick) {
      onLeftButtonClick(e)
    } else {
      navigateBack().then()
    }
  }

  return (
    <View className={styles.nav_bar +
      (className ? ` ${className}` : "")}
          style={style}>
      <View className={styles.left_button}
            style={showLeftButton || onLeftButtonClick ? {} : {visibility: "hidden"}}
            onClick={clickLeftButton}>
        <Text className={`iconfont x-return ${styles.icon}`}/>
        <Text>
          返回
        </Text>
      </View>
      <View className={styles.center_title}>
        <Text>
          {title}
        </Text>
      </View>
      <View className={styles.right_box}/>
    </View>
  )
}

export default NavBar;
四、自定义Tab栏
1、使用自定义tab栏前,我们需要先配置tab页面的tab路由
javascript
/**
 * @author: Dragon Wu
 * @since: 2025/5/19 11:33
 * @description: 自定义tabBar
 */

import "./index.scss";
import React, {CSSProperties, ReactNode, useMemo} from "react";
import {View, Text} from "@tarojs/components";
import styles from "./index.module.scss";
import {switchTab} from "@tarojs/taro";
import {useDispatch, useSelector} from "react-redux";
import {setCurrentTab} from "@/store/slices/common";
import {AtBadge} from "taro-ui";

// 自定义tabBar的Badge子项
export interface TabBadgeItem {
  text?: string,                        // 标题
  badge?: boolean | number | string     // 消息数值,为true时显示dot,为数值时显示数值
}

// 自定义tabBar的子项
export interface TabItem extends TabBadgeItem {
  defaultIcon?: ReactNode,              // 默认小图标
  activeIcon?: ReactNode,               // 激活状态下的小图标
  pagePath: string                      // tab的导航路径
}

const TabBar: React.FC<{
  data: TabItem[],
  className?: string,
  style?: CSSProperties
}> = ({data, className, style}) => {

  const {currentTab, tabBadgeItems} = useSelector(state => state.common)
  const dispatch = useDispatch()

  const switchTabTo = (e: number, url: string) => {
    dispatch(setCurrentTab(e))
    switchTab({url}).then()
  }

  const tabItems = useMemo<TabItem[]>(() => {
    return data.map((item: TabItem, index: number) => {
      const badgeItem = tabBadgeItems[index] ?? {}
      return {...item, ...badgeItem}
    })
  }, [data, tabBadgeItems])

  return (
    <>
      <View className={styles.tab_bar +
        (className ? ` ${className}` : "")}
            style={style}>
        {
          tabItems.map((item: TabItem, index: number) => (
            <View className={styles.item}
                  onClick={() => switchTabTo(index, item.pagePath)}
                  key={index}>
              <View className={styles.icon_box}>
                <AtBadge value={item?.badge && item?.badge !== true ? item?.badge as number : ""}
                         dot={item?.badge === true}>
                  {currentTab === index ? item.activeIcon : item.defaultIcon}
                </AtBadge>
              </View>
              <View className={styles.title_box}>
                <Text>{item?.text}</Text>
              </View>
            </View>
          ))
        }
      </View>
      <View className={styles.tab_bar + " " + styles.placeholder +
        (className ? ` ${className}` : "")}
            style={style}/>
    </>
  )
}

export default TabBar;
我的自定义tab跳转hook,这是基于官方的tab跳转api进一步实现的:
javascript
/**
 * @author: Dragon Wu
 * @since: 2025/5/22 16:27
 * @description: 调整tab并同时修改tab的选中状态
 */
import {useDispatch} from "react-redux";
import TABS from "@/config/tabs";
import {TabItem} from "@/components/layout/tabBar";
import {switchTab} from "@tarojs/taro";
import {setCurrentTab} from "@/store/slices/common";

const useSwitchTab = () => {
  const dispatch = useDispatch()

  return (option: switchTab.Option) => {
    const currentTab: number = TABS.findIndex((item: TabItem) => item.pagePath === option.url)
    if (currentTab < 0) {
      throw new Error("tab路径不正确")
    } else {
      dispatch(setCurrentTab(currentTab))
      switchTab(option).then()
    }
  }
}

export default useSwitchTab;
五、总结
1、要更自由地实现taro小程序的tab栏,没有太多限制,我们可以使用自定义组件实现;
2、由于app.tsx不直接支持dom元素显示,layout元素无法直接渲染,我们采用高级组件包裹tab页面的组件实现公共布局的效果;
3、通过redux对状态进行管理,实现tab间点击跳转tab页面;
4、使用自定义组件需要配置好app.config.ts里的自定义相关选项。
总结到此!