部署KingbaseES
下载KingbaseES介质
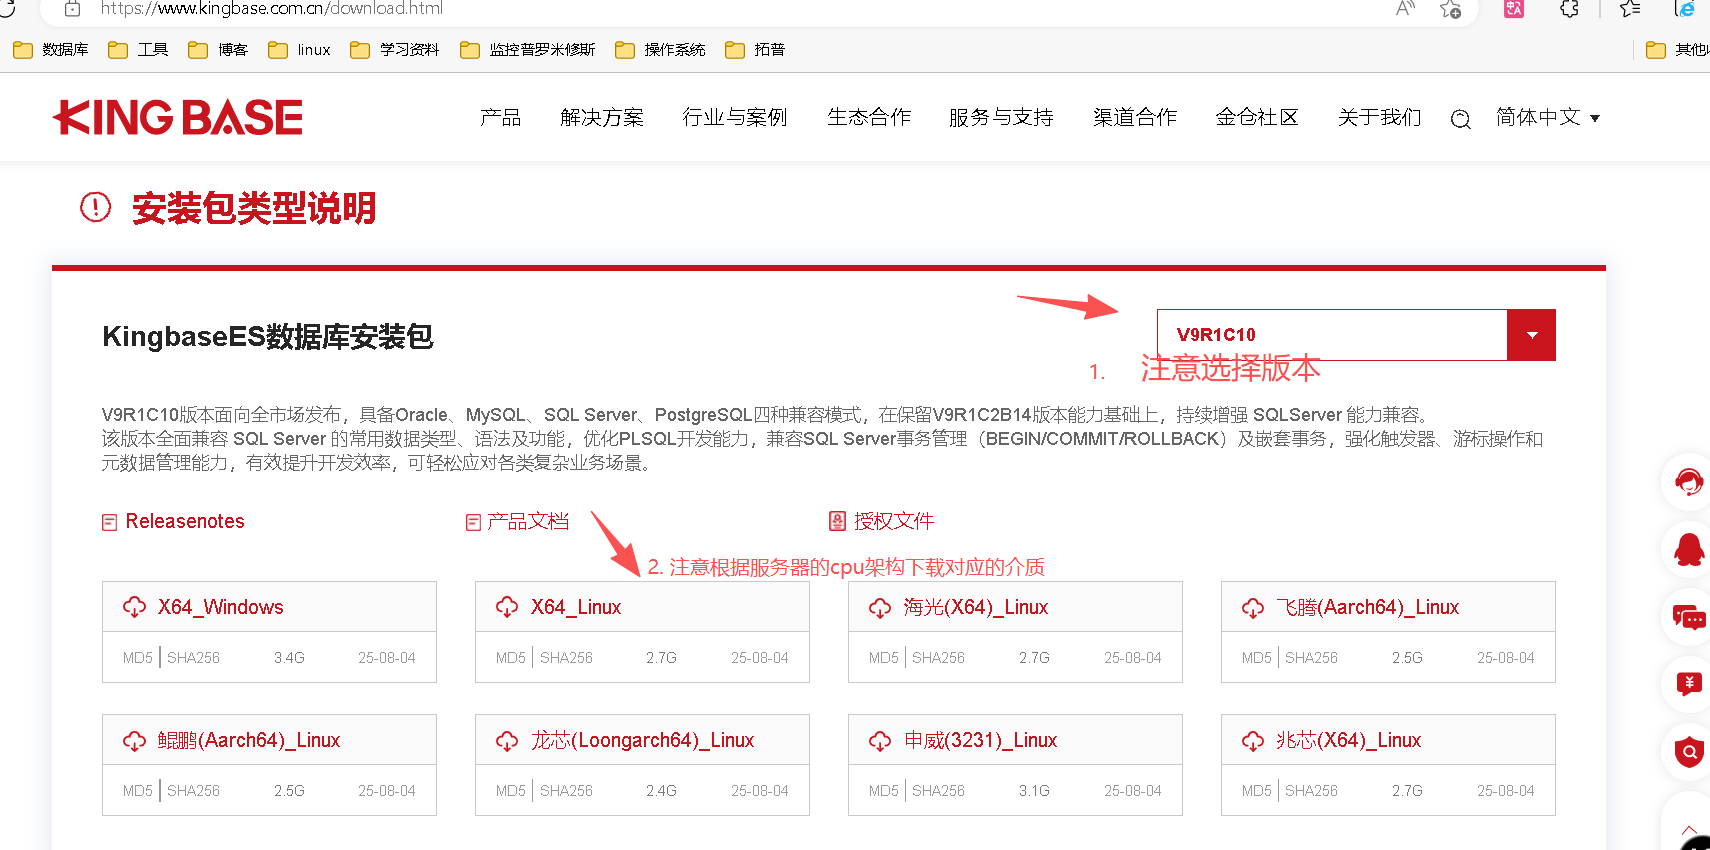
本文档采用新版本KingbaseES介质KingbaseES V9R1C10
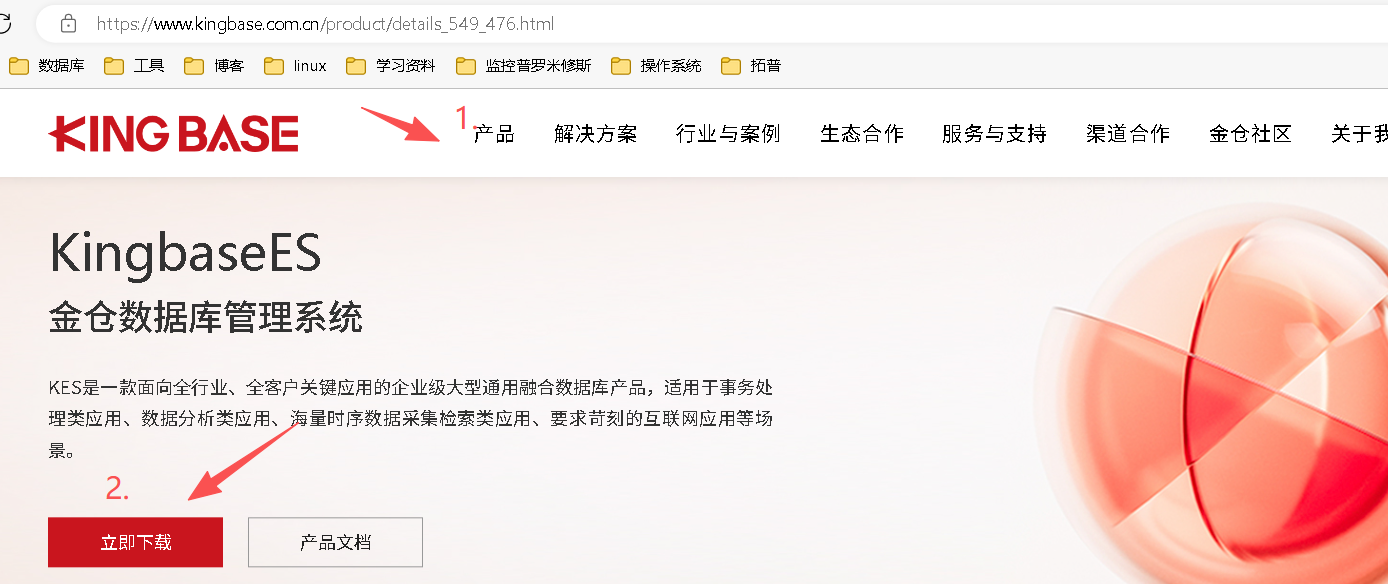
下载地址:https://www.kingbase.com.cn/ 登录金仓官网,从产品模块进入下载入口,如图:
本文档选用的是Centos7.9 x86_64的服务器,因此下载X64_Linux的安装介质。
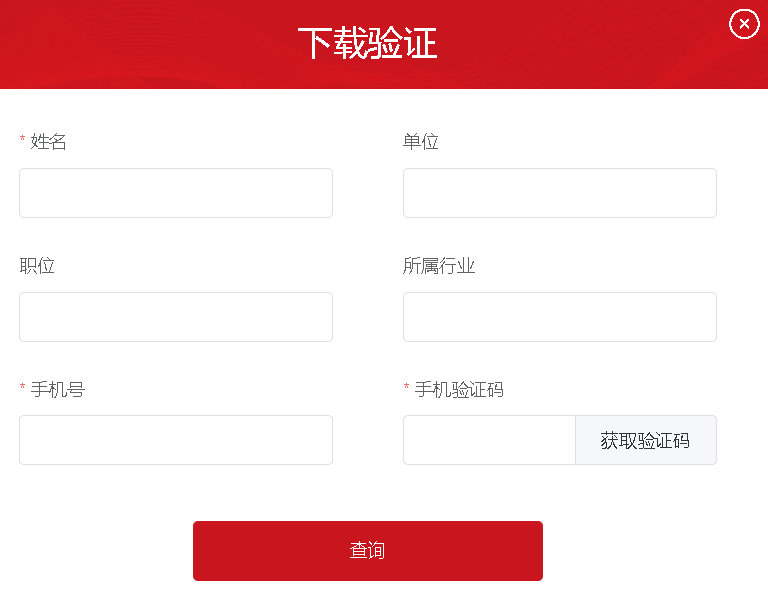
需要注意的是下载过程中需要填写基本信息,红色*项是必填项
通过以上步骤就可以获取 KingbaseES V9R1C10 安装包,下载完成后上传到/root目录下。
[root@localhost ~]# ls -l /root/
total 2904532
-rw-------. 1 root root       1508 May 20  2023 anaconda-ks.cfg
-rw-r--r--. 1 root root 2974226432 Oct 27 16:31 KingbaseES_V009R001C010B0004_Lin64_install.iso
下载KingbaseES授权文件
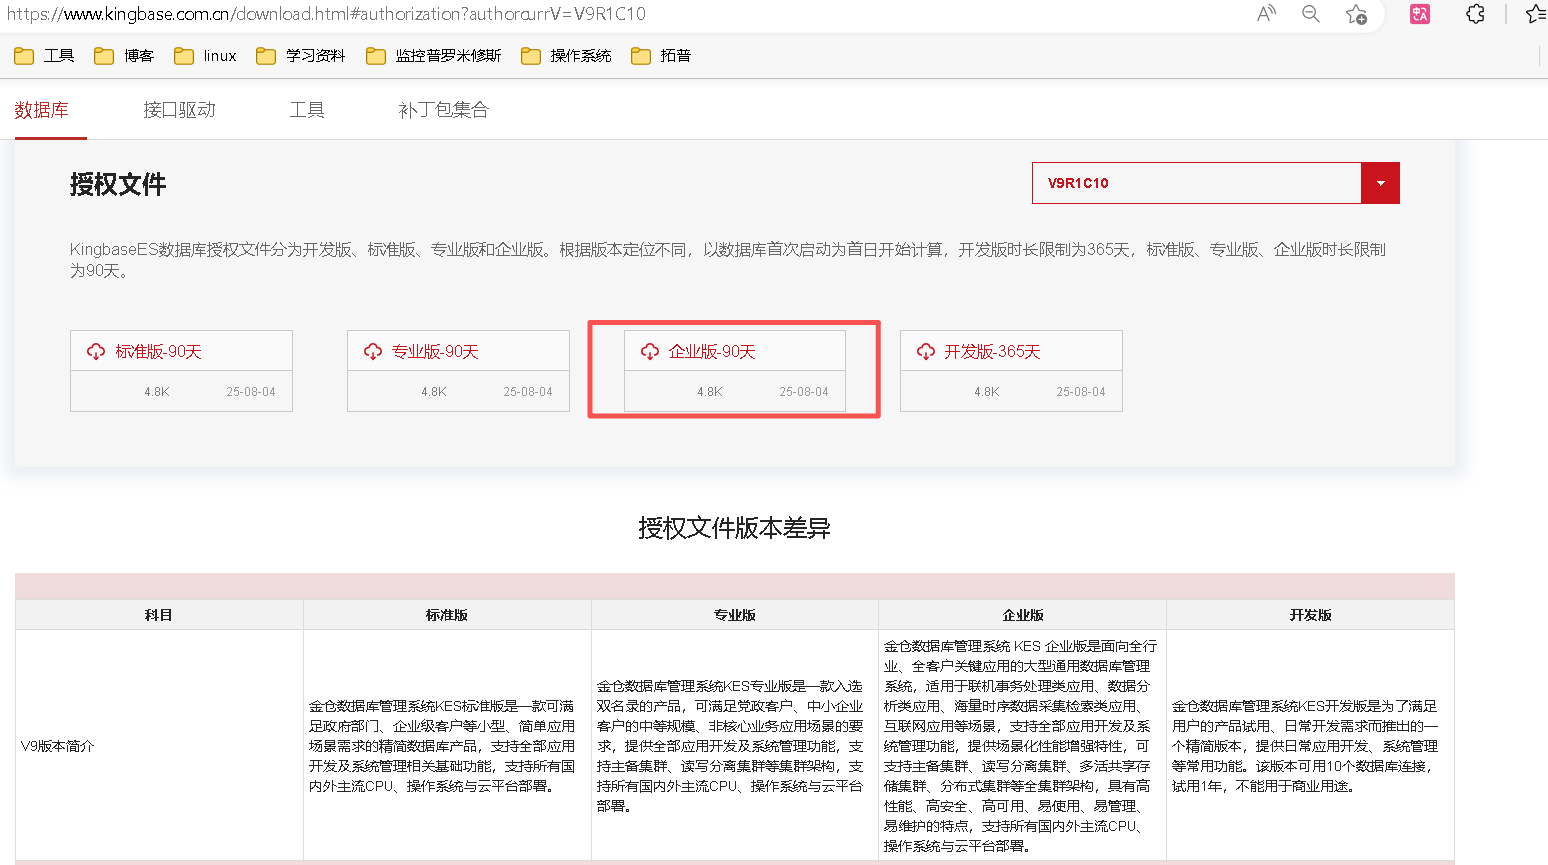
下载地址:https://www.kingbase.com.cn/ 登录金仓官网,从产品模块进入下载入口,如图:
选择要下载的安装介质的版本号,下载对应的授权文件,下载完成后上传到/root目录下。
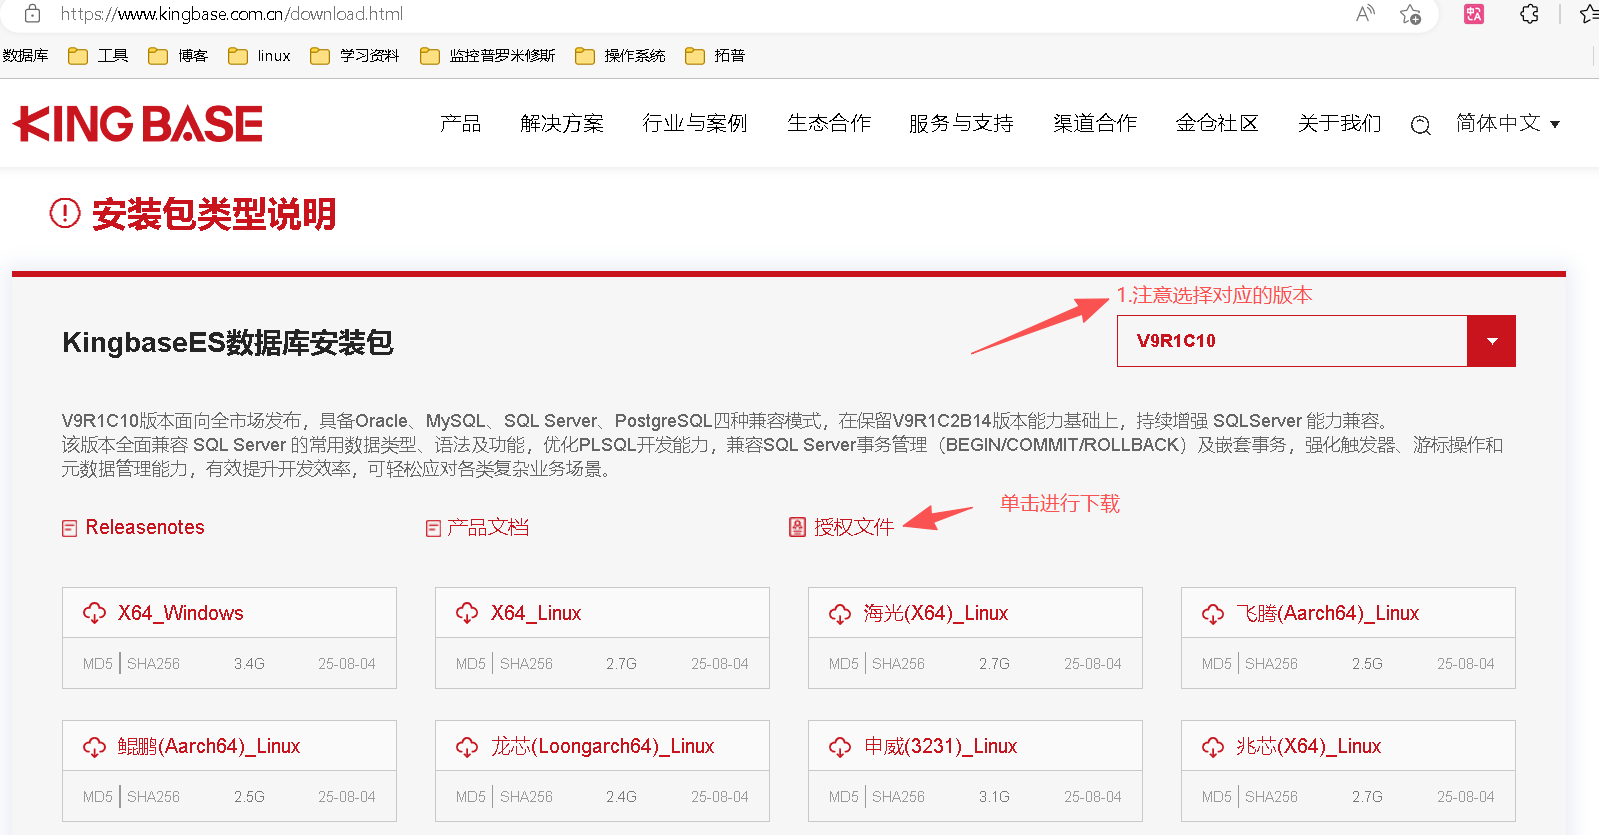
建议下载企业版的授权文件,场景、工具和特性更丰富。
[root@localhost ~]# ls -l /root/
total 2904532
-rw-------. 1 root root       1508 May 20  2023 anaconda-ks.cfg
-rw-r--r--. 1 root root 2974226432 Oct 27 16:31 KingbaseES_V009R001C010B0004_Lin64_install.iso
-rw-r--r--. 1 root root       4995 Oct 27 17:13 license_V009R001C-企业版.dat
挂载安装介质
iso格式的安装程序包需要先挂载才能使用。挂载iso文件需要使用root用户。
mount /root/KingbaseES_V009R001C010B0004_Lin64_install.iso /mnt查看挂载目录下的文件,如下:
[root@localhost ~]# ls -l /root/
total 2904524
-rw-------. 1 root root       1508 May 20  2023 anaconda-ks.cfg
-rw-r--r--. 1 root root 2974226432 Oct 27 16:31 KingbaseES_V009R001C010B0004_Lin64_install.iso
创建安装用户
在安装KingbaseES时,安装用户对于安装路径需有"读"、"写"、"执行"的权限。在Linux系统中,需要以非root用户执行安装程序,且该用户要有标准的home目录。
--检查kingbase用户是否存在,存在则执行下条命令删除,该操作要慎重
cat /etc/passwd | grep kingbase
userdel -rf kingbase

--创建同名用户组和用户kingbase
groupadd -g 1010 kingbase
useradd -d /home/kingbase -g kingbase -u 1010 kingbase

--设置用户kingbase密码
echo 'kingbase' | passwd --stdin kingbase
注意
该命令会同时创建同名用户组kingbase以及用户根目录/home/kingbase。
目录规划
KingbaseES默认的安装目录是 /opt/Kingbase/ES/V8。
本文档采用自定义安装路径为**/kdb**。
mkdir -pv /kdb/v9,data}
chown -R kingbase:kingbase /kdb/
chmod -R 775 /kdb/
**注意:**数据目录可不必事先创建。安装过程中会提示指定数据目录,如果目录不存在安装程序会自动创建。
环境变量
su - kingbase
cp /home/kingbase/.bashrc /home/kingbase/.bashrc_bak_`date +%F`
cat << EOF >> /home/kingbase/.bashrc
export PATH=$PATH:$KINGBASE_HOME/bin
export KINGBASE_HOME=/kdb/v9/Server
export LD_LIBRARY_PATH=$KINGBASE_HOME/lib:$PATH
export KINGBASE_DATA=/kdb/data
export KINGBASE_USER=system
export KINGBASE_PORT=54321
export KINGBASE_DATABASE=test
EOF

source /home/kingbase/.bashrc
命令行方式部署KES
启动安装程序
命令行安装支持中文和英文的文字提示。根据操作系统的语言设置会显示对应语言的提示信息。可以执行如下命令查看操作系统的语言设置:
echo $LANG命令行安装
su - kingbase
cd /mnt
sh setup.sh -i console
过程省略。
初始化数据库
首先选择数据库数据目录,默认数据库数据目录为安装目录下的data目录。
/kdb/v9/Server/bin/initdb -U "system" -W -D "/kdb/data"设置如下初始化数据库参数:
- 默认端口为:54321(可自定义),本文档自定义路径:/kdb/data
- 默认账户为:system(可自定义)
- 密码(自定义)
- 默认字符集编码为:UTF8(可选GBK、GB18030)
- 默认数据库兼容模式为:ORACLE(可选 PG、MySQL)
- 默认大小写敏感为:是(可选否)
- 默认数据块大小为:8k(可选16k、32k)
- 默认加密方法为sm4(可选 rc4)
- 默认身份认证方法为scram-sha-256(可选 scram-sm3,sm4,sm3)
启动数据库
/kdb/v9/Server/bin/sys_ctl -D /kdb/data 创建Apache James数据库和用户
create user james  with password 'james';
create database james  owner james ;
grant all privileges on database james  to james ;
部署Apache James
步骤: JDK21 → 解压 → 改配 → 启停 → 建域 → 建用户 → 发信测试
Apache James简介
Apache James(Java Apache Mail Enterprise Server)是 Apache 软件基金会用纯 Java 开发的开源企业级邮件服务器,也是一套可高度定制的邮件应用平台。它把 SMTP、POP3、IMAP、NNTP、JMAP、WebDAV 等主流协议集成在同一套内核中,并通过「Mailet/Matcher」插件体系把邮件处理流程完全组件化,因而既可以直接当成传统 MTA/MDA 使用,也能被嵌入到各类 Java 业务系统里,实现复杂的自动化邮件流程。
部署前准备工作
配置java环境(必须)
注意:James 3.8+ 官方明确要求 Java 21。
jdk21官方下载地址:https://download.oracle.com/java/21/latest/jdk-21_linux-x64_bin.tar.gz
tar -xvf jdk-21_linux-x64_bin.tar.gz -C /usr/local
cat >> /etc/profile << "EOF"
#add by java
export JAVA_HOME=/usr/local/jdk-21.0.9
export JRE_HOME=${JAVA_HOME}/jre
export CLASSPATH=.:${JAVA_HOME}/lib:${JRE_HOME}/lib:$CLASSPATH
export JAVA_PATH=${JAVA_HOME}/bin:${JRE_HOME}/bin
export PATH=${JAVA_PATH}:$PATH
export JAVA_BIN=${JAVA_HOME}/bin
EOF
source /etc/profile
java -version
注意:该步骤若省略会启动失败。
Apache James下载
下载地址:https://archive.apache.org/dist/james/server/3.8.0/james-server-app-3.8.0-app.zip
下载后上传到/root目录下
[root@localhost ~]# ls -l /root/james-server-app-3.8.0-app.zip
-rw-r--r--. 1 root root   88266992 Oct 28 16:09 james-server-app-3.8.0-app.zip
配置邮件服务器本地域名解析(必须)
[root@kes conf]# cat /etc/hosts
127.0.0.1   localhost localhost.localdomain localhost4 localhost4.localdomain4
::1         localhost localhost.localdomain localhost6 localhost6.localdomain6
192.168.40.107   dxj.mail.com  ##增加邮件服务器的域名,域名可自定义命名
后面配置James本地托管域名(conf/domainlist.xml)时会用到。
解压Apache James介质
unzip james-server-app-3.8.0-app.zip
mv james-server-spring-app-3.8.0 jamesserver38
其中,配置文件位于 conf/ 目录下,关键文件包括:
|-----------------------------|-----------|
| 文件 | 作用 |
| domainlist.xml | 配置本地托管的域名 |
| usersrepository.xml | 用户账户存储方式 |
| mailrepository.xml | 邮件存储方式 |
| smtpserver.xml | SMTP 服务配置 |
| imapserver.xml | IMAP 服务配置 |
| pop3server.xml | POP3 服务配置 |
| james-database.properties | 数据库连接配置 |
配置本地托管的域名
在 Apache James 中,domainlist.xml 是用于 配置邮件服务器所管理的域名列表 的核心配置文件。它定义了 James 服务器接收邮件时所认可的本地域名(即"本地域"或"托管域"),以及这些域名的存储方式(如内存、数据库存储等)。
配置文件位置:conf/domainlist.xml
主要作用:
-
列出 James 服务器负责接收邮件的域名。
-
配置域名的存储方式(如内存、JDBC、JPA 等)。
-
支持动态添加/删除域名(取决于存储实现)。
cd jamesserver38
cp -r conf confbak
cd conf
vi domainlist.xml
更改后的内容如下:注意defaultDomain值是指邮件服务器的域名非邮箱地址。
[root@localhost conf]# cat domainlist.xml | grep autodetect
<!-- If autodetect is TRUE, James wil attempt to discover its own host name AND -->
<!-- If autodetect is FALSE, James will use only the specified domainnames. -->
<!-- If autodetectIP is not FALSE, James will also allow add the IP address for each servername. -->
<!-- To override autodetected domainames names simply add explicit domainname elements. -->
   <autodetect>false</autodetect>
   <autodetectIP>false</autodetectIP>
   <autodetect>true</autodetect>
   <autodetectIP>true</autodetectIP>

[root@localhost conf]# cat domainlist.xml | grep defaultDomain
   <defaultDomain>dxj.mail.com</defaultDomain>
   <defaultDomain>localhost</defaultDomain>
添加KingbaseES的jdbc驱动
将金仓数据库的jdbc驱动拷贝到/root/jamesserver39/lib目录下
[root@localhost conf]# ls -l /kdb/v9/Interface/jdbc/
kingbase8-9.0.0.jar         kingbase8-9.0.0.jre6.jar    kingbase8-9.0.0.jre7.jar    postgresql-42.2.9.jar       postgresql-42.2.9.jre6.jar  postgresql-42.2.9.jre7.jar

[root@localhost conf]# cp /kdb/v9/Interface/jdbc/*.jar /root/jamesserver38/lib/
配置数据库连接
配置文件位置:conf/james-database.properties,
确保 sqlResources.xml 文件存在,该文件中定义了邮件仓库所需的表结构(如 inbox、spool、mail 等)。
vi james-database.properties更改内容如下:
# Use derby as default
database.driverClassName=org.apache.derby.jdbc.EmbeddedDriver
database.url=jdbc:postgresql://192.168.40.107:54321/james
database.username=james
database.password=james

# Supported adapters are:
# DB2, DERBY, H2, HSQL, INFORMIX, MYSQL, ORACLE, POSTGRESQL, SQL_SERVER, SYBASE
vendorAdapter.database=POSTGRESQL
配置持久化
- 配置文件位置:
conf/mailetcontainer.xml mailetcontainer.xml是 Apache James 的"邮件处理流水线总控文件" 。它决定:一封信被 James 收下后,要经过哪些"处理站"(Mailet / Matcher)?是否被转发、被投递、被垃圾过滤、被写入日志、被发到 Kafka......- 一句话总结:SMTP 端口只负责"收信"; mailetcontainer.xml****负责"怎么处理"。
修改 mailetcontainer.xml 文件用户需要把需要持久化的内容,从文件存储替换成数据库存储
    <!-- MailAddress used for PostMaster -->
    <context>
        <!-- When the domain part of the postmaster mailAddress is missing, the default domain is appended.
        You can configure it to (for example) <postmaster>postmaster@myDomain.com</postmaster> -->
        <postmaster>961573863@qq.com</postmaster>
    </context>
将以下内容的注释去掉:
<repositoryPath>db://maildb/deadletter/error</repositoryPath>注释掉以下内容
       <!--
       <mailet match="RemoteAddrNotInNetwork=127.0.0.1" class="ToProcessor">
          <processor>relay-denied</processor>
          <notice>550 - Requested action not taken: relaying denied</notice>
       </mailet>
       -->
修改smtpserver.xml文件
-
配置文件位置:
conf/smtpserver.xml -
smtpserver.xml是 Apache James 邮件服务器里负责"发信入口"的唯一配置文件----
SMTP/SMTPS/Submission(端口 25、465、587) 的所有行为都由它说了算。
一句话总结:谁可以发信、怎么认证、要不要 TLS、允不允许中继、限不限速,全写在该文件里。 -
每个
<smtpserver>节点就是 一条监听端口实例,想开几组就复制几段。
更改参数:
authRequired:必须 SMTP AUTH 才能中继,true 防垃圾邮件
verifyIdentity:发件人地址必须与登录账号一致,true 防伪造
        <authorizedAddresses>127.0.0.0/8</authorizedAddresses>

        <!--  Uncomment this if you want to verify sender addresses, ensuring that -->
        <!--  the sender address matches the user who has authenticated. -->
        <!--  This prevents a user of your mail server from acting as someone else -->
        <!--  If unspecified, default value is true -->
        <!--
        <verifyIdentity>true</verifyIdentity>
        <authRequired>true</authRequired>
生成keyStore
在 Apache James 里,keystore 的作用只有一个:
给 SMTPS(465)、IMAPS(993)、POP3S(995) 以及 STARTTLS 提供 TLS 证书(私钥 + 公钥)。
keytool -genkey -alias james -keyalg RSA -keystore keystore详细过程如下,对参数值要求没那么严格,可统一设置相同。
[root@localhost conf]# keytool -genkey -alias james -keyalg RSA -keystore keystore
Enter keystore password:
Re-enter new password:
Enter the distinguished name. Provide a single dot (.) to leave a sub-component empty or press ENTER to use the default value in braces.
What is your first and last name?
  [Unknown]:  dongxiaojie
What is the name of your organizational unit?
  [Unknown]:  dongxiaojie
What is the name of your organization?
  [Unknown]:  dongxiaojie
What is the name of your City or Locality?
  [Unknown]:  dongxiaojie
What is the name of your State or Province?
  [Unknown]:  dongxiaojie
What is the two-letter country code for this unit?
  [Unknown]:  dongxiaojie
Is CN=dongxiaojie, OU=dongxiaojie, O=dongxiaojie, L=dongxiaojie, ST=dongxiaojie, C=dongxiaojie correct?
  [no]:  y

Generating 3,072 bit RSA key pair and self-signed certificate (SHA384withRSA) with a validity of 90 days
	for: CN=dongxiaojie, OU=dongxiaojie, O=dongxiaojie, L=dongxiaojie, ST=dongxiaojie, C=dongxiaojie
调整tls 开启
在 Apache James 里"开启 TLS"其实就是 把明文端口变成加密端口 ,分 两条路线:
① STARTTLS (显式加密)------端口不变,先明文握手再升级 TLS;
② SMTPS/IMAPS/POP3S(隐式加密)------直接监听 465/993/995,全程 TLS。
配置smtpserver.xml
-
配置文件位置:
conf/smtpserver.xml -
在
smtpserver.xml里"开启 SSL"就是 让端口 465(SMTPS)或 587(STARTTLS)走 TLS。 -
一句话总结:465 写 socketTLS="true"****,587 写 startTLS="required"****,再把 keystore 路径填上,SSL 就开了。
vi smtpserver.xml
修改内容如下:
     <bind>0.0.0.0:465</bind>

     <connectionBacklog>200</connectionBacklog>

     <!-- Set to true to support STARTTLS or TLS for the Socket.
      -->
     <tls socketTLS="true" startTLS="false">
         <!-- To create a new keystore execute:
           keytool -genkey -alias james -keyalg RSA -storetype PKCS12 -keystore /path/to/james/conf/keystore
          -->
         <keystore>file://conf/keystore</keystore>
         <keystoreType>PKCS12</keystoreType>
         <secret>dongxiaojie</secret>
参数说明:
bind:监听地址与端口,0.0.0.0:465
配置pop3server.xml
-
配置文件位置:
conf/pop3server.xmlvi pop3server.xml
更改内容如下:
       <bind>0.0.0.0:995</bind>

       <connectionBacklog>200</connectionBacklog>

       <!-- Set to true to support STARTTLS or SSL for the Socket.
        -->
       <tls socketTLS="true" startTLS="false">
           <!-- To create a new keystore execute:
             keytool -genkey -alias james -keyalg RSA -storetype PKCS12 -keystore /path/to/james/conf/keystore
            -->
           <keystore>file://conf/keystore</keystore>
           <keystoreType>PKCS12</keystoreType>
           <secret>dongxiaojie</secret>
配置imapserver.xml
-
配置文件位置:
conf/imapserver.xmlvi imapserver.xml
更改内容如下:
       <bind>0.0.0.0:993</bind>

       <connectionBacklog>200</connectionBacklog>

       <!-- Set to true to use TLS for the Socket.
        -->
       <tls socketTLS="true" startTLS="false">
           <!-- To create a new keystore execute:
             keytool -genkey -alias james -keyalg RSA -storetype PKCS12 -keystore /path/to/james/conf/keystore
            -->
           <keystore>file://conf/keystore</keystore>
           <keystoreType>PKCS12</keystoreType>
           <secret>dongxiaojie</secret>
启动 James
cd /root/jamesserver38/bin
./run.sh
日志中输出以下信息说明启动成功:
Apache James Server is successfully started in 10619 milliseconds启动James应用的过程中会自动创建sqlResources.xml 文件中定义邮件仓库所需的表结构(如 inbox、spool、mail 等),登录数据库查看已创建的表:
james=> \c james james
You are now connected to database "james" as userName "james".
james=> \dt
                    List of relations
 Schema |              Name              | Type  | Owner
--------+--------------------------------+-------+-------
 public | james_domain                   | table | james
 public | james_mail                     | table | james
 public | james_mail_property            | table | james
 public | james_mail_repos               | table | james
 public | james_mail_store               | table | james
 public | james_mail_userflag            | table | james
 public | james_mailbox                  | table | james
 public | james_mailbox_annotation       | table | james
 public | james_max_domain_message_count | table | james
 public | james_max_domain_storage       | table | james
 public | james_max_global_message_count | table | james
 public | james_max_global_storage       | table | james
 public | james_max_user_message_count   | table | james
 public | james_max_user_storage         | table | james
 public | james_quota_currentquota       | table | james
 public | james_recipient_rewrite        | table | james
 public | james_sieve_quota              | table | james
 public | james_sieve_script             | table | james
 public | james_subscription             | table | james
 public | james_user                     | table | james
 public | openjpa_sequence_table         | table | james
(21 rows)
James邮件处理功能验证
James新建用户
创建两个用户:dxj@dxj.mail.com、kpbl@dxj.mail.com,密码分别为:dxj、kpbl
dxj.mail.com即/etc/hosts中配置的本地解析域名。
cd /root/jamesserver38/bin
sh james-cli.sh -h localhost -p 9999 AddUser dxj@dxj.mail.com dxj
sh james-cli.sh -h localhost -p 9999 AddUser kpbl@dxj.mail.com kpbl
Windows环境下启用foxmail组件
配置hosts(必须)
C:\Windows\System32\drivers\etc\hosts
增加以下内容:
192.168.40.107   dxj.mail.com
foxmail组件新建用户
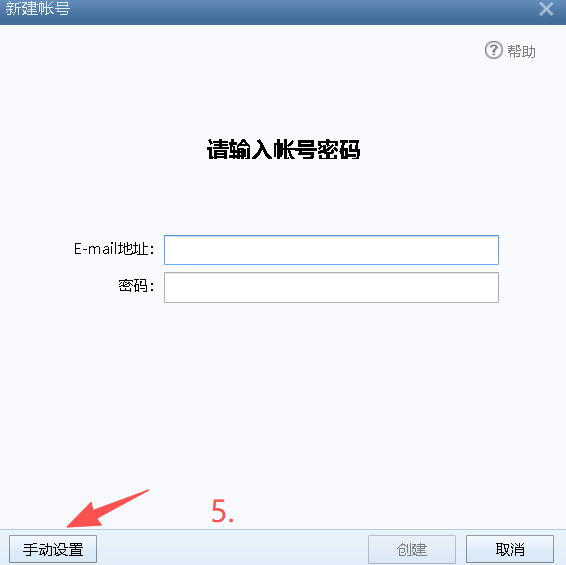
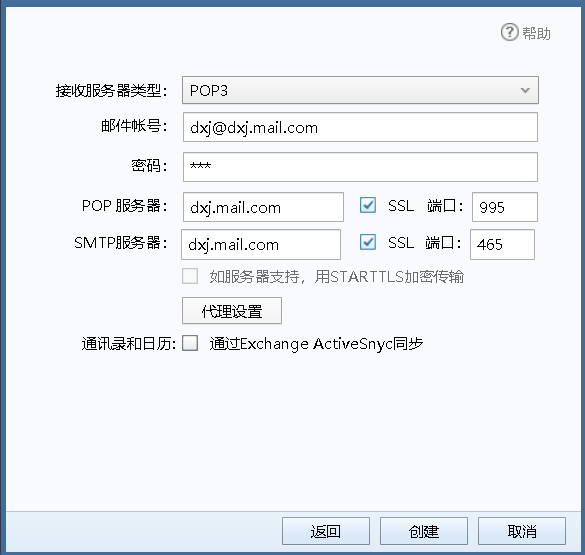
另一个用户按以上步骤创建即可。
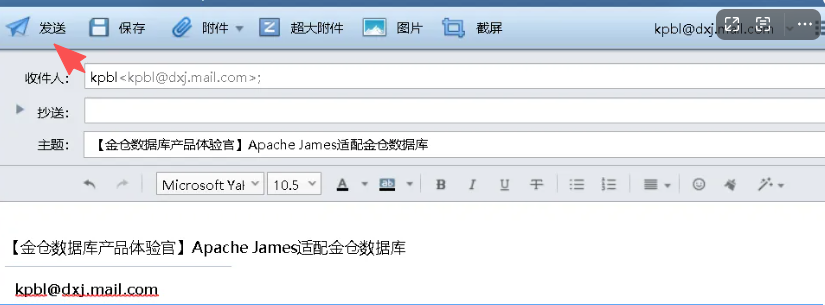
写邮件
dxj@dxj.mail.com、kpbl@dxj.mail.com
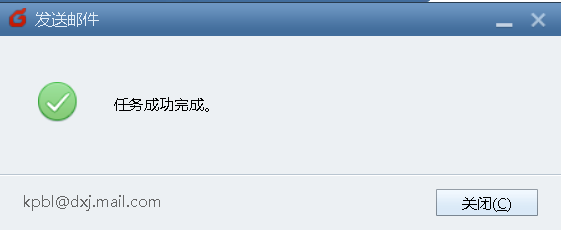
数据库中查询发件记录
james=> select * from james_mail;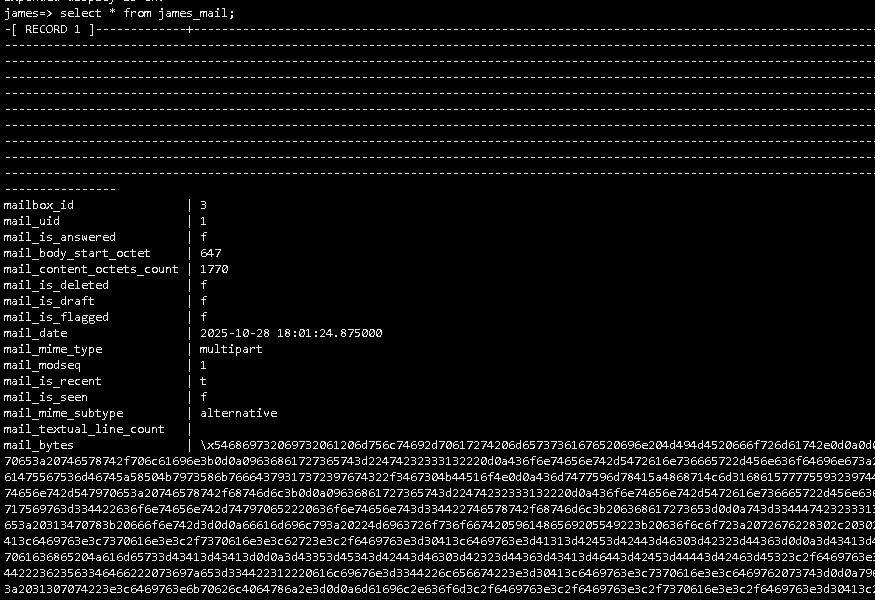
总结
Apache James 是一款开源的企业级邮件服务器(支持 SMTP、IMAP、POP3 等协议),默认使用 H2 或 PostgreSQL 作为元数据存储(如用户信息、邮件索引等)。人大金仓 KingbaseES V9R1C10 是国产化数据库,兼容 PostgreSQL 协议,广泛应用于信创场景。本次适配验证了 James 3.8版本与 KingbaseES V9R1C10 的兼容性,核心功能(用户管理、邮件存储、协议交互)可以在国产数据库环境下稳定运行。
参考链接:https://blog.csdn.net/lfcuiys/article/details/152464370