文章目录
- OpenStack管理
-
- OpenStack块存储管理-cinder
-
- Openstack存储类型
- Cinder作用
- Cinder架构
- Cinder架构部署
- Cinder-api
- Cinder-scheduler
- Cinder-volume
- [Cinder 挂载流程](#Cinder 挂载流程)
- OpenStack对象存储管理-swift
OpenStack管理
OpenStack块存储管理-cinder
cinder的配置文件位置:/etc/cinder
cinder的日志文件位置:/var/log/cinder
Openstack存储类型
- Ephemeral Storage 临时存储(非持久存储)
- 临时存储是指数据被虚拟机实例使用,虚拟机实例被关机、重启或删除,该实例中的所有数据信息会丢失
- 如果只部署了Nova服务,则默认分配给虚拟机的磁盘是临时的,当虚拟机终止后,存储空间也会被释放
- 默认情况下,临时存储以文件形式放置在计算节点的本地磁盘上
- Persistent Storage 持久存储
- 持久存储维护数据持续可用,保证数据安全性,持久化存储设备的生命周期独立于任何其他系统设备或资源,无论虚拟机实例是否终止
- 目前openstack的持久存储包括:块存储、对象存储和文件系统存储
Cinder作用
Cinder在虚拟机与具体存储设备之间引入了一层"逻辑存储卷"的抽象,Cinder本身不是一种存储技术,并没有实现对块设备的实际管理和服务
Cinder只是提供了一个中间的抽象层,为后端不同的存储技术,提供了统一的接口
不同的块设备服务厂商在Cinder中以驱动的形式实现上述接口与OpenStack进行整合
Cinder架构
类比nova架构
cinder-api ------------ nova-api
cinder-scheduler ------------ nova-scheduler
cinder-volume ------------ nova-compute
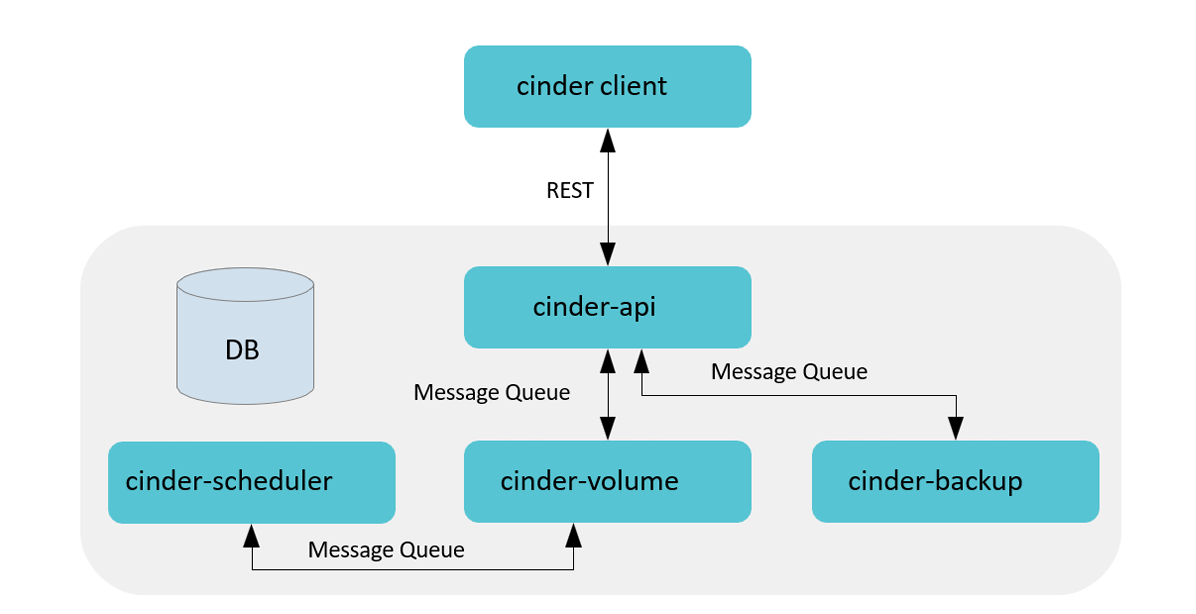
- Cinder Client封装Cinder提供的rest接口,以CLI形式供用户使用
- Cinder API对外提供rest API,对操作需求进行解析,对API进行路由寻找相应的处理方法。包含卷的增删改查(包括从源卷、镜像、快照创建)、快照增删改查、备份、volume type管理、挂载/卸载(Nova 调用)等
- Cinder Scheduler负责收集backend上报的容量、能力信息,根据设定的算法完成卷到指定cinder volume的调度
- Cinder Volume多节点部署,使用不同的配置文件、接入不同的backend设备,由各存储厂商插入 driver代码与设备交互完成设备容量和能力信息收集、卷操作
- Cinder Backup实现将卷的数据备份到其他存储介质(目前SWIFT/Ceph/TSM提供了驱动)
- SQL DB提供存储卷、快照、备份、service等数据,支持MySQL、PG、MSSQL等SQL数据库
查看控制节点 cinder进程:
bash
[root@controller ~]# ps -e | grep cinder
   1708 ?        00:00:02 cinder-schedule
   1722 ?        00:00:02 cinder-backup
   1737 ?        00:00:02 cinder-volume
   1739 ?        00:00:02 cinder-api
   2572 ?        00:00:00 cinder-backup
   2829 ?        00:00:00 cinder-api
   2830 ?        00:00:00 cinder-api
   2836 ?        00:00:00 cinder-volume
   4168 ?        00:00:00 cinder-rootwrap
查看cinder-volume 默认支持的存储设备
bash
[root@controller ~]# cd /usr/lib/python3.6/site-packages/cinder/volume/drivers
[root@controller drivers]# ls
__init__.py    infinidat.py   nfs.py       solidfire.py
__pycache__    infortrend     nimble.py    spdk.py
datera         inspur         prophetstor  storpool.py
dell_emc       kaminario      pure.py      stx
fujitsu        lenovo         qnap.py      synology
fusionstorage  linstordrv.py  quobyte.py   veritas_access
hedvig         lvm.py         rbd.py       veritas_cnfs.py
hitachi        macrosan       remotefs.py  vmware
hpe            nec            rsd.py       vzstorage.py
huawei         netapp         san          windows
ibm            nexenta        sandstone    zadara.py
架构说明

- Cinder默认使用LVM(Logical Volume Manager)作为后端存储(Backend Storage),而LVM通过在 操作系统与物理存储资源之间引入逻辑卷(Logical Volume)的抽象来解决传统磁盘分区管理工具的问 题
- LVM将众多不同的物理存储资源(物理卷、Physical Volume,如磁盘分区)组成卷组。LVM从卷组中 创建一个逻辑卷,然后将ext3、ReiserFS等文件系统安装在这个逻辑卷上
- 除了LVM,目前Cinder已经以驱动的形式支持众多存储技术或存储厂商的设备作为后端存储,如SAN (Storage Area Network)、Ceph、Sheepdog,以及EMC、华为等厂商的设备
LVM回顾

- 首先,磁盘划分为我们的物理卷PV
pvcreate /dev/sdb .. - 然后把我们的PV创建成VG卷组,同时我们产生了PE物理扩展(基本单位)
vgcreate -s pe大小 vg名 /dev/sdb .. - 然后我们在VG中创建Iv逻辑卷
lvcreate -n 逻辑卷名 -L大小 vg名此时,LV已经建好,要想使用还需要挂载 - 挂载,对LV逻辑卷进行分区格式才能使用
创建LVM:PV -> VG -> LV -> 挂载分区格式化
删除LVM:备份数据 -> LV -> VG -> PV
实验环境后端存储就是LVM(安装时决定的)
bash
[root@controller ~]# vim answers.txt
536 CONFIG_CINDER_BACKEND=lvm
544 CONFIG_CINDER_VOLUMES_CREATE=y
547 CONFIG_CINDER_VOLUME_NAME=cinder-volumes
554 CONFIG_CINDER_VOLUMES_SIZE=20G
实验环境查看
bash
[root@controller ~]# vgdisplay cinder-volumes
  Configuration setting "snapshot_autoextend_percent" invalid. It's not part of any section.
  Configuration setting "snapshot_autoextend_threshold" invalid. It's not part of any section.
  --- Volume group ---
  VG Name               cinder-volumes
  System ID
  Format                lvm2
  Metadata Areas        1
  Metadata Sequence No  4
  VG Access             read/write
  VG Status             resizable
  MAX LV                0
  Cur LV                1
  Open LV               0
  Max PV                0
  Cur PV                1
  Act PV                1
  VG Size               <20.60 GiB
  PE Size               4.00 MiB
  Total PE              5273
  Alloc PE / Size       5020 / <19.61 GiB
  Free  PE / Size       253 / 1012.00 MiB
  VG UUID               eRUCG9-ztxf-0V0O-Fauj-el0X-8gEg-cU0xfl
Cinder架构部署
存储演进
1.内置存储
存储介质(如硬盘)直接安装在运行操作系统和应用程序的计算机机箱内部
问题随着而来,存储容量和性能受单个服务器机箱限制
2.DAS 直连附件存储
可以看作是强化的移动硬盘,存储设备通过专用线缆(如SAS、SCSI、FC线缆)直接连接到一台服务器上
存储从"机箱内"走到了"机箱外",但连接关系仍然是 "一对一"或"点对点",存储无法在多个服务器间共享
3.NAS 网络附加存储
一个专用的、自带操作系统的存储设备,它通过标准的以太网连接到网络,为网络中的多个客户端 提供文件共享服务
比如NFS 服务,但是存在一定问题,性能不太好,容易受网络波动影响,比较慢
4.SAN(storage area network)存储区域网络
为存储访问专门构建一个高速的、独立的"后端"网络,仅用于服务存储
5.云存储
通过互联网提供的、按需使用的存储服务
以SAN存储为例
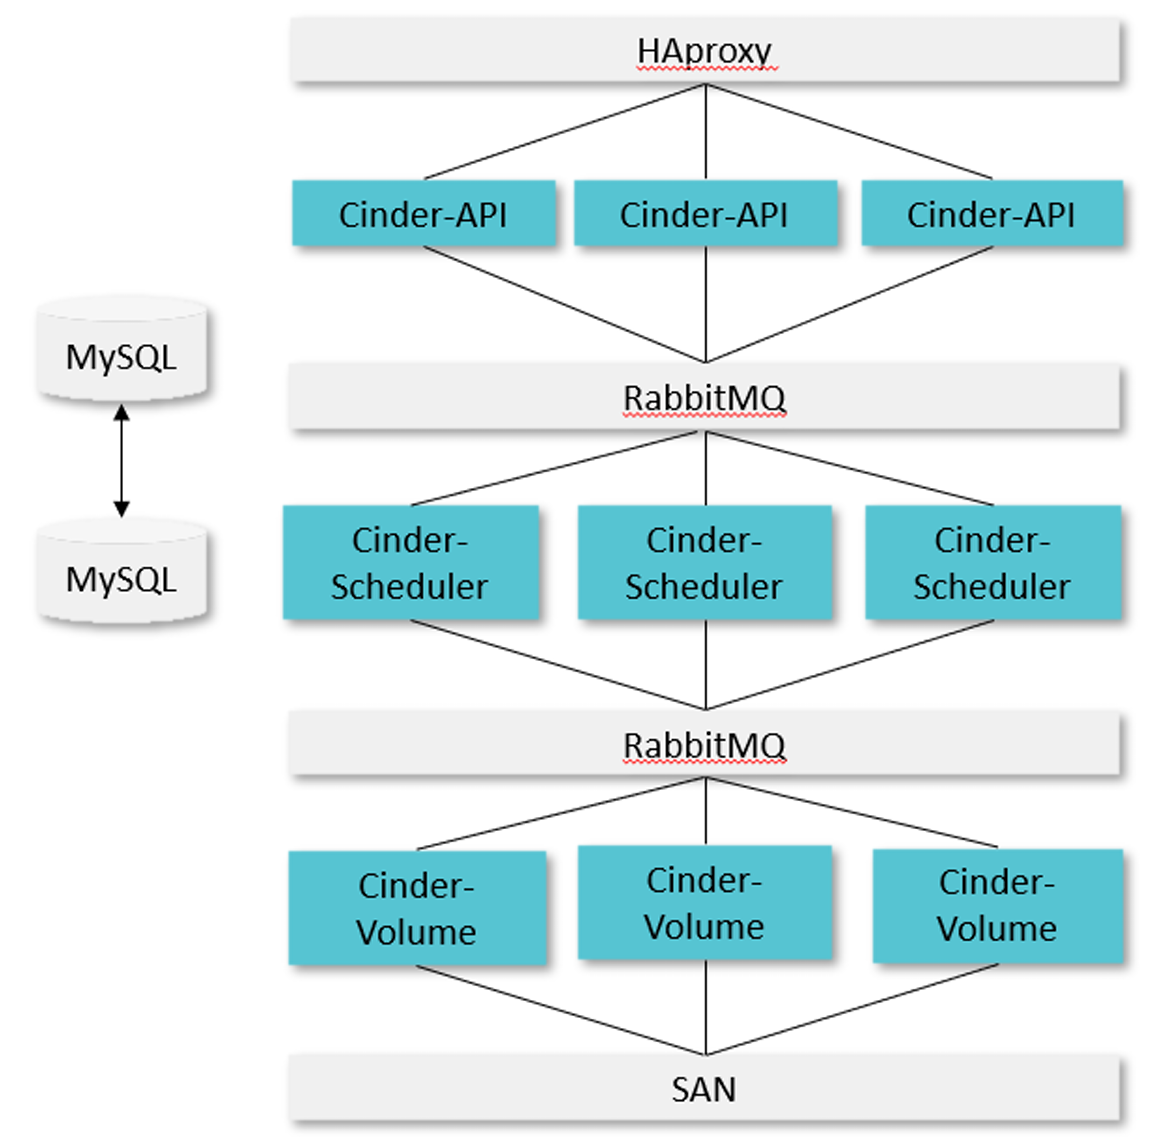
- Cinder-api,Cinder-Scheduler,Cinder-Volume可以选择部署到一个节点上,也可以分别部署
- API采用AA模式(Active-Active 多活模式),HAproxy作为LB(负载均衡),分发请求到多个Cinder API
- Scheduler也采用AA模式,由rabbitmq以负载均衡模式向3个节点分发任务,并同时从rabbitmq收取Cinder volume上报的能力信息,调度时,scheduler通过在DB中预留资源从而保证数据一致性
- Cinder Volume也采用AA模式,同时上报同一个backend容量和能力信息,并同时接受请求进行处理
- RabbitMQ,支持主备或集群
- MySQL,支持主备或集群
Cinder-api

- 检查参数合法性(用户输入,权限,资源是否存在等)
- 准备创建的参数字典,预留和提交配额
- 在数据库中创建对应的数据记录
- 通过消息队列将请求和参数发送到Scheduler
查看cinder-api 服务状态
bash
[root@controller ~]# systemctl status openstack-cinder-api.service
● openstack-cinder-api.service - OpenStack Cinder API Server
   Loaded: loaded (/usr/lib/systemd/system/openstack-cinder-api.se>
   Active: active (running) since Wed 2025-10-29 17:00:37 CST; 1h >
 Main PID: 1739 (cinder-api)
    Tasks: 3 (limit: 37543)
   Memory: 233.3M
   CGroup: /system.slice/openstack-cinder-api.service
           ├─1739 /usr/bin/python3 /usr/bin/cinder-api --config-fi>
           ├─2829 /usr/bin/python3 /usr/bin/cinder-api --config-fi>
           └─2830 /usr/bin/python3 /usr/bin/cinder-api --config-fi>

Oct 29 17:00:37 controller systemd[1]: Started OpenStack Cinder AP>
Cinder-scheduler

和Nova Scheduler类似,Cinder Scheduler也是经过Filter筛选符合条件的后端,然后使用Weigher计算 后端进行权重排序,最终选择出最合适的后端存储
配置cinder配置文件cinder.conf
bash
[root@controller ~]# cd /etc/cinder/
[root@controller cinder]# ls
api-paste.ini  cinder.conf  resource_filters.json  rootwrap.conf  rootwrap.d  volumes
[root@controller cinder]# vim cinder.conf
# 该配置文件的节点的AZ
395 storage_availability_zone=nova

# 创建卷时,不指定AZ默认使用
401 default_availability_zone=nova

# 默认过滤规则
592 scheduler_default_filters = AvailabilityZoneFilter,CapacityFilter,CapabilitiesFilter
AvailabilityZoneFilter
验证AZ实验
bash
[root@controller ~]# cd /etc/cinder/
[root@controller cinder]# ls
api-paste.ini  cinder.conf  resource_filters.json  rootwrap.conf  rootwrap.d  volumes
[root@controller cinder]# vim cinder.conf
#该配置文件的节点的AZ设置为az1
395 storage_availability_zone=az1

#创建卷时,不指定az默认使用nova AZ
401 default_availability_zone=nova

[root@controller cinder]# systemctl restart openstack-cinder*
[root@controller cinder]# cd
[root@controller ~]# source keystonerc_admin

# cinder.conf配置文件配置401 default_availability_zone=nova,创建卷时不指定AZ则使用nova AZ,而该节点属于az1 AZ,创建失败
[root@controller ~(keystone_admin)]# openstack volume create --size 1 volume1
Availability zone 'nova' is invalid. (HTTP 400) (Request-ID: req-d203c738-405a-423f-9a8a-beba34bd14fc)

# cinder配置文件配置395 storage_availability_zone=az1,该节点属于AZ az1节点,创建AZ az2卷,被AvailabilityZoneFilter过滤
[root@controller ~(keystone_admin)]# openstack volume create --size 1 --availability-zone az2 volume1
Availability zone 'az2' is invalid. (HTTP 400) (Request-ID: req-763d05d3-4b25-4551-91f5-bc6bec2b6bdf)

# cinder配置文件配置395 storage_availability_zone=az1,该节点属于AZ az1节点,创建AZ az1卷,创建成功
[root@controller ~(keystone_admin)]# openstack volume create --size 1 --availability-zone az1 volume1
+---------------------+--------------------------------------+
| Field               | Value                                |
+---------------------+--------------------------------------+
| attachments         | []                                   |
| availability_zone   | az1                                  |
| bootable            | false                                |
| consistencygroup_id | None                                 |
| created_at          | 2025-10-29T06:20:23.227050           |
| description         | None                                 |
| encrypted           | False                                |
| id                  | 1dac06a3-4bc0-4318-af09-da71342c5626 |
| migration_status    | None                                 |
| multiattach         | False                                |
| name                | volume1                              |
| properties          |                                      |
| replication_status  | None                                 |
| size                | 1                                    |
| snapshot_id         | None                                 |
| source_volid        | None                                 |
| status              | creating                             |
| type                | iscsi                                |
| updated_at          | None                                 |
| user_id             | d1a0ae2a6ae4467fbe7d4f3f2948c490     |
+---------------------+--------------------------------------+
CapacityFilter
创建 Volume 时,用户会指定 Volume 的大小。CapacityFilter 的作用是将存储空间不能满足 Volume 创 建需求的存储节点过滤掉
CapabilitiesFilter
不同的 Volume Provider 有自己的特性(Capabilities),比如是否支持 thin provision 等。Cinder 允 许用户创建 Volume 时通过 Volume Type 指定需要的 Capabilities
在创建卷的时候可以选择卷类型

但是我们从后端查看使用的是LVM,这是由卷类型,扩展规格决定的,由配置文件决定的


查看配置文件
bash
[root@controller ~(keystone_admin)]# vim /etc/cinder/cinder.conf
5261 [1vm]
5262 volume_backend_name=lvm
5263 volume_driver=cinder.volume.drivers.1vm.LvMVolumeDriver
5264 target_ip_address=192.168.108.10
5265 target_helper=lioadm
5266 volume_group=cinder-volumes
5267 volumes_dir=/var/lib/cinder/volumes
Cinder-volume

- 提取接收到的请求参数
- 调用对应的Driver 在后端创建实际的卷
- 使用Driver 返回的模型更新数据库中的记录
Cinder 挂载流程
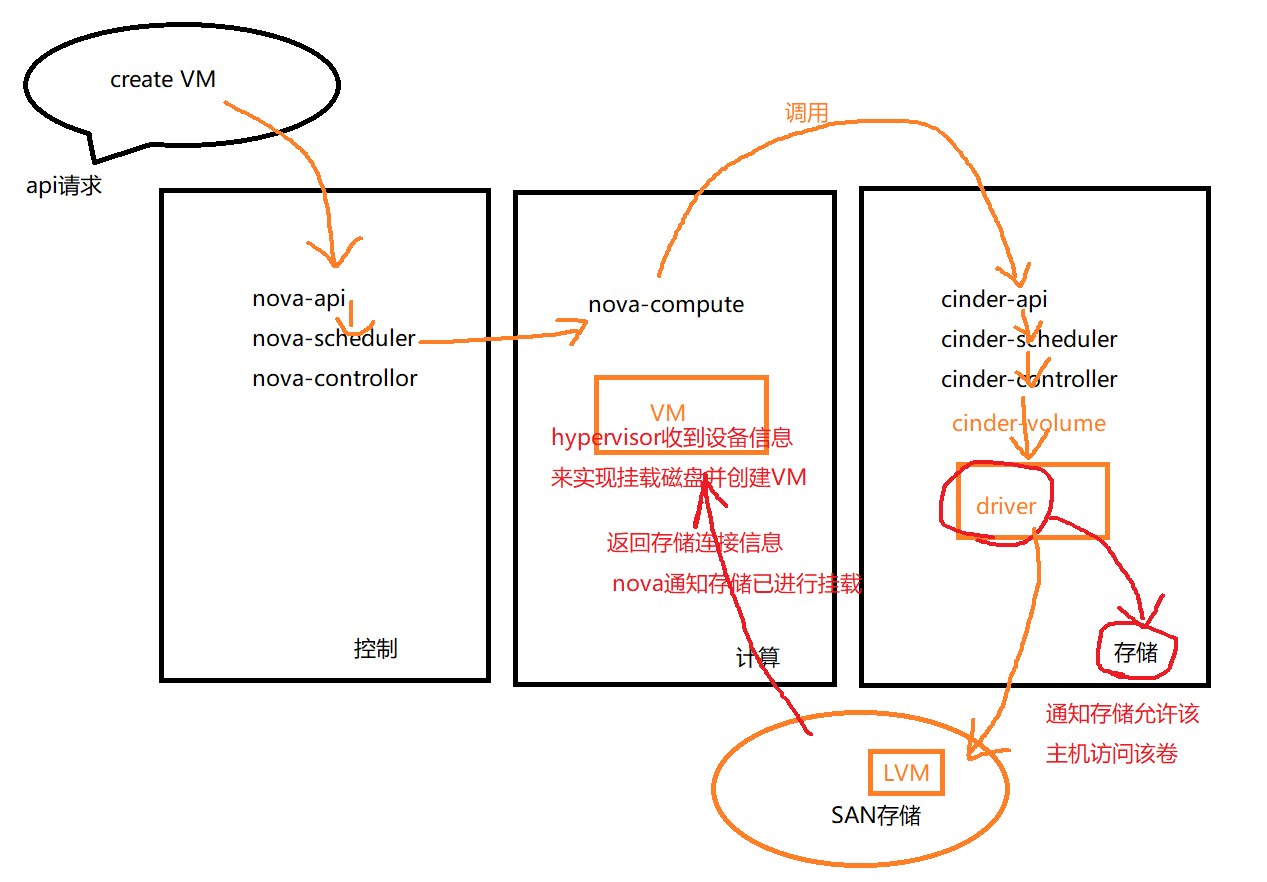
挂卷是通过nova和cinder的配合最终将远端的卷连接到虚拟机所在的host节点上,并最终通过虚拟机管理员程序映射到内部的虚拟机中
- nova调用cinder-api 创建卷,传递主机信息,如hostname,iSCSI initiator name
- cinder-api 将信息传递给cinder-volume
- cinder-volume通过创建卷时保存的host信息找到对应的cinder driver
- cinder driver通知存储允许该主机访问该卷,并返回该存储的连接信息,如iSCSI iqn,NFS path等
- nova调用针对不同存储类型进行主机识别磁盘的代码(cinder 提供了brick 模块用于参考)实现识别磁盘或者文件设备
- nova通知cinder已经进行了挂载
- nova将主机的设备信息传递给hypervisor来实现虚拟机挂载磁盘
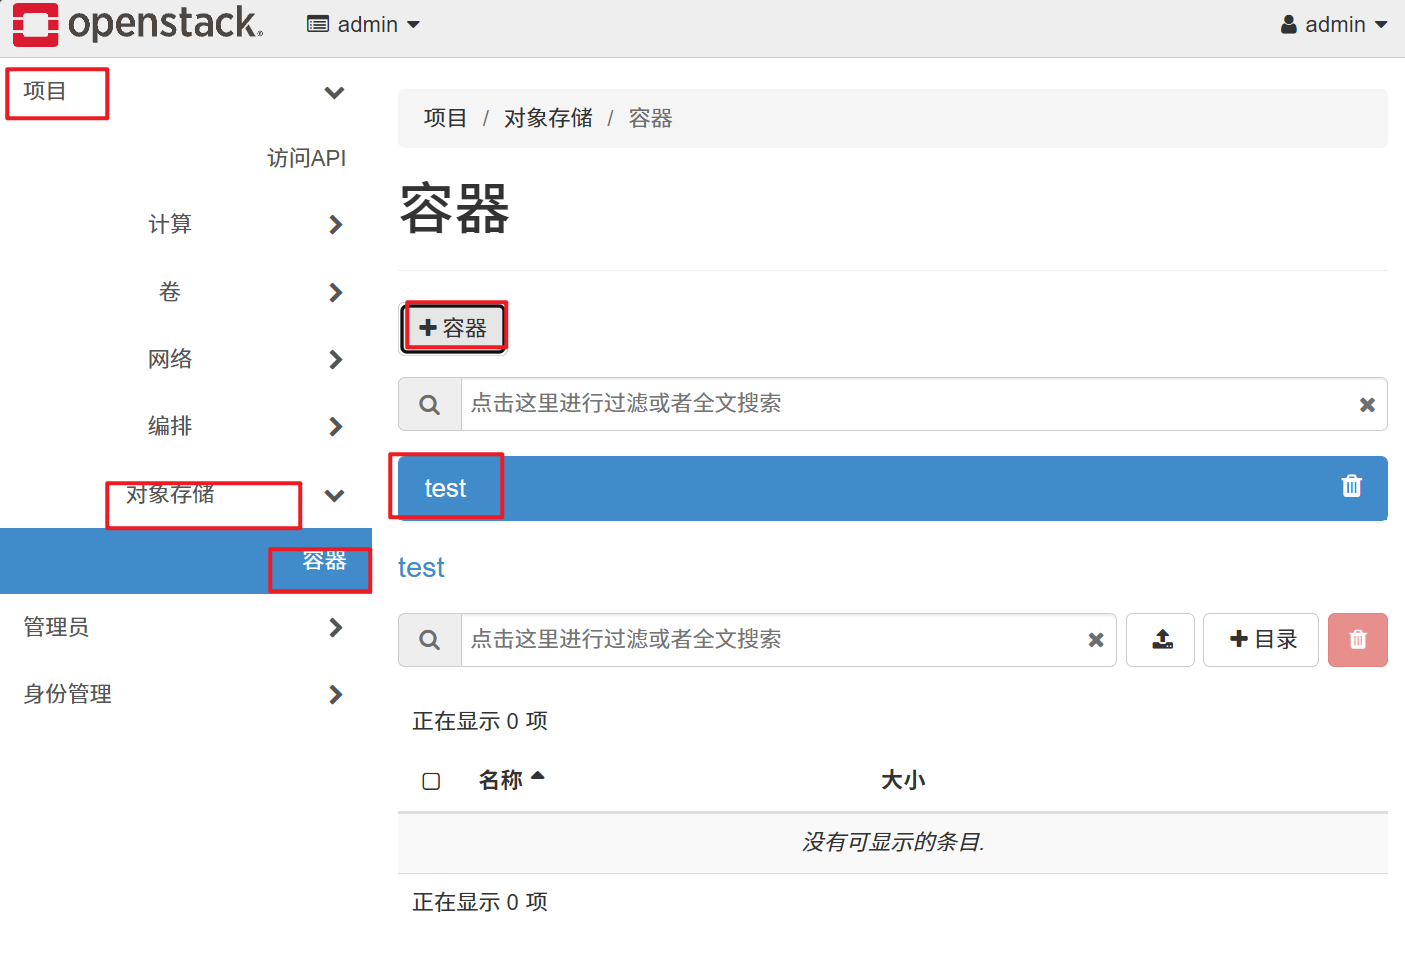
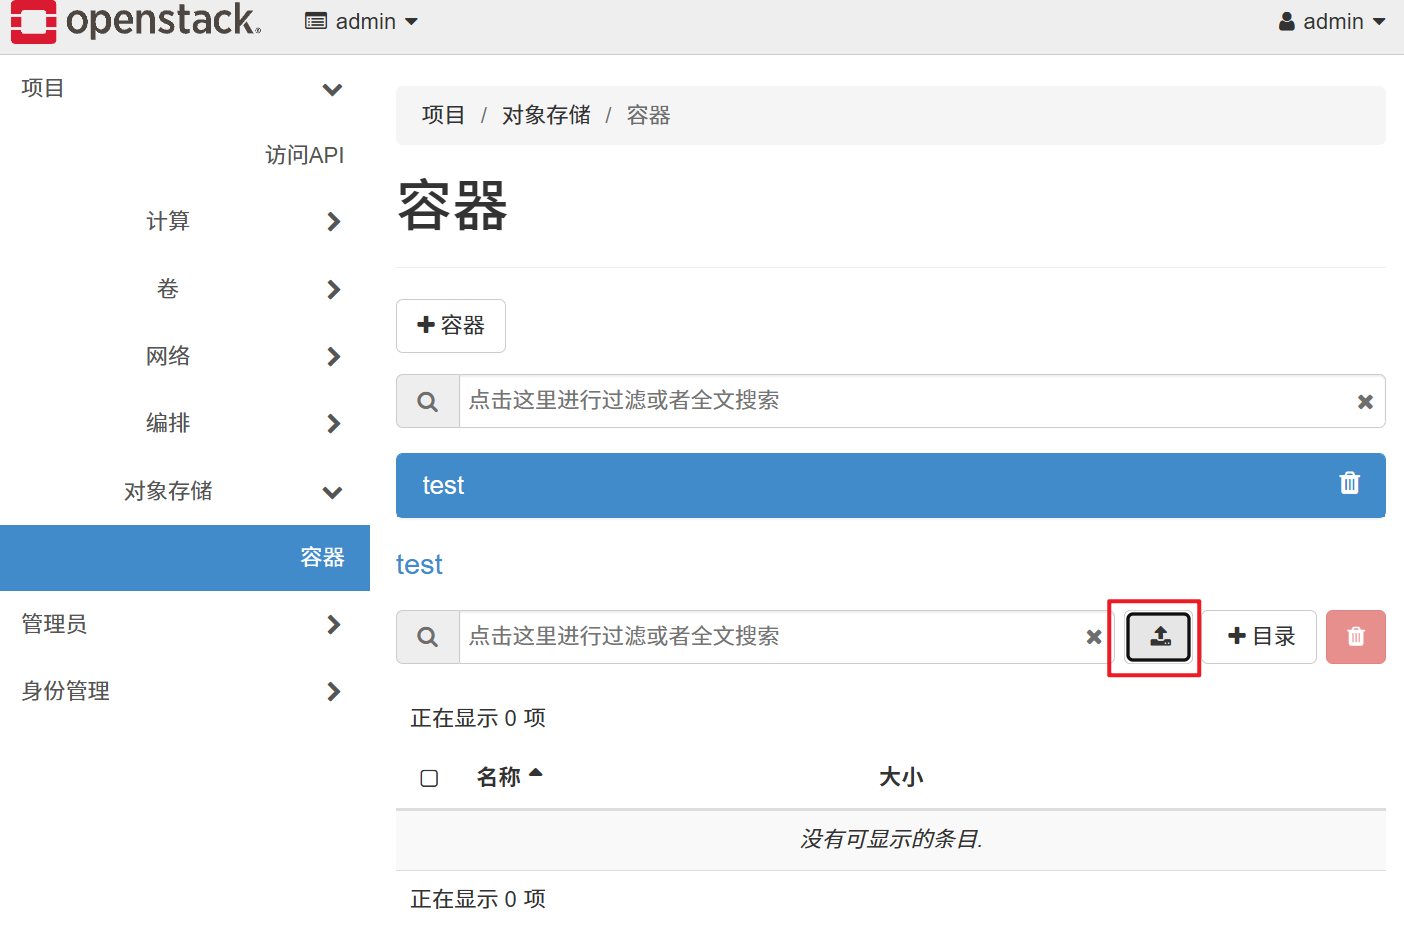
OpenStack对象存储管理-swift
Swift作用

- Swift不是文件系统或者实时的数据存储系统,它被称为对象存储,用于永久类型的静态数据的长期存储,这些数据可以检索、调整,必要时进行更新
- 适合存储的数据类型有虚拟机镜像,图片存储,邮件存储和存档备份
- swift是没有中心单元或主控节点的,它提供了更强的扩展性、冗余和持久性
使用swift stat可以显示swift中的账户,容器,对象的信息
swift为账户,容器,对象分别定义了ring(环)将虚拟节点(分区)映射到一组物理存储设备上,包括account ring、container ring、object ring
ring记录了存储对象与物理位置的映射关系,通过zone、device、partition(分区)和replica(副本)来维护映射信息
hash 哈希
Swift 使用一个叫做 "环" 的虚拟结构来管理所有数据的存放位置。这个环本质上是一个巨大的哈希环,这个环被划分为大量的 "分区" ,每个分区在环上占据一个点,当Swift 需要存储一个对象(比如一张图片 cat.jpg)时,它必须决定:"这个对象应该被放在集群中的哪台服务器上?",hash 就开始作用
三大特点:
- 不可逆运算
- hash值长度固定
- 雪崩效应(内容仅变化一点,其余部分完全一致,hash值发生巨大变化)
Swift实验

控制节点新添加一块20G磁盘
新磁盘分成两个区,并格式化
分区一:挂载到obs1目录
分区二:挂载到obs2目录


将两区格式化为xfs格式
给默认挂载的swift虚拟分区卸载

bash
[root@controller ~]# umount /srv/node/swiftloopback
[root@controller ~]# cd /srv/node/
[root@controller node]# ls
swiftloopback
[root@controller node]# rm -rf ./*
[root@controller node]# ls
[root@controller node]# mkdir obs1 obs2
[root@controller node]# ls
obs1  obs2
编辑配置文件,将obs1和obs2分别挂载
bash
[root@controller obs1]# vim /etc/fstab
[root@controller obs1]# tail -n 3 /etc/fstab
#/srv/loopback-device/swiftloopback     /srv/node/swiftloopback ext4       noatime,nodiratime,nofail,loop,user_xattr       0       0
/dev/sdb1 /srv/node/obs1 xfs defaults 0 0
/dev/sdb2 /srv/node/obs2 xfs defaults 0 0

[root@controller node]# mount -a
mount: (hint) your fstab has been modified, but systemd still uses
       the old version; use 'systemctl daemon-reload' to reload.
[root@controller node]# lsblk
NAME                       MAJ:MIN RM   SIZE RO TYPE MOUNTPOINT
loop1                        7:1    0  20.6G  0 loop
|-cinder--volumes-cinder--volumes--pool_tmeta
|                          253:3    0    20M  0 lvm
| `-cinder--volumes-cinder--volumes--pool
|                          253:5    0  19.6G  0 lvm
`-cinder--volumes-cinder--volumes--pool_tdata
                           253:4    0  19.6G  0 lvm
  `-cinder--volumes-cinder--volumes--pool
                           253:5    0  19.6G  0 lvm
sda                          8:0    0   200G  0 disk
|-sda1                       8:1    0     1G  0 part /boot
`-sda2                       8:2    0   199G  0 part
  |-cs-root                253:0    0    70G  0 lvm  /
  |-cs-swap                253:1    0   3.9G  0 lvm  [SWAP]
  `-cs-home                253:2    0 125.1G  0 lvm  /home
sdb                          8:16   0    20G  0 disk
|-sdb1                       8:17   0    10G  0 part /srv/node/obs1
`-sdb2                       8:18   0    10G  0 part /srv/node/obs2
修改obs1和obs2目录的权限
bash
[root@controller node]# chown swift:swift obs1
[root@controller node]# chown swift:swift obs2
[root@controller node]# ll
total 0
drwxr-xr-x 2 swift swift 6 Oct 30 15:43 obs1
drwxr-xr-x 2 swift swift 6 Oct 30 15:43 obs2
创建swift ring
bash
[root@controller node]# cd /etc/swift/
[root@controller swift]# ls
account-server             internal-client.conf
account-server.conf        object-expirer.conf
account.builder            object-server
account.ring.gz            object-server.conf
backups                    object.builder
container-reconciler.conf  object.ring.gz
container-server           proxy-server
container-server.conf      proxy-server.conf
container.builder          swift.conf
container.ring.gz

[root@controller swift]# swift-ring-builder container.builder create 12 2 1
[root@controller swift]# swift-ring-builder account.builder create 12 2 1
[root@controller swift]# swift-ring-builder object.builder create 12 2 1
# 12表示ring分区数量为2^12
# 2表示2个副本
# 1表示最少1小时后才能更改ring配置
创建ring映射关系
bash
# 查看配置文件,分别查看account,container,object的bind_port记录下来
[root@controller swift]# cat account-server.conf | grep bind_port
bind_port = 6002
[root@controller swift]# cat container-server.conf | grep bind_port
bind_port = 6001
[root@controller swift]# cat object-server.conf | grep bind_port
bind_port = 6000
[root@controller swift]# swift-ring-builder account.builder add z1-192.168.108.10:6002/obs1 100
WARNING: No region specified for z1-192.168.108.10:6002/obs1. Defaulting to region 1.
[root@controller swift]# swift-ring-builder account.builder add z2-192.168.108.10:6002/obs2 100
[root@controller swift]# swift-ring-builder container.builder add z1-192.168.108.10:6001/obs1 100
[root@controller swift]# swift-ring-builder container.builder add z2-192.168.108.10:6001/obs2 100
[root@controller swift]# swift-ring-builder object.builder add z1-192.168.108.10:6000/obs1 100
[root@controller swift]# swift-ring-builder object.builder add z2-192.168.108.10:6000/obs2 100
再平衡
bash
[root@controller swift]# swift-ring-builder account.builder rebalance
Reassigned 8192 (200.00%) partitions. Balance is now 0.00.  Dispersion is now 0.00
[root@controller swift]# swift-ring-builder container.builder rebalance
Reassigned 8192 (200.00%) partitions. Balance is now 0.00.  Dispersion is now 0.00
[root@controller swift]# swift-ring-builder object.builder rebalance
Reassigned 8192 (200.00%) partitions. Balance is now 0.00.  Dispersion is now 0.00
实验测试:
随便上传一个文件

查看文件位置
bash
[root@controller obs1]# pwd
/srv/node/obs1
[root@controller obs1]# find /srv/node -name *data
/srv/node/obs1/objects/1312/93c/520093a6ccfd97746dbf5b7998b3393c/1761815832.54504.data
/srv/node/obs2/objects/1312/93c/520093a6ccfd97746dbf5b7998b3393c/1761815832.54504.data