pytest架构是什么?
首先,来看一个 pytest 的例子:
ini
def test_a():

  print(123)
collected 1 item

test_a.py .                                                                                                            [100%]

============ 1 passed in 0.02s =======================
输出结果很简单:收集到 1 个用例,并且这条测试用例执行通过。 此时思考两个问题: 1.pytest 如何收集到用例的? 2.pytest 如何把 python 代码,转换成 pytest 测试用例(又称 item) ?
pytest如何做到收集到用例的?
这个很简单,遍历执行目录,如果发现目录的模块中存在符合" pytest 测试用例要求的 python 对象",就将之转换为 pytest 测试用例。 比如编写以下 hook 函数:
lua
def pytest_collect_file(path, parent):

    print("hello", path)
hello C:\Users\yuruo\Desktop\tmp\tmp123\tmp\testcase__init__.py

hello C:\Users\yuruo\Desktop\tmp\tmp123\tmp\testcase\conftest.py

hello C:\Users\yuruo\Desktop\tmp\tmp123\tmp\testcase\test_a.py
会看到所有文件内容。
pytest 像是包装盒,将 python 对象包裹起来,比如下图:
当写好 python 代码时:
python
def test_a:
print(123)
会被包裹成 Function :
javascript
<Function test_a>可以从 hook 函数中查看细节:
python
def pytest_collection_modifyitems(session, config, items):
pass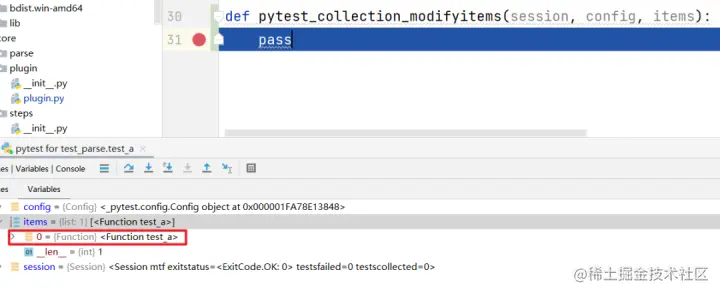
于是,理解包裹过程就是解开迷题的关键。pytest 是如何包裹 python 对象的? 下面代码只有两行,看似简单,但暗藏玄机!
python
def test_a:

    print(123)
把代码位置截个图,如下:
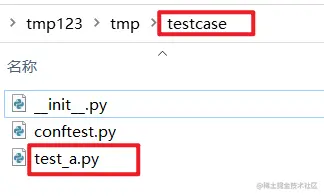
我们可以说,上述代码是处于"testcase包"下的 "test_a.py模块"的"test_a函数", pytest 生成的测试用例也要有这些信息: 处于"testcase包"下的 "test_a.py模块"的"test_a测试用例: 把上述表达转换成下图: pytest 使用 parent 属性表示上图层级关系,比如 Module 是 Function 的上级, Function 的 parent 属性如下:
javascript
<Function test_a>:

  parent: <Module test_parse.py>
当然 Module 的 parent 就是 Package:
xml
<Module test_parse.py>:

  parent: <Package tests>
这里科普一下,python 的 package 和 module 都是真实存在的对象,你可以从 obj 属性中看到,比如 Module 的 obj 属性如下:

如果理解了 pytest 的包裹用途,非常好!我们进行下一步讨论:如何构造 pytest 的 item ?
以下面代码为例:
python
def test_a:

    print(123)
构造 pytest 的 item ,需要: 3.构建 Package 4.构建 Module 5.构建 Function 以构建 Function 为例,需要调用其from_parent()方法进行构建,其过程如下图:
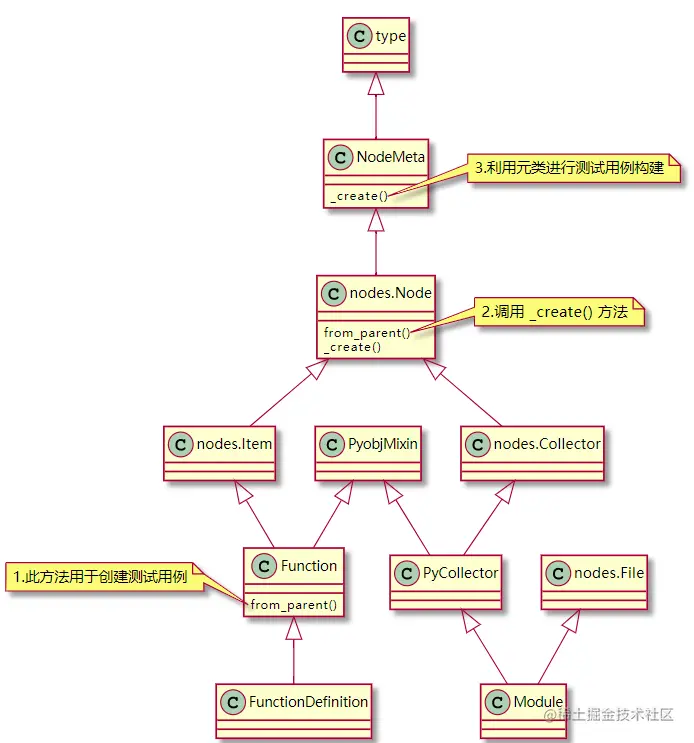
,就可以猜测出,"构建 Function"一定与其 parent 有不小联系!又因为 Function 的 parent 是 Module : 根据下面 Function 的部分代码(位于 python.py 文件):
python
class Function(PyobjMixin, nodes.Item):

    # 用于创建测试用例

    @classmethod

    def from_parent(cls, parent, **kw):

        """The public constructor."""

        return super().from_parent(parent=parent, **kw)

    # 获取实例

    def _getobj(self):

        assert self.parent is not None

        return getattr(self.parent.obj, self.originalname)  # type: ignore[attr-defined]

    # 运行测试用例

    def runtest(self) -> None:

        """Execute the underlying test function."""

        self.ihook.pytest_pyfunc_call(pyfuncitem=self)
得出结论,可以利用 Module 构建 Function!其调用伪代码如下:
vbnet
Function.from_parent(Module)既然可以利用 Module 构建 Function, 那如何构建 Module ? 当然是利用 Package 构建 Module!
scss
Module.from_parent(Package)既然可以利用 Package 构建 Module 那如何构建 Package ? 别问了,快成套娃了,请看下图调用关系:

pytest 从 Config 开始,层层构建,直到 Function !Function 是 pytest 的最小执行单元。 手动构建 item 就是模拟 pytest 构建 Function 的过程。也就是说,需要创建 Config ,然后利用 Config 创建 Session ,然后利用 Session 创建 Package ,...,最后创建 Function。
其实没这么复杂, pytest 会自动创建好 Config, Session和 Package ,这三者不用手动创建。

编辑
添加图片注释,不超过 140 字(可选)
比如编写以下 hook 代码,打断点查看其 parent 参数:
python
def pytest_collect_file(path, parent):

    pass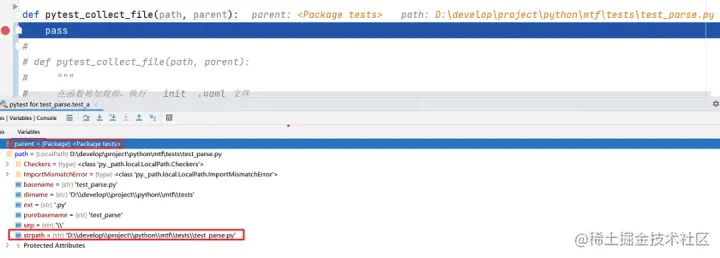
如果遍历的路径是某个包(可从path参数中查看具体路径),比如下图的包
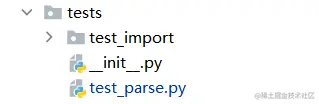
其 parent 参数就是 Package ,此时可以利用这个 Package 创建 Module :

编辑
添加图片注释,不超过 140 字(可选)
编写如下代码即可构建 pytest 的 Module ,如果发现是 yaml 文件,就根据 yaml 文件内容动态创建 Module 和 module :
ini
from _pytest.python import Module, Package

def pytest_collect_file(path, parent):

    if path.ext == ".yaml":

        pytest_module = Module.from_parent(parent, fspath=path)

        # 返回自已定义的 python module

        pytest_module._getobj = lambda : MyModule

        return pytest_module
需要注意,上面代码利用猴子补丁改写了 _getobj 方法,为什么这么做? Module 利用 _getobj 方法寻找并导入(import语句) path 包下的 module ,其源码如下:
python
# _pytest/python.py Module

class Module(nodes.File, PyCollector):

    def _getobj(self):

        return self._importtestmodule()

def _importtestmodule(self):

    # We assume we are only called once per module.

    importmode = self.config.getoption("--import-mode")

    try:

        # 关键代码:从路径导入 module

        mod = import_path(self.fspath, mode=importmode)

    except SyntaxError as e:

        raise self.CollectError(

            ExceptionInfo.from_current().getrepr(style="short")

        ) from e

        # 省略部分代码...
但是,如果使用数据驱动,即用户创建的数据文件 test_parse.yaml ,它不是 .py 文件,不会被 python 识别成 module (只有 .py 文件才能被识别成 module)。 这时,就不能让 pytest 导入(import语句) test_parse.yaml ,需要动态改写 _getobj ,返回自定义的 module ! 因此,可以借助 lambda 表达式返回自定义的 module :
python
lambda : MyModule这就涉及元编程技术:动态构建 python 的 module ,并向 module 中动态加入类或者函数:
python
import types

# 动态创建 module

module = types.ModuleType(name)

def function_template(*args, **kwargs):

    print(123)

# 向 module 中加入函数

setattr(module, "test_abc", function_template)
综上,将自己定义的 module 放入 pytest 的 Module 中即可生成 item :
python
# conftest.py

import types

from _pytest.python import Module

def pytest_collect_file(path, parent):

    if path.ext == ".yaml":

        pytest_module = Module.from_parent(parent, fspath=path)

        # 动态创建 module

        module = types.ModuleType(path.purebasename)

        def function_template(*args, **kwargs):

            print(123)

        # 向 module 中加入函数

        setattr(module, "test_abc", function_template)

        pytest_module._getobj = lambda: module

        return pytest_module
创建一个 yaml 文件,使用 pytest 运行:

ini
======= test session starts ====

platform win32 -- Python 3.8.1, pytest-6.2.4, py-1.10.0, pluggy-0.13.1

rootdir: C:\Users\yuruo\Desktop\tmp

plugins: allure-pytest-2.8.11, forked-1.3.0, rerunfailures-9.1.1, timeout-1.4.2, xdist-2.2.1

collected 1 item

test_a.yaml 123

.

======= 1 passed in 0.02s =====


PS C:\Users\yuruo\Desktop\tmp>
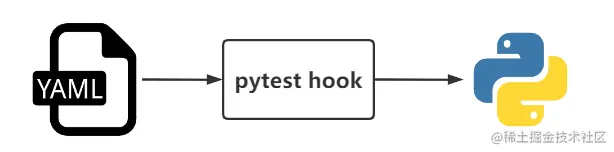
现在停下来,回顾一下,我们做了什么? 借用 pytest hook ,将 .yaml 文件转换成 python module。
编辑切换为居中
添加图片注释,不超过 140 字(可选)
作为一个数据驱动测试框架,我们没做什么?
没有解析 yaml 文件内容!上述生成的 module ,其内的函数如下:
python
def function_template(*args, **kwargs):

    print(123)
只是简单打印 123 。数据驱动测试框架需要解析 yaml 内容,根据内容动态生成函数或类。比如下面 yaml 内容:
yaml
test_abc:

  - print: 123
表达的含义是"定义函数 test_abc,该函数打印 123"。 可以利用 yaml.safe_load 加载 yaml 内容,并进行关键字解析,其中path.strpath代表 yaml 文件的地址:
python
import types

import yaml

from _pytest.python import Module

def pytest_collect_file(path, parent):

    if path.ext == ".yaml":

        pytest_module = Module.from_parent(parent, fspath=path)

        # 动态创建 module

        module = types.ModuleType(path.purebasename)

        # 解析 yaml 内容

        with open(path.strpath) as f:

            yam_content = yaml.safe_load(f)

            for function_name, steps in yam_content.items():


                def function_template(*args, **kwargs):

                    """

                    函数模块

                    """

                    # 遍历多个测试步骤 [print: 123, print: 456]

                    for step_dic in steps:

                        # 解析一个测试步骤 print: 123

                        for step_key, step_value in step_dic.items():

                            if step_key == "print":

                                print(step_value)


                # 向 module 中加入函数

                setattr(module, function_name, function_template)

        pytest_module._getobj = lambda: module

        return pytest_module
上述测试用例运行结果如下:
ini
=== test session starts ===

platform win32 -- Python 3.8.1, pytest-6.2.4, py-1.10.0, pluggy-0.13.1

rootdir: C:\Users\yuruo\Desktop\tmp

plugins: allure-pytest-2.8.11, forked-1.3.0, rerunfailures-9.1.1, timeout-1.4.2, xdist-2.2.1

collected 1 item

test_a.yaml 123

.

=== 1 passed in 0.02s ====
当然,也支持复杂一些的测试用例:
yaml
test_abc:

  - print: 123

  - print: 456

test_abd:

  - print: 123

  - print: 456
其结果如下:
ini
== test session starts ==

platform win32 -- Python 3.8.1, pytest-6.2.4, py-1.10.0, pluggy-0.13.1

rootdir: C:\Users\yuruo\Desktop\tmp

plugins: allure-pytest-2.8.11, forked-1.3.0, rerunfailures-9.1.1, timeout-1.4.2, xdist-2.2.1

collected 2 items

test_a.yaml 123

456

.123

456

.

== 2 passed in 0.02s ==
利用pytest创建数据驱动测试框架就介绍到这里啦,希望能给大家带来一定的帮助。大家有什么不懂的地方或者有疑惑也可以留言讨论哈,让我们共同进步呦!