引言:为什么 RabbitMQ 是微服务架构的必备神器?
在当今的分布式系统和微服务架构中,消息队列已经成为不可或缺的核心组件。而 RabbitMQ 作为其中的佼佼者,凭借其强大的功能、灵活的路由机制和卓越的性能,被广泛应用于各大互联网公司的生产环境中。
你是否遇到过这些问题:
- 系统峰值流量过高导致服务崩溃?
- 微服务之间耦合度太高,修改一个服务影响一片?
- 数据一致性难以保证,分布式事务处理复杂?
- 异步任务处理效率低下,影响用户体验?
RabbitMQ 正是解决这些问题的利器。本文将带你从理论到实践,全面掌握 SpringBoot 集成 RabbitMQ 的方方面面,让你在实际项目中能够游刃有余地使用这一强大工具。
一、RabbitMQ 核心概念与工作原理
在开始编码之前,我们必须先理解 RabbitMQ 的核心概念和工作原理,这是后续一切操作的基础。
1.1 核心组件
RabbitMQ 基于 AMQP(Advanced Message Queuing Protocol)协议实现,包含以下核心组件:
- Producer:消息生产者,负责发送消息
- Consumer:消息消费者,负责接收并处理消息
- Exchange:交换机,接收生产者发送的消息,并根据路由规则将消息路由到一个或多个队列
- Queue:消息队列,用于存储消息,直到被消费者消费
- Binding:绑定,用于建立 Exchange 和 Queue 之间的关联,并指定路由规则
- Connection:网络连接,如 TCP 连接
- Channel:信道,建立在 Connection 之上的虚拟连接,是进行消息读写的通道
graph LRA Producer -->| 发送消息 | B ExchangeB -->| 路由消息 | C Queue1B -->| 路由消息 | D Queue2C -->| 消费消息 | E Consumer1D -->| 消费消息 | F Consumer2
1.2 交换机类型
RabbitMQ 提供了四种主要的交换机类型,每种类型对应不同的路由策略:
- Direct Exchange:直接交换机,根据消息携带的路由键(Routing Key)与绑定的路由键完全匹配来路由消息
- Topic Exchange:主题交换机,通过通配符匹配路由键,比直接交换机更灵活
- Fanout Exchange:扇形交换机,将消息路由到所有与之绑定的队列,忽略路由键
- Headers Exchange:头交换机,根据消息的头部信息进行路由,不依赖路由键
1.3 消息流转过程
flowchart TDA 生产者创建消息 --> B 设置消息属性包括路由键B --> C 发送到指定交换机C --> D 交换机根据类型和绑定规则D --> E 将消息路由到匹配的队列E --> F 消费者监听队列获取消息F --> G 处理消息
二、环境准备
2.1 安装 RabbitMQ
RabbitMQ 基于 Erlang 语言开发,因此首先需要安装 Erlang 环境。
2.1.1 Windows 系统安装
-
下载并安装 Erlang:https://www.erlang.org/downloads
-
下载并安装 RabbitMQ:https://www.rabbitmq.com/download.html
-
启动 RabbitMQ 服务:
安装管理插件
rabbitmq-plugins enable rabbitmq_management
启动服务
net start RabbitMQ
2.1.2 Linux 系统安装(以 CentOS 为例)
# 安装Erlang
yum install -y erlang
# 安装RabbitMQ
wget https://github.com/rabbitmq/rabbitmq-server/releases/download/v3.13.0/rabbitmq-server-3.13.0-1.el8.noarch.rpm
rpm -ivh rabbitmq-server-3.13.0-1.el8.noarch.rpm
# 启动服务
systemctl start rabbitmq-server
# 设置开机启动
systemctl enable rabbitmq-server
# 启用管理插件
rabbitmq-plugins enable rabbitmq_management
2.2 访问 RabbitMQ 管理界面
安装完成后,通过浏览器访问http://localhost:15672(默认端口),使用默认账号密码guest/guest登录(注意:默认账号只允许本地访问,远程访问需要创建新用户)。
创建新用户命令:
# 创建用户
rabbitmqctl add_user admin 123456
# 设置用户角色为管理员
rabbitmqctl set_user_tags admin administrator
# 设置权限
rabbitmqctl set_permissions -p / admin ".*" ".*" ".*"
三、SpringBoot 项目搭建与配置
3.1 创建 Maven 项目
首先,我们创建一个 SpringBoot 项目,添加必要的依赖。
3.1.1 pom.xml 配置
<?xml version="1.0" encoding="UTF-8"?>
<project xmlns="http://maven.apache.org/POM/4.0.0" xmlns:xsi="http://www.w3.org/2001/XMLSchema-instance"
         xsi:schemaLocation="http://maven.apache.org/POM/4.0.0 https://maven.apache.org/xsd/maven-4.0.0.xsd">
    <modelVersion>4.0.0</modelVersion>
    <parent>
        <groupId>org.springframework.boot</groupId>
        <artifactId>spring-boot-starter-parent</artifactId>
        <version>3.2.0</version>
        <relativePath/>
    </parent>
    <groupId>com.ken</groupId>
    <artifactId>springboot-rabbitmq-demo</artifactId>
    <version>0.0.1-SNAPSHOT</version>
    <name>springboot-rabbitmq-demo</name>
    <description>SpringBoot集成RabbitMQ实战教程</description>

    <properties>
        <java.version>17</java.version>
        <mybatis-plus.version>3.5.5</mybatis-plus.version>
        <fastjson2.version>2.0.32</fastjson2.version>
        <guava.version>32.1.3-jre</guava.version>
        <swagger.version>2.2.0</swagger.version>
    </properties>

    <dependencies>
        <!-- SpringBoot Web -->
        <dependency>
            <groupId>org.springframework.boot</groupId>
            <artifactId>spring-boot-starter-web</artifactId>
        </dependency>

        <!-- SpringBoot RabbitMQ -->
        <dependency>
            <groupId>org.springframework.boot</groupId>
            <artifactId>spring-boot-starter-amqp</artifactId>
        </dependency>

        <!-- Lombok -->
        <dependency>
            <groupId>org.projectlombok</groupId>
            <artifactId>lombok</artifactId>
            <version>1.18.30</version>
            <scope>provided</scope>
        </dependency>

        <!-- MyBatis-Plus -->
        <dependency>
            <groupId>com.baomidou</groupId>
            <artifactId>mybatis-plus-boot-starter</artifactId>
            <version>${mybatis-plus.version}</version>
        </dependency>

        <!-- MySQL Connector -->
        <dependency>
            <groupId>com.mysql</groupId>
            <artifactId>mysql-connector-j</artifactId>
            <scope>runtime</scope>
        </dependency>

        <!-- Fastjson2 -->
        <dependency>
            <groupId>com.alibaba.fastjson2</groupId>
            <artifactId>fastjson2</artifactId>
            <version>${fastjson2.version}</version>
        </dependency>

        <!-- Guava -->
        <dependency>
            <groupId>com.google.guava</groupId>
            <artifactId>guava</artifactId>
            <version>${guava.version}</version>
        </dependency>

        <!-- Swagger3 -->
        <dependency>
            <groupId>org.springdoc</groupId>
            <artifactId>springdoc-openapi-starter-webmvc-ui</artifactId>
            <version>${swagger.version}</version>
        </dependency>

        <!-- Test -->
        <dependency>
            <groupId>org.springframework.boot</groupId>
            <artifactId>spring-boot-starter-test</artifactId>
            <scope>test</scope>
        </dependency>
        <dependency>
            <groupId>org.springframework.amqp</groupId>
            <artifactId>spring-rabbit-test</artifactId>
            <scope>test</scope>
        </dependency>
    </dependencies>

    <build>
        <plugins>
            <plugin>
                <groupId>org.springframework.boot</groupId>
                <artifactId>spring-boot-maven-plugin</artifactId>
                <configuration>
                    <excludes>
                        <exclude>
                            <groupId>org.projectlombok</groupId>
                            <artifactId>lombok</artifactId>
                        </exclude>
                    </excludes>
                </configuration>
            </plugin>
        </plugins>
    </build>
</project>
3.2 配置文件
创建application.yml配置文件,配置 RabbitMQ 连接信息和其他必要配置。
spring:
  application:
    name: springboot-rabbitmq-demo
  # RabbitMQ配置
  rabbitmq:
    host: localhost
    port: 5672
    username: admin
    password: 123456
    virtual-host: /
    # 生产者确认配置
    publisher-confirm-type: correlated
    publisher-returns: true
    # 消费者配置
    listener:
      simple:
        # 手动确认模式
        acknowledge-mode: manual
        # 消费者线程数
        concurrency: 1
        # 最大消费者线程数
        max-concurrency: 5
        # 每次从队列中获取的消息数量
        prefetch: 1
      direct:
        acknowledge-mode: manual

  # 数据库配置
  datasource:
    driver-class-name: com.mysql.cj.jdbc.Driver
    url: jdbc:mysql://localhost:3306/rabbitmq_demo?useUnicode=true&characterEncoding=utf8&useSSL=false&serverTimezone=Asia/Shanghai
    username: root
    password: root

# MyBatis-Plus配置
mybatis-plus:
  mapper-locations: classpath:mapper/**/*.xml
  type-aliases-package: com.ken.entity
  configuration:
    log-impl: org.apache.ibatis.logging.stdout.StdOutImpl
    map-underscore-to-camel-case: true

# 日志配置
logging:
  level:
    com.ken: debug
    org.springframework.amqp: info

# 服务端口
server:
  port: 8080

# Swagger配置
springdoc:
  api-docs:
    path: /api-docs
  swagger-ui:
    path: /swagger-ui.html
    operationsSorter: method
  packages-to-scan: com.ken.controller
3.3 主启动类
package com.ken;

import org.mybatis.spring.annotation.MapperScan;
import org.springframework.boot.SpringApplication;
import org.springframework.boot.autoconfigure.SpringBootApplication;

/**
 * SpringBoot集成RabbitMQ示例项目主启动类
 *
 * @author ken
 */
@SpringBootApplication
@MapperScan("com.ken.mapper")
public class SpringbootRabbitmqDemoApplication {

    public static void main(String[] args) {
        SpringApplication.run(SpringbootRabbitmqDemoApplication.class, args);
    }

}
四、RabbitMQ 核心配置类
为了更好地管理 RabbitMQ 的交换机、队列和绑定关系,我们创建一个配置类来集中定义这些组件。
4.1 队列、交换机和绑定配置
package com.ken.config;

import org.springframework.amqp.core.*;
import org.springframework.context.annotation.Bean;
import org.springframework.context.annotation.Configuration;

import java.util.HashMap;
import java.util.Map;

/**
 * RabbitMQ核心配置类,定义交换机、队列和绑定关系
 *
 * @author ken
 */
@Configuration
public class RabbitMQConfig {

    // ========================== 简单队列示例 ==========================
    /**
     * 简单队列名称
     */
    public static final String SIMPLE_QUEUE = "simple_queue";

    /**
     * 创建简单队列
     *
     * @return 队列实例
     */
    @Bean
    public Queue simpleQueue() {
        /*
         * 队列参数说明:
         * 1. 队列名称
         * 2. 是否持久化(true:队列会在RabbitMQ重启后保留)
         * 3. 是否排他性(true:仅限当前连接使用,连接关闭后自动删除)
         * 4. 是否自动删除(true:当最后一个消费者取消订阅后自动删除)
         * 5. 队列属性参数
         */
        return QueueBuilder.durable(SIMPLE_QUEUE)
                .autoDelete(false)
                .exclusive(false)
                .build();
    }

    // ========================== 工作队列示例 ==========================
    /**
     * 工作队列名称
     */
    public static final String WORK_QUEUE = "work_queue";

    /**
     * 创建工作队列
     *
     * @return 队列实例
     */
    @Bean
    public Queue workQueue() {
        return QueueBuilder.durable(WORK_QUEUE)
                .autoDelete(false)
                .exclusive(false)
                .build();
    }

    // ========================== 发布/订阅模式 ==========================
    /**
     * 扇形交换机名称
     */
    public static final String FANOUT_EXCHANGE = "fanout_exchange";

    /**
     * 发布订阅队列1
     */
    public static final String FANOUT_QUEUE1 = "fanout_queue1";

    /**
     * 发布订阅队列2
     */
    public static final String FANOUT_QUEUE2 = "fanout_queue2";

    /**
     * 创建扇形交换机
     *
     * @return 交换机实例
     */
    @Bean
    public FanoutExchange fanoutExchange() {
        /*
         * 交换机参数说明:
         * 1. 交换机名称
         * 2. 是否持久化
         * 3. 是否自动删除
         * 4. 交换机属性参数
         */
        return new FanoutExchange(FANOUT_EXCHANGE, true, false);
    }

    /**
     * 创建发布订阅队列1
     *
     * @return 队列实例
     */
    @Bean
    public Queue fanoutQueue1() {
        return QueueBuilder.durable(FANOUT_QUEUE1)
                .autoDelete(false)
                .exclusive(false)
                .build();
    }

    /**
     * 创建发布订阅队列2
     *
     * @return 队列实例
     */
    @Bean
    public Queue fanoutQueue2() {
        return QueueBuilder.durable(FANOUT_QUEUE2)
                .autoDelete(false)
                .exclusive(false)
                .build();
    }

    /**
     * 绑定队列1到扇形交换机
     *
     * @return 绑定关系
     */
    @Bean
    public Binding fanoutBinding1() {
        return BindingBuilder.bind(fanoutQueue1()).to(fanoutExchange());
    }

    /**
     * 绑定队列2到扇形交换机
     *
     * @return 绑定关系
     */
    @Bean
    public Binding fanoutBinding2() {
        return BindingBuilder.bind(fanoutQueue2()).to(fanoutExchange());
    }

    // ========================== 路由模式 ==========================
    /**
     * 直接交换机名称
     */
    public static final String DIRECT_EXCHANGE = "direct_exchange";

    /**
     * 路由队列1(接收error级别日志)
     */
    public static final String DIRECT_QUEUE_ERROR = "direct_queue_error";

    /**
     * 路由队列2(接收info、warn、error级别日志)
     */
    public static final String DIRECT_QUEUE_ALL = "direct_queue_all";

    /**
     * 路由键:error
     */
    public static final String ROUTING_KEY_ERROR = "error";

    /**
     * 路由键:info
     */
    public static final String ROUTING_KEY_INFO = "info";

    /**
     * 路由键:warn
     */
    public static final String ROUTING_KEY_WARN = "warn";

    /**
     * 创建直接交换机
     *
     * @return 交换机实例
     */
    @Bean
    public DirectExchange directExchange() {
        return new DirectExchange(DIRECT_EXCHANGE, true, false);
    }

    /**
     * 创建错误日志队列
     *
     * @return 队列实例
     */
    @Bean
    public Queue directQueueError() {
        return QueueBuilder.durable(DIRECT_QUEUE_ERROR)
                .autoDelete(false)
                .exclusive(false)
                .build();
    }

    /**
     * 创建所有级别日志队列
     *
     * @return 队列实例
     */
    @Bean
    public Queue directQueueAll() {
        return QueueBuilder.durable(DIRECT_QUEUE_ALL)
                .autoDelete(false)
                .exclusive(false)
                .build();
    }

    /**
     * 绑定错误日志队列到直接交换机,路由键为error
     *
     * @return 绑定关系
     */
    @Bean
    public Binding directBindingError() {
        return BindingBuilder.bind(directQueueError())
                .to(directExchange())
                .with(ROUTING_KEY_ERROR);
    }

    /**
     * 绑定所有级别日志队列到直接交换机,路由键为info
     *
     * @return 绑定关系
     */
    @Bean
    public Binding directBindingInfo() {
        return BindingBuilder.bind(directQueueAll())
                .to(directExchange())
                .with(ROUTING_KEY_INFO);
    }

    /**
     * 绑定所有级别日志队列到直接交换机,路由键为warn
     *
     * @return 绑定关系
     */
    @Bean
    public Binding directBindingWarn() {
        return BindingBuilder.bind(directQueueAll())
                .to(directExchange())
                .with(ROUTING_KEY_WARN);
    }

    /**
     * 绑定所有级别日志队列到直接交换机,路由键为error
     *
     * @return 绑定关系
     */
    @Bean
    public Binding directBindingAllError() {
        return BindingBuilder.bind(directQueueAll())
                .to(directExchange())
                .with(ROUTING_KEY_ERROR);
    }

    // ========================== 主题模式 ==========================
    /**
     * 主题交换机名称
     */
    public static final String TOPIC_EXCHANGE = "topic_exchange";

    /**
     * 主题队列1(接收订单相关消息)
     */
    public static final String TOPIC_QUEUE_ORDER = "topic_queue_order";

    /**
     * 主题队列2(接收用户相关消息)
     */
    public static final String TOPIC_QUEUE_USER = "topic_queue_user";

    /**
     * 主题队列3(接收所有系统消息)
     */
    public static final String TOPIC_QUEUE_ALL = "topic_queue_all";

    /**
     * 订单路由键前缀
     */
    public static final String ROUTING_KEY_ORDER = "system.order.#";

    /**
     * 用户路由键前缀
     */
    public static final String ROUTING_KEY_USER = "system.user.#";

    /**
     * 所有系统路由键
     */
    public static final String ROUTING_KEY_ALL = "system.#";

    /**
     * 创建主题交换机
     *
     * @return 交换机实例
     */
    @Bean
    public TopicExchange topicExchange() {
        return new TopicExchange(TOPIC_EXCHANGE, true, false);
    }

    /**
     * 创建订单主题队列
     *
     * @return 队列实例
     */
    @Bean
    public Queue topicQueueOrder() {
        return QueueBuilder.durable(TOPIC_QUEUE_ORDER)
                .autoDelete(false)
                .exclusive(false)
                .build();
    }

    /**
     * 创建用户主题队列
     *
     * @return 队列实例
     */
    @Bean
    public Queue topicQueueUser() {
        return QueueBuilder.durable(TOPIC_QUEUE_USER)
                .autoDelete(false)
                .exclusive(false)
                .build();
    }

    /**
     * 创建所有系统消息队列
     *
     * @return 队列实例
     */
    @Bean
    public Queue topicQueueAll() {
        return QueueBuilder.durable(TOPIC_QUEUE_ALL)
                .autoDelete(false)
                .exclusive(false)
                .build();
    }

    /**
     * 绑定订单队列到主题交换机
     *
     * @return 绑定关系
     */
    @Bean
    public Binding topicBindingOrder() {
        return BindingBuilder.bind(topicQueueOrder())
                .to(topicExchange())
                .with(ROUTING_KEY_ORDER);
    }

    /**
     * 绑定用户队列到主题交换机
     *
     * @return 绑定关系
     */
    @Bean
    public Binding topicBindingUser() {
        return BindingBuilder.bind(topicQueueUser())
                .to(topicExchange())
                .with(ROUTING_KEY_USER);
    }

    /**
     * 绑定所有系统消息队列到主题交换机
     *
     * @return 绑定关系
     */
    @Bean
    public Binding topicBindingAll() {
        return BindingBuilder.bind(topicQueueAll())
                .to(topicExchange())
                .with(ROUTING_KEY_ALL);
    }

    // ========================== 死信队列 ==========================
    /**
     * 死信交换机名称
     */
    public static final String DEAD_LETTER_EXCHANGE = "dead_letter_exchange";

    /**
     * 死信队列名称
     */
    public static final String DEAD_LETTER_QUEUE = "dead_letter_queue";

    /**
     * 死信路由键
     */
    public static final String DEAD_LETTER_ROUTING_KEY = "dead_letter_routing_key";

    /**
     * 普通队列(可能产生死信的队列)
     */
    public static final String NORMAL_QUEUE = "normal_queue";

    /**
     * 普通交换机
     */
    public static final String NORMAL_EXCHANGE = "normal_exchange";

    /**
     * 普通队列路由键
     */
    public static final String NORMAL_ROUTING_KEY = "normal_routing_key";

    /**
     * 创建死信交换机
     *
     * @return 交换机实例
     */
    @Bean
    public DirectExchange deadLetterExchange() {
        return new DirectExchange(DEAD_LETTER_EXCHANGE, true, false);
    }

    /**
     * 创建死信队列
     *
     * @return 队列实例
     */
    @Bean
    public Queue deadLetterQueue() {
        return QueueBuilder.durable(DEAD_LETTER_QUEUE)
                .autoDelete(false)
                .exclusive(false)
                .build();
    }

    /**
     * 绑定死信队列到死信交换机
     *
     * @return 绑定关系
     */
    @Bean
    public Binding deadLetterBinding() {
        return BindingBuilder.bind(deadLetterQueue())
                .to(deadLetterExchange())
                .with(DEAD_LETTER_ROUTING_KEY);
    }

    /**
     * 创建普通交换机
     *
     * @return 交换机实例
     */
    @Bean
    public DirectExchange normalExchange() {
        return new DirectExchange(NORMAL_EXCHANGE, true, false);
    }

    /**
     * 创建普通队列,并设置死信相关参数
     *
     * @return 队列实例
     */
    @Bean
    public Queue normalQueue() {
        Map<String, Object> arguments = new HashMap<>(3);
        // 设置死信交换机
        arguments.put("x-dead-letter-exchange", DEAD_LETTER_EXCHANGE);
        // 设置死信路由键
        arguments.put("x-dead-letter-routing-key", DEAD_LETTER_ROUTING_KEY);
        // 设置队列消息过期时间(毫秒),也可以在发送消息时单独设置
        arguments.put("x-message-ttl", 10000);
        // 设置队列最大长度
        arguments.put("x-max-length", 5);

        return QueueBuilder.durable(NORMAL_QUEUE)
                .autoDelete(false)
                .exclusive(false)
                .withArguments(arguments)
                .build();
    }

    /**
     * 绑定普通队列到普通交换机
     *
     * @return 绑定关系
     */
    @Bean
    public Binding normalBinding() {
        return BindingBuilder.bind(normalQueue())
                .to(normalExchange())
                .with(NORMAL_ROUTING_KEY);
    }

    // ========================== 延迟队列 ==========================
    /**
     * 延迟交换机(基于插件的延迟交换机)
     */
    public static final String DELAY_EXCHANGE = "delay_exchange";

    /**
     * 延迟队列
     */
    public static final String DELAY_QUEUE = "delay_queue";

    /**
     * 延迟队列路由键
     */
    public static final String DELAY_ROUTING_KEY = "delay_routing_key";

    /**
     * 创建延迟交换机(注意类型是x-delayed-message)
     *
     * @return 交换机实例
     */
    @Bean
    public CustomExchange delayExchange() {
        Map<String, Object> arguments = new HashMap<>(1);
        // 设置延迟交换机类型为direct
        arguments.put("x-delayed-type", "direct");

        /*
         * 参数说明:
         * 1. 交换机名称
         * 2. 交换机类型(x-delayed-message是延迟交换机的类型)
         * 3. 是否持久化
         * 4. 是否自动删除
         * 5. 其他属性
         */
        return new CustomExchange(DELAY_EXCHANGE, "x-delayed-message", true, false, arguments);
    }

    /**
     * 创建延迟队列
     *
     * @return 队列实例
     */
    @Bean
    public Queue delayQueue() {
        return QueueBuilder.durable(DELAY_QUEUE)
                .autoDelete(false)
                .exclusive(false)
                .build();
    }

    /**
     * 绑定延迟队列到延迟交换机
     *
     * @return 绑定关系
     */
    @Bean
    public Binding delayBinding() {
        return BindingBuilder.bind(delayQueue())
                .to(delayExchange())
                .with(DELAY_ROUTING_KEY)
                .noargs();
    }
}
4.2 消息转换器配置
为了更好地处理消息的序列化和反序列化,我们配置一个消息转换器,使用 Fastjson2 来处理 JSON 格式的消息。
package com.ken.config;

import com.alibaba.fastjson2.JSON;
import com.alibaba.fastjson2.JSONReader;
import com.alibaba.fastjson2.JSONWriter;
import org.springframework.amqp.support.converter.AbstractMessageConverter;
import org.springframework.amqp.support.converter.DefaultClassMapper;
import org.springframework.amqp.support.converter.Jackson2JsonMessageConverter;
import org.springframework.amqp.support.converter.MessageConverter;
import org.springframework.context.annotation.Bean;
import org.springframework.context.annotation.Configuration;
import org.springframework.amqp.core.Message;
import org.springframework.amqp.core.MessageProperties;

import java.io.ByteArrayInputStream;
import java.io.IOException;
import java.io.InputStream;

/**
 * 消息转换器配置,用于消息的序列化和反序列化
 *
 * @author ken
 */
@Configuration
public class MessageConverterConfig {

    /**
     * 配置Fastjson2消息转换器
     *
     * @return 消息转换器
     */
    @Bean
    public MessageConverter fastJsonMessageConverter() {
        return new AbstractMessageConverter() {
            private final DefaultClassMapper classMapper = new DefaultClassMapper();

            @Override
            protected Message createMessage(Object object, MessageProperties messageProperties) {
                // 设置消息内容类型为JSON
                messageProperties.setContentType(MessageProperties.CONTENT_TYPE_JSON);
                // 将对象序列化为JSON字符串
                byte[] bytes = JSON.toJSONBytes(object, JSONWriter.Feature.WriteClassName);
                return new Message(bytes, messageProperties);
            }

            @Override
            public Object fromMessage(Message message) throws IOException {
                // 从消息中获取字节数组
                byte[] body = message.getBody();
                if (ObjectUtils.isEmpty(body)) {
                    return null;
                }
                // 将JSON字节数组反序列化为对象
                try (InputStream is = new ByteArrayInputStream(body)) {
                    return JSON.parseObject(is, Object.class, JSONReader.Feature.SupportAutoType);
                }
            }
        };
    }
}
4.3 生产者确认和返回机制配置
为了确保消息的可靠传递,我们需要配置生产者的消息确认和返回机制。
package com.ken.config;

import lombok.extern.slf4j.Slf4j;
import org.springframework.amqp.rabbit.connection.CorrelationData;
import org.springframework.amqp.rabbit.core.RabbitTemplate;
import org.springframework.context.annotation.Configuration;

import javax.annotation.PostConstruct;
import javax.annotation.Resource;

/**
 * RabbitMQ消息确认配置
 * 包括生产者发送消息到交换机的确认,以及消息无法路由时的返回机制
 *
 * @author ken
 */
@Slf4j
@Configuration
public class RabbitMQConfirmConfig implements RabbitTemplate.ConfirmCallback, RabbitTemplate.ReturnsCallback {

    @Resource
    private RabbitTemplate rabbitTemplate;

    /**
     * 初始化方法,设置确认回调和返回回调
     */
    @PostConstruct
    public void init() {
        // 设置消息确认回调
        rabbitTemplate.setConfirmCallback(this);
        // 设置消息返回回调
        rabbitTemplate.setReturnsCallback(this);
        // 设置消息发送失败时的策略:true表示消息在未被路由到队列时会返回给生产者,false表示直接丢弃
        rabbitTemplate.setMandatory(true);
    }

    /**
     * 消息发送到交换机的确认回调
     *
     * @param correlationData 关联数据,包含消息ID等信息
     * @param ack 消息是否成功到达交换机
     * @param cause 失败原因,如果ack为true则为null
     */
    @Override
    public void confirm(CorrelationData correlationData, boolean ack, String cause) {
        String messageId = correlationData != null ? correlationData.getId() : "unknown";
        if (ack) {
            log.info("消息[{}]已成功发送到交换机", messageId);
        } else {
            log.error("消息[{}]发送到交换机失败,原因:{}", messageId, cause);
            // 这里可以添加消息重发或持久化到数据库等处理逻辑
        }
    }

    /**
     * 消息无法路由到队列时的返回回调
     *
     * @param returnedMessage 返回的消息对象,包含消息内容、交换机、路由键等信息
     */
    @Override
    public void returnedMessage(ReturnedMessage returnedMessage) {
        log.error("消息无法路由到队列,消息内容:{},交换机:{},路由键:{},回复码:{},回复文本:{}",
                new String(returnedMessage.getMessage().getBody()),
                returnedMessage.getExchange(),
                returnedMessage.getRoutingKey(),
                returnedMessage.getReplyCode(),
                returnedMessage.getReplyText());
        // 这里可以添加消息重发或持久化到数据库等处理逻辑
    }
}
五、通用工具类
为了简化开发,我们创建一些通用的工具类。
5.1 消息实体类
package com.ken.entity;

import com.baomidou.mybatisplus.annotation.IdType;
import com.baomidou.mybatisplus.annotation.TableId;
import com.baomidou.mybatisplus.annotation.TableName;
import lombok.Data;

import java.io.Serializable;
import java.time.LocalDateTime;

/**
 * 消息实体类,用于在系统中传递和存储消息
 *
 * @author ken
 */
@Data
@TableName("t_message_log")
public class Message implements Serializable {
    private static final long serialVersionUID = 1L;

    /**
     * 消息ID,主键
     */
    @TableId(type = IdType.ASSIGN_UUID)
    private String id;

    /**
     * 消息内容
     */
    private String content;

    /**
     * 交换机名称
     */
    private String exchange;

    /**
     * 路由键
     */
    private String routingKey;

    /**
     * 消息状态:0-待发送,1-已发送,2-已消费,3-发送失败,4-消费失败
     */
    private Integer status;

    /**
     * 重试次数
     */
    private Integer retryCount;

    /**
     * 创建时间
     */
    private LocalDateTime createTime;

    /**
     * 更新时间
     */
    private LocalDateTime updateTime;
}
5.2 消息日志服务
为了实现消息的可靠传递和追踪,我们创建一个消息日志服务,用于记录消息的发送和消费情况。
package com.ken.service;

import com.baomidou.mybatisplus.extension.service.IService;
import com.ken.entity.Message;

/**
 * 消息日志服务接口
 *
 * @author ken
 */
public interface MessageLogService extends IService<Message> {

    /**
     * 记录消息发送日志
     *
     * @param message 消息对象
     */
    void recordSendLog(Message message);

    /**
     * 更新消息发送状态
     *
     * @param messageId 消息ID
     * @param status 状态:1-已发送,3-发送失败
     */
    void updateSendStatus(String messageId, Integer status);

    /**
     * 更新消息消费状态
     *
     * @param messageId 消息ID
     * @param status 状态:2-已消费,4-消费失败
     */
    void updateConsumeStatus(String messageId, Integer status);

    /**
     * 增加消息重试次数
     *
     * @param messageId 消息ID
     * @return 最新的重试次数
     */
    int incrementRetryCount(String messageId);
}

package com.ken.service.impl;

import com.baomidou.mybatisplus.core.conditions.query.LambdaQueryWrapper;
import com.baomidou.mybatisplus.extension.service.impl.ServiceImpl;
import com.ken.entity.Message;
import com.ken.mapper.MessageMapper;
import com.ken.service.MessageLogService;
import lombok.extern.slf4j.Slf4j;
import org.springframework.stereotype.Service;
import org.springframework.transaction.annotation.Transactional;
import org.springframework.util.ObjectUtils;

import java.time.LocalDateTime;

/**
 * 消息日志服务实现类
 *
 * @author ken
 */
@Slf4j
@Service
public class MessageLogServiceImpl extends ServiceImpl<MessageMapper, Message> implements MessageLogService {

    /**
     * 记录消息发送日志
     *
     * @param message 消息对象
     */
    @Override
    @Transactional(rollbackFor = Exception.class)
    public void recordSendLog(Message message) {
        if (ObjectUtils.isEmpty(message)) {
            log.warn("消息对象为空,不记录发送日志");
            return;
        }

        message.setStatus(0); // 0-待发送
        message.setRetryCount(0);
        message.setCreateTime(LocalDateTime.now());
        message.setUpdateTime(LocalDateTime.now());

        boolean saveResult = save(message);
        if (saveResult) {
            log.info("消息[{}]发送日志记录成功", message.getId());
        } else {
            log.error("消息[{}]发送日志记录失败", message.getId());
        }
    }

    /**
     * 更新消息发送状态
     *
     * @param messageId 消息ID
     * @param status 状态:1-已发送,3-发送失败
     */
    @Override
    @Transactional(rollbackFor = Exception.class)
    public void updateSendStatus(String messageId, Integer status) {
        if (ObjectUtils.isEmpty(messageId) || ObjectUtils.isEmpty(status)) {
            log.warn("消息ID或状态为空,不更新发送状态");
            return;
        }

        Message message = new Message();
        message.setId(messageId);
        message.setStatus(status);
        message.setUpdateTime(LocalDateTime.now());

        int updateCount = baseMapper.updateById(message);
        if (updateCount > 0) {
            log.info("消息[{}]发送状态更新为{}成功", messageId, status);
        } else {
            log.error("消息[{}]发送状态更新为{}失败", messageId, status);
        }
    }

    /**
     * 更新消息消费状态
     *
     * @param messageId 消息ID
     * @param status 状态:2-已消费,4-消费失败
     */
    @Override
    @Transactional(rollbackFor = Exception.class)
    public void updateConsumeStatus(String messageId, Integer status) {
        if (ObjectUtils.isEmpty(messageId) || ObjectUtils.isEmpty(status)) {
            log.warn("消息ID或状态为空,不更新消费状态");
            return;
        }

        Message message = new Message();
        message.setId(messageId);
        message.setStatus(status);
        message.setUpdateTime(LocalDateTime.now());

        int updateCount = baseMapper.updateById(message);
        if (updateCount > 0) {
            log.info("消息[{}]消费状态更新为{}成功", messageId, status);
        } else {
            log.error("消息[{}]消费状态更新为{}失败", messageId, status);
        }
    }

    /**
     * 增加消息重试次数
     *
     * @param messageId 消息ID
     * @return 最新的重试次数
     */
    @Override
    @Transactional(rollbackFor = Exception.class)
    public int incrementRetryCount(String messageId) {
        if (ObjectUtils.isEmpty(messageId)) {
            log.warn("消息ID为空,不增加重试次数");
            return 0;
        }

        Message message = getById(messageId);
        if (ObjectUtils.isEmpty(message)) {
            log.warn("消息[{}]不存在,不增加重试次数", messageId);
            return 0;
        }

        int newRetryCount = message.getRetryCount() + 1;
        message.setRetryCount(newRetryCount);
        message.setUpdateTime(LocalDateTime.now());

        baseMapper.updateById(message);
        log.info("消息[{}]重试次数增加为{}", messageId, newRetryCount);

        return newRetryCount;
    }
}
5.3 MyBatis-Plus Mapper 接口
package com.ken.mapper;

import com.baomidou.mybatisplus.core.mapper.BaseMapper;
import com.ken.entity.Message;
import org.apache.ibatis.annotations.Mapper;

/**
 * 消息日志Mapper接口
 *
 * @author ken
 */
@Mapper
public interface MessageMapper extends BaseMapper<Message> {
}
5.4 消息发送工具类
package com.ken.util;

import com.alibaba.fastjson2.JSON;
import com.ken.entity.Message;
import com.ken.service.MessageLogService;
import lombok.extern.slf4j.Slf4j;
import org.springframework.amqp.rabbit.connection.CorrelationData;
import org.springframework.amqp.rabbit.core.RabbitTemplate;
import org.springframework.stereotype.Component;
import org.springframework.util.ObjectUtils;

import javax.annotation.Resource;
import java.util.UUID;

/**
 * 消息发送工具类,封装RabbitMQ消息发送的通用逻辑
 *
 * @author ken
 */
@Slf4j
@Component
public class RabbitMQMessageSender {

    @Resource
    private RabbitTemplate rabbitTemplate;

    @Resource
    private MessageLogService messageLogService;

    /**
     * 发送消息到指定交换机
     *
     * @param exchange 交换机名称
     * @param routingKey 路由键
     * @param data 消息内容
     * @return 消息ID
     */
    public String sendMessage(String exchange, String routingKey, Object data) {
        // 生成消息ID
        String messageId = UUID.randomUUID().toString();
        try {
            // 记录消息发送日志
            Message messageLog = new Message();
            messageLog.setId(messageId);
            messageLog.setContent(JSON.toJSONString(data));
            messageLog.setExchange(exchange);
            messageLog.setRoutingKey(routingKey);
            messageLogService.recordSendLog(messageLog);

            // 发送消息
            CorrelationData correlationData = new CorrelationData(messageId);
            rabbitTemplate.convertAndSend(exchange, routingKey, data, correlationData);

            log.info("消息[{}]发送成功,交换机:{},路由键:{},内容:{}",
                    messageId, exchange, routingKey, JSON.toJSONString(data));

            return messageId;
        } catch (Exception e) {
            log.error("消息[{}]发送失败,交换机:{},路由键:{},内容:{},异常:{}",
                    messageId, exchange, routingKey, JSON.toJSONString(data), e.getMessage(), e);

            // 更新消息发送状态为失败
            messageLogService.updateSendStatus(messageId, 3);

            throw new RuntimeException("消息发送失败:" + e.getMessage());
        }
    }

    /**
     * 发送延迟消息
     *
     * @param exchange 交换机名称(需要是延迟交换机)
     * @param routingKey 路由键
     * @param data 消息内容
     * @param delayTime 延迟时间(毫秒)
     * @return 消息ID
     */
    public String sendDelayMessage(String exchange, String routingKey, Object data, long delayTime) {
        if (delayTime <= 0) {
            throw new IllegalArgumentException("延迟时间必须大于0");
        }

        // 生成消息ID
        String messageId = UUID.randomUUID().toString();
        try {
            // 记录消息发送日志
            Message messageLog = new Message();
            messageLog.setId(messageId);
            messageLog.setContent(JSON.toJSONString(data));
            messageLog.setExchange(exchange);
            messageLog.setRoutingKey(routingKey);
            messageLogService.recordSendLog(messageLog);

            // 发送延迟消息,设置延迟头部信息
            CorrelationData correlationData = new CorrelationData(messageId);
            rabbitTemplate.convertAndSend(exchange, routingKey, data, message -> {
                // 设置延迟时间
                message.getMessageProperties().setHeader("x-delay", delayTime);
                return message;
            }, correlationData);

            log.info("延迟消息[{}]发送成功,交换机:{},路由键:{},延迟时间:{}ms,内容:{}",
                    messageId, exchange, routingKey, delayTime, JSON.toJSONString(data));

            return messageId;
        } catch (Exception e) {
            log.error("延迟消息[{}]发送失败,交换机:{},路由键:{},延迟时间:{}ms,内容:{},异常:{}",
                    messageId, exchange, routingKey, delayTime, JSON.toJSONString(data), e.getMessage(), e);

            // 更新消息发送状态为失败
            messageLogService.updateSendStatus(messageId, 3);

            throw new RuntimeException("延迟消息发送失败:" + e.getMessage());
        }
    }
}
六、实战示例
接下来,我们通过具体的示例来演示 RabbitMQ 的各种使用场景。
6.1 简单队列示例
简单队列是 RabbitMQ 中最基础的模式,一个生产者发送消息到一个队列,一个消费者从该队列接收消息。
6.1.1 生产者
package com.ken.producer;

import com.ken.config.RabbitMQConfig;
import com.ken.util.RabbitMQMessageSender;
import io.swagger.v3.oas.annotations.Operation;
import io.swagger.v3.oas.annotations.Parameter;
import io.swagger.v3.oas.annotations.tags.Tag;
import lombok.extern.slf4j.Slf4j;
import org.springframework.web.bind.annotation.GetMapping;
import org.springframework.web.bind.annotation.RequestMapping;
import org.springframework.web.bind.annotation.RequestParam;
import org.springframework.web.bind.annotation.RestController;

import javax.annotation.Resource;

/**
 * 简单队列消息生产者
 *
 * @author ken
 */
@Slf4j
@RestController
@RequestMapping("/api/simple")
@Tag(name = "简单队列示例", description = "简单队列的消息发送接口")
public class SimpleQueueProducer {

    @Resource
    private RabbitMQMessageSender messageSender;

    /**
     * 发送消息到简单队列
     *
     * @param message 消息内容
     * @return 消息ID
     */
    @GetMapping("/send")
    @Operation(summary = "发送消息到简单队列", description = "向简单队列发送一条消息")
    public String sendMessage(
            @Parameter(description = "消息内容", required = true)
            @RequestParam String message) {
        return messageSender.sendMessage("", RabbitMQConfig.SIMPLE_QUEUE, message);
    }
}
6.1.2 消费者
package com.ken.consumer;

import com.ken.config.RabbitMQConfig;
import com.ken.service.MessageLogService;
import com.rabbitmq.client.Channel;
import lombok.extern.slf4j.Slf4j;
import org.springframework.amqp.core.Message;
import org.springframework.amqp.rabbit.annotation.RabbitListener;
import org.springframework.stereotype.Component;
import org.springframework.util.StringUtils;

import javax.annotation.Resource;
import java.io.IOException;

/**
 * 简单队列消息消费者
 *
 * @author ken
 */
@Slf4j
@Component
public class SimpleQueueConsumer {

    @Resource
    private MessageLogService messageLogService;

    /**
     * 监听简单队列,消费消息
     *
     * @param message 消息对象
     * @param channel 信道
     * @throws IOException IO异常
     */
    @RabbitListener(queues = RabbitMQConfig.SIMPLE_QUEUE)
    public void consumeMessage(Message message, Channel channel) throws IOException {
        // 获取消息ID
        String messageId = message.getMessageProperties().getHeader("spring_returned_message_correlation");
        log.info("简单队列消费者接收到消息,消息ID:{},内容:{}", messageId, new String(message.getBody()));

        try {
            // 处理消息逻辑
            if (StringUtils.hasText(new String(message.getBody()))) {
                log.info("简单队列消息处理成功");
                // 手动确认消息已消费
                channel.basicAck(message.getMessageProperties().getDeliveryTag(), false);
                // 更新消息消费状态
                if (StringUtils.hasText(messageId)) {
                    messageLogService.updateConsumeStatus(messageId, 2);
                }
            } else {
                log.error("简单队列消息内容为空,拒绝消费");
                // 拒绝消息,并将消息丢弃(不重新入队)
                channel.basicReject(message.getMessageProperties().getDeliveryTag(), false);
                // 更新消息消费状态为失败
                if (StringUtils.hasText(messageId)) {
                    messageLogService.updateConsumeStatus(messageId, 4);
                }
            }
        } catch (Exception e) {
            log.error("简单队列消息处理异常,消息ID:{},异常:{}", messageId, e.getMessage(), e);
            // 拒绝消息,并将消息重新入队(可以设置重试次数限制)
            channel.basicNack(message.getMessageProperties().getDeliveryTag(), false, true);
            // 更新消息消费状态为失败
            if (StringUtils.hasText(messageId)) {
                messageLogService.updateConsumeStatus(messageId, 4);
                // 增加重试次数
                messageLogService.incrementRetryCount(messageId);
            }
        }
    }
}
6.2 工作队列示例
工作队列(Work Queue)用于将耗时的任务分发给多个消费者处理,实现负载均衡。
6.2.1 生产者
package com.ken.producer;

import com.ken.config.RabbitMQConfig;
import com.ken.util.RabbitMQMessageSender;
import io.swagger.v3.oas.annotations.Operation;
import io.swagger.v3.oas.annotations.Parameter;
import io.swagger.v3.oas.annotations.tags.Tag;
import lombok.extern.slf4j.Slf4j;
import org.springframework.web.bind.annotation.GetMapping;
import org.springframework.web.bind.annotation.RequestMapping;
import org.springframework.web.bind.annotation.RequestParam;
import org.springframework.web.bind.annotation.RestController;

import javax.annotation.Resource;

/**
 * 工作队列消息生产者
 *
 * @author ken
 */
@Slf4j
@RestController
@RequestMapping("/api/work")
@Tag(name = "工作队列示例", description = "工作队列的消息发送接口")
public class WorkQueueProducer {

    @Resource
    private RabbitMQMessageSender messageSender;

    /**
     * 发送消息到工作队列
     *
     * @param message 消息内容
     * @param count 发送消息数量
     * @return 消息发送结果
     */
    @GetMapping("/send")
    @Operation(summary = "发送消息到工作队列", description = "向工作队列发送指定数量的消息")
    public String sendMessage(
            @Parameter(description = "消息内容", required = true)
            @RequestParam String message,
            @Parameter(description = "发送消息数量", required = true, example = "10")
            @RequestParam Integer count) {
        if (count <= 0) {
            return "消息数量必须大于0";
        }

        for (int i = 0; i < count; i++) {
            String msg = message + " - " + (i + 1);
            messageSender.sendMessage("", RabbitMQConfig.WORK_QUEUE, msg);
        }

        return "成功发送" + count + "条消息到工作队列";
    }
}
6.2.2 消费者
我们创建两个消费者来演示工作队列的负载均衡效果。
package com.ken.consumer;

import com.ken.config.RabbitMQConfig;
import com.ken.service.MessageLogService;
import com.rabbitmq.client.Channel;
import lombok.extern.slf4j.Slf4j;
import org.springframework.amqp.core.Message;
import org.springframework.amqp.rabbit.annotation.RabbitListener;
import org.springframework.stereotype.Component;
import org.springframework.util.StringUtils;

import javax.annotation.Resource;
import java.io.IOException;
import java.time.LocalTime;
import java.util.concurrent.TimeUnit;

/**
 * 工作队列消息消费者1
 *
 * @author ken
 */
@Slf4j
@Component
public class WorkQueueConsumer1 {

    @Resource
    private MessageLogService messageLogService;

    /**
     * 监听工作队列,消费消息
     *
     * @param message 消息对象
     * @param channel 信道
     * @throws IOException IO异常
     */
    @RabbitListener(queues = RabbitMQConfig.WORK_QUEUE)
    public void consumeMessage(Message message, Channel channel) throws IOException {
        // 获取消息ID
        String messageId = message.getMessageProperties().getHeader("spring_returned_message_correlation");
        String msgContent = new String(message.getBody());
        log.info("【消费者1】接收到工作队列消息,时间:{},消息ID:{},内容:{}",
                LocalTime.now(), messageId, msgContent);

        try {
            // 模拟处理耗时任务(1秒)
            TimeUnit.SECONDS.sleep(1);

            log.info("【消费者1】工作队列消息处理成功,消息ID:{}", messageId);
            // 手动确认消息已消费
            channel.basicAck(message.getMessageProperties().getDeliveryTag(), false);
            // 更新消息消费状态
            if (StringUtils.hasText(messageId)) {
                messageLogService.updateConsumeStatus(messageId, 2);
            }
        } catch (Exception e) {
            log.error("【消费者1】工作队列消息处理异常,消息ID:{},异常:{}", messageId, e.getMessage(), e);
            // 拒绝消息,并将消息重新入队
            channel.basicNack(message.getMessageProperties().getDeliveryTag(), false, true);
            // 更新消息消费状态为失败
            if (StringUtils.hasText(messageId)) {
                messageLogService.updateConsumeStatus(messageId, 4);
                messageLogService.incrementRetryCount(messageId);
            }
        }
    }
}

package com.ken.consumer;

import com.ken.config.RabbitMQConfig;
import com.ken.service.MessageLogService;
import com.rabbitmq.client.Channel;
import lombok.extern.slf4j.Slf4j;
import org.springframework.amqp.core.Message;
import org.springframework.amqp.rabbit.annotation.RabbitListener;
import org.springframework.stereotype.Component;
import org.springframework.util.StringUtils;

import javax.annotation.Resource;
import java.io.IOException;
import java.time.LocalTime;
import java.util.concurrent.TimeUnit;

/**
 * 工作队列消息消费者2
 *
 * @author ken
 */
@Slf4j
@Component
public class WorkQueueConsumer2 {

    @Resource
    private MessageLogService messageLogService;

    /**
     * 监听工作队列,消费消息
     *
     * @param message 消息对象
     * @param channel 信道
     * @throws IOException IO异常
     */
    @RabbitListener(queues = RabbitMQConfig.WORK_QUEUE)
    public void consumeMessage(Message message, Channel channel) throws IOException {
        // 获取消息ID
        String messageId = message.getMessageProperties().getHeader("spring_returned_message_correlation");
        String msgContent = new String(message.getBody());
        log.info("【消费者2】接收到工作队列消息,时间:{},消息ID:{},内容:{}",
                LocalTime.now(), messageId, msgContent);

        try {
            // 模拟处理耗时任务(2秒)
            TimeUnit.SECONDS.sleep(2);

            log.info("【消费者2】工作队列消息处理成功,消息ID:{}", messageId);
            // 手动确认消息已消费
            channel.basicAck(message.getMessageProperties().getDeliveryTag(), false);
            // 更新消息消费状态
            if (StringUtils.hasText(messageId)) {
                messageLogService.updateConsumeStatus(messageId, 2);
            }
        } catch (Exception e) {
            log.error("【消费者2】工作队列消息处理异常,消息ID:{},异常:{}", messageId, e.getMessage(), e);
            // 拒绝消息,并将消息重新入队
            channel.basicNack(message.getMessageProperties().getDeliveryTag(), false, true);
            // 更新消息消费状态为失败
            if (StringUtils.hasText(messageId)) {
                messageLogService.updateConsumeStatus(messageId, 4);
                messageLogService.incrementRetryCount(messageId);
            }
        }
    }
}
6.3 发布 / 订阅模式示例
发布 / 订阅模式(Publish/Subscribe)允许将一条消息发送给多个消费者,每个消费者都能收到相同的消息副本。
6.3.1 生产者
package com.ken.producer;

import com.ken.config.RabbitMQConfig;
import com.ken.util.RabbitMQMessageSender;
import io.swagger.v3.oas.annotations.Operation;
import io.swagger.v3.oas.annotations.Parameter;
import io.swagger.v3.oas.annotations.tags.Tag;
import lombok.extern.slf4j.Slf4j;
import org.springframework.web.bind.annotation.GetMapping;
import org.springframework.web.bind.annotation.RequestMapping;
import org.springframework.web.bind.annotation.RequestParam;
import org.springframework.web.bind.annotation.RestController;

import javax.annotation.Resource;

/**
 * 发布/订阅模式消息生产者
 *
 * @author ken
 */
@Slf4j
@RestController
@RequestMapping("/api/fanout")
@Tag(name = "发布/订阅模式示例", description = "发布/订阅模式的消息发送接口")
public class FanoutProducer {

    @Resource
    private RabbitMQMessageSender messageSender;

    /**
     * 发送消息到扇形交换机
     *
     * @param message 消息内容
     * @return 消息ID
     */
    @GetMapping("/send")
    @Operation(summary = "发送消息到扇形交换机", description = "向扇形交换机发送消息,所有绑定的队列都会收到消息")
    public String sendMessage(
            @Parameter(description = "消息内容", required = true)
            @RequestParam String message) {
        // 扇形交换机忽略路由键,所以这里可以传空字符串
        return messageSender.sendMessage(RabbitMQConfig.FANOUT_EXCHANGE, "", message);
    }
}
6.3.2 消费者
package com.ken.consumer;

import com.ken.config.RabbitMQConfig;
import com.ken.service.MessageLogService;
import com.rabbitmq.client.Channel;
import lombok.extern.slf4j.Slf4j;
import org.springframework.amqp.core.Message;
import org.springframework.amqp.rabbit.annotation.RabbitListener;
import org.springframework.stereotype.Component;
import org.springframework.util.StringUtils;

import javax.annotation.Resource;
import java.io.IOException;

/**
 * 发布/订阅模式消息消费者1
 *
 * @author ken
 */
@Slf4j
@Component
public class FanoutConsumer1 {

    @Resource
    private MessageLogService messageLogService;

    /**
     * 监听扇形交换机绑定的队列1,消费消息
     *
     * @param message 消息对象
     * @param channel 信道
     * @throws IOException IO异常
     */
    @RabbitListener(queues = RabbitMQConfig.FANOUT_QUEUE1)
    public void consumeMessage(Message message, Channel channel) throws IOException {
        // 获取消息ID
        String messageId = message.getMessageProperties().getHeader("spring_returned_message_correlation");
        String msgContent = new String(message.getBody());
        log.info("【发布订阅消费者1】接收到消息,消息ID:{},内容:{}", messageId, msgContent);

        try {
            // 处理消息逻辑
            log.info("【发布订阅消费者1】消息处理成功");
            // 手动确认消息已消费
            channel.basicAck(message.getMessageProperties().getDeliveryTag(), false);
            // 更新消息消费状态
            if (StringUtils.hasText(messageId)) {
                messageLogService.updateConsumeStatus(messageId, 2);
            }
        } catch (Exception e) {
            log.error("【发布订阅消费者1】消息处理异常,消息ID:{},异常:{}", messageId, e.getMessage(), e);
            // 拒绝消息,并将消息重新入队
            channel.basicNack(message.getMessageProperties().getDeliveryTag(), false, true);
            // 更新消息消费状态为失败
            if (StringUtils.hasText(messageId)) {
                messageLogService.updateConsumeStatus(messageId, 4);
                messageLogService.incrementRetryCount(messageId);
            }
        }
    }
}

package com.ken.consumer;

import com.ken.config.RabbitMQConfig;
import com.ken.service.MessageLogService;
import com.rabbitmq.client.Channel;
import lombok.extern.slf4j.Slf4j;
import org.springframework.amqp.core.Message;
import org.springframework.amqp.rabbit.annotation.RabbitListener;
import org.springframework.stereotype.Component;
import org.springframework.util.StringUtils;

import javax.annotation.Resource;
import java.io.IOException;

/**
 * 发布/订阅模式消息消费者2
 *
 * @author ken
 */
@Slf4j
@Component
public class FanoutConsumer2 {

    @Resource
    private MessageLogService messageLogService;

    /**
     * 监听扇形交换机绑定的队列2,消费消息
     *
     * @param message 消息对象
     * @param channel 信道
     * @throws IOException IO异常
     */
    @RabbitListener(queues = RabbitMQConfig.FANOUT_QUEUE2)
    public void consumeMessage(Message message, Channel channel) throws IOException {
        // 获取消息ID
        String messageId = message.getMessageProperties().getHeader("spring_returned_message_correlation");
        String msgContent = new String(message.getBody());
        log.info("【发布订阅消费者2】接收到消息,消息ID:{},内容:{}", messageId, msgContent);

        try {
            // 处理消息逻辑
            log.info("【发布订阅消费者2】消息处理成功");
            // 手动确认消息已消费
            channel.basicAck(message.getMessageProperties().getDeliveryTag(), false);
            // 更新消息消费状态
            if (StringUtils.hasText(messageId)) {
                messageLogService.updateConsumeStatus(messageId, 2);
            }
        } catch (Exception e) {
            log.error("【发布订阅消费者2】消息处理异常,消息ID:{},异常:{}", messageId, e.getMessage(), e);
            // 拒绝消息,并将消息重新入队
            channel.basicNack(message.getMessageProperties().getDeliveryTag(), false, true);
            // 更新消息消费状态为失败
            if (StringUtils.hasText(messageId)) {
                messageLogService.updateConsumeStatus(messageId, 4);
                messageLogService.incrementRetryCount(messageId);
            }
        }
    }
}
6.4 路由模式示例
路由模式(Routing)允许根据消息的路由键将消息发送到不同的队列,实现消息的定向分发。
6.4.1 生产者
package com.ken.producer;

import com.ken.config.RabbitMQConfig;
import com.ken.util.RabbitMQMessageSender;
import io.swagger.v3.oas.annotations.Operation;
import io.swagger.v3.oas.annotations.Parameter;
import io.swagger.v3.oas.annotations.enums.ParameterIn;
import io.swagger.v3.oas.annotations.tags.Tag;
import lombok.extern.slf4j.Slf4j;
import org.springframework.web.bind.annotation.GetMapping;
import org.springframework.web.bind.annotation.RequestMapping;
import org.springframework.web.bind.annotation.RequestParam;
import org.springframework.web.bind.annotation.RestController;

import javax.annotation.Resource;

/**
 * 路由模式消息生产者
 *
 * @author ken
 */
@Slf4j
@RestController
@RequestMapping("/api/direct")
@Tag(name = "路由模式示例", description = "路由模式的消息发送接口")
public class DirectProducer {

    @Resource
    private RabbitMQMessageSender messageSender;

    /**
     * 发送消息到直接交换机
     *
     * @param message 消息内容
     * @param level 日志级别(info、warn、error)
     * @return 消息ID
     */
    @GetMapping("/send")
    @Operation(summary = "发送消息到直接交换机", description = "向直接交换机发送消息,根据日志级别路由到不同队列")
    public String sendMessage(
            @Parameter(description = "消息内容", required = true)
            @RequestParam String message,
            @Parameter(description = "日志级别", required = true, example = "info",
                    in = ParameterIn.QUERY, allowableValues = {"info", "warn", "error"})
            @RequestParam String level) {
        String routingKey;
        switch (level.toLowerCase()) {
            case "info":
                routingKey = RabbitMQConfig.ROUTING_KEY_INFO;
                break;
            case "warn":
                routingKey = RabbitMQConfig.ROUTING_KEY_WARN;
                break;
            case "error":
                routingKey = RabbitMQConfig.ROUTING_KEY_ERROR;
                break;
            default:
                return "不支持的日志级别,请使用info、warn或error";
        }

        return messageSender.sendMessage(RabbitMQConfig.DIRECT_EXCHANGE, routingKey, message);
    }
}
6.4.2 消费者
package com.ken.consumer;

import com.ken.config.RabbitMQConfig;
import com.ken.service.MessageLogService;
import com.rabbitmq.client.Channel;
import lombok.extern.slf4j.Slf4j;
import org.springframework.amqp.core.Message;
import org.springframework.amqp.rabbit.annotation.RabbitListener;
import org.springframework.stereotype.Component;
import org.springframework.util.StringUtils;

import javax.annotation.Resource;
import java.io.IOException;

/**
 * 路由模式消息消费者(处理错误日志)
 *
 * @author ken
 */
@Slf4j
@Component
public class DirectErrorConsumer {

    @Resource
    private MessageLogService messageLogService;

    /**
     * 监听错误日志队列,消费消息
     *
     * @param message 消息对象
     * @param channel 信道
     * @throws IOException IO异常
     */
    @RabbitListener(queues = RabbitMQConfig.DIRECT_QUEUE_ERROR)
    public void consumeErrorMessage(Message message, Channel channel) throws IOException {
        // 获取消息ID
        String messageId = message.getMessageProperties().getHeader("spring_returned_message_correlation");
        String msgContent = new String(message.getBody());
        log.error("【错误日志消费者】接收到错误消息,消息ID:{},内容:{}", messageId, msgContent);

        try {
            // 处理错误消息逻辑,例如发送邮件通知、记录到错误日志系统等
            log.info("【错误日志消费者】错误消息处理成功");
            // 手动确认消息已消费
            channel.basicAck(message.getMessageProperties().getDeliveryTag(), false);
            // 更新消息消费状态
            if (StringUtils.hasText(messageId)) {
                messageLogService.updateConsumeStatus(messageId, 2);
            }
        } catch (Exception e) {
            log.error("【错误日志消费者】错误消息处理异常,消息ID:{},异常:{}", messageId, e.getMessage(), e);
            // 拒绝消息,并将消息重新入队
            channel.basicNack(message.getMessageProperties().getDeliveryTag(), false, true);
            // 更新消息消费状态为失败
            if (StringUtils.hasText(messageId)) {
                messageLogService.updateConsumeStatus(messageId, 4);
                messageLogService.incrementRetryCount(messageId);
            }
        }
    }
}

package com.ken.consumer;

import com.ken.config.RabbitMQConfig;
import com.ken.service.MessageLogService;
import com.rabbitmq.client.Channel;
import lombok.extern.slf4j.Slf4j;
import org.springframework.amqp.core.Message;
import org.springframework.amqp.rabbit.annotation.RabbitListener;
import org.springframework.stereotype.Component;
import org.springframework.util.StringUtils;

import javax.annotation.Resource;
import java.io.IOException;

/**
 * 路由模式消息消费者(处理所有级别日志)
 *
 * @author ken
 */
@Slf4j
@Component
public class DirectAllConsumer {

    @Resource
    private MessageLogService messageLogService;

    /**
     * 监听所有级别日志队列,消费消息
     *
     * @param message 消息对象
     * @param channel 信道
     * @throws IOException IO异常
     */
    @RabbitListener(queues = RabbitMQConfig.DIRECT_QUEUE_ALL)
    public void consumeAllMessage(Message message, Channel channel) throws IOException {
        // 获取消息ID
        String messageId = message.getMessageProperties().getHeader("spring_returned_message_correlation");
        String routingKey = message.getMessageProperties().getReceivedRoutingKey();
        String msgContent = new String(message.getBody());

        switch (routingKey) {
            case RabbitMQConfig.ROUTING_KEY_INFO:
                log.info("【全量日志消费者】接收到info消息,消息ID:{},内容:{}", messageId, msgContent);
                break;
            case RabbitMQConfig.ROUTING_KEY_WARN:
                log.warn("【全量日志消费者】接收到warn消息,消息ID:{},内容:{}", messageId, msgContent);
                break;
            case RabbitMQConfig.ROUTING_KEY_ERROR:
                log.error("【全量日志消费者】接收到error消息,消息ID:{},内容:{}", messageId, msgContent);
                break;
            default:
                log.info("【全量日志消费者】接收到未知级别消息,消息ID:{},路由键:{},内容:{}",
                        messageId, routingKey, msgContent);
        }

        try {
            // 处理消息逻辑,例如统一记录到日志系统
            log.info("【全量日志消费者】消息处理成功");
            // 手动确认消息已消费
            channel.basicAck(message.getMessageProperties().getDeliveryTag(), false);
            // 更新消息消费状态
            if (StringUtils.hasText(messageId)) {
                messageLogService.updateConsumeStatus(messageId, 2);
            }
        } catch (Exception e) {
            log.error("【全量日志消费者】消息处理异常,消息ID:{},异常:{}", messageId, e.getMessage(), e);
            // 拒绝消息,并将消息重新入队
            channel.basicNack(message.getMessageProperties().getDeliveryTag(), false, true);
            // 更新消息消费状态为失败
            if (StringUtils.hasText(messageId)) {
                messageLogService.updateConsumeStatus(messageId, 4);
                messageLogService.incrementRetryCount(messageId);
            }
        }
    }
}
6.5 主题模式示例
主题模式(Topic)是路由模式的扩展,允许使用通配符来匹配路由键,提供更灵活的路由规则。
6.5.1 生产者
package com.ken.producer;

import com.ken.config.RabbitMQConfig;
import com.ken.util.RabbitMQMessageSender;
import io.swagger.v3.oas.annotations.Operation;
import io.swagger.v3.oas.annotations.Parameter;
import io.swagger.v3.oas.annotations.tags.Tag;
import lombok.extern.slf4j.Slf4j;
import org.springframework.web.bind.annotation.GetMapping;
import org.springframework.web.bind.annotation.RequestMapping;
import org.springframework.web.bind.annotation.RequestParam;
import org.springframework.web.bind.annotation.RestController;

import javax.annotation.Resource;

/**
 * 主题模式消息生产者
 *
 * @author ken
 */
@Slf4j
@RestController
@RequestMapping("/api/topic")
@Tag(name = "主题模式示例", description = "主题模式的消息发送接口")
public class TopicProducer {

    @Resource
    private RabbitMQMessageSender messageSender;

    /**
     * 发送消息到主题交换机
     *
     * @param message 消息内容
     * @param type 消息类型(order/create, order/pay, user/login, user/register等)
     * @return 消息ID
     */
    @GetMapping("/send")
    @Operation(summary = "发送消息到主题交换机", description = "向主题交换机发送消息,根据消息类型路由到不同队列")
    public String sendMessage(
            @Parameter(description = "消息内容", required = true)
            @RequestParam String message,
            @Parameter(description = "消息类型", required = true, example = "order/create")
            @RequestParam String type) {
        String routingKey = "system." + type;
        return messageSender.sendMessage(RabbitMQConfig.TOPIC_EXCHANGE, routingKey, message);
    }
}
6.5.2 消费者
package com.ken.consumer;

import com.ken.config.RabbitMQConfig;
import com.ken.service.MessageLogService;
import com.rabbitmq.client.Channel;
import lombok.extern.slf4j.Slf4j;
import org.springframework.amqp.core.Message;
import org.springframework.amqp.rabbit.annotation.RabbitListener;
import org.springframework.stereotype.Component;
import org.springframework.util.StringUtils;

import javax.annotation.Resource;
import java.io.IOException;

/**
 * 主题模式消息消费者(处理订单相关消息)
 *
 * @author ken
 */
@Slf4j
@Component
public class TopicOrderConsumer {

    @Resource
    private MessageLogService messageLogService;

    /**
     * 监听订单相关消息队列,消费消息
     *
     * @param message 消息对象
     * @param channel 信道
     * @throws IOException IO异常
     */
    @RabbitListener(queues = RabbitMQConfig.TOPIC_QUEUE_ORDER)
    public void consumeOrderMessage(Message message, Channel channel) throws IOException {
        // 获取消息ID和路由键
        String messageId = message.getMessageProperties().getHeader("spring_returned_message_correlation");
        String routingKey = message.getMessageProperties().getReceivedRoutingKey();
        String msgContent = new String(message.getBody());
        log.info("【订单消息消费者】接收到消息,路由键:{},消息ID:{},内容:{}", routingKey, messageId, msgContent);

        try {
            // 处理订单相关消息逻辑
            log.info("【订单消息消费者】消息处理成功");
            // 手动确认消息已消费
            channel.basicAck(message.getMessageProperties().getDeliveryTag(), false);
            // 更新消息消费状态
            if (StringUtils.hasText(messageId)) {
                messageLogService.updateConsumeStatus(messageId, 2);
            }
        } catch (Exception e) {
            log.error("【订单消息消费者】消息处理异常,消息ID:{},异常:{}", messageId, e.getMessage(), e);
            // 拒绝消息,并将消息重新入队
            channel.basicNack(message.getMessageProperties().getDeliveryTag(), false, true);
            // 更新消息消费状态为失败
            if (StringUtils.hasText(messageId)) {
                messageLogService.updateConsumeStatus(messageId, 4);
                messageLogService.incrementRetryCount(messageId);
            }
        }
    }
}

package com.ken.consumer;

import com.ken.config.RabbitMQConfig;
import com.ken.service.MessageLogService;
import com.rabbitmq.client.Channel;
import lombok.extern.slf4j.Slf4j;
import org.springframework.amqp.core.Message;
import org.springframework.amqp.rabbit.annotation.RabbitListener;
import org.springframework.stereotype.Component;
import org.springframework.util.StringUtils;

import javax.annotation.Resource;
import java.io.IOException;

/**
 * 主题模式消息消费者(处理用户相关消息)
 *
 * @author ken
 */
@Slf4j
@Component
public class TopicUserConsumer {

    @Resource
    private MessageLogService messageLogService;

    /**
     * 监听用户相关消息队列,消费消息
     *
     * @param message 消息对象
     * @param channel 信道
     * @throws IOException IO异常
     */
    @RabbitListener(queues = RabbitMQConfig.TOPIC_QUEUE_USER)
    public void consumeUserMessage(Message message, Channel channel) throws IOException {
        // 获取消息ID和路由键
        String messageId = message.getMessageProperties().getHeader("spring_returned_message_correlation");
        String routingKey = message.getMessageProperties().getReceivedRoutingKey();
        String msgContent = new String(message.getBody());
        log.info("【用户消息消费者】接收到消息,路由键:{},消息ID:{},内容:{}", routingKey, messageId, msgContent);

        try {
            // 处理用户相关消息逻辑
            log.info("【用户消息消费者】消息处理成功");
            // 手动确认消息已消费
            channel.basicAck(message.getMessageProperties().getDeliveryTag(), false);
            // 更新消息消费状态
            if (StringUtils.hasText(messageId)) {
                messageLogService.updateConsumeStatus(messageId, 2);
            }
        } catch (Exception e) {
            log.error("【用户消息消费者】消息处理异常,消息ID:{},异常:{}", messageId, e.getMessage(), e);
            // 拒绝消息,并将消息重新入队
            channel.basicNack(message.getMessageProperties().getDeliveryTag(), false, true);
            // 更新消息消费状态为失败
            if (StringUtils.hasText(messageId)) {
                messageLogService.updateConsumeStatus(messageId, 4);
                messageLogService.incrementRetryCount(messageId);
            }
        }
    }
}

package com.ken.consumer;

import com.ken.config.RabbitMQConfig;
import com.ken.service.MessageLogService;
import com.rabbitmq.client.Channel;
import lombok.extern.slf4j.Slf4j;
import org.springframework.amqp.core.Message;
import org.springframework.amqp.rabbit.annotation.RabbitListener;
import org.springframework.stereotype.Component;
import org.springframework.util.StringUtils;

import javax.annotation.Resource;
import java.io.IOException;

/**
 * 主题模式消息消费者(处理所有系统消息)
 *
 * @author ken
 */
@Slf4j
@Component
public class TopicAllConsumer {

    @Resource
    private MessageLogService messageLogService;

    /**
     * 监听所有系统消息队列,消费消息
     *
     * @param message 消息对象
     * @param channel 信道
     * @throws IOException IO异常
     */
    @RabbitListener(queues = RabbitMQConfig.TOPIC_QUEUE_ALL)
    public void consumeAllMessage(Message message, Channel channel) throws IOException {
        // 获取消息ID和路由键
        String messageId = message.getMessageProperties().getHeader("spring_returned_message_correlation");
        String routingKey = message.getMessageProperties().getReceivedRoutingKey();
        String msgContent = new String(message.getBody());
        log.info("【全量系统消息消费者】接收到消息,路由键:{},消息ID:{},内容:{}", routingKey, messageId, msgContent);

        try {
            // 处理所有系统消息的通用逻辑,例如记录系统操作日志
            log.info("【全量系统消息消费者】消息处理成功");
            // 手动确认消息已消费
            channel.basicAck(message.getMessageProperties().getDeliveryTag(), false);
            // 更新消息消费状态
            if (StringUtils.hasText(messageId)) {
                messageLogService.updateConsumeStatus(messageId, 2);
            }
        } catch (Exception e) {
            log.error("【全量系统消息消费者】消息处理异常,消息ID:{},异常:{}", messageId, e.getMessage(), e);
            // 拒绝消息,并将消息重新入队
            channel.basicNack(message.getMessageProperties().getDeliveryTag(), false, true);
            // 更新消息消费状态为失败
            if (StringUtils.hasText(messageId)) {
                messageLogService.updateConsumeStatus(messageId, 4);
                messageLogService.incrementRetryCount(messageId);
            }
        }
    }
}
6.6 死信队列示例
死信队列(Dead Letter Queue)用于处理无法被正常消费的消息,例如过期消息、被拒绝的消息或队列满时的消息。
6.6.1 生产者
package com.ken.producer;

import com.ken.config.RabbitMQConfig;
import com.ken.util.RabbitMQMessageSender;
import io.swagger.v3.oas.annotations.Operation;
import io.swagger.v3.oas.annotations.Parameter;
import io.swagger.v3.oas.annotations.tags.Tag;
import lombok.extern.slf4j.Slf4j;
import org.springframework.web.bind.annotation.GetMapping;
import org.springframework.web.bind.annotation.RequestMapping;
import org.springframework.web.bind.annotation.RequestParam;
import org.springframework.web.bind.annotation.RestController;

import javax.annotation.Resource;

/**
 * 死信队列消息生产者
 *
 * @author ken
 */
@Slf4j
@RestController
@RequestMapping("/api/deadletter")
@Tag(name = "死信队列示例", description = "死信队列的消息发送接口")
public class DeadLetterProducer {

    @Resource
    private RabbitMQMessageSender messageSender;

    /**
     * 发送消息到普通队列,该队列配置了死信队列
     *
     * @param message 消息内容
     * @param count 发送消息数量
     * @return 消息发送结果
     */
    @GetMapping("/send")
    @Operation(summary = "发送消息到普通队列", description = "向配置了死信的普通队列发送消息,当消息成为死信时会被路由到死信队列")
    public String sendMessage(
            @Parameter(description = "消息内容", required = true)
            @RequestParam String message,
            @Parameter(description = "发送消息数量", required = true, example = "10")
            @RequestParam Integer count) {
        if (count <= 0) {
            return "消息数量必须大于0";
        }

        for (int i = 0; i < count; i++) {
            String msg = message + " - " + (i + 1);
            messageSender.sendMessage(
                    RabbitMQConfig.NORMAL_EXCHANGE,
                    RabbitMQConfig.NORMAL_ROUTING_KEY,
                    msg);
        }

        return "成功发送" + count + "条消息到普通队列";
    }
}
6.6.2 消费者
package com.ken.consumer;

import com.ken.config.RabbitMQConfig;
import com.ken.service.MessageLogService;
import com.rabbitmq.client.Channel;
import lombok.extern.slf4j.Slf4j;
import org.springframework.amqp.core.Message;
import org.springframework.amqp.rabbit.annotation.RabbitListener;
import org.springframework.stereotype.Component;
import org.springframework.util.StringUtils;

import javax.annotation.Resource;
import java.io.IOException;

/**
 * 普通队列消息消费者(故意拒绝部分消息,使其成为死信)
 *
 * @author ken
 */
@Slf4j
@Component
public class NormalQueueConsumer {

    @Resource
    private MessageLogService messageLogService;

    /**
     * 监听普通队列,消费消息,故意拒绝偶数编号的消息
     *
     * @param message 消息对象
     * @param channel 信道
     * @throws IOException IO异常
     */
    @RabbitListener(queues = RabbitMQConfig.NORMAL_QUEUE)
    public void consumeMessage(Message message, Channel channel) throws IOException {
        // 获取消息ID
        String messageId = message.getMessageProperties().getHeader("spring_returned_message_correlation");
        String msgContent = new String(message.getBody());
        log.info("【普通队列消费者】接收到消息,消息ID:{},内容:{}", messageId, msgContent);

        try {
            // 提取消息编号
            int index = msgContent.lastIndexOf("-");
            if (index > 0 && index < msgContent.length() - 1) {
                String numStr = msgContent.substring(index + 1).trim();
                int num = Integer.parseInt(numStr);

                // 处理奇数编号的消息,拒绝偶数编号的消息
                if (num % 2 == 1) {
                    // 处理消息逻辑
                    log.info("【普通队列消费者】消息处理成功,消息ID:{}", messageId);
                    // 手动确认消息已消费
                    channel.basicAck(message.getMessageProperties().getDeliveryTag(), false);
                    // 更新消息消费状态
                    if (StringUtils.hasText(messageId)) {
                        messageLogService.updateConsumeStatus(messageId, 2);
                    }
                } else {
                    log.warn("【普通队列消费者】故意拒绝偶数消息,消息ID:{},内容:{}", messageId, msgContent);
                    // 拒绝消息,不重新入队,使其成为死信
                    channel.basicReject(message.getMessageProperties().getDeliveryTag(), false);
                    // 更新消息消费状态为失败
                    if (StringUtils.hasText(messageId)) {
                        messageLogService.updateConsumeStatus(messageId, 4);
                    }
                }
            } else {
                log.error("【普通队列消费者】消息格式不正确,拒绝消费,消息ID:{},内容:{}", messageId, msgContent);
                // 拒绝消息,不重新入队,使其成为死信
                channel.basicReject(message.getMessageProperties().getDeliveryTag(), false);
                // 更新消息消费状态为失败
                if (StringUtils.hasText(messageId)) {
                    messageLogService.updateConsumeStatus(messageId, 4);
                }
            }
        } catch (Exception e) {
            log.error("【普通队列消费者】消息处理异常,消息ID:{},异常:{}", messageId, e.getMessage(), e);
            // 拒绝消息,不重新入队,使其成为死信
            channel.basicReject(message.getMessageProperties().getDeliveryTag(), false);
            // 更新消息消费状态为失败
            if (StringUtils.hasText(messageId)) {
                messageLogService.updateConsumeStatus(messageId, 4);
            }
        }
    }
}

package com.ken.consumer;

import com.ken.config.RabbitMQConfig;
import com.ken.service.MessageLogService;
import com.rabbitmq.client.Channel;
import lombok.extern.slf4j.Slf4j;
import org.springframework.amqp.core.Message;
import org.springframework.amqp.rabbit.annotation.RabbitListener;
import org.springframework.stereotype.Component;
import org.springframework.util.StringUtils;

import javax.annotation.Resource;
import java.io.IOException;

/**
 * 死信队列消息消费者
 *
 * @author ken
 */
@Slf4j
@Component
public class DeadLetterConsumer {

    @Resource
    private MessageLogService messageLogService;

    /**
     * 监听死信队列,消费死信消息
     *
     * @param message 消息对象
     * @param channel 信道
     * @throws IOException IO异常
     */
    @RabbitListener(queues = RabbitMQConfig.DEAD_LETTER_QUEUE)
    public void consumeDeadLetterMessage(Message message, Channel channel) throws IOException {
        // 获取消息ID
        String messageId = message.getMessageProperties().getHeader("spring_returned_message_correlation");
        String msgContent = new String(message.getBody());
        log.error("【死信队列消费者】接收到死信消息,消息ID:{},内容:{}", messageId, msgContent);

        try {
            // 处理死信消息的逻辑,例如记录到错误日志、人工干预等
            log.info("【死信队列消费者】死信消息处理成功");
            // 手动确认消息已消费
            channel.basicAck(message.getMessageProperties().getDeliveryTag(), false);
            // 更新消息消费状态
            if (StringUtils.hasText(messageId)) {
                messageLogService.updateConsumeStatus(messageId, 2);
            }
        } catch (Exception e) {
            log.error("【死信队列消费者】死信消息处理异常,消息ID:{},异常:{}", messageId, e.getMessage(), e);
            // 死信消息再次处理失败,可以根据业务需求决定是否再次入队或做其他处理
            channel.basicAck(message.getMessageProperties().getDeliveryTag(), false);
            // 更新消息消费状态为失败
            if (StringUtils.hasText(messageId)) {
                messageLogService.updateConsumeStatus(messageId, 4);
            }
        }
    }
}
6.7 延迟队列示例
延迟队列用于处理需要延迟执行的任务,例如订单超时取消、定时提醒等场景。
要使用延迟队列,需要先安装 RabbitMQ 的延迟插件:rabbitmq_delayed_message_exchange。
安装方法:
- 下载插件:https://github.com/rabbitmq/rabbitmq-delayed-message-exchange/releases
- 将插件复制到 RabbitMQ 的插件目录
- 启用插件:rabbitmq-plugins enable rabbitmq_delayed_message_exchange
- 重启 RabbitMQ 服务
6.7.1 生产者
package com.ken.producer;

import com.ken.config.RabbitMQConfig;
import com.ken.util.RabbitMQMessageSender;
import io.swagger.v3.oas.annotations.Operation;
import io.swagger.v3.oas.annotations.Parameter;
import io.swagger.v3.oas.annotations.tags.Tag;
import lombok.extern.slf4j.Slf4j;
import org.springframework.web.bind.annotation.GetMapping;
import org.springframework.web.bind.annotation.RequestMapping;
import org.springframework.web.bind.annotation.RequestParam;
import org.springframework.web.bind.annotation.RestController;

import javax.annotation.Resource;
import java.time.LocalDateTime;

/**
 * 延迟队列消息生产者
 *
 * @author ken
 */
@Slf4j
@RestController
@RequestMapping("/api/delay")
@Tag(name = "延迟队列示例", description = "延迟队列的消息发送接口")
public class DelayProducer {

    @Resource
    private RabbitMQMessageSender messageSender;

    /**
     * 发送延迟消息到延迟交换机
     *
     * @param message 消息内容
     * @param delayTime 延迟时间(毫秒)
     * @return 消息ID
     */
    @GetMapping("/send")
    @Operation(summary = "发送延迟消息", description = "向延迟交换机发送消息,指定延迟时间后才会被消费")
    public String sendDelayMessage(
            @Parameter(description = "消息内容", required = true)
            @RequestParam String message,
            @Parameter(description = "延迟时间(毫秒)", required = true, example = "5000")
            @RequestParam Long delayTime) {
        if (delayTime <= 0) {
            return "延迟时间必须大于0";
        }

        String fullMessage = message + "(发送时间:" + LocalDateTime.now() + ")";
        return messageSender.sendDelayMessage(
                RabbitMQConfig.DELAY_EXCHANGE,
                RabbitMQConfig.DELAY_ROUTING_KEY,
                fullMessage,
                delayTime);
    }
}
6.7.2 消费者
package com.ken.consumer;

import com.ken.config.RabbitMQConfig;
import com.ken.service.MessageLogService;
import com.rabbitmq.client.Channel;
import lombok.extern.slf4j.Slf4j;
import org.springframework.amqp.core.Message;
import org.springframework.amqp.rabbit.annotation.RabbitListener;
import org.springframework.stereotype.Component;
import org.springframework.util.StringUtils;

import javax.annotation.Resource;
import java.io.IOException;
import java.time.LocalDateTime;

/**
 * 延迟队列消息消费者
 *
 * @author ken
 */
@Slf4j
@Component
public class DelayQueueConsumer {

    @Resource
    private MessageLogService messageLogService;

    /**
     * 监听延迟队列,消费延迟消息
     *
     * @param message 消息对象
     * @param channel 信道
     * @throws IOException IO异常
     */
    @RabbitListener(queues = RabbitMQConfig.DELAY_QUEUE)
    public void consumeDelayMessage(Message message, Channel channel) throws IOException {
        // 获取消息ID
        String messageId = message.getMessageProperties().getHeader("spring_returned_message_correlation");
        String msgContent = new String(message.getBody());
        log.info("【延迟队列消费者】接收到延迟消息,接收时间:{},消息ID:{},内容:{}",
                LocalDateTime.now(), messageId, msgContent);

        try {
            // 处理延迟消息的逻辑,例如订单超时取消、定时提醒等
            log.info("【延迟队列消费者】延迟消息处理成功");
            // 手动确认消息已消费
            channel.basicAck(message.getMessageProperties().getDeliveryTag(), false);
            // 更新消息消费状态
            if (StringUtils.hasText(messageId)) {
                messageLogService.updateConsumeStatus(messageId, 2);
            }
        } catch (Exception e) {
            log.error("【延迟队列消费者】延迟消息处理异常,消息ID:{},异常:{}", messageId, e.getMessage(), e);
            // 拒绝消息,并将消息重新入队
            channel.basicNack(message.getMessageProperties().getDeliveryTag(), false, true);
            // 更新消息消费状态为失败
            if (StringUtils.hasText(messageId)) {
                messageLogService.updateConsumeStatus(messageId, 4);
                messageLogService.incrementRetryCount(messageId);
            }
        }
    }
}
七、数据库脚本
为了存储消息日志,我们需要创建相应的数据库表。
-- 创建数据库
CREATE DATABASE IF NOT EXISTS rabbitmq_demo CHARACTER SET utf8mb4 COLLATE utf8mb4_unicode_ci;

-- 使用数据库
USE rabbitmq_demo;

-- 创建消息日志表
CREATE TABLE IF NOT EXISTS t_message_log (
    id VARCHAR(64) NOT NULL COMMENT '消息ID',
    content TEXT COMMENT '消息内容',
    exchange VARCHAR(255) COMMENT '交换机名称',
    routing_key VARCHAR(255) COMMENT '路由键',
    status TINYINT DEFAULT 0 COMMENT '消息状态:0-待发送,1-已发送,2-已消费,3-发送失败,4-消费失败',
    retry_count INT DEFAULT 0 COMMENT '重试次数',
    create_time DATETIME COMMENT '创建时间',
    update_time DATETIME COMMENT '更新时间',
    PRIMARY KEY (id)
) ENGINE=InnoDB DEFAULT CHARSET=utf8mb4 COMMENT='消息日志表';
八、RabbitMQ 高级特性与最佳实践
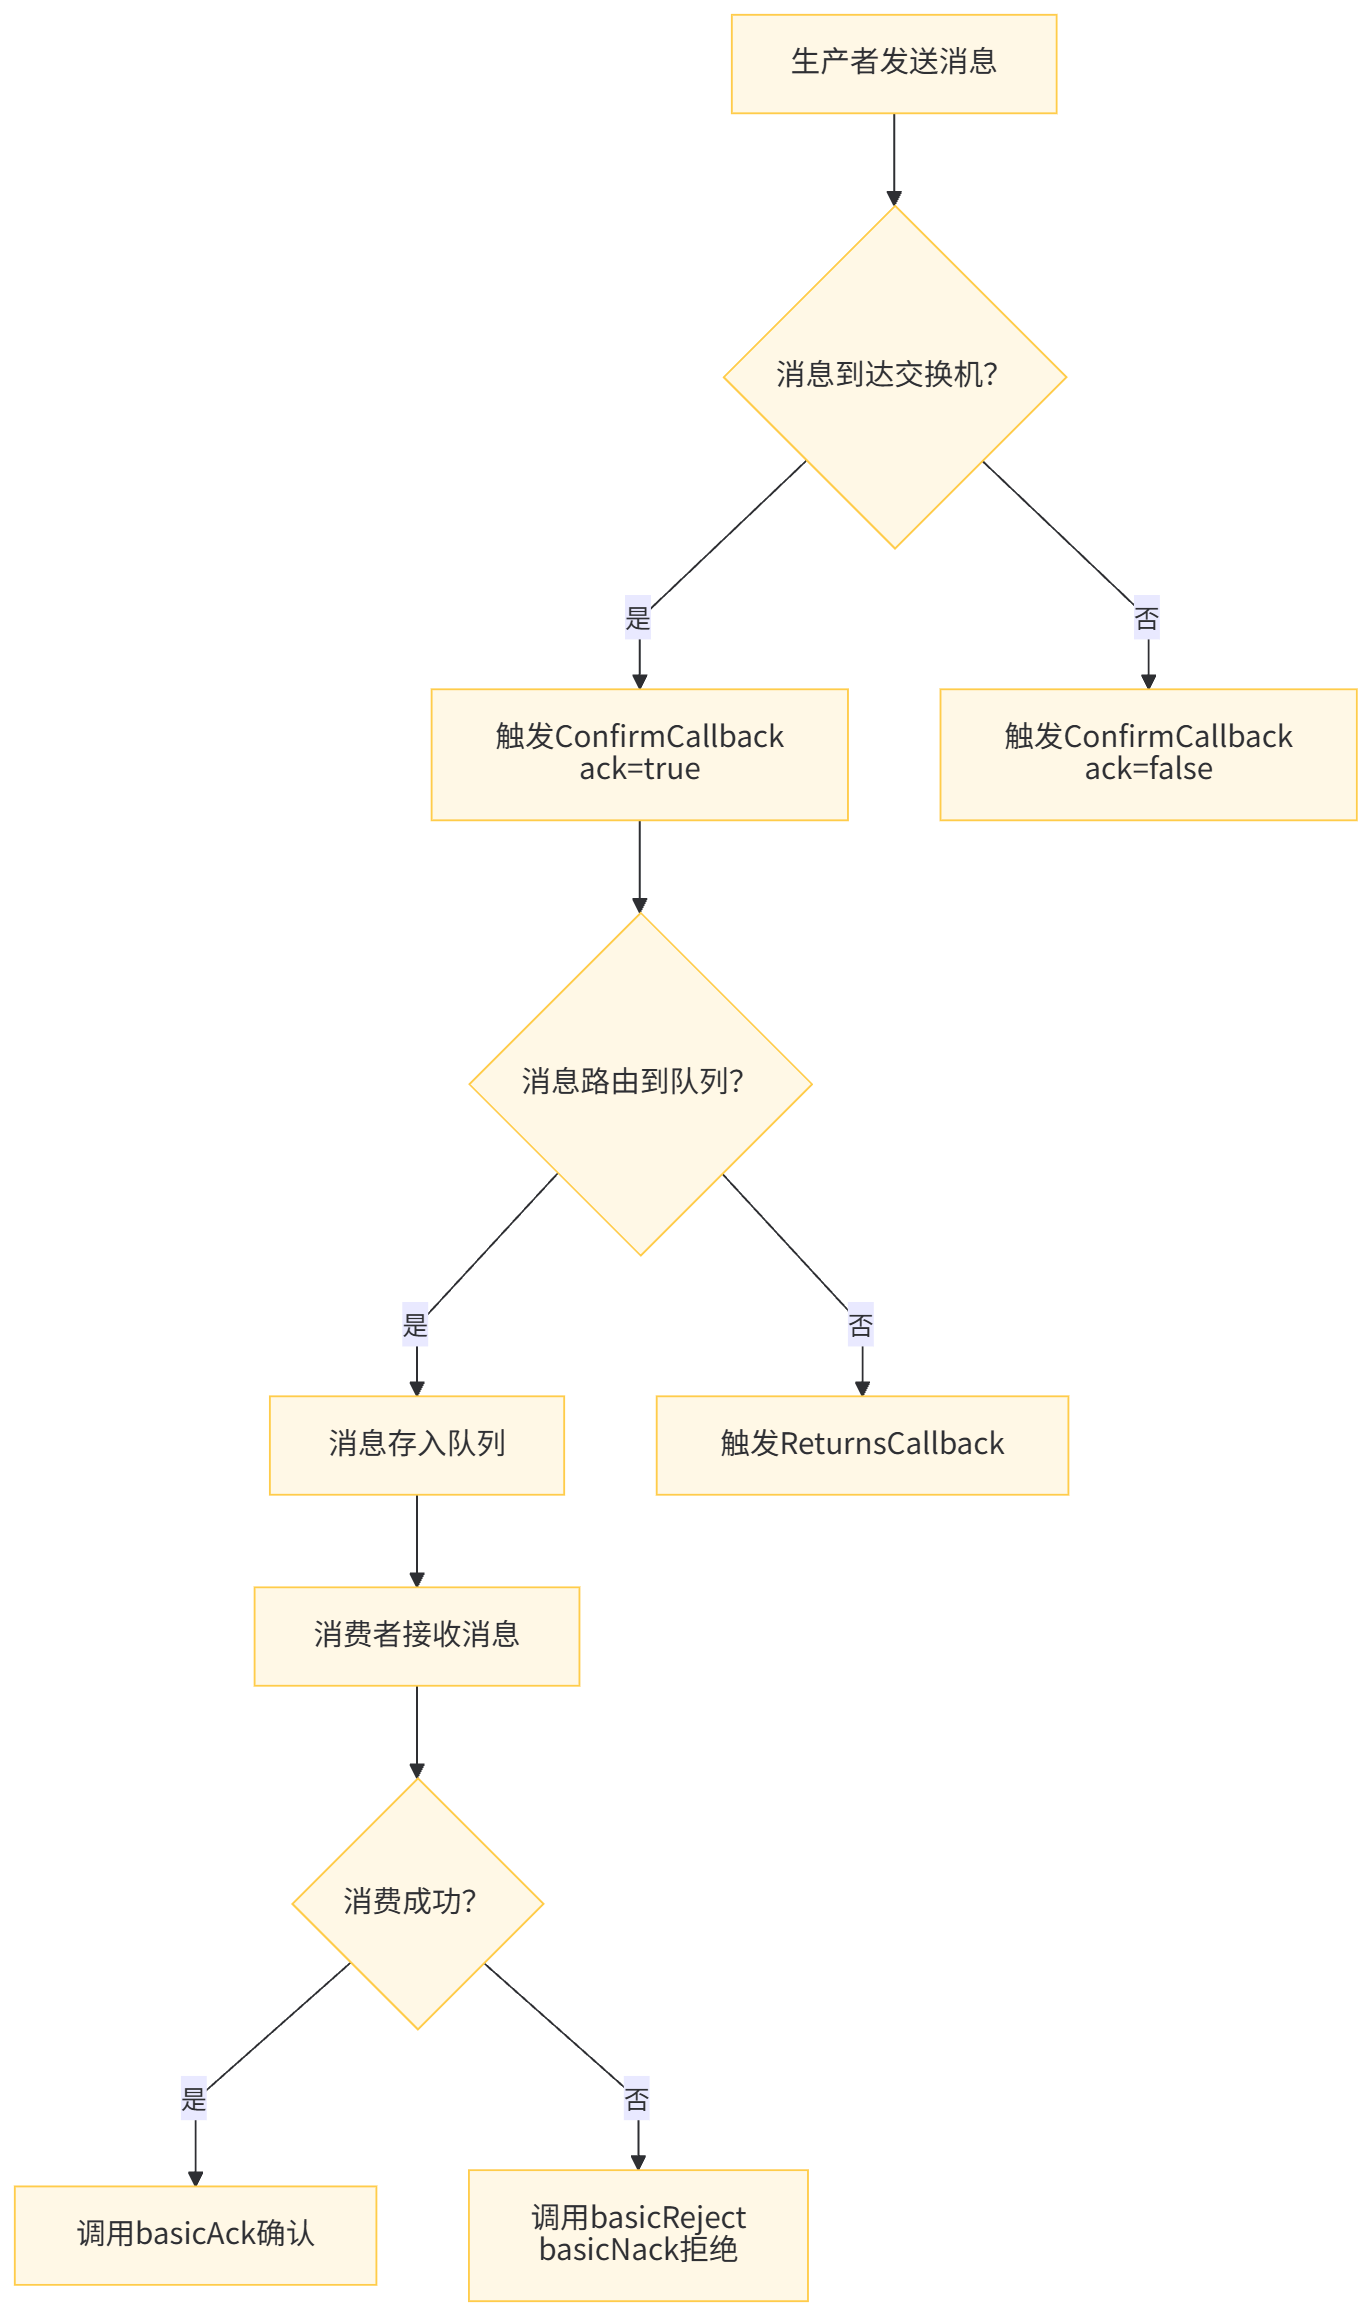
8.1 消息确认机制
RabbitMQ 提供了完善的消息确认机制,确保消息的可靠传递:
-
生产者确认机制:确保消息成功发送到交换机
- 配置
publisher-confirm-type: correlated启用确认机制 - 通过
ConfirmCallback回调处理确认结果
- 配置
-
消息返回机制:当消息无法路由到队列时返回给生产者
- 配置
publisher-returns: true和mandatory: true启用返回机制 - 通过
ReturnsCallback回调处理返回的消息
- 配置
-
消费者确认机制:确保消息被成功消费
- 配置
acknowledge-mode: manual启用手动确认 - 消费成功调用
basicAck()确认 - 消费失败调用
basicReject()或basicNack()拒绝
- 配置
8.2 消息持久化
为了防止 RabbitMQ 服务重启导致消息丢失,需要配置消息持久化:
-
交换机持久化 :创建交换机时设置
durable: true -
队列持久化 :创建队列时设置
durable: true -
消息持久化 :发送消息时设置
deliveryMode: MessageDeliveryMode.PERSISTENT// 发送持久化消息的示例
rabbitTemplate.convertAndSend(exchange, routingKey, data, message -> {
message.getMessageProperties().setDeliveryMode(MessageDeliveryMode.PERSISTENT);
return message;
}, correlationData);
8.3 消息幂等性处理
在分布式系统中,消息重复消费是常见问题,需要保证消息处理的幂等性:
-
基于消息 ID 的幂等处理:
- 为每条消息生成唯一 ID
- 消费前检查该 ID 是否已处理
- 已处理则直接返回,未处理则执行处理逻辑并记录 ID
-
基于业务唯一标识的幂等处理:
- 使用业务相关的唯一标识(如订单号)
- 结合业务逻辑确保重复处理不会产生副作用
// 幂等性处理示例
public void processMessage(String messageId, String orderId, String messageContent) {
// 1. 检查消息是否已处理
if (messageLogService.isMessageProcessed(messageId)) {
log.info("消息[{}]已处理,无需重复处理", messageId);
return;
}// 2. 检查业务是否已处理(以订单为例) if (orderService.isOrderProcessed(orderId)) { log.info("订单[{}]已处理,无需重复处理", orderId); // 标记消息为已处理 messageLogService.markAsProcessed(messageId); return; } // 3. 处理业务逻辑 orderService.processOrder(orderId, messageContent); // 4. 标记消息为已处理 messageLogService.markAsProcessed(messageId);}
8.4 消息重试机制
当消息处理失败时,需要有合理的重试机制:
-
本地重试:通过 Spring 的重试机制在消费者本地进行有限次数的重试
-
消息重入队:消费失败时将消息重新入队,等待再次消费
-
定时重试:结合延迟队列实现指数退避策略的定时重试
// 消息重试配置示例
@Bean
public SimpleRabbitListenerContainerFactory rabbitListenerContainerFactory(ConnectionFactory connectionFactory) {
SimpleRabbitListenerContainerFactory factory = new SimpleRabbitListenerContainerFactory();
factory.setConnectionFactory(connectionFactory);
factory.setAcknowledgeMode(AcknowledgeMode.MANUAL);
// 重试配置
factory.setRetryTemplate(retryTemplate());
return factory;
}@Bean
public RetryTemplate retryTemplate() {
RetryTemplate retryTemplate = new RetryTemplate();// 重试策略:最多重试3次 SimpleRetryPolicy retryPolicy = new SimpleRetryPolicy(); retryPolicy.setMaxAttempts(3); retryTemplate.setRetryPolicy(retryPolicy); // 退避策略:指数退避,初始间隔1秒,乘数2,最大间隔10秒 ExponentialBackOffPolicy backOffPolicy = new ExponentialBackOffPolicy(); backOffPolicy.setInitialInterval(1000); backOffPolicy.setMultiplier(2); backOffPolicy.setMaxInterval(10000); retryTemplate.setBackOffPolicy(backOffPolicy); return retryTemplate;}
8.5 性能优化建议
- 合理设置消费者数量:根据服务器性能和业务需求设置适当的消费者数量
- 设置 prefetchCount:控制每次从队列中获取的消息数量,避免消费者过载
- 使用批量操作:对于大量消息,考虑使用批量发送和批量确认
- 避免消息过大:过大的消息会影响性能,可考虑拆分或存储到外部系统
- 合理设置交换机和队列:根据业务场景选择合适的交换机类型
- 监控和调优:通过 RabbitMQ 管理界面监控队列状态,及时发现和解决问题
九、常见问题及解决方案
-
消息丢失问题:
- 解决方案:启用消息持久化、生产者确认机制和消费者确认机制
-
消息重复消费问题:
- 解决方案:实现消息幂等性处理,使用唯一标识判断消息是否已处理
-
消息堆积问题:
- 解决方案:增加消费者数量、优化消费逻辑、设置合理的预取数量、考虑使用死信队列处理无法消费的消息
-
RabbitMQ 性能问题:
- 解决方案:合理配置硬件资源、优化消息大小、使用批量操作、避免同步阻塞操作
-
网络分区问题:
- 解决方案:配置合适的网络分区处理策略、使用集群部署提高可用性
-
消费者阻塞问题:
- 解决方案:设置合理的超时时间、避免在消费逻辑中执行耗时操作、使用异步处理
十、总结
本文详细介绍了 SpringBoot 集成 RabbitMQ 的全过程,从基础概念到实战示例,再到高级特性和最佳实践,涵盖了 RabbitMQ 在实际项目中的各种使用场景。