这个条款揭示了C++动态内存管理中最基本但常被忽视的规则:new/delete形式必须严格匹配。理解这一原则是避免内存泄漏和未定义行为的关键。
思维导图:new/delete配对使用的完整体系
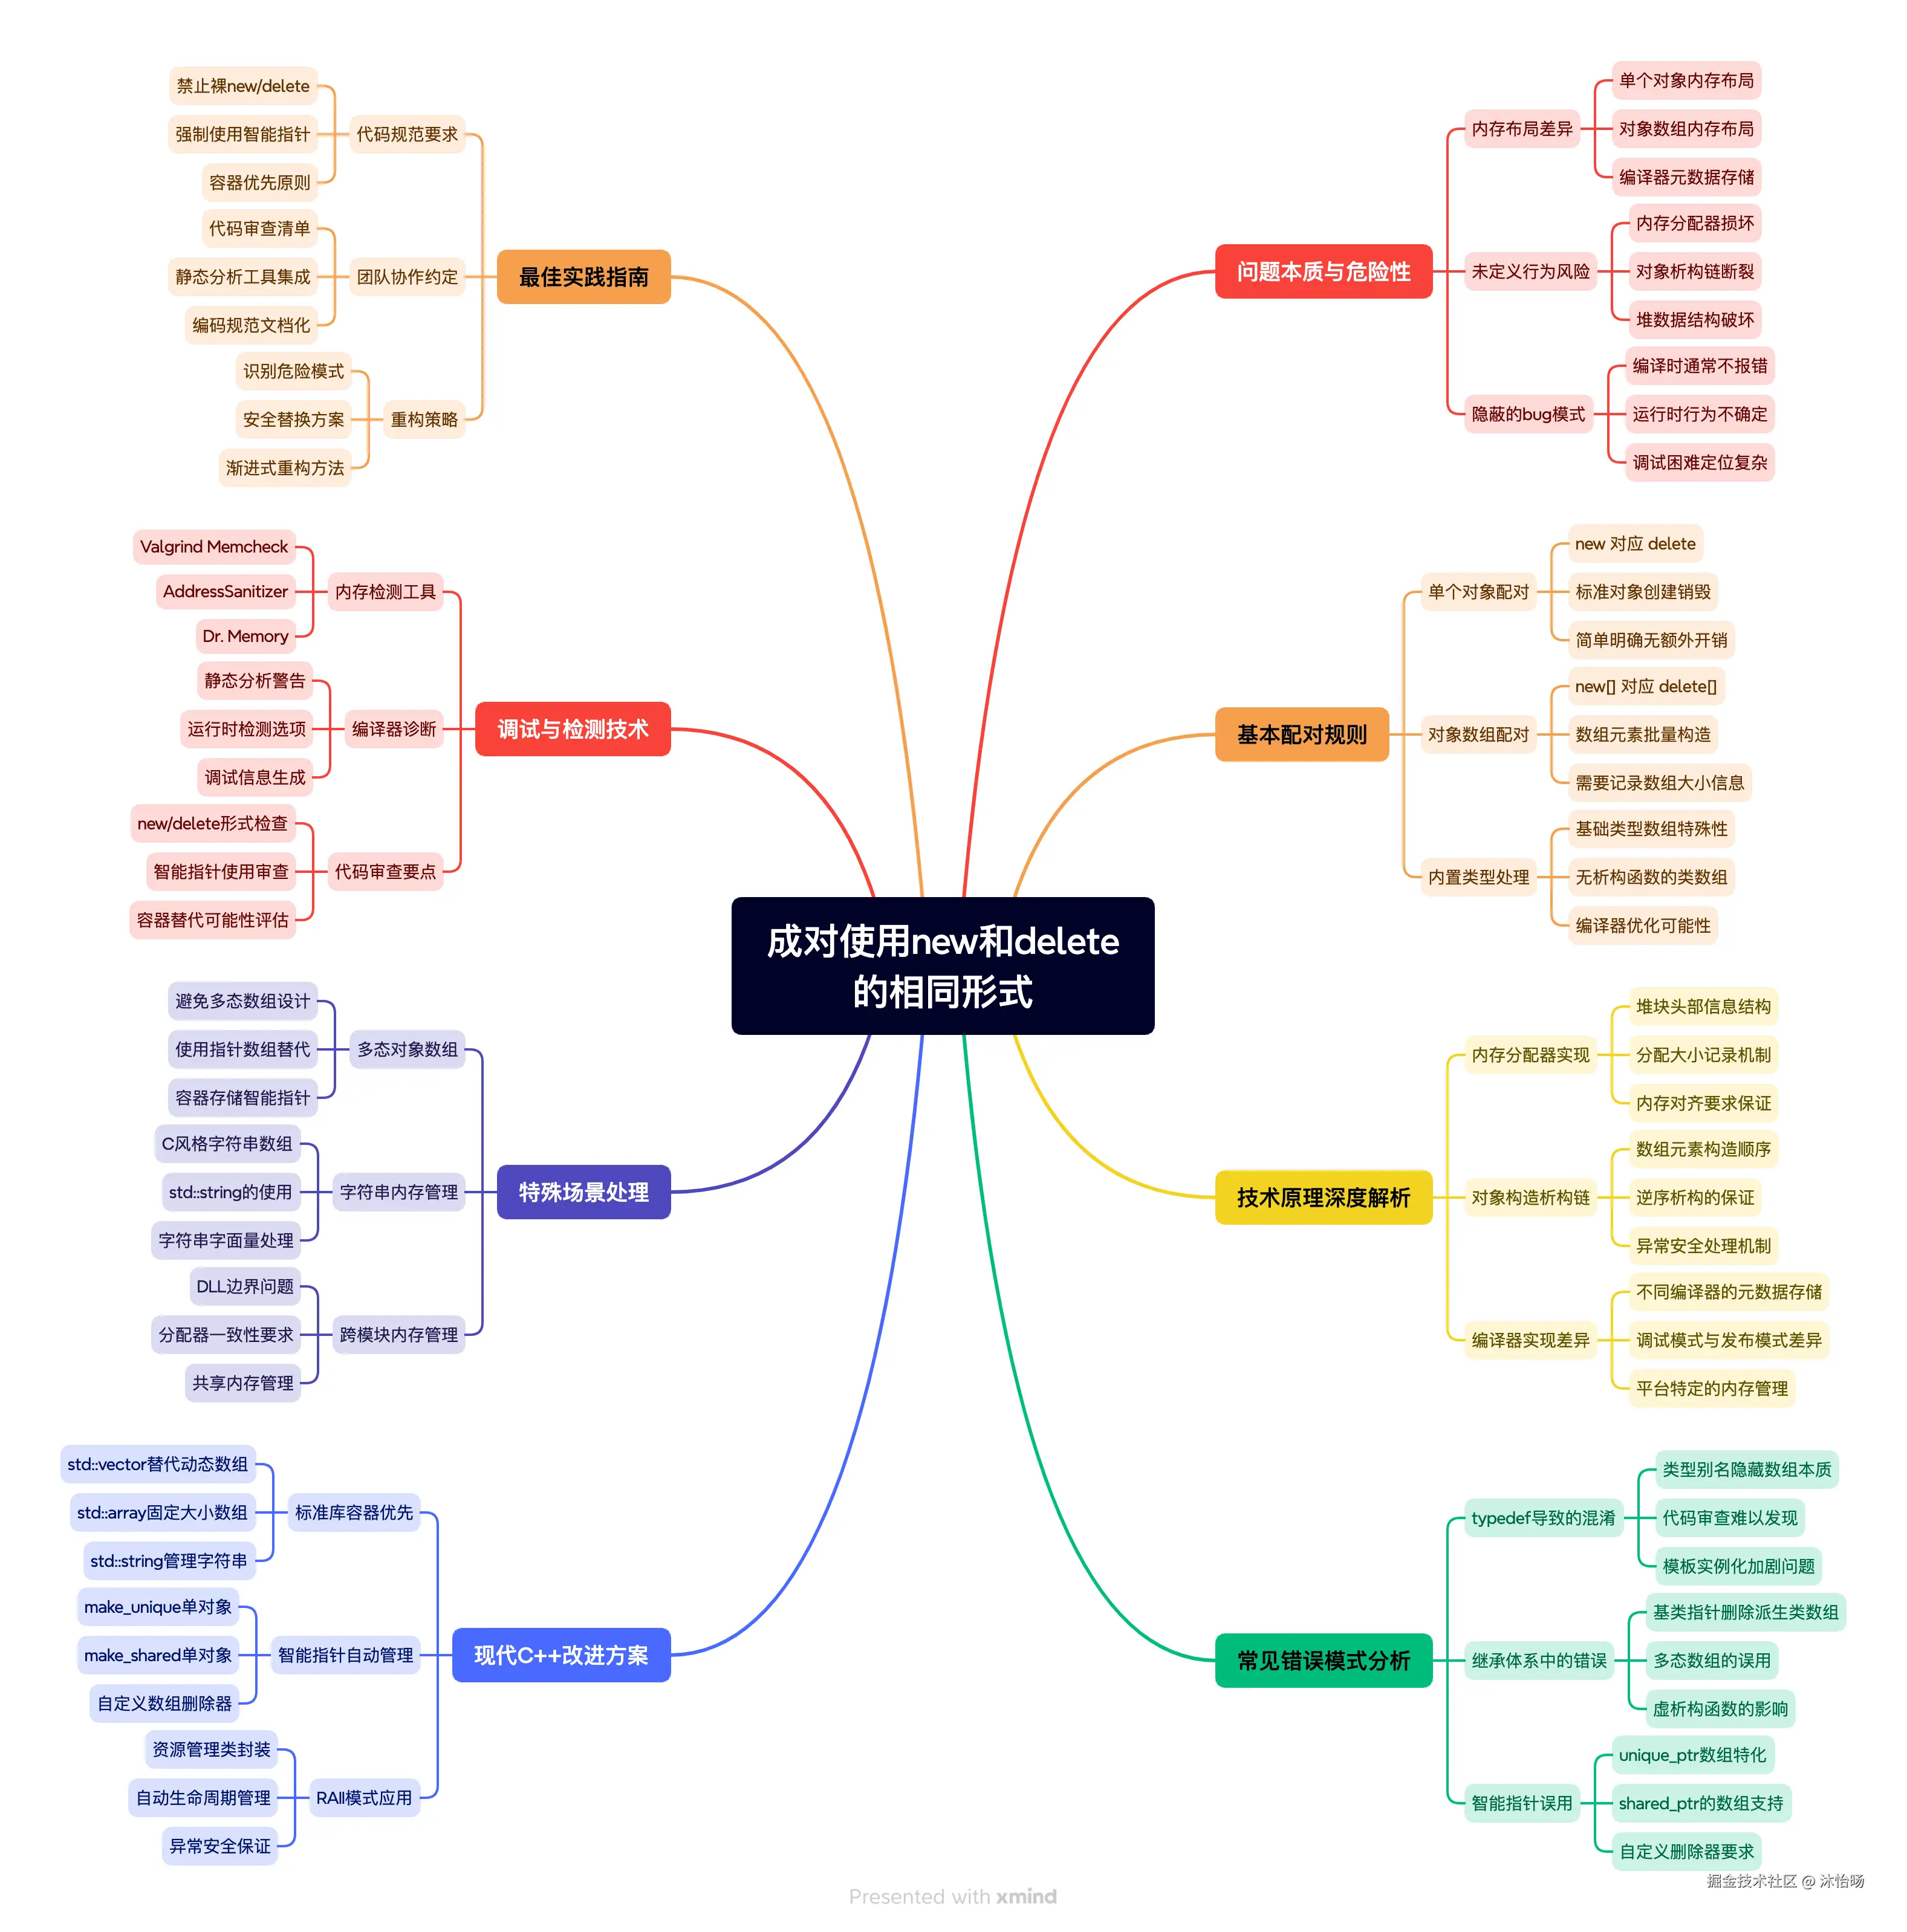
关键洞见与行动指南
必须遵守的核心原则:
- 严格形式匹配 :
new配delete,new[]配delete[] - 避免多态数组:不要通过基类指针删除派生类数组
- 使用标准库:优先使用容器和智能指针替代手动内存管理
- 明确类型信息:使用清晰的类型别名,避免混淆
现代C++开发建议:
- 禁止裸new/delete:在代码规范中明确禁止手动内存管理
- 使用make_unique/make_shared:工厂函数自动选择正确的分配形式
- 容器优先原则 :使用
std::vector、std::array替代动态数组 - 静态分析集成:在CI/CD流水线中集成内存检测工具
设计原则总结:
- RAII原则:资源获取即初始化,利用析构函数自动释放
- 零规则:让编译器生成正确的拷贝控制成员
- 明确所有权:使用智能指针明确表达资源所有权语义
- 防御性编程:假设所有手动内存管理都可能出错
需要警惕的陷阱:
- typedef隐藏的数组:类型别名可能隐藏数组本质
- 多态数组删除:通过基类指针删除派生类数组
- 跨模块边界:在不同DLL中分配和释放内存
- 异常安全:在异常发生时确保资源正确释放
最终建议: 将new/delete配对规则视为C++内存管理的"物理定律"。培养"自动管理思维"------在需要动态内存时首先问自己:"能否用标准库容器或智能指针替代手动管理?" 这种预防性的思考方式是构建健壮C++系统的关键。
记住:在C++内存管理中,正确的配对不是最佳实践,而是避免灾难的基本要求。 条款16教会我们的不仅是一个语法规则,更是对C++内存模型深刻理解的体现。
深入解析:内存布局的核心差异
1. 问题根源:内存分配的内部机制
单个对象 vs 对象数组的内存布局:
cpp
class Widget {
public:
    Widget() { std::cout << "Widget构造 " << this << std::endl; }
    ~Widget() { std::cout << "Widget析构 " << this << std::endl; }
private:
    int data[10];
};

void demonstrate_memory_layout() {
    // 单个对象的内存分配
    Widget* singleObj = new Widget();
    // 内存布局: [Widget对象数据]

    // 对象数组的内存分配
    Widget* arrayObj = new Widget[3];
    // 内存布局: [数组大小][Widget][Widget][Widget]
    // 大多数编译器会在数组前面存储元素数量

    std::cout << "单个对象地址: " << singleObj << std::endl;
    std::cout << "数组对象地址: " << arrayObj << std::endl;

    // 正确的释放
    delete singleObj;      // 释放单个对象
    delete[] arrayObj;     // 释放对象数组
}
危险的错误配对示例:
cpp
void demonstrate_dangerous_mismatch() {
    // 场景1:new[] 配 delete
    std::cout << "=== 错误1: new[] 配 delete ===" << std::endl;
    Widget* widgets = new Widget[3];

    // delete widgets;  // 灾难!
    // 实际发生:
    // 1. 只调用第一个元素的析构函数
    // 2. 试图释放错误的内存地址(数组开始位置 - 数组大小存储偏移)
    // 3. 堆数据结构破坏

    // 场景2:new 配 delete[]
    std::cout << "\n=== 错误2: new 配 delete[] ===" << std::endl;
    Widget* single = new Widget();

    // delete[] single;  // 同样灾难!
    // 实际发生:
    // 1. 试图读取数组大小(在对象前面)
    // 2. 调用多个不存在的对象的析构函数
    // 3. 释放错误大小的内存块

    // 正确释放
    delete[] widgets;
    delete single;
}
2. 编译器实现的差异
不同编译器的数组大小存储:
cpp
void demonstrate_compiler_differences() {
    class Simple {
    public:
        ~Simple() {}  // 有析构函数,编译器必须记录数组大小
    };

    Simple* array1 = new Simple[5];

    // 在大多数编译器中,内存布局类似:
    // [size_t n=5][Simple][Simple][Simple][Simple][Simple]
    // 数组开始的实际地址是 &array1 - sizeof(size_t)

    delete[] array1;  // 编译器知道要调用5次析构函数

    // 对于没有析构函数的类型,编译器可能优化
    class NoDestructor {
    public:
        // 没有用户定义的析构函数
    };

    NoDestructor* array2 = new NoDestructor[5];
    // 编译器可能不存储数组大小,因为不需要调用析构函数

    delete[] array2;  // 可能只是释放内存,不调用析构函数
}
解决方案:严格的配对规则
1. 基本配对规则
正确的new/delete配对:
cpp
class Investment {
public:
    Investment() { std::cout << "Investment构造" << std::endl; }
    virtual ~Investment() { std::cout << "Investment析构" << std::endl; }
    virtual void calculate() = 0;
};

class Stock : public Investment {
public:
    void calculate() override {
        std::cout << "计算股票收益" << std::endl;
    }
};

void demonstrate_correct_pairing() {
    std::cout << "=== 单个对象 ===" << std::endl;
    Investment* single = new Stock();
    single->calculate();
    delete single;  // 正确:new 配 delete

    std::cout << "\n=== 对象数组 ===" << std::endl;
    Investment* array = new Stock[3];
    // 注意:这里有多态数组的问题,后面会讨论
    delete[] array;  // 正确:new[] 配 delete[]

    std::cout << "\n=== 内置类型数组 ===" << std::endl;
    int* intArray = new int[100];
    delete[] intArray;  // 正确:即使没有析构函数也要匹配

    double* singleDouble = new double;
    delete singleDouble;  // 正确:new 配 delete
}
2. typedef带来的陷阱
typedef隐藏的数组本质:
cpp
// 危险的typedef定义
typedef Investment* InvestmentPtr;
typedef Investment* InvestmentArray[10];  // 大小为10的Investment指针数组

void demonstrate_typedef_danger() {
    // 情况1:看起来像单个对象,实际上是数组
    InvestmentArray investments;  // Investment* investments[10]

    // 错误的分配方式
    InvestmentPtr* badAlloc = new InvestmentArray;  // 实际上是 new Investment*[10]
    // 看起来像单个对象,但实际上是数组!

    // delete badAlloc;  // 错误:应该用 delete[]
    delete[] badAlloc;   // 正确

    // 情况2:更清晰的现代替代
    using InvestmentPtr = Investment*;
    using InvestmentArray = std::array<Investment*, 10>;

    InvestmentArray safeInvestments;  // 明确的容器类型
    // 不需要手动内存管理!
}
现代C++的解决方案:
cpp
// 使用using替代typedef,更清晰
using SingleInvestment = Investment;
using InvestmentArray = Investment[10];

void demonstrate_modern_solution() {
    // C++11 using语法更清晰
    auto single = new SingleInvestment;  // 明确是单个对象
    delete single;

    // 但更好的方案是使用标准库容器
    std::vector<std::unique_ptr<Investment>> investments;
    investments.push_back(std::make_unique<Stock>());
    // 自动管理内存,无需担心new/delete配对
}
现代C++的改进方案
1. 智能指针自动管理
unique_ptr的数组特化:
cpp
#include <memory>

void demonstrate_smart_pointers() {
    std::cout << "=== unique_ptr 单对象 ===" << std::endl;
    {
        std::unique_ptr<Investment> investment = std::make_unique<Stock>();
        investment->calculate();
        // 自动调用delete,无需手动管理
    }

    std::cout << "\n=== unique_ptr 对象数组 ===" << std::endl;
    {
        // unique_ptr的数组特化版本
        std::unique_ptr<Investment[]> array(new Stock[3]);
        // 会自动调用delete[]

        // C++20支持make_unique对于数组(有限制)
        // auto array = std::make_unique<Investment[]>(3);
    }

    std::cout << "\n=== shared_ptr 需要自定义删除器 ===" << std::endl;
    {
        // shared_ptr默认使用delete,不是delete[]
        std::shared_ptr<Investment> single = std::make_shared<Stock>();

        // 对于数组,需要提供自定义删除器
        std::shared_ptr<Investment> array(
            new Stock[3],
            [](Investment* p) { delete[] p; }
        );
    }
}
2. 标准库容器优先
完全避免手动内存管理:
cpp
#include <vector>
#include <array>
#include <string>

void demonstrate_standard_containers() {
    std::cout << "=== std::vector 替代动态数组 ===" << std::endl;
    {
        std::vector<Stock> stocks(3);  // 创建3个Stock对象
        for (auto& stock : stocks) {
            stock.calculate();
        }
        // 自动管理内存,正确调用所有析构函数
    }

    std::cout << "\n=== std::array 替代固定大小数组 ===" << std::endl;
    {
        std::array<Stock, 5> fixedStocks;  // 固定大小数组
        for (auto& stock : fixedStocks) {
            stock.calculate();
        }
        // 栈上分配,自动析构
    }

    std::cout << "\n=== 多态对象使用智能指针容器 ===" << std::endl;
    {
        std::vector<std::unique_ptr<Investment>> portfolio;
        portfolio.push_back(std::make_unique<Stock>());
        // portfolio.push_back(std::make_unique<Bond>());

        for (auto& investment : portfolio) {
            investment->calculate();
        }
        // 自动正确释放所有对象
    }
}
特殊场景与陷阱规避
1. 多态对象数组的问题
多态数组的危险性:
cpp
class Bond : public Investment {
public:
    void calculate() override {
        std::cout << "计算债券收益" << std::endl;
    }
};

void demonstrate_polymorphic_array_danger() {
    // 危险:多态数组
    Investment* investments = new Stock[3];

    // delete[] investments;  // 未定义行为!
    // 问题:
    // 1. 通过基类指针删除派生类数组
    // 2. 派生类对象大小可能与基类不同
    // 3. 析构函数调用不正确

    // 正确做法:使用指针数组
    Investment** safeInvestments = new Investment*[3];
    safeInvestments[0] = new Stock();
    safeInvestments[1] = new Bond();
    safeInvestments[2] = new Stock();

    for (int i = 0; i < 3; ++i) {
        delete safeInvestments[i];  // 正确调用虚析构函数
    }
    delete[] safeInvestments;  // 释放指针数组

    // 更好的做法:使用智能指针容器
    std::vector<std::unique_ptr<Investment>> bestInvestments;
    bestInvestments.push_back(std::make_unique<Stock>());
    bestInvestments.push_back(std::make_unique<Bond>());
}
2. 字符串内存管理
C风格字符串的正确管理:
cpp
void demonstrate_string_management() {
    std::cout << "=== C风格字符串数组 ===" << std::endl;

    // 字符数组
    char* str = new char[100];
    std::strcpy(str, "Hello World");
    std::cout << "C字符串: " << str << std::endl;
    delete[] str;  // 必须使用delete[]

    // 字符串指针数组
    const char* const* strings = new const char*[3] {
        "Hello", "World", "!"
    };

    for (int i = 0; i < 3; ++i) {
        std::cout << strings[i] << " ";
    }
    std::cout << std::endl;

    delete[] strings;  // 释放指针数组

    // 现代C++:使用std::string和std::vector
    std::vector<std::string> modernStrings = {"Hello", "World", "!"};
    for (const auto& s : modernStrings) {
        std::cout << s << " ";
    }
    std::cout << std::endl;
}
实战案例:复杂系统的内存管理
案例1:图形系统资源管理
cpp
#include <memory>
#include <vector>

class Texture {
private:
    unsigned int textureId;
    int width, height;

public:
    Texture(int w, int h) : width(w), height(h) {
        // 模拟OpenGL纹理创建
        textureId = static_cast<unsigned int>(w * h); // 模拟ID生成
        std::cout << "创建纹理 " << textureId << " (" << w << "x" << h << ")" << std::endl;
    }

    ~Texture() {
        std::cout << "销毁纹理 " << textureId << std::endl;
    }

    void bind() const {
        std::cout << "绑定纹理 " << textureId << std::endl;
    }
};

class TextureManager {
private:
    // 使用智能指针管理单个纹理
    std::vector<std::unique_ptr<Texture>> textures;

    // 纹理数组的专门管理
    class TextureArray {
    private:
        std::unique_ptr<Texture[]> array;
        size_t count;

    public:
        TextureArray(size_t n) : array(new Texture[n]), count(n) {
            std::cout << "创建纹理数组,大小: " << n << std::endl;
        }

        // 自动调用delete[]
        ~TextureArray() = default;

        Texture& operator[](size_t index) {
            return array[index];
        }

        size_t size() const { return count; }
    };

    std::vector<std::unique_ptr<TextureArray>> textureArrays;

public:
    // 添加单个纹理
    void addTexture(int width, int height) {
        textures.push_back(std::make_unique<Texture>(width, height));
    }

    // 添加纹理数组
    void addTextureArray(size_t count, int width, int height) {
        auto array = std::make_unique<TextureArray>(count);
        textureArrays.push_back(std::move(array));
    }

    // 使用所有纹理
    void useAllTextures() {
        std::cout << "=== 使用单个纹理 ===" << std::endl;
        for (auto& texture : textures) {
            texture->bind();
        }

        std::cout << "=== 使用纹理数组 ===" << std::endl;
        for (auto& array : textureArrays) {
            for (size_t i = 0; i < array->size(); ++i) {
                (*array)[i].bind();
            }
        }
    }

    // 自动正确释放所有资源
};

void demonstrate_graphics_resource_management() {
    TextureManager manager;

    // 添加单个纹理
    manager.addTexture(256, 256);
    manager.addTexture(512, 512);

    // 添加纹理数组
    manager.addTextureArray(3, 128, 128);
    manager.addTextureArray(5, 64, 64);

    manager.useAllTextures();

    std::cout << "TextureManager离开作用域,自动释放所有资源..." << std::endl;
}
案例2:数据库连接池
cpp
#include <memory>
#include <vector>
#include <array>

class DatabaseConnection {
private:
    std::string connectionString;
    bool connected;

public:
    explicit DatabaseConnection(const std::string& connStr)
        : connectionString(connStr), connected(false) {
        connect();
    }

    ~DatabaseConnection() {
        disconnect();
    }

    void connect() {
        if (!connected) {
            connected = true;
            std::cout << "连接数据库: " << connectionString << std::endl;
        }
    }

    void disconnect() {
        if (connected) {
            connected = false;
            std::cout << "断开数据库连接: " << connectionString << std::endl;
        }
    }

    void execute(const std::string& query) {
        if (connected) {
            std::cout << "执行查询: " << query << " on " << connectionString << std::endl;
        }
    }
};

class ConnectionPool {
private:
    // 固定大小连接池 - 使用std::array
    static constexpr size_t POOL_SIZE = 5;
    std::array<std::unique_ptr<DatabaseConnection>, POOL_SIZE> connections;

    // 动态扩展连接 - 使用std::vector
    std::vector<std::unique_ptr<DatabaseConnection>> extraConnections;

public:
    ConnectionPool() {
        // 初始化固定连接池
        for (size_t i = 0; i < POOL_SIZE; ++i) {
            connections[i] = std::make_unique<DatabaseConnection>(
                "Server=DB" + std::to_string(i) + ";Database=App"
            );
        }
        std::cout << "初始化连接池,大小: " << POOL_SIZE << std::endl;
    }

    // 获取固定连接池中的连接
    DatabaseConnection* getConnection(size_t index) {
        if (index < POOL_SIZE) {
            return connections[index].get();
        }
        return nullptr;
    }

    // 创建新的动态连接
    void createExtraConnection(const std::string& connStr) {
        extraConnections.push_back(
            std::make_unique<DatabaseConnection>(connStr)
        );
    }

    // 使用所有连接
    void useAllConnections() {
        std::cout << "=== 使用固定连接池 ===" << std::endl;
        for (size_t i = 0; i < POOL_SIZE; ++i) {
            connections[i]->execute("SELECT * FROM users");
        }

        std::cout << "=== 使用动态连接 ===" << std::endl;
        for (auto& conn : extraConnections) {
            conn->execute("UPDATE stats SET value = 1");
        }
    }

    // 自动正确释放所有连接
    ~ConnectionPool() {
        std::cout << "连接池销毁,自动释放所有连接..." << std::endl;
    }
};

void demonstrate_connection_pool_management() {
    ConnectionPool pool;

    // 使用固定连接
    auto* conn1 = pool.getConnection(0);
    auto* conn2 = pool.getConnection(1);

    if (conn1 && conn2) {
        conn1->execute("BEGIN TRANSACTION");
        conn2->execute("COMMIT");
    }

    // 添加动态连接
    pool.createExtraConnection("Server=EXTRA;Database=Backup");
    pool.createExtraConnection("Server=ANALYTICS;Database=Reports");

    pool.useAllConnections();

    std::cout << "ConnectionPool离开作用域..." << std::endl;
}
调试与检测技术
1. 内存检测工具使用
Valgrind检测示例:
cpp
void demonstrate_memory_debugging() {
    // 这些错误会在Valgrind/Memcheck中被检测到

    // 错误1:new[] 配 delete
    int* array1 = new int[10];
    // delete array1;  // Valgrind会报告:mismatched free() / delete / delete[]

    // 错误2:内存泄漏
    int* leaked = new int[100];
    // 忘记delete[] leaked

    // 错误3:重复释放
    int* doubleFree = new int;
    delete doubleFree;
    // delete doubleFree;  // Valgrind会报告:invalid free()

    // 正确释放
    delete[] array1;
    // delete[] leaked;  // 修复泄漏
    // 第二个delete注释掉
}
2. 编译器诊断选项
利用编译器警告:
cpp
// 编译时使用这些选项检测问题:
// g++ -Wall -Wextra -Werror main.cpp
// clang++ -Weverything -Werror main.cpp
// MSVC /W4 /WX

void demonstrate_compiler_warnings() {
    // 某些编译器可以检测到明显的类型不匹配
    int* single = new int;

    // delete[] single;  // 某些编译器会警告:不匹配的删除形式

    delete single;  // 正确
}