前言
大家好,我是奈德丽。
周末闲着没事,突然想研究一下 create-vite 是怎么实现的。打开源码一看,我人都傻了------核心逻辑就几百行代码!这让我突然来了兴致:既然这么简单,为什么不自己撸一个呢?
于是我花了一个周末的时间,从零开始实现了一个简化版的脚手架工具 custom-create-vite。虽然功能没有官方的全面,但该有的都有,而且还加了一些自己觉得好用的特性,比如eslint、tailwind等。
今天就来和大家分享一下整个实现过程,以及我踩过的那些坑,如果你也想有一个自己的cli工具,不妨花几分钟看一看。
为什么要造这个轮子?
可能有人会问:官方的 create-vite 不是挺好用的吗?干嘛要自己写?
说实话,我主要是出于这几个原因:
1. 学习目的
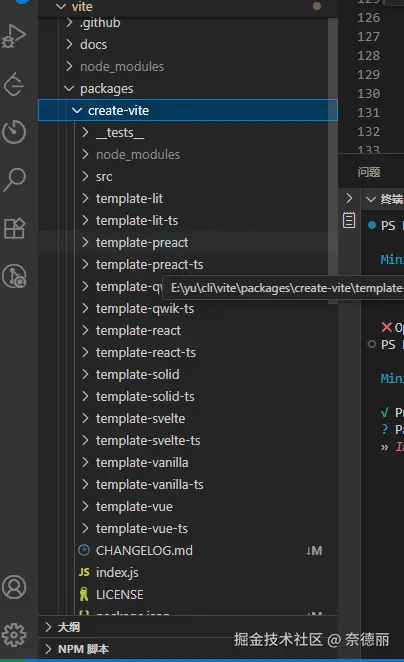
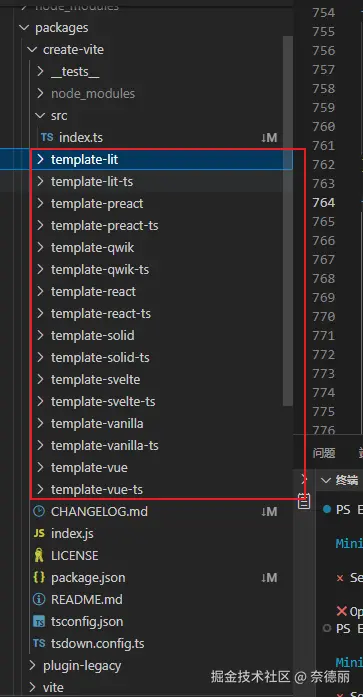
学习当然是为了解决自己的疑惑,以前通过npm create vite,不知道实际上是怎么运行的,之前一直以为我执行了这个命令之后,vite cli是根据用户选择实时动态生成内容,简单点说,就是当你在Vue、React等众多框架中选择Vue时,cli是动态生成了vue模板,其实不是这样,它是提前创建了很多个template,比如js和ts就对应了不同模板,而React和Vue也是,他俩组合就有4个模板。
2. 团队定制需求
我们团队有一些固定的开发规范,比如统一用 Antfu 的 ESLint 配置、Tailwind CSS v4 等等。每次创建新项目都要手动配置这些东西,贼烦。如果能在脚手架里预置这些选项,那就爽歪歪了。
3. 插件化扩展
我想实现一个插件系统,让用户在创建项目的时候就能选择要不要装 ESLint、Tailwind CSS、UnoCSS 这些工具。这样新项目开箱即用,不用再手动配置。
基于这些想法,我开始动手了。
技术选型
既然是 2025 年了,那必须得用现代化的技术栈:
- prompts:交互式命令行工具,API 简单,体积小
- picocolors:给终端输出加点颜色,提升用户体验
没错,整个项目只依赖这两个包:
json
{
  "dependencies": {
    "prompts": "^2.4.2",
    "picocolors": "^1.1.1"
  }
}
项目结构设计
在动手写代码之前,我先规划了一下项目主要结构:
bash
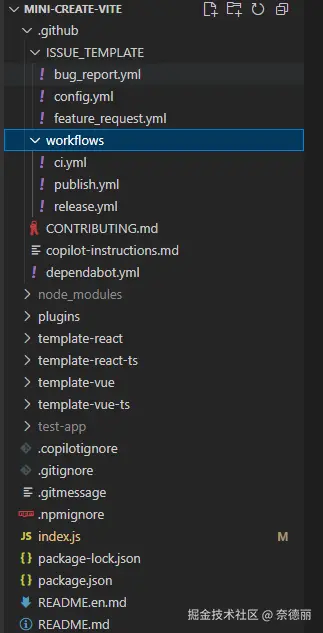
mini-vite/
├── index.js                    # 主入口文件
├── plugins/                    # 插件系统
│   ├── index.js               # 插件管理器
│   ├── eslint.js              # ESLint 插件
│   ├── tailwind.js            # Tailwind CSS 插件
│   └── unocss.js              # UnoCSS 插件
├── template-vue/              # Vue JavaScript 模板
├── template-vue-ts/           # Vue TypeScript 模板
├── template-react/            # React JavaScript 模板
├── template-react-ts/         # React TypeScript 模板
└── package.json
结构很清晰:
- 主逻辑放在
index.js - 插件系统独立成
plugins目录,方便扩展 - 每个模板都是独立的目录,包含完整的项目文件
除了主要目录,我还搭建了工作流,以及github 原生dependabot,如果有小伙伴感兴趣的话,后期可以写一篇文章专门讲一讲如何配置。
核心流程实现
下面讲讲具体的实现细节。整个流程可以分为 7 个步骤:
第一步:配置命令行入口
首先在 package.json 里声明 bin 字段:
json
{
  "name": "mini-vite",
  "type": "module",
  "bin": {
    "mini-vite": "index.js",
    "create-mini-vite": "index.js"
  }
}
注意两点:
- type 必须设置为 module,这样才能用 ES Module 语法
- 我配置了两个命令名,用户可以用
mini-vite或create-mini-vite,怎么顺手怎么来
然后在 index.js 开头加上 shebang:
js
#!/usr/bin/env node这一行告诉系统用 Node.js 来执行这个文件。没有这一行,直接运行会报错。
第二步:询问项目名称
js
import prompts from 'prompts'
import colors from 'picocolors'

const { cyan, green, yellow, red, reset } = colors

async function init() {
  console.log(`\n${cyan('Mini Vite')} - A minimal scaffolding tool\n`)

  let targetDir = 'mini-vite-project'

  const result = await prompts({
    type: 'text',
    name: 'projectName',
    message: reset('Project name:'),
    initial: targetDir,
    onState: (state) => {
      targetDir = state.value?.trim() || targetDir
    }
  })

  if (!result.projectName) {
    console.log('\n' + red('✖') + ' Operation cancelled')
    return
  }
}

init().catch((e) => {
  console.error(red('Error:'), e)
  process.exit(1)
})
用 prompts 询问用户输入项目名称,默认是 mini-vite-project。如果用户直接按回车或者 Ctrl+C 取消,就退出程序。
第三步:检查目录是否存在
js
import fs from 'fs'
import path from 'path'

const root = path.join(process.cwd(), targetDir)

// 判断目录是否为空
function isEmpty(path) {
  const files = fs.readdirSync(path)
  return files.length === 0 || (files.length === 1 && files[0] === '.git')
}

// 清空目录
function emptyDir(dir) {
  if (!fs.existsSync(dir)) return
  for (const file of fs.readdirSync(dir)) {
    if (file === '.git') continue
    fs.rmSync(path.resolve(dir, file), { recursive: true, force: true })
  }
}

if (fs.existsSync(root) && !isEmpty(root)) {
  const response = await prompts({
    type: 'select',
    name: 'overwrite',
    message: `Target directory "${targetDir}" is not empty. Please choose:`,
    choices: [
      { title: 'Cancel', value: 'no' },
      { title: 'Remove existing files', value: 'yes' }
    ]
  })

  if (response.overwrite === 'no') {
    console.log('\n' + red('✖') + ' Operation cancelled')
    return
  } else if (response.overwrite === 'yes') {
    console.log(`\nRemoving existing files in ${targetDir}...`)
    emptyDir(root)
  }
}
这里我踩了个坑!一开始我用 fs.rmdirSync(),结果发现如果目录非空就会报错。后来改成 fs.rmSync() 配合 recursive: true,才能递归删除整个目录。
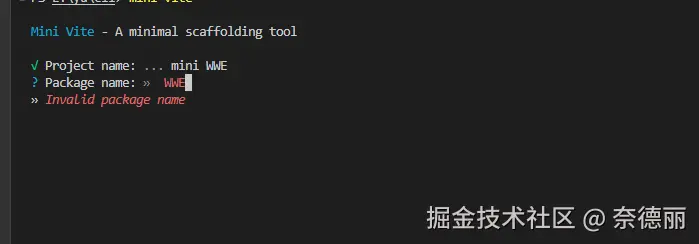
第四步:验证包名
js
function isValidPackageName(projectName) {
  return /^(?:@[a-z\d\-*~][a-z\d\-*._~]*\/)?[a-z\d\-~][a-z\d\-._~]*$/.test(projectName)
}

function toValidPackageName(projectName) {
  return projectName
    .trim()
    .toLowerCase()
    .replace(/\s+/g, '-')
    .replace(/^[._]/, '')
    .replace(/[^a-z\d\-~]+/g, '-')
}

let packageName = path.basename(root)

if (!isValidPackageName(packageName)) {
  const response = await prompts({
    type: 'text',
    name: 'packageName',
    message: reset('Package name:'),
    initial: toValidPackageName(packageName),
    validate: (name) => isValidPackageName(name) || 'Invalid package name'
  })
  packageName = response.packageName
}
npm 包名有一定的规范,不能有大写字母、空格、特殊字符等。所以需要验证一下,如果不合法就提示用户重新输入。
第五步:选择框架和变体
js
const FRAMEWORKS = [
  {
    name: 'vue',
    display: 'Vue',
    color: green,
    variants: [
      { name: 'vue-ts', display: 'TypeScript', color: blue },
      { name: 'vue', display: 'JavaScript', color: yellow }
    ]
  },
  {
    name: 'react',
    display: 'React',
    color: cyan,
    variants: [
      { name: 'react-ts', display: 'TypeScript', color: blue },
      { name: 'react', display: 'JavaScript', color: yellow }
    ]
  }
]

// 选择框架
const frameworkResponse = await prompts({
  type: 'select',
  name: 'framework',
  message: reset('Select a framework:'),
  choices: FRAMEWORKS.map(framework => ({
    title: framework.color(framework.display),
    value: framework
  }))
})

const framework = frameworkResponse.framework

if (!framework) {
  console.log('\n' + red('✖') + ' Operation cancelled')
  return
}

// 选择变体(TypeScript 或 JavaScript)
const variantResponse = await prompts({
  type: 'select',
  name: 'variant',
  message: reset('Select a variant:'),
  choices: framework.variants.map(variant => ({
    title: variant.color(variant.display),
    value: variant.name
  }))
})

const template = variantResponse.variant
这里我用了两级选择:先选框架(Vue 或 React),再选变体(TypeScript 或 JavaScript)。这样交互更清晰,用户体验更好。
每个选项都用不同的颜色标识,视觉效果更友好。
第六步:选择增强功能(插件系统)
这是我觉得最有意思的部分!一开始我vite cli 的swc也是动态插入的,但是并没有这种插件模块,我想了一下还是通过单独的模块来实现一个插件系统,因为后续会扩展更多的插件,这样可扩展性也更高点
js
// 5. 选择增强功能(可选)
  const featuresResponse = await prompts([
    {
      type: 'multiselect',
      name: 'features',
      message: reset('Select additional features:'),
      //把多选一的插件排除掉
      choices: getPluginChoices().filter(choice => !['tailwind', 'unocss'].includes(choice.value)),
      hint: '- Space to select. Return to submit',
      instructions: false
    }
  ])

  const selectedFeatures = featuresResponse.features || []

  // 6. 选择 CSS 框架(单选,可选)
  const cssFrameworkResponse = await prompts({
    type: 'select',
    name: 'cssFramework',
    message: reset('Select a CSS framework (optional):'),
    choices: [
      { title: 'None', value: null },
      { title: 'Tailwind CSS v4', value: 'tailwind', description: 'Utility-first CSS framework' },
      { title: 'UnoCSS', value: 'unocss', description: 'Instant on-demand Atomic CSS' }
    ]
  })

  if (cssFrameworkResponse.cssFramework) {
    selectedFeatures.push(cssFrameworkResponse.cssFramework)
  }
我把插件分成了两类:
- 通用功能:ESLint(多选)等不能同时选择的扩展
- CSS 框架:Tailwind CSS 或 UnoCSS(单选)
为什么要分开呢?因为 CSS 框架是互斥的,不能同时装 Tailwind 和 UnoCSS,会冲突。所以必须用单选。
第七步:复制模板并应用插件
js
import { fileURLToPath } from 'url'
import { applyPlugins } from './plugins/index.js'

const currentDir = path.dirname(fileURLToPath(import.meta.url))
const templateDir = path.resolve(currentDir, `template-${template}`)

// 复制文件的工具函数
function copy(src, dest) {
  const stat = fs.statSync(src)
  if (stat.isDirectory()) {
    copyDir(src, dest)
  } else {
    fs.copyFileSync(src, dest)
  }
}

function copyDir(srcDir, destDir) {
  fs.mkdirSync(destDir, { recursive: true })
  for (const file of fs.readdirSync(srcDir)) {
    const srcFile = path.resolve(srcDir, file)
    const destFile = path.resolve(destDir, file)
    copy(srcFile, destFile)
  }
}

// 创建目标目录
fs.mkdirSync(root, { recursive: true })

// 复制模板文件
const files = fs.readdirSync(templateDir)
for (const file of files.filter(f => f !== 'package.json')) {
  const srcFile = path.join(templateDir, file)
  const destFile = path.join(root, file)
  copy(srcFile, destFile)
}

// 读取并修改 package.json
const pkgPath = path.join(templateDir, 'package.json')
const pkg = JSON.parse(fs.readFileSync(pkgPath, 'utf-8'))
pkg.name = packageName

// 应用选中的插件
applyPlugins(selectedFeatures, root, template, pkg)

// 写入 package.json
fs.writeFileSync(
  path.join(root, 'package.json'),
  JSON.stringify(pkg, null, 2) + '\n'
)
这里有个小细节:因为用了 ES Module,没有 __dirname 变量,所以要用 import.meta.url 配合 fileURLToPath 来获取当前文件路径。
复制文件的逻辑很简单:递归遍历模板目录,把每个文件都复制到目标目录。
最关键的是 applyPlugins 这一步,它会根据用户选择的插件,动态修改项目配置。
插件系统的设计
插件系统是整个项目的核心,我花了不少时间来设计它的架构。
插件的标准结构
每个插件都是一个独立的 JS 文件,导出一个对象:
js
// plugins/eslint.js
export const eslintPlugin = {
  name: 'eslint',
  title: 'ESLint + Prettier (Antfu Config)',
  description: 'Code quality and formatting',

  setup(root, template, pkg) {
    // 1. 添加依赖
    pkg.devDependencies = pkg.devDependencies || {}
    pkg.devDependencies['eslint'] = '^9.39.1'
    pkg.devDependencies['@antfu/eslint-config'] = '^6.2.0'

    // 2. 创建配置文件
    const configContent = `import antfu from '@antfu/eslint-config'

export default antfu()`

    fs.writeFileSync(
      path.join(root, 'eslint.config.js'),
      configContent
    )

    console.log(`${green('✔')} ESLint configured`)
  }
}
每个插件包含:
- name:插件标识
- title:显示给用户看的名称
- description:简短描述
- setup :安装函数,接收
root(项目目录)、template(模板名称)、pkg(package.json 对象)三个参数
插件管理器
js
// plugins/index.js
import { eslintPlugin } from './eslint.js'
import { tailwindPlugin } from './tailwind.js'
import { unocssPlugin } from './unocss.js'

export const plugins = {
  eslint: eslintPlugin,
  tailwind: tailwindPlugin,
  unocss: unocssPlugin
}

// 插件执行顺序
const pluginOrder = {
  eslint: 1,
  tailwind: 2,
  unocss: 2
}

export function applyPlugins(selectedPlugins, root, template, pkg) {
  // 按优先级排序
  const sortedPlugins = [...selectedPlugins].sort((a, b) => {
    const orderA = pluginOrder[a] || 999
    const orderB = pluginOrder[b] || 999
    return orderA - orderB
  })

  for (const pluginName of sortedPlugins) {
    const plugin = plugins[pluginName]

    if (!plugin) {
      console.error(`${red('✖')} Plugin "${pluginName}" not found`)
      continue
    }

    try {
      plugin.setup(root, template, pkg)
    } catch (error) {
      console.error(`${red('✖')} Failed to configure ${plugin.title}`)
      console.error(`   ${error.message}`)
    }
  }
}
插件管理器负责:
- 按优先级排序插件(ESLint 要先执行,CSS 框架后执行)
- 依次调用每个插件的
setup方法 - 错误处理,防止某个插件失败导致整个流程崩溃
Tailwind CSS v4 插件
这里我又踩了个坑!
Tailwind CSS v4 的配置方式和 v3 完全不同。v3 需要创建 tailwind.config.js 和 postcss.config.js,但 v4 简化了很多:
js
// plugins/tailwind.js
export const tailwindPlugin = {
  name: 'tailwind',
  title: 'Tailwind CSS v4',
  description: 'Utility-first CSS framework',

  setup(root, template, pkg) {
    // 1. 添加依赖
    pkg.devDependencies['tailwindcss'] = '^4.1.0'
    pkg.devDependencies['@tailwindcss/vite'] = '^4.1.0'

    // 2. 创建 CSS 文件
    const cssPath = path.join(root, 'src/index.css')
    fs.writeFileSync(cssPath, '@import "tailwindcss";\n')

    // 3. 修改 vite.config.js
    const viteConfigPath = path.join(root, 'vite.config.js')
    let viteConfig = fs.readFileSync(viteConfigPath, 'utf-8')

    // 在 import 区域添加
    viteConfig = viteConfig.replace(
      /(import .+ from .+\n)/,
      `$1import tailwindcss from '@tailwindcss/vite'\n`
    )

    // 在 plugins 数组添加
    viteConfig = viteConfig.replace(
      /plugins:\s*\[/,
      'plugins: [tailwindcss(), '
    )

    fs.writeFileSync(viteConfigPath, viteConfig)

    console.log(`${green('✔')} Tailwind CSS v4 configured`)
  }
}
这里采用的最新版的v4 tailwindcss,v4 的配置步骤:
- 安装
tailwindcss和@tailwindcss/vite - 在 CSS 文件里写
@import "tailwindcss"; - 在
vite.config.js引入 Vite 插件
不需要 创建 tailwind.config.js 和 postcss.config.js!
UnoCSS 插件
js
// plugins/unocss.js
export const unocssPlugin = {
  name: 'unocss',
  title: 'UnoCSS',
  description: 'Instant on-demand Atomic CSS',

  setup(root, template, pkg) {
    // 1. 添加依赖
    pkg.devDependencies['unocss'] = '^0.64.6'

    // 2. 创建配置文件
    const configContent = `import { defineConfig } from 'unocss'

export default defineConfig({
  // 你的配置
})`

    fs.writeFileSync(
      path.join(root, 'uno.config.ts'),
      configContent
    )

    // 3. 修改 vite.config.js
    const viteConfigPath = path.join(root, 'vite.config.js')
    let viteConfig = fs.readFileSync(viteConfigPath, 'utf-8')

    viteConfig = viteConfig.replace(
      /(import .+ from .+\n)/,
      `$1import UnoCSS from 'unocss/vite'\n`
    )

    viteConfig = viteConfig.replace(
      /plugins:\s*\[/,
      'plugins: [UnoCSS(), '
    )

    fs.writeFileSync(viteConfigPath, viteConfig)

    // 4. 修改 main 入口文件
    const isVue = template.startsWith('vue')
    const mainFile = isVue ? 'main.js' : 'main.jsx'
    const mainPath = path.join(root, 'src', mainFile)
    let mainContent = fs.readFileSync(mainPath, 'utf-8')

    mainContent = `import 'virtual:uno.css'\n${mainContent}`

    fs.writeFileSync(mainPath, mainContent)

    console.log(`${green('✔')} UnoCSS configured`)
  }
}
UnoCSS 的配置相对复杂一点:
- 创建
uno.config.ts - 修改
vite.config.js引入插件 - 在入口文件(
main.js或main.jsx)引入virtual:uno.css
模板设计
因为平常主要用Vue和React比较多,我为 Vue 和 React 各准备了 JS 和 TS 两个版本,一共 4 个模板。
Vue 模板
arduino
template-vue/
├── index.html
├── vite.config.js
├── package.json
├── public/
│   └── vite.svg
└── src/
    ├── main.js
    ├── App.vue
    ├── style.css
    ├── components/
    │   └── HelloWorld.vue
    └── assets/
└── vue.svgpackage.json:
json
{
  "name": "vite-project",
  "private": true,
  "version": "0.0.0",
  "type": "module",
  "scripts": {
    "dev": "vite",
    "build": "vite build",
    "preview": "vite preview"
  },
  "dependencies": {
    "vue": "^3.5.13"
  },
  "devDependencies": {
    "@vitejs/plugin-vue": "^5.2.1",
    "vite": "^6.0.5"
  }
}vite.config.js:
js
import { defineConfig } from 'vite'
import vue from '@vitejs/plugin-vue'

export default defineConfig({
  plugins: [vue()]
})
React 模板
arduino
template-react/
├── index.html
├── vite.config.js
├── package.json
├── public/
│   └── vite.svg
└── src/
    ├── main.jsx
    ├── App.jsx
    ├── index.css
    ├── components/
    │   └── Counter.jsx
    └── assets/
└── react.svgpackage.json:
json
{
  "name": "vite-project",
  "private": true,
  "version": "0.0.0",
  "type": "module",
  "scripts": {
    "dev": "vite",
    "build": "vite build",
    "preview": "vite preview"
  },
  "dependencies": {
    "react": "^18.3.1",
    "react-dom": "^18.3.1"
  },
  "devDependencies": {
    "@vitejs/plugin-react": "^4.3.4",
    "@types/react": "^18.3.18",
    "@types/react-dom": "^18.3.5",
    "vite": "^6.0.5"
  }
}
TypeScript 版本就是在上面的基础上:
- 添加
tsconfig.json和tsconfig.node.json - 文件后缀改成
.ts或.tsx package.json里加上typescript依赖
使用方式
开发阶段,可以用node index.js或则是使用 npm link 把命令链接到全局:
bash
cd mini-vite
npm link
然后就可以在任意目录使用了:
bash
mini-vite my-app或者:
bash
create-mini-vite my-app执行后会看到交互式界面:
vbnet
Mini Vite - A minimal scaffolding tool

? Project name: › my-app
? Select a framework: ›
  Vue
  React
? Select a variant: ›
  TypeScript
  JavaScript
? Select additional features: ›
◯ ESLint + Prettier (Antfu Config)
? Select a CSS framework (optional): ›
  None
  Tailwind CSS v4
  UnoCSS

✔ Scaffolding project in /path/to/my-app...

✔ ESLint configured
✔ Tailwind CSS v4 configured

✔ Done!

Now run:

  cd my-app
  npm install
  npm run dev
踩过的坑
1. ES Module 的 __dirname 问题
在 ES Module 里没有 __dirname 和 __filename,要这样获取:
js
import { fileURLToPath } from 'url'
import path from 'path'

const __filename = fileURLToPath(import.meta.url)
const __dirname = path.dirname(__filename)
我一开始直接用 __dirname,结果报错说未定义。查了文档才知道要用 import.meta.url。
2. Tailwind CSS v4 的配置变化
v4 不再需要 tailwind.config.js 和 postcss.config.js,直接在 CSS 里引入就行:
css
@import "tailwindcss";然后在 vite.config.js 引入 Vite 插件:
js
import tailwindcss from '@tailwindcss/vite'

export default defineConfig({
  plugins: [tailwindcss()]
})
我一开始还按 v3 的方式创建配置文件,浪费了好长时间。
3. 正则表达式修改 vite.config.js
用正则表达式修改配置文件的时候要特别小心:
js
// 不好的写法(假设格式固定)
content.replace('plugins: [', 'plugins: [tailwindcss(), ')

// 好的写法(考虑各种空格情况)
content.replace(/plugins:\s*\[/, 'plugins: [tailwindcss(), ')
因为不同人写代码的格式可能不一样,有人写 plugins:[,有人写 plugins: [。用正则的 \s* 可以匹配任意空格。
和官方工具的对比
| 特性 | create-vite | mini-vite |
|---|---|---|
| 支持的框架 | 8+ | 2(Vue、React) |
| 模板数量 | 18+ | 4 |
| 依赖数量 | 3 | 2 |
| 插件系统 | ✗ | ✓(ESLint、Tailwind、UnoCSS) |
| 代码量 | ~500 行 | ~300 行 |
| 团队定制 | 困难 | 容易 |
| 学习难度 | 中等 | 简单 |
官方工具功能更全面,适合生产环境。我这个更轻量、更灵活,适合学习和团队定制。
写在最后
后续我会补充更多plugin,支持h5端不同机型适配、router和跨页面应用存储等通用功能 大家也可以尝试写一个自己的cli工具,无论是团队开发还是个人独立开发,我觉得都挺有用的,虽然现在ai很牛,有时候让它创建项目,也会出错,还得不断调试才能做好(吐槽一下)
emm 懦夫的味道...