在 Android 应用开发中,底部导航栏是非常常见的交互组件,能够让用户快速切换不同的功能模块。本文将详细介绍如何使用 Material Design 组件中的 BottomNavigationView 实现底部导航功能。
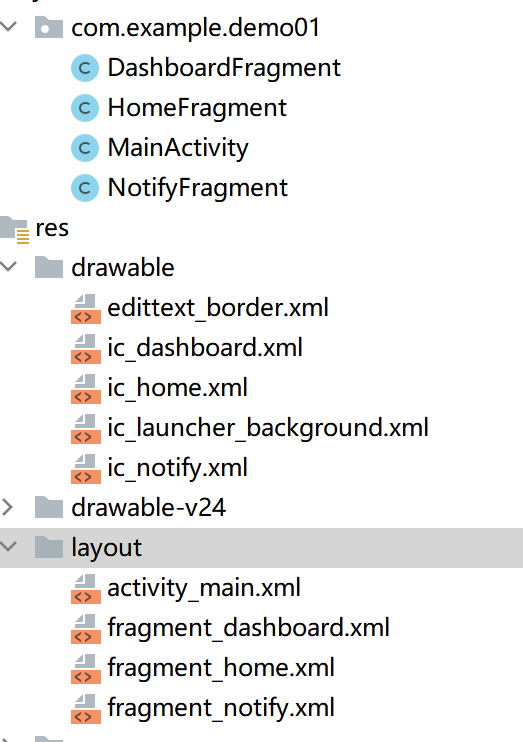
目录结构如图
一、布局文件实现
首先,我们需要在 activity_main.xml 中定义主布局结构,主要包含一个用于显示内容的 FrameLayout 和底部导航栏 BottomNavigationView。
XML
<?xml version="1.0" encoding="utf-8"?>
<LinearLayout xmlns:android="http://schemas.android.com/apk/res/android"
    xmlns:app="http://schemas.android.com/apk/res-auto"
    android:orientation="vertical"
    android:layout_width="match_parent"
    android:layout_height="match_parent">
    <!-- 用于显示Fragment内容的容器 -->
    <FrameLayout
        android:id="@+id/fragment_container"
        android:layout_width="match_parent"
        android:layout_height="0dp"
        android:layout_weight="1" />

    <!-- 底部导航栏 -->
    <com.google.android.material.bottomnavigation.BottomNavigationView
        android:id="@+id/bottom_nav"
        android:layout_width="match_parent"
        android:layout_height="wrap_content"
        app:menu="@menu/bottom_nav_menu" />
</LinearLayout>
二、创建导航菜单
接下来需要创建底部导航栏的菜单文件,在 res/menu 目录下创建 bottom_nav_menu.xml:
XML
<?xml version="1.0" encoding="utf-8"?>
<menu xmlns:android="http://schemas.android.com/apk/res/android">
    <item
        android:id="@+id/nav_home"
        android:icon="@drawable/ic_home"
        android:title="Home" />
    <item
        android:id="@+id/nav_dashboard"
        android:icon="@drawable/ic_dashboard"
        android:title="Dashboard" />
    <item
        android:id="@+id/nav_notify"
        android:icon="@drawable/ic_notify"
        android:title="Notify" />
</menu>
三、添加导航图标
在 res/drawable 目录下添加三个导航图标文件(可以使用 Vector Asset 创建):
- ic_home.xml(首页图标)
XML
<vector xmlns:android="http://schemas.android.com/apk/res/android"
    android:width="24dp"
    android:height="24dp"
    android:viewportWidth="24.0"
    android:viewportHeight="24.0">
    <path
        android:fillColor="#FF000000"
        android:pathData="M10,20v-6h4v6h5v-8h3L12,3 2,12h3v8z" />
</vector>- ic_dashboard.xml(仪表盘图标)
XML
<vector xmlns:android="http://schemas.android.com/apk/res/android"
    android:width="24dp"
    android:height="24dp"
    android:viewportWidth="24.0"
    android:viewportHeight="24.0">
    <path
        android:fillColor="#FF000000"
        android:pathData="M3,13h8L11,3L3,3v10zM3,21h8v-6L3,15v6zM13,21h8L21,11h-8v10zM13,3v6h8L21,3h-8z" />
</vector>- ic_notify.xml(通知图标)
XML
<vector xmlns:android="http://schemas.android.com/apk/res/android"
    android:width="24dp"
    android:height="24dp"
    android:viewportWidth="24.0"
    android:viewportHeight="24.0">
    <path
        android:fillColor="#FF000000"
        android:pathData="M12,22c1.1,0 2,-0.9 2,-2h-4c0,1.1 0.9,2 2,2zM18,16v-5c0,-3.07 -1.63,-5.64 -4.5,-6.32L13.5,4c0,-0.83 -0.67,-1.5 -1.5,-1.5s-1.5,0.67 -1.5,1.5v0.68C7.64,5.36 6,7.92 6,11v5l-2,2v1h16v-1l-2,-2z" />
</vector>
四、创建 Fragment 布局
我们需要为三个导航项创建对应的 Fragment 布局文件:
- fragment_home.xml(首页布局):
XML
<?xml version="1.0" encoding="utf-8"?>
<LinearLayout xmlns:android="http://schemas.android.com/apk/res/android"
    android:layout_width="match_parent"
    android:layout_height="match_parent"
    android:gravity="center"
    android:orientation="vertical">

    <TextView
        android:layout_width="wrap_content"
        android:layout_height="wrap_content"
        android:text="首页"
        android:textSize="24sp" />
</LinearLayout>- fragment_dashboard.xml(仪表盘布局):
```XML
<?xml version="1.0" encoding="utf-8"?>
<LinearLayout xmlns:android="http://schemas.android.com/apk/res/android"
    android:layout_width="match_parent"
    android:layout_height="match_parent"
    android:gravity="center"
    android:orientation="vertical">

    <TextView
        android:layout_width="wrap_content"
        android:layout_height="wrap_content"
        android:text="仪表盘"
        android:textSize="24sp" />
</LinearLayout>
```- fragment_notify.xml(通知布局):
```XML
<?xml version="1.0" encoding="utf-8"?>
<LinearLayout xmlns:android="http://schemas.android.com/apk/res/android"
    android:layout_width="match_parent"
    android:layout_height="match_parent"
    android:gravity="center"
    android:orientation="vertical">

    <TextView
        android:layout_width="wrap_content"
        android:layout_height="wrap_content"
        android:text="通知"
        android:textSize="24sp" />
</LinearLayout>
```

### 五、创建 Fragment 类

为每个布局创建对应的 Fragment 类:- HomeFragment.java:
```java
import android.os.Bundle;
import android.view.LayoutInflater;
import android.view.View;
import android.view.ViewGroup;
import androidx.fragment.app.Fragment;

public class HomeFragment extends Fragment {
    @Override
    public View onCreateView(LayoutInflater inflater, ViewGroup container,
                             Bundle savedInstanceState) {
        // 加载布局文件
        return inflater.inflate(R.layout.fragment_home, container, false);
    }
}
```

其他代码也一样 注意修改 类名和 布局选择
六、实现 MainActivity 逻辑
最后,在 MainActivity 中实现底部导航栏的切换逻辑:
java
package com.example.demo01;
import android.os.Bundle;
import androidx.appcompat.app.AppCompatActivity;
import androidx.fragment.app.Fragment;
import com.google.android.material.bottomnavigation.BottomNavigationView;
public class MainActivity extends AppCompatActivity {
    private BottomNavigationView bottomNav;
    @Override
    protected void onCreate(Bundle savedInstanceState) {
        super.onCreate(savedInstanceState);
        setContentView(R.layout.activity_main);
        bottomNav = findViewById(R.id.bottom_nav);
        // 默认首页
        loadFragment(new HomeFragment());
        // 1.2.1 旧版监听接口
        bottomNav.setOnNavigationItemSelectedListener(
                item -> {
                    Fragment selected = null;
                    int id = item.getItemId();

                    if (id == R.id.nav_home) {
                        selected = new HomeFragment();
                    } else if (id == R.id.nav_dashboard) {
                        selected = new DashboardFragment();
                    } else if (id == R.id.nav_notify) {
                        selected = new NotifyFragment();
                    }
                    return loadFragment(selected);
                });
    }
    private boolean loadFragment(Fragment f) {
        if (f == null) return false;
        getSupportFragmentManager()
                .beginTransaction()
                .replace(R.id.fragment_container, f)
                .commit();
        return true;
    }
}
七、注意事项
-
底部导航栏的图标和文字颜色可以通过主题进行自定义
-
当导航项超过 3 个时,BottomNavigationView 会默认使用移位模式,可通过代码禁用
