Nginx 配置入门到实战:从静态网站到负载均衡
1. Nginx 安装与环境配置
1.1 系统环境准备
首先更新系统包并安装必要的依赖:
bash
# 更新系统包列表
sudo apt update

# 安装编译工具和依赖
sudo apt install -y build-essential libpcre3 libpcre3-dev zlib1g zlib1g-dev libssl-dev curl wget git
1.2 下载并编译安装 Nginx
创建安装脚本文件:
文件名:install_nginx.sh
bash
#!/bin/bash

# 创建nginx用户和组
sudo groupadd nginx
sudo useradd -g nginx -s /bin/false nginx

# 下载nginx源码
cd /tmp
wget http://nginx.org/download/nginx-1.24.0.tar.gz
tar -zxvf nginx-1.24.0.tar.gz
cd nginx-1.24.0

# 配置编译参数
./configure \
    --prefix=/usr/local/nginx \
    --user=nginx \
    --group=nginx \
    --with-http_ssl_module \
    --with-http_v2_module \
    --with-http_realip_module \
    --with-http_stub_status_module \
    --with-http_gzip_static_module \
    --with-pcre \
    --with-stream

# 编译并安装
make
sudo make install

# 创建systemd服务文件
sudo tee /etc/systemd/system/nginx.service << EOF
[Unit]
Description=The nginx HTTP and reverse proxy server
After=network.target

[Service]
Type=forking
PIDFile=/usr/local/nginx/logs/nginx.pid
ExecStartPre=/usr/local/nginx/sbin/nginx -t
ExecStart=/usr/local/nginx/sbin/nginx
ExecReload=/usr/local/nginx/sbin/nginx -s reload
ExecStop=/usr/local/nginx/sbin/nginx -s quit
PrivateTmp=true

[Install]
WantedBy=multi-user.target
EOF

# 重新加载systemd并启动nginx
sudo systemctl daemon-reload
sudo systemctl enable nginx
sudo systemctl start nginx

# 验证安装
/usr/local/nginx/sbin/nginx -v
echo "Nginx 安装完成!"
执行安装脚本:
bash
chmod +x install_nginx.sh
sudo ./install_nginx.sh
1.3 验证安装
检查Nginx服务状态:
bash
sudo systemctl status nginx
curl -I http://localhost
2. 静态网站配置
2.1 创建网站目录结构
创建静态网站文件目录:
bash
# 创建网站根目录
sudo mkdir -p /var/www/static-site/html
sudo mkdir -p /var/www/static-site/logs

# 设置权限
sudo chown -R nginx:nginx /var/www/static-site
sudo chmod -R 755 /var/www/static-site
2.2 创建示例静态网站
文件名:/var/www/static-site/html/index.html
html
<!DOCTYPE html>
<html lang="zh-CN">
<head>
    <meta charset="UTF-8">
    <meta name="viewport" content="width=device-width, initial-scale=1.0">
    <title>静态网站示例</title>
    <style>
        * {
            margin: 0;
            padding: 0;
            box-sizing: border-box;
        }

        body {
            font-family: 'Arial', sans-serif;
            line-height: 1.6;
            color: #333;
            background: linear-gradient(135deg, #667eea 0%, #764ba2 100%);
            min-height: 100vh;
        }

        .container {
            max-width: 1200px;
            margin: 0 auto;
            padding: 2rem;
        }

        .header {
            text-align: center;
            color: white;
            margin-bottom: 3rem;
        }

        .header h1 {
            font-size: 3rem;
            margin-bottom: 1rem;
            text-shadow: 2px 2px 4px rgba(0,0,0,0.3);
        }

        .header p {
            font-size: 1.2rem;
            opacity: 0.9;
        }

        .content-grid {
            display: grid;
            grid-template-columns: repeat(auto-fit, minmax(300px, 1fr));
            gap: 2rem;
            margin-bottom: 3rem;
        }

        .card {
            background: white;
            padding: 2rem;
            border-radius: 10px;
            box-shadow: 0 10px 30px rgba(0,0,0,0.2);
            transition: transform 0.3s ease;
        }

        .card:hover {
            transform: translateY(-5px);
        }

        .card h3 {
            color: #667eea;
            margin-bottom: 1rem;
            font-size: 1.5rem;
        }

        .card p {
            color: #666;
            line-height: 1.6;
        }

        .status-info {
            background: rgba(255,255,255,0.1);
            padding: 1.5rem;
            border-radius: 10px;
            color: white;
            text-align: center;
        }

        .status-item {
            margin: 0.5rem 0;
            font-size: 1.1rem;
        }

        .highlight {
            color: #ffd700;
            font-weight: bold;
        }
    </style>
</head>
<body>
    <div class="container">
        <div class="header">
            <h1>🚀 Nginx 静态网站</h1>
            <p>恭喜!您的静态网站已成功通过 Nginx 部署</p>
        </div>

        <div class="content-grid">
            <div class="card">
                <h3>📁 静态资源服务</h3>
                <p>Nginx 高效地提供 HTML、CSS、JavaScript 和图像文件,具有出色的性能和低资源消耗。</p>
            </div>

            <div class="card">
                <h3>⚡ 性能优化</h3>
                <p>通过 Gzip 压缩、缓存控制和连接优化,Nginx 确保您的网站快速加载并提供流畅的用户体验。</p>
            </div>

            <div class="card">
                <h3>🔒 安全可靠</h3>
                <p>Nginx 提供强大的安全功能,包括访问控制、SSL/TLS 支持和 DDoS 防护机制。</p>
            </div>
        </div>

        <div class="status-info">
            <div class="status-item">
                服务器状态: <span class="highlight">运行中</span>
            </div>
            <div class="status-item">
                服务类型: <span class="highlight">静态网站托管</span>
            </div>
            <div class="status-item">
                部署时间: <span id="currentTime" class="highlight"></span>
            </div>
        </div>
    </div>

    <script>
        // 显示当前时间
        document.getElementById('currentTime').textContent = new Date().toLocaleString();

        // 添加交互效果
        document.addEventListener('DOMContentLoaded', function() {
            const cards = document.querySelectorAll('.card');
            cards.forEach((card, index) => {
                card.style.animationDelay = (index * 0.1) + 's';
                card.style.animation = 'fadeInUp 0.6s ease forwards';
            });
        });
    </script>
</body>
</html>
2.3 配置静态网站服务器
文件名:/usr/local/nginx/conf/nginx.conf
nginx
user nginx nginx;
worker_processes auto;
error_log /var/www/static-site/logs/error.log;
pid /usr/local/nginx/logs/nginx.pid;

events {
    worker_connections 1024;
    use epoll;
    multi_accept on;
}

http {
    include mime.types;
    default_type application/octet-stream;

    # 日志格式
    log_format main '$remote_addr - $remote_user [$time_local] "$request" '
                    '$status $body_bytes_sent "$http_referer" '
                    '"$http_user_agent" "$http_x_forwarded_for"';

    # 访问日志
    access_log /var/www/static-site/logs/access.log main;

    # 基础性能优化
    sendfile on;
    tcp_nopush on;
    tcp_nodelay on;
    keepalive_timeout 65;
    types_hash_max_size 2048;

    # Gzip 压缩配置
    gzip on;
    gzip_vary on;
    gzip_min_length 1024;
    gzip_types text/plain text/css application/json application/javascript text/xml application/xml application/xml+rss text/javascript;

    # 静态网站服务器配置
    server {
        listen 80;
        server_name localhost;
        root /var/www/static-site/html;
        index index.html index.htm;

        # 安全头设置
        add_header X-Frame-Options "SAMEORIGIN" always;
        add_header X-XSS-Protection "1; mode=block" always;
        add_header X-Content-Type-Options "nosniff" always;

        # 静态资源缓存
        location ~* \.(jpg|jpeg|png|gif|ico|css|js)$ {
            expires 1y;
            add_header Cache-Control "public, immutable";
        }

        # 错误页面
        error_page 404 /404.html;
        location = /404.html {
            internal;
        }

        error_page 500 502 503 504 /50x.html;
        location = /50x.html {
            internal;
        }
    }
}
2.4 测试静态网站配置
bash
# 检查配置文件语法
sudo /usr/local/nginx/sbin/nginx -t

# 重新加载配置
sudo systemctl reload nginx

# 测试访问
curl http://localhost
3. 反向代理配置
3.1 创建后端应用示例
创建简单的 Node.js 后端应用:
文件名:/var/www/backend-app/app.js
javascript
const http = require('http');
const url = require('url');

const server = http.createServer((req, res) => {
    const parsedUrl = url.parse(req.url, true);
    const pathname = parsedUrl.pathname;

    // 设置 CORS 头
    res.setHeader('Access-Control-Allow-Origin', '*');
    res.setHeader('Access-Control-Allow-Methods', 'GET, POST, OPTIONS');
    res.setHeader('Access-Control-Allow-Headers', 'Content-Type');

    // 处理预检请求
    if (req.method === 'OPTIONS') {
        res.writeHead(200);
        res.end();
        return;
    }

    // 路由处理
    if (pathname === '/api/info') {
        res.writeHead(200, { 'Content-Type': 'application/json' });
        res.end(JSON.stringify({
            status: 'success',
            message: '欢迎访问后端 API 服务',
            timestamp: new Date().toISOString(),
            server: 'Backend Server 1',
            version: '1.0.0'
        }));
    } else if (pathname === '/api/users') {
        res.writeHead(200, { 'Content-Type': 'application/json' });
        res.end(JSON.stringify({
            users: [
                { id: 1, name: '张三', email: 'zhangsan@example.com' },
                { id: 2, name: '李四', email: 'lisi@example.com' },
                { id: 3, name: '王五', email: 'wangwu@example.com' }
            ]
        }));
    } else if (pathname === '/api/health') {
        res.writeHead(200, { 'Content-Type': 'application/json' });
        res.end(JSON.stringify({
            status: 'healthy',
            uptime: process.uptime(),
            memory: process.memoryUsage()
        }));
    } else {
        res.writeHead(404, { 'Content-Type': 'application/json' });
        res.end(JSON.stringify({
            error: '接口不存在',
            path: pathname
        }));
    }
});

const PORT = 3000;
server.listen(PORT, () => {
    console.log(`后端服务运行在 http://localhost:${PORT}`);
});
启动后端服务:
bash
# 安装 Node.js(如果尚未安装)
curl -fsSL https://deb.nodesource.com/setup_18.x | sudo -E bash -
sudo apt-get install -y nodejs

# 启动后端服务
node /var/www/backend-app/app.js
3.2 配置反向代理
更新 Nginx 配置以包含反向代理:
文件名:/usr/local/nginx/conf/nginx.conf(反向代理部分)
nginx
http {
    # ... 之前的配置保持不变 ...

    # 上游服务器配置
    upstream backend_servers {
        server 127.0.0.1:3000;
        # 可以添加更多后端服务器
        # server 127.0.0.1:3001;
        # server 127.0.0.1:3002;
    }

    # 主服务器配置 - 包含反向代理
    server {
        listen 80;
        server_name localhost;
        root /var/www/static-site/html;
        index index.html index.htm;

        # 安全头设置
        add_header X-Frame-Options "SAMEORIGIN" always;
        add_header X-XSS-Protection "1; mode=block" always;
        add_header X-Content-Type-Options "nosniff" always;

        # API 请求代理到后端
        location /api/ {
            proxy_pass http://backend_servers;
            proxy_set_header Host $host;
            proxy_set_header X-Real-IP $remote_addr;
            proxy_set_header X-Forwarded-For $proxy_add_x_forwarded_for;
            proxy_set_header X-Forwarded-Proto $scheme;

            # 代理超时设置
            proxy_connect_timeout 30s;
            proxy_send_timeout 30s;
            proxy_read_timeout 30s;

            # 缓冲设置
            proxy_buffering on;
            proxy_buffer_size 4k;
            proxy_buffers 8 4k;
        }

        # 静态资源缓存
        location ~* \.(jpg|jpeg|png|gif|ico|css|js)$ {
            expires 1y;
            add_header Cache-Control "public, immutable";
        }

        # 错误页面
        error_page 404 /404.html;
        location = /404.html {
            internal;
        }

        error_page 500 502 503 504 /50x.html;
        location = /50x.html {
            internal;
        }
    }
}
3.3 创建测试页面
文件名:/var/www/static-site/html/proxy-test.html
html
<!DOCTYPE html>
<html lang="zh-CN">
<head>
    <meta charset="UTF-8">
    <meta name="viewport" content="width=device-width, initial-scale=1.0">
    <title>反向代理测试</title>
    <style>
        body {
            font-family: 'Arial', sans-serif;
            max-width: 1200px;
            margin: 0 auto;
            padding: 2rem;
            background: #f5f5f5;
        }

        .container {
            background: white;
            padding: 2rem;
            border-radius: 10px;
            box-shadow: 0 2px 10px rgba(0,0,0,0.1);
        }

        .card {
            background: #f8f9fa;
            padding: 1.5rem;
            margin: 1rem 0;
            border-radius: 8px;
            border-left: 4px solid #007bff;
        }

        button {
            background: #007bff;
            color: white;
            border: none;
            padding: 10px 20px;
            border-radius: 5px;
            cursor: pointer;
            margin: 5px;
        }

        button:hover {
            background: #0056b3;
        }

        pre {
            background: #2d2d2d;
            color: #f8f8f2;
            padding: 1rem;
            border-radius: 5px;
            overflow-x: auto;
        }

        .success { border-left-color: #28a745; }
        .error { border-left-color: #dc3545; }
    </style>
</head>
<body>
    <div class="container">
        <h1>🔀 Nginx 反向代理测试</h1>
        <p>这个页面演示了 Nginx 反向代理的功能,所有 /api/ 请求都被代理到后端 Node.js 服务。</p>

        <div class="card">
            <h3>测试 API 端点</h3>
            <button onclick="testAPI('/api/info')">测试 /api/info</button>
            <button onclick="testAPI('/api/users')">测试 /api/users</button>
            <button onclick="testAPI('/api/health')">测试 /api/health</button>
            <button onclick="testAPI('/api/notfound')">测试不存在的接口</button>
        </div>

        <div class="card">
            <h3>请求详情</h3>
            <div id="requestInfo">点击上方按钮开始测试</div>
        </div>

        <div class="card">
            <h3>响应结果</h3>
            <pre id="responseOutput">等待请求...</pre>
        </div>
    </div>

    <script>
        async function testAPI(endpoint) {
            const requestInfo = document.getElementById('requestInfo');
            const responseOutput = document.getElementById('responseOutput');

            requestInfo.innerHTML = `
                <strong>请求信息:</strong><br>
                - 端点: ${endpoint}<br>
                - 方法: GET<br>
                - 时间: ${new Date().toLocaleString()}
            `;

            responseOutput.textContent = '请求中...';

            try {
                const startTime = performance.now();
                const response = await fetch(endpoint);
                const endTime = performance.now();

                const data = await response.json();

                responseOutput.innerHTML = `<div class="${response.ok ? 'success' : 'error'}">${JSON.stringify(data, null, 2)}</div>`;

                requestInfo.innerHTML += `<br>- 状态码: ${response.status}<br>- 响应时间: ${(endTime - startTime).toFixed(2)}ms`;
            } catch (error) {
                responseOutput.innerHTML = `<div class="error">请求失败: ${error.message}</div>`;
            }
        }
    </script>
</body>
</html>
4. 负载均衡配置
4.1 创建多个后端服务实例
创建第二个后端服务:
文件名:/var/www/backend-app/app2.js
javascript
const http = require('http');
const url = require('url');

const server = http.createServer((req, res) => {
    const parsedUrl = url.parse(req.url, true);
    const pathname = parsedUrl.pathname;

    res.setHeader('Access-Control-Allow-Origin', '*');
    res.setHeader('Access-Control-Allow-Methods', 'GET, POST, OPTIONS');
    res.setHeader('Access-Control-Allow-Headers', 'Content-Type');

    if (req.method === 'OPTIONS') {
        res.writeHead(200);
        res.end();
        return;
    }

    if (pathname === '/api/info') {
        res.writeHead(200, { 'Content-Type': 'application/json' });
        res.end(JSON.stringify({
            status: 'success',
            message: '欢迎访问后端 API 服务',
            timestamp: new Date().toISOString(),
            server: 'Backend Server 2',  // 注意这里标识为服务器2
            version: '1.0.0'
        }));
    } else if (pathname === '/api/users') {
        res.writeHead(200, { 'Content-Type': 'application/json' });
        res.end(JSON.stringify({
            users: [
                { id: 1, name: '赵六', email: 'zhaoliu@example.com' },
                { id: 2, name: '孙七', email: 'sunqi@example.com' },
                { id: 3, name: '周八', email: 'zhouba@example.com' }
            ]
        }));
    } else if (pathname === '/api/health') {
        res.writeHead(200, { 'Content-Type': 'application/json' });
        res.end(JSON.stringify({
            status: 'healthy',
            uptime: process.uptime(),
            memory: process.memoryUsage(),
            server: 'Backend Server 2'
        }));
    } else {
        res.writeHead(404, { 'Content-Type': 'application/json' });
        res.end(JSON.stringify({
            error: '接口不存在',
            path: pathname
        }));
    }
});

const PORT = 3001;
server.listen(PORT, () => {
    console.log(`后端服务 2 运行在 http://localhost:${PORT}`);
});
启动多个后端服务:
bash
# 终端1 - 启动第一个后端服务
node /var/www/backend-app/app.js

# 终端2 - 启动第二个后端服务
node /var/www/backend-app/app2.js
4.2 配置负载均衡
更新 Nginx 配置实现负载均衡:
文件名:/usr/local/nginx/conf/nginx.conf(负载均衡配置)
nginx
http {
    # ... 之前的配置保持不变 ...

    # 上游服务器配置 - 负载均衡
    upstream backend_cluster {
        # 轮询负载均衡策略
        server 127.0.0.1:3000 weight=3;  # 权重3,处理更多请求
        server 127.0.0.1:3001 weight=2;  # 权重2
        server 127.0.0.1:3002 backup;    # 备份服务器

        # 可选的其他负载均衡方法:
        # least_conn;  # 最少连接数
        # ip_hash;     # IP哈希
        # hash $request_uri consistent; # 一致性哈希
    }

    # 健康检查配置
    upstream backend_health {
        server 127.0.0.1:3000;
        server 127.0.0.1:3001;

        # 健康检查参数
        check interval=3000 rise=2 fall=3 timeout=1000;
    }

    # 主服务器配置 - 负载均衡
    server {
        listen 80;
        server_name localhost;
        root /var/www/static-site/html;
        index index.html index.htm;

        # 安全头设置
        add_header X-Frame-Options "SAMEORIGIN" always;
        add_header X-XSS-Protection "1; mode=block" always;
        add_header X-Content-Type-Options "nosniff" always;

        # API 请求负载均衡
        location /api/ {
            proxy_pass http://backend_cluster;
            proxy_set_header Host $host;
            proxy_set_header X-Real-IP $remote_addr;
            proxy_set_header X-Forwarded-For $proxy_add_x_forwarded_for;
            proxy_set_header X-Forwarded-Proto $scheme;
            proxy_set_header X-Forwarded-Server $host;

            # 负载均衡特定头
            proxy_set_header X-LB-Server $upstream_addr;

            # 代理超时设置
            proxy_connect_timeout 30s;
            proxy_send_timeout 30s;
            proxy_read_timeout 30s;

            # 缓冲设置
            proxy_buffering on;
            proxy_buffer_size 4k;
            proxy_buffers 8 4k;

            # 重试机制
            proxy_next_upstream error timeout invalid_header http_500 http_502 http_503 http_504;
            proxy_next_upstream_tries 3;
            proxy_next_upstream_timeout 30s;
        }

        # 负载均衡状态页面
        location /lb-status {
            stub_status on;
            access_log off;
            allow 127.0.0.1;
            deny all;
        }

        # 静态资源缓存
        location ~* \.(jpg|jpeg|png|gif|ico|css|js)$ {
            expires 1y;
            add_header Cache-Control "public, immutable";
        }
    }
}
4.3 创建负载均衡监控页面
文件名:/var/www/static-site/html/load-balancer.html
html
<!DOCTYPE html>
<html lang="zh-CN">
<head>
    <meta charset="UTF-8">
    <meta name="viewport" content="width=device-width, initial-scale=1.0">
    <title>负载均衡监控</title>
    <style>
        :root {
            --primary: #3498db;
            --success: #2ecc71;
            --warning: #f39c12;
            --danger: #e74c3c;
            --dark: #2c3e50;
            --light: #ecf0f1;
        }

        * {
            margin: 0;
            padding: 0;
            box-sizing: border-box;
        }

        body {
            font-family: 'Segoe UI', Tahoma, Geneva, Verdana, sans-serif;
            background: linear-gradient(135deg, #667eea 0%, #764ba2 100%);
            min-height: 100vh;
            padding: 2rem;
        }

        .container {
            max-width: 1400px;
            margin: 0 auto;
        }

        .header {
            text-align: center;
            color: white;
            margin-bottom: 3rem;
        }

        .header h1 {
            font-size: 3rem;
            margin-bottom: 1rem;
        }

        .dashboard {
            display: grid;
            grid-template-columns: 1fr 1fr;
            gap: 2rem;
            margin-bottom: 2rem;
        }

        .card {
            background: white;
            border-radius: 15px;
            padding: 2rem;
            box-shadow: 0 10px 30px rgba(0,0,0,0.2);
        }

        .stats-grid {
            display: grid;
            grid-template-columns: repeat(3, 1fr);
            gap: 1rem;
            margin-bottom: 2rem;
        }

        .stat-card {
            background: var(--light);
            padding: 1.5rem;
            border-radius: 10px;
            text-align: center;
        }

        .stat-number {
            font-size: 2.5rem;
            font-weight: bold;
            color: var(--primary);
        }

        .server-list {
            display: grid;
            gap: 1rem;
        }

        .server-item {
            display: flex;
            justify-content: space-between;
            align-items: center;
            padding: 1rem;
            background: var(--light);
            border-radius: 8px;
            border-left: 5px solid var(--success);
        }

        .server-item.offline {
            border-left-color: var(--danger);
            opacity: 0.6;
        }

        .status-indicator {
            width: 12px;
            height: 12px;
            border-radius: 50%;
            background: var(--success);
        }

        .offline .status-indicator {
            background: var(--danger);
        }

        .controls {
            display: flex;
            gap: 1rem;
            margin: 2rem 0;
        }

        button {
            padding: 12px 24px;
            border: none;
            border-radius: 8px;
            cursor: pointer;
            font-size: 1rem;
            transition: all 0.3s ease;
        }

        .btn-primary {
            background: var(--primary);
            color: white;
        }

        .btn-success {
            background: var(--success);
            color: white;
        }

        .btn-warning {
            background: var(--warning);
            color: white;
        }

        pre {
            background: var(--dark);
            color: white;
            padding: 1rem;
            border-radius: 8px;
            overflow-x: auto;
            max-height: 400px;
            overflow-y: auto;
        }

        .request-log {
            margin-top: 1rem;
        }

        .log-entry {
            padding: 0.5rem;
            border-bottom: 1px solid #eee;
            font-family: monospace;
        }

        .timestamp {
            color: #888;
            margin-right: 1rem;
        }
    </style>
</head>
<body>
    <div class="container">
        <div class="header">
            <h1>⚖️ Nginx 负载均衡监控</h1>
            <p>实时监控负载均衡状态和后端服务器健康情况</p>
        </div>

        <div class="stats-grid">
            <div class="stat-card">
                <div class="stat-number" id="totalRequests">0</div>
                <div>总请求数</div>
            </div>
            <div class="stat-card">
                <div class="stat-number" id="activeServers">0</div>
                <div>活跃服务器</div>
            </div>
            <div class="stat-card">
                <div class="stat-number" id="responseTime">0ms</div>
                <div>平均响应时间</div>
            </div>
        </div>

        <div class="dashboard">
            <div class="card">
                <h2>后端服务器状态</h2>
                <div class="server-list" id="serverList">
                    <!-- 服务器状态将通过 JavaScript 动态生成 -->
                </div>

                <div class="controls">
                    <button class="btn-primary" onclick="testLoadBalancer()">测试负载均衡</button>
                    <button class="btn-success" onclick="startStressTest()">压力测试</button>
                    <button class="btn-warning" onclick="clearLogs()">清空日志</button>
                </div>
            </div>

            <div class="card">
                <h2>负载均衡信息</h2>
                <div id="loadBalancerInfo">
                    <p><strong>策略:</strong>加权轮询 (Weighted Round Robin)</p>
                    <p><strong>服务器1权重:</strong>3</p>
                    <p><strong>服务器2权重:</strong>2</p>
                    <p><strong>健康检查:</strong>启用</p>
                </div>

                <h3 style="margin-top: 2rem;">请求日志</h3>
                <div class="request-log" id="requestLog">
                    <!-- 请求日志将在这里显示 -->
                </div>
            </div>
        </div>

        <div class="card">
            <h2>详细响应信息</h2>
            <pre id="detailedResponse">等待请求...</pre>
        </div>
    </div>

    <script>
        let requestCount = 0;
        let totalResponseTime = 0;

        // 初始化服务器列表
        const servers = [
            { id: 1, name: 'Backend Server 1', url: 'http://localhost:3000', weight: 3, online: false },
            { id: 2, name: 'Backend Server 2', url: 'http://localhost:3001', weight: 2, online: false }
        ];

        // 更新服务器状态显示
        function updateServerDisplay() {
            const serverList = document.getElementById('serverList');
            serverList.innerHTML = '';

            servers.forEach(server => {
                const serverElement = document.createElement('div');
                serverElement.className = `server-item ${server.online ? '' : 'offline'}`;
                serverElement.innerHTML = `
                    <div>
                        <strong>${server.name}</strong><br>
                        <small>${server.url} | 权重: ${server.weight}</small>
                    </div>
                    <div class="status-indicator"></div>
                `;
                serverList.appendChild(serverElement);
            });

            // 更新活跃服务器计数
            const activeServers = servers.filter(s => s.online).length;
            document.getElementById('activeServers').textContent = activeServers;
        }

        // 测试负载均衡
        async function testLoadBalancer() {
            const startTime = performance.now();
            requestCount++;

            try {
                const response = await fetch('/api/info');
                const data = await response.json();
                const endTime = performance.now();
                const responseTime = endTime - startTime;

                totalResponseTime += responseTime;

                // 更新统计信息
                document.getElementById('totalRequests').textContent = requestCount;
                document.getElementById('responseTime').textContent =
                    Math.round(totalResponseTime / requestCount) + 'ms';

                // 更新详细响应
                document.getElementById('detailedResponse').textContent =
                    JSON.stringify(data, null, 2);

                // 添加请求日志
                addRequestLog({
                    timestamp: new Date().toLocaleTimeString(),
                    server: data.server || 'Unknown',
                    responseTime: responseTime.toFixed(2) + 'ms',
                    status: '成功'
                });

                // 更新服务器状态
                updateServerStatus(data.server);

            } catch (error) {
                addRequestLog({
                    timestamp: new Date().toLocaleTimeString(),
                    server: 'N/A',
                    responseTime: 'N/A',
                    status: '失败: ' + error.message
                });
            }
        }

        // 压力测试
        async function startStressTest() {
            for (let i = 0; i < 10; i++) {
                await testLoadBalancer();
                await new Promise(resolve => setTimeout(resolve, 500));
            }
        }

        // 添加请求日志
        function addRequestLog(log) {
            const logContainer = document.getElementById('requestLog');
            const logEntry = document.createElement('div');
            logEntry.className = 'log-entry';
            logEntry.innerHTML = `
                <span class="timestamp">[${log.timestamp}]</span>
                <strong>${log.server}</strong> -
                ${log.responseTime} -
                <span style="color: ${log.status.includes('成功') ? 'green' : 'red'}">${log.status}</span>
            `;
            logContainer.appendChild(logEntry);
            logContainer.scrollTop = logContainer.scrollHeight;
        }

        // 清空日志
        function clearLogs() {
            document.getElementById('requestLog').innerHTML = '';
            document.getElementById('detailedResponse').textContent = '等待请求...';
        }

        // 更新服务器状态
        function updateServerStatus(serverName) {
            servers.forEach(server => {
                if (server.name === serverName) {
                    server.online = true;
                }
            });
            updateServerDisplay();
        }

        // 初始检查服务器状态
        async function checkServerHealth() {
            for (const server of servers) {
                try {
                    const response = await fetch(server.url + '/api/health');
                    if (response.ok) {
                        server.online = true;
                    }
                } catch (error) {
                    server.online = false;
                }
            }
            updateServerDisplay();
        }

        // 初始化
        checkServerHealth();
        updateServerDisplay();
    </script>
</body>
</html>
4.4 创建启动管理脚本
文件名:manage_services.sh
bash
#!/bin/bash

# 颜色定义
RED='\033[0;31m'
GREEN='\033[0;32m'
YELLOW='\033[1;33m'
BLUE='\033[0;34m'
NC='\033[0m' # No Color

# 打印彩色消息
print_status() {
    echo -e "${BLUE}[INFO]${NC} $1"
}

print_success() {
    echo -e "${GREEN}[SUCCESS]${NC} $1"
}

print_warning() {
    echo -e "${YELLOW}[WARNING]${NC} $1"
}

print_error() {
    echo -e "${RED}[ERROR]${NC} $1"
}

# 启动后端服务
start_backend_services() {
    print_status "启动后端服务..."

    # 启动第一个后端服务
    if [ ! -f "/tmp/backend1.pid" ]; then
        node /var/www/backend-app/app.js > /var/log/backend1.log 2>&1 &
        echo $! > /tmp/backend1.pid
        print_success "后端服务1启动完成 (PID: $!)"
    else
        print_warning "后端服务1已经在运行"
    fi

    # 启动第二个后端服务
    if [ ! -f "/tmp/backend2.pid" ]; then
        node /var/www/backend-app/app2.js > /var/log/backend2.log 2>&1 &
        echo $! > /tmp/backend2.pid
        print_success "后端服务2启动完成 (PID: $!)"
    else
        print_warning "后端服务2已经在运行"
    fi
}

# 停止后端服务
stop_backend_services() {
    print_status "停止后端服务..."

    if [ -f "/tmp/backend1.pid" ]; then
        kill $(cat /tmp/backend1.pid) 2>/dev/null
        rm -f /tmp/backend1.pid
        print_success "后端服务1已停止"
    fi

    if [ -f "/tmp/backend2.pid" ]; then
        kill $(cat /tmp/backend2.pid) 2>/dev/null
        rm -f /tmp/backend2.pid
        print_success "后端服务2已停止"
    fi
}

# 重启 Nginx
restart_nginx() {
    print_status "重启 Nginx 服务..."
    sudo systemctl restart nginx
    if [ $? -eq 0 ]; then
        print_success "Nginx 重启完成"
    else
        print_error "Nginx 重启失败"
        sudo /usr/local/nginx/sbin/nginx -t
    fi
}

# 检查服务状态
check_status() {
    print_status "检查服务状态..."

    # 检查 Nginx
    if systemctl is-active --quiet nginx; then
        print_success "Nginx 正在运行"
    else
        print_error "Nginx 未运行"
    fi

    # 检查后端服务
    if [ -f "/tmp/backend1.pid" ] && kill -0 $(cat /tmp/backend1.pid) 2>/dev/null; then
        print_success "后端服务1正在运行 (PID: $(cat /tmp/backend1.pid))"
    else
        print_error "后端服务1未运行"
    fi

    if [ -f "/tmp/backend2.pid" ] && kill -0 $(cat /tmp/backend2.pid) 2>/dev/null; then
        print_success "后端服务2正在运行 (PID: $(cat /tmp/backend2.pid))"
    else
        print_error "后端服务2未运行"
    fi
}

# 显示使用说明
show_usage() {
    echo "Nginx 负载均衡管理脚本"
    echo "用法: $0 {start|stop|restart|status|test}"
    echo ""
    echo "命令:"
    echo "  start   启动所有服务"
    echo "  stop    停止所有服务"
    echo "  restart 重启所有服务"
    echo "  status  检查服务状态"
    echo "  test    测试负载均衡"
}

# 测试负载均衡
test_load_balancer() {
    print_status "测试负载均衡..."

    for i in {1..5}; do
        response=$(curl -s http://localhost/api/info)
        server=$(echo $response | grep -o '"server":"[^"]*"' | cut -d'"' -f4)
        print_status "请求 $i: 由 $server 处理"
    done
}

# 主程序
case "$1" in
    start)
        start_backend_services
        restart_nginx
        ;;
    stop)
        stop_backend_services
        sudo systemctl stop nginx
        ;;
    restart)
        stop_backend_services
        start_backend_services
        restart_nginx
        ;;
    status)
        check_status
        ;;
    test)
        test_load_balancer
        ;;
    *)
        show_usage
        exit 1
        ;;
esac

exit 0
给脚本执行权限并测试:
bash
chmod +x manage_services.sh
./manage_services.sh start
./manage_services.sh status
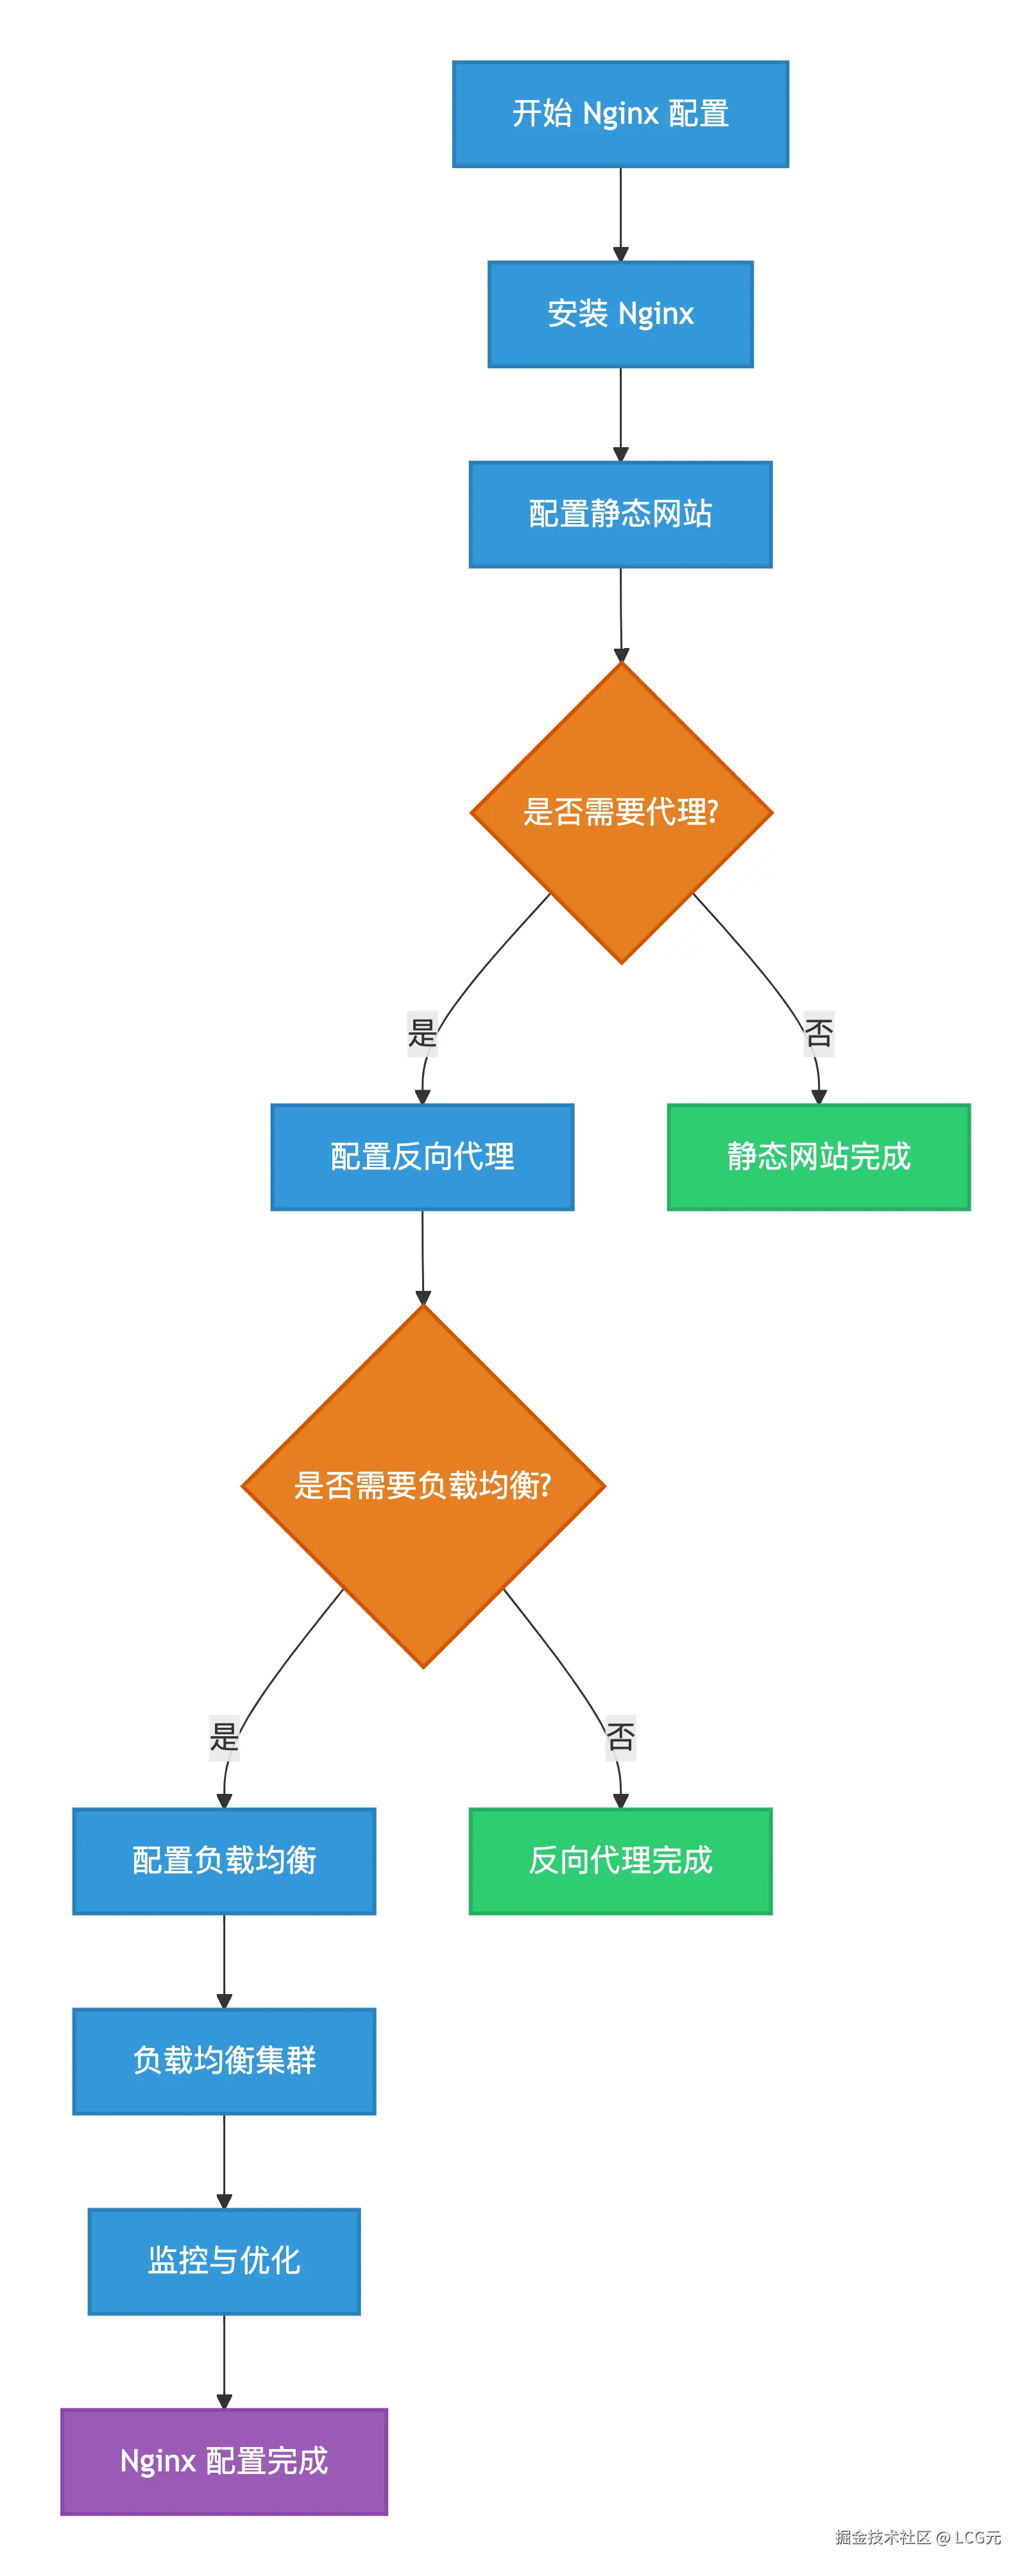
./manage_services.sh test5. Nginx 配置流程图
以下流程图展示了从静态网站到负载均衡的完整配置流程:
6. 性能优化与监控
6.1 创建性能监控脚本
文件名:monitor_nginx.sh
bash
#!/bin/bash

# Nginx 性能监控脚本

# 颜色定义
GREEN='\033[0;32m'
BLUE='\033[0;34m'
YELLOW='\033[1;33m'
RED='\033[0;31m'
NC='\033[0m'

# 获取 Nginx 状态
get_nginx_status() {
    echo -e "${BLUE}=== Nginx 状态信息 ===${NC}"

    # 检查 Nginx 进程
    nginx_processes=$(ps aux | grep nginx | grep -v grep | wc -l)
    echo -e "Nginx 进程数: ${GREEN}$nginx_processes${NC}"

    # 获取连接状态
    if [ -f /usr/local/nginx/logs/nginx.pid ]; then
        echo -e "Nginx PID: ${GREEN}$(cat /usr/local/nginx/logs/nginx.pid)${NC}"
    fi

    # 检查监听端口
    echo -e "监听端口:"
    netstat -tlnp | grep nginx || echo -e "${YELLOW}未找到 Nginx 监听端口${NC}"
}

# 获取连接信息
get_connection_info() {
    echo -e "\n${BLUE}=== 连接信息 ===${NC}"

    # 获取 HTTP 连接数
    http_connections=$(netstat -an | grep :80 | wc -l)
    echo -e "HTTP 连接数: ${GREEN}$http_connections${NC}"

    # 获取 ESTABLISHED 连接数
    established_connections=$(netstat -an | grep :80 | grep ESTABLISHED | wc -l)
    echo -e "已建立连接: ${GREEN}$established_connections${NC}"
}

# 监控系统资源
get_system_resources() {
    echo -e "\n${BLUE}=== 系统资源 ===${NC}"

    # CPU 使用率
    cpu_usage=$(top -bn1 | grep "Cpu(s)" | awk '{print $2}' | cut -d'%' -f1)
    echo -e "CPU 使用率: ${GREEN}${cpu_usage}%${NC}"

    # 内存使用
    memory_total=$(free -h | grep Mem | awk '{print $2}')
    memory_used=$(free -h | grep Mem | awk '{print $3}')
    memory_percent=$(free | grep Mem | awk '{printf("%.2f"), $3/$2 * 100}')
    echo -e "内存使用: ${GREEN}${memory_used}/${memory_total} (${memory_percent}%)${NC}"

    # 负载平均值
    load_avg=$(uptime | awk -F'load average:' '{print $2}')
    echo -e "负载平均值: ${GREEN}$load_avg${NC}"
}

# 监控后端服务
check_backend_services() {
    echo -e "\n${BLUE}=== 后端服务状态 ===${NC}"

    # 检查后端服务1
    if curl -s http://localhost:3000/api/health > /dev/null; then
        echo -e "后端服务1: ${GREEN}正常${NC}"
    else
        echo -e "后端服务1: ${RED}异常${NC}"
    fi

    # 检查后端服务2
    if curl -s http://localhost:3001/api/health > /dev/null; then
        echo -e "后端服务2: ${GREEN}正常${NC}"
    else
        echo -e "后端服务2: ${RED}异常${NC}"
    fi

    # 测试负载均衡
    echo -e "\n${BLUE}=== 负载均衡测试 ===${NC}"
    for i in {1..3}; do
        response=$(curl -s http://localhost/api/info)
        server=$(echo $response | grep -o '"server":"[^"]*"' | cut -d'"' -f4 2>/dev/null)
        if [ -n "$server" ]; then
            echo -e "请求 $i: ${GREEN}$server${NC}"
        else
            echo -e "请求 $i: ${RED}失败${NC}"
        fi
    done
}

# 日志文件监控
monitor_logs() {
    echo -e "\n${BLUE}=== 最近访问日志 ===${NC}"
    if [ -f /var/www/static-site/logs/access.log ]; then
        tail -5 /var/www/static-site/logs/access.log
    else
        echo -e "${YELLOW}访问日志文件不存在${NC}"
    fi

    echo -e "\n${BLUE}=== 最近错误日志 ===${NC}"
    if [ -f /var/www/static-site/logs/error.log ]; then
        tail -5 /var/www/static-site/logs/error.log
    else
        echo -e "${YELLOW}错误日志文件不存在${NC}"
    fi
}

# 主监控循环
continuous_monitor() {
    echo -e "${BLUE}开始持续监控 (每10秒刷新,Ctrl+C 退出)...${NC}"
    while true; do
        clear
        echo -e "${GREEN}Nginx 监控面板 - $(date)${NC}"
        echo "=========================================="

        get_nginx_status
        get_connection_info
        get_system_resources
        check_backend_services
        monitor_logs

        sleep 10
    done
}

# 显示使用说明
show_usage() {
    echo "Nginx 监控脚本"
    echo "用法: $0 {status|monitor|test}"
    echo ""
    echo "命令:"
    echo "  status   显示当前状态"
    echo "  monitor  持续监控模式"
    echo "  test     运行完整测试"
}

case "$1" in
    status)
        get_nginx_status
        get_connection_info
        get_system_resources
        check_backend_services
        ;;
    monitor)
        continuous_monitor
        ;;
    test)
        get_nginx_status
        get_connection_info
        get_system_resources
        check_backend_services
        monitor_logs
        ;;
    *)
        show_usage
        exit 1
        ;;
esac
6.2 配置日志轮转
文件名:/etc/logrotate.d/nginx-custom
bash
/var/www/static-site/logs/*.log {
    daily
    missingok
    rotate 52
    compress
    delaycompress
    notifempty
    create 644 nginx nginx
    postrotate
        /usr/local/nginx/sbin/nginx -s reopen
    endscript
}
7. 完整测试验证
7.1 运行完整测试
bash
# 给监控脚本执行权限
chmod +x monitor_nginx.sh

# 启动所有服务
./manage_services.sh start

# 运行完整测试
./monitor_nginx.sh test

# 测试负载均衡
./manage_services.sh test
7.2 验证所有功能
- 访问静态网站 : 打开浏览器访问
http://localhost - 测试反向代理 : 访问
http://localhost/proxy-test.html - 验证负载均衡 : 访问
http://localhost/load-balancer.html - 检查监控面板 : 运行
./monitor_nginx.sh monitor
总结
通过本教程,您已经完成了从基础的 Nginx 静态网站配置到高级的负载均衡设置的完整流程。这个配置提供了:
- ✅ 高性能的静态资源服务
- ✅ 灵活的反向代理配置
- ✅ 智能的负载均衡策略
- ✅ 实时监控和健康检查
- ✅ 完整的日志记录和分析
这套配置可以直接在生产环境中使用,并且可以根据实际需求进行扩展和优化。每个配置都有详细的说明和测试方法,确保您能够理解并掌握 Nginx 的核心功能。