前言
在提升Android能力的多种方式中,阅读Android源码是一种相当重要的方式,并且只有在熟悉了源码之后,我们才能处理一些需求。
在Android源码中,我认为首先需要阅读的就是Android系统启动流程。实际上已经有很多的文章、书籍和视频都讲过这个了,但我还是想写写Android系统启动流程的文章:一方面是对过往知识做一个总结,加深自己的理解;另一方面是分享出来,如果可以帮助到一些人也是很好的。
注意:本文出现的源码基于Android - 15.0.0_r1。另外本文关注主要逻辑,省略部分代码。
一、 Android系统启动大致流程
本文是介绍init进程,那么我们先看下Android系统启动流程: 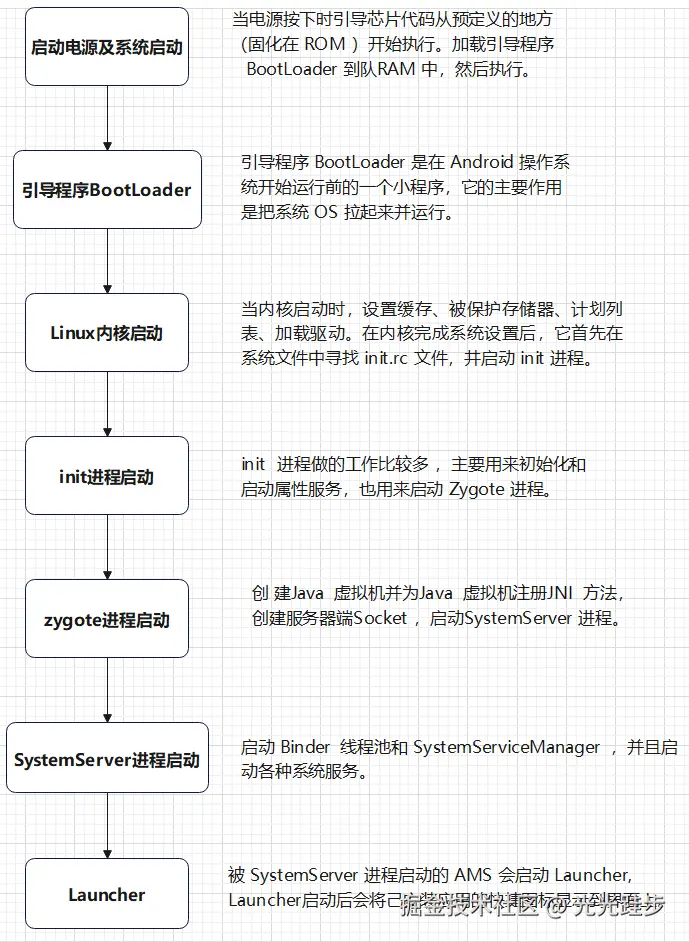 启动电源及系统启动 -> Bootloader -> Linux内核启动 -> init -> Zygote -> SystemServer -> Launcher
二、Init进程
init 进程是用户空间启动的第1个进程,它会依次执行 FirstStageMain -> SetupSelinux -> SecondStageMain 三个阶段。 我们知道,C++中的main方法,是函数的入口,Android中也不例外,它的入口函数是:/system/core/init/main.cpp
C++
int main(int argc, char** argv) {
	...
    if (argc > 1) {
        if (!strcmp(argv[1], "selinux_setup")) {
            return SetupSelinux(argv);
        }

        if (!strcmp(argv[1], "second_stage")) {
            return SecondStageMain(argc, argv);
        }
    }

    return FirstStageMain(argc, argv);
}
在main函数刚进来时,会进到FirstStageMain中去。看看FirstStageMain做了什么。
2.1 FirstStageMain
FirstStageMain的代码的位置:/system/core/init/first_stage_init.cpp
源码较长,只看比较重要的部分
C++
int FirstStageMain(int argc, char** argv) {
    ...
    CHECKCALL(mount("tmpfs", "/dev", "tmpfs", MS_NOSUID, "mode=0755"));
    ...
    CHECKCALL(mount("devpts", "/dev/pts", "devpts", 0, NULL));
#define MAKE_STR(x) __STRING(x)
    CHECKCALL(mount("proc", "/proc", "proc", 0, "hidepid=2,gid=" MAKE_STR(AID_READPROC)));
#undef MAKE_STR
    ...
    CHECKCALL(mount("sysfs", "/sys", "sysfs", 0, NULL));
    CHECKCALL(mount("selinuxfs", "/sys/fs/selinux", "selinuxfs", 0, NULL));

    ...
    InitKernelLogging(argv);
    ...

    const char* path = "/system/bin/init";
    const char* args[] = {path, "selinux_setup", nullptr};
    ...
    execv(path, const_cast<char**>(args));
	...
    return 1;
}
FirstStageMain函数主要做了挂载文件系统,创建目录,初始化Kernel log。介绍下5个重要的文件系统:
- tmpfs:用于存放设备节点和动态生成的设备文件,支持运行时设备管理。
- devpts):提供伪终端(PTY)接口,让用户空间终端/shell 能与内核终端子系统交互。
- procfs:暴露进程和内核状态、配置信息给用户空间,可用于系统监控与参数调整。
- sysfs:用于暴露内核设备模型、驱动和子系统的信息与控制接口,支撑硬件管理。
- selinuxfs:提供 SELinux 安全策略与状态的接口,用于系统的强制访问控制机制。
InitKernelLogging(argv)代码如下:
/system/core/init/first_stage_init.cpp
C++
void InitKernelLogging(char** argv) {
    SetFatalRebootTarget();
    android::base::InitLogging(argv, &android::base::KernelLogger, InitAborter);
}
这里着重看看android::base::InitLogging(argv, &android::base::KernelLogger, InitAborter), 先看KernelLogger做了什么
/system/libbase/logging.cpp
C++
void KernelLogger(android::base::LogId, android::base::LogSeverity severity, const char* tag,
                  const char*, unsigned int, const char* full_message) {
  SplitByLines(full_message, KernelLogLine, severity, tag);
}
继续跟KernelLogLine
/system/libbase/logging.cpp
C++
#if defined(__linux__)
static void KernelLogLine(const char* msg, int length, android::base::LogSeverity severity,
   ...
  static int klog_fd = OpenKmsg();
  if (klog_fd == -1) return;
  ...
}
实际上,KernelLogLine就是调用了OpenKmsg
/system/libbase/logging.cpp
C++
#if defined(__linux__)
static int OpenKmsg() {
#if defined(__ANDROID__)
    // 尝试从环境变量获取预打开的文件描述符
    const auto val = getenv("ANDROID_FILE__dev_kmsg");
    if (val != nullptr) {
        int fd;
        // 解析环境变量值为文件描述符
        if (android::base::ParseInt(val, &fd, 0)) {
            // 验证文件描述符有效性
            auto flags = fcntl(fd, F_GETFL);
            if ((flags != -1) && ((flags & O_ACCMODE) == O_WRONLY))
                return fd; // 返回可用的 fd
        }
    }
    // init进程启动时,此时没有任何预先存在的文件描述符可继承,因此会打开/dev/kmsg
    return TEMP_FAILURE_RETRY(open("/dev/kmsg", O_WRONLY | O_CLOEXEC));
}
再看看InitLogging代码
/system/libbase/logging.cpp
C++
void InitLogging(char* argv[], LogFunction&& logger, AbortFunction&& aborter) {
  SetLogger(std::forward<LogFunction>(logger));
  SetAborter(std::forward<AbortFunction>(aborter));

  if (gInitialized) { // gInitialized是一个静态变量,防止重复调用
    return;
  }

  gInitialized = true;

  if (argv != nullptr) {
    // 设置默认日志标签
    SetDefaultTag(basename(argv[0]));
  }

  // 获取环境变量配置
  const char* tags = getenv("ANDROID_LOG_TAGS");
  if (tags == nullptr) {
    return;
  }

  // 根据环境变量,设置日志级别
  std::vector<std::string> specs = Split(tags, " ");
  for (size_t i = 0; i < specs.size(); ++i) {
    std::string spec(specs[i]);
    if (spec.size() == 3 && StartsWith(spec, "*:")) {
      switch (spec[2]) {
        case 'v':
          SetMinimumLogSeverity(VERBOSE);
          continue;
        case 'd':
          SetMinimumLogSeverity(DEBUG);
          continue;
        case 'i':
          SetMinimumLogSeverity(INFO);
          continue;
        case 'w':
          SetMinimumLogSeverity(WARNING);
          continue;
        case 'e':
          SetMinimumLogSeverity(ERROR);
          continue;
        case 'f':
          SetMinimumLogSeverity(FATAL_WITHOUT_ABORT);
          continue;
        // liblog will even suppress FATAL if you say 's' for silent, but fatal should
        // never be suppressed.
        case 's':
          SetMinimumLogSeverity(FATAL_WITHOUT_ABORT);
          continue;
      }
    }
    LOG(FATAL) << "unsupported '" << spec << "' in ANDROID_LOG_TAGS (" << tags
               << ")";
  }
}
小结一下FirstStageMain
- 创建目录和挂载文件系统
- 初始化Kernel日志 (打开/dev/kmsg,并根据环境变量ANDROID_LOG_TAGS,设置日志级别)
完成这些后,会通过execv回到Main.cpp,此时会执行SetupSelinux 阶段
2.2 SetupSelinux
它负责加载并启用 SELinux 安全策略
/system/core/init/selinux.cpp
C++
int SetupSelinux(char** argv) {
    // 设置 stdio 到 /dev/null
    SetStdioToDevNull(argv);

    // 初始化 kernel 日志
    InitKernelLogging(argv);

    if (REBOOT_BOOTLOADER_ON_PANIC) {
        InstallRebootSignalHandlers();
    }

    boot_clock::time_point start_time = boot_clock::now();

    SelinuxSetupKernelLogging();

    // 加载SELinux策略
    if (IsMicrodroid()) {
        LoadSelinuxPolicyMicrodroid();
    } else {
        LoadSelinuxPolicyAndroid();
    }

    // 切换到 Selinux enforcement 模式
    SelinuxSetEnforcement();

    ...

    const char* path = "/system/bin/init";
    const char* args[] = {path, "second_stage", nullptr};
    // 重新启动 init 本身,进入SecondStageMain
    execv(path, const_cast<char**>(args));

    ...
}
这一阶段提供了整个用户空间服务启动的安全基础:在 SELinux 策略生效之后,后续解析 .rc、启动服务、fork 应用进程,才能在预期的安全域下执行。
2.3 SecondStageMain
之后便进入了我们着重关注的第二阶段初始化。
/system/core/init/init.cpp
C++
int SecondStageMain(int argc, char** argv) {
    ...
    InitKernelLogging(argv);
   ...
    // 初始化属性服务
    PropertyInit();

    // 创建Epoll对象
    Epoll epoll;
    if (auto result = epoll.Open(); !result.ok()) {
        PLOG(FATAL) << result.error();
    }
    epoll.SetFirstCallback(ReapAnyOutstandingChildren);

    // 注册epoll
    InstallSignalFdHandler(&epoll);
    InstallInitNotifier(&epoll);

    // 开启属性服务
    StartPropertyService(&property_fd);

    // 加载init.rc文件
    LoadBootScripts(am, sm);
    ...
}
2.3.1 初始化属性服务
我们看看PropertyInit具体是怎么初始化属性服务的,先看下PropertyInit代码 /system/core/init/property_service.cpp
C++
void PropertyInit() {
    ...

    mkdir("/dev/__properties__", S_IRWXU | S_IXGRP | S_IXOTH);
    CreateSerializedPropertyInfo();
    // 初始化属性内存区域
    if (__system_property_area_init()) {
        LOG(FATAL) << "Failed to initialize property area";
    }
    ...
}
__system_property_area_init是定义在system_property_api.cpp中的一个方法
/bionic/libc/bionic/system_property_api.cpp
C++
int __system_property_area_init() {
    bool fsetxattr_fail = false;
    return system_properties.AreaInit(PROP_DIRNAME, &fsetxattr_fail) && !fsetxattr_fail ? 0 : -1;
}
只是调用了system_properties.AreaInit,继续跟这个方法,看看做了什么 /bionic/libc/system_properties/system_properties.cpp
C++
bool SystemProperties::AreaInit(const char* filename, bool* fsetxattr_failed) {
    return AreaInit(filename, fsetxattr_failed, false);
}

bool SystemProperties::AreaInit(const char* filename, bool* fsetxattr_failed,
                             bool load_default_path) {
   ...
   if (!serial_contexts->Initialize(true, properties_filename_.c_str(), fsetxattr_failed,
			load_default_path)) {
		return false;
   }

   ...
   return true;
}
继续跟serial_contexts->Initialize
/bionic/libc/system_properties/contexts_serialized.cpp
C++
bool ContextsSerialized::Initialize(bool writable, const char* dirname, bool* fsetxattr_failed,
                                    bool load_default_path) {
  dirname_ = dirname;
  tree_filename_ = PropertiesFilename(dirname, "property_info");
  serial_filename_ = PropertiesFilename(dirname, "properties_serial");

  if (!InitializeProperties(load_default_path)) {
    return false;
  }

  if (writable) {
    ...
    if (open_failed || !MapSerialPropertyArea(true, fsetxattr_failed)) {
      FreeAndUnmap();
      return false;
    }
  } else {
    if (!MapSerialPropertyArea(false, nullptr)) {
      FreeAndUnmap();
      return false;
    }
  }
  return true;
}
后续执行MapSerialPropertyArea方法
/bionic/libc/system_properties/contexts_serialized.cpp
C++
bool ContextsSerialized::MapSerialPropertyArea(bool access_rw, bool* fsetxattr_failed) {
  if (access_rw) {
    serial_prop_area_ = prop_area::map_prop_area_rw(
        serial_filename_.c_str(), "u:object_r:properties_serial:s0", fsetxattr_failed);
  } else {
    serial_prop_area_ = prop_area::map_prop_area(serial_filename_.c_str());
  }
  return serial_prop_area_;
}
若是可写,执行map_prop_area_rw
不可写,执行map_prop_area
先看看执行map_prop_area_rw代码
/bionic/libc/system_properties/prop_area.cpp
C++
prop_area* prop_area::map_prop_area_rw(const char* filename, const char* context,
                                       bool* fsetxattr_failed) {
  ...
  void* const memory_area = mmap(nullptr, pa_size_, PROT_READ | PROT_WRITE, MAP_SHARED, fd, 0);
  ...
}
这个方法就是调用了mmap做内存映射,再看看map_prop_area代码 /bionic/libc/system_properties/prop_area.cpp
C++
prop_area* prop_area::map_prop_area(const char* filename) {
  int fd = open(filename, O_CLOEXEC | O_NOFOLLOW | O_RDONLY);
  if (fd == -1) return nullptr;

  prop_area* map_result = map_fd_ro(fd);
  close(fd);

  return map_result;
}

prop_area* prop_area::map_fd_ro(const int fd) {
  ...
  void* const map_result = mmap(nullptr, pa_size_, PROT_READ, MAP_SHARED, fd, 0);
  ...
}
同样最终也是调用了mmap方法。
因此PropertyInit() 初始化属性服务,其实就是通过 mmap 系统调用 来完成属性内存区域的初始化与映射的, 建立了 /dev/properties 共享内存区,供所有进程读写系统属性,如 getprop/setprop 命令操作的数据来源。
2.3.2 开启属性服务
/system/core/init/property_service.cpp
C++
void StartPropertyService(int* epoll_socket) {
    // 初始化属性版本
    InitPropertySet("ro.property_service.version", "2");

    // 创建 socketpair,用来让 init 与其属性服务线程之间做通信
    int sockets[2];
    if (socketpair(AF_UNIX, SOCK_SEQPACKET | SOCK_CLOEXEC, 0, sockets) != 0) {
        PLOG(FATAL) << "Failed to socketpair() between property_service and init";
    }
    *epoll_socket = from_init_socket = sockets[0];
    init_socket = sockets[1];

    // 开启消息接收通道
    StartSendingMessages();

    // 启动系统属性服务线程和普通属性服务线程
    StartThread(PROP_SERVICE_FOR_SYSTEM_NAME, 0660, AID_SYSTEM, property_service_for_system_thread,
                true);
    StartThread(PROP_SERVICE_NAME, 0666, 0, property_service_thread, false);
    ...
}
我们先看看StartSendingMessages方法
/system/core/init/property_service.cpp
C++
void StartSendingMessages() {
    auto lock = std::lock_guard{accept_messages_lock};
    accept_messages = true;
}
StartSendingMessages方法很简单,accept_messages是静态变量,这里使用了互斥锁来保证它的写操作,并设置为true,后续属性变更时,会判断accept_messages为true才会执行。
再看看StartThread方法
/system/core/init/property_service.cpp
C++
void StartThread(const char* name, int mode, int gid, std::thread& t, bool listen_init) {
    int fd = -1;
    // 创建一个 socket
    if (auto result = CreateSocket(name, SOCK_STREAM | SOCK_CLOEXEC | SOCK_NONBLOCK,
                                   /*passcred=*/false, /*should_listen=*/false, mode, /*uid=*/0,
                                   /*gid=*/gid, /*socketcon=*/{});
        result.ok()) {
        fd = *result;
    } else {
        LOG(FATAL) << "start_property_service socket creation failed: " << result.error();
    }

    // 对 fd 进行监听
    listen(fd, 8);

    // 创建一个新线程
    auto new_thread = std::thread(PropertyServiceThread, fd, listen_init);
    t.swap(new_thread);
}
StartPropertyService会创建启动系统属性服务线程和普通属性服务线程,系统属性使用0660,普通属性使用0666。 这里说下Linux中各个数字代表什么权限:4 、2 和 1表示读、写、执行权限 0abc, a表示拥有者,b表示所属组,c表示其他用户。因此系统属性使用0660,表示拥有者,所属组有读写权限;普通属性使用0666表示所有用户均有读写权限。
这里使用2个线程,因为系统属性可能有敏感属性,所以使用了更严格的权限。后续创建了一个新的线程,看看PropertyServiceThread里面做了什么
/system/core/init/property_service.cpp
C++
static void PropertyServiceThread(int fd, bool listen_init) {
    Epoll epoll;
    if (auto result = epoll.Open(); !result.ok()) {
        LOG(FATAL) << result.error();
    }

    // 监听fd,当有更新时, 调用handle_property_set_fd来进行处理。
    if (auto result = epoll.RegisterHandler(fd, std::bind(handle_property_set_fd, fd));
        !result.ok()) {
        LOG(FATAL) << result.error();
    }

    // 监听init_socket(init_socket在StartPropertyService已经初始化了), 当更新时, 调用HandleInitSocket来进行处理。
    if (listen_init) {
        if (auto result = epoll.RegisterHandler(init_socket, HandleInitSocket); !result.ok()) {
            LOG(FATAL) << result.error();
        }
    }

    while (true) {
        // 进入事件等待循环
        auto epoll_result = epoll.Wait(std::nullopt);
        if (!epoll_result.ok()) {
            LOG(ERROR) << epoll_result.error();
        }
    }
}
在PropertyServiceThread中监听了fd和init_socket,继续看看handle_property_set_fd里的代码
/system/core/init/property_service.cpp
C++
static void handle_property_set_fd(int fd) {
    ...
    uint32_t cmd = 0;
    // // 从 socket 中获取cmd
    if (!socket.RecvUint32(&cmd, &timeout_ms)) {
        PLOG(ERROR) << "sys_prop: error while reading command from the socket";
        socket.SendUint32(PROP_ERROR_READ_CMD);
        return;
    }

    switch (cmd) {
    // 设置属性
    case PROP_MSG_SETPROP: {
        char prop_name[PROP_NAME_MAX];
        char prop_value[PROP_VALUE_MAX];

        // 从 socket 中获取name, value
        if (!socket.RecvChars(prop_name, PROP_NAME_MAX, &timeout_ms) ||
            !socket.RecvChars(prop_value, PROP_VALUE_MAX, &timeout_ms)) {
          PLOG(ERROR) << "sys_prop(PROP_MSG_SETPROP): error while reading name/value from the socket";
          return;
        }
        ...

        // 在HandlePropertySetNoSocket中处理
        auto result = HandlePropertySetNoSocket(prop_name, prop_value, source_context, cr, &error);
        ...

        break;
      }

    // 设置属性
    case PROP_MSG_SETPROP2: {
        std::string name;
        std::string value;

        // 从 socket 中获取name, value
        if (!socket.RecvString(&name, &timeout_ms) ||
            !socket.RecvString(&value, &timeout_ms)) {
          PLOG(ERROR) << "sys_prop(PROP_MSG_SETPROP2): error while reading name/value from the socket";
          socket.SendUint32(PROP_ERROR_READ_DATA);
          return;
        }

        // 在HandlePropertySet中处理
        auto result = HandlePropertySet(name, value, source_context, cr, &socket, &error);
        ...
        break;
      }

    default:
        LOG(ERROR) << "sys_prop: invalid command " << cmd;
        socket.SendUint32(PROP_ERROR_INVALID_CMD);
        break;
    }
}
handle_property_set_fd 根据 socket 中获取到的cmd, 调用HandlePropertySetNoSocket 或HandlePropertySet去设置属性。而 HandlePropertySetNoSocket 也会调用到 HandlePropertySet,因此我们直接看HandlePropertySet代码
/system/core/init/property_service.cpp
C++
std::optional<uint32_t> HandlePropertySet(const std::string& name, const std::string& value,
                                          const std::string& source_context, const ucred& cr,
                                          SocketConnection* socket, std::string* error) {
    if (auto ret = CheckPermissions(name, value, source_context, cr, error); ret != PROP_SUCCESS) {
        return {ret};
    }

    // 控制属性
    if (StartsWith(name, "ctl.")) {
        return {SendControlMessage(name.c_str() + 4, value, cr.pid, socket, error)};
    }

    // 设备重新启动属性
    if (name == "sys.powerctl") {
        std::string cmdline_path = StringPrintf("proc/%d/cmdline", cr.pid);
        std::string process_cmdline;
        std::string process_log_string;
        if (ReadFileToString(cmdline_path, &process_cmdline)) {
            process_log_string = StringPrintf(" (%s)", process_cmdline.c_str());
        }
        LOG(INFO) << "Received sys.powerctl='" << value << "' from pid: " << cr.pid
                  << process_log_string;
        if (value == "reboot,userspace" && !is_userspace_reboot_supported().value_or(false)) {
            *error = "Userspace reboot is not supported by this device";
            return {PROP_ERROR_INVALID_VALUE};
        }
    }

    if (name == kRestoreconProperty && cr.pid != 1 && !value.empty()) {
        static AsyncRestorecon async_restorecon;
        async_restorecon.TriggerRestorecon(value);
        return {PROP_SUCCESS};
    }

    // 普通属性
    return PropertySet(name, value, socket, error);
}
HandlePropertySet中,设置普通属性会调用PropertySet,继续看看PropertySet代码
/system/core/init/property_service.cpp
C++
static std::optional<uint32_t> PropertySet(const std::string& name, const std::string& value,
                                           SocketConnection* socket, std::string* error) {
    size_t valuelen = value.size();

    if (!IsLegalPropertyName(name)) {
        *error = "Illegal property name";
        return {PROP_ERROR_INVALID_NAME};
    }

    if (auto result = IsLegalPropertyValue(name, value); !result.ok()) {
        *error = result.error().message();
        return {PROP_ERROR_INVALID_VALUE};
    }

    if (name == "sys.powerctl") {
        // No action here - NotifyPropertyChange will trigger the appropriate action, and since this
        // can come to the second thread, we mustn't call out to the __system_property_* functions
        // which support multiple readers but only one mutator.
    } else {
        // __system_property_find
        prop_info* pi = (prop_info*)__system_property_find(name.c_str());
        if (pi != nullptr) {
            // ro.* properties are actually "write-once".
            if (StartsWith(name, "ro.")) {
                *error = "Read-only property was already set";
                return {PROP_ERROR_READ_ONLY_PROPERTY};
            }

            __system_property_update(pi, value.c_str(), valuelen);
        } else {
            int rc = __system_property_add(name.c_str(), name.size(), value.c_str(), valuelen);
            if (rc < 0) {
                *error = "__system_property_add failed";
                return {PROP_ERROR_SET_FAILED};
            }
        }

        // Don't write properties to disk until after we have read all default
        // properties to prevent them from being overwritten by default values.
        bool need_persist = StartsWith(name, "persist.") || StartsWith(name, "next_boot.");
        if (socket && persistent_properties_loaded && need_persist) {
            if (persist_write_thread) {
                persist_write_thread->Write(name, value, std::move(*socket));
                return {};
            }
            WritePersistentProperty(name, value);
        }
    }

    NotifyPropertyChange(name, value);
    return {PROP_SUCCESS};
}/system/core/init/property_service.cpp(xrefandroid.com/android- PropertySet方法中,先调用__system_property_find方法,如果已经当前属性存在,则更新它,不存在,则添加。先看看__system_property_find方法。
/bionic/libc/system_properties/system_properties.cpp
C++
const prop_info* SystemProperties::Find(const char* name) {
  if (!initialized_) {
    return nullptr;
  }

  prop_area* pa = contexts_->GetPropAreaForName(name);
  if (!pa) {
    async_safe_format_log(ANDROID_LOG_WARN, "libc", "Access denied finding property \"%s\"", name);
    return nullptr;
  }

  return pa->find(name);
}
SystemProperties方法先调用了contexts_->GetPropAreaForName, 然后再调用了pa->find。contexts_是在初始化属性流程中赋值的(auto serial_contexts = new (contexts_data_) ContextsSerialized();)。通过调用ContextsSerialized返回了prop_area对象,这里就不跟进去看怎么返回prop_area对象了,我们直接看prop_area里面的find方法
/bionic/libc/system_properties/prop_area.cpp
C++
const prop_info* prop_area::find(const char* name) {
  return find_property(root_node(), name, strlen(name), nullptr, 0, false);
}
find方法直接调用了find_property方法,那么看看find_property的实现
/bionic/libc/system_properties/prop_area.cpp
C++
const prop_info* prop_area::find_property(prop_trie_node* const trie, const char* name,
uint32_t namelen, const char* value, uint32_t valuelen,
bool alloc_if_needed) {
if (!trie) return nullptr;
const char* remaining_name = name;
prop_trie_node* current = trie;
while (true) {
const char* sep = strchr(remaining_name, '.');
const bool want_subtree = (sep != nullptr);
const uint32_t substr_size = (want_subtree) ? sep - remaining_name : strlen(remaining_name);
if (!substr_size) {
return nullptr;
}
prop_trie_node* root = nullptr;
uint_least32_t children_offset = atomic_load_explicit(¤t->children, memory_order_relaxed);
if (children_offset != 0) {
root = to_prop_trie_node(¤t->children);
} else if (alloc_if_needed) {
uint_least32_t new_offset;
root = new_prop_trie_node(remaining_name, substr_size, &new_offset);
if (root) {
atomic_store_explicit(¤t->children, new_offset, memory_order_release);
}
}
if (!root) {
return nullptr;
}
current = find_prop_trie_node(root, remaining_name, substr_size, alloc_if_needed);
if (!current) {
return nullptr;
}
if (!want_subtree) break;
remaining_name = sep + 1;
}
uint_least32_t prop_offset = atomic_load_explicit(¤t->prop, memory_order_relaxed);
if (prop_offset != 0) {
return to_prop_info(¤t->prop);
} else if (alloc_if_needed) {
uint_least32_t new_offset;
prop_info* new_info = new_prop_info(name, namelen, value, valuelen, &new_offset);
if (new_info) {
atomic_store_explicit(¤t->prop, new_offset, memory_order_release);
}
return new_info;
} else {
return nullptr;
}
}在find_property方法里面,我们就可以看到属性是通过树来存储的。__system_property_find是从树里找节点,而__system_property_add最终也会调用到find_property方法,它是往这个树里添加节点。
2.3.3 加载init.rc文件
加载init.rc文件是在LoadBootScripts方法中,看看它做了什么
/system/core/init/init.cpp
C++
static void LoadBootScripts(ActionManager& action_manager, ServiceList& service_list) {
    // 创建解析器
    Parser parser = CreateParser(action_manager, service_list);

    std::string bootscript = GetProperty("ro.boot.init_rc", "");
    if (bootscript.empty()) {
        parser.ParseConfig("/system/etc/init/hw/init.rc");
        if (!parser.ParseConfig("/system/etc/init")) {
            late_import_paths.emplace_back("/system/etc/init");
        }
        // late_import is available only in Q and earlier release. As we don't
        // have system_ext in those versions, skip late_import for system_ext.
        parser.ParseConfig("/system_ext/etc/init");
        if (!parser.ParseConfig("/vendor/etc/init")) {
            late_import_paths.emplace_back("/vendor/etc/init");
        }
        if (!parser.ParseConfig("/odm/etc/init")) {
            late_import_paths.emplace_back("/odm/etc/init");
        }
        if (!parser.ParseConfig("/product/etc/init")) {
            late_import_paths.emplace_back("/product/etc/init");
        }
    } else {
        parser.ParseConfig(bootscript);
    }
}
首先看看 CreateParser 中的代码
/system/core/init/init.cpp
C++
Parser CreateParser(ActionManager& action_manager, ServiceList& service_list) {
    Parser parser;

    parser.AddSectionParser("service", std::make_unique<ServiceParser>(
                                               &service_list, GetSubcontext(), std::nullopt));
    parser.AddSectionParser("on", std::make_unique<ActionParser>(&action_manager, GetSubcontext()));
    parser.AddSectionParser("import", std::make_unique<ImportParser>(&parser));

    return parser;
}

std::map<std::string, std::unique_ptr<SectionParser>> section_parsers_;
void Parser::AddSectionParser(const std::string& name, std::unique_ptr<SectionParser> parser) {
    section_parsers_[name] = std::move(parser);
}
CreateParser 方法创建了 ServiceParser、ActionParser、和 ImportParser,并通过 AddSectionParser 将它们按名字注册到 Parser 内部的 section_parsers_ 映射表(即键为 "service"、"on"、"import")中。
而需要进行解析的init.rc文件,也只有这3种, 下面为init.rc简略文件
/system/core/rootdir/init.rc
C++
...
import /system/etc/init/hw/init.${ro.zygote}.rc

# Cgroups are mounted right before early-init using list from /etc/cgroups.json
on early-init
    # Disable sysrq from keyboard
    write /proc/sys/kernel/sysrq 0
...
service ueventd /system/bin/ueventd
    class core
    critical
...
而ParseConfig方法里面会判断是不是目录,init.rc不是目录,会调用ParseConfigFile方法,继续看这个方法。
/system/core/init/parser.cpp
C++
Result<void> Parser::ParseConfigFile(const std::string& path) {
    ...
    // 从路径中读取文件
    auto config_contents = ReadFile(path);

    // 解析数据
    ParseData(path, &config_contents.value());

    LOG(VERBOSE) << "(Parsing " << path << " took " << t << ".)";
    return {};
}
继续看看ParseData中怎么处理的
/system/core/init/parser.cpp
C++
// system/core/init/parser.cpp
void Parser::ParseData(const std::string& filename, std::string* data) {
    ...

    for (;;) {
        switch (next_token(&state)) {
            case T_EOF:
                end_section();

                for (const auto& [section_name, section_parser] : section_parsers_) {
                    section_parser->EndFile();
                }

                return;
            case T_NEWLINE: {
                state.line++;
                if (args.empty()) break;
                // If we have a line matching a prefix we recognize, call its callback and unset any
                // current section parsers.  This is meant for /sys/ and /dev/ line entries for
                // uevent.
                auto line_callback = std::find_if(
                    line_callbacks_.begin(), line_callbacks_.end(),
                    [&args](const auto& c) { return android::base::StartsWith(args[0], c.first); });
                if (line_callback != line_callbacks_.end()) {
                    end_section();

                    if (auto result = line_callback->second(std::move(args)); !result.ok()) {
                        parse_error_count_++;
                        LOG(ERROR) << filename << ": " << state.line << ": " << result.error();
                    }
                } else if (section_parsers_.count(args[0])) { // 1
                    end_section();
                    section_parser = section_parsers_[args[0]].get();
                    section_start_line = state.line;
                    if (auto result =
                                section_parser->ParseSection(std::move(args), filename, state.line);
                        !result.ok()) {
                        parse_error_count_++;
                        LOG(ERROR) << filename << ": " << state.line << ": " << result.error();
                        section_parser = nullptr;
                        bad_section_found = true;
                    }
                } else if (section_parser) {
                    if (auto result = section_parser->ParseLineSection(std::move(args), state.line);
                        !result.ok()) {
                        parse_error_count_++;
                        LOG(ERROR) << filename << ": " << state.line << ": " << result.error();
                    }
                } else if (!bad_section_found) {
                    parse_error_count_++;
                    LOG(ERROR) << filename << ": " << state.line
                               << ": Invalid section keyword found";
                }
                args.clear();
                break;
            }
            case T_TEXT:
                args.emplace_back(state.text);
                break;
        }
    }
}
需要先说明1处的 std::map 的 count() 函数用于检查指定键是否存在于映射中。
section_parsers_之前添加了on, service, import,当遍历init.rc文件时,如果是这几个字符串,section_parser = section_parsers_args\[0].get();会拿到对应的解析器。
如Service 类型语句会使用 ServiceParser 解析
/system/core/init/service_parser.cpp
C++
Result<void> ServiceParser::ParseSection(std::vector<std::string>&& args,
                                         const std::string& filename, int line) {
    // 判断参数是否少于3个
    if (args.size() < 3) {
        return Error() << "services must have a name and a program";
    }

    const std::string& name = args[1];
    // 判断 Service 的 name 有效性
    if (!IsValidName(name)) {
        return Error() << "invalid service name '" << name << "'";
    }
    ...

    // 构造 Service 对象
    service_ = std::make_unique<Service>(name, restart_action_subcontext, filename, str_args);
    return {};
}
在解析完init.rc文件之后,ParseData会在循环中执行end_section方法,代码如下:
/system/core/init/parser.cpp
C++
    auto end_section = [&] {
        bad_section_found = false;
        if (section_parser == nullptr) return;

        if (auto result = section_parser->EndSection(); !result.ok()) {
            parse_error_count_++;
            LOG(ERROR) << filename << ": " << section_start_line << ": " << result.error();
        }

        section_parser = nullptr;
        section_start_line = -1;
    };
继续跑到对应解析器的EndSection,此处看下ServiceParser的EndSection方法
/system/core/init/service_parser.cpp
C++
Result<void> ServiceParser::EndSection() {
    ...

    service_list_->AddService(std::move(service_));

    return {};
}
实际上这里就是把构建的service对象添加到service_list_中。
再看看on对应解析器做了什么。
/system/core/init/action_parser.cpp
C++
Result<void> ActionParser::ParseSection(std::vector<std::string>&& args,
                                        const std::string& filename, int line) {
    ...
    auto action = std::make_unique<Action>(false, action_subcontext, filename, line, event_trigger,
                                           property_triggers);

    action_ = std::move(action);
    return {};
}
/system/core/init/action_parser.cpp
C++
Result<void> ActionParser::EndSection() {
    if (action_ && action_->NumCommands() > 0) {
        action_manager_->AddAction(std::move(action_));
    }

    return {};
}
类似于ServiceParser, ActionParser先通过ParseSection构造action,在EndSection添加到了action_manager中。 SecondStageMain后续会在一个循环中去执行这些activon,如下:
/system/core/init/init.cpp
C++
    while (true) {
        ...
        if (!(prop_waiter_state.MightBeWaiting() || Service::is_exec_service_running())) {
            am.ExecuteOneCommand();
            // If there's more work to do, wake up again immediately.
            if (am.HasMoreCommands()) {
                next_action_time = boot_clock::now();
            }
        }
        ...
    }
代码中的am就是ActionManage,看看ExecuteOneCommand做了什么
/system/core/init/action_manager.cpp
C++
void ActionManager::ExecuteOneCommand() {
    {
        auto lock = std::lock_guard{event_queue_lock_};
        // 取出可执行的 Action
        while (current_executing_actions_.empty() && !event_queue_.empty()) {
            for (const auto& action : actions_) {
                if (std::visit([&action](const auto& event) { return action->CheckEvent(event); },
                               event_queue_.front())) {
                    current_executing_actions_.emplace(action.get());
                }
            }
            event_queue_.pop();
        }
    }

    // 执行action
    action->ExecuteOneCommand(current_command_);
    ...
}
在ExecuteOneCommand中会从event_queue_中取出可执行的aciton并且执行。
小结一下此处:解析init.rc文件,将service添加到service_list中,将action添加到action_manager中,后续在一个循环中执行action_manager中的action。
2.3.4 启动zygote
在知道了上面这些后,再来看看init是如何启动zygote的呢?
zygote的rc文件是通过import导入的,会通过ImportParser导入zygote.rc。
init.zygote64.rc文件
/system/core/rootdir/init.zygote64.rc
rc
service zygote /system/bin/app_process64 -Xzygote /system/bin --zygote --start-system-server --socket-name=zygote
    class main
    priority -20
    user root
    group root readproc reserved_disk
    socket zygote stream 660 root system
    socket usap_pool_primary stream 660 root system
    ...
此处class 为 main 对应init中的
/system/core/rootdir/init.rc
rc
on nonencrypted
    class_start main
    class_start late_start
在SecondStageMain中的循环去执行action时,也就是上面的on语句, 执行class_start,它对应的方法是do_class_start,如下
/system/core/init/builtins.cpp
C++
// Builtin-function-map start
const BuiltinFunctionMap& GetBuiltinFunctionMap() {
    constexpr std::size_t kMax = std::numeric_limits<std::size_t>::max();
    // clang-format off
    static const BuiltinFunctionMap builtin_functions = {
        ...
        {"class_start",             {1,     1,    {false,  do_class_start}}},
        ...
    }
}
继续看看do_class_start做了什么
/system/core/init/builtins.cpp
C++
static Result<void> do_class_start(const BuiltinArguments& args) {
    ...
    for (const auto& service : ServiceList::GetInstance()) {
        if (service->classnames().count(args[1])) {
            if (auto result = service->StartIfNotDisabled(); !result.ok()) {
                LOG(ERROR) << "Could not start service '" << service->name()
                           << "' as part of class '" << args[1] << "': " << result.error();
            }
        }
    }
    return {};
}
do_class_start会去遍历ServiceList,然后去调用StartIfNotDisabled方法。
/system/core/init/service.cpp
C++
Result<void> Service::StartIfNotDisabled() {
    if (!(flags_ & SVC_DISABLED)) {
        return Start();
    } else {
        flags_ |= SVC_DISABLED_START;
    }
    return {};
}
StartIfNotDisabled继续调用了Start方法。
/system/core/init/service.cpp
C++
Result<void> Service::Start() {
    ...

    pid_t pid = -1;
    if (namespaces_.flags) {
        pid = clone(nullptr, nullptr, namespaces_.flags | SIGCHLD, nullptr);
    } else {
        pid = fork();
    }

    if (pid == 0) { // 1
        umask(077);
        cgroups_activated.CloseWriteFd();
        setsid_finished.CloseReadFd();
        RunService(descriptors, std::move(cgroups_activated), std::move(setsid_finished)); // 2
        _exit(127);
    } else {
        cgroups_activated.CloseReadFd();
        setsid_finished.CloseWriteFd();
    }

    ...
}
在Start方法中, 1处调用了fork函数, fork函数返回pid为0代表是子进程,继续执行2处的RunService。
/system/core/init/service.cpp
C++
void Service::RunService(const std::vector<Descriptor>& descriptors,
                         InterprocessFifo cgroups_activated, InterprocessFifo setsid_finished) {
    ...

    if (!ExpandArgsAndExecv(args_, sigstop_)) {
        PLOG(ERROR) << "cannot execv('" << args_[0]
                    << "'). See the 'Debugging init' section of init's README.md for tips";
    }
}
调用了ExpandArgsAndExecv方法,看看它做了什么
/system/core/init/service.cpp
C++
static bool ExpandArgsAndExecv(const std::vector<std::string>& args, bool sigstop) {
    std::vector<std::string> expanded_args;
    std::vector<char*> c_strings;

    expanded_args.resize(args.size());
    c_strings.push_back(const_cast<char*>(args[0].data()));
    for (std::size_t i = 1; i < args.size(); ++i) {
        auto expanded_arg = ExpandProps(args[i]);
        if (!expanded_arg.ok()) {
            LOG(FATAL) << args[0] << ": cannot expand arguments': " << expanded_arg.error();
        }
        expanded_args[i] = *expanded_arg;
        c_strings.push_back(expanded_args[i].data());
    }
    c_strings.push_back(nullptr);

    if (sigstop) {
        kill(getpid(), SIGSTOP);
    }

    return execv(c_strings[0], c_strings.data()) == 0;
}
这里实际上是调用了execv方法,找到/system/bin/app_process64下的可执行文件,从而启动zygote进程。
三、总结
至此就分析完了init进程,每个阶段执行内容:
| 阶段 | 对应文件 | 关键任务 |
|---|---|---|
| FirstStageMain | first_stage_init.cpp | 挂载文件系统、进入 selinux_setup |
| SetupSelinux | selinux.cpp | 加载 SELinux 策略并启用 |
| SecondStageMain | init.cpp | 初始化并开启属性服务、加载 rc 文件、启动 Zygote |
3个阶段都会去初始化初始化Kernel日志,这样做的好处是可以避免阶段依赖,也就是低耦合,高内聚。
当加载init.rc文件时,在ServiceParser::ParseSection方法中,会把service语句包装成std::unique_ptr,在ServiceParser::EndSection方法中添加到ServiceList,同理on语句也会添加到ActionManager,后面在一个循环中,遍历ActionManager。
在init_zygotexx.rc文件中,Zygote的class为main,当解析到nonencrypted语句时
rc
on nonencrypted
    class_start main
    class_start late_start
会执行class_start,它对应的方法是do_class_start,遍历服务serviceList,从而找到对应的服务开启,调用Service::Start 方法,在这个方法中,先fork出子进程,然后执行execv, 会找到对应的可执行性文件app_process,从而启动了Zygote。
最后分享几个看Android系统源码的网站:
- cs.android.com/android/pla...
- aospxref.com/
- Android OS 在线源代码 - https://www.androidos.net.cn
- XRefAndroid - Support Android 16.0 & OpenHarmony 6.0 (AndroidXRef/AospXRef)
感谢阅读,希望本文对你有所帮助,如有任何不对的地方,欢迎大家指出。
四、参考资料
《Android进阶解密》