在Django中可以使用CKEditor4和CKEditor5两个版本,分别对应软件包django-ckeditor和django-ckeditor-5。原来使用的是CKEditor4,python manager.py makemigrations时总是提示CKEditor4有安全风险,建议升级到CKEditor5。故卸载了CKEditor4,安装配置CKEditor5,具体步骤如下:
-
安装CKEditor5(Debian系统):
sudo pip3 install django-ckeditor-5
-
将"django_ckeditor_5"添加到settings.py的INSTALLED_APPS中:
INSTALLED_APPS = [
'django.contrib.auth',
'django.contrib.contenttypes',
'django.contrib.sessions',
'django.contrib.messages',
'django.contrib.staticfiles',
'django_ckeditor_5',
......
] -
在settings.py中配置CKEditor5(官网标准设置):
STATIC_URL = '/static/'
MEDIA_URL = '/media/'
MEDIA_ROOT = os.path.join(BASE_DIR, 'media')customColorPalette = [
{
'color': 'hsl(4, 90%, 58%)',
'label': 'Red'
},
{
'color': 'hsl(340, 82%, 52%)',
'label': 'Pink'
},
{
'color': 'hsl(291, 64%, 42%)',
'label': 'Purple'
},
{
'color': 'hsl(262, 52%, 47%)',
'label': 'Deep Purple'
},
{
'color': 'hsl(231, 48%, 48%)',
'label': 'Indigo'
},
{
'color': 'hsl(207, 90%, 54%)',
'label': 'Blue'
},
]CKEDITOR_5_CUSTOM_CSS = 'path_to.css' # optional
CKEDITOR_5_FILE_STORAGE = "path_to_storage.CustomStorage" # optional
CKEDITOR_5_CONFIGS = {
'default': {
'toolbar': ['heading', '|', 'bold', 'italic', 'link',
'bulletedList', 'numberedList', 'blockQuote', 'imageUpload', ],}, 'extends': { 'blockToolbar': [ 'paragraph', 'heading1', 'heading2', 'heading3', '|', 'bulletedList', 'numberedList', '|', 'blockQuote', ], 'toolbar': ['heading', '|', 'outdent', 'indent', '|', 'bold', 'italic', 'link', 'underline', 'strikethrough', 'code','subscript', 'superscript', 'highlight', '|', 'codeBlock', 'sourceEditing', 'insertImage', 'bulletedList', 'numberedList', 'todoList', '|', 'blockQuote', 'imageUpload', '|', 'fontSize', 'fontFamily', 'fontColor', 'fontBackgroundColor', 'mediaEmbed', 'removeFormat', 'insertTable',], 'image': { 'toolbar': ['imageTextAlternative', '|', 'imageStyle:alignLeft', 'imageStyle:alignRight', 'imageStyle:alignCenter', 'imageStyle:side', '|'], 'styles': [ 'full', 'side', 'alignLeft', 'alignRight', 'alignCenter', ] }, 'table': { 'contentToolbar': [ 'tableColumn', 'tableRow', 'mergeTableCells', 'tableProperties', 'tableCellProperties' ], 'tableProperties': { 'borderColors': customColorPalette, 'backgroundColors': customColorPalette }, 'tableCellProperties': { 'borderColors': customColorPalette, 'backgroundColors': customColorPalette } }, 'heading' : { 'options': [ { 'model': 'paragraph', 'title': 'Paragraph', 'class': 'ck-heading_paragraph' }, { 'model': 'heading1', 'view': 'h1', 'title': 'Heading 1', 'class': 'ck-heading_heading1' }, { 'model': 'heading2', 'view': 'h2', 'title': 'Heading 2', 'class': 'ck-heading_heading2' }, { 'model': 'heading3', 'view': 'h3', 'title': 'Heading 3', 'class': 'ck-heading_heading3' } ] } }, 'list': { 'properties': { 'styles': 'true', 'startIndex': 'true', 'reversed': 'true', } }}
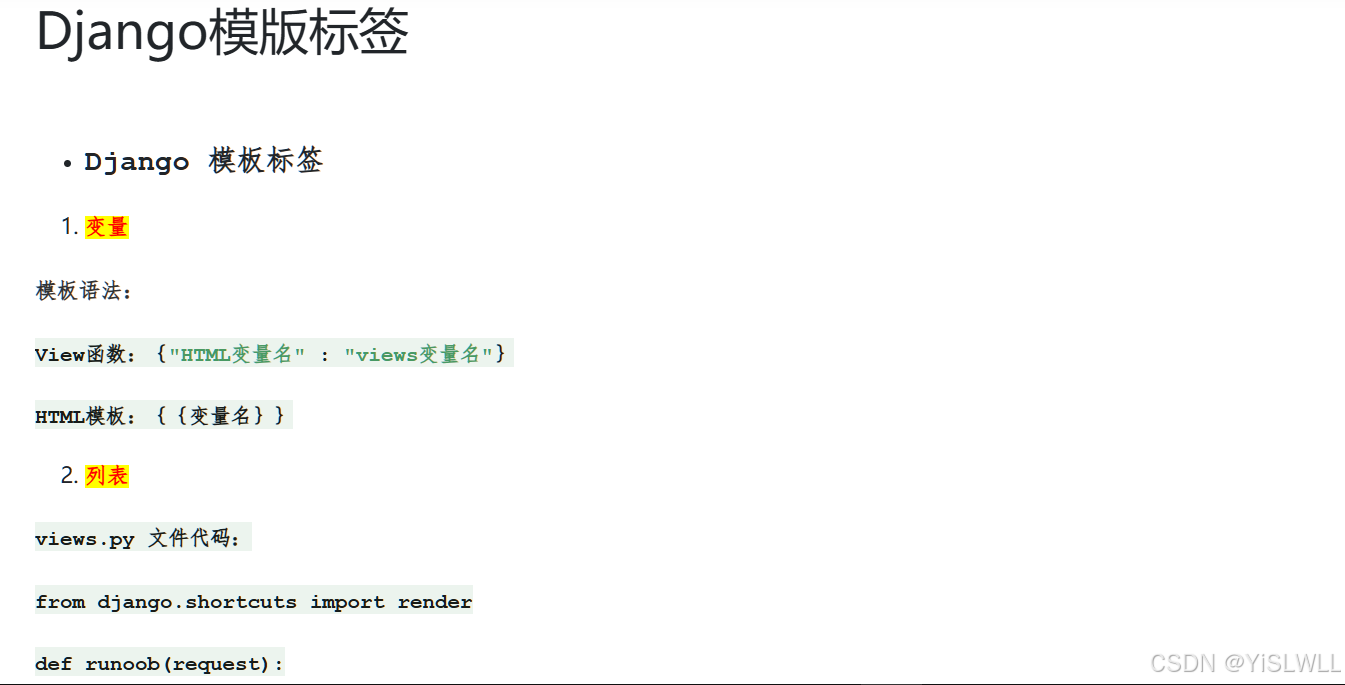
其中定义了三种配置,分别为"default","extends"和"list",下面主要使用"extends"。
-
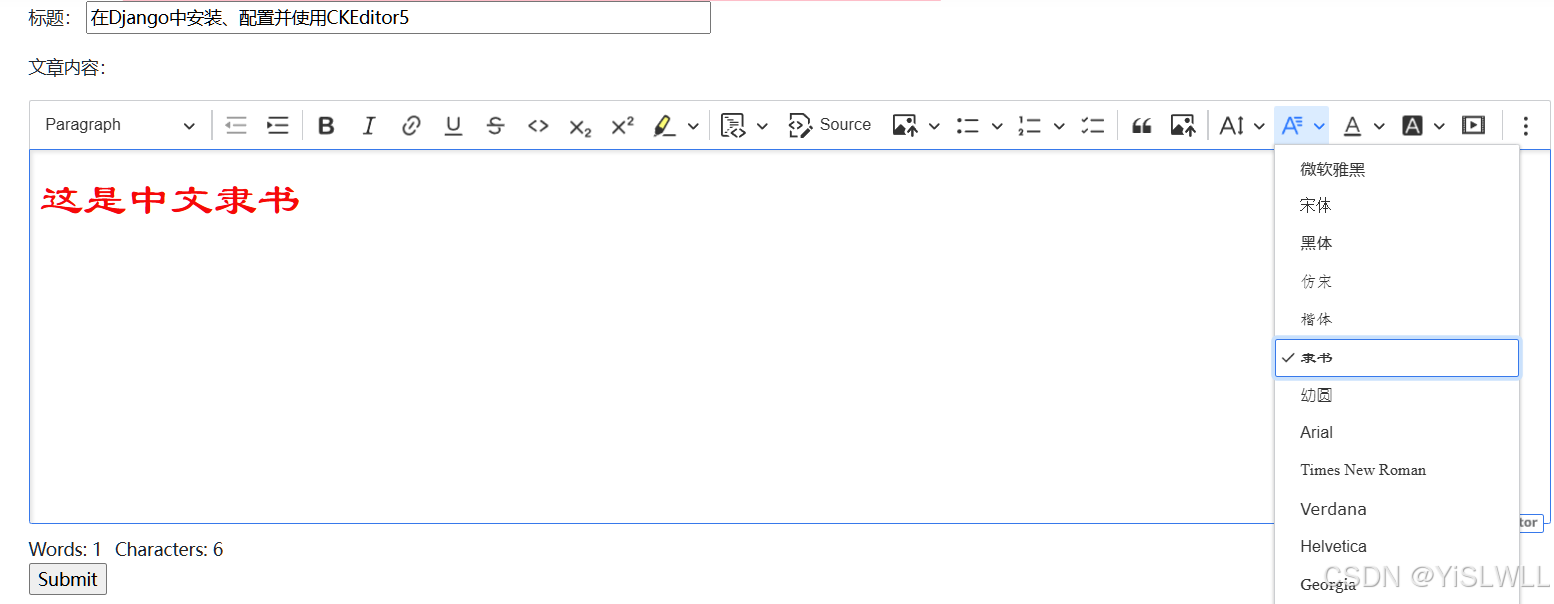
为了使用中文字体,需要修改extends配置,增加fontFamily设置,将中文字体放在英文字体的前面。
'fontFamily': {
'options': ['微软雅黑', '宋体', '黑体', '仿宋', '楷体', '隶书', '幼圆', 'Arial', 'Times New Roman', 'Verdana', 'Helvetica', 'Georgia', 'Courier New', 'Impact', 'Comic Sans MS', 'Trebuchet MS'],
'supportAllValues': 'true',
},
效果如下:
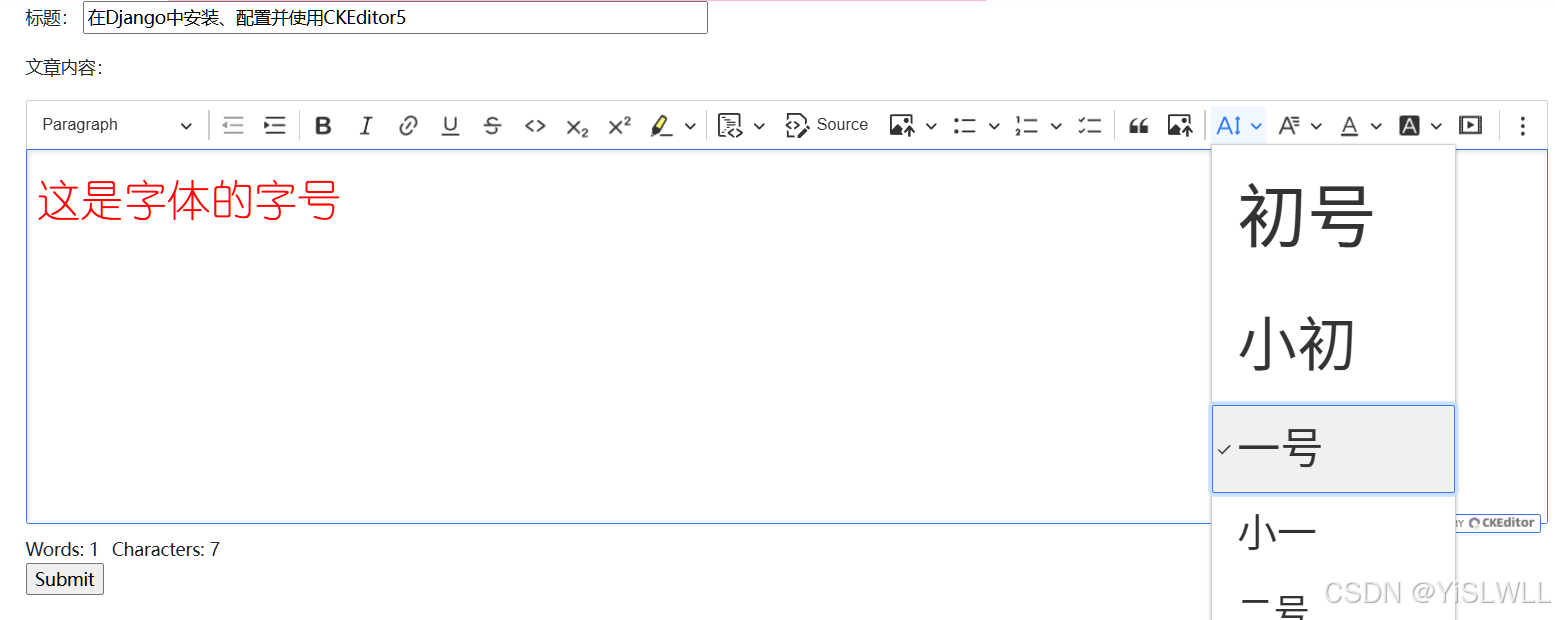
- 为了使用方便,需要设置字体大小,根据word的使用习惯,按字号来设置字体,修改extends配置,增加fontSize设置。
(1) 如果需要下拉列表的字体大小和设置字体大小一样,可以如下设置:
    'options': [
    { 'model':'56px', 'title': "初号"},
    { 'model':'48px', 'title': "小初"},
    { 'model':'34.7px', 'title': "一号"},
    { 'model':'32px', 'title': "小一"},
    { 'model':'29.3px', 'title': "二号"},
    { 'model':'24px', 'title': "小二"},
    { 'model':'21.3px', 'title': "三号"},
    { 'model':'20px', 'title': "小三"},
    { 'model':'18.7px', 'title': "四号"},
    { 'model':'16px', 'title': "小四"},
    { 'model':'14px', 'title': "五号"},
    { 'model':'12px', 'title': "小五"},
    { 'model':'10px', 'title': "六号"},
    { 'model':'8.7px', 'title': "小六"},
    { 'model':'7.3px', 'title': "七号"},
    { 'model':'6.7px', 'title': "八号"},
    ],
    'supportAllValues': 'true',
   },
效果如下:
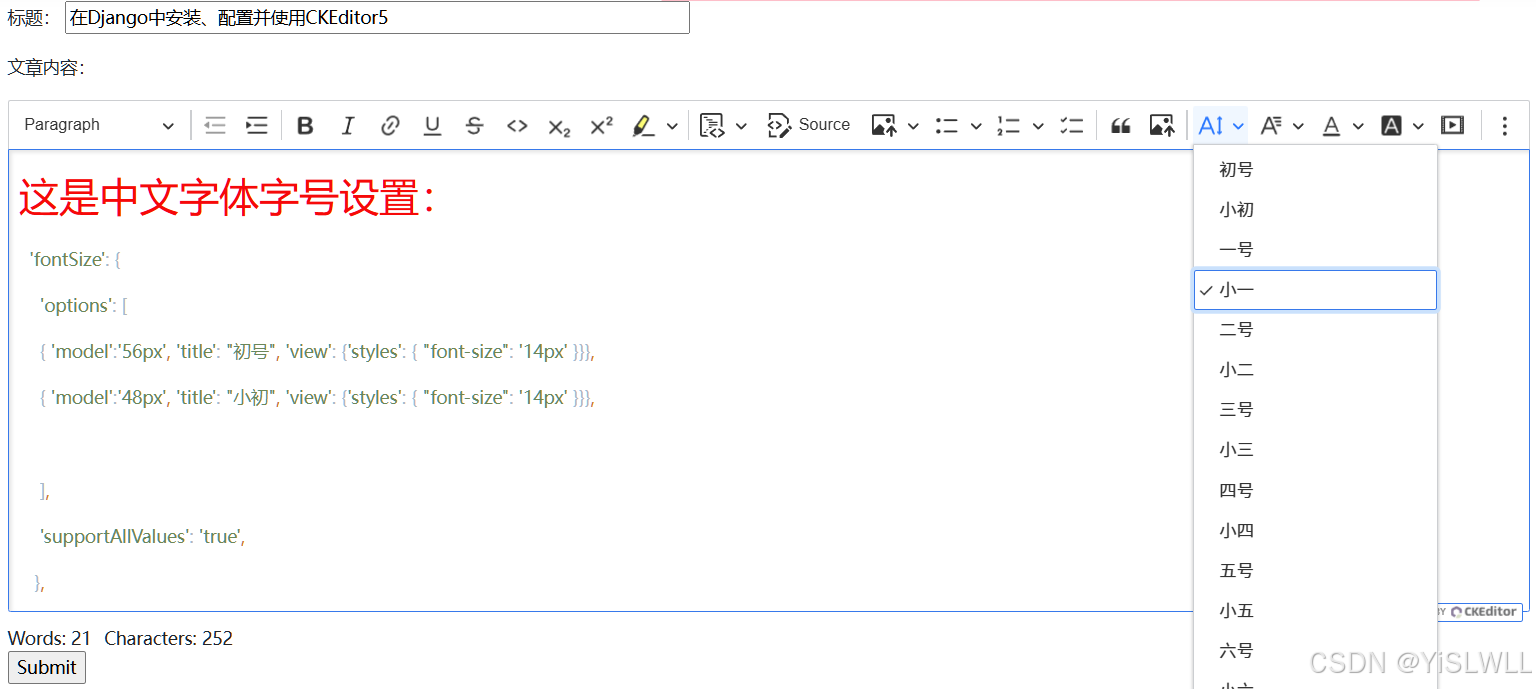
(2) 如果不需要下拉列表的字体大小和实际字体大小一样,可以增加显示格式设置,将下拉列表字体大小都统一为14px:
  'fontSize': {
    'options': [
    { 'model':'56px', 'title': "初号", 'view': {'styles': { "font-size": '14px' }}},
    { 'model':'48px', 'title': "小初", 'view': {'styles': { "font-size": '14px' }}},
    { 'model':'34.7px', 'title': "一号", 'view': {'styles': { "font-size": '14px' }}},
    { 'model':'32px', 'title': "小一", 'view': {'styles': { "font-size": '14px' }}},
    { 'model':'29.3px', 'title': "二号", 'view': {'styles': { "font-size": '14px' }}},
    { 'model':'24px', 'title': "小二", 'view': {'styles': { "font-size": '14px' }}},
    { 'model':'21.3px', 'title': "三号", 'view': {'styles': { "font-size": '14px' }}},
    { 'model':'20px', 'title': "小三", 'view': {'styles': { "font-size": '14px' }}},
    { 'model':'18.7px', 'title': "四号", 'view': {'styles': { "font-size": '14px' }}},
    { 'model':'16px', 'title': "小四", 'view': {'styles': { "font-size": '14px' }}},
    { 'model':'14px', 'title': "五号", 'view': {'styles': { "font-size": '14px' }}},
    { 'model':'12px', 'title': "小五", 'view': {'styles': { "font-size": '14px' }}},
    { 'model':'10px', 'title': "六号", 'view': {'styles': { "font-size": '14px' }}},
    { 'model':'8.7px', 'title': "小六", 'view': {'styles': { "font-size": '14px' }}},
    { 'model':'7.3px', 'title': "七号", 'view': {'styles': { "font-size": '14px' }}},
    { 'model':'6.7px', 'title': "八号", 'view': {'styles': { "font-size": '14px' }}},
    ],
    'supportAllValues': 'true',
   },
效果如下:
我个人使用了第二种,另外加上一些常规设置,settings.py中CKEditor5的全部设置如下:
STATIC_ROOT = os.path.join(BASE_DIR,"static/")
MEDIA_URL = "media/"
MEDIA_ROOT = os.path.join(BASE_DIR,"media/")

CKEDITOR_5_CONFIGS = {
'default': {
  'toolbar': ['heading', '|', 'bold', 'italic', 'link',
           'bulletedList', 'numberedList', 'blockQuote', 'imageUpload', ],
},
'extends': {
  'blockToolbar': [
     'paragraph', 'heading1', 'heading2', 'heading3',
     '|',
     'bulletedList', 'numberedList',
     '|',
     'blockQuote',
  ],
  'toolbar': ['heading', '|', 'outdent', 'indent', '|', 'bold', 'italic', 'link', 'underline', 'strikethrough',
  'code','subscript', 'superscript', 'highlight', '|', 'codeBlock', 'sourceEditing', 'insertImage',
           'bulletedList', 'numberedList', 'todoList', '|',  'blockQuote', 'imageUpload', '|',
           'fontSize', 'fontFamily', 'fontColor', 'fontBackgroundColor', 'mediaEmbed', 'removeFormat',
           'insertTable',],
  'image': {
     'toolbar': ['imageTextAlternative', '|', 'imageStyle:alignLeft',
              'imageStyle:alignRight', 'imageStyle:alignCenter', 'imageStyle:side',  '|'],
     'styles': [
        'full',
        'side',
        'alignLeft',
        'alignRight',
        'alignCenter',
     ]

  },
  'table': {
     'contentToolbar': [ 'tableColumn', 'tableRow', 'mergeTableCells',
     'tableProperties', 'tableCellProperties' ],
     'tableProperties': {
        'borderColors': customColorPalette,
        'backgroundColors': customColorPalette
     },
     'tableCellProperties': {
        'borderColors': customColorPalette,
        'backgroundColors': customColorPalette
     }
  },
  'heading' : {
     'options': [
        { 'model': 'paragraph', 'title': 'Paragraph', 'class': 'ck-heading_paragraph' },
        { 'model': 'heading1', 'view': 'h1', 'title': 'Heading 1', 'class': 'ck-heading_heading1' },
        { 'model': 'heading2', 'view': 'h2', 'title': 'Heading 2', 'class': 'ck-heading_heading2' },
        { 'model': 'heading3', 'view': 'h3', 'title': 'Heading 3', 'class': 'ck-heading_heading3' }
     ]
  },

  'fontFamily': {
        'options': ['微软雅黑', '宋体', '黑体', '仿宋', '楷体', '隶书', '幼圆', 'Arial', 'Times New Roman', 'Verdana', 'Helvetica', 'Georgia', 'Courier New', 'Impact', 'Comic Sans MS', 'Trebuchet MS'],
        'supportAllValues': 'true',
    },
  'fontSize': {
    'options': [
    { 'model':'56px', 'title': "初号", 'view': {'styles': { "font-size": '14px' }}},
    { 'model':'48px', 'title': "小初", 'view': {'styles': { "font-size": '14px' }}},
    { 'model':'34.7px', 'title': "一号", 'view': {'styles': { "font-size": '14px' }}},
    { 'model':'32px', 'title': "小一", 'view': {'styles': { "font-size": '14px' }}},
    { 'model':'29.3px', 'title': "二号", 'view': {'styles': { "font-size": '14px' }}},
    { 'model':'24px', 'title': "小二", 'view': {'styles': { "font-size": '14px' }}},
    { 'model':'21.3px', 'title': "三号", 'view': {'styles': { "font-size": '14px' }}},
    { 'model':'20px', 'title': "小三", 'view': {'styles': { "font-size": '14px' }}},
    { 'model':'18.7px', 'title': "四号", 'view': {'styles': { "font-size": '14px' }}},
    { 'model':'16px', 'title': "小四", 'view': {'styles': { "font-size": '14px' }}},
    { 'model':'14px', 'title': "五号", 'view': {'styles': { "font-size": '14px' }}},
    { 'model':'12px', 'title': "小五", 'view': {'styles': { "font-size": '14px' }}},
    { 'model':'10px', 'title': "六号", 'view': {'styles': { "font-size": '14px' }}},
    { 'model':'8.7px', 'title': "小六", 'view': {'styles': { "font-size": '14px' }}},
    { 'model':'7.3px', 'title': "七号", 'view': {'styles': { "font-size": '14px' }}},
    { 'model':'6.7px', 'title': "八号", 'view': {'styles': { "font-size": '14px' }}},
    ],
    'supportAllValues': 'true',
   },
   'height': '800px',
},
'list': {
  'properties': {
     'styles': 'true',
     'startIndex': 'true',
     'reversed': 'true',
  }
}
}

# Define a constant in settings.py to specify file upload permissions
CKEDITOR_5_FILE_UPLOAD_PERMISSION = "authenticated"  # Possible values: "staff", "authenticated", "any"

CKEDITOR_5_USER_LANGUAGE=True #使用Django配置的语言6.修改项目的urls.py,如下所示:
from django.conf import settings
from django.conf.urls.static import static

urlpatterns = [
    path('admin/login/', sign_in, name='admin_login'),  #替代admin原始登录界面
    path('admin/', admin.site.urls),
    ......
]

urlpatterns += [
path("ckeditor5/", include('django_ckeditor_5.urls')),
] + static(settings.MEDIA_URL, document_root=settings.MEDIA_ROOT)-
在项目应用(假设为myapp)的models.py中新建CKEditor类:
from django.db import models
from django_ckeditor_5.fields import CKEditor5Fieldclass CkeditorArt(models.Model):
#content = models.TextField(verbose_name='内容')
article_id = models.AutoField(primary_key=True)
title = models.CharField(max_length=200,verbose_name='标题',default='CKEditor编辑页面')
content = CKEditor5Field('内容',config_name='extends')#定义模型在admin管理界面显示名称,也可在admin.py中新建ModelAdmin类使用list_display来设置 def __str__(self): return f"{self.title},{self.content}" -
在项目应用(myapp)的forms.py中新建表单类:
from django import forms
from django_ckeditor_5.widgets import CKEditor5Widget
from .models import CkeditorArtclass PostAdminForm(forms.ModelForm):
def init(self, *args, **kwargs):
super().init(*args, **kwargs)
self.fields["content"].required = Falsetitle = forms.CharField(label='文章标题',max_length=200, required=True, widget=forms.TextInput(attrs={"placeholder": "在这里输入标题",'style': 'width: 500px;'}),) class Meta: model = CkeditorArt fields = ('title','content') widgets = { "content": CKEditor5Widget( attrs={"class": "django_ckeditor_5"}, config_name="extends" ) }
此处的CKEditor的配置config_name为前面setttings.py中设置extends配置。
-
为便于使用Django后台管理CKEditor表单提交的内容,在项目应用(myapp)的admin.py中增加如下内容:
from .models import CkeditorArt
class CkeditorArtAdmin(admin.ModelAdmin):
list_display = ('title','content')
admin.site.register(CkeditorArt,CkeditorArtAdmin) -
更新数据库和static文件
python3 manage.py makemigrations
python3 manage.py migrate
python3 manage.py collectstatic -
在项目应用(myapp)的urls.py中设置路径:
from django.urls import path
from . import viewsurlpatterns = [
path('Ckeditor/', views.Ckeditor, name='ckeditor'),
.....
]
12.在项目应用(myapp)的views.py中新建上面提到的view函数Ckeditor:
from django.shortcuts import render
from django.http import HttpResponse
from .forms import PostAdminForm

@login_required(login_url='/login/')  #需要登录用户权限
def Ckeditor(request):
    """ 自定义form表单 """
    if request.method == 'POST':
        form = PostAdminForm(data=request.POST)
        if form.is_valid():
            form.save()
            return render(request, 'form-post-finished.html')
    form = PostAdminForm()
    return render(request, 'ckeditor-form.html', {'form':form})
13.在项目应用(myapp)的templates目录下新建上面提到的ckeditor-form.html,主要内容如下:
{% extends "newdesign/newbase.html" %}

    {% block mytitle %}
        <title>Ckeditor富文本编辑</title>
    {% endblock %}

    {% block maincontent %}
    <div class="row">
        <form method="post", class="form-horizontal">
            {% csrf_token %}
          <p>标题: {{form.title |safe}}</p>
          <p>文章内容:</p>
            {{form.content |safe}}
            {{form.media}}
            <input type="submit" value="Submit">
        </form>
    </div>
    {% endblock %}
通过地址/myapp/Ckeditor即可访问CKEditor编辑页面,可以直接把word排版好的内容拷贝过来,格式和照片等都可以按word的排版正常显示。
- 在CKEditor表单页面输入文章标题,完成文章内容,示例如下,然后submit提交。
提交后可以在Django的管理后台看到相关记录:
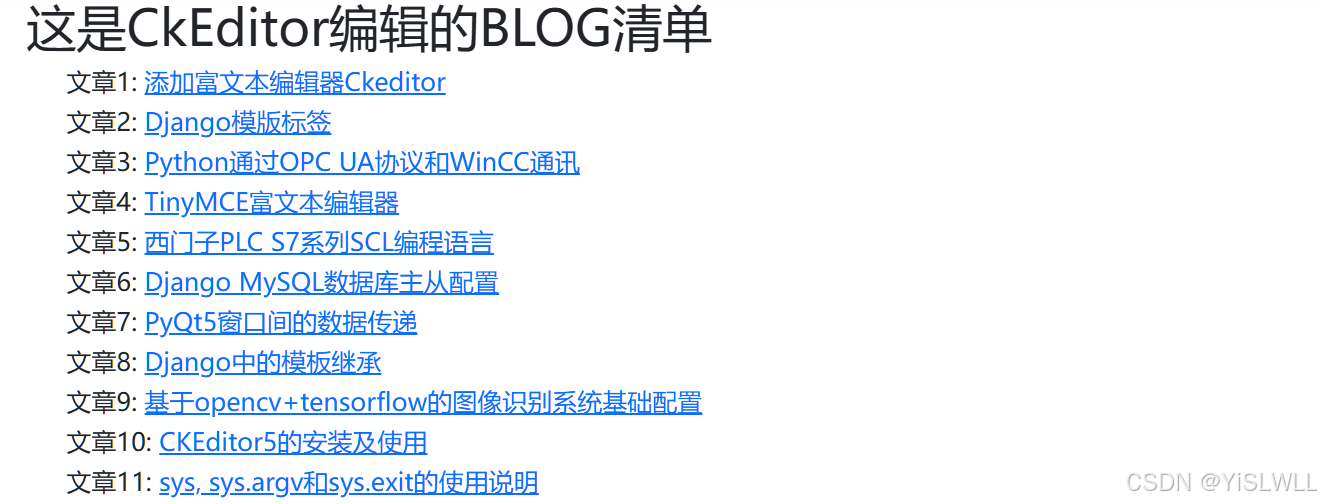
 15. 下面将所有文章以列表的形式在网页上展示出来,点击列表中文章的标题,即可展示文章内容,效果如下:
(1)在项目应用(myapp)的urls.py中设置bloglist和每篇文章的路径:
from django.urls import path
from . import views


urlpatterns = [
    path('Ckeditor/', views.Ckeditor, name='ckeditor'),
    path('bloglist/', views.Bloglist, name='bloglist'),
    path('blog/<str:article_id>/', views.Showblog, name='showblog'),
]
(2)在项目应用(myapp)的views.py中新建上面提到的view函数Bloglist和Showblog:
from .models import CkeditorArt
#@login_required(login_url='/login/')
def Showblog(request,article_id):
    try:
        article = CkeditorArt.objects.get(article_id=article_id)
        return render(request, 'showblog.html', {'content':article.content,'title':article.title})
    except CkeditorArt.DoesNotExist:
        message = '<h1 style="color: red;">文章没找到!<h1>'
        return render(request, 'showblog.html', {'content':message,'title':'文章没找到'})


#@login_required(login_url='/login/')
def Bloglist(request):
    #values返回字典,values_list返回元组
    objs = CkeditorArt.objects.values('article_id','title')
    context = {
    'objs':objs,
    }
    return render(request,'bloglist.html', context)
(3)在项目应用(myapp)的templates目录下新建上面提到的bloglist.html和showblog.html
bloglist.html
{% extends "newdesign/newbase.html" %}

        {% block mytitle %}
            <title>BLOG列表</title>
        {% endblock %}

       {% block maincontent %}
        <h1>这是CkEditor编辑的BLOG清单</h1>
        <div>
            <ul>
                {% for obj in objs %}
                <h5>文章{{obj.article_id}}: <a href="/myapp/blog/{{ obj.article_id }}/">{{obj.title}}</a></h5>
                {% endfor %}
            </ul>
        </div>
    {% endblock %}
showblog.html
{% extends "newdesign/newbase.html" %}

    {% block mytitle %}
        <title>{{title}}</title>
    {% endblock %}

    {% block maincontent %}

    <h2>{{title}}</h2>

    {{content|safe}}
    {% endblock %}
至此,通过CKEditor就基本实现了一个简单博客网站的功能。