文章目录
一、引言
web网络服务也叫www万维网服务,是能够让用户通过浏览器访问到互联网中文档等资源的服务
常见的Web服务程序
-
IIS(Internet InformationServices):一款图形化网站管理工具它不仅能提供Web网站服务,还能够提供FTP、NMTP、SMTP、等服务,但是只能在windows中使用。
-
Nginx:一款轻量级网站服务软件,稳定性好,功能丰富,占用低系统资源,内存占用少。
-
Apache:快平台和安全性广泛且拥有快速,可靠,简单的API扩展
。
- Tomcat:轻量级web服务软件,一般用于开发和调试jsp代码,通常认为他是apache的扩展程序。
浏览器
- 服务器提供的最主要数据是超文本标记语(html),多媒体文件(图片、影像、声音、文字等,都属于多媒体或称为超媒体),HTML只是一些纯文本数据,通过所谓的标记来规范所要显示的数据格式。
- 客户端收到服务器的数据之后需要软件解析服务器所提供的数据,最后将效果呈现在屏幕上。
网址和http
- web服务器提供的数据大部分是预先写在服务端写好的,并放置在特殊的目录下面,及整个网站的首页,在redhat中国,默认是/var/www/html
- 浏览器就是通过在地址栏中国输入的网址来取得目录的位置
URL
- URL(Uniform Resource Locator):统一资源定位符,是互联网上标准资源的地址。
-格式:<协议>://<主机或主机名>[:port]/<目录资源,路径> - 协议::http、https、ftp等
- 主机地址或者主机名:主机地址就是服务器在因特网所在的IP地址。如果是主机名的话,那么就需要域名解析了
- 端口号(port):http为80,https为443
- 0-1023:永久地分配给固定的应用程序使用
- 1024-41951:注册端口,但要求不是特别严格,分配给程序注册为某应用使用
- 41952-60000:客户端程序随机使用的端口,动态端口,或私有端口
http
http一次请求发送给和对应的响应组成功过一次http事务

常见请求方法:
| 求方法 | 协议版本 | 说明 |
|---|---|---|
| GET | 0.9 | 获取资源,可以理解为读取或者下载数据 |
| HEAD | 1.0 | 获取资源,和 GET 类似,不返回具体数据,只需要头信息 |
| POST | 1.0 | 向服务端提交数据,数据通常交由后端程序处理 |
| PUT | 1.1 | 向服务端提交数据,数据直接存储在服务器上 |
| PATCH | 1.1 | 对PUT方法的补充,用来对己知资源进行局部更新 |
| DELETE | 1.1 | 请求服务端删除指定资源 |
| CONNECT | 1.1 | 建立一个到服务端的隧道 |
| OPTIONS | 1.1 | 请求服务端返回对指定资源支持使用的请求方法 |
| TRACE | 1.1 | 追踪请求到达服务器中间经过的代理服务器 |
状态码
- 1xx:指示信息 ------ 表示请求已接收,继续处理
- 2xx:成功 ------ 表示请求已被成功接收、理解、接
- 3xx:重定向 ------ 要完成请求必须进行更进一步的操作
- 4xx:客户端错误 ------ 请求有语法错误或请求无法实现
- 5xx:服务器端错误 ------ 服务器未能实现合法的请求
常见的状态码:
- 200 OK:客户端请求成功
- 400 Bad Request:客户端请求有语法错误,不能被服务器所理解
- 401 Unauthorized:请求未经授权,这个状态代码必须和 WWW-Authenticate 报头域一起使用
- 403 Forbidden:服务器收到请求,但是拒绝提供服务
- 404 Not Found:请求资源不存在。例如:输入了错误的URL
- 500 Internal Server Error:服务器发生不可预期的错误
- 503 Server Unavailable:服务器当前不能处理客户端的请求,一段时间后可能恢复正常
http协议请求的工作流程
- 当用户在浏览器的搜索框中输入域名后,依次检查浏览器缓存和系统缓存,如果没有,就讲请求发送给dns服务器dns服务器会解析域名对应的地址返回给浏览器。
- 建立tcp连接:http协议是建立在tcp协议之上,所以必须先建立可靠的连接。
- tcp建立后浏览器就可以向服务器发送http请求,服务器收到请求后从数据存储中找到报文中请求的资源,然后构建正确的http响应报文,之后将响应报文发送给客户端浏览器。
- 浏览器收到响应并解析,完成后关闭tcp连接。
- 服务器将完成的相关事务记录到日志中。

二、利用nginx搭建静态网站
**静态网站:**服务器仅向客户端提供数据,之后不需要服务端和客户端互动,客户端可以浏览网站,但是无法上传数据
1.nginx
特点:
- 高并发:单机nginx可支持十万级的并发连接,优化后最高可支持百万级并发连接。
- 内存消耗低
- 高扩展性:采用模块化设计,支持丰富的第三方模块
- 高可靠性:才用master-worker模式,如果worker出现故障,master可快速的开启一个新的worker来提供服务。
Nginx 采用一个 Master 进程和多个 Worker 进程的模型。(默认情况会建立和CPU数量相等的worker进程,它们之间相互独立)
master:监控给给给worker进场数量和状态
worker:处理客户端请求,接收master发送的指令
nginx正向代理

分析:一个用户访问不了某个网站,但是能访问一个代理服务器,代理服务器能访问到用户访问不了的网站,于是用户就访问代理服务器,代理服务器去将内容取回来返回给用户。就像要访问Google要用VPN代理一样
nginx反向代理

分析: 反向代理正好相反,他是用来保护服务端的,当外网客户来访问服务器时,为了避免暴露服务器的实际ip地址,它会让客户端访问代理服务器,然后代理服务器去真正的服务器获取响应并返回给客户端。
nginx负载均衡
负载均衡:将传入的网络流量(请求)分发到多个后端服务器。目的:
-
提高性能和吞吐量:避免单个服务器过载。
-
实现高可用和容错:当某个后端服务器宕机时,自动将流量路由到其他健康的服务器。
-
实现水平扩展:通过添加更多的服务器来轻松应对增长的业务流量。
2.部署nginx*
bash
#关闭防火墙和selinux
[root@server ~] setenforce  0

[root@server ~] systemctl stop  firewalld

[root@server ~] systemctl disable  firewalld

#安装
[root@server ~] yum  install  nginx  -y

# 启动httpd
[root@server ~] systemctl start  nginx
 # 设置开机启动
[root@server ~] systemctl enable  nginx
 # 查看状态,q键退出查看
[root@server ~] systemctl status  nginx
#查看进程
[root@server ~]ps -ef | grep nginx
root        2898       1  0 15:49 ?        00:00:00 nginx: master process /usr/sbin/nginx
nginx       2899    2898  0 15:49 ?        00:00:00 nginx: worker process
nginx       2900    2898  0 15:49 ?        00:00:00 nginx: worker process
root        3115    2652  0 15:50 pts/1    00:00:00 grep --color=auto nginx
nginx配置文件
网页默认目录:/usr/share/nginx/html
访问日志:/var/log/nginx/access.log
错误日志:/var/log/nginx/error.log
主配置文件
bash
/etc/nginx/nginx.conf
层级结构图:

分析
bash
user nginx;  #运行账户
worker_processes auto;
error_log /var/log/nginx/error.log; # 错误日志存放目录
pid /run/nginx.pid;

# Load dynamic modules. See /usr/share/doc/nginx/README.dynamic.
include /usr/share/nginx/modules/*.conf;  #导入外部文件

#性能配置模块
events {
    worker_connections 1024;
}

http {
    log_format  main  '$remote_addr - $remote_user [$time_local] "$request" '
                      '$status $body_bytes_sent "$http_referer" '
                      '"$http_user_agent" "$http_x_forwarded_for"';

    access_log  /var/log/nginx/access.log  main;  # 访问日志存储位置

    sendfile            on;
    tcp_nopush          on;
    tcp_nodelay         on;
    keepalive_timeout   65;
    types_hash_max_size 4096;

    include             /etc/nginx/mime.types;
    default_type        application/octet-stream;

    # Load modular configuration files from the /etc/nginx/conf.d directory.
    # See http://nginx.org/en/docs/ngx_core_module.html#include
    # for more information.
    include /etc/nginx/conf.d/*.conf;
 # 加载子配置文件,可以将后续虚拟主机server里的内容写在子配置文件对应的目录下
    server {
        listen       80; #监听ipv4端口
        listen       [::]:80;  #监听ipv6端口
        server_name  _;
        root         /usr/share/nginx/html;
        #默认网页目录

        # Load configuration files for the default server block.
        include /etc/nginx/default.d/*.conf;
# location配置段,一般用来匹配不同的URI请求
 # 404时返回给客户端的页面
        error_page 404 /404.html;
        location = /404.html {
        }
# 50x错误返回给客户端的页面
        error_page 500 502 503 504 /50x.html;
        location = /50x.html {
        }
}-
root指令与alias
-
root指令用于静态资源目录位置,它可以写在 http 、 server 、 location 等配置中,root指令定义的路径会与 URI 叠加产生最终访问路径,如:
nginxlocation /image { root /opt/nginx/static; } # 当用户访问 www.test.com/image/1.png 时,实际在服务器找的路径是 /opt/nginx/static/image/1.png-
alias也是指定静态资源目录位置,但只能访问指定的绝对路径,不会叠加目录,只能写在 location 中且末尾一定要添加 / , 如:
nginxlocation /image { alias /opt/nginx/static/image/; } #当用户访问 www.test.com/image/1.png 时,实际在服务器找的路径是 /opt/nginx/static/image/1.png -
location匹配路径
-
格式:
nginx
location   [ = | ~ | ~* | ^~ ] uri {
  ...
}
匹配规则:
- = 精确匹配;
- ~ 正则匹配,区分大小写;
- ~* 正则匹配,不区分大小写;
- ^~ 匹配以某个字符串开头,不是正则匹配;
- / 通用匹配,如果没有其它匹配,任何请求都会匹配到
- 注:匹配优先级:= > ^~ > ~ > ~* > 不带任何字符。
实例:
bash
server {
  listen  80;
  server_name  www.nginx-test.com;

  # 只有当访问 www.nginx-test.com/match_all/ 时才会匹配到/usr/share/nginx/html/match_all/index.html
  location = /match_all/ {
      root  /usr/share/nginx/html;
      index index.html;
  }

  # 当访问 www.nginx-test.com/1.jpg 等路径时会去 /usr/share/nginx/images/1.jpg 找对应的资源
  location ~ \.(jpeg|jpg|png|svg)$ {
    root /usr/share/nginx/images;
  }


}

# 注意:
location / {
    root html;
    index index.html index.htm;
  }
# 其/是统统都匹配到指定路径,而指定路径为html ,即nginx的默认网页目录/usr/share/nginx/html
实验1:搭建网站
bash
# 新建网页存储目录
[root@server ~] mkdir  /www/test
#写入内容到网站目录下的index.html文件中,因为默认会访问网站目录下的index.html文件
 [root@server ~] echo welcome to web > /www/test/index.html

[root@server ~]# vi  /etc/nginx/nginx.conf
# server端中启用location模块
server {
        listen       80;
        listen       [::]:80;
        server_name  _;
        location / {
                root         /www/test;
                index  index.html  index.htm;
        }

[root@server ~]# systemctl restart nginx  # 重启服务

curl可以查看到网站内容
[root@server ~]# curl 192.168.65.100
welcome to web
实验2:搭建密码验证功能访问网站
bash
新建登录账户
[root@server ~] useradd test1
[root@server ~] passwd test1
Changing password for user test1.
New password:  #123456
BAD PASSWORD: The password is shorter than 8 characters
Retype new password:
passwd: all authentication tokens updated successfully.


增加密码访问控制

[root@server ~]# htpasswd -c /etc/nginx/passwd test1
New password:   #1234567
Re-type new password:
Adding password for user test1

# htpasswd:生成密码数据的命令
# -c:表示第一次生成,会创建存储密码的文件,第二次创建密码时不能增加-c参数,否则会覆盖
# /etc/httpd/passwd : 存储访问网站的密码文件,passwd为文件名,名称可以自定
# test1:需要验证密码访问的账户名称


#配置文件设置访问网站时需要验证密码
[root@server ~] vim  /etc/nginx/nginx.conf
server {
        listen       80;
        listen       [::]:80;
        root         /www/test;
        autoindex    on;    # 开启目录访问列表
        auth_basic   "Please input password";
        auth_basic_user_file   /etc/nginx/passwd;

[root@server ~] nginx  -t
nginx: the configuration file /etc/nginx/nginx.conf syntax is ok
nginx: configuration file /etc/nginx/nginx.conf test is successful


[root@server ~]# systemctl restart nginx

# windows打开浏览器输入IP地址时有验证密码的对话框弹出,输入密码验证访问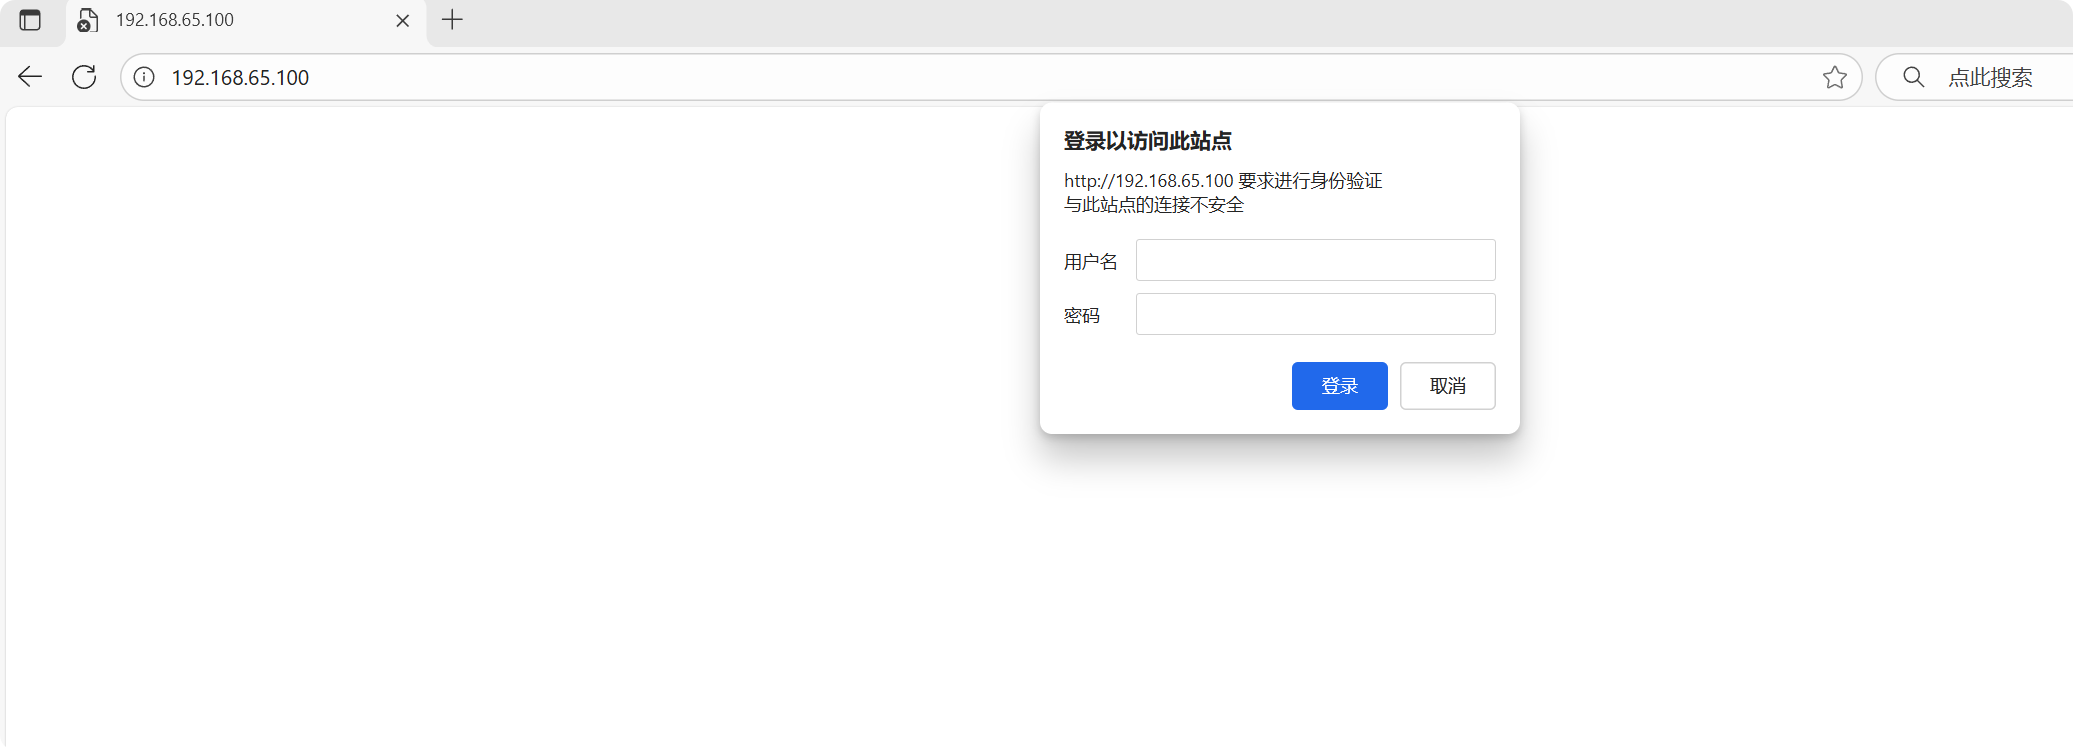
3.虚拟主机
- 虚拟主机就可以把真实服务器分割成多个虚拟的服务器
- nginx基于客户端请求的不同的ip地址,域名或端口号,实现提供多个网站同时为客户端提供访问服务的技术,请求方式的不同,得到的网页的内容也各不相同。
基于IP地址的虚拟主机
准备:
关闭防火墙和selinux
bash
[root@server ~] setenforce  0

[root@server ~] systemctl stop  firewalld

[root@server ~]systemctl disable  firewalld

[root@server ~] yum  install  nginx  -y

[root@server ~] systemctl start  nginx   # 启动httpd

[root@server ~] systemctl enable nginx # 设置开机启动利用nmtui或者nmcli命令添加两个ip
bash
[root@node ~] nmcli c  modify ens160 +ipv4.addresses 192.168.65.210/24
[root@node ~] nmcli c  modify ens160 +ipv4.addresses 192.168.65.220/24
[root@node ~] nmcli c  up  ens32
新建两个存储网页的目录,并写入网页文件
bash
[root@localhost ~] mkdir -p /www/ip{210,220}
[root@localhost ~] echo "this is ip210" >  /www/ip210/index.html
[root@localhost ~] echo "this is ip220" >  /www/ip220/index.html
修改配置文件,建立基于IP地址的虚拟地址
bash
# 在/etc/nginx/conf.d目录下建立子配置文件实现,更加精简,执行时会被主配置文件加载


[root@localhost ~]vim  /etc/nginx/conf.d/ip.conf
server {
        listen       80;
        server_name  192.168.65.210;
        root         /www/ip210;
        }

server {
        listen       80;
        server_name  192.168.65.220;
        root         /www/ip220;
}
重启并测试
bash
[root@localhost ~] systemctl  restart nginx

[root@localhost ~] curl  192.168.65.210
this is ip210
[root@localhost ~] curl  192.168.65.220
this is ip220
基于端口号的虚拟主机
可以让客户端通过一个IP地址的不同端口号来访问不同的网站
准备:
关闭防火墙和selinux
bash
[root@server ~] setenforce  0

[root@server ~] systemctl stop  firewalld

[root@server ~]systemctl disable  firewalld

[root@server ~] yum  install  nginx  -y

[root@server ~] systemctl start  nginx   # 启动httpd

[root@server ~] systemctl enable  nginx  # 设置开机启动
新建两个存储网页的目录
bash
[root@localhost ~]# mkdir -p /www/port{5111,5222}
[root@localhost ~]# echo "this is port5111" > /www/port5111/index.html
[root@localhost ~]# echo "this is port5222" > /www/port5222/index.html

!也可以自己编写html文件
编辑配置文件
bash
# 在/etc/nginx/conf.d目录下建立子配置文件实现,更加精简,执行时会被主配置文件加载


[root@localhost ~]vim /etc/nginx/conf.d/port.conf

server {
        listen       5111;
        server_name  _;
        root         /www/port5111;
        }

server {
        listen       5222;
        server_name  _;
        root         /www/port5222;
}
重启服务,测试
bash
[root@localhost ~] nginx -t
nginx: the configuration file /etc/nginx/nginx.conf syntax is ok
nginx: configuration file /etc/nginx/nginx.conf test is successful
[root@localhost ~] systectl restart nginx
bash: systectl: command not found...
[root@localhost ~] systemctl restart nginx
[root@localhost ~] curl 192.168.65.200:5111
this is port5111
[root@localhost ~] curl 192.168.65.200:5222
this is port5222
基于域名的虚拟主机
当服务器无法给每个网站都分配一个独立的IP地址时,可以通过用户请求的域名不同实现传输不同的网页数据
域名解析:浏览器如何通过域名去查询URL对应的IP
- 浏览器缓存:浏览器会按照一定的频率缓存DNS记录
- 操作系统缓存:如果浏览器缓存中找不到需要的DNS记录,那就去操作系统中的hosts文件找。hosts是一个没有扩展名的系统文件,其作用就是将一些常用的网址域名与其对应的IP地址建立一个关联"数据库",当用户在浏览器中输入一个需要登录的网址时,系统会首先自动从Hosts文件中寻找对应的IP地址,一旦找到,系统会立即打开对应网页,如果没有找到,则系统会再将网址提交DNS域名解析服务器进行IP地址的解析。
- windows下的hosts文件路径:C:\Windows\System32\drivers\etc\hosts
- Linux下的hosts文件路径:/etc/hosts
准备:
关闭防火墙和selinux
bash
[root@server ~] setenforce  0

[root@server ~] systemctl stop  firewalld

[root@server ~]systemctl disable  firewalld

[root@server ~] yum  install  nginx  -y

[root@server ~] systemctl start  nginx   # 启动httpd

[root@server ~] systemctl enable  nginx  # 设置开机启动
新建两个存储网页的目录
bash
[root@localhost ~]mkdir -p /www/name_{dns1,ns2}
[root@localhost ~] echo "this is dns1" > /www/name_dns1/index.html
[root@localhost ~]echo "this is dns2" > /www/name_ns2/index.html

!也可以自己编写html文件
编辑配置文件
bash
# 在/etc/nginx/conf.d目录下建立子配置文件实现,更加精简,执行时会被主配置文件加载


[root@localhost ~]vim
 /etc/nginx/conf.d/dns.conf
server {
        listen       80;
        server_name  www.dns1.com;   # 重点,需要写域名
        root         /www/name_dns1;
}
server {
        listen       80;
        server_name  www.dns2.com;   # 重点,需要写域名
        root         /www/name_ns2;
}
手动配置IP地址与域名的映射关系
bash
# Linux端
[root@server ~] vim  /etc/hosts
# 添加如下内容:
192.168.65.200  www.dns1.com
192.168.65.200  www.dns2.com

# windows端,打开:
C:\Windows\System32\drivers\etc\hosts文件,添加如下内容:
192.168.65.200 www.dns1.com
192.168.65.200 www.dns2.com
重启服务,测试
bash
nginx -t
nginx: the configuration file /etc/nginx/nginx.conf syntax is ok
nginx: configuration file /etc/nginx/nginx.conf test is successful
[root@localhost ~] systectl restart nginx
bash: systectl: command not found...
[root@localhost ~] systemctl restart nginx
[root@localhost ~]# curl www.dns2.com
this is dns2
[root@localhost ~]# curl www.dns1.com
this is dns1

windows里可以打开浏览器输入域名进行测试