概要
最近又做到了PAK包得加载和封装,之前其实做过但是时间一久很多技术实现过程就忘记了,这次功能要全面一些主要就是将A工程设为总程序,但是对于B;C端制作得一些蓝图Actor或者模型在不改动程序得前提下热更新到我们得A工程中做部署,本来准备先看看现成得发现啊,网络环境及其恶劣不是要vip就是乱七八糟的得一些事情,我建议这种就不要做技术分享,遇到这种大家还是多翻翻官方文档或者问问AI吧。我也不废话了直接上代码,版本是UE 5.5。
PAK打包必用代码
主要用的就是UE自带得工具UnrealPak.exe程序作为底层实现来实现得,为了方便打包端得程序我写在编辑器蓝图里了
-
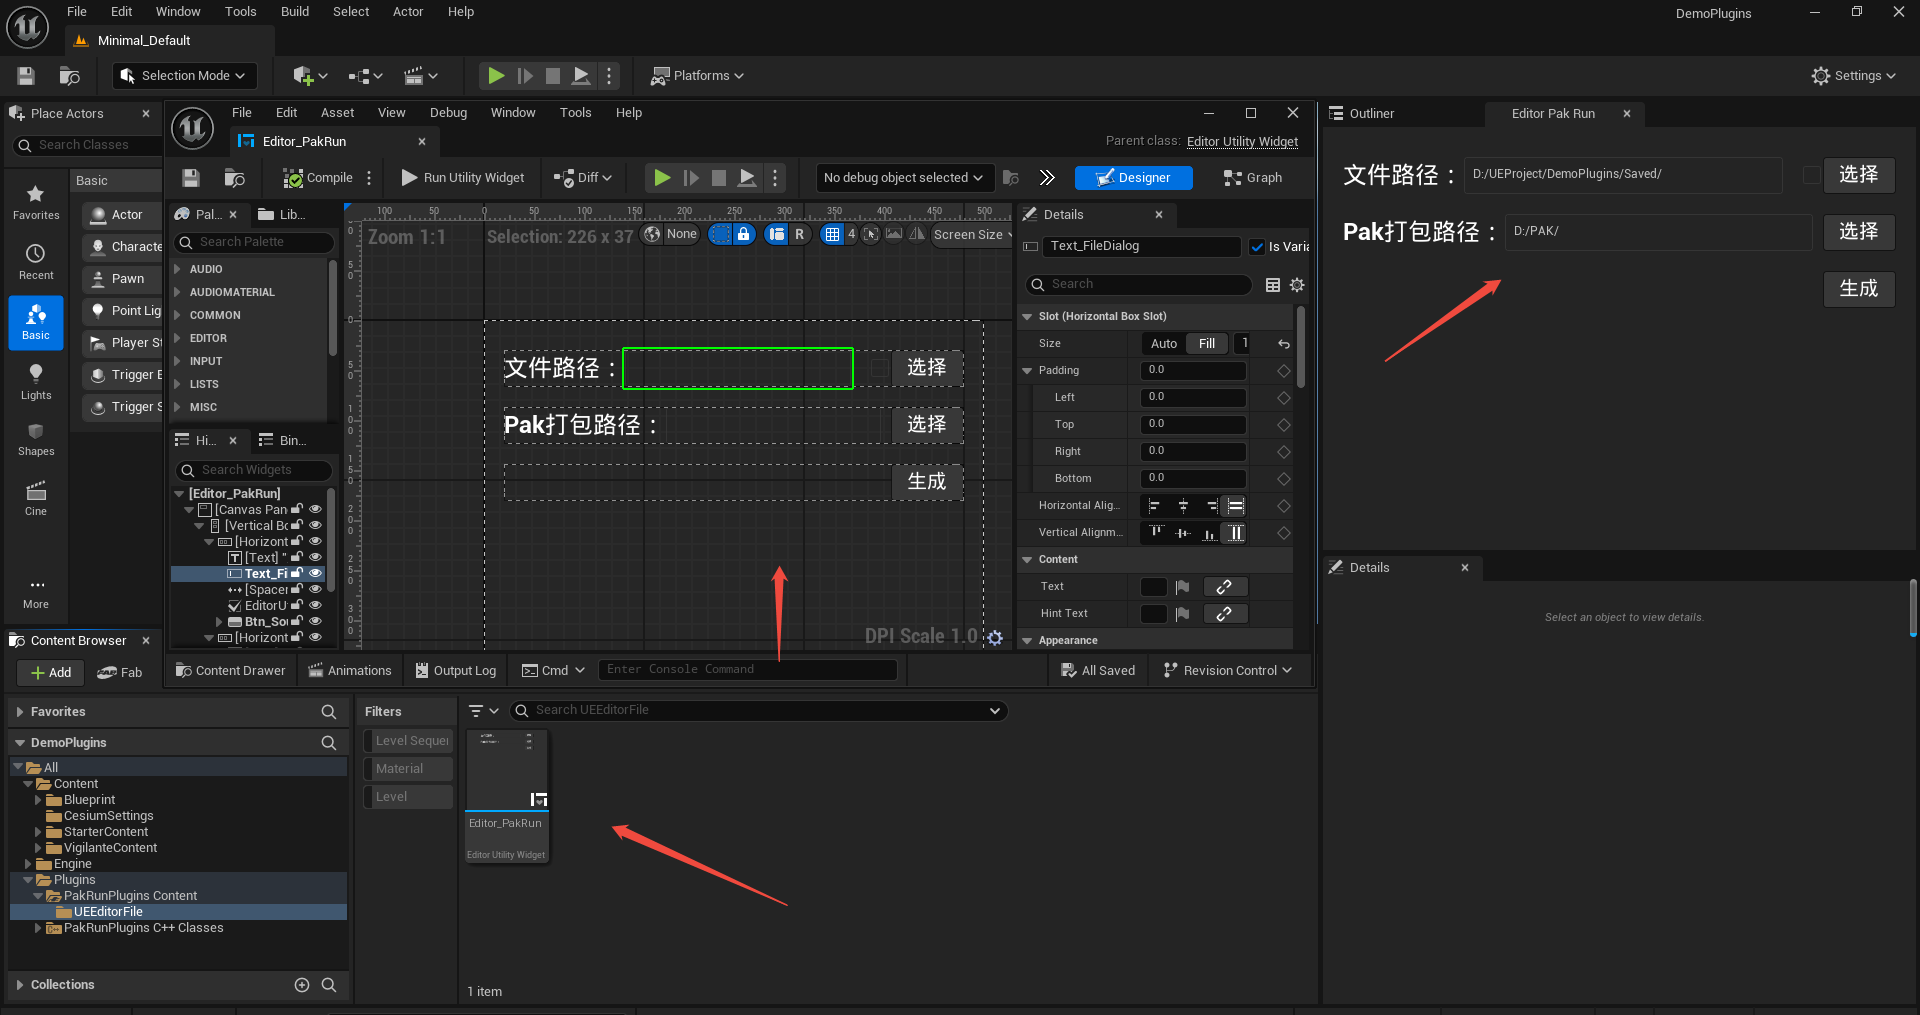
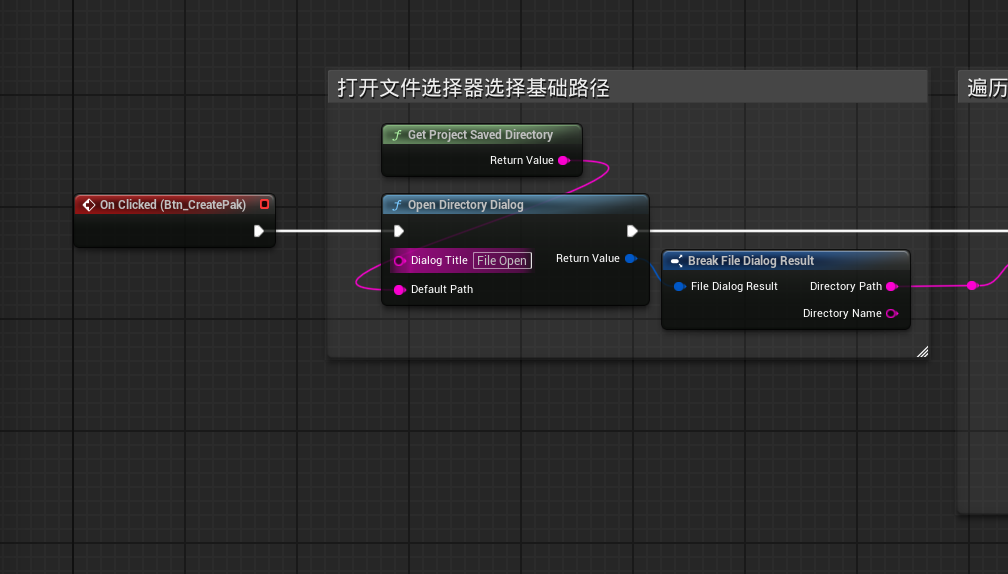
创建编辑器UMG蓝图方便管理,然后创建一个按钮一个文本输入框,我们先获取某个文件夹地址或者某个文件得路径地址。
-
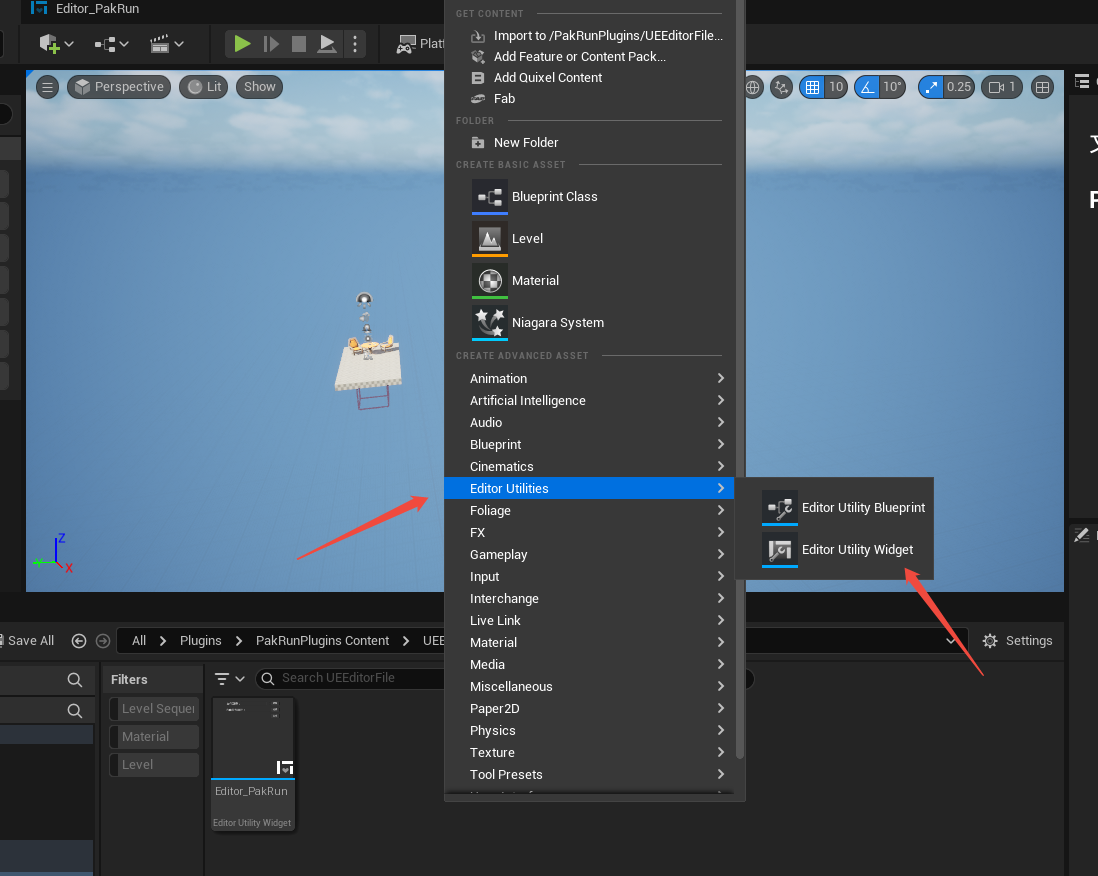
创建一个插件或者在你的C++类里面添加两个函数一个结构体,因为我们希望pak得文件名还是我们选择得文件名称,这样方便我们管理。最外层添加结构体。在自己得类里面添加函数。
cppUSTRUCT(BlueprintType) struct FFileDialogResult { GENERATED_USTRUCT_BODY() UPROPERTY(EditAnywhere, BlueprintReadWrite) FString DirectoryPath; UPROPERTY(EditAnywhere, BlueprintReadWrite) FString DirectoryName; };cpp//通过文件对话框选择文件,返回选择文件的路径 UFUNCTION(BlueprintCallable, Category = "File Utility") static FFileDialogResult OpenFileDialog(const FString& DialogTitle = TEXT("File Open"), const FString& DefaultPath = TEXT("")); //通过文件对话框选择文件夹返回文件夹路径 UFUNCTION(BlueprintCallable, Category = "File Utility") static FFileDialogResult OpenDirectoryDialog(const FString& DialogTitle = TEXT("File Open"), const FString& DefaultPath = TEXT(""));cpp#include "DesktopPlatformModule.h" #include "IDesktopPlatform.h" FFileDialogResult UPakRunPluginsBPLibrary::OpenFileDialog(const FString& DialogTitle, const FString& DefaultPath) { FFileDialogResult Result; IDesktopPlatform* DesktopPlatform = FDesktopPlatformModule::Get(); if (DesktopPlatform) { TArray<FString> OutFiles; const FString FileTypes = TEXT("Files (*.*)"); // 筛选.fbx文件 const void* ParentWindowHandle = nullptr; FString StartPath = DefaultPath; // 文件对话框打开的默认地址 if (StartPath.IsEmpty() || !FPaths::DirectoryExists(StartPath)) { StartPath = FPaths::ProjectDir(); // 默认为项目根目录 } uint32 SelectionFlag = 0; // 只能选择单个文件 bool bFileSelected = DesktopPlatform->OpenFileDialog( ParentWindowHandle, DialogTitle, StartPath, // 文件对话框打开的默认地址 TEXT(""), // 默认的选中文件 FileTypes, // 可选择文件的类型 SelectionFlag, // 选择文件的数量 OutFiles // 被选则文件的地址 ); if (bFileSelected && OutFiles.Num() > 0) { Result.DirectoryPath = OutFiles[0]; // 第1个被选择的文件 FPaths::NormalizeFilename(Result.DirectoryPath); // 标准化文件地址 Result.DirectoryName = FPaths::GetCleanFilename(Result.DirectoryPath); return Result; } } else { UE_LOG(LogTemp, Error, TEXT("DesktopPlatform module is not available.")); } return Result; } FFileDialogResult UPakRunPluginsBPLibrary::OpenDirectoryDialog(const FString& DialogTitle, const FString& DefaultPath) { FString OutSelectedFilePath = TEXT(""); FFileDialogResult Result; IDesktopPlatform* DesktopPlatform = FDesktopPlatformModule::Get(); if (DesktopPlatform) { const void* ParentWindowHandle = nullptr; FString StartPath = DefaultPath; // 文件对话框打开的默认地址 if (StartPath.IsEmpty() || !FPaths::DirectoryExists(StartPath)) { StartPath = FPaths::ProjectDir(); // 默认为项目根目录 } bool bFileSelected = DesktopPlatform->OpenDirectoryDialog( ParentWindowHandle, DialogTitle, StartPath, OutSelectedFilePath ); if (bFileSelected && !OutSelectedFilePath.IsEmpty()) { FPaths::NormalizeFilename(OutSelectedFilePath); Result.DirectoryPath = OutSelectedFilePath + TEXT("/"); Result.DirectoryName = FPaths::GetCleanFilename(OutSelectedFilePath); return Result; } } else { UE_LOG(LogTemp, Error, TEXT("DesktopPlatform module is not available.")); } return Result; }cppPrivateDependencyModuleNames.AddRange( new string[] { "CoreUObject", "Engine", "Slate", "SlateCore", "DesktopPlatform" //在build.cs里面添加我们得文件引用去器 DesktopPlatform } ); -
文件调用,这样我们就有两个静态函数了,我比较喜欢静态函数,这样没有限制,可以任意调用使用,如果你是Subsystem或者actor也可以看自己喜欢那种方式,默认得地址我们可以给一个项目地址或者存储地址不用来回找了,可以快速定位下,返回得一个是地址一个名称。
cppGet Project Saved Directory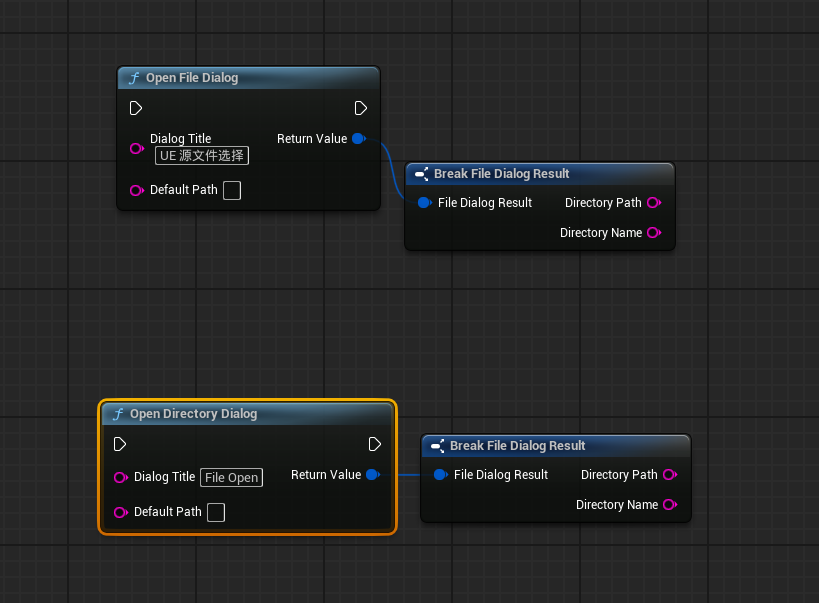
-
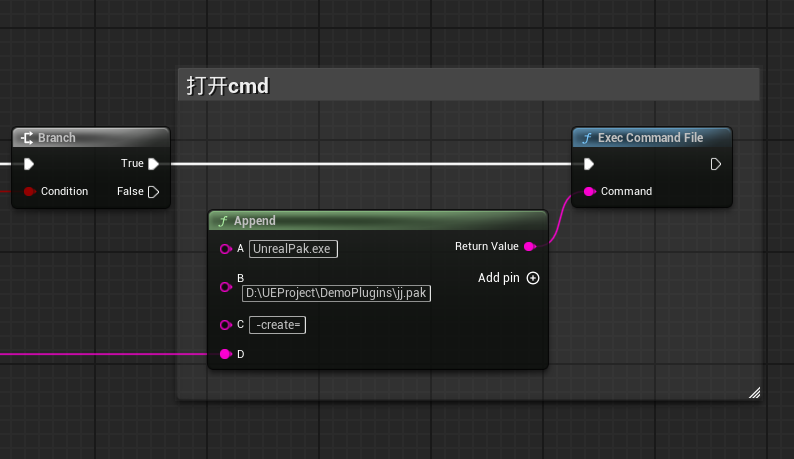
接下来我们通过UE调用cmd窗口来执行UnrealPak.exe命令来执行我们得打包程序命令,这样就可以完成自动序列化生成了。还是在添加函数形式,这样就可以调用Windows下面得CMD窗口了,Command里面是我们要让CMD执行得命令指令。
cpp//通过调用本地Windows窗口来执行cmd UFUNCTION(BlueprintCallable, Category = "File Utility") static void ExecCommandFile(const FString& Command);cppvoid UPakRunPluginsBPLibrary::ExecCommandFile(const FString& Command) { FString FullCommand = FString::Printf(TEXT("/K %s"),*Command); FProcHandle ProcessHandle = FPlatformProcess::CreateProc(TEXT("cmd.exe"),*FullCommand,true, true, true,nullptr,0,nullptr, nullptr); if (ProcessHandle.IsValid()) { FPlatformProcess::CloseProc(ProcessHandle); UE_LOG(LogTemp, Log, TEXT("Executed command: %s"), *Command); } else { UE_LOG(LogTemp, Error, TEXT("Failed to execute command: %s"),*Command); } }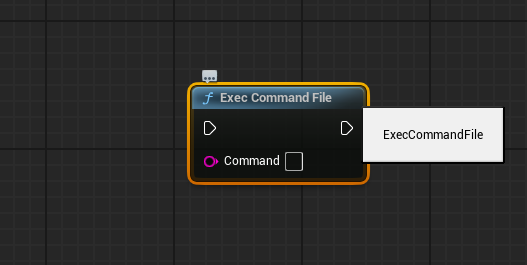
-
UnrealPak.exe调用,默认得地址在引擎下面得Win64文件里面有一个UnrealPak.exe
cppC:\Program Files\Epic Games\UE_5.5\Engine\Binaries\Win64 -
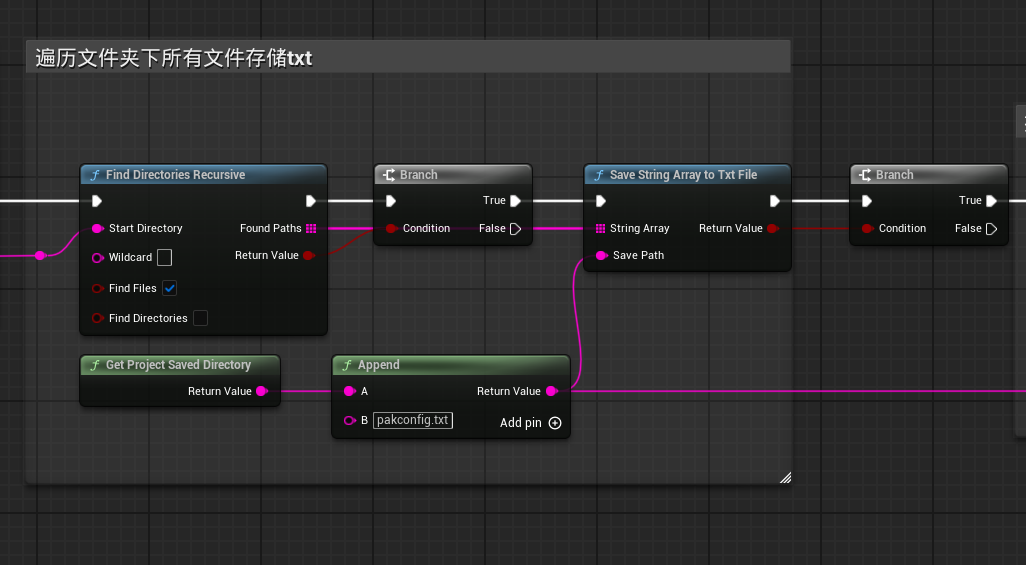
UE官方得调用方式其实有好几种,而且参数也很多,默认得调用方式就这exe pak地址 文件地址,这样我们在调用单个文件或者某个文件夹时时没有问题得,但是我经过测试发现,使用UnrealPak.exe打得包目录层级是一样,并不会把自己目录包含进去,这样就导致我们在挂载pak文件时就会出现路径不全得问题,导致我们找不到我们实际得uasset文件。所以我们就需要遍历把我们整个目录都打包进去,这样所有信息才是全得。
cppunrealpak D:\PAK\VigilanteContent.pak -create=D:\UEProject\DemoPlugins\Content\ -
我们需要换一条命令来进行我们得pak文件得调用和加载,使用txt文本加载得方式来加载我们得文件,其实就是把文件所有得路径都放进去了,然后直接加载txt就ok了。
cppunrealpak D:\PAK\VigilanteContent.pak -create=D:\UEProject\pakconfig.txt //文本内容如下 D:\UEProject\DemoPlugins\Saved\Cooked\Windows\DemoPlugins\Content\VigilanteContent\PB_ASSET.uasset D:\UEProject\DemoPlugins\Saved\Cooked\Windows\DemoPlugins\Content\VigilanteContent\PB_ASSET.uexp -
那么就用到了TXT创建和获取文件了,其实获取文件UE官方有一个插件叫Blueprint File utilities,它已经完全满足我们实现获取某个文件夹下面得文件和文件名路径了,但是我们为了代码得便捷性,自己引用下这样就不需要开启很多插件了,
cpp//获取文件夹下面所有得文件或者文件夹 UFUNCTION(BlueprintCallable, Category = "FileUtils") static bool FindDirectoriesRecursive(const FString& StartDirectory, TArray<FString>& FoundPaths, const FString& Wildcard = TEXT(""), bool bFindFiles = true, bool bFindDirectories = false);cpp#include"HAL/FileManager.h" bool UPakRunPluginsBPLibrary::FindDirectoriesRecursive(const FString& StartDirectory, TArray<FString>& FoundFilenames, const FString& FileExtension /*= TEXT("")*/, bool bFindFiles /*= true*/, bool bFindDirectories /*= false*/) { const bool bClearFilenameArray = true; FString Wildcard = FileExtension; if (Wildcard.IsEmpty()) { Wildcard = TEXT("*.*"); } IFileManager::Get().FindFilesRecursive(FoundFilenames, *StartDirectory, *Wildcard, bFindFiles, bFindDirectories, bClearFilenameArray); return FoundFilenames.Num() > 0; }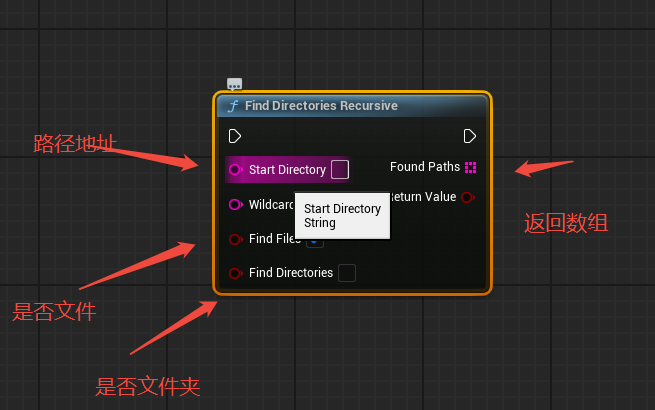
-
获取到得文件数组我们要把它存储成TXT文件,那我们再次对添加C++函数如下
cpp//存储TXT UFUNCTION(BlueprintCallable, Category = "File Utility") static bool SaveStringArrayToTxtFile(const TArray<FString>& StringArray, const FString& SavePath);cpp#include "Runtime/Core/Public/Misc/Paths.h" bool UPakRunPluginsBPLibrary::SaveStringArrayToTxtFile(const TArray<FString>& StringArray, const FString& SavePath) { // 检查字符串数组是否为空 if (StringArray.Num() == 0) { UE_LOG(LogTemp, Warning, TEXT("String array is empty, nothing to save.")); return false; } // 构建完整文件路径 //FString FullFilePath = SavePath + "/" + FileName + "." + FileExtension; FString FullFilePath = SavePath; // 检查保存目录是否存在,不存在则创建 IPlatformFile& PlatformFile = FPlatformFileManager::Get().GetPlatformFile(); FString DirectoryPath = FPaths::GetPath(FullFilePath); if (!PlatformFile.DirectoryExists(*DirectoryPath)) { if (!PlatformFile.CreateDirectoryTree(*DirectoryPath)) { UE_LOG(LogTemp, Error, TEXT("Failed to create directory: %s"), *DirectoryPath); return false; } UE_LOG(LogTemp, Log, TEXT("Created directory: %s"), *DirectoryPath); } // 使用FFileHelper保存字符串数组到文件 bool bSaveSuccess = FFileHelper::SaveStringArrayToFile( StringArray, *FullFilePath, FFileHelper::EEncodingOptions::ForceUTF8 ); if (bSaveSuccess) { UE_LOG(LogTemp, Log, TEXT("Successfully saved file: %s"), *FullFilePath); } else { UE_LOG(LogTemp, Error, TEXT("Failed to save file: %s"), *FullFilePath); } return bSaveSuccess; } -
这样基础得功能就都实现了,通过文件选择器,传输给获取文件路径,转txt文本存储,打开cmd进行命令发送为了怕老铁们对蓝图还是不熟悉我们把逻辑再梳理下。
PAK包基础设置及注意事项
- 项目设置:其实很多地方应该讲了项目得基础设置,我们再从头来一遍
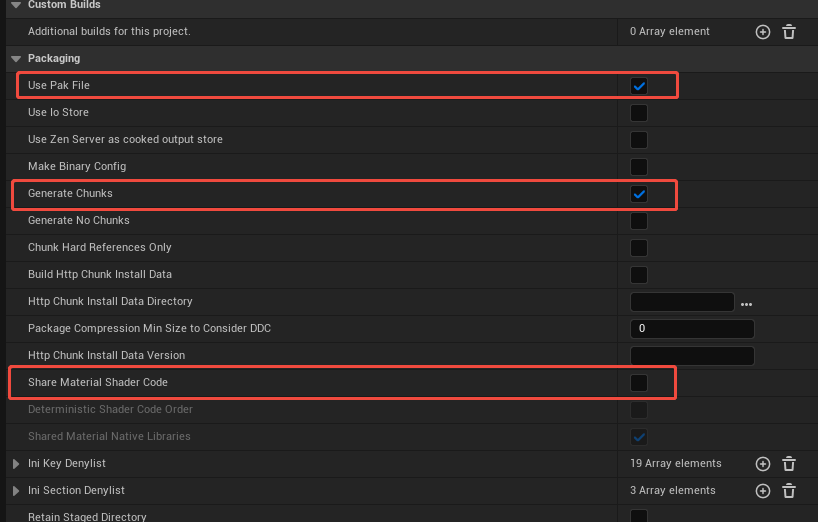
- 检查项目设置->打包下面关闭Use Io Store ,关闭Share Material ShaderCode,开启Use Pak File和Generate Chunks
- 添加额外Cook选项,把我们需要得文件路径添加进来

- 对项目进行Cook编译,编译后得数据内容在Saved->Cooked->Windows下面,你会发现在同级目录下面多了.uexp得同名称文件这个就是我们编译好的数据。
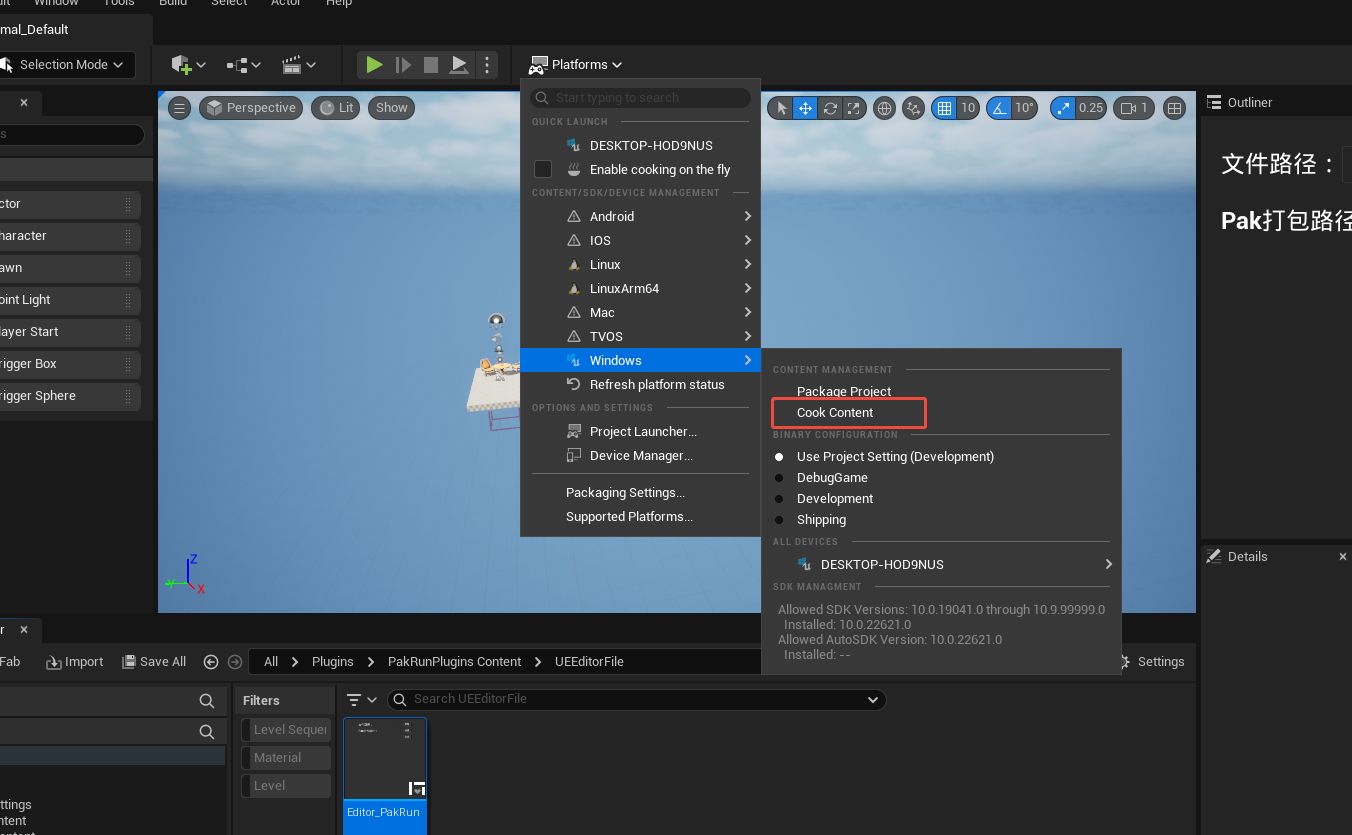
- 使用PAK打包得时候有两种方式,第一种呢就是通过我们得编译COOK,然后选择路径一定要时编译后得路径地址,不要直接选Content下面去Saved->Cooked文件下面找到你要封包得地址然后选择去打包。
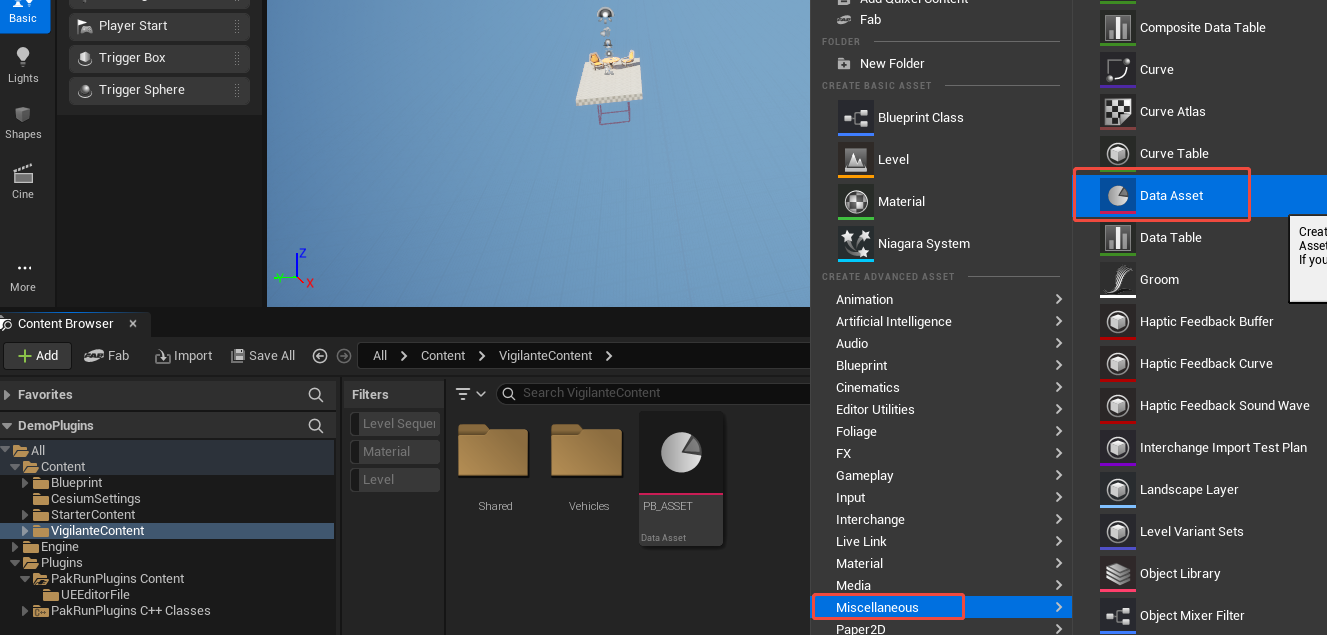
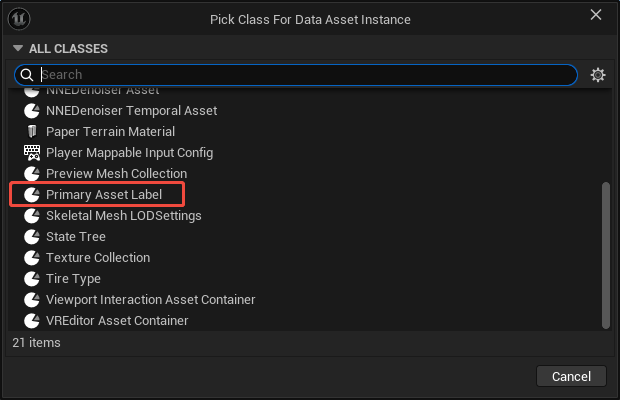
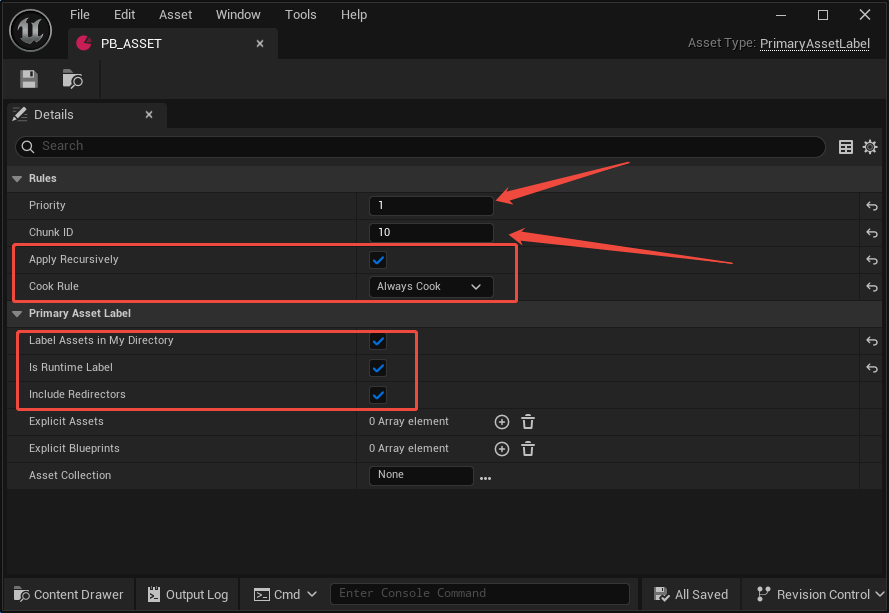
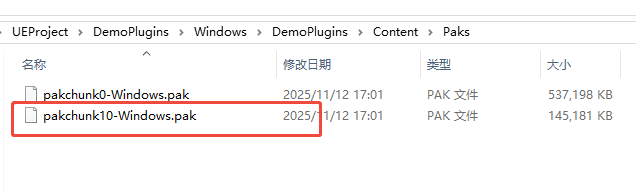
- 第二种方式呢就是直接打包项目,在我们想要打包得目录地址下面创建一个DataAsset,下拉选择Primary Asset Label选项,如果时多个块文件都需要打包得时候要注意优先级和ID,ID切记不要重复,然后就是几个选项和截图一致就可以了,这样我们在打包得时候就会发现,多了一个ID命名得PAK文件,这个文件就是我们封装得包。
技术细节
- PAK分为Cook和未Cook,运行时使用一定要是Cook后,这个切记,只有编辑状态下使用才是未Cook得,我这里说得都是已经Cook过的。还要注意Cook得文件地址在Saved下面。
- 检查PAK地址路径是否一致,有一个文件UnrealPakViewer可以看我们PAK得文件路径,我们做验证和对比就是我们文件得层级目录和文件得完整性。

- 要注意不同版本UE封装得包是无法解包得无论版本得高低,所以使用PAK得话要注意版本得一致性。
- 最重要得一点最好所有用到的内容放到一个文件夹下面,直接对这个PAK封包就可以如果引用得文件在其他文件夹,恰巧你也没打进去就会出现一个事情丢材质等乱七八糟的是事情,最好统一管理下,这样就不会出现问题了。
小结
运行时解包,我这里就不说了,大家直接去看下官方得讲解就可以了,很多时候官方说得解包可能有人不好使,其实大部分原因都是我们挂载得文件路径可能不对,所以我们多检查一下吧
cpp
//官方文件地址 里面有两个文件和一个地址
https://epicgames.ent.box.com/s/hecu7ew61l3yu9smc5ll44vp8xdbdtgz

//官方PAK运行时导入教程地址
https://dev.epicgames.com/community/learning/tutorials/7Bj8/unreal-engine-example-project-loading-pak-files-at-runtime
我也把插件给大家分享下,但是版本是5.5,建议大家好好缕一遍,东西有点多,但是缕下来你就知道PAK这套使用机制大概什么情况了。
cpp
通过网盘分享的文件:插件及可视化
链接: https://pan.baidu.com/s/1Hf8ndmgSjkUAVyW_Xp5aKA 提取码: iaxd
--来自百度网盘超级会员v7的分享