一、题目
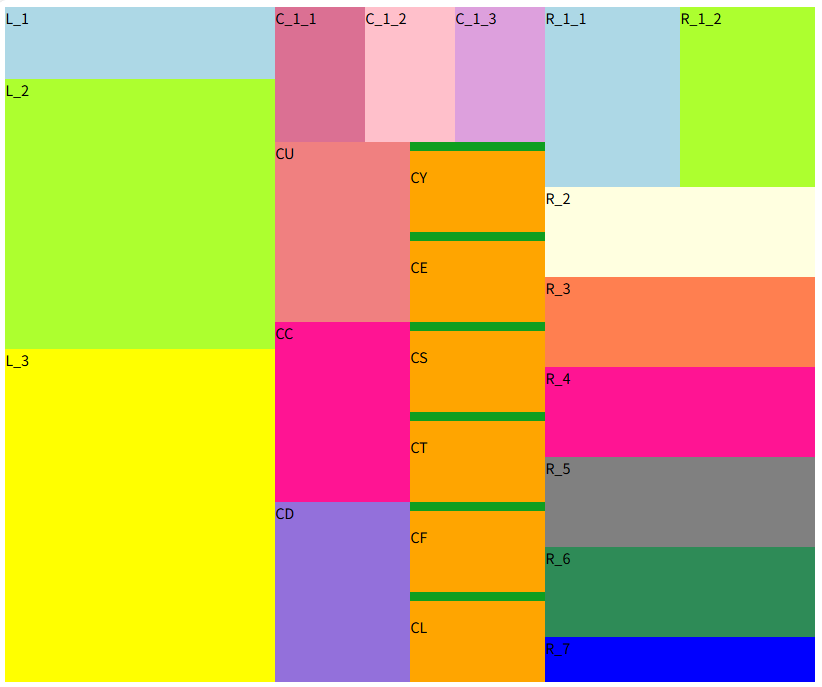
实现以下图片
二、思路
基于此案例,我们采用最基础的方法实现------浮动。
思路:
1、通过观察图片可以发现,布局整体分为左中右三个部分,所以先设置三个div盒子(L、C、R)用于分别放置这几部分。
2、在L盒子中,可看出分为三部分------上中下,即宽度一致,高度不一致。可通过统一设置宽度,分别设置高度来实现。
3、在C盒子中整体看又可以分为四个中等div盒子,在每个中等div盒子中继续划分。相当于在L盒子的基础上再次进行划分。
4、R盒子和L盒子几乎一致,区别在于R盒子的子盒子更多,并且其中有需要继续划分的盒子。
5、需要注意的是LCR三个盒子的划分虽然不同,但是整体高度一致;并且在C盒子中会发现在CY、CE、CS、CT、CF、CL中在盒子内部上方有边框,需要在样式中进行设置。
三、实现
1、外层盒子的创建
html
	<body>

		<div id="L"></div>

		<div id="C"></div>

		<div id="R"></div>
	</body>
2、分别在三个盒子中创建子盒子
(1)L盒子
html
        <div id="L">
			<div id="L_1">L_1</div>
			<div id="L_2">L_2</div>
			<div id="L_3">L_3</div>
		</div>
(2)C盒子
html
        <div id="C">
			<div id="C_1"></div>

			<div id="C_2"></div>

			<div id="C_3"></div>

			<div id="C_4"></div>
		</div>
(3)R盒子
html
		<div id="R">
			<div id="R_1">R_1</div>
			<div id="R_2">R_2</div>
			<div id="R_3">R_3</div>
			<div id="R_4">R_4</div>
			<div id="R_5">R_5</div>
			<div id="R_6">R_6</div>
			<div id="R_7">R_7</div>
		</div>
(4)C盒子的继续划分
html
		<div id="C">
			<div id="C_1">
				<div id="C_1_1">C_1_1</div>
				<div id="C_1_2">C_1_2</div>
				<div id="C_1_3">C_1_3</div>
			</div>

			<div id="C_2">
				<div id="CU">CU</div>
				<div id="CYE">
					<div id="CY" >
						<p>CY</p>
					</div>
					<div id="CE">
						<p>CE</p>
					</div>
				</div>
			</div>

			<div id="C_3">
				<div id="CC">CC</div>
				<div id="CST">
					<div id="CS" >
						<p>CS</p>
					</div>
					<div id="CT">
						<p>CT</p>
					</div>
				</div>
			</div>

			<div id="C_4">
				<div id="CD">CD</div>
				<div id="CFL">
					<div id="CF">
						<p>CF</p>
					</div>
					<div id="CL">
						<p>CL</p>
					</div>
				</div>
			</div>
		</div>
3、样式设置
(1)设置盒子浮动
css
			div {
				float: left;
			}
(2)宽度设置
设置L、C、R盒子的宽度为300px,设置其子盒子的宽度为300px。
css
			#L,
			#C,
			#R {
				width: 300px;
			}

			#L>div,
			#C>div,
			#R>div {
				width: 300px;
			}
(3)设置L盒子子盒子的样式
css
			#L_1 {
				height: 80px;
				background-color: lightblue;
			}

			#L_2 {
				height: 300px;
				background-color: greenyellow;
			}

			#L_3 {
				height: 370px;
				background-color: yellow;
			}
(4)设置C盒子的子盒子的样式
-
设置第二层盒子的高度
css#C_2, #C_3, #C_4 { height: 200px; } #CU, #CC, #CD, #CYE, #CST, #CFL { width: 150px; } -
设置第三层盒子的宽高
css#C_1_1, #C_1_2, #C_1_3 { width: 100px; height: 150px; } -
设置第二层已划分好的盒子的背景色
css#C_1_1 { background-color: palevioletred; } #C_1_2 { background-color: pink; } #C_1_3 { background-color: plum; } #CU { height: 200px; background-color: lightcoral; } #CC { height: 200px; background-color: deeppink; } #CD { height: 200px; background-color: mediumpurple; } -
设置第三层盒子的样式及背景色
css#CY, #CE, #CS, #CT, #CF, #CL { border-top: 10px solid #0f9e20; background-color: orange; width: 150px; height: 90px; }
(5)设置R盒子的子盒子的样式
为每个盒子设置高度和背景色
css
#R_1_1,
#R_1_2 {
height: 200px;
width: 150px;
}
#R_1_1 {
background-color: lightblue;
}
#R_1_2 {
background-color: greenyellow;
}
#R_2 {
height: 100px;
background-color: lightyellow;
}
#R_3 {
height: 100px;
background-color: coral;
}
#R_4 {
height: 100px;
background-color: deeppink;
}
#R_5 {
height: 100px;
background-color: gray;
}
#R_6 {
height: 100px;
background-color: seagreen;
}
#R_7 {
height: 50px;
background-color: blue;
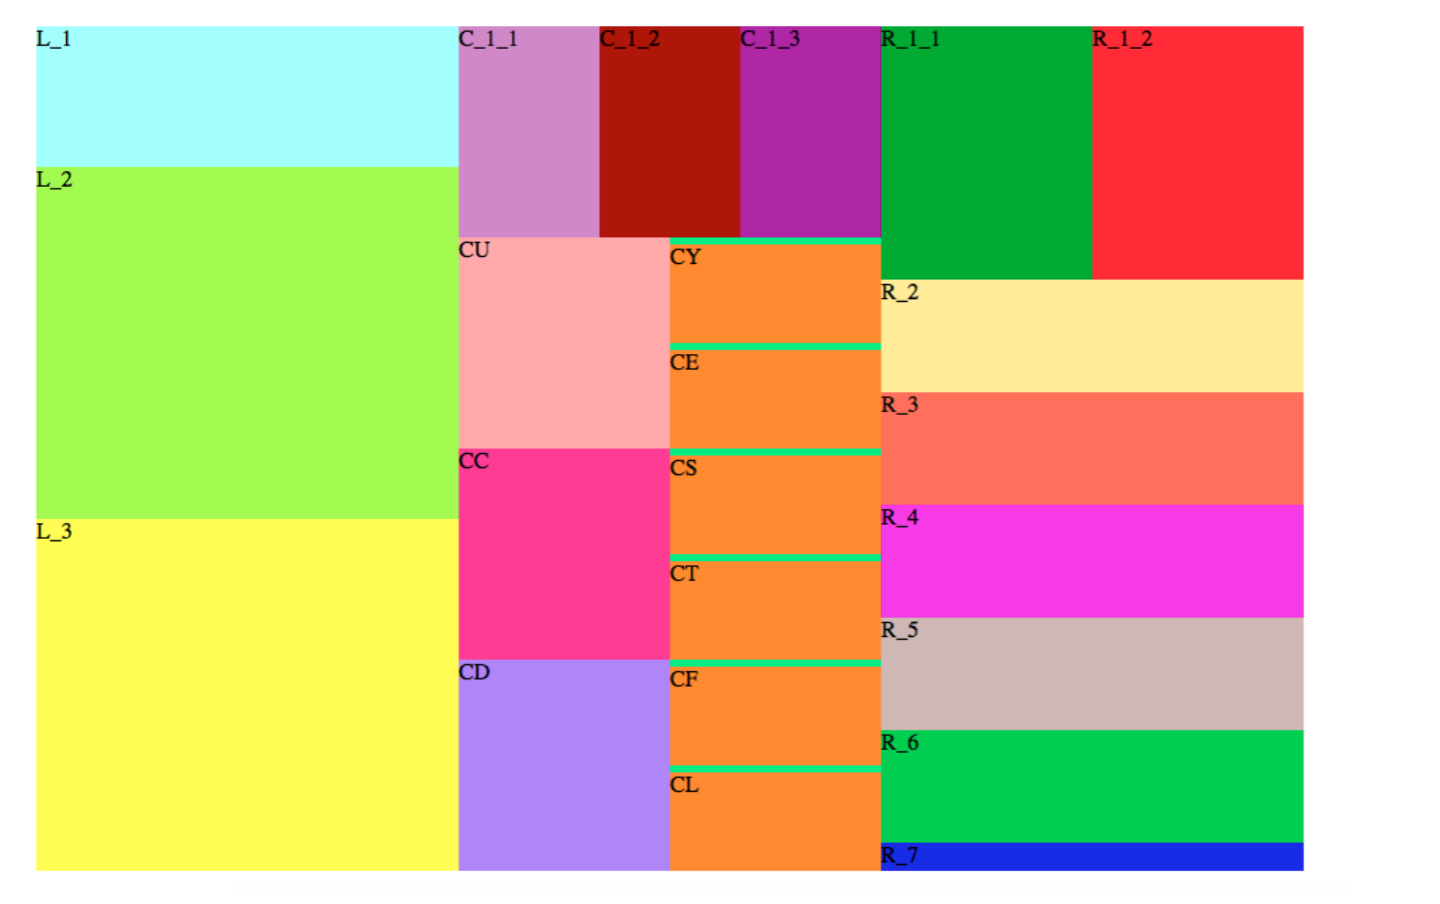
}四、效果展示