四层负载均衡
- 四层负载均衡:工作在传输层,只看「IP + 端口」转发,不解析内容,快且简单,适合数据库、SSH 等纯 TCP/UDP 流量;
- 七层负载均衡:工作在应用层,会解析 HTTP 等应用内容(如 URL、域名),能精细化转发和控制,适合 Web、API 等场景。
Nginx四层负载均衡配置测试
bash
需求:
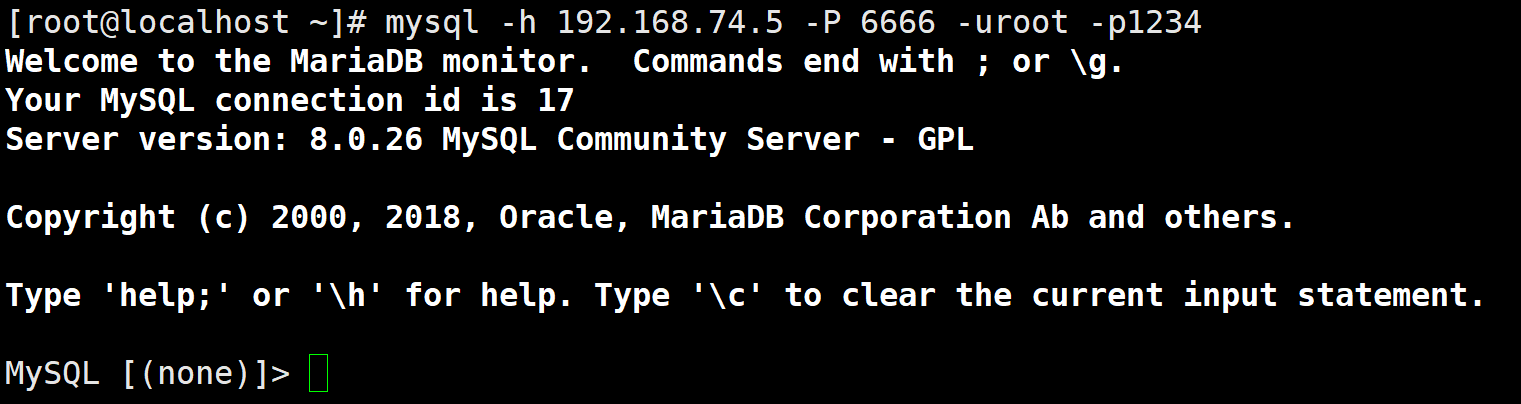
1通过访问负载均衡的5555端口,实际是后端的web01的22端口在提供服务
2通过访问负载均衡的6666端口,实际是后端的mysql的3306端口在提供服务
配置主配置文件在http区块外包含的语句
[root@siceng nginx]#grep conf.c nginx.conf
......
events {
worker_connections 1024;
}
include /etc/nginx/conf.c/*.conf;
http {
include /etc/nginx/mime.types;
default_type application/octet-stream;
log_format main '$remote_addr - $remote_user [$time_local] "$request" '
'$status $body_bytes_sent "$http_referer" '
'"$http_user_agent" "$http_x_forwarded_for"';
......
创建四层配置文件
[root@siceng nginx]#mkdir conf.c
[root@siceng nginx]#cd conf.c/
[root@siceng conf.c]# cat lb.conf
stream {
upstream web01 {
server 192.168.74.8:22;
}
upstream db01 {
server 192.168.74.7:3306;
}
server {
listen 5555;
proxy_pass web01;
}
server {
listen 6666;
proxy_pass db01;
}
}此时用跳板机访问5的5555端口会直接访问8的22端口

此时访问5的6666端口会直接访问7的3306数据库
四层转发七层配置
"四层入口负载均衡 → 七层负载均衡 → 后端应用服务器" 的经典多层架构,核心优势是:四层负责高并发流量分发(高效),七层负责应用层精细化控制(灵活),适合中大型集群场景
bash
[root@siceng conf.c]# cat lb.conf
stream {
	upstream webs {
	server 192.168.74.61:80 weight=4;
	server 192.168.74.62:80 weight=5 down;
	}

	server {
	listen 80;
	proxy_pass webs;
	}
}
tomcat图片分离
步骤一:下载安装启动tomcat
1:下载tomcat安装包到本地,并解压到指定目录
bash
wget https://dlcdn.apache.org/tomcat/tomcat-10/v10.1.49/bin/apache-tomcat-10.1.49.tar.gz --no-check-certificate

tar xf apache-tomcat-10.1.49.tar.gz -C /usr/local/
2:创建软连接,安装运行环境java(8.0以上版本)
bash
yum install java-11-openjdk-devel -y3:启动tomcat服务,查看8080端口
bash
/usr/local/tomcat/bin/startup.sh
netstat -tunlp|grep 8080
步骤二:nginx实现代理tomcat进行图片拆分
web02配置反向代理到自身的8080端口
bash
[root@web02 conf.d]# cat proxy.conf
upstream tom {
server 192.168.74.8:8080;
}
server {
listen 80;
server_name test.tomcat.com;
location / {
proxy_pass http://tom;
}
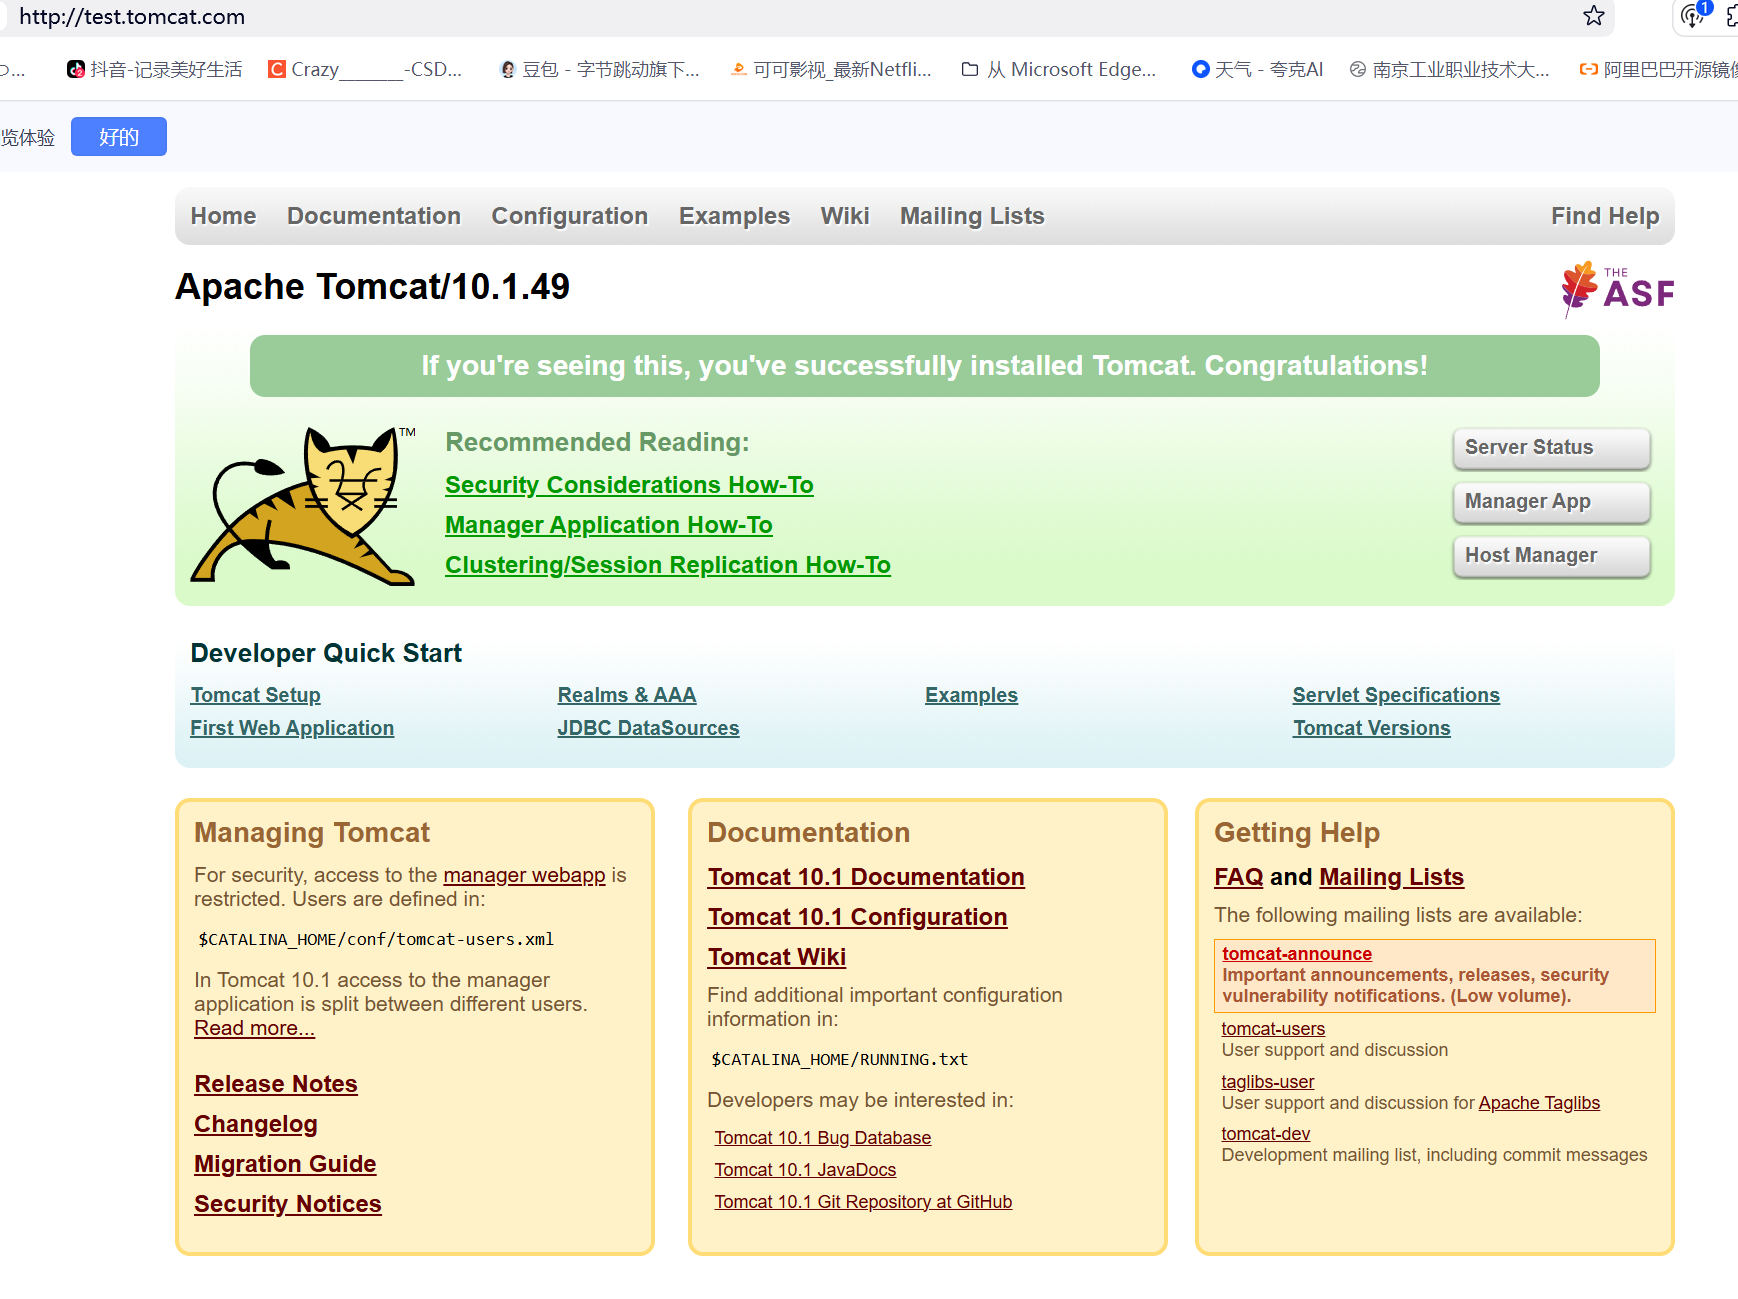
}此时访问192.168.74.8,就相当于访问192.168.74.8:8080
通过配置Nginx反向代理的locatoin,将tomcat的图片拆分
bash
[root@web02 conf.d]# cat proxy.conf
upstream tom {
  server 192.168.74.8:8080;
}

server {
  listen 80;
  server_name test.tomcat.com;

location / {
  proxy_pass http://tom;
   }

# 如果访问.png.jpg...结尾的请求,则直接通过/code/images/返回给用户
location ~* \.(png|jpg|svg|mp4|mp3)$ {
  root /code/imagess;
     }

}
由于现在还没有创建代码目录,所以访问tomcat网页时无法加载图片
创建代码目录,并把图片文件放进去,即可正常显示资源
bash
mkdir imagess
cd /usr/local/tomcat/webapps/ROOT
cp *.svg *.png /code/imagess/
chown -R www.www /code/imagess/
systemctl restart nginx
通过负载均衡实现动静分离
1.配置WEB01的静态页面
bash
[root@web01 conf.d]# cat static.conf
server {
  listen 80;
  server_name static.com;

    location / {
      root /code/test01;
      index index.html;
}
    location ~* .*\.(jpg|png|gif)$ {
      root /code/images;
   }

}

创建代码目录,记得注意权限属主属组要对上
[root@web01 conf.d]#mkdir /code/images
[root@web01 conf.d]#cd /code/images
自己上传一张图片,命名为a.png
2.配置WEB02的动态资源
bash
部署Tomcat
[root@web02 ~]#cd /usr/local/tomcat/webapps/ROOT/
[root@web02 ROOT]#cat test.jsp
<%@ page language="java" import="java.util.*" pageEncoding="utf-8"%>
<HTML>
<HEAD>
<TITLE>oldboy JSP Page</TITLE>
</HEAD>
<BODY>
<%
Random rand = new Random();
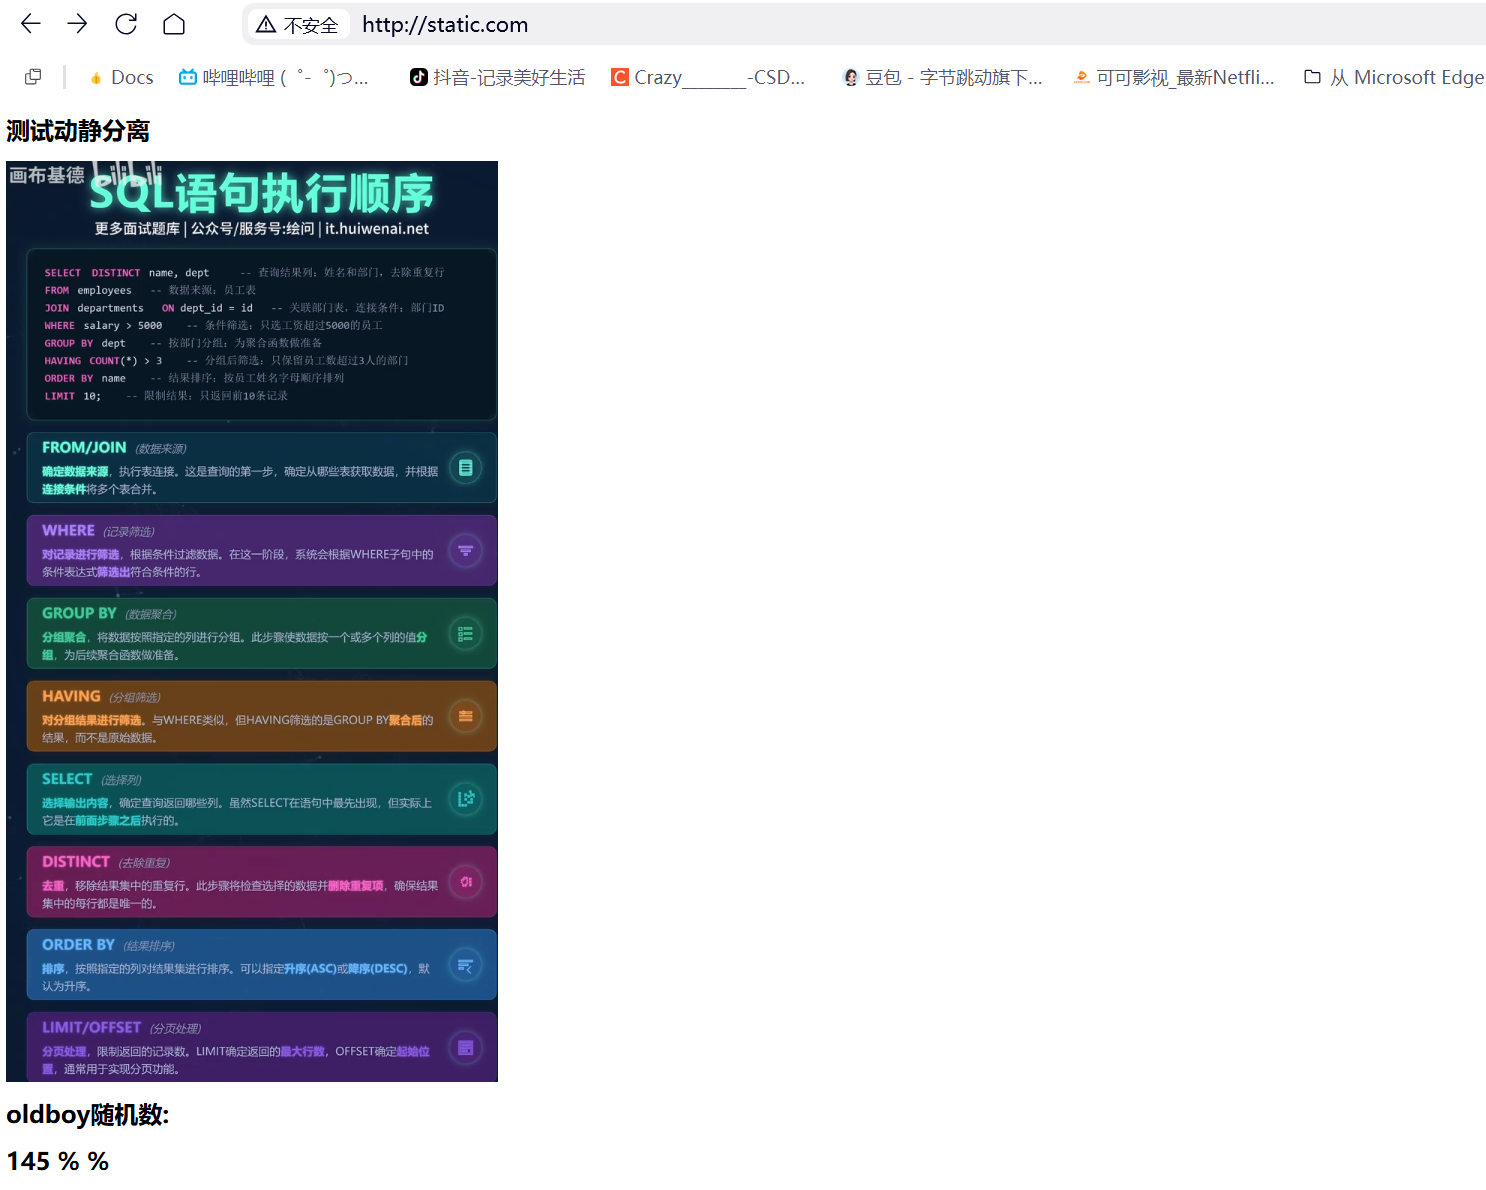
out.println("<h1>oldboy随机数:<h1>");
out.println(rand.nextInt(99)+100);
%>
</BODY>
</HTML>3.负载均衡集成动态和静态页面
bash
[root@localhost conf.d]# cat test.conf
upstream static {
  server 192.168.74.7:80;
}

upstream java {
  server 192.168.74.8:8080;
}

server {
  listen 80;
  server_name static.com;
  root /code/;
  index index.html;

  location ~* \.(jpg|png|gif)$ {
    proxy_pass http://static;
    proxy_set_header Host $http_host;
}

  location ~ \.jsp {
    proxy_pass http://java;
    proxy_set_header Host $http_host;
  }
}
4.创建代码目录:集成动静态数据
bash
[root@lb01 conf.d]#mkdir /code
[root@lb01 conf.d]#cat /code/index.html
<html lang="en">
<head>
<meta charset="UTF-8" />
<title>测试ajax和跨域访问</title>
<script src="http://apps.bdimg.com/libs/jquery/2.1.1/jquery.js"></script>
</head>
<script type="text/javascript">
$(document).ready(function(){
$.ajax({
type: "GET",
url: "http://static.com/test.jsp",
success: function(data){
$("#get_data").html(data)
},
error: function() {
alert("哎呦喂,失败了,回去检查你服务去~");
}
});
});
</script>
<body>
<h1>测试动静分离</h1>
<img src="http://static.com/a.png">
<div id="get_data"></div>
</body>
</html>
完成后访问: static.com 访问首页
部署业务中遇到的问题
1 AJAX 请求失败,很可能是跨域问题, 即index.html是在http://192.168.74.7(或其他域名)下访问,而请求的是http://www.static.com,则属于跨域,会被拦截。
2 百度CDN jquery 地址导入错误,导致网页无法正常打开
3 相关代码文件需要修改nginx属主数组
通过客户端信息(UA)调度到不同的代码
1.WEB01部署三个静态页面
bash
[root@web01 conf.d]# cat sj.conf
server {
listen 9090;
location / {
root /code/android;
index index.html;
}
}
server {
listen 9091;
location / {
root /code/iphone;
index index.html;
}
}
server {
listen 9092;
location / {
root /code/pc;
index index.html;
}
}
[root@web01 conf.d]# mkdir /code/{android,iphone,pc}
[root@web01 conf.d]# echo 您是用安卓手机访问的页面.... > /code/android/index.html
[root@web01 conf.d]# echo 您是用苹果手机访问的页面.... > /code/iphone/index.html
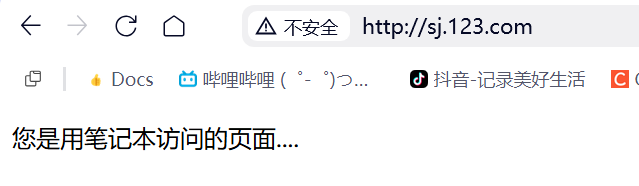
[root@web01 conf.d]# echo 您是用笔记本访问的页面.... > /code/pc/index.html
[root@web01 conf.d]#chown -R www:www android/ iphone/ pc/
[root@web01 conf.d]#chmod -R 755 android/ iphone/ pc/2.负载均衡判断客户来源信息转发到不同的业务
bash
[root@localhost conf.d]# cat sj.conf
upstream android {
  server 192.168.74.7:9090;
}

upstream iphone {
  server 192.168.74.7:9091;
}

upstream pc {
  server 192.168.74.7:9092;
}

server {
  listen 80;
  server_name sj.123.com;
  charset 'utf-8';

location / {
#如果客户端来源是Android则跳转到Android的资源;
if ($http_user_agent ~* "Android") {
  proxy_pass http://android;
}

#如果客户端来源是Iphone则跳转到Iphone的资源;
if ($http_user_agent ~* "Iphone") {
  proxy_pass http://iphone;
}

#如果客户端是IE浏览器则返回403错误;
if ($http_user_agent ~* "MSIE") {
  return 403;
}

#默认跳转pc资源;
  proxy_pass http://pc;
}
}
浏览器访问测试: sj.123.com
这是我的个人学习笔记,主要用于记录自己对知识点的理解和梳理。由于目前仍在学习探索阶段,内容中难免存在理解偏差或表述疏漏,恳请各位大佬不吝赐教,多提宝贵意见~ 若有不同看法,欢迎理性交流探讨,感谢包容与指正!