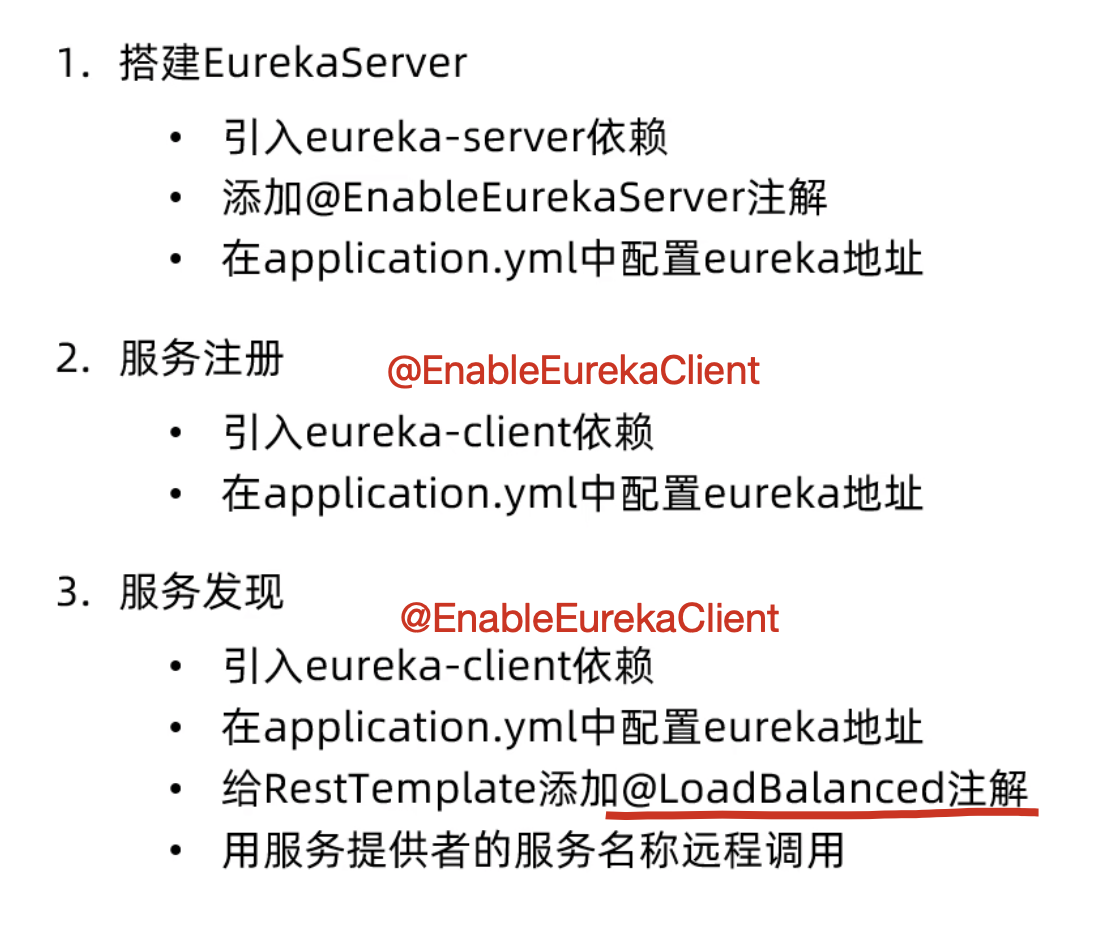
一、搭建Eureka Server(服务注册中心)
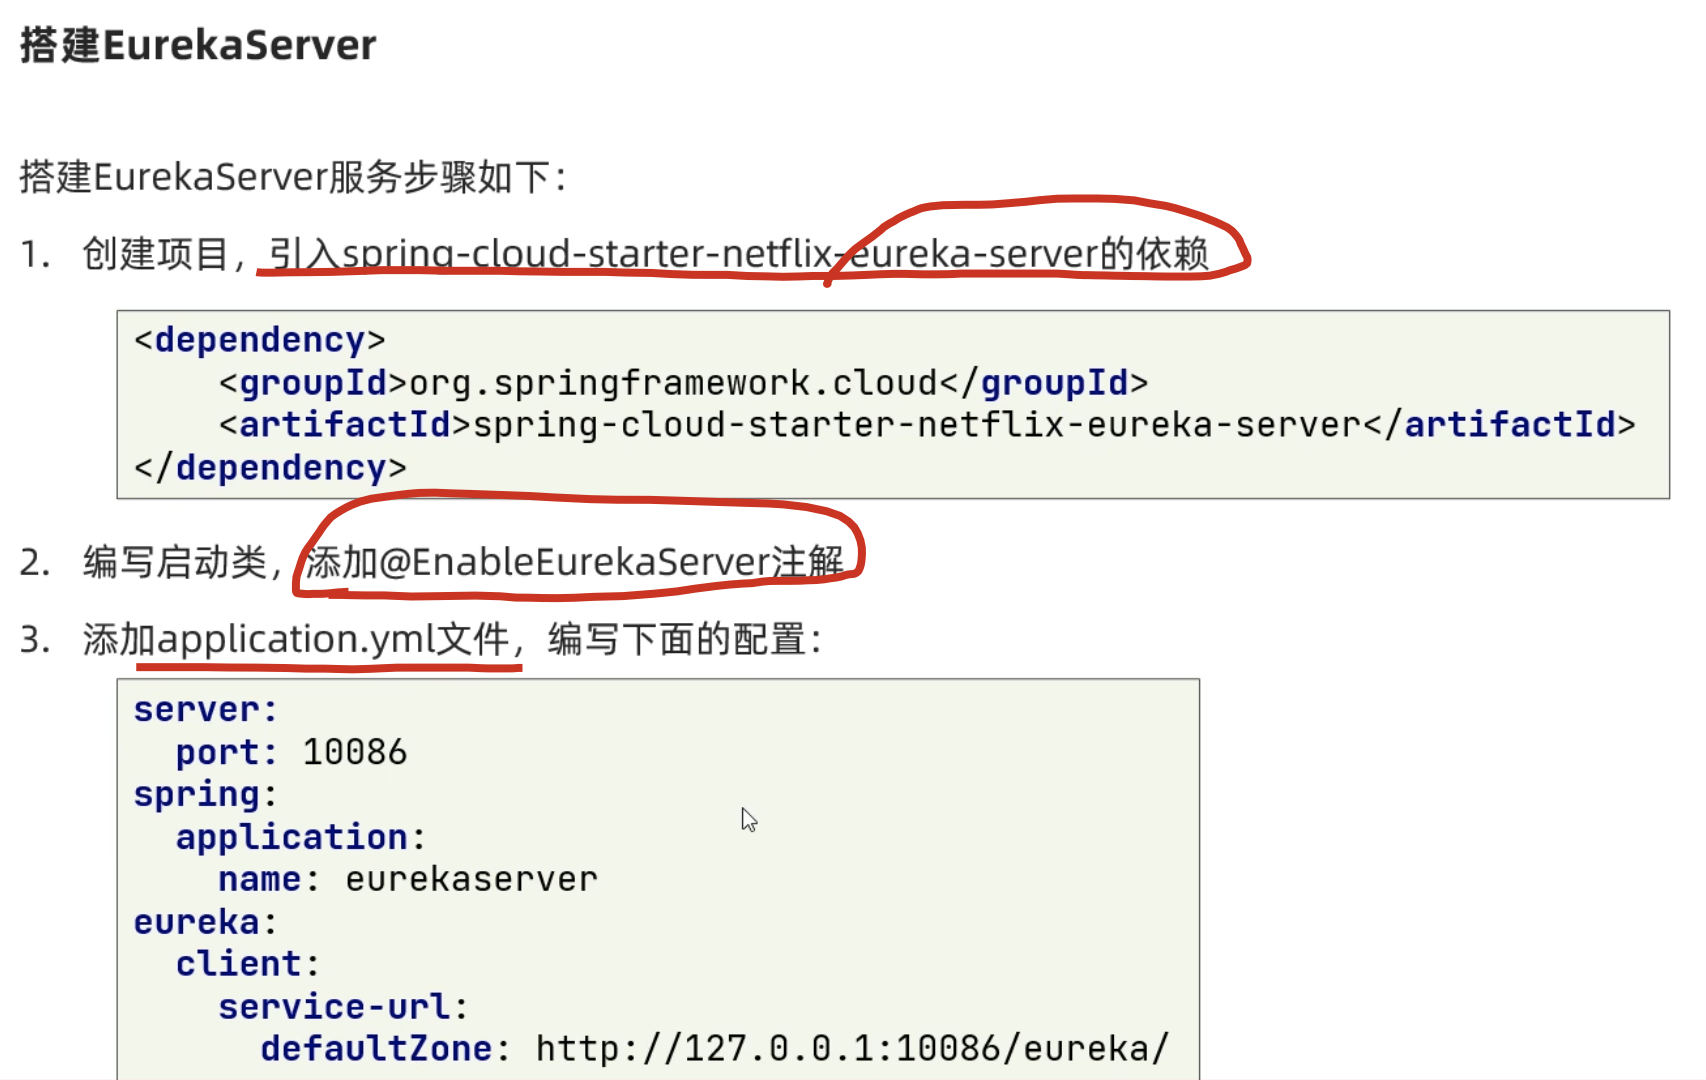
1. 创建Spring Boot项目
使用Spring Boot项目生成工具或IDE创建一个新的Spring Boot项目。
2. 添加依赖
在pom.xml文件中添加Spring Cloud和Eureka Server的依赖:
XML
<parent>
    <groupId>org.springframework.boot</groupId>
    <artifactId>spring-boot-starter-parent</artifactId>
    <version>2.7.0</version>
    <relativePath/> <!-- lookup parent from repository -->
</parent>

<dependencyManagement>
    <dependencies>
        <dependency>
            <groupId>org.springframework.cloud</groupId>
            <artifactId>spring-cloud-dependencies</artifactId>
            <version>2021.0.1</version>
            <type>pom</type>
            <scope>import</scope>
        </dependency>
    </dependencies>
</dependencyManagement>

<dependencies>
    <!-- Spring Boot Web starter -->
    <dependency>
        <groupId>org.springframework.boot</groupId>
        <artifactId>spring-boot-starter-web</artifactId>
    </dependency>

    <!-- Eureka Server -->
    <dependency>
        <groupId>org.springframework.cloud</groupId>
        <artifactId>spring-cloud-starter-netflix-eureka-server</artifactId>
    </dependency>
</dependencies>
3. 创建启动类
创建Eureka Server的启动类,并添加@EnableEurekaServer注解:
java
package com.example.eureka;

import org.springframework.boot.SpringApplication;
import org.springframework.boot.autoconfigure.SpringBootApplication;
import org.springframework.cloud.netflix.eureka.server.EnableEurekaServer;

@SpringBootApplication
@EnableEurekaServer
public class EurekaServerApplication {
    public static void main(String[] args) {
        SpringApplication.run(EurekaServerApplication.class, args);
    }
}
4. 配置application.yml
在src/main/resources目录下创建或修改application.yml文件:
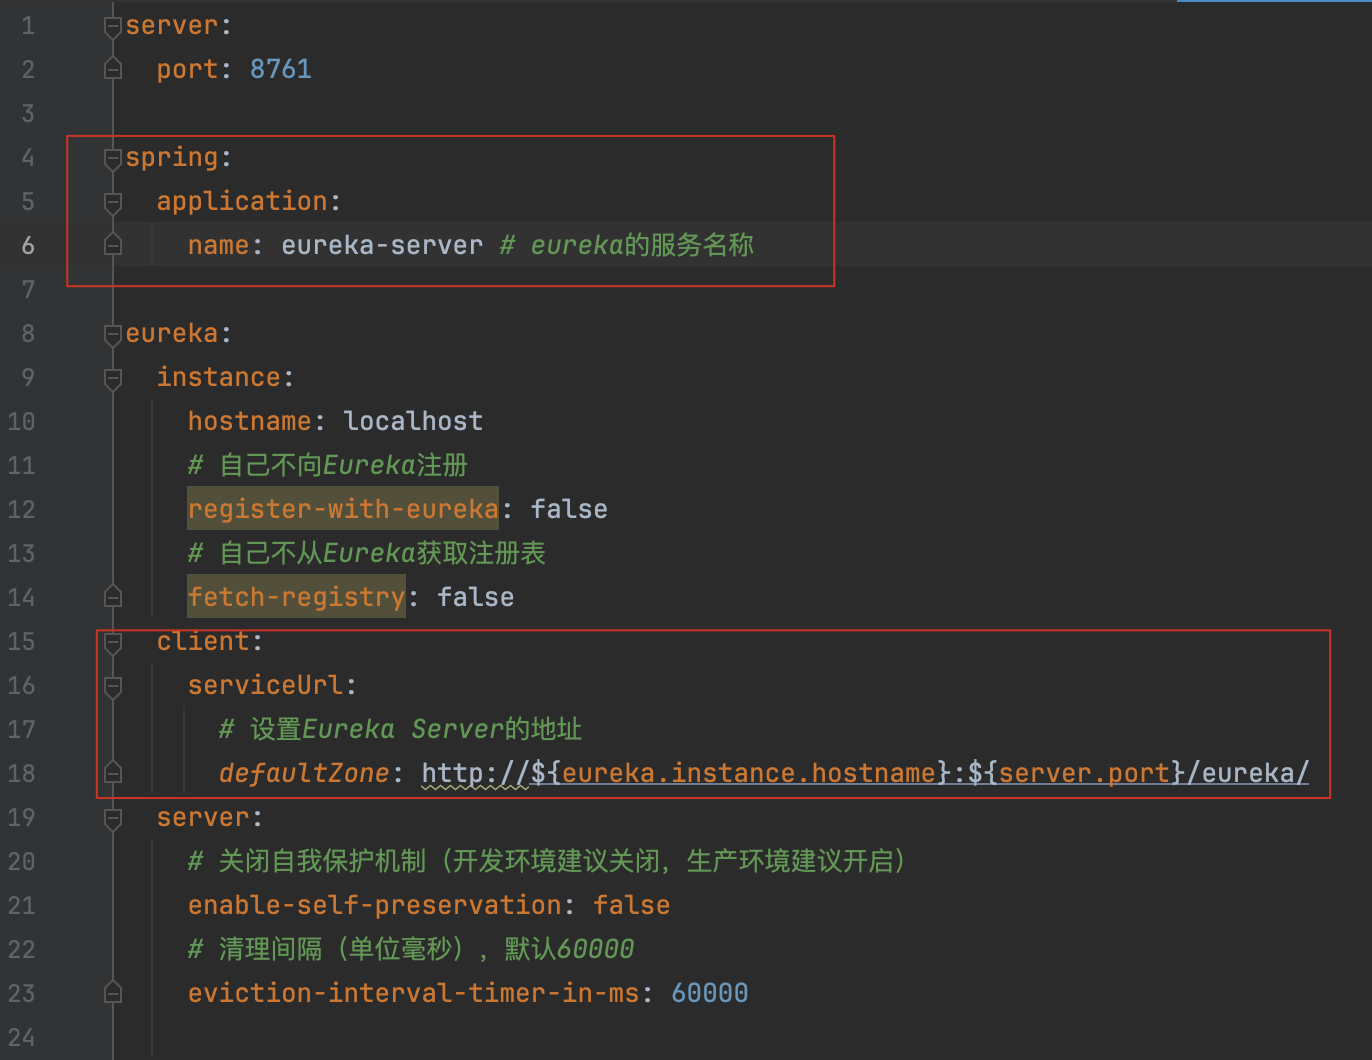
eureka.client,serviceUrl.defaultZone,配置的是eureka-server自己的地址,在单机模式下,这个配置实际上没有作用!
defaultZone的完整含义是:"当前服务应该向哪个Eureka Server注册"
5. 启动Eureka Server
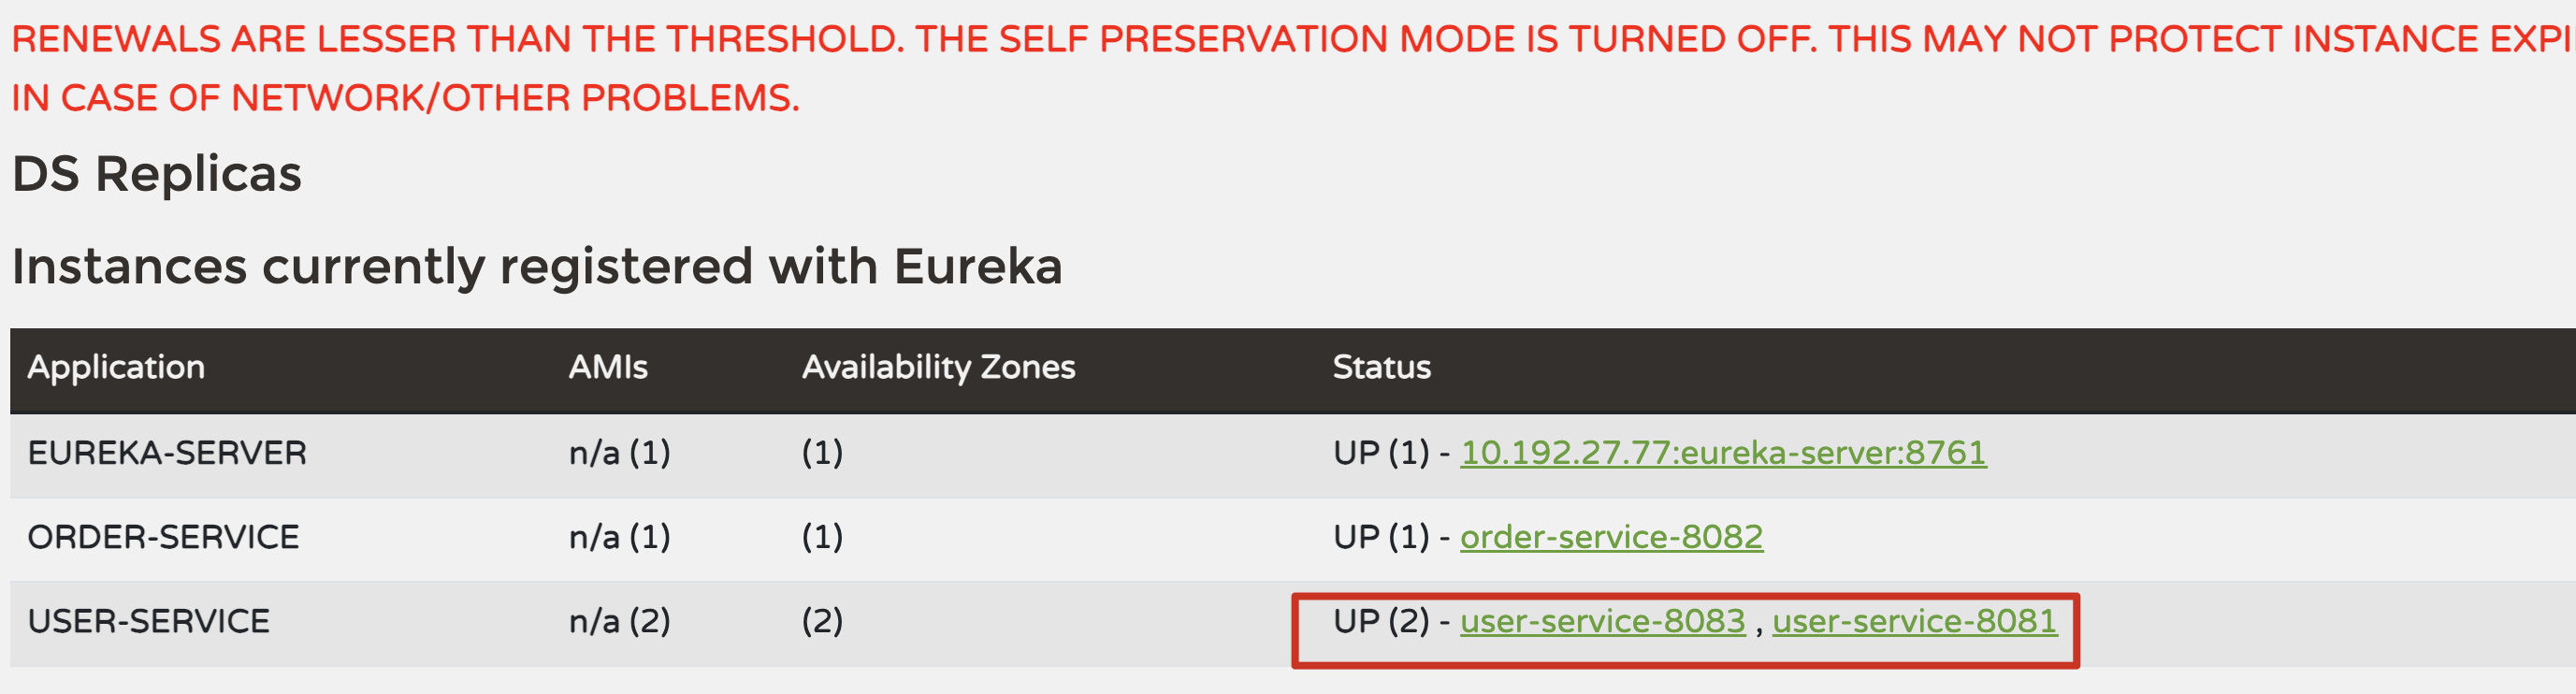
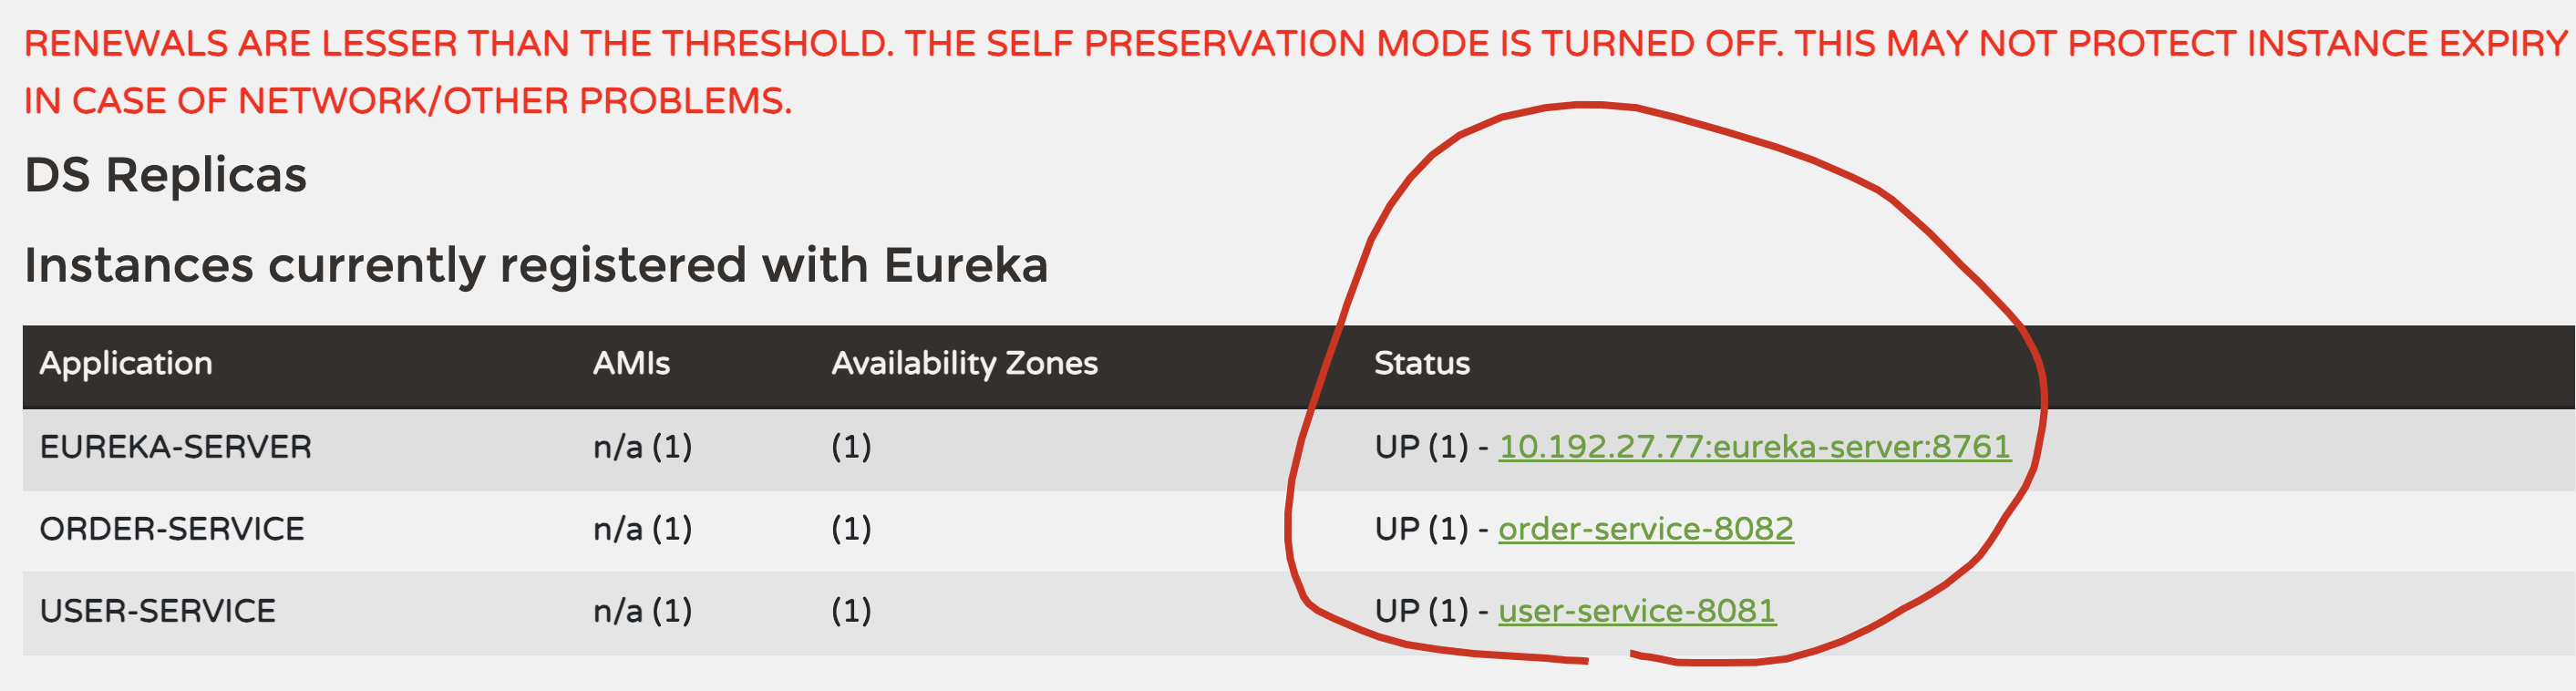
运行启动类,然后访问http://localhost:8761就可以看到Eureka Server的管理界面。
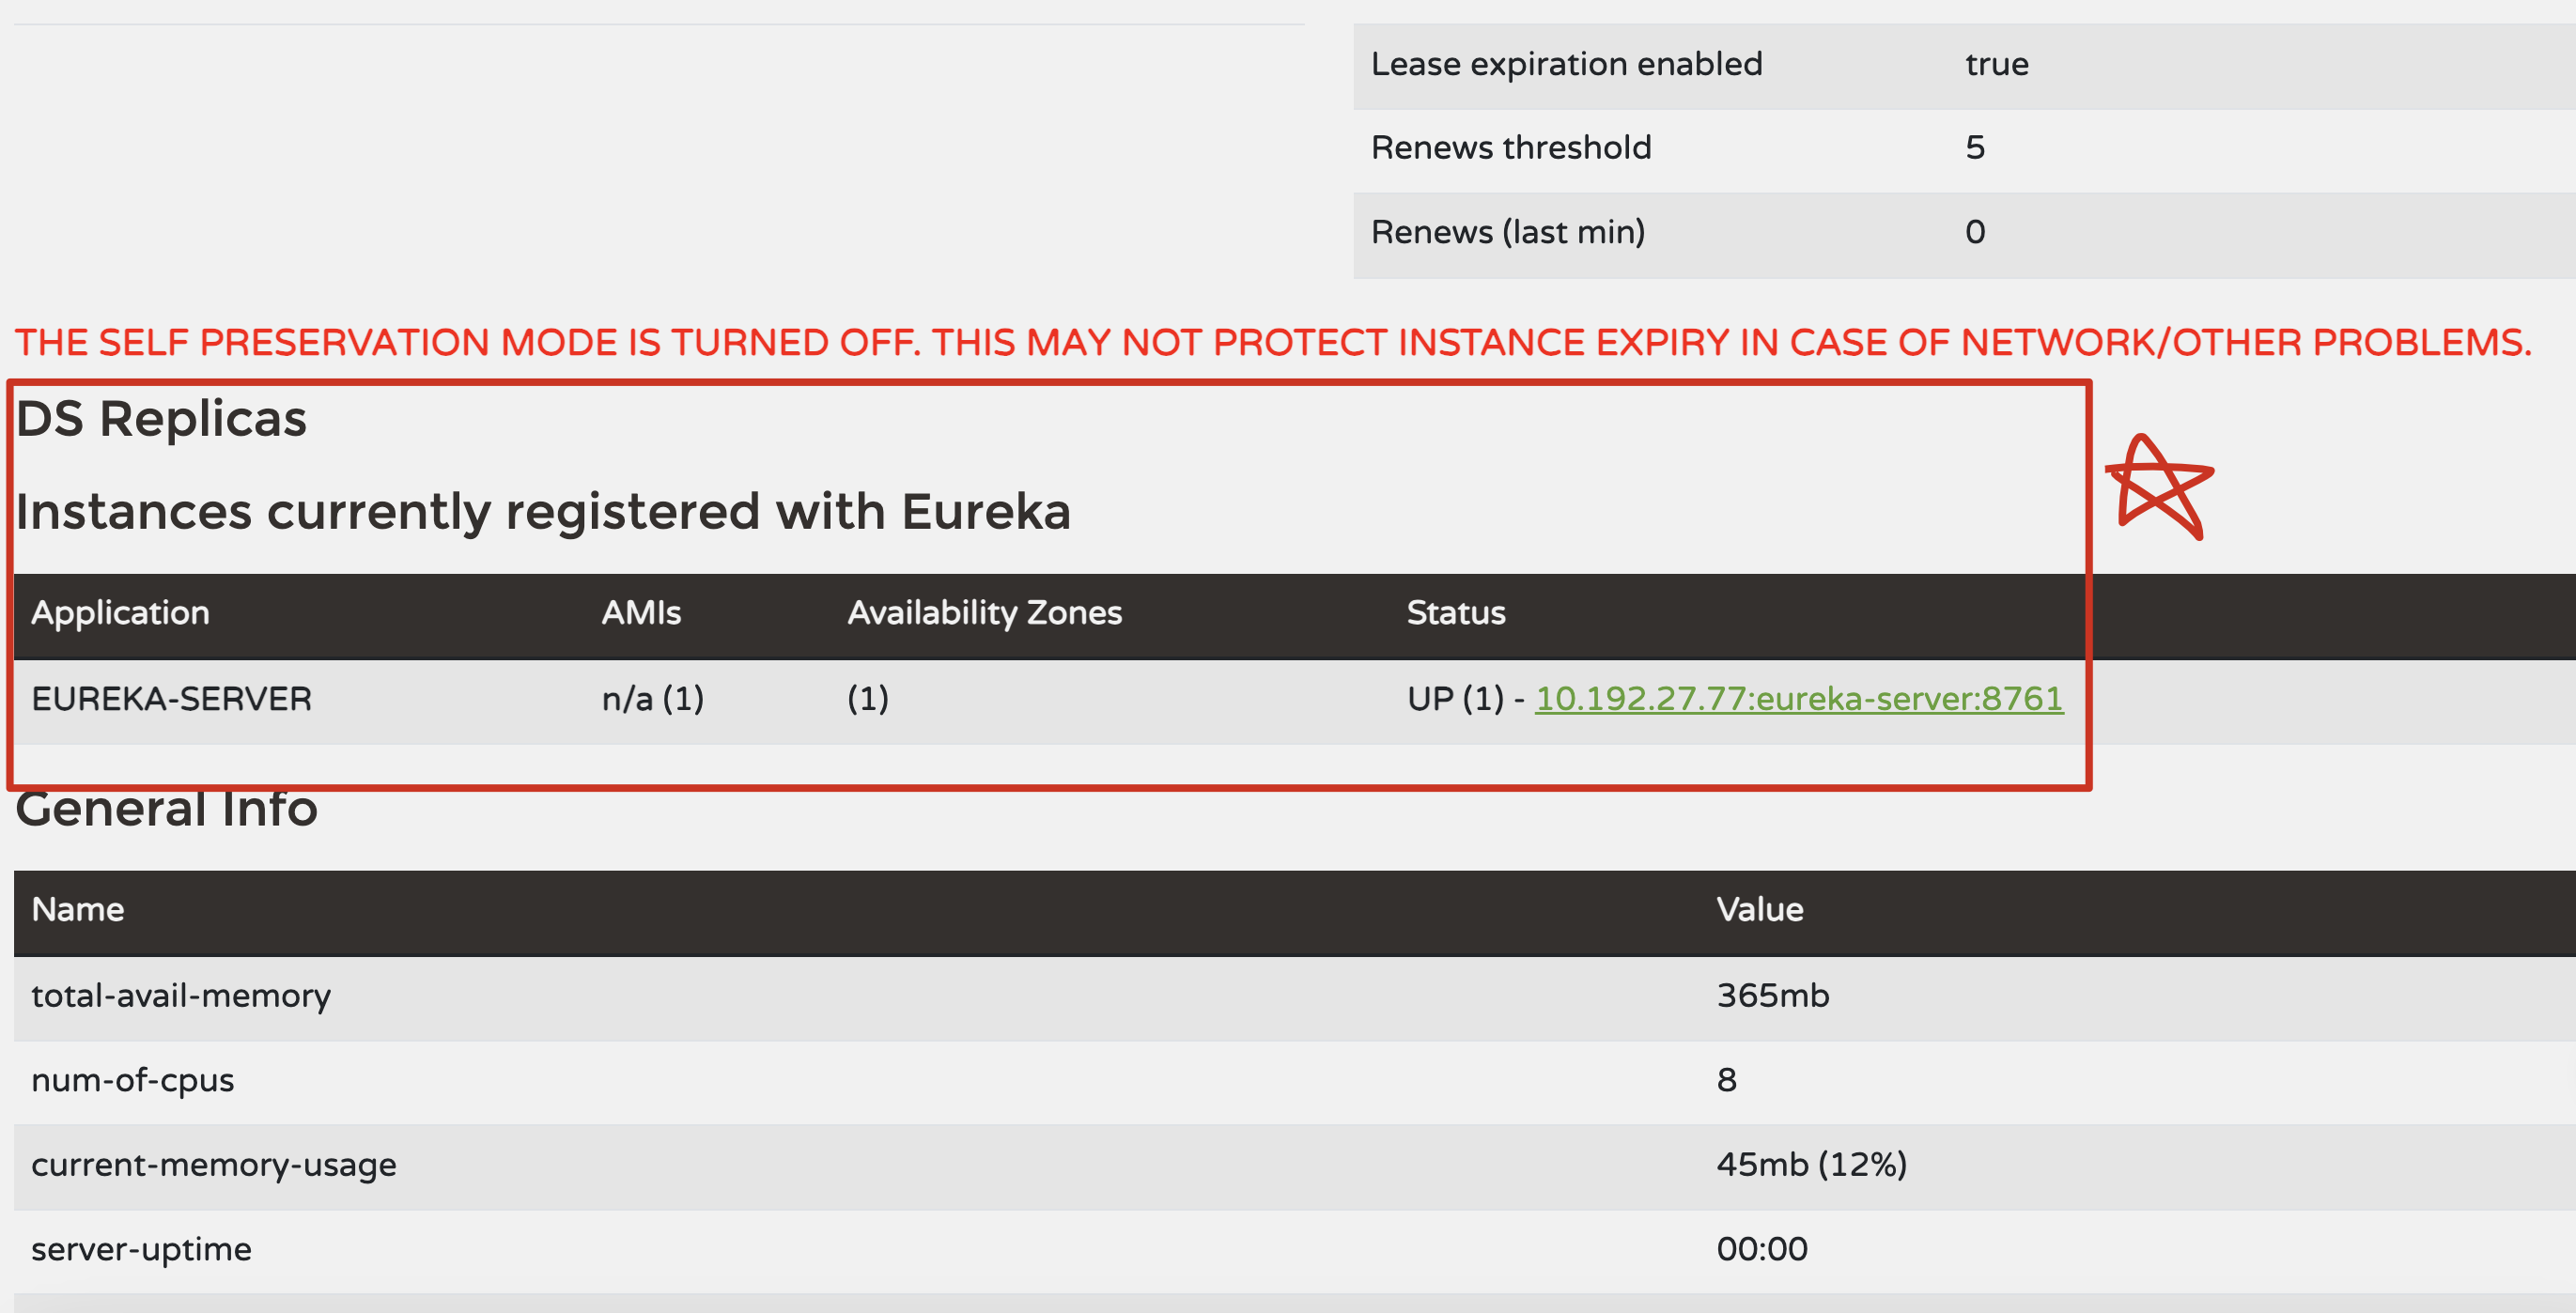
服务的实例列表,status: up是正常启动了,down就是挂了。
6、小结
7、Eureka defaultZone配置详解
(1)问题分析
为什么Eureka Server要配置自己的地址作为defaultZone?
这看起来很奇怪:自己的Eureka Server为什么还要指向自己?
(2)defaultZone的真正含义
defaultZone的完整含义是:"当前服务应该向哪个Eureka Server注册"
用一张表格来说明:
| 组件 | defaultZone的作用 | 配置示例 |
|---|---|---|
| Eureka Client(如user-service) | 告诉自己应该向哪个Eureka Server注册 | http://localhost:8761/eureka/ |
| Eureka Server | 这是一个特殊情况,下面详细说明 | 取决于是单机还是集群 |
情况1:Eureka Server单机部署
当你只有一个Eureka Server时,配置应该是:
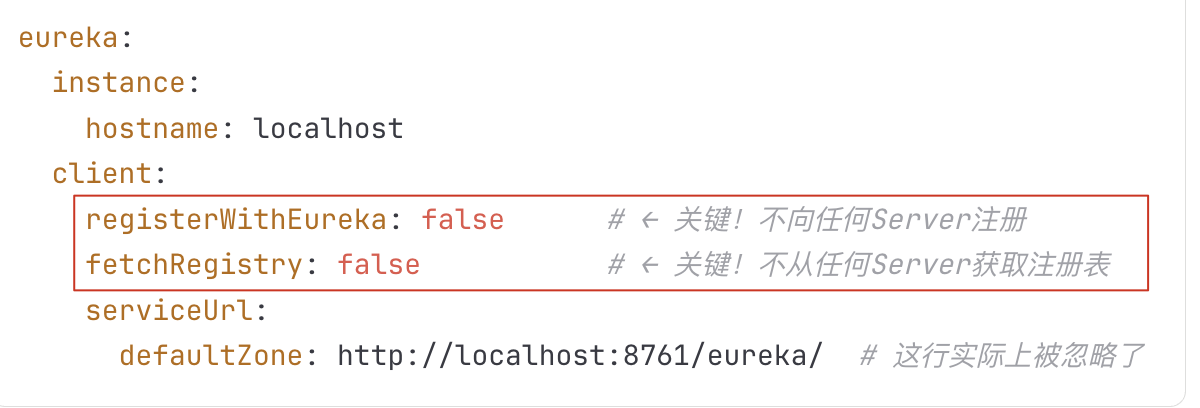
解释:
registerWithEureka: false表示"我自己不注册"fetchRegistry: false表示"我不从其他地方获取注册表"- 因为前两个都是false,所以
defaultZone这行实际上没有作用,可以写也可以不写
情况2:Eureka Server集群部署(这是重要的!)
当你有多个Eureka Server 时,它们之间需要相互注册和同步数据。
假设你有3个Eureka Server:
| 实例 | 端口 | 主机名 |
|---|---|---|
| Server1 | 8761 | eureka1.example.com |
| Server2 | 8762 | eureka2.example.com |
| Server3 | 8763 | eureka3.example.com |
Server1的配置
bash
server:
  port: 8761

spring:
  application:
    name: eureka-server

eureka:
  instance:
    hostname: eureka1.example.com
    register-with-eureka: true      # ← 改为true!注册到其他Server
    fetch-registry: true            # ← 改为true!从其他Server获取数据
  client:
    serviceUrl:
      # Server1向Server2和Server3注册
      defaultZone: http://eureka2.example.com:8762/eureka/,http://eureka3.example.com:8763/eureka/
  server:
    enable-self-preservation: false
Server2的配置
bash
server:
  port: 8762

spring:
  application:
    name: eureka-server

eureka:
  instance:
    hostname: eureka2.example.com
    register-with-eureka: true
    fetch-registry: true
  client:
    serviceUrl:
      # Server2向Server1和Server3注册
      defaultZone: http://eureka1.example.com:8761/eureka/,http://eureka3.example.com:8763/eureka/
  server:
    enable-self-preservation: false
Server3的配置
bash
server:
  port: 8763

spring:
  application:
    name: eureka-server

eureka:
  instance:
    hostname: eureka3.example.com
    register-with-eureka: true
    fetch-registry: true
  client:
    serviceUrl:
      # Server3向Server1和Server2注册
      defaultZone: http://eureka1.example.com:8761/eureka/,http://eureka2.example.com:8762/eureka/
  server:
    enable-self-preservation: false
关键点:
- 每个Server都配置
register-with-eureka: true - 每个Server都配置
fetch-registry: true - 每个Server的
defaultZone指向其他的Server(不是自己) - 这样形成一个集群,Server之间相互同步数据
情况3:你看到的配置(官方示例中)
在很多官方文档或教程中,你会看到Eureka Server的配置是这样的:
bash
eureka:
  instance:
    hostname: localhost
  client:
    registerWithEureka: false
    fetchRegistry: false
    serviceUrl:
      defaultZone: http://${eureka.instance.hostname}:${server.port}/eureka/
这是为什么?
这其实是一个保险起见 的配置方式。即使你设置了 registerWithEureka: false,也还是指定了defaultZone。
这样做的好处是:
- 如果以后想改成集群模式,只需要改一下
registerWithEureka和fetchRegistry的值,不需要改defaultZone - 具有前向兼容性
总结
| 配置项 | 单机模式 | 集群模式 |
|---|---|---|
registerWithEureka |
false |
true |
fetchRegistry |
false |
true |
defaultZone |
指向自己(实际不用) | 指向其他Server |
| 作用 | 简单、独立 | 高可用、容错 |
你看到的配置:
bash
defaultZone: http://${eureka.instance.hostname}:${server.port}/eureka/这其实是在为将来的集群部署预留配置空间 。在单机模式下,因为 registerWithEureka: false,这行配置实际上不起作用。
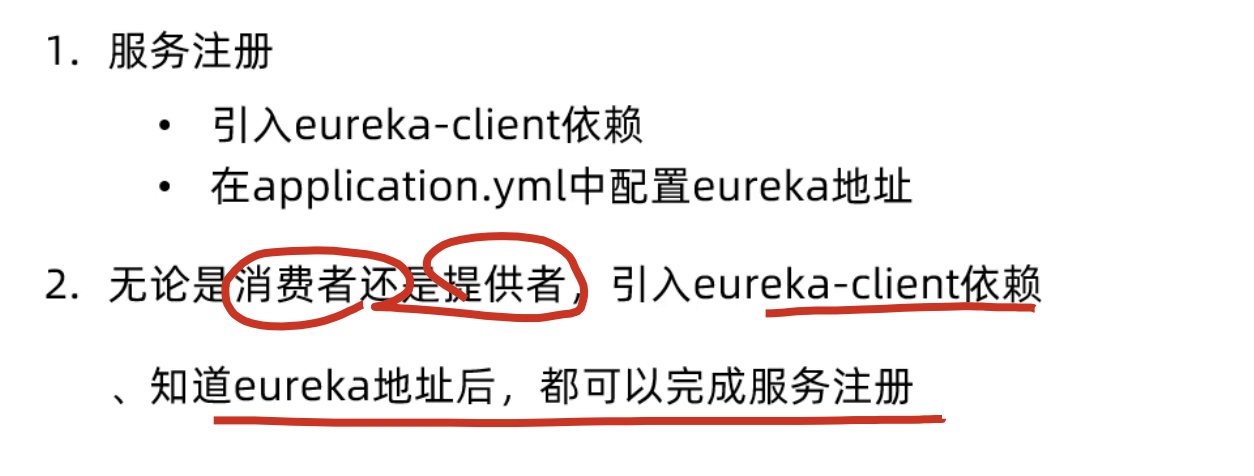
二、搭建Eureka Client(服务提供者user-service)
1. 创建Spring Boot项目
创建一个新的Spring Boot项目作为服务提供者。
2. 添加依赖
在pom.xml文件中添加Eureka Client的依赖:
XML
<parent>
    <groupId>org.springframework.boot</groupId>
    <artifactId>spring-boot-starter-parent</artifactId>
    <version>2.7.0</version>
    <relativePath/>
</parent>

<dependencyManagement>
    <dependencies>
        <dependency>
            <groupId>org.springframework.cloud</groupId>
            <artifactId>spring-cloud-dependencies</artifactId>
            <version>2021.0.1</version>
            <type>pom</type>
            <scope>import</scope>
        </dependency>
    </dependencies>
</dependencyManagement>

<dependencies>
    <!-- Spring Boot Web starter -->
    <dependency>
        <groupId>org.springframework.boot</groupId>
        <artifactId>spring-boot-starter-web</artifactId>
    </dependency>

    <!-- Eureka Client -->
    <dependency>
        <groupId>org.springframework.cloud</groupId>
        <artifactId>spring-cloud-starter-netflix-eureka-client</artifactId>
    </dependency>
</dependencies>
3. 创建启动类
创建Eureka Client的启动类,并添加@EnableEurekaClient注解:
java
package com.example.service;

import org.springframework.boot.SpringApplication;
import org.springframework.boot.autoconfigure.SpringBootApplication;
import org.springframework.cloud.netflix.eureka.EnableEurekaClient;

@SpringBootApplication
@EnableEurekaClient
public class UserServiceApplication {
    public static void main(String[] args) {
        SpringApplication.run(UserServiceApplication.class, args);
    }
}
4. 创建业务Controller
创建一个简单的Controller来提供服务:
java
package com.example.service.controller;

import org.springframework.beans.factory.annotation.Autowired;
import org.springframework.cloud.client.ServiceInstance;
import org.springframework.cloud.client.discovery.DiscoveryClient;
import org.springframework.web.bind.annotation.GetMapping;
import org.springframework.web.bind.annotation.RestController;

@RestController
public class UserController {

    @Autowired
    private DiscoveryClient discoveryClient;

    @GetMapping("/user/list")
    public String getUserList() {
        return "User list from service";
    }

    @GetMapping("/services")
    public Object getServices() {
        // 获取所有注册的服务
        return discoveryClient.getServices();
    }

    @GetMapping("/service-instance")
    public Object getServiceInstance() {
        // 获取user-service的所有实例
        return discoveryClient.getInstances("user-service");
    }
}
5. 配置application.yml
在src/main/resources目录下创建或修改application.yml文件:
bash
server:
  port: 8081

spring:
  application:
    name: user-service

eureka:
  client:
    serviceUrl:
      # 指定Eureka Server的地址
      defaultZone: http://localhost:8761/eureka/
  instance:
    # 优先使用IP地址而不是机器名
    prefer-ip-address: true
    # 实例的唯一标识
    instance-id: ${spring.application.name}-${server.port}
    # 心跳间隔(秒),默认30秒
    lease-renewal-interval-in-seconds: 30
    # 过期时间(秒),默认90秒,Eureka Server在90秒内没有收到心跳则将该实例删除
    lease-expiration-duration-in-seconds: 90
6. 启动Eureka Client
运行启动类,服务会自动注册到Eureka Server。访问http://localhost:8761可以看到该服务已注册。
7、小结

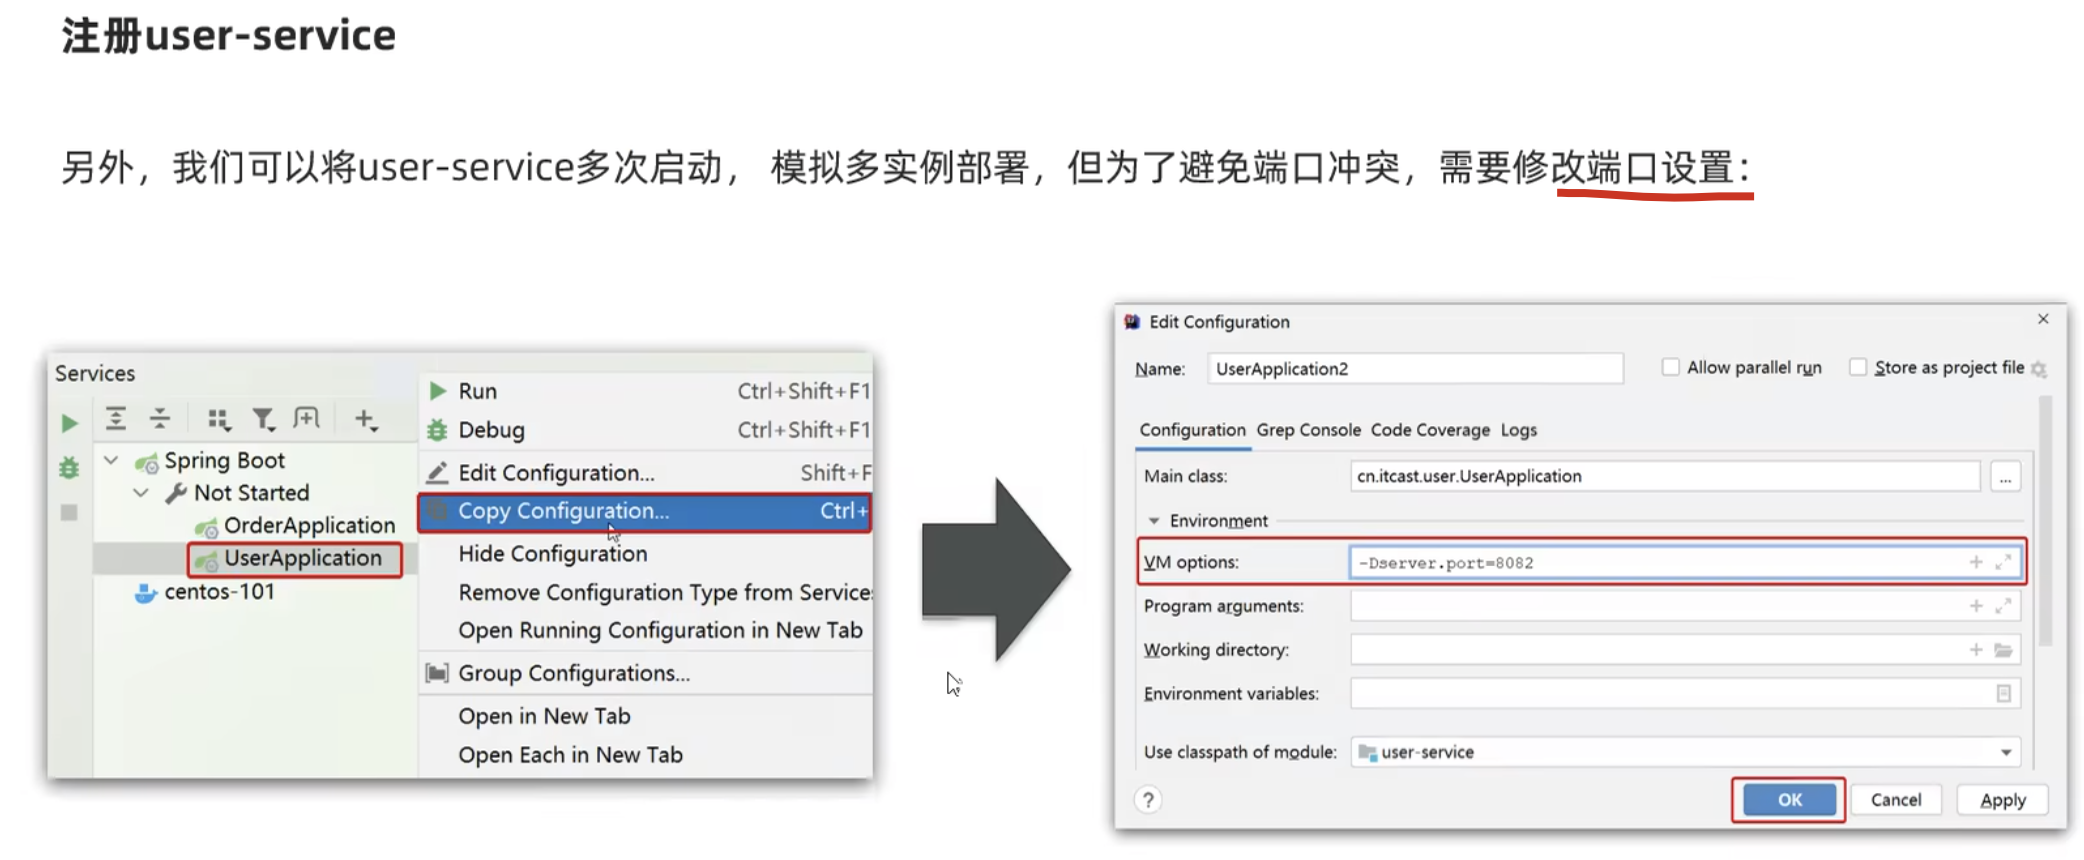
8、启动多次
三、搭建Eureka Client(服务消费者order-service)
1. 创建Spring Boot项目
创建另一个Spring Boot项目作为服务消费者。
2. 添加依赖
与服务提供者相同,添加Eureka Client和Ribbon(用于负载均衡)的依赖:
XML
<dependencies>
    <!-- Spring Boot Web starter -->
    <dependency>
        <groupId>org.springframework.boot</groupId>
        <artifactId>spring-boot-starter-web</artifactId>
    </dependency>

    <!-- Eureka Client -->
    <dependency>
        <groupId>org.springframework.cloud</groupId>
        <artifactId>spring-cloud-starter-netflix-eureka-client</artifactId>
    </dependency>

    <!-- Ribbon (负载均衡) -->
    <dependency>
        <groupId>org.springframework.cloud</groupId>
        <artifactId>spring-cloud-starter-netflix-ribbon</artifactId>
    </dependency>
</dependencies>
3. 创建启动类
java
package com.example.consumer;

import org.springframework.boot.SpringApplication;
import org.springframework.boot.autoconfigure.SpringBootApplication;
import org.springframework.cloud.netflix.eureka.EnableEurekaClient;
import org.springframework.context.annotation.Bean;
import org.springframework.web.client.RestTemplate;

@SpringBootApplication
@EnableEurekaClient
public class OrderServiceApplication {

    @Bean
    public RestTemplate restTemplate() {
        return new RestTemplate();
    }

    public static void main(String[] args) {
        SpringApplication.run(OrderServiceApplication.class, args);
    }
}
4. 创建业务Controller
创建一个Controller来调用其他服务:
java
package com.example.consumer.controller;

import org.springframework.beans.factory.annotation.Autowired;
import org.springframework.cloud.client.ServiceInstance;
import org.springframework.cloud.client.discovery.DiscoveryClient;
import org.springframework.web.bind.annotation.GetMapping;
import org.springframework.web.bind.annotation.RestController;
import org.springframework.web.client.RestTemplate;

import java.util.List;

@RestController
public class OrderController {

    @Autowired
    private RestTemplate restTemplate;

    @Autowired
    private DiscoveryClient discoveryClient;

    @GetMapping("/order/create")
    public String createOrder() {
        // 方式1:手动从Eureka获取服务信息
        List<ServiceInstance> instances = discoveryClient.getInstances("user-service");
        if (instances.isEmpty()) {
            return "user-service is not available";
        }
        ServiceInstance instance = instances.get(0);
        String url = String.format("http://%s:%s/user/list", instance.getHost(), instance.getPort());

        // 调用user-service
        String result = restTemplate.getForObject(url, String.class);
        return "Order created, user info: " + result;
    }

    @GetMapping("/order/create-ribbon")
    public String createOrderWithRibbon() {
        // 方式2:使用@LoadBalanced注解,RestTemplate会自动进行负载均衡
        String url = "http://user-service/user/list";
        String result = restTemplate.getForObject(url, String.class);
        return "Order created with Ribbon, user info: " + result;
    }
}
如果要使用Ribbon的负载均衡功能,需要修改启动类中的RestTemplate配置:
java
@Bean
@LoadBalanced  // 添加这个注解
public RestTemplate restTemplate() {
    return new RestTemplate();
}
【注意】:
要是不加=@LoadBalanced 这个注解,使用restTemplate调用服务名是不起作用的!但是调用ip + 端口号,是能成功的!
5. 配置application.yml
bash
server:
  port: 8082

spring:
  application:
    name: order-service

eureka:
  client:
    serviceUrl:
      defaultZone: http://localhost:8761/eureka/
  instance:
    prefer-ip-address: true
    instance-id: ${spring.application.name}-${server.port}
6. 启动Eureka Client
运行启动类,访问http://localhost:8761可以看到order-service也已注册。
四、测试Eureka服务
- 启动Eureka Server(8761端口)
- 启动user-service(8081端口)
- 启动order-service(8082端口)
- 访问
http://localhost:8761查看注册的服务 - 访问
http://localhost:8082/order/create-ribbon测试服务调用
这样就完成了一个简单的Eureka服务注册与发现的搭建。在实际项目中,可能还需要添加更多的配置和优化,如健康检查、熔断器、限流等。
五、小结